
INTRODUCTION P e a r l Section 1
R E S E R V A T I O N S 9.0 Pearl User Guide Section 1 INTRODUCTION 1 R E S E R V A T I O N S 9.0 User Guide Table of Contents 1. Introduction 1.1 System Requirements 1.2 Installation 1.3 Networking 1.4 Finding and Printing Records 1.5 Reservations 9.0 Overview 1.6 Security 1.7 Reporting Overview 2. Getting Started 2.1 Company Defaults 2.2 Data Entry Defaults 2.3 Guest Information 2.4 Point of Sale 2.5 Rooms and Rates 3. Running the Program 3.1 Guest Information 3.2 Rooms and Rates 3.3 Single Reservations 3.4 Group Reservations 3.5 Agent Reservations 3.6 Point of Sale 4. Integration 4.1 Accounting 4.2 Credit Cards 4.3 Availability OnlineTM 4.4 Point of Sale Hardware 5. File Maintenance 5.1 Saving a Master Copy 5.2 Backup Procedures 6. Reporting 6.1 Reporting Overview 6.2 Guest Reports 6.3 Reservation Reports 6.4 Marketing Reports 6.5 Shift Reports 6.6 The To-Do List 7. Customizing 7.1 Inserting Your Company Logo 7.2 Customize Layouts 7.3 More Customizations 8. Support 8.1 Support Options 2 9. Reservations Calendar 9.1 Opening the Calendar 9.2 Refreshing the Calendar 9.3 Navigating the Calendar 9.4 Viewing the Details of an Event 9.5 Calendar Views 9.6 Adding a Manual Event 9.7 Printing a Calendar View 10. Reservations GO! 10.1 Opening Reservations GO! 10.2 Guest Area 10.3 Reserve Area 10.4 Search Availability Area 10.5 Reports Area 11. Updating Reservations 11.1 Selecting the Correct Version 11.2 Updating from Version 7 or Version 8 11.3 Updating from Version 7 or Version 8 Single User 11.4 Upgrading from Version 9 Any Type 3 1.1 Minimum System Requirements MAC OS X • Intel based Macintosh computer • 1 GB RAM • CD or DVD drive and hard disk drive • Mac OS X 10.6 or Higher • (1024x768) or higher resolution display Windows XP or Higher • Pentium III 700 MHz or faster • 256 MB RAM (recommended 2 GB or higher) • Windows XP (SP3) or higher • CD or DVD drive and hard disk drive • (1024x768) or higher resolution display Additional Requirements • Multi-user version requires FileMaker Pro v12 or higher for each workstation. (This software is included in our multi-user bundle pricing.) • Email feature requires internet access with an email account. • Virtual Terminal requires PayPal™ or other merchant account. • Online reservations requires a paid subscription to Availability Online™. • iPOST™ plug-in, licensed for each user, for multi-users with an Availability Online™ account ($35). http://www.fmwebschool.com/ipost_web.php 4 1.2 Installation MAC SINGLE USERS • Use the link to download the file to your desktop. • Make a BACKUP of this file before opening it and keep this copy in a safe place, as this is your master copy of the software. • Double-click the file to 'unzip'. • Move the expanded folder to the preferred place you wish to store on your computer (if different than the desktop). • Open the folder and 'drag & drop' the 'ReservationsV9.app' file to the dock for easy launching (the largest file in the folder with an icon that looks like a folder). • Close the folder window and launch the program from the icon in the dock. • The first time you open the system, it will require you to enter the Registration codes, which were sent in a separate email. • Enter the codes and click the ‘I Agree’ box to continue exploring the software. MAC NETWORK USERS INSTALLING FROM AN ELECTRONIC LINK • Use the electronic link to download 2 files to your desktop. • Make a BACKUP of these files before opening and keep this copy in a safe place, as this is your master copy of the software. INSTALLING FROM A CD • Insert the CD into computer. • Open CD on your computer to see contents. NEXT INSTALL THE RESERVATION SYSTEM ON THE “HOST” COMPUTER • The ‘Host’ computer is the computer that will ‘serve’ the Reservation system, and should be the computer that will use the system the most and always have it open. Note: The host computer must have the Reservations 9.0 system open for network users to open it. • Move the ReservationsV9 to the computer that will be the ‘Host’, and remove it from the computer you downloaded it to (if different than the Host). • Launch the ReservationsV9 file by double-clicking it. • The first time you open the system, it will require you to enter the Registration codes, which were sent in a separate email. • Enter the codes and click the ‘I Agree’ box to continue exploring the software. NOTE: Before clicking ‘I Agree’, make sure that you set up your system for either Australia or the United States. For help on deciding which version to choose, hover your mouse over the blue font which says ‘Which should I choose?’ You can change this setting in the ‘Settings’ à ‘Company Defaults’ and ‘Accounting’ areas before you begin using the software, but altering it after you have entered rates will cause the rate lookups on the reservation screen to not look up properly. INSTALLING THE NETWORK SEATS ON EACH COMPUTER:• Double-click the “FMP_12.0Mac_full_ESD.dmg” file • Double-click the “FileMaker Pro 12” box to begin installation and follow the prompts to install. • When prompted for a License Key, enter the key code provided and your company name as the ‘User Name’. Enter ‘Compu-Books’ as the Organization. • Allow the installer to put an icon in your dock when it asks. • Close the folders on your desktop. 5 • Repeat these steps for each computer, using a separate key code for each installation. NETWORK USERS: • Additional users will connect to Reservations 9.0 by launching the FileMaker Pro software and then selecting ‘Remote’ (button). If the Reservation system is open on the Host computer, the network user will see a window with the host computer named in the left side, with the ReservationsV9 file named on the right side of the window. • Double-click the ReservationsV9 file to connect. WINDOWS SINGLE USERS • Use the link to download the file to your desktop. • Make a BACKUP of this file before opening it and keep this copy in a safe place, as this is your master copy of the software. • Double-click the file to 'unzip', this will leave an installer file on the desktop. • Double-click the installer file on your desktop to install the program. • Launch the program from the icon on your desktop or from the Start menu. • The first time you open the system, it will require you to enter the Registration codes, which were sent in a separate email. • Enter the codes and click the ‘I Agree’ box to continue exploring the software. WINDOWS NETWORK USERS INSTALLING FROM AN ELECTRONIC LINK • Use the electronic link to download 2 files to your desktop. • Make a BACKUP of these files before opening and keep this copy in a safe place, as this is your master copy of the software. INSTALLING FROM A CD • Insert the CD into computer. • Open CD on your computer to see contents. NEXT INSTALL THE RESERVATION SYSTEM ON THE “HOST” COMPUTER • The ‘Host’ computer is the computer that will ‘serve’ the Reservation system, and should be the computer that will use the system the most and always have it open. NOTE: The host computer must have the Reservations 9.0 system open for network users to connect to it. • Move the ReservationsV9 to the computer that will be the ‘Host’, and remove it from the computer you downloaded it to (if different than the Host). • Launch the ReservationsV9 file by double-clicking it. • The first time you open the system, it will require you to enter the Registration codes, which were sent in a separate email. • Enter the codes and click the ‘I Agree’ box to begin exploring the software INSTALLING THE NETWORK SEATS ON EACH COMPUTER: • Double-click the “FMP_12.0_full_ESD.exe” file. • Double-click the “FileMaker Pro 12” box to begin installation and follow the prompts to install. • When prompted for a License Key, enter the key code provided and your company name as the ‘User Name’. Enter ‘Compu-Books’ as the Organization. • Allow the installer to put an icon on your desktop when it asks. • Close the folders on your desktop. • Repeat these steps for each computer, using a separate key code for each installation. 6 NETWORK USERS: • Additional users will connect to Reservations 9.0 by launching the FileMaker Pro software and then selecting ‘Remote’ (button). IF the Reservation system is open on the Host computer, the network user will see a window with the host computer named in the left side. • Click once on the name of the host computer, then Double-click the ReservationsV9 file on the right to connect. 7 Step By Step 1.3 Networking OVERVIEW The Reservations 9.0 system uses the FileMaker engine to run, thus each computer that is going to be used to access the program must have a different FileMaker seat to run it. In order to share the Reservations 9.0 program to other users, it must be open and running on a host computer. When this is done, other users can remotely access the program. FileMaker software comes bundled with our multi-user packages. NOTE: The host computer must be someone who is working in Reservations 9.0 the most so that Reservations 9.0 is in the front. INSTALLING SEAT LICENSES (See 1.2 Installation – either Windows or Mac) OPENING / SHARING FILE After installing, the host computer must have the FileMaker and Reservations 9.0 programs open before it can be accessed on other computers. HOST COMPUTER 1. Open FileMaker. 2. From the File menu, choose “Sharing…” and then click on “FileMaker Network…” 3. In the resulting dialogue box, choose the radio button to turn Network Sharing “On”. Then choose “OK”. 4. Go to ‘File’ and ‘Open’ to point to and open your copy of Reservations 9.0. 5. Enter your password. 6. If this is a new copy of Reservations 9.0 that you have just bought, you will need to enter your Company Name, Customer Number, the License Code, POS License Code (if applicable), and the QB License Code (if applicable), then you will need to read the License agreement and check the box ‘I Agree’. OTHER COMPUTERS 1. Open FileMaker. 2. Go to ‘File’ and ‘Open Remote’. 3. If your computer is connected to the network, it will see the name of the Host computer on the left side of the dialogue box. 4. Choose the Host computer, and then on the right choose the Reservations 9.0 program. 5. Click ‘Open’. 6. Enter your password. 8 1.4 Finding and Printing Records FINDING RECORDS Every field is indexed, so you can search on any field on your screen. When you click a 'Find' button on various screens in the system, you will be in the 'Find Mode', which is a screen with magnifying glasses showing in each field for you to type in what you want to find. After entering what you’d like to search for, click the ‘Perform' button on the top of the screen to perform the find. This will find all the records that meet your criteria. In order to browse through the found set of records on a form, you would use the record navigation arrows on the upper right side of the screen. On a report, you will see the found set of records in a list view. Some reports in the system will find and sort records on a pre-defined instruction specifically for that report, but most reports will allow you to utilize the 'Find Mode' to search with. After performing a find and browsing the records, you may wish to return to viewing / browsing all the records. Use the ‘Find All’ button to go back to browsing all records. PRINTING RECORDS On layouts that can be printed, Reservations 9.0 has a button to print. These buttons are preset to print a certain page setup (landscape or portrait) and a certain amount of records (current record or records being browsed). The ‘Current Record’ option prints the record you are currently on and viewing. This print option is be used to print forms (i.e. Confirmations and Invoices). The ‘Records Being Browsed’ option would print the found set of records that you are browsing. For example, when you perform a Find, the records found are your ‘Records Being Browsed’. Then if you click ‘Find All’, you would now be browsing all the records. This print option is used on reports that you view as a list. Some reports in the system have a ‘Sort’ button. This means that the records on the report will be sorted and/or subtotaled. Some reports will automatically sort for you based on the most recently found set. After performing a find for the specific dates you’d like to print, make sure that the report is sorted correctly by clicking the ‘Sort’ button and choosing your sorting options. 9 1.5 Reservations 9.0 Overview ROOM SETUP In the Settings area, the ‘Room’ entity can changed to be ‘Cabin’ (if you rent cabins), ‘Bed’ (as in Hostels that rent specific beds instead of rooms), ‘Site’ (for campgrounds and RV resorts), or ‘Slip’ if you are a boat marina. If you prefer a different room entity, simply double-click in the room entity field until you see a cursor, and type the entity you prefer. Rooms must be setup for each year for the purpose of keeping reservation history for annual periods, and displaying availability for each year separately. Rates are entered on the Room record, and may be copied to other rooms with the click of a button. Keep one room record setup as 'OTHER' with the year set to ‘ALL’ to store all the miscellaneous fees you need to charge on the guest invoice (Pet Fees, Extra Person Fees, Phone charges, etc.) See sample below. 10 GUESTS AREA Information about your guests and inquirers can be setup in the ‘Guests’ area. The Guests area tracks reservation history, notes, emergency and marketing information. You can send emails to individuals and groups as well. (See section 2.3 for more details on how to setup guest information.) Optionally, you can create a guest record 'on-the-fly' when entering a reservation in the Reserve area. (See section 3.3 for more details on how to setup a Reservation.) RESERVATIONS Book reservations for Individuals, Groups and Agents in the ‘Reserve’ area of the program. Quick data entry allows you to take reservations and either email or print the confirmations with the click of a button. One way to enter a reservation is to search the guest records to find an existing guest and then click the 'New Reservation' button to quickly book a new room for that guest. Another way to start a reservation is to go straight to the reservation screen and create a new record. When the popup Guest ID list displays, select an existing guest. If the guest you are looking for is not in the system, use the tab key to skip the popup list and go from field to field entering the guest information. This method will automatically add the guest’s information to the ‘Guests’ area. 11 AVAILABILITY Click the 'Search Availability' button to view a pop-up window that shows availability to find a room to best suit your guests' needs. The color-coded room grid will show the guest’s name in customizable colors to let you know the status of confirmed, unconfirmed, checked in and checked out at a glance. In addition, next to each room there are boxes that show the grouping of the room based on your settings. Clicking on a name on the room grid will bring you to that reservation in the main window. Clicking on a blank space will allow you to create a new reservation for that room and date. If you choose to create a new reservation, you will be asked how many nights the reservation should be for and a new record will be created pre-filled with that room, check in date and check out date. The arrow buttons on the left and right side of the month buttons will let you advance to the next set of days or backwards to the previous set. The buttons with month names let you jump from month to month. Finally, the up and down arrows on either side of the year let you go back or forward by year. A 'Conflict' message appears on the reservation if you try to double-book rooms, but will not prevent you from keeping the duplicate booking. View the 'Conflict Report' under the Admin Reports heading in the Reports area to list any existing conflicts. CONTACT LOG & TO-DO TASKS The Guest and Reserve entry screens have a handy contact log to enter notes and reminders regarding that guest, group or reservation. To-Do memos can be printed on a To-Do List report, and will be removed from the report after you click the 'Done' box for each task. The Memos/To-Do area on the guest record can be used to record many things in addition to To-Do notes, such as: • A list of family members • A list of birthdays • Date of inquiry of a potential guest 12 • Guest interests • A guest’s food preferences • And more! POINT OF SALE & DAY USE (Special access code required.) This area of the program allows invoicing for unlimited point-of-sale locations (restaurant, gift shop, boutique, etc.) and day-use packages. A detailed inventory list is used to sell unlimited number of items for each location. Print a receipt for the sale, or click a button to add the charge to the Guest invoice. REPORTS The reports menu offers many detailed reports that have flexible 'find' options to get just the information you want. This includes reports for all areas of the system such as Guests, Reservations, Room Entity reports, POS, Accounting, Marketing, Admin and Shift Reports. ADD YOUR LOGO TO FORMS The invoices and confirmations for individual, group and agent reservations can be customized with your logo. (See 7.1 Customize Logo for more information) MAKE RESERVATIONS 9.0 LARGER ON YOUR SCREEN To enlarge the screen size of Reservations, you have a few options. 13 First, you can change the screen resolution on your computer. This will affect all programs on your computer at once, so you don't have to make individual adjustments in each program. To do this on a Windows machine, enter the Control Panel and choose Personalization, then Display Settings. There is a slider bar entitled "Resolution" which you can slide lower for less resolution. Once you click "Apply", this will make objects on your screen appear larger. On a Macintosh computer, enter your System Preferences area and click "Displays". There is a "Resolutions" box where you can choose your resolution options. Smaller numbers mean that objects will appear larger. Again, these changes will affect your entire computer, which is useful so you don't need to adjust settings within each program. The other option is to make the change only within the Reservations software. In order to accomplish this, open the software and look in the lower left area of the window. You will see the current view size (most likely 100% right now) and to the right of it, you'll see two buttons with black mountains for zooming in and out. Click the mountain on the right to zoom in, then maximize your viewing screen to see the program larger. 14 1.6 Security OVERVIEW The ‘Security’ navigation button in the Settings area is where the Manager can go to add and delete accounts. Five types of accounts can be created: Manager, Admin, Front Desk, View Only, and POS (point of sale). Each account has different accessibility. DEFAULT LOG IN ACCOUNTS: There are five different user accounts in Reservations 9.0 that are already set up. The default passwords on these accounts are sent in the email with your purchase. Before logging in with the user accounts, you must go to the Settings tab, click on the Security Link, and uncheck the “Disable Log-in” checkbox. NOTE: For restricted users (User and POS Accounts), when you navigate to restricted layouts there will be a black screen with the text 'No Access'. To navigate away from this, choose to return to the ‘About’ menu from the ‘Res Help’ file menu. Manager Account • This account allows access to all user areas of Reservations 9.0. • The manager can add, edit or delete records on all user entry screens and also can access all the Settings, including this Security portion. Admin Account • This account allows access to all user areas of Reservations 9.0 except Settings. • The user can add, edit or delete records on all user entry screens. Front Desk Account • This account allows access to all user areas of Reservations 9.0 except Settings, Reports and POS. • The user can add, edit or delete records on all user entry screens except Rooms, which is view only access. View Only Account • This account allows view only access to all user areas of Reservations 9.0 except Settings and Reports. POS Account • This account allows access to only the Point of Sale area of Reservations 9.0. NOTE: This area can only be accessed if the POS module is purchased. SETTING UP NEW ACCOUNTS: The Manager log in has permission to create and/or delete log-in accounts. This is done in the Settings area of the program by clicking buttons to create accounts in one of the three types of access levels mentioned above. • • Users can change their passwords after the manager sets an initial password, but the Manager can delete the account without knowing the password. Managers can click the 'Delete an Account' button to remove accounts LOST PASSWORDS: During log-in, you will be given the opportunity to reset the 3 default accounts back to their original passwords. This will give you access to remove and re-create user accounts. 15 NOTE: On the Inquiry List, Birthday List and Referral Report you can send an email to the found set of records you are viewing by clicking on the ‘Email Found Set’ button. 1.7 Reporting Overview ABOUT REPORT QUERIES Some reports in the system will prompt you to enter dates or other information before generating the report. It is best not to cancel this process, but continue running this report script, and then return to the Navigation buttons if you need to start over. Other reports will automatically find information appropriate for the report, but allow you to further search by clicking the 'Find' button. Most reports have a 'Sort' button. This button is used to sort the records the way you want to view them. Some reports will automatically sort for you based on the most recently found set. After performing a find for the specific dates you’d like to print, make sure that the report is sorted correctly by clicking the ‘Sort’ button and selecting your preferences. 16 R E S E R V A T I O N S 9.0 Pearl User Guide Section 2 GETTING STARTED 17 Step By Step 2.1 Company Defaults COMPANY INFORMATION Company defaults are used throughout this system in Confirmations, Invoices, Email, etc. Some of the defaults you can enter into the system include your company name, address and phone numbers, as well as deposit policies, invoice message, email signature and email confirmation defaults. NOTE: This area is where you choose ‘USA’ or ‘Australia’ depending on which version you wish to have. This will affect the Room Info entry, POS Item entry, and Invoices and Confirmations. For help on deciding which version to choose, hover your mouse over the blue words, ‘Which should I choose?’ Set up your Company defaults: 1. Click on the "Settings" navigation button. 2. Click on the "Company Defaults" button if it’s not already chosen. 3. Enter your company information by tabbing through the fields. PRINT ROOM NO ON INVOICE/CONFIRMATIONS Selecting “Yes” will display the Room number on each line item of the Confirmation and Invoice printed and emailed forms. 18 Step By Step See Section 6 for information about Reporting on WHAT NEXT: Next youper willTax. need to apply these Sales taxes to your room charges and POS Items where applicable. More details 2.4, 3.2. USE CUSTOM RESERVATION ID Reservations V9 is preset with a starting Reservation ID of 1. Several users have asked to establish their own starting Reservation ID. Clicking the “Yes” radio open a pop-up window. You have the option to cancel or enter an initial Reservation ID and Continue. The pop-up window will automatically display the Last reservation ID used, if applicable. All future Reservations will begin with this number and increase by 1. Clicking the “No” button will automatically reset the Reservation ID back to the default Reservation ID. NOTE: Reservation ID numbers should be unique, so do not reset the Reservation ID to a lower number which could result in duplicate Reservation ID’s SET UP TAX RATES Before entering any reservations or POS invoices, the tax rates in the system need to be set up. There are two tax rates available in Reservations 9.0. You can use one for hotel tax and one for sales tax or combine them both into one. NOTE: Australia Users should use only Hotel Tax for rooms. NOTE: The Sales Tax is the only one available for use in the POS area. 1. Click the 'Settings' navigation button. 2. Click into the Tax Rate fields and enter your data. MYOB™ and QuickBooks™ users: You will also want to click the 'Accounting' button under the Settings area to set the tax information. DATA ENTRY PREFERENCES Data entry preferences make Reservations 9.0 flexible to meet your Company and location’s needs by giving you the ability to change the name of certain fields. For example, choose ‘Province’ instead of ‘State’, or ‘Postal Code’ instead of ‘Zip’ for address fields. 1. Click on the 'Settings' navigation button. 2. To the right is a white box labeled 'Data Entry Preferences'. 3. Click on the radio button for your preferences. NOTE: These choices will change the titles of the corresponding fields throughout the 19 Step StepBy ByStep Step database, but will not change information you have entered into the fields. SET UP ROOM ENTITIES Another data entry preference is the ability to change your Room Entity title. ‘Room’ can changed to ‘Cabin’ (if you rent cabins), ‘Bed’ (as in Hostels that rent specific beds instead of rooms), ‘Site’ (for campgrounds and RV resorts), or ‘Slip’ if you own a boat marina. If you prefer a different room entity, simply double-click in the room entity field until you see a cursor, and type the entity you prefer. 1. Click on the 'Settings' navigation button. 2. To the right is a white box labeled 'Data Entry Preferences’. 3. Select the room entity title you prefer from the drop-down list. If you prefer a different room entity than one provided on the list, simply double-click in the room entity field until you see a cursor, and type the entity you prefer. 4. Select if you would like to ‘Prompt for housekeeping status on check in / check out’. USER DEFINED FIELDS User Defined fields can be changed to track unique information about your guests or reservations. You have three user-defined fields for guests, and three for reservations. Choices for how to use these fields are numerous – for example, track pet names, food preferences or health issues for guests, and flight information, room setup or guest preferences on reservations. You will be able to see information you enter into the User Defined fields in the ‘Guest User Defined List’ and the ‘Res User Defined List’ Reports. 1. Click on the 'Settings' navigation button. 2. There is one box on the right for user-defined fields, one for single reservations and one for guests. A. For Single Reservations, enter the titles (up to three) of fields that you would like to have. B. For Guests, enter the titles (up to three) of fields that you would like to have. The titles that you enter will be changed in the single reservations and guests areas, and will not change or overwrite information you have already entered into those fields. For single reservations, they will show under the ‘Single’ navigation button, under ‘To-Do’. For guests, they will show under the ‘Guests’ navigation button, under ‘Add’l Info / QB’. PRINT SETTINGS The default print settings are set to 8.5 X 11 inches. Checking the ‘Use A4 Paper Size’ will change the default print settings to the A4 paper format. 20 Step By Step 2.2 Data Entry Defaults LISTS/COLORS Value lists are the pop-up menus that are used throughout this system. Among them are the Referral List, Country List, Payment Types, Occasion List and Staff List. These value lists can be changed and modified to fit your needs. REFERRAL LIST The Referral pop-up shows up in the Guests area and is used to track how your guests found out about your business. Some examples include: Internet, Magazine, Newspaper, Friend, etc. OCCASION LIST The Occasion pop-up is used in the Single and Group reservations areas of the system. Use this to track the purpose of your guest’s visit; for example, an anniversary, wedding, birthday, business trip, convention, etc. This information may also be helpful in marketing to your guests. COUNTRY LIST The Country pop-up shows up in the Guests and Reservations address areas of the system. This list can include any number of countries that you wish to enter. CREDIT CARD TYPES The Credit Card Types pop-up shows in the Reservations area under the Payments tab. This list is used to say how the guest is paying for their reservation, for instance; Visa, Master Card, Check, Debit, Cash, etc. ROOM TYPES The Room Types pop-up shows up in the Room area and is used to set the Room Type. Some examples include: Suite, Single, Double. ROOM VIEWS The Room View pop-up shows up in the Room area and is used to set the Room View type. Some examples include: Garden, Ocean, Poolside. STAFF LIST The Staff pop-up is used in all data entry areas of the system to indicate who entered the information. Here you can enter a list of your employees and staff. AVAILABILITY CALENDAR COLOR SCHEME Use these options to set up the color scheme for your availability grid by assigning colors to confirmed, unconfirmed, checked in, checked out guests and conflicts. In 1. 2. 3. order to change or modify any of these value lists: Click on the "Settings" navigation button. Click on the "Lists/Colors" button. To add a line to a value list, click on the next available line (you may need to scroll down) and enter the information. 4. When you click off of the field, the value list will automatically re-alphabetize. 5. To delete a line item, simply click on the Trash Can button that is next to the option that you wish to delete; a window will pop-up confirming that you would like to delete this item. 21 NOTE: If the address is not complete, be sure to Step Step By By Step Step check ‘No’ for the Mail List option, located in the Add’l Info/QB tab under the Marketing heading. 2.3 Guest Information ENTERING YOUR GUEST RECORDS Once guest records are entered into Reservations 9.0, they are stored and you will not have to enter them again. Here are two ways to enter guest records: IN 1. 2. 3. THE GUESTS AREA Click the 'Guests' navigation button. Click the green '+ New' button to create a blank new record. Enter name & address for this contact by tabbing from field to field. IN 1. 2. 3. THE RESERVATIONS AREA Click the 'Reserve' navigation button. Click the green '+ New' button. Clicking into the Guest ID field will display a list of existing guests. You may start typing the first few letters of the guest’s last name to quickly find the guest in the list. If the guest is not already in the pop-up list, tab to the next field and enter the guest’s information. This will automatically add them to the master list and they will appear in the Guests area. IMPORTING YOUR GUEST RECORDS If you have guest records in other files on your computer, you can import them instead of typing them manually. You can import guest and other contact records from an Excel spreadsheet or from a tab or comma delimited text file. 1. Make sure you are in the Guests area of Reservations 9.0. 2. Choose 'Import Records’ à ‘File' from the File Menu. 3. Select the File you wish to import, and then click 'Open'. (You may need to choose to show ‘all available’ file types from the Show menu). 4. Make sure the table on the right says Guests. 5. Match the fields on the left (outside source) with the fields on the right (Guests) by clicking and dragging the 22 NOTE: Before leaving the current found set of records after your import (which is the group of imported records), review them carefully to decide if they came in correctly. If they haven’t, see below. black arrows next to the fields on the right to line up with the appropriate fields on the left. 6. Click in between the matched fields so an arrow appears; this means that the information for this field will be imported. 7. Make sure ‘Add New Records’ is checked, then click the 'Import' button. DELETING RECORDS THAT ARE IMPORTED INCORRECTLY Choose 'Delete Found Records' from the 'Records' Navigation menu at the top of your screen to remove the group you just imported, and try the exercise again. IMPORTANT! Only do this if you have not left the current found set. Once records are mixed in with the rest of the database, it may be hard to isolate them if you find a problem later. 23 Step By Step NOTE: Locations must have an account number assigned if you intend to export POS transactions to MYOB or QuickBooks accounting software. 2.4 Point of Sale SET UP LOCATIONS / CATEGORIES / RECEIPT MESSAGE Point-of-Sale is an optional feature that makes it easy to track sales, print receipts and/or charge purchases made at point-of-sale locations back to your guest invoice. Please note that if you do not have POS locations, you are still able to add fees to the guest invoice (such as additional person fees, event fees, etc.) through the ‘Other’ room without purchasing the POS module. Before creating POS Items for sale, you will need to set up Locations and Categories (Categories are optional). 1. Start by clicking the 'POS' button. 2. Click the 'POS Settings' button. 3. Click the next available line to enter records in both the 'Locations' and 'Category' lists (you may have to scroll). 4. Enter item information by tabbing from field to field. 5. The POS Receipt Message will be shown at the bottom of the receipts printed for POS. 24 Step By Step NOTE: BeIfsure indicate Location related NOTE: you to change thethe Item No., you must to each item because the pop-up list on the POS re-generate the barcode by clicking the invoice area will only itemsbutton. appropriate for ‘Generate a show Bar Code’ each location. SET UP POS / DAY USE ITEMS You will need to set up all the items you wish to sell and assign them to their POS locations or assign as Day Use before generating any invoices. When ‘USA’ is chosen in the Settings area, the ‘Items’ screen will only show one price field. When ‘Australia’ is chosen in Settings, the ‘Items’ screen will show the price including and excluding tax. Here you can keep detailed information on your inventory with margin/markup calculations, pictures, barcode and vendor contact information. 1. 2. 3. 4. 5. Start by clicking the 'POS' button. Click the 'Items' button. Click the green ‘+ New’ button to create a new blank record. Enter item information by tabbing from field to field. To generate a Bar Code for this Item, enter an ‘Item No’ and click the ‘Generate a Bar Code’ button. 25 Step By Step 2.5 Rooms and Rates SET UP ROOM ENTITIES The room entity automatically defaults to ‘Room’. However, Reservations 9.0 allows you to set a preference to change your Room Entity title. ‘Room’ can changed to ‘Cabin’ (if you rent cabins), ‘Bed’ (as in Hostels that rent beds instead of rooms) ‘Site’ (for campgrounds and RV resorts), or ‘Slip’ if you are a boat marina. If you prefer a different room entity, simply double-click in the room entity field until you see a cursor, and type the entity you prefer. Set your room entity in the Settings area. SET UP ROOMS AND RATES The reservation system tracks history by year, therefore a record must be set up for each room FOR EACH YEAR. For example, your system should have room number 1 for year 2013, and another room number 1 for year 2014, etc. You can set up rooms for an unlimited number of years. An easy way of setting up rooms for multiple years is to set up all of your rooms and rates for one year, then choose the “Create Records for a New Year” button to copy all the rooms. You will then need to use the “Copy Rates from Another Room” button to copy rates to your newly created rooms. 1. Click 'Room' from the Navigation buttons. 2. Click the green '+ New' button. 3. Enter the room information by tabbing from field to field. Note: Make sure you carefully 26 NOTE: For all other charges, keep one room record setup as ‘OTHER’ and store all your miscellaneous charges (pet fee, extra person fee, etc.) and use ‘ALL’ for the year. choose the Room ID/Name, because many things within the system are linked to this (rates, furniture, history and reservations) and changing the Room ID/Name at a future date may cause issues with the linked records. 4. Be sure to indicate the YEAR for each new record. 5. The following settings will appear on the Search Availability grid: room view, room type and smoking or non-smoking status. You can also choose the sort order for the Search Availability calendar by entering a number in the "Calendar Sort Order" field. Note: If you choose to use the sort order option rather than letting Reservations 9.0 automatically sort them for you, you will need to enter a number for each room for correct sorting, and you must set up this sort order for all room years. 6. Enter as many rates as applicable for this room by clicking on the first available line in the Rates area. 7. Effective dates must be entered for the YEAR of the room record. Enter multiple rates for the same Rate ID if you have seasonal rates. For example: Standard Rate $99 Starts 1/1/13, Ends 4/30/13 Standard Rate $109 Starts 5/1/13, Ends 12/31/13. Entering rates this way will make the system ‘smart’ to know what rate to charge based on the check-in dates on the reservations. 8. Check the appropriate tax box for each rate, as well as if it is commissionable, and the rate’s effective start and effective end date. (The tax names are set up in ‘Settings’) 9. Set the Maximum Occupancy in the Max Occup: field. 10. Set the Housekeeping Status and Staff Assigned to Housekeeping. Further Example of Rate Setup: If most of your rooms are similar, a convenient shortcut is to set up one room, then use the ‘Duplicate’ button. The room and its rates will automatically be copied for modification as another room. AVAILABILITY ONLINETM USERS: You will need to set up each Room ID in your online account for the availability to upload properly. It’s important that the name you use for your rooms in Availability Online matches exactly the Room ID/Name you use within Reservations 9.0. 27 R E S E R V A T I O N S 9.0 Pearl User Guide Section 3 RUNNING THE PROGRAM 28 StepNOTE: By StepUse the ‘Inquiries’ report to filter NOTE: If the address is not complete, be sure to inquiries within the List last option, 30 or 60 days. in See check ‘No’ for the Mail located the section for more Add’l Info/QB tab6under the information. Marketing heading. 3.1 Guest Information CREATING NEW GUEST RECORDS Once Guest Records are entered into Reservations 9.0, they are stored and you will not have to enter them again. Here are two ways to enter Guest Records: IN 1. 2. 3. THE GUESTS AREA From the Navigation buttons, click the 'Guests' button. Click the green '+ New' button to create a blank new record. Enter details for this contact by tabbing from field to field. IN 1. 2. 3. THE RESERVATIONS AREA Click the ‘Reserve’ navigation button. Click the green '+ New' button. Clicking into the Guest ID field will display a list of existing guests. You may start typing the first few letters of the guest’s last name to quickly find the guest in the list. If the guest is not already in the pop-up list, tab to the next field and enter the guest’s information. This will automatically add them to the master list and they will appear in the Guests area. TO DELETE A GUEST RECORD 1. Find the Guest record you want to delete 2. Click the red 'x Delete' button ENTERING INQUIRY RECORDS In Reservations 9.0, you can store information about people who are contacting you with inquiries about your establishment. Use the 'Inquiry' and Followed Up' check boxes in the Addt’l Info/QB tab to indicate which records are inquiries. This information is helpful in marketing and makes it easy to track people who have inquired and who you have sent a brochure to, then follow-up with correspondence or phone calls. 1. 2. 3. 4. 5. From the Navigation buttons, click 'Guests'. Click the green '+ New' button to create a new blank record. Enter the information for the person by tabbing from field to field. Check the 'Inquiry' box under the “Add’l Info / QB” tab. If the address is incomplete, be sure to select 'No' on the Mail List option. 29 Step By You Stepcan change the User Defined field NOTE: Step By Step titles under the Settings navigation tab. See 2.1 Company Defaults for more information. ENTER ADDITIONAL GUEST INFO The “Add’l Info / QB” tab on the guest record is where to find marketing information, emergency contact information and three user defined fields. 1. Click the 'Guests' Navigation button. 2. Find the Guest record you want to enter notes into. a. Click the ‘Find’ button. b. Type in the last name or other information that you would like to find. c. Click the ‘Perform’ button on the top of the screen to search. 3. Click the “Add'l Info / QB” tab. 4. Enter pertinent information regarding marketing, emergency contacts and other tracking data. ENTERING CONTACT LOGS AND REMINDERS Each guest record has an area to store notes or memos and reminders that will appear on the ‘Memos/To-Do’ list. The memos will stay on the To-Do list until you check ‘Done’. 2. Click the 'Guests' Navigation button. 3. Find the guest record you want to enter notes into. a. Click the ‘Find’ button. b. Type in the last name or other information that you would like to find. c. Click the ‘Perform’ button on the top of the screen to search. 4. Click the 'Memos/To-Do' tab. 5. Click into the last line in the contact log area and enter your memo and 'Remind Me' date if you want this memo to appear on the To-Do list (available in Reports). The record will automatically sort by date (most recent on top) after it is saved. The Memos/To-Do area on the guest record can be used to record many things, such as: • A list of family members, • A list of birthdays, • Date of inquiry of a potential guest, • Guest interests, • A guest’s food preferences, • And more! EMAILING GUESTS The Email feature in the Guests area is a great way to keep in touch with your guests and inquirers. IMPORTANT! You must have an Internet connection and an e-mail account for this feature to work. The ‘from’ email address and your company signature (stored in the Settings area) 30 Step By Step NOTE: Once you send the message and leave the email message screen, the message will clear. Use the ‘Refresh’ button to clear the message manually and enter a new message. automatically fill in and you can enter the message you want to be sent. The ‘Send’ button will send the message to the current guest on the screen. The ‘Send to Found Set’ button in the lower right side of the screen will send the message to the found set of records. For example, if message you find and all the records of guests with birthdays in August, you could send them NOTE: Once you send the leave all a note to invite them to come stay with you to celebrate. the email message screen, the message will clear. Use the ‘Refresh’ button to clear the message manually and enter a new message. 1. Find the guest record(s) for whom you want to email. a. Click the 'Find' button. NOTE: Once you send the message and leave b.screen, Type the in the last name the email message message will or other information that you would like to find. c. Click theto 'Perform' clear. Use the ‘Refresh’ button clear the button on the top of the screen to search. message manually 2. Click and the enter 'Email' a new tab.message. 3. Enter the email subject and message. 4. Click the 'Send' button to send to the current guest record you are on, OR Click the ‘Send to Found Set’ button to send to the current found set of guests (See 1.4 Finding and Printing Records for more information on the Found Set of Records) Reservations 9.0 sends the email message to your default email program. Depending on which email software you use, the message(s) may send automatically or be found in your 'Outbox' or 'Drafts' box. 31 3.2 Rooms and Rates SET UP ROOMS & RATES The reservation system tracks history by year, therefore a room record must be set up FOR EACH YEAR. See 2.5 Rooms / Rates for more detailed information on setting up your rooms and rates for the first time. EFFECTIVE DATES ON RATES AND CHARGES The best way to handle seasonal and other rate changes is to duplicate an existing rate and give it an effective date. Then set the original rate to have an expiration date one day before the new rates’ effective date. For example: Standard Rate $99 Starts 1/1/13, Ends 4/30/13 Standard Rate $109 Starts 5/1/13, Ends 12/31/13 Entering rates this way makes the system ‘smart’ to know what rate to charge based on the check-in/out dates you enter on the reservation. Remember, the effective dates can only span the year the room is set up for. You will have new effective dates for future years. Also, changes to rates will only effect new reservations entered. DUPLICATING A ROOM Click the ‘Duplicate’ button and the room and its rates will automatically be copied. Doublecheck that the effective dates are applicable to the new rate. CREATING ROOMS FOR A NEW YEAR A simple shortcut for creating next year’s rooms is to duplicate all your rooms for a new year. Click the ‘Create Records for a New Year’ button and enter the new year you wish to duplicate them for when prompted. You will also have the option of copying the rates from the previous year. Double-check that the effective dates are applicable to the new year. ROOM MAINTENANCE Track the maintenance for each room with the Maintenance feature. You can add memos on what needs to be done for each room, when it needs to be done by, who it is performed by and when it is performed. These maintenance requests are added to a list under the Reports navigation button in the Room Info area and will only be removed from the list when ‘Done’ is checked. 32 Step By Step NOTE: Under the ‘Maintenance Request’ tab, you have the ability to print out your request and/or go to the report and see all requests. 1. Click the 'Room' navigation button. 2. Find the room for which you want to record maintenance information. A. Click the ‘Find’ button. B. Type in the room name or number. C. Click the record navigation buttons to navigate to the room record for the current year. 3. There are two ways to enter maintenance requests: A. Click on the ‘Maint. History’ tab under Units & Rates, then click into the next available line to add your notes – OR – B. Click the ‘Maintenance Request’ button and the green ‘+ New’ button for a new blank record 4. Enter your maintenance notes. HOUSEKEEPING STATUS Track the housekeeping status with the field ‘Housekeeping Status’. That is where you would enter whether a room is Clean and Vacant, Needs Cleaning, or is Occupied. The list is also editable to let you add your own status. You can also assign staff to each room. When you check in or check out a guest, you will be prompted to adjust the housekeeping status and staff assigned to the room. To turn off this feature, visit the Settings à Company Defaults area of Reservations 9.0. 33 Step By Step 3.3 Single Reservations CREATE A SINGLE RESERVATION Use this option to create reservations for individuals, families or groups where a single invoice will be required. You may reserve more than one room on each reservation record. If more than one invoice is required, proceed to section 3.4 (Group Reservations). 1. 2. 3. 4. Go to the ‘Reserve’ navigation button. Click the ‘Single’ navigation button. Click the green '+ New' button to create a new blank record. Scroll the pop-up Guest ID list to find existing Guest names. You may start entering the Last name of the guest to assist in finding the correct guest. After selecting a guest from the list, their contact information automatically fills in. OR If this person is not in the system, create a new record in the Guests area or tab through the fields entering in the information and it will automatically be added to the Guests area. (See 3.1 Guests) 5. Checked in – if ‘Prompt for housekeeping status on check in/check out’ field is set to “Yes”, then clicking the “Checked In” box will display a pop up asking for the housekeeping status, and you may assign Housekeeping staff at that time. Current date and time will automatically be set. 6. Checked Out - if ‘Prompt for housekeeping status on check in/check out’ field is set to “Yes”, then clicking the “Checked Out” box will display a pop up asking for the housekeeping status, and you may assign Housekeeping staff at that time. Current date and time will automatically be set. If the Disable Log-in is unchecked, you will receive a message notifying you that the reservation will be “locked” and only a user with a “Mananger” login will be able to edit or delete the record. - NOTE: After a customer is checked out, only ‘Managers’ and ‘Admin’ users will be able to view the credit card number for 8 days after the check out date. All other users and after 8 days, the credit card number will be encrypted. 7. On the Invoice there are 2 text boxes, text entered into the top box will appear on all invoices. Text entered into the second box will only display on the specific invoice it was entered upon. Waiting List 1. ‘Add to Waiting List button’ – will display a pop-up window asking for the Desired dates From and To, and you may enter additional comments. 2. Clicking on the ‘Waiting List’ button will display all guests on the waiting list. If a room becomes available, you may click the ‘Book’ button to book the reservation. Or click on the trashcan to remove the Guest from the waiting list. 34 WHAT NEXT: Next you will need to check availability and search for a room to reserve. See below under Search Availability and Reserving Rooms. 35 Step ByDeleting Step NOTE: a guest reservation does NOT Step By Step onsystem. a name in the room grid will delete their contactNOTE: recordClicking from the bring you to that Reservation in the main window. Clicking on a blank record will ask if you wish to create a ‘New’ single reservation. Clicking ‘New’ will create a new single reservation for that room and default to the SEARCH AVAILABILITY number of has nights you choose. Reservations 9.0 a 'Search Availability' button on almost every screen. This button will take you to the pop-up room grid for this month and this year. 1. Click on the 'Search Availability' button in the right upper corner of the screen. 2. This will open a pop-up window, defaulting to availability for the current month and year. 3. Click the left and right buttons to advance forward or backward through the blocks of days, the month buttons to jump to a certain month, and the up and down arrow buttons next to the year to advance forward or backward in years. RESERVING ROOMS When searching availability, you may click on a blank space to create a new single reservation or return to the single reservation you were working on so you can finish the reservation. 1. Click into the room field under the ‘Charges’ tab. 2. Enter the room number, check-in date, check out date, etc. by tabbing from field to field. 3. Choose the Rate from a pop-up list and the charges will automatically calculate. 36 Step By Stepyou send the message or leave the NOTE: Once ‘Email’ tab, the message will clear. Click ‘Refresh to clear the comments and start over. IMPORTANT! If you have booked a conflict, the system will show a "CONFLICT" message in red, however it not prevent you from double booking a room. To view a list of reservation conflicts, view the 'Conflict Report' from the Reports area. TO CONFIRM A RESERVATION 1. Click the 'Payments' tab to enter the credit card number and/or deposit for this reservation. To comply with PCI regulations, the number you enter in the “CC Number” field will be encrypted after you leave the dialogue box for privacy purposes. 2. Print or email the confirmation by clicking the 'Confirmation' button or 'Email' tab (See below for more information). DEPOSIT POLICY NOTES There is a check box near the bottom of the screen to choose which Deposit policy you want on your confirmations or invoices. This automatically defaults to ‘A’, which is the default deposit policy, however you may choose the alternate deposit policy 'B'. (See 2.1 Company Defaults for information on editing these policies. EMAILING RESERVATION CONFIRMATIONS Reservation Confirmations can be viewed and then printed or emailed. There are two ways you can email a confirmation. The first is through a plain email file, and the other is through a PDF that includes your logo and reservation information in a graphically designed format. 1. Find the reservation you want to email a confirmation for. 2. Click the 'Email' tab. The system will automatically create a message for your email with the reservation information. This is modifiable so you can add comments to the email. 3. Click the ‘Send’ button. Reservations 9.0 sends the email message to your default email program. Mac users and Multi-User version users can also send a PDF email confirmation that includes your logo and reservation information in a graphically designed format. Windows users who have PDF-generating software can also choose to ‘Print’ the confirmation, then redirect the printer to the “Adobe PDF” file. 1. Find the reservation you want to email a confirmation for. 2. Click on the ‘Confirmation’ button under the ‘Charges’ tab. 3. Click the ‘Email’ button. Reservations 9.0 sends the email message to your default email program and attaches the confirmation as a PDF. Reservations 9.0 sends the email message to your default email program. Depending on which email software you use, the message(s) may send automatically or be found in your 'Outbox' or 'Drafts' box. 37 Step By Step Step NOTE: You can define the User Defined field Step By titles under the Settings navigation tab. See 2.1 Company Defaults for more information. FAXING CONFRIMATIONS If you have an internal modem and fax software on your computer, it is possible to fax a confirmation from within Reservations 9.0. 1. 2. 3. 4. Click the ‘Confirmation' button on the reservation screen. Click the 'Print' button. Redirect the printing to your fax program instead of the printer. Enter the fax number, etc. and continue to fax the document. TO-DO NOTES Each reservation allows entry of notes about phone calls, faxes, emails or to-do reminders. The memos will be added to the ‘To-Do List’ when entered and removed when you check ‘Done’. 1. Click on the ‘Single’ navigation button in the Reserve area. 2. Click the 'To-Do' tab. 3. Here you can enter reminders or to-do notes in the portal, additional notes in the blank note field at the bottom, or additional information in the User Defined fields. CHECK-IN A GUEST To check in a guest, Reservations 9.0 has a check box at the bottom of the main Reserve area screen that makes it quick and easy. Either Or 1. Click the 'Reserve' navigation button, 1. Go to today's date on the availability then the 'Single' navigation button. calendar. 2. Click the ‘Find’ button. 2. Click on the name of the guest arriving A. Enter the guest’s last name and to zoom to their reservation. check in date or the reservation number. B. Click the 'Continue' button to pull up the record. Then 3. Click the 'Checked In' checkbox at the bottom of the screen, and the system will add the date and time to the guest's arrival automatically. NOTE: If the “Prompt for housekeeping status on check in/check out” field is set to “YES” a pop-up dialog will appear asking for the housekeeping status, and you have the option to assign staff at this time also. 4. Print the 'Check In Form' if desired for the guest to fill out or verify their information. After a guest is checked in, that guest’s name will change color on the Search Availability 38 Step By Step Step By Step NOTE: The ‘OTHER’ room needs to be set up with additional charges in the Room Info area before you can enter additional charges. See 2.5 Rooms / Rates for more information. calendar, indicating that they are checked in. The guest is also added to the Check-in report. ADDING CHARGES TO THE GUEST INVOICE During a guest’s stay, you can add charges to their invoice. You will be able to keep track of what charges were made and for how much. 1. Find the reservation you wish to enter charges into. 2. Under the Room drop-down list choose ‘OTHER’. 3. Select the charge from the Rate drop-down list. PREPARING CHECK-OUT INVOICE Before checking out a guest, you want to find the guest in the system, review their information, and add any last minute charges. Then you’re ready to print out an invoice. 1. Find the reservation for the guest who is checking out: Either Or Or A. B. From the Single C. Go to today’s date on F rom the Navigation Reservations area, click the Search Availability buttons, click 'Reports'. ‘Find’. calendar. a. Click the 'Current a. Enter the guest last a. Click on the name of Guest List' button. name and check in date the guest departing b. Click the zoom button or reservation number. to zoom to their next to the guest b. Click the ‘Perform’ button reservation. checking out to pull up to pull up record. their reservation. Then 2. Review and enter more charges as needed. 3. Click the 'Invoice' button to view and print the guest invoice. 4. Present invoice to the guest and receive payment. 5. Enter the payment by clicking the 'Payments' tab and then clicking into the next available line. - Note: Only the ‘Manager’ and ‘Admin’ will be able to view the credit card number after a guest has been checked out. The card number will only be available for 8 days after the check out date, after which time it will be permanently encrypted. 39 guest(s) will be checked-out. See below. VIRTUAL TERMINAL Virtual Terminal is a feature in the Reserve area under the 'Single' navigation button where a merchant account virtual terminal can be displayed and used to accept credit cards. It automatically defaults to PayPal™, so if you have an account, you simply need to sign in and process the payments. SETTING UP VIRTUAL TERMINAL Under the 'Settings' navigation button, 'Accept Credit Cards' and 'Merchant Account' you may enter the URL for the virtual terminal website if you already have a merchant account to accept credit cards and they offer a virtual terminal. Once this is setup, whenever you click on the 'Virtual Terminal' tab under 'Single Reservations', your virtual terminal website will appear in the portal where you can log in and make payments online. If you do not have a merchant account and would wish to have one, you can either use the link which appears in the bottom right of the pop-up window after you click the ‘Virtual Terminal’ button, or in the 'Settings' à 'Accept Credit Cards' à 'PayPal™' area there is also an image near the bottom you can click on to sign up. 40 Step By Step CHECK-OUT A GUEST To check out a guest, Reservations 9.0 has a check box at the bottom of any of the Reservation screens that makes it quick and easy. 1. Click the ‘Reserve’ navigation button. 2. Click the 'Single’ navigation button. 3. If you have not already, find the guest you are checking out by clicking the ‘Find’ button. A. Enter the reservation number or guest’s last name and check in date. B. Click the 'Continue' button to pull up the guest’s record. 4. Click the 'Checked Out' checkbox at the bottom of the screen, and the system will add the date and time to the guest's departure automatically. - If the “Prompt for housekeeping status on check in/check out” field is set to “YES” a pop-up dialog will appear asking for the housekeeping status, and you have the option to assign staff at this time also. After the guest has been checked out, that guest’s name will change color on the Availability screen indicating they are checked out and will be added to the Check-out report. 41 Step By Step 3.4 Group Reservations CREATE A GROUP RESERVATION Use this option to create reservations for families, groups or events where multiple invoices will be required. You may reserve more than one room on each reservation record; each reserved room will be viewable in the Group area as well as in the Single area. Also, you do not need to have detailed information about the group at the time of initial reservation; you can add information as you receive it. 1. 2. 3. 4. Go to the ‘Reserve’ navigation button. Click the ‘Group’ navigation button. Click the green '+ New' button to create a new blank record. Either choose from the pop-up a list of existing guests in your database or tab through the fields to enter new guest information into the system. You may begin typing the Host’s last name to quickly find the host in a large list. Information you enter here will automatically appear in the Guests area of the program (see 3.1 Guests). WHAT NEXT: Next you will need to search availability and search for a room to reserve. See below under Search Availability and Reserving Rooms. 42 NOTE: Deleting a group reservation does NOT Step By Step delete their contact record from the system. To delete an entire group reservation, you must first delete each individual reservation. SEARCH AVAILABILITY Reservations 9.0 has a 'Search Availability' button on nearly every area of the program. This button will take you to the pop-up room grid for this month and this year. Please see Section 3.3, ‘Search Availability’ for stepby-step instructions for using this feature. RESERVING ROOMS After verifying availability and returning to the group reservation you were working on, it is time to reserve the rooms for the guests. 1. Make sure you’re on the ‘Rooms’ tab in the ‘Reserve’ à ‘Group’ area of the program. 2. Press the ‘New Line’ button on the right side of the screen to start a new reservation for member(s) of your group. 3. Choose the room number from the pop-up list. Continue entering information for your reservation. When you choose a rate from the pop-up list, the charges will automatically calculate. 4. After entering the rate, you will enter the Guest for that particular room. If the host has not given you guest names for each room, simply enter the host’s name. Later, if the host gives more information, the guest name can be changed for each room. A. If the person is already in the system, choose their name from the pop-up list. B. Otherwise, use the silver zoom button to navigate to that guest’s single reservation and enter their information. The name in the group reservation will be automatically updated, since their single reservation is linked to the group. 5. Review for accuracy, edit and repeat the process as needed. Each room reserved on the group reservation will have it’s own single reservation number that you can zoom to and each will have it’s own invoice. If, however, the host wishes to pay for all the room reservations, remove the price from each reservation and add them to the Host’s. Each reservation may still have it’s own invoice, however, for incidentals/other fees. IMPORTANT! If you have booked a conflict, the system will show a "CONFLICT" message in red, however it will allow you to leave conflicts in the system. To view a list of reservation conflicts, view the 'Conflict Report' from the report menu. EMAILING RESERVATION CONFIRMATIONS Reservation Confirmations can be viewed and then printed or emailed. Please see Section 3.3, ‘Emailing Reservation Confirmations’ for step-by-step instructions for using this feature. FAXING CONFRIMATIONS If you have an internal modem and fax software on your computer, it is possible to fax a confirmation from within Reservations 9.0. Please see Section 3.3, ‘Faxing Confirmations’ for step-by-step instructions for using this feature. 43 Step Step By By Step Step GROUP DETAILS The ‘Group Details’ tab is designed to keep notes and other special information about the group as well as summarize the number of rooms reserved and number of adults, children and others that are coming. 1. Click on the ‘Reserve’ button, then the 'Group' navigation button. 2. Click the ‘Group Details’ tab. 3. Here you can enter notes, special needs or names of honorary guests. CHECK-IN A GUEST You will need to zoom to each guest’s reservation in the group in order to check them in. Reservations 9.0 has a check box at the bottom of the main Reserve area screen that makes it quick and easy. 1. Find the reservation for the guest who is checking out: Either Or a. Navigate to the ‘Reserve’ à ‘Group’ 2. Go to today's date on the availability à ‘Rooms’ tab. calendar. b. Click the blue ‘zoom’ button next to 3. Click on the name of the guest the guest’s reservation number to arriving to zoom to their reservation. go to their reservation. Then 4. Click the 'Checked In' checkbox at the bottom of the screen, and the system will add the date and time to the guest's arrival automatically. - If the “Prompt for housekeeping status on check in/check out” field is set to “YES” a pop-up dialog will appear asking for the housekeeping status, and you have the option to assign staff at this time also. 5. Print the 'Check In Form' if desired for the guest to fill out or verify their information. After a guest is checked in, that guest’s name will change color on the Search Availability calendar, indicating that they are checked in. The guest is also added to the Check-in report. 44 Step StepBy ByStep Step NOTE: The ‘OTHER’ room needs to be set up with additional charges in the Room Info area before you can enter additional charges. See 2.5 Rooms / Rates for more information. PREPARING CHECK-OUT INVOICE, VIRTUAL TERMINAL, CHECK-OUT A GUEST Since each group has multiple guests, you will need to zoom to a specific guest in order to enter charges and payments and when checking-out a guest. See Section 3.3, ‘Virtual Terminal’, and ‘Check-Out a Guest’ for step-by-step instructions on using these features. ADDING CHARGES TO THE GUEST INVOICE During a guest’s stay, you can add charges to their invoice. You will be able to keep track of what charges were made and for how much. 1. Find the reservation for the guest who is checking out: Either Or a. Navigate to the ‘Reserve’ à ‘Group’ 2. Go to today's date on the availability à ‘Room’ tab. calendar. b. Click the blue ‘zoom’ button next to 3. Click on the name of the guest to the guest’s reservation ID number zoom to their reservation. to go to their reservation. Then 1. Under the Room drop-down list choose ‘OTHER’. 2. Select the charge from the Rate drop-down list. GROUP INFORMATION SHEET The Group Information Sheet allows you to view specific details about a group on a printable form. 1. 2. 3. 4. Click the ‘Reserve’ navigation button. Click the 'Group' button. Click on the ‘Print’ button, which is just above the ‘Home’ phone number entry area. Here you can view a group's information and/or print it out by clicking the 'Print' button at the top right hand side of the screen. 5. To exit the screen, click on the 'Form' button. 45 Step By Step See 2.5 Room / Rates for more information. 3.5 Agent Reservations AGENT COMMISSIONS Reservations 9.0 has the ability to track commissions for Agents. This needs to be set up in the Agent Info area as well as the Room Info area. 1. 2. 3. 4. 5. Click the 'Reserve' button, then the 'Agent' button. Click the 'Agent Info' tab. Click the green '+ New' button to create a new blank record. Enter the Agency information by tabbing from field to field. Enter the commission rate as a decimal number. ROOM SETUP Before entering any Agent reservations, you will also need to check the ‘Commissionable’ box on certain rooms and rates. Unless this is checked AND the Agent has a Commission Rate, the ‘Commission due’ amount will not be calculated. 46 Step By Step WHAT NEXT: Next you will need to check availability and search for a room to reserve. See below under Search Availability and Reserving Rooms. CREATE AN AGENT RESERVATION Use this option to create Reservations via travel agents and track Agent commissions due. 1. 2. 3. 4. Go to the ‘Reserve’ navigation button. Click the ‘Agent’ navigation button. Click the green '+ New' button to create a new blank record. Click into the 'Agent ID' field and select the agent from the list. You may enter the last name of the agent to find the agent quicker in a large list. 5. Next, you will enter the Guest information by clicking into the ‘Guest ID’ field and selecting them from the list. NOTE: If either the guest or the agent is not already in the system, use the ‘Tab’ key to move off the pop-up list and enter the appropriate information on the screen. This will automatically add them to the Agent Info or Guests area for future reservations. 47 NOTE: Deleting an agent reservation does NOT Step By Step delete their contact record from the system. SEARCH AVAILABILITY Reservations 9.0 has a 'Search Availability' button on nearly every area of the program. This button will take you to the pop-up room grid for this month and this year. Please see Section 3.3, ‘Search Availability’ for stepby-step instructions for using this feature. RESERVING ROOMS After searching availability and returning to the agent reservation you were working on, it is time to enter the rooms for the guests. 1. 2. 3. 4. From the Reserve, Agent, Reservation Info, Guest/Room tab, click the ‘New Line’ button. Enter the reservation information by tabbing from field to field. Choose the Rate from a pop-up list and the charges will automatically calculate. Review for accuracy, edit and repeat the process if multiple rooms for this reservation are needed. 5. Agent commissions are automatically calculated at the bottom of the screen if the Agency has a Commission Rate filled in and if that particular room was checked ‘Commissionable’. Each room reserved on the Agent Reservation will have it’s own Single Reservation number that you can zoom to and each will have it’s own Invoice. IMPORTANT! If you have booked a conflict, the system will show a "CONFLICT" message in red, however it will allow you to leave conflicts in the system. To view a list of reservation conflicts, view the 'Conflict Report' from the Admin Reports in the report menu. EMAILING RESERVATION CONFIRMATIONS Reservation Confirmations can be viewed and then printed or emailed. Please see Section 3.3, ‘Emailing Reservation Confirmations’ for step-by-step instructions for using this feature. FAXING CONFRIMATIONS If you have an internal modem and fax software on your computer, it is possible to fax a confirmation from within Reservations 9.0. Please see Section 3.3, ‘Faxing Confirmations’ for step-by-step instructions for using this feature. TO-DO NOTES Each reservation allows entry of notes about phone calls, faxes, emails or to-do reminders. Please see Section 3.3, ‘To-Do Notes’ for step-by-step instructions for using this feature. CHECK-IN A GUEST To check in a guest, Reservations 9.0 has a check box at the bottom of the main Reserve area screen that makes it quick and easy. You will need to zoom to each guest in the group to check them in. Please see Section 3.3, ‘Check-In a Guest’ for step-by-step instructions for using this feature. 48 ADDING CHARGES TO THE GUEST INVOICE When the guest arrives, you can add charges to their invoice and keep track of what charges were made and for how much. Please see Section 3.3, ‘Adding Charges to the Guest Invoice’ for step-by-step instructions for using this feature. PREPARING CHECK-OUT INVOICE, VIRTUAL TERMINAL, CHECK-OUT A GUEST Please see Section 3.3 for step-by-step instructions for using these features. AGENT COMMISSIONS REPORT The 'Agency Reservations' report, available in the Reports area under the Reservations heading, will list all reservations made by agents and show the commission due. You can 'find' records on this report by Agency or by date. 1. Click the 'Reports' navigation button. 2. Click the 'Agency Reservations' report button under the Reservations heading. 3. Find the desired records for this report. 49 Step By Step NOTE: Locations and Items must be setup Step By Step before creating POS Invoices. 3.6 Point of Sale ENTERING POS / DAY USE INVOICES You can create invoices for Point of Sale locations on your property with this feature. A receipt can be printed, or the charge can be added to a guest invoice with the click of a button. 1. 2. 3. 4. 5. 6. 7. 8. To begin a sale at a POS location, start by clicking the 'POS' navigation button. Click the green '+ New' button to create a new blank record. Select the Location of this sale from the pop-up list on the right side of the screen Drag and drop the Item No on the right to the Item No field on the Invoice, or use a scanner to scan the bar code of the item while your cursor is blinking in the ‘Item No’ field. Edit the quantity of the item, if needed. Continue adding items as needed. Enter the amount tendered to see the 'change due'. Or, if you desire to add the charges to the guest invoice for payment at check out, proceed to step 1 of ‘Posting POS Charges to the Guest Invoice’ below. Click the 'Print Receipt' button to print a receipt. NOTE: if you do not have a receipt printer you can print a full size invoice on any regular printer POSTING POS CHARGES TO THE GUEST INVOICE 1. After adding all of the items you are selling, enter the guest’s reservation number into the 'Res ID' field at the lower left hand side of the screen. (Guest name and Room number will automatically appear after you enter the Res ID number). 2. Verify the Guest name that automatically fills in. 3. Click the 'Add to Guest Invoice' button. NOTE: POS invoices cannot be edited once the payment method is selected (Cash, credit card or posted to guest invoice), except by the Manager access account. 50 R E S E R V A T I O N S 9.0 Pearl User Guide Section 4 INTEGRATION 51 Step By Step NOTE: The USA version of MYOB™ (called NOTE: To find out more this accounting Step By Step Locations and Payabout Type names must NOTE: Item and Pay Type names must match AccountEdge) will import taxMYOB™ code peris software, please use theone following match exactly; keep inthat mind that exactly; keep in mind MYOB™ is URLs: ‘case’ invoice, which is the first tax code used. The Australia: http://myob.com/ ‘case’ sensitive. sensitive. AUS version of MYOB™ can import a separate USA: http://www.accountedge.com/ tax code for each line. 4.1 Accounting SETTINGS TO INTEGRATE WITH ACCOUNTEDGE Before Reservations 9.0 can correctly export and integrate with AccountEdge, there are a few settings that need to be entered according to your company. TAX CODES AND PAYMENT TYPES WITH BANK ACCOUNTS 1. 2. 3. 4. Navigate to the ‘Settings’ à ‘Accounting’ à ‘MYOB’ area. Select the version of the MYOBTM product you use (USA or Australia). Enter an MYOBTM tax code for each tax used with a corresponding rate. Enter the Payment Types with a corresponding MYOBTM Bank Account. FOR GUEST CHECK-OUT INVOICES 1. In your MYOBTM company file, create a customer card named GUEST (all caps) 2. Setup an item in MYOB™ for each rate entered under Room Info in the Reservations 9.0 program. FOR POS / DAY USE RECEIPTS Follow this procedure only if you have registered to use the POS Sales system. 1. Setup one customer card in MYOB™ for each Location listed in the POS Settings button. At least one location is required. 2. Assign an MYOB™ income account for each "Location" in POS settings 52 Step By Step WHAT NEXT: See help notes below for Step By Step NOTE: It is very importantthese that you the information on importing textimport files into invoices BEFORE theMYOB™. receipts into the MYOB file. EXPORTING CLOSED GUEST INVOICES Make sure to review the help note above, ‘Settings to Integrate with MYOB™’, before proceeding. EXPORT THE DATA FROM RESERVATIONS 1. From the Settings à Accounting à MYOB area, click on the button, "Export Closed Guest Invoices and Payments'. This process will export the invoices that have been marked 'checked out' but they have not yet been posted from the Reservations 9.0 program into a tab-delimited text file. 2. A message window will appear, Export Check Out Invoices. This window is to inform you that all guest invoices marked checked out but not yet posted will be exported for MYOB™ and you will be asked to name and save the file. Select Cancel or Okay. If you select Okay to continue, another message window will appear. 3. Export Invoice Payments message will appear next, informing you that the following screen you will need to name the Receipts text file and indicate where to save it. Select okay to continue. 4. A save window will appear for you to name and save the Receipts file. Select Save to continue. 5. An export Invoice Payments message will then appear, informing you that the payments have been exported. Select OK to continue. 6. A message appears instructing you to name and save the Invoice file. 7. Export Check out Invoices message will appear informing you that the Invoices have been exported. You will need to verify the following posting report with the MYOBTM Sales Register after the import is complete. Select Okay to continue. We suggest you over-write this file each time you export. IMPORTING CLOSED GUEST INVOICES After following the steps above, the next step is to import your text files into MYOB™. IMPORT YOUR GUEST INVOICES TO MYOB 1. 2. 3. 4. 5. 6. 7. Open your MYOB™ data file. Choose 'Import Data/Sales/Item Sales from the MYOB File menu. Import File Type = Tab Delimited, First record = Data record, Reject Duplicates. File of type = All Files. Select the Guest Invoice text file just created, Click OK. Click the 'Continue' button. Click the 'Match All' button, then the 'Import' button 53 Step By Step Step Step NOTE: This will create a text file, which you can Step By By Step import into your MYOB™ accounting system as ‘Vendor Cards’. IMPORT YOUR GUEST PAYMENTS (RECEIPTS) INTO MYOBTM 1. 2. 3. 4. 5. 6. 7. Open your MYOB™ data file. Choose 'Import Data/Receipts/Receive Payments from the MYOB™ File menu. Import File Type = Tab Delimited, First record = Data record, Reject Duplicates. File of type = All Files. Select the Receipts text file just created, Click OK. Click the 'Continue' button. Click the 'Match All' button, then the 'Import' button. VIEW / PRINT TRANSACTIONS 1. From the Reports Index, select the 'Sales and Receivables Journal' from the 'Sales' report tab. 2. Click the 'Customize' button and set the date range for the transactions just imported. 3. Click 'Display' to view/print report and compare to posting report from Reservations 9.0. EXPORTING AGENT RECORDS FOR MYOB™ Travel agent information can be exported for MYOB as well. 1. 2. 3. 4. Start by clicking the 'Settings' button Click the 'Accounting' button Click the 'Export Agency Names' button Follow the prompts to name the export file IMPORTING AGENT RECORDS 1. From within MYOB™, choose Import Data/Cards/Vendors from the File menu. 2. Import File format = Tab-delimited, First Record is = Data Record, Duplicate Records = Reject Them (or update them) 3. Click 'Continue' 4. Select the file you exported above for Agents, then click 'Open' 5. Click the 'Match All' button, then the 'Import' button. 54 Step By Step EXPORTING POS SALES FOR MYOB Select this button only if you have registered to use a Daily POS Sales system. 1. Under the ‘Settings’ and ‘Accounting’ navigation buttons, click the ‘Export Daily POS Sales’. 2. This process will find the new sales not yet posted and will create a tab-delimited text file. Any sales that have been charged back to a guest invoice will not be included in the batch. These charges will post in with the guest invoice. 3. Export Daily Receipts window will appear. Select a Receipt Date and click Okay to continue. 4. Export Daily POS Receipts window will appear informing you that you will need to name and save the Receipts file. Select Okay to continue. We suggest you over-write this file each time you export. IMPORTING POS SALES 1. 2. 3. 4. 5. 6. 7. Open your MYOB™ data file. Choose 'Import Data/Sales/Service Sales from the MYOBTM File menu. Import File Type = Tab Delimited, First record = Data record, Reject Duplicates. File of type = All Files. Select the POS Sales text file just created, Click OK. Click the 'Continue' button. Click the 'Match All' button, then the 'Import' button. VIEW / PRINT TRANSACTIONS 1. From the Reports Index, select the 'Sales and Receivables Journal' from the 'Sales' report tab. 2. Click the 'Customize' button and set the date range for the transactions just imported. 3. Click 'Display' to view/print report and compare to posting report from Reservations 9.0. POSTING TO QUICKBOOKS™ Requirements for sending Guests to QB: 1. Set up one Customer named "Guest" in QuickBooks (Actual guest name and address are sent in on the invoices under the "Guest" name). Note: You also have the option of setting up each Guest in QB. See 'Guest Information Preference' in the QuickBooks Accounting Settings area. Requirements for sending Guest invoices to QB: 1. The Class must exist in QB (if used). 2. The Tax Codes must exist in QB as a Sales Tax Item. 3. The Rate ID's must exist in QB as Items. 4. The payment method must exist in QB customer list items. Requirements for sending Guest Payments to QB: 1. The payment type must exist in QB customer list items. 2. The invoice must be posted to QB before payment can be posted. Requirements for sending POS Receipts to QB: 1. The Locations must exist in QB as a customer. Note: leave tax code blank on customer in QB. 55 2. The Class must exist in QB (not required, but if used the class must exist). 3. The Tax Codes must exist in QB as a Sales Tax Item. 4. The Locations must exist in QB as Items (make locations taxable - tax will actually be determined by each sale that posts.). 5. The payment method must exist in QB customer list items. To Send Transactions: Guest Record: click 'Post Guest to QB' button on Guest Add’l Info/QB screen. Guest Invoice: click 'Post to QB' button on Reserve screen. Guest Payment: click 'Send QB' button on payment line item. POS Receipt: click 'Post to QuickBooks' button on POS Screen. 56 4.2 Credit Cards PAYPAL™ VIRTUAL TERMINAL If you don't have a merchant account, PayPalTM is a quick and easy way to start accepting credit cards. PayPal™accepts credit cards from 190 countries, and offers a 'virtual terminal' that makes it easy for you to enter credit card payments while you are entering the reservation right in your software! Each of the single reservation screens (found in the Reserve, Single navigation area) has a 'Virtual Terminal' button where you can enter and process these payments with an Internet connection. This button defaults to the PayPal™ virtual terminal site unless you enter a URL in the Settings area for another virtual terminal. Go to the ‘Settings’ area of Reservations 9.0 for more information and to sign up! You can also navigate to the PayPal™ website for more information. Please use the link provided in the Settings, Accept Credit Cards, and PayPal navigation area to setup your account. Virtual Terminal with PayPal™ is currently only available in the US. 57 USING YOUR MERCHANT ACCOUNT If you already have a merchant account and they offer a 'virtual terminal', enter the URL in the Settings, Accept Credit Cards, Merchant Account area. This will make the website appear when clicking the 'Virtual Terminal' button so you can enter and process credit card payments right inside your Reservations 9.0 software! If you don't already have a merchant account, we recommend the PayPal™ virtual terminal. To find out more information about this, please visit the following URL: https://www.paypal.com/us/mrb/pal=SBAX33KJ6QK2Y 58 4.3 Availability Online™ AN OVERVIEW Availability Online™ is an online reservations program that works with your website and the Reservations 9.0 software. You can have a link on your website to accept online reservations, and Availability Online™ will send you an email notification when a new reservation has been placed. Inside the email notification is an email link that you can paste into the 'Availability Online' screen to display, review, edit and save the reservation. Availability can be uploaded to the Availability Online™ site from your Reservations 9.0 software as well to keep the online availability current. Below is an example of a calendar that could appear on your website. Keep in mind that the calendar is completely customizable to match your website. 59 Step By Step HOW DO I SIGN UP? If you have a website and would like to take reservations online, Availability Online™ makes it easy, affordable, and it works with this software! AVAILABILITY ONLINE™ WEBSITE Go to www.availabilityonline.com and be sure to tell them you use our Reservations 9.0 software! BEFORE USING AVAILABILITY ONLINE Before using your Availability Online™ account with your Reservations 9.0 software, make sure that you enter your room names in Availability Online™. The ‘Name’ field of the Room Management area in Availability Online must match EXACTLY the 'Room ID/Name' field in the Room --> Units & Rates area of Reservations 9.0, including such details as the capital and small letters must match, and there can be no extra spaces or hard returns. IMPORTANT: Do not change the Room No/Name field in Reservations 9.0 after setting up rooms and making reservations, because changing it will cause all Rates, Reservation History, Furniture and Maintenance records related to the room to disconnect. Instead, change what you have in Availability Online. PROCESSING AN AVAILABILITY ONLINE™ RESERVATION An Availability Online™ account is required to use this feature. Once you have created an account, setup your rooms, and receive a notification email from Availability Online™ informing you of a new reservation, you can proceed to process the reservations in your Reservations 9.0 database. 1. When you receive a notification email from Availability Online informing you of a new reservation, copy the link under ‘View details for this reservation’ in the sent email. 2. In Reservations 9.0, navigate to the 'Reserve' à 'Online' area. 3. Paste the link into the text box on the right side of the screen and click the 'Display' button, then log in. Note: you will need to login each time you revisit this screen for security reasons. 4. The Availability Online reservation appears on the left. You can ‘Search Availability’ and come back to this screen as needed. Note: We advise not to use the ‘Archive’ or ‘Send Confirmation E-mail’ buttons located at the bottom of the scrolling window you use to view the reservation. Instead, send a confirmation email from the ‘Reserve’ à ‘Single’ area and upload availability from the ‘Reserve’ à ‘Online’ à ‘Upload Availability’ area. 5. To add this reservation to your records, click the 'Add Reservation Displayed Below' button. 6. This will take you to a review screen. PLEASE REVIEW the reservation information and edit as needed because the guest may note have completed the Availability Online form correctly and some information may need to be moved or screened for typos. The first room shown in Availability Online™ will be used for this reservation by default and will show in the choice 1 'Room' field in this area. You can edit this room before saving. 7. Before continuing, determine whether the guest is already in your system by clicking the drop-down list called ‘Guest ID’ and search by last name. This will keep all of your guest’s history linked. If this reservation is from a new guest, a new guest ID will automatically be generated once you click the ‘confirm’ button. 8. Choose the appropriate tax to apply to this reservation by clicking the tax check boxes on the right side of the screen. 9. Click the 'Confirm - Save Reservation Displayed' button to save this reservation to your 60 Step By Step records. Note: Availability Online version 4.0 allows up-selling of items. Reservations 9.0 currently does not support up-selling of items for the import or accepting of Reservations. Note: The Payment Information seen in the review window will be recorded and saved in Reservations 9.0, however the credit card number will be encrypted to comply with PCI requirements. UPLOADING AVAILABILITY Click a button to upload your availability calendar to Availability Online™ at any time to keep your online calendar up to date. Before uploading your calendar for the first time, you will need to set up your Availability Online default account information by navigating to the ‘Reserve’ à ‘Online ’ à ‘Upload Availability’ area (i.e. Username and Password). 1. To upload your availability to your online calendar, navigate to the ‘Reserve’ à ‘Online ’ à ‘Upload Availability’ area. 2. Be sure you have your user ID and password entered. 3. Follow the instructions on the left by first clicking on the current month. The system will automatically upload/update one year’s worth of reservations. 4. Click the button ‘Upload to Availability Online’. 5. This process might take a few minutes. It’s important not to interrupt the process once you’ve started it, so please wait as the process is completed. When the process is complete, a window will pop-up saying ‘Upload Complete’ and upload results will show in the field on the current screen. 61 62 4.4 Point of Sale Hardware Below is the recommended hardware that has been tested to work with Reservations 9.0. Please contact us or visit the ordering page on our website if you’re interested in ordering. RECEIPT PRINTER Manufacturer: Star Micronics Model: Star TSP100 futurePRINT™ CASH DRAWER Manufacturer: M-S Cash Drawer™ Model: CF-405 BARCODE SCANNER Manufacturer: Hand Held Products™ Model: 3800g General Purpose Linear Imager 63 R E S E R V A T I O N S 9.0 Pearl User Guide Section 5 FILE MAINTENANCE 64 5.1 Saving a Master Copy SAVE A MASTER COPY OF YOUR SOFTWARE Reservations 9.0 is delivered via electronic download, so you are able to start using the program immediately after purchasing it from our website. It’s important to save a master copy of your program in case you need to reinstall on a new computer at some point. Most computer systems have a utility program to burn a CD of anything on your computer. See your computer’s help system for detailed instructions, but generally the utility program will automatically be displayed if you insert a blank CD into the CD drive of your computer. Copy/paste or drag your Reservations 9.0 installer to the CD, then tell your computer to burn the CD to make a permanent copy. 5.2 Backup Procedures NEVER BACKUP OR COPY YOUR RESERVATIONS 9.0 SYSTEM WHILE IT IS RUNNING! This also applies if your system has automatic system-wide backup software installed, such as Time Machine, which now comes standard on the Mac. Make sure the backup is scheduled to run at a time when your Reservations software will be closed. This includes backup software for Windows machines that is designed to skip open programs; it may still cause corruption in your Reservations software if you have it open while the backup runs. You can back up your Reservations 9.0 system by burning it to a CD. Most computer systems have a utility program to burn a CD of anything on your computer. See your computer’s help system for detailed instructions, but generally the utility program will automatically be displayed if you insert a blank CD into the CD drive of your computer. Remember to quit the Reservations system before backing up, then copy/paste or drag your Reservations 9.0 installer to the CD and tell your computer to burn the CD to make a copy. You can also copy/paste it to another storage device at regular intervals. If you use the FileMaker™ Server software, there is a built-in backup system that can automatically backup your system on a regular basis. FileMaker Server is an optional software package used to extend a network beyond the 9 users that is allowed with individual copies of FileMaker. See www.FileMaker.com for more information. 65 R E S E R V A T I O N S 9.0 Pearl User Guide Section 6 REPORTING 66 6.1 Reporting Overview All the reports in Reservations 9.0 have a ‘Print’ button, which is preset to print a certain page setup, either landscape or portrait, and a certain amount of records, either the current record or the set of records being browsed. Other options you might have are ‘Find’, ‘Find All’ and ‘Sort’. These buttons make reports flexible for you, letting you find records by a certain criteria, find all records or sort the records (i.e. sort by date, invoice number, name, etc.). Some reports will automatically sort for you based on the most recently found set. Whenever you view a report in the system, you will always be taken to the last records you were viewing in that area. Here is an example of the Current Guest List report: 6.2 Guest Reports GUEST REPORTS Use these guest reports to view and print information about your guests. 67 6.3 Reservation Reports RESERVATION REPORTS This set of reports is used to keep track of your reservations and availability. 6.4 Accounting Reports ACCOUNTING REPORTS Use these accounting reports for bookkeeping: To report sales per tax: 1. Click the 'Invoice Log Detail' report button under the Accounting heading. 2. Click the 'Find' button'. 3. Enter the date range desired for the report in the date field. 4. Click ‘Perform’. 68 6.4 Marketing Reports MARKETING REPORTS Use these Marketing reports and tools to keep in touch with your guests and inquiries: 1. Inquiry List - This list displays all the records entered as an 'inquiry' in the Guest Info area. Use this list to follow up with potential customers. 2. Referral Report - This list displays the 'referral' entered on the Guest record. You can find records on this list by the referral type and email the found set of records. 3. Mailing Labels - Create mailing labels for a set of records. Detailed instructions and options are available after clicking the button. 4. Mail Merge - Use this feature to prepare a 'merge' file for the found set of records to use with Word or other word-processing program. You would find the set of records you wish to do the mail merge with, and then go to this screen to save the merge file. 5. Birthday List - This list offers an easy way to find guest with birthdays in any month, which is a great opportunity to keep in touch and make a special offer for them to return to your property! 6.5 Shift Reports SHIFT REPORTS There are four shift reports available on the Reports menu: 1. Shift Check-out Summary - This report shows just the invoice totals for guests checked out on the 'found' shift. You would find the staff name and date for this report. 2. Shift Check-out Detail - This report shows the invoice detail for guests checked out on the 'found' shift. You would find the staff name and date for this report. 3. Shift Receipts Log - This report shows total receipts entered on the 'found' shift. You would find the staff name and date for this report. 4. Shift Booking Report - This report shows a list of reservations made on the 'found' shift. You would find the staff name and date for this report. 69 6.6 The To-Do List TO-DO LIST The To-Do list report, found at the end of the Admin Reports, will display memos with a reminder date due today or later. To-Do notes will stay on the list until the 'Done' box is checked. 70 R E S E R V A T I O N S 9.0 Pearl User Guide Section 7 CUSTOMIZING 71 Step By Step 7.1 Inserting Your Company Logo In order to have your company logo appear on the Invoices and Confirmations throughout the system, you will have to add it in the Settings area. 1. Click on the ‘Settings’ navigation button, then ‘Company Defaults’. 2. In the ‘Company Settings’ area, click into the ‘Logo’ box, then either: A. Paste in an image, – OR – B. Click the ‘Insert’ menu, click ‘Picture…’ and choose a file from your computer. 3. Click somewhere on the gray area of the screen to save your information. For more information on entering your company defaults, see 2.1 Company Defaults. 7.2 Customize Layouts Customize the Confirmation and Guest Invoice Forms With the Single-user version and the Pro Pack, or the Multi-user version (which includes the Pro Pack), you can customize the layouts in the program. Navigate to the Settings à Customize area to get started. Here are some of the features you can change on your layout: • Change which fields display and how they are arranged. • Add field labels and text. 72 • Change the format of text, dates, time, and numbers in fields or text. • Specify which objects to print. • Add graphics (your logo or other images). To learn more about editing layouts, use the link below to view a Getting Started with FileMaker video or search the FileMaker 'Help' menu. http://fmdl.filemaker.com/MISC/fmp10/fm10_overview_640x400.mov Layouts that are modifiable within Reservations 9.0 include: • All invoice layouts, • All confirmation layouts, • POS receipt layouts, • POS sales report, • Current guest list, • Reservations by month, • Receipts log, and • User Definable Fields Reports (Reservation and Guest). 7.3 More Customizations GET AN ESTIMATE TO FURTHER MODIFY THE SYSTEM Do you have special needs or require special program featured? Send us your wish list for an estimate to have our developers at Compu-Books prepare a custom version to fit your company’s special needs. Reservations 9.0 has been modified for diving resorts, fishing lodges, cabin rentals, time share and many others. 73 R E S E R V A T I O N S 9.0 Pearl User Guide Section 8 SUPPORT 74 8.1 Support Options COMPLIMENTARY SUPPORT We care about you, our valuable customers. That’s why we always offer 90 days of free phone and email support after you purchase our software. We’ll help with your initial set-up and provide training resources. Registered users also always receive free updates, which include changes and enhancements that are made to Reservations 9.0. Make sure to watch for updates on the ‘What’s New’ page of our website and sign up for the Reservations Newsletter to be notified when updates are made available. FEE-BASED SERVICES Please visit our website for more details or to request our fee-based services, which include: • One on One Training – A 30-minute screen-sharing session with the Team Viewer software in which we assist you with any specific training or set-up needs you have. • Data Migration / System Setup – We will set up your system for you; this includes importing your guest information, room information, and your rates so all you need to do is start taking reservations! • Data Recovery – We are here to help in the unfortunate event you experience a system crash. We will recover your data if possible. Reservations 9.0 is published by Compu-Books Glendale, Arizona USA Phone: 623-217-2167 • Fax: 623-223-7235 [email protected] • www.Compu-Reservations.com Reservations 9.0 is a Trademark of Compu-Books All Rights reserved. Reservations 9.0 is built using FileMaker™ as a programming tool. FileMaker and the file folder logo are trademarks of FileMaker, Inc., registered in the US and other countries. FileMaker has no obligation to provide any technical support for the software. Contact Compu-Books for all support questions. 75 R E S E R V A T I O N S 9.0 Pearl User Guide Section 9 Calendar 76 9. Reservations Calendar We have added an additional Reservations Calendar that works in conjunction with Reservations 9.0. The Reservations Calendar allows users to update the calendar with the reservations out of Reservations 9.0. Users can also add their own appointments to the calendar. Different Calendar views may be printed for reference. 9.1 Opening the Calendar OPENING THE CALENDAR Opening the calendar can be performed easily by clicking the Calendar Icon located at the top of most screens. 9.2 Refreshing the Calendar REFRESHING THE CALENDAR Upon opening the calendar, we recommend, “Refreshing” the calendar. This can be done simply by pressing the icon on the Calendar window. A Dialog Box will appear (pictured below) in which the current date is set as the starting date. Enter a start date that you would like the reservations to be refreshed. Upon clicking “OK”, all reservations on or after the starting date will be deleted, and all reservations on or after the starting date will be pulled from Reservations V9 and added to the Calendar. NOTE: Reservations Prior to the Starting Date will not be deleted from the calendar to allow reference to past reservations. NOTE: Events added to the calendar manually will not be modified during a refresh. NOTE: Any modifications made to a Reservation event in the calendar will have no affect on the actual reservation in Reservations V9. 9.3 Navigating the Calendar 77 NAVIGATING THE CALENDAR Navigating the Calendar is very simple. Todays date will always be highlighted in yellow for easy reference. You may navigate by using the calendar to the right of the calendar grid to zoom to a specific day, use the today, tomorrow, or enter date buttons to jump to a specific day or use the Previous and Next buttons located just above the calendar grid. 9.4 Viewing the Details of an Event VIEWING DETAILS OF AN EVENT Hovering over an event will display the description of the event. Clicking on a specific calendar event will open a pop-up window displaying all the details: 9.5 Calendar Views CALENDAR VIEWS The Calendar is split into 3 separate calendar views listed below. Clicking on the respective button will navigate to the correct view. 1. Day View: This view displays all the events for the day. This view is best if there are a large number of Reservations. 2. Week View: This view displays events over 7 day period Calendar view. 3. Month View: Displays events for the entire month. NOTE: If there are more than 5 events per day, in the Monthly view you will see a bolded line appear with the number of additional events on that day. Clicking on the bolded “x more” line will zoom to the daily view which will display all the events for the day. 78 9.6 Adding a Manual Event ADDING A MANUAL EVENT Clicking on the button will bring up the Event Details screen in which you may add a new Event. After adding your event, click the the event and update the calendar grid. button to save NOTE: An additional way to add an event to the Calendar is to press and hold the Shift button down and then click anywhere in the calendar grid. A new Event Details screen will appear for that day. 9.7 Printing a Calendar View PRINTING A CALENDAR VIEW Clicking the button will open a new window displaying the respective calendar view, (Daily, Weekly, or Monthly) ready to be printed. 79 R E S E R V A T I O N S 9.0 Pearl User Guide Section 10 Reservations GO! 80 Step By Step 10. Reservations GO! Reservations GO is a simplified mobile version of Reservations. Reservations Go is available only with the MultiUser versions of ReservationsV9. NOTE: Reservations GO is currently only available for the iPhone. 10.1 Opening Reservations Go OPENING RESERVATIONS GO 1. To open Reservations Go, you must first download the latest version of FileMaker Go 12 to your iPhone. FileMaker Go 12 for iPhone is available through the Apple App Store for free. 2. Reservations Go will connect to ReservationsV9 remotely. You must open your Reservations V9 file to allow Sharing. See section 1.3 Networking for instructions on how to set up Remote Sharing for the Host Computer. 4. Now you can open Reservations Go on your iPhone. Start the FileMaker Go application on your iPhone. Click on the ‘Open File Browser...’ button. A)Select ‘Local Network Hosts’. Select your Local Host Name. Select ‘Reservations V9’. The Reservations Go menu will appear, and you can begin using the application. local b) Remote 81 10.2 Go Guests Area GO GUESTS AREA 1. Guest List When Pressing the Guests button you will be presented with the Guest List, this is an alphabetical list by Last Name. Clicking on any guest name will open the Guest Details. Clicking on the ‘New Guest’ button will open another screen enabling you to add a new guest. You may click the ‘Find’ button to search for an individual name. 2. Guest Details The Guest Details view offers a subset of the details offered on the Desktop Version of Reservations V9. You will have the ability to Add New Guests, Delete a Guest, and scroll through all Guests. Reservations Go limits the editable items to Guest Address, Contact Info, Marketing details, and Notes. NOTE: Any changes made in Reservations Go will immediately be changed in ReservationsV9. 82 10.3 Go Reservations Area GO RESERVATIONS AREA 1. Reservation List When Pressing the Reserve button you will be presented with the Reservations List. Clicking on any reservation will open the Reservation Details. Guests that have Checked In and have not yet Checked Out will be highlighted in grey. Clicking the Find Button will allow you to find by Reservation Number, Guest Name, or Check In Date. Clicking on the ‘New Reservation’ button will open another screen enabling you to add a new guest. NOTE: If you are in Find mode and want to Cancel your Find. Press the ‘Find All’ button and a dialog will appear with a Cancel button. 2. Reservation Details The Reservations view offers a subset of the details offered on the Desktop Version of Reservations V9. You will have the ability to Add New Reservation, Delete a Reservation, and scroll through all Reservations. You can add Charges, Payments, and Email a Confirmation by clicking on the respective buttons. NOTE: Any changes made in Reservations Go will immediately be changed in ReservationsV9. 83 10.4 GO Search Availability Area GO SEARCH AVAILABILITY AREA The Search Availability works similar to the Search Availability in ReservationsV9 except in Reservations Go only the Total Number of Guests is displayed due to size constraints. NOTE: Search Availability is best viewed in Landscape Mode. 10.5 GO Reports Area GO REPORTS AREA 1. Only a subset of the Reports offered on the Desktop Version of Reservations V9 are available in Reservations Go. 84 R E S E R V A T I O N S 9.0 Pearl User Guide Section 11 Update Wizard 85 11. Update Wizard When Upgrading from a previous or current version of Reservations you will be guided trough the Update Wizard. Manual intervention needs to take place for renaming the old Reservations file, or for converting the old file to the current version. Follow the instructions on the wizard to complete the Upgrade. 11.1 Selecting the correct Version: SELECTING THE CORRECT VERSION The first step of the Update Wizard is to choose the correct version you are upgrading from. Select one of the options from the list and press the ‘Continue’ button. You must select the version you are updating from in order to continue. 11.2 Updating from Version 7 or Version 8 UDATING FROM VERSION 7 OR VERSION 8 If you are upgrading from Version 7 or Version 8, you will need to convert the old ReservationsV#.fp7 file up to the new file format of ReservationsOLD.fmp12. Please follow the instructions on the Update Wizard screen. Pressing the ‘Print Instructions’ button on the Update Wizard screen can print instructions. After converting the file and placing in the correct folder, press the ‘Start Update Wizard’ to begin updating your old Reservations File. 86 11.3 Updating from Version 7 or Version 8 Single User UPDATING FROM VERSION 7 OR VERSION 8 SINGLE USER Single Users upgrading from Version 7 or 8 of Reservations, Users will be required to send Compu-Books their existing Reservations file, and we will convert and return the file to you. Please follow the instructions on the Update Wizard Screen. Pressing the ‘Print Instructions’ button on the Update Wizard screen can print instructions. After converting the file and placing in the correct folder, press the ‘Start Update Wizard’ to begin updating your old Reservations File. 87 11.4 Updating from Version 9 Any Type UPDATING FROM VERSION 9 ANY TYPE If you are upgrading from Version 9, you will need to rename your existing Reservations file and perform the Update Wizard. Please follow the instructions on the Update Wizard screen. Pressing the ‘Print Instructions’ button on the Update Wizard screen can print instructions. After converting the file and placing in the correct folder, press the ‘Start Update Wizard’ to begin updating your old Reservations File. 88


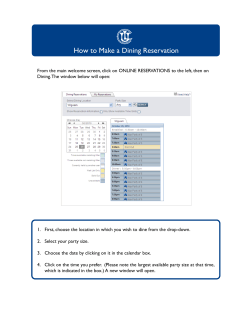


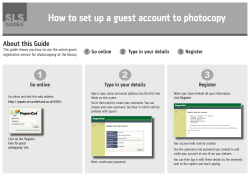


© Copyright 2026