
2 Connection
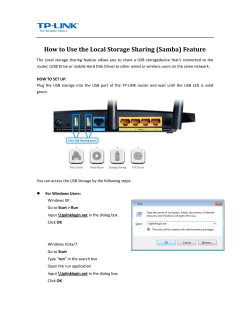
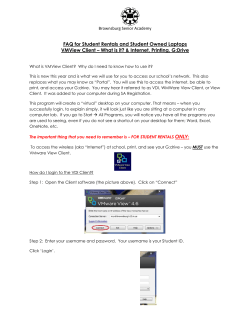
WRH-300xx2-S Simple Manual
English
Names and Functions of Parts
Top
Right side
Procedure
2
WRH-300xx2-S 简易版用户手册 中文・简体
Connection
A Windows 8.1 / 8
顶部
Click the wireless icon.
右侧面
②①
Bottom
④
Left side
⑥
⑦
A wired connection has not been established.
Off
Lit
A wired connection has been established.
Blinking Data is being transferred.
② WLAN lamp(green) Blinking The wireless connection is enabled.
WPS/RESET lamp Blinking The WPS function is in operation
③
(green)
The reset function is starting
Lit
Use a LAN cable to connect this product to the hotel's LAN port.
④ ETHERNET port
Hold down this button for approximately three seconds to start
⑤ WPS button
the WPS function
Hold down this button for approximately five seconds to start
⑥ Reset button
the reset function
① ETHERNET lamp
(green)
⑦ USB connector
(power supply)
This is a USB micro-B connector for use in supplying power to
the device.
Connect the included USB (Micro-B to A) cable.
Supplying Power
■Supply power using a PC USB port and the included
USB (Micro-B to A) cable
■Supply power using a separately sold USB power
supply adapter and the included USB (Micro-B to A)
cable
* Use a USB power supply adapter that has an output of 5 V
and 500 mA or more.
1 Connecting to a Wireless LAN
Procedure
Router (Router Mode or
Access Point Mode)
Connect a LAN cable (either one that you have purchased
separately or one that is provided by the hotel) to the
LAN port in the hotel room and to this product's
ETHERNET port.
Supply power to the product according to the
instructions under "Supplying Power."
Check that this product's lamps are as shown below:
① ETHERNET lamp Lit in green or blinking in green
Lit
in green or blinking in green
② WLAN lamp
③ WPS/RESET lamp Off
Connect to the network according to the instructions
under "Procedure 2, Connection."
连接
将鼠标器放到屏幕右上角,
出现超级按钮栏,
点击
[设置]
。
点击无线的图标。
From the list of networks, select the network that has the
same SSID as the network written on the included "Setup
Information Sheet," and then click [Connect].
⑤ ③
2
A Windows 8.1 / 8
各部分的名称和作用
Point to the upper-right corner of the screen to display the
Charms bar, and then click [Settings].
步骤
从网络列表中选择与附带的“ 设置信息表 ”上所记载的相
同的 SSID,
并点击
[连接]
按钮。
Check that the message "You can also connect by pushing the
button on the router." is displayed.
Hold down the product's [WPS] button for approximately 3
seconds. When you release the button, the product's
"WPS/RESET lamp" will start to blink in green.
If a screen is displayed with the message "Do you want to
turn on sharing between PCs and connect to devices on this
network?", click "Yes, turn on sharing and connect to
devices."
⑤ ③
②①
底部
④
左侧面
确认“ 按下路由器的按钮也无法连接。
”的消息。
长按本产品的[WPS 按钮]3 秒钟左右然后放开,本产品的
“WPS/RESET 指示灯 ”开始绿色闪烁。
弹出“ 启用电脑共享 ...”窗口后,点击“ 是,启用共享并连接
到设备 ”
。
B Windows 7/Vista/XP
⑥
Click the wireless LAN icon in the notification area in the
lower-right corner of the screen.
From the list of networks, select the network that has the
same SSID as the network written on the included "Setup
Information Sheet", and then click [Connect].
When the "Connect to a Network" dialog box is displayed,
enter the (13-digit) encryption key written above, and
then click [OK].
If you are using the WPS function to establish the connection,
hold down the product's [WPS] button for approximately 3
seconds. When you release the button, the product's
"WPS/RESET" lamp will start to blink in green.
⑦
熄灭 有线未连接
ETHERNET指示灯
亮灯 有线连接中
①
(绿色)
闪烁 数据传输中
② WLAN指示灯(绿色) 闪烁 无线功能已开启。
WPS/Reset指示灯 闪烁 WPS功能工作中
③
(绿色)
亮灯 重置功能启动
用局域网电缆连接本产品和酒店的局域网端子。
④ ETHERNET端口
按住约3秒后,WPS功能启动
⑤ WPS按钮
⑥ Reset按钮
按住约5秒后,重置功能启动
⑦ USB 连接器
这是供电专用USB micro-B连接器。
(用于电源)
连接附带的USB(microB-A)电缆。
B Windows 7/Vista/XP
点击屏幕右下方任务栏上的无线局域网的图标。
从网络列表中选择与附带的“ 设置信息表 ”上所记载的相
同的 SSID 并点击
[连接]
按钮。
弹出“ 连接到网络 ”的窗口后,输入上面的密钥(13 位数)
并点击
[确定]。
使用 WPS 功能连接时,长按本产品的[WPS 按钮]3 秒钟
左右后放开,本产品的“WPS/RESET ”指示灯开始绿色闪
烁。
不久,
“ 连接到网络 ”窗口自动关闭。
Eventually, the "Connect to a Network" dialog box will
disappear automatically.
取电的方法
■ 用电脑的 USB 端口
+附带的 USB
(microB-A)
电缆供电
■用另售的 USB 供电适配器
+附带的 USB(microB-A)电缆供电
C Mac OS (Wireless LAN Connection)
Click the [Apple menu] in the upper left of the screen, and
then click [System Preferences].
Click [Network].
※USB供电适配器请使用具有5V 500mA以上的输出的产品。
Check that "Status" for the AirMac (Wi-Fi) has changed to
"On."
From the list of networks, select the network that has the
same SSID as the network written on the included "Setup
Information Sheet."
步骤
A password entry screen will be displayed, so enter the
(13-digit) encryption key written on the "Setup Information
Sheet," and then click [OK].
1
Install the simple setup application "QR link" (free of charge),
and then configure the settings.
连接无线局域网路由器
(路由器模式)
(访问点模式)
参考“ 取电的方法 ”取电。
From your terminal, open the AppStore (iOS) or Google Play
(Android), search for [QR link], and then install the software.
确认本产品指示灯的状态是否如下所示。
① ETHERNET 指示灯 绿色亮灯或绿色闪烁
绿色亮灯或绿色闪烁
② WLAN 指示灯
③ WPS/RESET 指示灯 熄灭
On your terminal's home screen, tap the [QR link] icon.
Tap [Read QR Code] to read the QR code printed on the
included "Setup Information Sheet."
Follow the instructions on the screen, and then tap
[Close] to finish the procedure.
点击屏幕左上方的
[苹果菜单]
,
点击
[系统环境设置]
。
点击 [ 网络 ]。
确认 AirMac (Wi-Fi) 的“ 状况 ”为“ 启用 ”。
从“ 网络名称 ”列表中选择与附带的“ 设置信息表 ”上所
记载的相同的 SSID 。
将另售的或者酒店内设置的局域网电缆连接到酒店客房的
局域网端子与本产品的 ETHERNET 端口上。
D Smartphones and tablet PCs(iOS/Android)
C Mac OS(无线局域网连接)
请参考“ 步骤 2 连接 ”
,
接入网络。
弹出密码输入窗口,输入“ 设置信息表 ”所记载的密钥(13
位数)
并点击
[确定]
。
D 智能手机/平板电脑(iOS/Android)
安装简单设置应用程序“QR link”
(免费),进行设置。
从智能手机或平板电脑打开 AppStore(iOS)或 Google Play
(Android)
,
搜索
[QR link]
并安装。
触摸智能手机或平板电脑的主屏上的[QR link]
图标。
触摸[QR 码读取]
,读取附带的“ 设置信息表 ”上打印的
QR 码。
按照屏幕上的指示,
最后触摸[关闭]按钮。
有些酒店可能需要用Web浏览器(IE或Safari等)进行认证,如果需要认证,请向
您下榻的酒店确认认证方法。
Depending on the hotel, the web browser (such as IE and Safari) may require you
to certify yourself. In this situation, check with the hotel regarding how to do this.
-1-
WRH-300xx2-S 간이 버전 매뉴얼
한국어
2
Manual simples WRH-300xx2-S
접속
우측면
Português
Nome e função das partes
A Windows 8.1 / 8
각 부분의 명칭과 기능
윗면
순서
화면의 우측 상단 모서리에 마우스를 올리면 표시되는 참바
(charm bar)에서 [설정]을 클릭합니다.
Parte superior
Lado direito
무선 아이콘을 클릭합니다.
네트워크 목록에서「설정 정보 시트」내에 기재된 것과
동일한 SSID를 선택한 후[접속]버튼을 클릭합니다.
⑤ ③
②①
④
좌측면
바닥면
「라우터 버튼을 눌러도 접속할 수 있습니다. 」
라는 메시지를
확인합니다.
⑤ ③
Parte inferior
본 제품의[WPS 버튼]
을 3초 정도 길게 누른 후 손을 떼면 본
제품의「WPS/RESET 램프」
이 녹색으로 점멸을 시작합니다.
②①
④
Lado esquerdo
「PC의 공유를 ON으로...」
화면이 표시되면「예, 공유를 ON
하여 디바이스에 접속합니다」
를 클릭합니다.
⑥
⑦
소등 유선 미접속
ETHERNET 램프
점등 유선 접속 중
①
(녹색)
점멸 데이터 전송 중
② WLAN 램프(녹색) 점멸 무선이 활성화 상태.
WPS/RESET 램프 점멸 WPS 기능 동작 중
③
(녹색)
소등 리셋 기능 기동
본 제품과 호텔의 LAN단자를 LAN 케이블로 접속합니다.
④ ETHERNET 포트
약 3 초간 누르면 WPS 기능 작동
⑤ WPS 버튼
⑥ Reset 버튼
약 5 초간 누르면 리셋 기능 작동
⑦ USB 커넥터
전원공급 전용 USB micro-B 커넥터입니다.
(전원용)
동봉의 USB(microB-A) 케이블을 접속합니다.
B Windows 7/Vista/XP
⑥
화면 우측 하단의 태스크 트레이에 있는 무선 LAN 아이콘을
클릭합니다.
Não foi estabelecida uma conexão com fio.
Desl
Acesa
Foi estabelecida uma conexão com fio.
Piscando Dados estão sendo transferidos.
② Lâmpada WLAN(verde) Piscando A conexão sem fio está ativada.
Piscando A função WPS está em operação.
Lâmpada
③
WPS/RESET(verde) Acesa
A função de reinicialização está iniciando.
④ Porta ETHERNET Use um cabo LAN para conectar este produto à porta LAN do hotel.
Mantenha o botão pressionado por aproximadamente
⑤ Botão WPS
3 segundos para ativar a função WPS.
⑥ Botão
Mantenha o botão pressionado por aproximadamente
reinicialização
5 segundos para iniciar a função de reinicialização.
⑦ Conector USB
Este é um conector USB micro B a ser utilizada para suprir
(fonte de
o dispositivo de energia.
alimentação)
Conecte o cabo USB (micro B para A) incluso.
Lâmpada
① ETHERNET
(verde)
네트워크 목록에서「설정 정보 시트」내에 기재된 것과
동일한 SSID를 선택한 후[접속]버튼을 클릭합니다.
「네트워크에 접속」화면이 표시되면 위의 암호 키(13자리)
를 입력한 후[OK]
를 클릭합니다.
WPS 기능을 사용하여 접속할 경우는 본 제품의[WPS
버튼]을 3초 정도 길게 누른 후 손을 뗍니다. 본 제품의
「WPS/RESET」
램프 이 녹색으로 점멸을 시작합니다.
잠시 후 자동으로「네트워크에 접속」화면이 꺼집니다.
전원 취득법
■ PC의 USB 포트
+동봉의 USB(microB-A) 케이블로 전원공급
■별매의 USB 전원공급 어댑터
+동봉의 USB(microB-A) 케이블로 전원공급
※USB 전원공급 어댑터는 5V 500mA 이상의 출력을 가진
제품을 사용해 주십시오.
순서
1
무선 LAN 라우터에 연결
(라우터 모드)
(액세스 포인트 모드)
별매 또는 호텔에 설치된 LAN 케이블을 호텔 객실에 있는
LAN 단자과 본 제품의 ETHERNET 포트에 접속합니다.
「전원 취득법」을 참고로 전원을 취득합니다.
본 제품의 램프 상태가 다음과 같이 되어 있는지
확인합니다.
① ETHERNET 램프 녹색 점등 또는 녹색 점멸
녹색 점등 또는 녹색 점멸
② WLAN 램프
③ WPS/RESET 램프 소등
「순서2 접속」
를 참고로 네트워크에 접속해 주십시오.
C Mac OS(무선 LAN 접속)
Suprimento de energia
화면 좌측 상단에 있는[애플 메뉴]를 클릭한 후[시스템
환경 설정]
을 클릭합니다.
■Forneça energia usando uma porta USB do PC
e o cabo USB (micro B para A) incluso
■Forneça energia usando um adaptador de
alimentação USB e um cabo USB (micro B para
A) incluso
[네트워크]를 클릭합니다.
AirMac (Wi-Fi)의「상황」이「입력」으로 되어 있는지
확인합니다.
「네트워크 이름」의 목록에서「설정 정보 시트」내에
기재된 것과 동일한 SSID를 선택합니다.
* Utilize um adaptador de alimentação USB com uma
saída de 5 V e 500 mA ou mais.
비밀번호 입력 화면이 표시되므로「설정 정보 시트」에
기재된 암호 키(13자리)를 입력한 후 [OK]
를 클릭합니다.
Procedimento
D 스마트폰/태블릿PC(iOS/Android)
간단 설정 애플리케이션『QR link』(무료)를 인스톨하여
설정합니다.
1
Conexão a um
roteador LAN sem fio
(modo roteador ou de
ponto de acesso)
각 단말기에서 AppStore(iOS) 또는 Google Play(Android)를
열고[QR link]
를 검색하여 인스톨합니다.
Conecte um cabo LAN (comprado separadamente ou
fornecido pelo hotel) à porta LAN do quarto de hotel e à
porta ETHERNET do produto.
각 단 말 기 의 홈 화 면 에 서 [ Q R l i n k ]의 아 이 콘 을
터치합니다.
Forneça energia para o produto de acordo com as
instruções em "Suprimento de energia."
[QR 코드 판독]
을 터치하고「설정 정보 시트 내」
에 인쇄된
QR 코드를 판독합니다.
Verifique se as lâmpadas deste produto estão como
mostrado abaixo:
화면의 지시에 따라 마지막으로 [닫기] 버튼을 터치합니다.
① Lâmpada ETHERNET Acesa na cor verde ou piscando na cor verde
② Lâmpada WLAN Acesa na cor verde ou piscando na cor verde
③ Lâmpada WPS/RESET Desl
호텔에 따라서는 Web 브라우저(IE나 Safari 등)에 의한 인증 작업을 거쳐야 하는
경우가 있습니다. 이 경우에는 숙박하시는 호텔에 인증 방법을 확인해 주십시오.
WRH-300xx2-S Series Multi-language manual 2014/7/28 1st Edition ©2014 ELECOM Co., Ltd. All Rights Reserved
⑦
Conecte à rede de acordo com as instruções em
Procedimento 2, Conexão.
-2-
Procedimento
2
Conexão
A Windows 8.1 / 8
Aponte para o canto superior direito da tela para exibir a
barra Botões, clicando em seguida em [Configurações].
Clique no ícone Sem fio.
A partir da lista de redes, selecione aquela com o mesmo
SSID que a rede registrada na Folha de informações de
configuração e clique em seguida em [Conectar].
Verifique que a mensagem Você também pode se conectar
pressionando o botão do roteador é exibida.
Mantenha pressionados o botão [WPS] por
aproximadamente 3 segundos. Quando liberar o botão, a
lâmpada WPS/RESET começará a brilhar na cor verde.
Se a tela for exibida com a mensagem Deseja ativar o
compartilhamento entre PCs e se conectar a dispositivos
nesta rede? , clique em Ativar compartilhamento ou
conectar a dispositivos .
B Windows 7/Vista/XP
Clique no ícone LAN sem fio na área de notificação no canto
inferior direito da tela.
A partir da lista de redes, selecione aquela com o mesmo
SSID que a rede registrada na Folha de informações de
configuração e clique em seguida em [Conectar].
Quando a caixa de diálogo Conectar-se a uma rede
for exibida, insira a chave criptografada (de 13 dígitos)
mostrada acima e em seguida clique em [OK].
Se estiver utilizando uma função WPS para estabelecer
a conexão, mantenha pressionado o botão [WPS] por
aproximadamente 3 segundos. Quando liberar o
botão, a lâmpada "WPS/RESET do produto começará
a brilhar na cor verde.
Eventualmente, a caixa de diálogo Conectar-se a uma
rede desaparecerá automaticamente.
C SO Mac (conexão LAN sem fio)
Clique no [menu Apple] no canto superior esquerdo da
tela e clique em seguida em [Preferências do Sistema].
Clique em [Rede].
Verifique se o Estado do AirMac (Wi-Fi) foi comutado
para Lig .
A partir da lista de redes, selecione aquela com o
mesmo SSID que a rede registrada na Folha de
informações de configuração .
Uma tela de introdução de senha será exibida. Assim,
insira a chave criptografada (de 13 dígitos) registrada na
Folha de informações de configuração e clique em [OK].
D Smartphones e tablet PCs(iOS/Android)
Instale a aplicação de configuração simples QR link (gra
tuitamente) e a seguir ajuste as configurações.
A partir de seu terminal, abra o AppStore (iOS) ou Google
Play (Android), procure por [QR Link] e em seguida instale
o software.
Na tela inicial de seu terminal, toque no ícone [QR link].
Toque em [Ler QR Code] para ler o código QR impresso
na Folha de informações de configuração incluída.
Siga as instruções na tela e a seguir toque em [Fechar]
para concluir o procedimento.
Dependendo do hotel, o navegador da Web (como o IE ou o Safari) pode exigir que
você se certifique. Nessa caso, verifique com o hotel sobre como certificar-se.


© Copyright 2026