
Bling It Up With Glitter Heat Set Vinyl
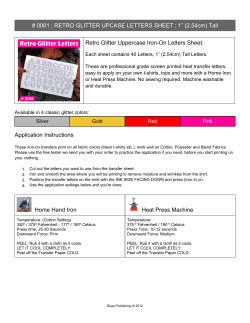
Bling It Up With Glitter Heat Set Vinyl
Glitter heat set vinyl has been around for a while. Owners of a Silhouette Cameo cutter have been able to cut
simple and complex designs in the vinyl and fuse them onto cotton, polyester and cotton/poly blend textiles.
Embroidery machine owners can use the technique described in this blog to produce a limited range of - but still
pretty spectacular - glitter bling designs with this vinyl – no vinyl cutter needed.
The secrets of doing this are revealed below - - - Glitter vinyl is a heat set product. When a design is cut with the Silhouette Cameo, the design must be cut with
the carrier sheet and glittery (is there really such a word?) side down on the cutting mat. To get the correct final
results, the design must be cut as a mirror image of the finished look. The cut design is placed glitter-side up on
the fabric and heat fused with an iron or heat press. But, we digress...
Secrets revealed
The glitter applique may be only part of the 'artwork' that you want to put on a particular piece of fabric or
garment. This technique may not be compatible with designs that require multiple hooping where the vinyl
would have to be clamped between the inner and outer hoop rings.
1. Stabilize and hoop the fabric as you would normally for an embroidered applique design.
2. Stitch the placement line of applique design.
3. The vinyl material is a bit expensive, so cut a piece large enough to cover the placement stitch and outer satin
stitch, but avoid overly generous borders. For the secret vinyl embroidery technique, remove the heavy plastic
covering (carrier sheet) from the cut piece of the vinyl.
4. LIGHTLY spray the backside (hot melt glue side) with temporary spray adhesive.
5. Cover the placement stitch line with glitter vinyl, glitter-side up.
6. Stitch the design. Note – the outer boundaries of the design must be a satin stitch.
7. Tear away excess glitter vinyl.
8. Note - Before removing the stabilizer from the project, the vinyl must be heat set. Follow the remaining
directions.
9. Though some form of a heat press with temperature control and a clamping mechanism is preferable, you can
use a household iron to fuse the vinyl to the fabric. The results will not be as consistent when an iron is used. If
you have a choice of irons, pick the heaviest and highest wattage iron for this job.
10. Place the project applique-side up on a firm padded surface that can take some heat.
11. Cover the glitter vinyl and surrounding fabric with a Teflon press sheet.
12. The iron/press should be set for a temperature of 315-320 degrees F (typically HIGH for an iron).
13. Press the iron straight down, apply 'medium to heavy' pressure without moving the iron sideways for 10-15
seconds.
14. Remove iron and let the materials cool until you can handle the materials.
15. Remove stabilizer.
16. Admire your work.
Care Guide:
Turn garment inside out and machine wash with cool/warm water temperature.
Line dry.
Credits for Embroidery Designs Shown:
BIKE lettering created with TT Fonts in Floriani software.
Bow design created in Floriani software.
Baseball applique from Anita Goodesign


© Copyright 2026