
Using ADOBE SCENE7 ®
Using ADOBE® SCENE7® Legal notices Legal notices For legal notices, see http://helpx.adobe.com/legal/legal-notices.html. Last updated 10/9/2014 iii Contents Chapter 1: Introducing Adobe Scene7 What’s new . . . . . . . . . . . . . . . . . . . . . . . . . . . . . . . . . . . . . . . . . . . . . . . . . . . . . . . . . . . . . . . . . . . . . . . . . . . . . . . . . . . . . . . . . . . . . . . . . . . . . . . . . . . 1 System requirements .................................................................................................. 1 Adobe Scene7 Publishing System desktop applications Using Help Support ................................................................. 2 ............................................................................................................ 2 ............................................................................................................... 2 Help for Scene7 Media Portal Adobe Training Services Developer resources .......................................................................................... 4 ............................................................................................... 4 ................................................................................................... 4 Chapter 2: Getting started Adobe Scene7 platform overview ...................................................................................... 7 Using Scene7 Publishing System desktop version Media Portal ...................................................................... 9 .......................................................................................................... 9 Signing in and out . . . . . . . . . . . . . . . . . . . . . . . . . . . . . . . . . . . . . . . . . . . . . . . . . . . . . . . . . . . . . . . . . . . . . . . . . . . . . . . . . . . . . . . . . . . . . . . . . . . . 10 Navigation basics . . . . . . . . . . . . . . . . . . . . . . . . . . . . . . . . . . . . . . . . . . . . . . . . . . . . . . . . . . . . . . . . . . . . . . . . . . . . . . . . . . . . . . . . . . . . . . . . . . . . . 10 Setup basics . . . . . . . . . . . . . . . . . . . . . . . . . . . . . . . . . . . . . . . . . . . . . . . . . . . . . . . . . . . . . . . . . . . . . . . . . . . . . . . . . . . . . . . . . . . . . . . . . . . . . . . . . . 12 About rich media . . . . . . . . . . . . . . . . . . . . . . . . . . . . . . . . . . . . . . . . . . . . . . . . . . . . . . . . . . . . . . . . . . . . . . . . . . . . . . . . . . . . . . . . . . . . . . . . . . . . . 13 Chapter 3: Setup Personal Setup . . . . . . . . . . . . . . . . . . . . . . . . . . . . . . . . . . . . . . . . . . . . . . . . . . . . . . . . . . . . . . . . . . . . . . . . . . . . . . . . . . . . . . . . . . . . . . . . . . . . . . . 15 Application Setup Publish Setup . . . . . . . . . . . . . . . . . . . . . . . . . . . . . . . . . . . . . . . . . . . . . . . . . . . . . . . . . . . . . . . . . . . . . . . . . . . . . . . . . . . . . . . . . . . . . . . . . . . . 20 . . . . . . . . . . . . . . . . . . . . . . . . . . . . . . . . . . . . . . . . . . . . . . . . . . . . . . . . . . . . . . . . . . . . . . . . . . . . . . . . . . . . . . . . . . . . . . . . . . . . . . . . 55 Video SEO (Search Engine Optimization) Administration Setup . . . . . . . . . . . . . . . . . . . . . . . . . . . . . . . . . . . . . . . . . . . . . . . . . . . . . . . . . . . . . . . . . . . . . . . . . . . . . . 60 . . . . . . . . . . . . . . . . . . . . . . . . . . . . . . . . . . . . . . . . . . . . . . . . . . . . . . . . . . . . . . . . . . . . . . . . . . . . . . . . . . . . . . . . . . . . . . . . . 62 Chapter 4: Media Portal System requirements . . . . . . . . . . . . . . . . . . . . . . . . . . . . . . . . . . . . . . . . . . . . . . . . . . . . . . . . . . . . . . . . . . . . . . . . . . . . . . . . . . . . . . . . . . . . . . . . . 68 Quick Start: Media Portal administration Media Portal user roles . . . . . . . . . . . . . . . . . . . . . . . . . . . . . . . . . . . . . . . . . . . . . . . . . . . . . . . . . . . . . . . . . . . . . . . . . . . . . . 68 . . . . . . . . . . . . . . . . . . . . . . . . . . . . . . . . . . . . . . . . . . . . . . . . . . . . . . . . . . . . . . . . . . . . . . . . . . . . . . . . . . . . . . . . . . . . . . . 70 Creating and managing Media Portal groups Adding and managing Media Portal users Managing FTP accounts . . . . . . . . . . . . . . . . . . . . . . . . . . . . . . . . . . . . . . . . . . . . . . . . . . . . . . . . . . . . . . . . . . . . . . . . . . 71 . . . . . . . . . . . . . . . . . . . . . . . . . . . . . . . . . . . . . . . . . . . . . . . . . . . . . . . . . . . . . . . . . . . . . . . . . . . . . 73 . . . . . . . . . . . . . . . . . . . . . . . . . . . . . . . . . . . . . . . . . . . . . . . . . . . . . . . . . . . . . . . . . . . . . . . . . . . . . . . . . . . . . . . . . . . . . . 75 Specifying export options available to Media Portal users Creating and enabling Image Presets Making more efficient use of metadata Customizing the Media Portal screen . . . . . . . . . . . . . . . . . . . . . . . . . . . . . . . . . . . . . . . . . . . . . . . . . . . . . . . . . . . . . . 76 . . . . . . . . . . . . . . . . . . . . . . . . . . . . . . . . . . . . . . . . . . . . . . . . . . . . . . . . . . . . . . . . . . . . . . . . . . . . . . . . . 77 . . . . . . . . . . . . . . . . . . . . . . . . . . . . . . . . . . . . . . . . . . . . . . . . . . . . . . . . . . . . . . . . . . . . . . . . . . . . . . . . 77 . . . . . . . . . . . . . . . . . . . . . . . . . . . . . . . . . . . . . . . . . . . . . . . . . . . . . . . . . . . . . . . . . . . . . . . . . . . . . . . . . . 78 Chapter 5: Upload and publish assets Uploading files . . . . . . . . . . . . . . . . . . . . . . . . . . . . . . . . . . . . . . . . . . . . . . . . . . . . . . . . . . . . . . . . . . . . . . . . . . . . . . . . . . . . . . . . . . . . . . . . . . . . . . . 79 Publishing files . . . . . . . . . . . . . . . . . . . . . . . . . . . . . . . . . . . . . . . . . . . . . . . . . . . . . . . . . . . . . . . . . . . . . . . . . . . . . . . . . . . . . . . . . . . . . . . . . . . . . . . 87 Testing assets before making them public Checking job files . . . . . . . . . . . . . . . . . . . . . . . . . . . . . . . . . . . . . . . . . . . . . . . . . . . . . . . . . . . . . . . . . . . . . . . . . . . . . 90 . . . . . . . . . . . . . . . . . . . . . . . . . . . . . . . . . . . . . . . . . . . . . . . . . . . . . . . . . . . . . . . . . . . . . . . . . . . . . . . . . . . . . . . . . . . . . . . . . . . . 93 Last updated 10/9/2014 iv USING SCENE7 Contents Chapter 6: Managing assets Working with asset folders . . . . . . . . . . . . . . . . . . . . . . . . . . . . . . . . . . . . . . . . . . . . . . . . . . . . . . . . . . . . . . . . . . . . . . . . . . . . . . . . . . . . . . . . . . . . 97 Viewing assets in the Browse Panel . . . . . . . . . . . . . . . . . . . . . . . . . . . . . . . . . . . . . . . . . . . . . . . . . . . . . . . . . . . . . . . . . . . . . . . . . . . . . . . . . . . 98 Selecting assets in the Browse Panel . . . . . . . . . . . . . . . . . . . . . . . . . . . . . . . . . . . . . . . . . . . . . . . . . . . . . . . . . . . . . . . . . . . . . . . . . . . . . . . . . . 98 Searching assets . . . . . . . . . . . . . . . . . . . . . . . . . . . . . . . . . . . . . . . . . . . . . . . . . . . . . . . . . . . . . . . . . . . . . . . . . . . . . . . . . . . . . . . . . . . . . . . . . . . . . . 99 Previewing an asset . . . . . . . . . . . . . . . . . . . . . . . . . . . . . . . . . . . . . . . . . . . . . . . . . . . . . . . . . . . . . . . . . . . . . . . . . . . . . . . . . . . . . . . . . . . . . . . . . 102 Moving, renaming, and deleting assets Working in Detail view . . . . . . . . . . . . . . . . . . . . . . . . . . . . . . . . . . . . . . . . . . . . . . . . . . . . . . . . . . . . . . . . . . . . . . . . . . . . . . . 104 . . . . . . . . . . . . . . . . . . . . . . . . . . . . . . . . . . . . . . . . . . . . . . . . . . . . . . . . . . . . . . . . . . . . . . . . . . . . . . . . . . . . . . . . . . . . . . . 105 Viewing, adding, and exporting metadata . . . . . . . . . . . . . . . . . . . . . . . . . . . . . . . . . . . . . . . . . . . . . . . . . . . . . . . . . . . . . . . . . . . . . . . . . . . . 108 Exporting assets from Scene7 Publishing System Sharing asset changes with peers in real time Printing assets . . . . . . . . . . . . . . . . . . . . . . . . . . . . . . . . . . . . . . . . . . . . . . . . . . . . . . . . . . . . . . . . . . . . . 113 . . . . . . . . . . . . . . . . . . . . . . . . . . . . . . . . . . . . . . . . . . . . . . . . . . . . . . . . . . . . . . . . . . . . . . . . 115 . . . . . . . . . . . . . . . . . . . . . . . . . . . . . . . . . . . . . . . . . . . . . . . . . . . . . . . . . . . . . . . . . . . . . . . . . . . . . . . . . . . . . . . . . . . . . . . . . . . . . . . 115 Managing the Trash folder . . . . . . . . . . . . . . . . . . . . . . . . . . . . . . . . . . . . . . . . . . . . . . . . . . . . . . . . . . . . . . . . . . . . . . . . . . . . . . . . . . . . . . . . . . . 116 Organizing your work with Projects Chapter 7: Image Sizing Quick Start: Image Sizing . . . . . . . . . . . . . . . . . . . . . . . . . . . . . . . . . . . . . . . . . . . . . . . . . . . . . . . . . . . . . . . . . . . . . . . . . . . . . . . . . . 117 . . . . . . . . . . . . . . . . . . . . . . . . . . . . . . . . . . . . . . . . . . . . . . . . . . . . . . . . . . . . . . . . . . . . . . . . . . . . . . . . . . . . . . . . . . . . 119 Uploading master images . . . . . . . . . . . . . . . . . . . . . . . . . . . . . . . . . . . . . . . . . . . . . . . . . . . . . . . . . . . . . . . . . . . . . . . . . . . . . . . . . . . . . . . . . . . 121 Setting up Image Presets . . . . . . . . . . . . . . . . . . . . . . . . . . . . . . . . . . . . . . . . . . . . . . . . . . . . . . . . . . . . . . . . . . . . . . . . . . . . . . . . . . . . . . . . . . . . 121 Publishing master images . . . . . . . . . . . . . . . . . . . . . . . . . . . . . . . . . . . . . . . . . . . . . . . . . . . . . . . . . . . . . . . . . . . . . . . . . . . . . . . . . . . . . . . . . . . 123 Linking URLs to your web application Chapter 8: Zoom Quick Start: Zoom . . . . . . . . . . . . . . . . . . . . . . . . . . . . . . . . . . . . . . . . . . . . . . . . . . . . . . . . . . . . . . . . . . . . . . . . . . . . . . . . 123 . . . . . . . . . . . . . . . . . . . . . . . . . . . . . . . . . . . . . . . . . . . . . . . . . . . . . . . . . . . . . . . . . . . . . . . . . . . . . . . . . . . . . . . . . . . . . . . . . . . 126 Uploading zoom images . . . . . . . . . . . . . . . . . . . . . . . . . . . . . . . . . . . . . . . . . . . . . . . . . . . . . . . . . . . . . . . . . . . . . . . . . . . . . . . . . . . . . . . . . . . . . 127 Creating zoom targets for Guided Zoom Setting up Zoom Viewer Presets . . . . . . . . . . . . . . . . . . . . . . . . . . . . . . . . . . . . . . . . . . . . . . . . . . . . . . . . . . . . . . . . . . . . . . . . . . . . . 128 . . . . . . . . . . . . . . . . . . . . . . . . . . . . . . . . . . . . . . . . . . . . . . . . . . . . . . . . . . . . . . . . . . . . . . . . . . . . . . . . . . . . . 130 Previewing image assets with different Zoom Viewers Publishing zoom images . . . . . . . . . . . . . . . . . . . . . . . . . . . . . . . . . . . . . . . . . . . . . . . . . . . . . . . . . . . . . . . . 131 . . . . . . . . . . . . . . . . . . . . . . . . . . . . . . . . . . . . . . . . . . . . . . . . . . . . . . . . . . . . . . . . . . . . . . . . . . . . . . . . . . . . . . . . . . . . . 132 Linking Zoom viewers to your web pages . . . . . . . . . . . . . . . . . . . . . . . . . . . . . . . . . . . . . . . . . . . . . . . . . . . . . . . . . . . . . . . . . . . . . . . . . . . . 132 Chapter 9: eCatalogs Quick Start: eCatalog . . . . . . . . . . . . . . . . . . . . . . . . . . . . . . . . . . . . . . . . . . . . . . . . . . . . . . . . . . . . . . . . . . . . . . . . . . . . . . . . . . . . . . . . . . . . . . . . 136 Uploading the PDF files Creating an eCatalog . . . . . . . . . . . . . . . . . . . . . . . . . . . . . . . . . . . . . . . . . . . . . . . . . . . . . . . . . . . . . . . . . . . . . . . . . . . . . . . . . . . . . . . . . . . . . . 138 . . . . . . . . . . . . . . . . . . . . . . . . . . . . . . . . . . . . . . . . . . . . . . . . . . . . . . . . . . . . . . . . . . . . . . . . . . . . . . . . . . . . . . . . . . . . . . . . 139 Creating eCatalog Image Maps Managing Info Panel content . . . . . . . . . . . . . . . . . . . . . . . . . . . . . . . . . . . . . . . . . . . . . . . . . . . . . . . . . . . . . . . . . . . . . . . . . . . . . . . . . . . . . . 142 . . . . . . . . . . . . . . . . . . . . . . . . . . . . . . . . . . . . . . . . . . . . . . . . . . . . . . . . . . . . . . . . . . . . . . . . . . . . . . . . . . . . . . . . 145 Setting up eCatalog Viewer Presets . . . . . . . . . . . . . . . . . . . . . . . . . . . . . . . . . . . . . . . . . . . . . . . . . . . . . . . . . . . . . . . . . . . . . . . . . . . . . . . . . . 147 Previewing eCatalogs in the eCatalog Viewer Publishing eCatalogs . . . . . . . . . . . . . . . . . . . . . . . . . . . . . . . . . . . . . . . . . . . . . . . . . . . . . . . . . . . . . . . . . . . . . . . . . 148 . . . . . . . . . . . . . . . . . . . . . . . . . . . . . . . . . . . . . . . . . . . . . . . . . . . . . . . . . . . . . . . . . . . . . . . . . . . . . . . . . . . . . . . . . . . . . . . . 148 Linking an eCatalog to a web page . . . . . . . . . . . . . . . . . . . . . . . . . . . . . . . . . . . . . . . . . . . . . . . . . . . . . . . . . . . . . . . . . . . . . . . . . . . . . . . . . . . 149 Chapter 10: Image Sets Quick Start: Image Sets . . . . . . . . . . . . . . . . . . . . . . . . . . . . . . . . . . . . . . . . . . . . . . . . . . . . . . . . . . . . . . . . . . . . . . . . . . . . . . . . . . . . . . . . . . . . . . 151 Preparing Image Set assets for upload Creating an Image Set . . . . . . . . . . . . . . . . . . . . . . . . . . . . . . . . . . . . . . . . . . . . . . . . . . . . . . . . . . . . . . . . . . . . . . . . . . . . . . . 152 . . . . . . . . . . . . . . . . . . . . . . . . . . . . . . . . . . . . . . . . . . . . . . . . . . . . . . . . . . . . . . . . . . . . . . . . . . . . . . . . . . . . . . . . . . . . . . . 152 Including zoom targets and Image Maps in Image Sets Managing info panel content . . . . . . . . . . . . . . . . . . . . . . . . . . . . . . . . . . . . . . . . . . . . . . . . . . . . . . . . . . . . . . . 154 . . . . . . . . . . . . . . . . . . . . . . . . . . . . . . . . . . . . . . . . . . . . . . . . . . . . . . . . . . . . . . . . . . . . . . . . . . . . . . . . . . . . . . . . 154 Last updated 10/9/2014 v USING SCENE7 Contents Viewing Image Sets . . . . . . . . . . . . . . . . . . . . . . . . . . . . . . . . . . . . . . . . . . . . . . . . . . . . . . . . . . . . . . . . . . . . . . . . . . . . . . . . . . . . . . . . . . . . . . . . . . 156 Automated Image Set generation . . . . . . . . . . . . . . . . . . . . . . . . . . . . . . . . . . . . . . . . . . . . . . . . . . . . . . . . . . . . . . . . . . . . . . . . . . . . . . . . . . . . 157 Linking an Image Set to a web page . . . . . . . . . . . . . . . . . . . . . . . . . . . . . . . . . . . . . . . . . . . . . . . . . . . . . . . . . . . . . . . . . . . . . . . . . . . . . . . . . . 157 Chapter 11: Swatch Sets Quick Start: Swatch Sets . . . . . . . . . . . . . . . . . . . . . . . . . . . . . . . . . . . . . . . . . . . . . . . . . . . . . . . . . . . . . . . . . . . . . . . . . . . . . . . . . . . . . . . . . . . . . 160 Preparing Swatch Set assets for upload Creating a Swatch Set . . . . . . . . . . . . . . . . . . . . . . . . . . . . . . . . . . . . . . . . . . . . . . . . . . . . . . . . . . . . . . . . . . . . . . . . . . . . . . 161 . . . . . . . . . . . . . . . . . . . . . . . . . . . . . . . . . . . . . . . . . . . . . . . . . . . . . . . . . . . . . . . . . . . . . . . . . . . . . . . . . . . . . . . . . . . . . . . 161 Including zoom targets and Image Maps in Swatch Sets Viewing Swatch Sets . . . . . . . . . . . . . . . . . . . . . . . . . . . . . . . . . . . . . . . . . . . . . . . . . . . . . . . . . . . . . . 163 . . . . . . . . . . . . . . . . . . . . . . . . . . . . . . . . . . . . . . . . . . . . . . . . . . . . . . . . . . . . . . . . . . . . . . . . . . . . . . . . . . . . . . . . . . . . . . . . 163 Linking a Swatch Set to a web page . . . . . . . . . . . . . . . . . . . . . . . . . . . . . . . . . . . . . . . . . . . . . . . . . . . . . . . . . . . . . . . . . . . . . . . . . . . . . . . . . . 164 Chapter 12: Spin Sets Quick Start: Spin Sets . . . . . . . . . . . . . . . . . . . . . . . . . . . . . . . . . . . . . . . . . . . . . . . . . . . . . . . . . . . . . . . . . . . . . . . . . . . . . . . . . . . . . . . . . . . . . . . . 167 Creating a Spin Set . . . . . . . . . . . . . . . . . . . . . . . . . . . . . . . . . . . . . . . . . . . . . . . . . . . . . . . . . . . . . . . . . . . . . . . . . . . . . . . . . . . . . . . . . . . . . . . . . . 168 Setting up Spin Set Viewer Presets . . . . . . . . . . . . . . . . . . . . . . . . . . . . . . . . . . . . . . . . . . . . . . . . . . . . . . . . . . . . . . . . . . . . . . . . . . . . . . . . . . . 171 Previewing a Spin Set . . . . . . . . . . . . . . . . . . . . . . . . . . . . . . . . . . . . . . . . . . . . . . . . . . . . . . . . . . . . . . . . . . . . . . . . . . . . . . . . . . . . . . . . . . . . . . . . 171 Publishing a Spin Set . . . . . . . . . . . . . . . . . . . . . . . . . . . . . . . . . . . . . . . . . . . . . . . . . . . . . . . . . . . . . . . . . . . . . . . . . . . . . . . . . . . . . . . . . . . . . . . . 172 Linking a Spin Set to a web page . . . . . . . . . . . . . . . . . . . . . . . . . . . . . . . . . . . . . . . . . . . . . . . . . . . . . . . . . . . . . . . . . . . . . . . . . . . . . . . . . . . . . 173 Chapter 13: Template Basics Quick Start: Template Basics . . . . . . . . . . . . . . . . . . . . . . . . . . . . . . . . . . . . . . . . . . . . . . . . . . . . . . . . . . . . . . . . . . . . . . . . . . . . . . . . . . . . . . . . . 175 Uploading template files Creating a template . . . . . . . . . . . . . . . . . . . . . . . . . . . . . . . . . . . . . . . . . . . . . . . . . . . . . . . . . . . . . . . . . . . . . . . . . . . . . . . . . . . . . . . . . . . . 176 . . . . . . . . . . . . . . . . . . . . . . . . . . . . . . . . . . . . . . . . . . . . . . . . . . . . . . . . . . . . . . . . . . . . . . . . . . . . . . . . . . . . . . . . . . . . . . . . . 177 Creating template parameters Publishing templates . . . . . . . . . . . . . . . . . . . . . . . . . . . . . . . . . . . . . . . . . . . . . . . . . . . . . . . . . . . . . . . . . . . . . . . . . . . . . . . . . . . . . . . 184 . . . . . . . . . . . . . . . . . . . . . . . . . . . . . . . . . . . . . . . . . . . . . . . . . . . . . . . . . . . . . . . . . . . . . . . . . . . . . . . . . . . . . . . . . . . . . . . . 186 Linking a template to a web page Managing content variations . . . . . . . . . . . . . . . . . . . . . . . . . . . . . . . . . . . . . . . . . . . . . . . . . . . . . . . . . . . . . . . . . . . . . . . . . . . . . . . . . . . . 186 . . . . . . . . . . . . . . . . . . . . . . . . . . . . . . . . . . . . . . . . . . . . . . . . . . . . . . . . . . . . . . . . . . . . . . . . . . . . . . . . . . . . . . . . 187 Chapter 14: Template Publishing Quick Start: Template Publishing . . . . . . . . . . . . . . . . . . . . . . . . . . . . . . . . . . . . . . . . . . . . . . . . . . . . . . . . . . . . . . . . . . . . . . . . . . . . . . . . . . . . . 188 Create the initial template in Illustrator Upload files for Template Publishing . . . . . . . . . . . . . . . . . . . . . . . . . . . . . . . . . . . . . . . . . . . . . . . . . . . . . . . . . . . . . . . . . . . . . . . . . . . . . . . 189 . . . . . . . . . . . . . . . . . . . . . . . . . . . . . . . . . . . . . . . . . . . . . . . . . . . . . . . . . . . . . . . . . . . . . . . . . . . . . . . . . 189 Defining variability: Parameterization versus DOM manipulation Parameterizing a template in Scene7 . . . . . . . . . . . . . . . . . . . . . . . . . . . . . . . . . . . . . . . . . . . . . . . . . . . . . . . . . . . . . . . . . . . . . . . . . . . . . . . . . 190 Preview and update template attributes DOM manipulation . . . . . . . . . . . . . . . . . . . . . . . . . . . . . . . . . . . . . . . . . . . . . . . . . . . . . . 190 . . . . . . . . . . . . . . . . . . . . . . . . . . . . . . . . . . . . . . . . . . . . . . . . . . . . . . . . . . . . . . . . . . . . . . . . . . . . . 194 . . . . . . . . . . . . . . . . . . . . . . . . . . . . . . . . . . . . . . . . . . . . . . . . . . . . . . . . . . . . . . . . . . . . . . . . . . . . . . . . . . . . . . . . . . . . . . . . . . 196 Linking an FXG template to a web page . . . . . . . . . . . . . . . . . . . . . . . . . . . . . . . . . . . . . . . . . . . . . . . . . . . . . . . . . . . . . . . . . . . . . . . . . . . . . . 198 Creating a PDF document . . . . . . . . . . . . . . . . . . . . . . . . . . . . . . . . . . . . . . . . . . . . . . . . . . . . . . . . . . . . . . . . . . . . . . . . . . . . . . . . . . . . . . . . . . . 199 Chapter 15: Video Working with HTML5 video . . . . . . . . . . . . . . . . . . . . . . . . . . . . . . . . . . . . . . . . . . . . . . . . . . . . . . . . . . . . . . . . . . . . . . . . . . . . . . . . . . . . . . . . . . 206 Best practice: Using the HTML5 Video viewer Quick Start: Video . . . . . . . . . . . . . . . . . . . . . . . . . . . . . . . . . . . . . . . . . . . . . . . . . . . . . . . . . . . . . . . . . . . . . . . . . 207 . . . . . . . . . . . . . . . . . . . . . . . . . . . . . . . . . . . . . . . . . . . . . . . . . . . . . . . . . . . . . . . . . . . . . . . . . . . . . . . . . . . . . . . . . . . . . . . . . . . 209 Uploading and encoding videos . . . . . . . . . . . . . . . . . . . . . . . . . . . . . . . . . . . . . . . . . . . . . . . . . . . . . . . . . . . . . . . . . . . . . . . . . . . . . . . . . . . . . 211 Previewing videos in a video viewer . . . . . . . . . . . . . . . . . . . . . . . . . . . . . . . . . . . . . . . . . . . . . . . . . . . . . . . . . . . . . . . . . . . . . . . . . . . . . . . . . . 222 Deploying video to your websites and mobile sites Adding captions to video . . . . . . . . . . . . . . . . . . . . . . . . . . . . . . . . . . . . . . . . . . . . . . . . . . . . . . . . . . . . . . . . . . . 224 . . . . . . . . . . . . . . . . . . . . . . . . . . . . . . . . . . . . . . . . . . . . . . . . . . . . . . . . . . . . . . . . . . . . . . . . . . . . . . . . . . . . . . . . . . . . 229 Last updated 10/9/2014 vi USING SCENE7 Contents Adding chapter markers to video . . . . . . . . . . . . . . . . . . . . . . . . . . . . . . . . . . . . . . . . . . . . . . . . . . . . . . . . . . . . . . . . . . . . . . . . . . . . . . . . . . . . 231 Exporting source and encoded videos Using the Universal URL . . . . . . . . . . . . . . . . . . . . . . . . . . . . . . . . . . . . . . . . . . . . . . . . . . . . . . . . . . . . . . . . . . . . . . . . . . . . . . . 233 . . . . . . . . . . . . . . . . . . . . . . . . . . . . . . . . . . . . . . . . . . . . . . . . . . . . . . . . . . . . . . . . . . . . . . . . . . . . . . . . . . . . . . . . . . . . . 233 Chapter 16: Video Recuts Quick Start: Video Recuts . . . . . . . . . . . . . . . . . . . . . . . . . . . . . . . . . . . . . . . . . . . . . . . . . . . . . . . . . . . . . . . . . . . . . . . . . . . . . . . . . . . . . . . . . . . . 234 Video Presets . . . . . . . . . . . . . . . . . . . . . . . . . . . . . . . . . . . . . . . . . . . . . . . . . . . . . . . . . . . . . . . . . . . . . . . . . . . . . . . . . . . . . . . . . . . . . . . . . . . . . . . . 235 Uploading and transcoding video for Video Recuts Thumbnails for Video Recuts . . . . . . . . . . . . . . . . . . . . . . . . . . . . . . . . . . . . . . . . . . . . . . . . . . . . . . . . . . . . . . . . . . . . . . . . . . . . . . . . . . . . . . . . . 236 Setting up Viewer Presets for Video Recuts Creating Video Recuts . . . . . . . . . . . . . . . . . . . . . . . . . . . . . . . . . . . . . . . . . . . . . . . . . . . . . . . . . . . . . . . . . . . 236 . . . . . . . . . . . . . . . . . . . . . . . . . . . . . . . . . . . . . . . . . . . . . . . . . . . . . . . . . . . . . . . . . . . . . . . . . . . 236 . . . . . . . . . . . . . . . . . . . . . . . . . . . . . . . . . . . . . . . . . . . . . . . . . . . . . . . . . . . . . . . . . . . . . . . . . . . . . . . . . . . . . . . . . . . . . . . 237 Create a Video Recut Template . . . . . . . . . . . . . . . . . . . . . . . . . . . . . . . . . . . . . . . . . . . . . . . . . . . . . . . . . . . . . . . . . . . . . . . . . . . . . . . . . . . . . . 248 Creating information panels for Video Recuts Previewing Video Recuts in a Viewer Publishing a Video Recut . . . . . . . . . . . . . . . . . . . . . . . . . . . . . . . . . . . . . . . . . . . . . . . . . . . . . . . . . . . . . . . . . . . . . . . . 249 . . . . . . . . . . . . . . . . . . . . . . . . . . . . . . . . . . . . . . . . . . . . . . . . . . . . . . . . . . . . . . . . . . . . . . . . . . . . . . . . . 252 . . . . . . . . . . . . . . . . . . . . . . . . . . . . . . . . . . . . . . . . . . . . . . . . . . . . . . . . . . . . . . . . . . . . . . . . . . . . . . . . . . . . . . . . . . . . 252 Deploying a Video Recut on your web site . . . . . . . . . . . . . . . . . . . . . . . . . . . . . . . . . . . . . . . . . . . . . . . . . . . . . . . . . . . . . . . . . . . . . . . . . . . . 253 Chapter 17: Mixed Media Sets Quick Start: Mixed Media Sets . . . . . . . . . . . . . . . . . . . . . . . . . . . . . . . . . . . . . . . . . . . . . . . . . . . . . . . . . . . . . . . . . . . . . . . . . . . . . . . . . . . . . . . . 255 Creating a Mixed Media Set . . . . . . . . . . . . . . . . . . . . . . . . . . . . . . . . . . . . . . . . . . . . . . . . . . . . . . . . . . . . . . . . . . . . . . . . . . . . . . . . . . . . . . . . . . 256 Setting up a Mixed Media Set Viewer Preset Publishing a Mixed Media Set . . . . . . . . . . . . . . . . . . . . . . . . . . . . . . . . . . . . . . . . . . . . . . . . . . . . . . . . . . . . . . . . . . . . . . . . . . 258 . . . . . . . . . . . . . . . . . . . . . . . . . . . . . . . . . . . . . . . . . . . . . . . . . . . . . . . . . . . . . . . . . . . . . . . . . . . . . . . . . . . . . . . . 260 Linking a Mixed Media Set to a web page . . . . . . . . . . . . . . . . . . . . . . . . . . . . . . . . . . . . . . . . . . . . . . . . . . . . . . . . . . . . . . . . . . . . . . . . . . . . 260 Chapter 18: Adobe Analytics Instrumentation Kit Enabling Adobe Analytics Video Reports . . . . . . . . . . . . . . . . . . . . . . . . . . . . . . . . . . . . . . . . . . . . . . . . . . . . . . . . . . . . . . . . . . . . . . . . . . . . . 263 Quick Start: Integrating Scene7 and Adobe Analytics Log in to Adobe Analytics . . . . . . . . . . . . . . . . . . . . . . . . . . . . . . . . . . . . . . . . . . . . . . . . . . . . . . . . . . . . . . . . . 263 . . . . . . . . . . . . . . . . . . . . . . . . . . . . . . . . . . . . . . . . . . . . . . . . . . . . . . . . . . . . . . . . . . . . . . . . . . . . . . . . . . . . . . . . . . . . 265 Configuring Adobe Analytics reports . . . . . . . . . . . . . . . . . . . . . . . . . . . . . . . . . . . . . . . . . . . . . . . . . . . . . . . . . . . . . . . . . . . . . . . . . . . . . . . . . 265 Publishing Adobe Analytics configuration information . . . . . . . . . . . . . . . . . . . . . . . . . . . . . . . . . . . . . . . . . . . . . . . . . . . . . . . . . . . . . . . 269 Instrumenting a viewer using the Adobe Analytics Instrumentation Kit Testing the integration by viewing an Adobe Analytics report Disabling Adobe Analytics tracking . . . . . . . . . . . . . . . . . . . . . . . . . . . . . . . . . . . . . . . . . . . . . . . . 269 . . . . . . . . . . . . . . . . . . . . . . . . . . . . . . . . . . . . . . . . . . . . . . . . . . . . . . . . 270 . . . . . . . . . . . . . . . . . . . . . . . . . . . . . . . . . . . . . . . . . . . . . . . . . . . . . . . . . . . . . . . . . . . . . . . . . . . . . . . . . . 271 Chapter 19: Test&Target integration Quick Start: Test&Target integration . . . . . . . . . . . . . . . . . . . . . . . . . . . . . . . . . . . . . . . . . . . . . . . . . . . . . . . . . . . . . . . . . . . . . . . . . . . . . . . . . 272 Integrating Scene7 with Test&Target Creating an offer set . . . . . . . . . . . . . . . . . . . . . . . . . . . . . . . . . . . . . . . . . . . . . . . . . . . . . . . . . . . . . . . . . . . . . . . . . . . . . . . . . 273 . . . . . . . . . . . . . . . . . . . . . . . . . . . . . . . . . . . . . . . . . . . . . . . . . . . . . . . . . . . . . . . . . . . . . . . . . . . . . . . . . . . . . . . . . . . . . . . . . 273 Pushing offer sets to Test&Target . . . . . . . . . . . . . . . . . . . . . . . . . . . . . . . . . . . . . . . . . . . . . . . . . . . . . . . . . . . . . . . . . . . . . . . . . . . . . . . . . . . . 276 Chapter 20: User-generated content Uploading an image asset or a vector asset Deleting an uploaded asset . . . . . . . . . . . . . . . . . . . . . . . . . . . . . . . . . . . . . . . . . . . . . . . . . . . . . . . . . . . . . . . . . . . . . . . . . . . 278 . . . . . . . . . . . . . . . . . . . . . . . . . . . . . . . . . . . . . . . . . . . . . . . . . . . . . . . . . . . . . . . . . . . . . . . . . . . . . . . . . . . . . . . . . . 286 Getting disk usage information . . . . . . . . . . . . . . . . . . . . . . . . . . . . . . . . . . . . . . . . . . . . . . . . . . . . . . . . . . . . . . . . . . . . . . . . . . . . . . . . . . . . . . 287 Chapter 21: Master files Best practices for optimizing the quality of your images Editing images . . . . . . . . . . . . . . . . . . . . . . . . . . . . . . . . . . . . . . . . . . . . . . . . . . . . . . . . . . . . . . 289 . . . . . . . . . . . . . . . . . . . . . . . . . . . . . . . . . . . . . . . . . . . . . . . . . . . . . . . . . . . . . . . . . . . . . . . . . . . . . . . . . . . . . . . . . . . . . . . . . . . . . . 292 Last updated 10/9/2014 vii USING SCENE7 Contents Creating Image Maps Cropping an image . . . . . . . . . . . . . . . . . . . . . . . . . . . . . . . . . . . . . . . . . . . . . . . . . . . . . . . . . . . . . . . . . . . . . . . . . . . . . . . . . . . . . . . . . . . . . . . . 293 . . . . . . . . . . . . . . . . . . . . . . . . . . . . . . . . . . . . . . . . . . . . . . . . . . . . . . . . . . . . . . . . . . . . . . . . . . . . . . . . . . . . . . . . . . . . . . . . . . 299 Sharpening an image Adjusting an image . . . . . . . . . . . . . . . . . . . . . . . . . . . . . . . . . . . . . . . . . . . . . . . . . . . . . . . . . . . . . . . . . . . . . . . . . . . . . . . . . . . . . . . . . . . . . . . . 300 . . . . . . . . . . . . . . . . . . . . . . . . . . . . . . . . . . . . . . . . . . . . . . . . . . . . . . . . . . . . . . . . . . . . . . . . . . . . . . . . . . . . . . . . . . . . . . . . . . 304 Image editing options at upload Working with PDFs . . . . . . . . . . . . . . . . . . . . . . . . . . . . . . . . . . . . . . . . . . . . . . . . . . . . . . . . . . . . . . . . . . . . . . . . . . . . . . . . . . . . . 305 . . . . . . . . . . . . . . . . . . . . . . . . . . . . . . . . . . . . . . . . . . . . . . . . . . . . . . . . . . . . . . . . . . . . . . . . . . . . . . . . . . . . . . . . . . . . . . . . . . 308 Working with PSD files . . . . . . . . . . . . . . . . . . . . . . . . . . . . . . . . . . . . . . . . . . . . . . . . . . . . . . . . . . . . . . . . . . . . . . . . . . . . . . . . . . . . . . . . . . . . . . . 310 Working with PostScript and Illustrator files . . . . . . . . . . . . . . . . . . . . . . . . . . . . . . . . . . . . . . . . . . . . . . . . . . . . . . . . . . . . . . . . . . . . . . . . . . 312 Working with vignette, window covering, and cabinet files Working with Viewer SWF files . . . . . . . . . . . . . . . . . . . . . . . . . . . . . . . . . . . . . . . . . . . . . . . . . . . . . . . . . . . 312 . . . . . . . . . . . . . . . . . . . . . . . . . . . . . . . . . . . . . . . . . . . . . . . . . . . . . . . . . . . . . . . . . . . . . . . . . . . . . . . . . . . . . . . 312 Chapter 22: Support files Fonts . . . . . . . . . . . . . . . . . . . . . . . . . . . . . . . . . . . . . . . . . . . . . . . . . . . . . . . . . . . . . . . . . . . . . . . . . . . . . . . . . . . . . . . . . . . . . . . . . . . . . . . . . . . . . . . 314 ICC profiles XML files . . . . . . . . . . . . . . . . . . . . . . . . . . . . . . . . . . . . . . . . . . . . . . . . . . . . . . . . . . . . . . . . . . . . . . . . . . . . . . . . . . . . . . . . . . . . . . . . . . . . . . . . . . 315 . . . . . . . . . . . . . . . . . . . . . . . . . . . . . . . . . . . . . . . . . . . . . . . . . . . . . . . . . . . . . . . . . . . . . . . . . . . . . . . . . . . . . . . . . . . . . . . . . . . . . . . . . . . . 316 Last updated 10/9/2014 1 Chapter 1: Introducing Adobe Scene7 Welcome to Adobe® Scene7®, the leading on-demand cross-media publishing system for uploading, managing, enhancing, and publishing dynamic rich content to all devices and screens. Adobe Scene7 solutions include the following: • Dynamic Imaging: Real-time editing, formatting and sizing, interactive zoom and pan; color swatching and texture swatching; 360-degree spin; image templates; multimedia viewers. • eCatalogs: Author, hotspot linking, publish and deliver dynamically served online catalogs into configurable viewers. • Media Portal: Self-serve environment providing portal users with administrator-controlled “views” into Scene7 assets for easy access to upload, browse, search, preview, and export of assets. • eVideo: Upload final videos in any format, automatically transcode and standardize to Flash formats, manage, edit, create hot spots and video templates, publish and stream into configurable video viewers • Visual Configurators: Real-time rendering technology to enable online visual configuration for personalization and customization effects such as real-time rendering of colors textures, surfaces, patterns, monograms, and engravings into product images or scenes. • Web-to-Print: Real-time composition technology and framework to enable custom web-to-print solutions for creating customized and personalized documents. • Target email and print: Deliver visually targeted, personalized email campaigns tied to customer profile, product, and channel databases. What’s new To review the latest Adobe Scene7 release information, including new features, enhancements, and fixes, see the Scene7 Release Notes. System requirements For the best experience using Scene7 Publishing System, make sure that your system meets the following system requirements and recommendations: • Microsoft® Windows® 7 or later or Mac OS X 10.6 or higher Macintosh® Intel processor required. • 3 GB RAM or higher required (4 GB or higher recommended). • Color monitor. • Video card supporting True Color at 1280x1024 resolution or higher. • JAVA-enabled browser, Flash 11 or higher. • Windows-supported browsers: Internet Explorer 9.0 or higher; Firefox 23 or higher. • Macintosh-supported browsers: Safari 6.0 or higher, Firefox™ 23 or higher. Note: If your browser does not have Flash Player version 11, you can download it from Adobe at www.adobe.com/go/learn_sc7_flashplayer_en. Last updated 10/9/2014 2 USING SCENE7 Introducing Adobe Scene7 Adobe Scene7 Publishing System desktop applications The Adobe Scene7 Publishing System desktop application is an Adobe AIR® application that lets you run SPS and Media Portal from your desktop without a web browser. You can use the SPS desktop application to upload files and folders from your desktop. Using Help Adobe Scene7 offers the Help program and onscreen Help. Help program The Scene7 Help system is designed to direct you to information for completing all tasks. To access Help in the Scene7 Publishing System, choose Help > Help on This Topic. The Help system opens to a page that explains the Scene7 screen you are currently viewing. Choose Help > Help Contents to open the Help program to its table of contents. To use the Help program: Contents search Click the Plus icon next to content titles and subtitles to find information. You can click the Minus icon to collapse subtitles. Search by keyword Enter a search term in the Search box. You see a list of pages from the Help system with the word you entered. Select a page to open it. Hypertext link cross-references Throughout the Help system are many hypertext link cross-references. Select a hypertext link to open the Help program to a page with more information or background information about the task you want to do. For information about getting technical support from Scene7, choose Help > Support. Onscreen Help Scene7 offers onscreen Help: Tool tips You see a tool tip when you move the cursor over buttons, menus, and navigation links. Tool tips tell you the names of these onscreen items so you can identify them quickly. Onscreen instructions Some screens present getting-started instructions in the form of a text overlay that explains how to accomplish a task. In addition, some screens also offer these icons: • Instructions icon Click the Info Tip icon icon to read brief task instructions. • Question Mark icon Click the Question Mark icon next to specific buttons or controls to get an explanation of a button or control. Support Technical support offerings are designed to meet the needs of any size company. This table describes Scene7 tech support offerings: Last updated 10/9/2014 3 USING SCENE7 Introducing Adobe Scene7 Support Trial version Subscription Case limit 2 per month Unlimited Response time 2 business days 4 business hours Free live web training and video tutorials Included Included E-mail support [email protected] US/Canada: [email protected] Japan: [email protected] EMEA: [email protected] Live telephone support Not available US/Canada: (800) 898-9743 or (408) 454-5910, Monday-Friday, 06:00-18:00 (PT) Japan: +81-3-6743-9632, Monday-Friday, 9:00 AM to 5:00 PM (Standard hours) Europe: +44 (0)20 35641782, Monday-Friday, 09:00-18:00 (UTC/GMT) Germany: +49 (0)69 51709005, Monday-Friday, 10:00-19:00 (CET) France: +33 157324085, Monday-Friday, 10:00-19:00 (CET) Netherlands: +31 (0)20 2035138, Monday-Friday, 10:00-19:00 (CET) When reporting issues to Technical Support, include this information: • Company name • Your name, phone number, and e-mail address • Scene7 application, platform, and version • Issue description and the steps necessary to reproduce the problem • Error message (if any) • Browser type and version (if applicable) • Adobe® Flash® Player version (if applicable) Last updated 10/9/2014 4 USING SCENE7 Introducing Adobe Scene7 Help for Scene7 Media Portal The following Help document is also available from Scene7: Using Scene7 Media Portal Adobe Scene7 Media Portal is a browser-based environment providing portal users easy access to upload, browse, search, preview, and export assets in corporate-approved formats. See www.adobe.com/go/learn_sc7_mediaportalusing_en. Adobe Training Services Scene7 offers training in the form of video tutorials, instructor-led workshops and web sessions, and demos. Adobe Training Services Adobe Training Services provides in-depth, customized classroom training designed for your organization. Training can take the form of regional university-style classes, web-based sessions, or custom onsite workshops. Regional classes are open to all customers and held periodically at various locations across North America and EMEA. Custom sessions can be tailored for beginning to advanced users, end users, administrators, and IT staff. See Adobe Training Services. Quick Start Video Tutorials Learn about Media Portal, dynamic imaging, eCatalogs, eVideos, Web to Print, and many other subjects pertaining to understanding and using Scene7 Publishing System. See Quick Start Video Tutorials. Demos Watch demonstrations of Scene7 features. See Demos. Getting Started chapter of Help The Getting Started section of the Help system presents instructions for users who are new to Scene7. It explains the basics of the platform, navigation, setup, asset management, and building rich media. See “Getting started” on page 7. Developer resources Scene7 provides documentation for the latest major version of each Scene7 software module. Module documents are available for Scene7 Image Authoring, the Scene7 Publishing System, Image Server, Render Server, Viewers, and Webto-Print. Release notes are also available for some modules. Release notes provide details on the release, including enhancements, new functionality, tips, troubleshooting advice, and known outstanding issues. Release notes also offer interactive examples of rich-media features and how to activate them. In addition, Release Notes offer installation and configuration instructions for clients with licensed software. Last updated 10/9/2014 5 USING SCENE7 Introducing Adobe Scene7 Reference Guides to the Image Server, Render Server, and Viewers describe the http protocols for these server modules. Web site developers who want to further customize and leverage Scene7 rich media for a web site or custom application can use these guides. Scene7 assumes that the reader is familiar with the Scene7 system, general http protocol standards and conventions, and basic imaging terminology. Scene7 Publishing System API Document Web address API Reference Guide Contact Scene7 technical support for documentation. Image Authoring Document Web address User Guide Contact Scene7 technical support for this documentation. Release Notes Contact Scene7 technical support for this documentation. Image Serving and Image Rendering Document Web address API Reference Guide https://marketing.adobe.com/resources/help/en_US/s7/is_ir_api/index.html Viewers Document Web address Viewers Reference Guide and Release Notes https://marketing.adobe.com/resources/help/en_US/s7/viewers_ref/index.html Viewer Library Examples https://marketing.adobe.com/resources/help/en_US/s7/vlist/vlist.html Adobe Scene7 Viewer SDK for Adobe www.adobe.com/go/learn/learn_s7_devresources_en Flash Adobe Scene7 HTML5 Viewer SDK www.adobe.com/go/learn/learn_s7_devresources_en Web-to-Print Document Web address Reference Guide www.adobe.com/go/learn_s7_webtoprint_en Solution Accelerator SDK www.adobe.com/go/learn/learn_s7_devresources_en Accessing SDKs through Adobe Developer Connection To download and install the SDKs, you must register with Adobe Developer Connection. 1 In your Web browser, go to Adobe Developer Connection at https://marketing.adobe.com/developer/en_US. 2 On the Developer Connection Home page, near the upper-right corner, click Register. 3 In the Register dialog box, enter your username, email address, and then agree to the Terms and Conditions. 4 Click Create New Account. You are sent a Welcome email. Last updated 10/9/2014 6 USING SCENE7 Introducing Adobe Scene7 5 To activate your account and set your password, in the email, click Click to change password. 6 Set your password, and then click Save. 7 In the upper-right corner of the Developer Connection page, click Dev Center. (https://marketing.adobe.com/developer/en_US/devcenter). 8 In the left navigation area, click Scene7. 9 Follow the on-screen instructions to download and install the SDK that you want. Last updated 10/9/2014 7 Chapter 2: Getting started Adobe® Scene7® lets you upload media assets to the Scene7 Publishing System (SPS), build rich media, and publish your work to Scene7 Image Servers. You can upload many different types of assets such as images, PDFs, PSD files, videos, graphics, and fonts. As part of the publishing process, Scene7 generates the URLs you need for your web sites, mobile devices, and applications. Rich media tools include image sizing, eCatalogs, Image Sets, Spin Sets, Swatch Sets, Mixed Media Sets, basic Templates, FXG Templates, and Video Recuts. Adobe Scene7 platform overview Scene7 is an integrated, rich media management, publishing, and serving environment. Rich media can be delivered to all marketing and selling channels, including the web, print material, e-mail campaigns, web portals, desktops, and devices. Workflow process The key Scene7 workflow steps are: Upload and manage your assets Upload your media assets to SPS. You can organize, browse, and search for assets on the system. You can also apply metadata to assets. If you install Adobe Scene7 Publishing System desktop application, you can upload files and folders by dragging them from your desktop to an upload folder. Create rich media Create different configurations of your assets such as eCatalogs, Image Sets, Spin Sets, Swatch Sets, Mixed Media Sets, basic Templates, FXG Templates, and Video Recuts. For more information, see “About rich media” on page 13. Publish and administer Publish assets to the Scene7 Saas network, as well as monitor the status of assets when they are published, administer user rights, and maintain security. Serve Deliver media from Scene7 SaaS network to web pages, applications, and mobile devices; the media are performance-optimized and are delivered with CDN caching. Scene7 provides you with a URL for each asset. After you publish the asset, the URL becomes active. Last updated 10/9/2014 8 USING SCENE7 Getting started CREATE AUTHOR DELIVER Master Assets (Images, Videos, Audio) Web Scene7 Publishing System Adobe Creative Suite (Graphics, Layouts, Skins, PDFs, etc.) Upload, Download Dynamic Imaging eCatalogs Media Portal eVideos Dynamic Banners Print Add-ons: Web-to-Print Email & Print Visual Configurators eMail MS Office API & SDKs (UGC, WTP) Desktop Servers (IS, RS, FMS, TS, IDS) Other (Fonts, ICC, XML, Scene7 VNT, FXG, Zip) SaaS Infrastructure (Storage, Bandwidth, CDN, Analytics) Devices The Scene7 workflow process. Single master images and single URL calls Scene7 is fundamentally different from other systems because you can use Scene7 to deliver media dynamically from single master assets and URL calls. The URL strings you generate with Scene7 include instructions that tell the server how to display the asset when it is delivered. For example, the same master image can be delivered in different sizes, formats, weights, colors, and zoom views. As part of building and publishing media assets with Scene7, you visually configure the effects. In so doing, you create the URL calls that correctly tell the server how to present your master asset to applications. eMail Scene7 can deliver the same master image to different mediums in different sizes and formats. Last updated 10/9/2014 9 USING SCENE7 Getting started Content caching The images that Scene7 generates dynamically are cache-friendly; in most cases, they are JPEG images with unique URL calls that identify them. The images are delivered on the content delivery network (CDN), a system of servers that are networked together on the Internet to deliver content faster. The images are distributed from servers located globally, and then to computers. When implementing a caching mechanism using any CDN vendor, you simply change the server name to point to the CDN-enabled Scene7 Image Server. All Scene7 editions include bundled CDN caching. Using Scene7 Publishing System desktop version Scene7 Publishing System is available in a desktop application to streamline the uploading of assets into the web-based Scene7 Publishing platform. The desktop version includes all of the features in the web version. It also includes the ability to upload files and folders by dragging them directly from the desktop. System requirements For the best experience using Scene7 desktop, make sure that your system meets the following system requirements and recommendations: • Microsoft® Windows® 7 or later; Mac OS X 10.6 or higher with Macintosh® Intel processor required. • 3 GB RAM or higher required ( 4 GB or higher recommended). • Minimum Resolution 1000 X 640 – (1024 X 768 or higher recommended.) • Adobe AIR 15.0 or higher required. Installing Scene7 Publishing System desktop version 1 In Scene7 Publishing System, click Setup > Personal Setup. 2 On the Personal Setup page, under Desktop Version, do one of the following: or • Click Install Now. • If you have previously installed the desktop version, click Reinstall Now Media Portal Adobe Media Portal provides companies with the ability to easily acquire, control, and distribute approved creative assets to external partners and channels, as well as internal business users. This browser-based, “self-serve” environment provides portal users with administrator-controlled “views” into Scene7 assets for easy access to upload, browse, search, preview, and export assets in corporate-approved formats. For more information about Media Portal including system requirements, see www.adobe.com/go/learn_sc7_mediaportalusing_en. For information about administering Media Portal, see “Quick Start: Media Portal administration” on page 68. Last updated 10/9/2014 10 USING SCENE7 Getting started Signing in and out Upload, building, and publishing with the Scene7 Publishing System requires meeting certain user prerequisites and system requirements. You identify yourself to SPS by signing in. When you have finished using Scene7, sign out. Make sure that you have the following before using Scene7: Setup You must have been set up to use Scene7 by your administrator. URL You must have the URL location for accessing Scene7. You get this URL via the “Welcome” e-mail or from your Scene7 administrator. Login name You use your e-mail address as your login name. Password You obtain your temporary password in a “Welcome” e-mail from Scene7 or from your Scene7 administrator. The first time you sign in, you are prompted to change this temporary password. Sign in The Welcome e-mail you received from your administrator provides you with the sign-in URL, your username, and a temporary password. 1 Start your web browser. 2 Go to the Scene7 sign-in URL (from the Welcome e-mail). Alternatively, you can sign in from the Scene7 web site (www.adobe.com/products/scene7.html) by selecting the Client Login button. 3 Enter your e-mail address in the User Name box. 4 Enter your password in the Password box. 5 Optionally, you can make your computer remember your e-mail address by selecting the Remember My User Name option. 6 Click Sign In. More Help topics “Personal Setup” on page 15 Sign out • Click Sign Out, located on the right side of the Global Navigation bar. • Exit your browser. Important: Because SPS is web-based, going to a different web site exits the system. For example, if you click the Back button in your browser window, you exit Scene7. Navigation basics The Scene7 Publishing System screen includes three major areas: Global Navigation bar, Asset Library, and Browse Panel/Build Panel. Last updated 10/9/2014 11 USING SCENE7 Getting started Main Scene7 areas. A. Global Navigation bar B. Asset Library C. Filters tab D. Browse Panel E. Media Cart (Media Portal only) Global Navigation bar The Global Navigation bar, located along the top of the screen, offers buttons for performing different tasks: Select Company Choose the company you want to access from the menu. This button isn’t available if you’re working with one company. Upload Opens the Upload screen so you can upload files from your computer or network to SPS. You can upload files from your desktop or via FTP. See “Uploading files” on page 79. Build Choose a Build task from the menu. The Build panel opens so you can create an asset type. Publish Opens the Publish screen so you can publish rich media assets to Scene7 Image Servers and the rest of the Scene7 SAAS Infrastructure. See “Publishing files” on page 87. Jobs Opens the Jobs screen so you can examine records of upload and publish jobs. Recent Opens the Recent Activity screen so you can view the names of recently modified assets and recent upload and publish jobs. Setup Opens the Setup screen so you can choose setup or administration options for optimizing your use of Scene7. See “Setup” on page 15. Help Choose a Help option: • Help > Help On This Topic Opens the Help system to a page with information about the task you are currently doing. • Help > Video Tutorial Accesses videos on specific topics to demonstrate how to get started with each rich media publishing workflow. • Help > Help Contents Opens the Help system to the Introduction page. You can click through the Table of Contents to find and view different topics. Last updated 10/9/2014 12 USING SCENE7 Getting started • Help > About Tells you which version of Scene7 you are running. • Help > Support Tells you how to get technical support from Scene7. Sign Out Exits the Scene7 Publishing System. Asset Library Use the Asset Library to organize the assets you are working with. You can create folders and subfolders for organizing your assets in the Asset Library. At the top of the Asset Library panel are commands for locating assets. You can search for assets and filter to locate assets. Click the Trash icon at the bottom of the Asset Library to examine assets you deleted. You can click Asset Library controls to open or close the Asset Library and get more room to work onscreen. Select the Expand/Collapse control to expand or close the panel. These controls are located on the left side of the panel. More Help topics “Managing assets” on page 97 Browse Panel/Build Panel The Browse/Build Panel is where you do much of your work. What appears in this panel depends on whether you are working in Browse mode or Build mode: Browse mode Select a folder in the Asset Library to view and work with its contents in the Browse Panel. This panel offers the File, Preview, Select All, Select None, and Sort menus for working with assets. You can also view assets in , List View , or Detail View button. different ways by moving the slider or selecting the Grid View Selecting the Detail View button or double-clicking an asset opens the asset in Detail view, where you can perform asset-dependent file operations. Build mode Click the Build button and choose an option to start building an eCatalog, Image Set, Spin Set, or one of several other available items on the Build menu. The Build screen opens. You can select the assets you want to work with before or after you enter Build mode. More Help topics “Managing assets” on page 97 “Viewing assets in the Browse Panel” on page 98 “Selecting assets in the Browse Panel” on page 98 “Searching assets” on page 99 Setup basics Use the Scene7 Publishing System Setup screen to enter your personal settings. If you are an administrator, set up your company settings. To open a Setup screen, click the Setup button on the Global Navigation bar. The settings available to you on this screen depend on your status as a user or administrator: • Users can only access Personal settings and the accounts of companies of which they are a member; they cannot perform any administrative tasks. Last updated 10/9/2014 13 USING SCENE7 Getting started • Administrators can access Personal settings, as well as view and administer their own company accounts. They can also perform all application setup functions, and all administration functions, including adding administrators and users. Administrators can also set up Image Presets and Viewer Presets in the Setup screen: Image Presets Image Presets are saved formats for displaying master images at different sizes and formats. Viewer Presets Viewer Presets determine how you see your rich media when you see it in a viewer. More Help topics “Setup” on page 15 “User Administration” on page 62 “Image Presets” on page 23 “Viewer Presets” on page 32 About rich media Scene7 offers many tools for creating rich media. You create these rich media types: eCatalogs Present an interactive web version of your catalog or other print material. Create clickable areas (called Image Maps) that show rollover content and allow customers to turn pages, zoom, pan, and attach sticky notes to pages. See “Quick Start: eCatalog” on page 136. eVideo Delivery high-quality video experiences to multiple screens, including desktops, mobile devices, and tablets. Use predefined Scene7 encoding presets or customize encoding to control the quality and size of video. Organize, browse, and search video with full metadata support for efficient management of video assets. See “Quick Start: Video” on page 209. Image Maps Dynamically serve images at any size and format throughout your web site. Instead of manually creating many images at different sizes, you only use one master image. As Scene7 delivers the requested image, it optimizes the image for highest-quality results in size, format, weight, quality, and sharpening. See “Quick Start: Image Sizing” on page 119. Image Sets Deliver an interactive shopping experience in which users can view products in multiple views. You can combine zoom, multiple views, and color swatches for an integrated viewing experience. See “Quick Start: Image Sets” on page 151. Mixed Media Sets Provide a mix of image sets, spin sets, swatch sets, zoom targets, video, and audio in one presentation. You can set up Mixed Media sets with tabs to separate video from images. You can also specify where and how to display swatches and zoom targets and give users a full multimedia view of your products or services. See “Quick Start: Mixed Media Sets” on page 255. Spin Sets Sequence images to spin them horizontally. Spin Sets allow visitors to your web site to turn products and view them from different sides. You can create one-dimensional and two-dimensional Spin Sets. See “Quick Start: Spin Sets” on page 167. Swatch Sets Deliver an interactive shopping experience in which users can view products in different colors and patterns. You can combine zoom, multiple views, and color swatches for an integrated viewing experience. See “Swatch Sets” on page 160. Template Basics Create data-driven templates that combine fonts, images, and graphics for monogramming, online personalization, and promotions. For example, layer sale or other promotional graphics onto product images or place Last updated 10/9/2014 14 USING SCENE7 Getting started the names of customers on T-shirts or coffee mugs. Customers can see their names in e-mail messages or print brochures you send to them. See “Quick Start: Template Basics” on page 175. Template Publishing Create professionally branded print content that is easy for your customers, clients, and staff to customize and personalize. You can maintain corporate content and brand identity throughout the publishing process. End users can customize the print content — but only the part of the content that you allow them to customize. Personalized stationary, business cards, posters, greeting cards, labels, checks, gifts, clothing, calendars, scrapbooks, and photo albums are examples of customized print products that you can deliver. Corporations can maintain a common brand identity in their signage that can be customized for different regions, franchises, stores, and branch offices. See “Quick Start: Template Publishing” on page 188. Video Recuts Combine video clips, audio, photos, graphics, text, and transitions in the easy-to-use Video Recut window. Create Video Recuts to easily enhance your video to highlight features and targeted promotions. See “Quick Start: Video Recuts” on page 234. Zoom Targets Allow customers to zoom in, zoom out, and pan images using the configurable viewers that come with Scene7. Customers can quickly and interactively view high-resolution product details. See “Quick Start: Zoom” on page 126. Last updated 10/9/2014 15 Chapter 3: Setup Adobe® Scene7 offers the Setup screens so you can customize Scene7 for your company and administer users: • Open the Personal Setup screen to change personal settings, such as your Browse Panel settings and your password. See “Personal Setup” on page 15. • Open the Application Setup screens to enter general application settings, create Image Presets, Video Presets, Viewer Presets, and define metadata. See “Application Setup” on page 20. • Open the Administration Setup screens to administer users and access usage reports. See “Administration Setup” on page 62. • Open the Media Portal screens to administer Media Portal. See “Media Portal” on page 68. To open the Setup screens, on the Global Navigation bar, click Setup, and then choose the type of settings you want. In the Setup screen, you can display different Setup options by clicking the expand/collapse controls. Important: All users can change settings on the Personal Setup screen, but the Application Setup and Administration Setup screens are reserved for administrators. Personal Setup All users can change settings on the Personal Setup screen. To open the Personal Setup screen, click Setup > Personal Setup. Note: The Personal Setup screen lists which user role you have in the Scene7 Publishing System: Company Administrator, Administrator, or User. The Personal Setup settings control the default behavior of the Browse Panel, how you receive e-mail, and password settings. Remember to click Save after you change these settings. My Account Information Identifies your account name, name, user name (e-mail address), and assigned user role. Desktop Version Click Install Now to install the desktop version of Scene7 Publishing System on your local hard drive. Or, click Reinstall Now to install the desktop version again. Illustator Plug-in for Web-to-Print On computers running Windows 7 or 8, you must have administrator privileges and log on as an administrator in Windows to install the Adobe Illustrator Plug-in for Web-to-Print. After you install the plug-in, it is available in Adobe Illustrator. The plug-in is supported for the following Adobe Illustrator versions: • Adobe Illustrator 18 in Adobe Creative Cloud 2014. Last updated 10/9/2014 16 USING SCENE7 Setup • Adobe Illustrator 17 in Adobe Creative Cloud. • Adobe Illustrator 16 in Adobe Creative Suite 6. Supported Adobe Illustrator platforms include the following: • Apple Mac OS X 10.7 or greater. • Windows 8, 32-bit and 64-bit. • Windows 7, 32-bit and 64-bit. • Windows XP, 32-bit and 64-bit (for Adobe Illustrator 16 in Adobe Creative Suite 6 only). See also “Template Publishing” on page 188. To install the plug-in on your local hard drive 1 On the Personal Setup page in Scene7 Publishing System, under Illustrator Plug-in for Web-to-Print, click Download Now to download the Illustrator Plug-in for Web-to-Print.zip file. 2 Uncompress the ZIP file to a temporary folder. A readme file is included at the root of the unzipped file to provide you with additional information about the plug-in. 3 Depending on your installed operating system, do one of the following: • Windows Last updated 10/9/2014 17 USING SCENE7 Setup If you are running Do this Adobe Illustrator 18 in Adobe Creative Cloud 2014 1 From the root of the unzipped folder, click CC-2014. 2 Depending on the bit version of Adobe Illustrator that you are using, click win32 or win64. 3 Click libraries > flame, and then copy aflame.dll to Adobe Illustrator's executable folder. For example, C:\Program Files\Adobe\Adobe Illustrator CC 2014\Support Files\Contents\Windows. Note: This example path is for the 64-bit location; the 32-bit location may fall under Program Files (x86) instead. 4 Return to the same libraries folder, click flamingo, and then copy aflamingo.dll to the same Adobe Illustrator executable folder that you used in the previous step. 5 Return to the win32 or win64 folder that you selected in step 2, and then copy AdobeS7FXGFileFormat.aip to Adobe Illustrator's plug-ins folder. For example, C:\Program Files\Adobe\Adobe Illustrator CC 2014\Plug-ins\Illustrator Formats. Note: This example path is for the 64-bit location; the 32-bit location may fall under Program Files (x86) instead. Adobe Illustrator 17 in Adobe Creative Cloud 1 From the root of the unzipped folder, click CC. 2 Depending on the bit version of Adobe Illustrator that you are using, click win32 or win64. 3 Copy AdobeS7FXGFileFormat.aip to Adobe Illustrator's plug-ins folder. For example, C:\Program Files\Adobe\Adobe Illustrator CC (64 Bit)\Plug-ins\Illustrator Formats. Note: This example path is for the 64-bit location; the 32-bit location may fall under Program Files (x86) instead. Adobe Illustrator 16 in Adobe Creative Suite 6 1 From the root of the unzipped folder, click 6.0. 2 Depending on the bit version of Adobe Illustrator that you are using, click win32 or win64. 3 Copy AdobeS7FXGFileFormat.aip to Adobe Illustrator's plug-ins folder. For example, C:\Program Files\Adobe\Adobe Illustrator CS6 (64 Bit)\Plug-ins\Illustrator Formats. Note: This example path is for the 64-bit location; the 32-bit location may fall under Program Files (x86) instead. • Mac Last updated 10/9/2014 18 USING SCENE7 Setup If you are running Do this Adobe Illustrator 18 in Adobe Creative Cloud 2014 1 From the root of the unzipped folder, click CC-2014 > mac64. 2 Click libraries > flame, and then copy the aflame.framework folder to Adobe Illustrator package contents folder. For example, /Applications/Adobe Illustrator CC 2014/ Illustrator.app/Contents/Frameworks/. (To open Adobe Illustrator’s package contents folder, right-click on the Adobe illustrator CC 2014 icon and click Show Package Contents from context menu).. 3 Return to the same libraries folder, click flamingo, and then copy the aflamingo.framework folder to the same Adobe Illustrator package contents folder that you used in the previous step. 4 Return to the mac64 folder that you selected in step 1, and then copy the AdobeS7FXGFileFormat.aip folder to Adobe Illustrator’s plug-in folder. For example, /Applications/Adobe Illustrator CC 2014/Plugins/Illustrator Formats/. Adobe Illustrator 17 in Adobe Creative Cloud 1 From the root of the unzipped folder, click CC > mac64. 2 Copy the AdobeS7FXGFileFormat.aip folder to Adobe Illustrator’s plug-in folder. For example, /Applications/Adobe Illustrator CC/Plugins/Illustrator Formats/. Adobe Illustrator 16 in Adobe Creative Suite 6 1 From the root of the unzipped folder, click 6.0 > mac64. 2 Copy the AdobeS7FXGFileFormat.aip folder to Adobe Illustrator’s plug-in folder. For example, /Applications/Adobe Illustrator CS6/Plugins/Illustrator Formats/. The plug-in is now available for you to use in Adobe Illustrator. Browser Thumbnail Size Determines the default size of thumbnail images in Grid view in the Browse Panel. Default Asset Library View Determines whether the assets in the Asset Library for build sets appear as thumbnails or by name. If you are working with large quantities of assets in the Asset Library, you can view the assets by name. For example, if you are building a large eCatalog with many PDF files, you can view the assets by name to make the list shorter. Default Browse Sort Order Determines the order in which assets appear by default in the Browse Panel. Choose a sort criterion on the menu and whether you want an ascending or descending sort. Last updated 10/9/2014 19 USING SCENE7 Setup Default Browse Location Lets you set the browse location to the default, the last folder browsed, or to a specific location that you navigate to and identify. You can also set the browse location to sort the files and folders in ascending or descending order. Default Browse View Determines whether Grid view or List view is the default view you see when you first open the Browse Panel. Splash Screen Display Determines whether you see any splash screens, including the Welcome splash screen. Show ToolTips Determines whether tool tips appear when you move the pointer over buttons, menus, and navigation links. Tool tips describe on-screen items. Checkerboard Background Displays a checkerboard layer behind images, letting you easily see the transparent areas of an image that has an alpha channel. Show File Size Displays the file size of an asset when you are browsing. Confirm When Leaving SPS Displays a confirmation window before you exit Scene7 Publishing System. Include UDFs in Search Deselected (default) to improve system performance for most metadata searches that you run. If most of your metadata searches benefit from including user-defined fields, you can select this option to turn it on. As an alternative, use Advanced Search to give you a more directed and faster search experience than including userdefined fields. See “Conducting an advanced search” on page 99. See also “User-Defined Fields” on page 49. Basic Search Type Choose a default search type, Contains or Starts With. Show Media Portal Features Select this option to access Media Portal features, such as Media Cart. Show Command Feedback Show command requests to the server. Show Dialog During Export Displays a dialog box when you perform an export. If you deselect this option, you can still go to the Jobs page to retrieve the results of your export. Email Email Options Choose how you want Scene7 to inform you by e-mail when upload and publish jobs are completed. You can receive job completion notices only if warnings or errors occurred. Email Scope Determines whether you receive all job e-mail for your company or only e-mail about upload and publish jobs you initiate. Email Types Determines whether you are informed when upload jobs and publish jobs are completed. Language Preferred Language Determines the language for the interface. Password New Password Enter a new password (it must be at least six characters long). Re-Type Password Re-enter the new password to confirm that you are entering it correctly. Password Expiration Determines whether your password expires after 72 days as a security measure. If you select Yes, you are asked to create a new password after 72 days. Last updated 10/9/2014 20 USING SCENE7 Setup Application Setup You can use the Application Setup pages to enter general settings, create image presets, video encoding presets, viewer presets, or to define universal viewers, default viewers, and metadata. You can also setup batch set presets to automate the generation of 2D spin sets (for example), publishing settings, and video SEO settings. Important: Only Scene7 Publishing System administrators can change settings on the Application Setup pages. General Settings To open the Application General Settings page, on the Global Navigation bar, click Setup > Application Setup > General Settings. Servers On account creation, Scene7 automatically provides the assigned servers for your company. These servers are used to construct URL strings for your web site and applications. These URL calls are specific to your account. See also “Testing the Secure Testing service” on page 92. Published Server Name This server is the live CDN server used in all system-generated URL calls specific to your account. Do not change this server name unless you are instructed to do so by a Scene7 support technician. Origin Server Name This server is used for quality assurance testing only. Do not change this server name unless instructed to do so by a Scene7 support technician. AGM Server Name This server is used for Web-to-Print templates. This server is set on a company-wide basis. Do not change this server name unless instructed to do so by a Scene7 support technician. Test&Target Server Name Your Test&Target URL, up to and including .com. For instructions about obtaining this URL, see “Integrating Scene7 with Test&Target” on page 273. iOS Streaming Server Name The URL to your Scene7 iOS streaming server. This server delivers streaming video to iOS-based devices using HTTP protocol. RTMP Streaming Server Name The URL to your Scene7 RTMP (Real Time Messaging Protocol) streaming server. This server delivers streaming video using RTMP protocol and Flash Media Server. Progressive Video Server Name The URL to your Scene7 progressive video server. This server delivers progressive video using HTTP protocol. Show URL for Unpublished Assets Select this option if you want Scene7 to display a URL when previewing any asset, whether it is published or not. If the asset is not published, the URL does not work. However, you can use the URL for planning or organizational purposes. Allow AIR Install Select this option to allow users to download Scene7 Publishing System desktop version to their local hard drives. Users install the application from the Desktop Version area of the Personal Setup screen. AIR users must manually uninstall their existing app and reinstall from the web version of Scene7 Publishing System (in Personal Settings). After this one-time reinstallation, you are prompted to upgrade whenever the server has a newer version of Scene7 Publishing System AIR. Scene7 Publishing System is integrated with the Application Update Framework which streamlines the upgrade process. CDN Invalidation Template Specifies the template that is used for invalidating the CDN (Content Delivery Network) cache. For example, suppose you enter an image URL (including image presets or modifiers) referencing <ID>, instead of a specific image ID as in the following example: Last updated 10/9/2014 21 USING SCENE7 Setup http://sample.scene7.com/is/image/Company/<ID>?$s7product$ If the Template just contains <ID>, then SPS fills in the http://<server>/is/image, where <server> is the Publish Server Name that is defined in General Settings. Setting the CDN Invalidate Template, selecting an image named Backpack_B, and then clicking File > Invalidate CDN results in the following generated URL in the CDN Invalidate interface: http://sample.scene7.com/is/image/Company/Backpack_B?$s7product$ In the URL list box, click Continue to clear the cache for that specific image URL call. Note that you can also add URLs by typing or pasting them into the URL list box; you do not need to set the Template beforehand. After you have selected your CDN Invalidation Template, and made an Invalidate CDN request, an indicator will pop up in the user interface that gives you an estimate of how long it will take to clear the cache. Similarly, if multiple images are selected within SPS when you click File > Invalidate CDN, each image is referenced in the saved Template URL. Therefore, you can define a CDN Invalidate Template referencing each URL that is referenced on your Web site (such as product detail, search results, and so forth). Then, when you select one or images for invalidation from cache, the URLs automatically populate the interface. See “Content caching” on page 9. See “Republished assets and CDN delays” on page 90. Browse Show Projects Determines whether Projects are available as a means of organizing your Scene7 assets. See “Organizing your work with Projects” on page 117. Show Sample eVideo Content Provides sample content for Video Recuts in the eVideo Recuts screen. The sample content — audio, background, borders, captions, effects, graphics, transitions, and video — appears in the Sample eVideo Content panel. Show Generated Content In folders, shows content generated from an asset. For example, when a PDF file is rasterized as it is uploaded, Scene7 creates one image for each page in the original PDF. If Show Generated Content is selected, each image generated when the original PDF was uploaded appears along with the PDF in the folder to which the PDF was uploaded. Show Encoded Videos Deselected (off) by default. To quickly search and browse for videos in Scene7 Publishing System without having to navigate through numerous encoded derivatives of the same video, leave this option deselected (default). Only the Master Video thumbnail, which is the source video you uploaded and used to create all the derivatives, and only the “parent” Adaptive Video Set thumbnail, which contains all the “child” derivatives of the encoded video set, are displayed in the user interface. You can, however, still access individual encoded videos from the Master Video or the Adaptive Video Set. To do so, double-click the video thumbnail image to open Detail View. Then click Encoded Videos in the right panel to access all the “child” videos. You can also use File > Reprocess to create more encoded “child” videos directly from an Adaptive Video Set. Scene7 Publishing System automatically finds the “parent” Master Video of the Adaptive Video Set and uses that as the source video for transcoding. When you save the new individual encoded videos, however, they are not seen when you search or browse. However, they are still accessible from the Encoded Videos tab in Detail View. See “Uploading and encoding videos” on page 211. To continue the ability to access all your encoded video derivatives when you search and browse, select Show Encoded Videos. Last updated 10/9/2014 22 USING SCENE7 Setup There are certain actions on the Build menu that only work, or optionally work, with individual videos. This functionality makes it necessary to show all the encoded video derivatives that you can select from, regardless of how you set Show Encoded Videos. The Build actions that over-ride the Show Encoded Videos setting include Adaptive Video Sets, eCatalogs, and Video Recuts. Note: If you did not use Scene7 Publishing System to upload and encode your video assets, Scene7 shows all your individual encoded videos, even is this option is deselected. Scene7 FTP Account Server Lists your FTP account server. User Name Lists your FTP account user name. Upload to Application Overwrite Images Scene7 does not allow two files to have the same name. Each item's Scene7 Publishing System ID (the image name minus the filename extension) must be unique. Because of this rule, the Upload dialog box has an Overwrite option. The exact effect of this option depends on the specified Overwrite Images option. These options specify how replacement images are uploaded: whether they replace the original images, or become duplicate images. Duplicate images are renamed with a “-1” (for example, chair.tif is renamed chair-1.tif). These options affect images uploaded to a different folder than the original or images with a different filename extension from the original (such as JPG, TIF, or PNG). (See “Using the Overwrite Images option” on page 23.) • Overwrite in current folder, same base image name/extension This option is the strictest rule for replacement. It requires that you upload the replacement image to the same folder as the original, and that the replacement image has the same filename extension as the original. If these requirements are not met, a duplicate is created. • Overwrite in current folder, same base asset name regardless of extension Requires that you upload the replacement image to the same folder as the original, however the filename extension can be different from the original. For example, chair.tif replaces chair.jpg. • Overwrite in any folder, same base asset name/extension Requires that the replacement image has the same filename extension as the original image (for example, chair.jpg must replace chair.jpg, not chair.tif). However, you can upload the replacement image to a different folder than the original. The updated image resides in the new folder; the file can no longer be found in its original location • Overwrite in any folder, same base asset name regardless of extension This option is the most inclusive replacement rule. You can upload a replacement image to a different folder than the original, upload a file with a different filename extension, and replace the original file. If the original file is in a different folder, the replacement image resides in the new folder to which it was uploaded. Retain Publish Specifies whether a replacement image uploaded to Scene7 retains the Ready to Publish setting of the image it is replacing, or the setting is specified on upload. Default Color Profiles Specifies the color profiles applied as part of Default Color Profile Options when adding CMYK images. Default Upload Options Opens the Upload Job Options dialog box, where you can specify default upload options. For information about these options, see “Upload options” on page 84. Image Map Editor, to Application Default Image Mapping HREF Defines the default URL used for the image mapping href column. This URL is the default URL you see when you create new Image Maps. Default Image Mapping Template Defines the default Javascript for the image mapping href template. You can set custom code here to be executed whenever you click an image map. Last updated 10/9/2014 23 USING SCENE7 Setup Other Settings, to Application Trash Can Clean Up Warnings Assets in the Trash are automatically removed within seven days. Select “Send emails before trash items are automatically deleted” if you want notifications sent to company administrators when assets that are in the Trash are four days away from being permanently deleted. See “Managing the Trash folder” on page 116. Using the Overwrite Images option Scene7 does not allow two files to have the same name. Each item's Scene7 Publishing System ID (the image name minus the filename extension) must be unique. Because of this rule, the Upload dialog box includes Overwrite Images options. The exact effect of this option depends on a setting for each company's Scene7 Publishing System Internal Settings. If you previously uploaded images and then changed the original files (or replaced them), the chosen Overwrite option specifies how Scene7 replaces the images. No information about the image changes, but the new image replaces the old one. If the folder also contains images that are not already in Scene7, these images are added. Use this option if images you have uploaded have changed in some way (image has been altered) but the reference to the image remains the same. Overwrite is also helpful when uploading and ripping Adobe® PDFs. To fine-tune how Scene7 rips the image, adjust the ICC color profile options in the Upload dialog box and re-upload using the Overwrite feature. The Scene7 IDs that are used to access images from the production servers are derived from the image filenames. The use of uppercase and lowercase characters in the filename is important, both in the replacement of existing files and for the Scene7 IDs used to access the image. Be sure the use of uppercase and lowercase characters in filenames is correct before uploading into Scene7 to avoid Scene7 IDs that differ only in case for the same image. If you deselect this option, all images with the same filenames as existing images are treated as duplicates and are not added. Image Presets The Image Presets screen is for creating and editing Image Presets. Image Presets enable Scene7 to deliver images dynamically at different sizes from the same master image. Each Image Preset represents a predefined collection of sizing and formatting commands for displaying images. When you create an Image Preset, you choose a size for image delivery. You also choose formatting commands so that the appearance of the image is optimized when the image is delivered for viewing. Administrators can create presets for exporting assets. Users can choose a preset when they export images, which also reformats images to the specifications that the administrator specifies. To open the Image Preset screen, on the Global Navigation bar, click Setup > Image Presets. More Help topics “Setting up Image Presets” on page 121 Creating and editing Image Presets 1 Click Setup > Image Presets. 2 Create a new preset or start from an existing one: Creating an Image Preset Click Add. Creating an Image Preset from an existing preset Select the Image Preset that is most like the one you want to create, and then click Edit. Last updated 10/9/2014 24 USING SCENE7 Setup 3 On the Add (or Edit) Preset screen, enter a name for the preset. 4 Set the Preset options that you want. See “Image Preset options” on page 24. 5 Click Save, or if you started from an existing preset, click Save As. 6 To preview the preset with your own image, click Browse and then select an image. To preview with the default image, click Reset. You can edit an Image Preset by selecting its name on the Image Presets screen and then clicking Edit. To delete an Image Preset, select it, and then click Delete. Image Preset options The Add Preset and Edit Preset screens offers these options for creating and editing Image Presets: Preset Name Enter a descriptive name without any blank spaces. Include the image-size specification in the name to help users identify this Image Preset. Width and Height Enter in pixels the size at which the image is delivered. Format Choose a format from the menu. Choosing the GIF, JPEG, PDF, or TIFF format brings up additional options: • GIF Color Quantization Options • Type Choose Adaptive (the default), Web, or Macintosh. If you choose GIF With Alpha, the Macintosh® option is not available. • Dither Choose Diffuse or Off. • Number Of Colors Drag the slider to enter 2–255. • Color List Enter a comma-separated list. For example, for white, gray, and black, enter 000000,888888,ffffff. • JPEG Options • Quality Controls the JPEG compression level. This setting affects both file size and image quality. The JPEG quality scale is 1–100. • Enable JPG Chrominance Downsampling Because the eye is less sensitive to high-frequency color information than high-frequency luminance, JPEG images divide image information into luminance and color components. When a JPEG image is compressed, the luminance component is left at full resolution, while the color components are downsampled by averaging together groups of pixels. Downsampling reduces the data volume by one half or one third with almost no impact on perceived quality. Downsampling is not applicable to grayscale images. This technique reduces the amount of compression useful for images with high contrast (for example, images with overlaid text). • PDF and TIFF options • Compression Choose a compression algorithm. Colorspace Choose a color space. Sharpening Select the Enable Simple Sharpening option to apply a basic sharpening filter to the image after all scaling takes place. Sharpening can help compensate for blurriness that can result when you display an image at a different size. For more information about sharpening, resample modes, and unsharp masking, see “Sharpening an image” on page 300. Last updated 10/9/2014 25 USING SCENE7 Setup Resample Mode Choose a Resampling mode option. These options sharpen the image when it is downsampled: • B-Linear The fastest resampling method; some aliasing artifacts are noticeable. • Bi-Cubic Increases CPU usage on the Image Server, but yields sharper images with less noticeable aliasing artifacts. • Sharp2 Can produce slightly sharper results than the Bi-Cubic option, but at even higher CPU cost on the Image Server. • Tri-Linear Uses both higher and lower resolutions, if available; recommended only when aliasing is an issue. This method reduces JPEG size due to reduced high-frequency data. Unsharp Masking Choose these options to fine-tune sharpening: • Amount Controls the amount of contrast applied to edge pixels. The default is 1.0. For high-resolution images, you can increase it to as high as 5.0. Think of Amount as a measure of filter intensity. • Radius Determines the number of pixels surrounding the edge pixels that affect the sharpening. For highresolution images, enter from 1 through 2. A low value sharpens only the edge pixels; a high value sharpens a wider band of pixels. The correct value depends on the size of the image. • Threshold Determines the range of contrast to ignore when the unsharp mask filter is applied. In other words, this option determines how different the sharpened pixels must be from the surrounding area before they are considered edge pixels and are sharpened. To avoid introducing noise, experiment with values between .02 and 0.2. The default value of 6 sharpens all pixels in the image. • Color Space Determines whether the image uses the space in which the image was created, usually RGB (Original) or a luminance space (Intensity). Color Choose these options: • Output Color Profile Select Use Default or one of the ICC color profiles available on the Scene7 Publishing System. See also “ICC profiles” on page 315. • Rendering Intent Select an option if you want to override the default rendering intent of the color profile. Use this option when one of the default ICC profiles is the target color space of a color conversion, an output device (printer or monitor) is characterized by this profile, and the specified rendering intent is valid for this profile. • Embed Profile Select this option so that, if you open this image in Adobe® Photoshop®, it uses this profile. Print Resolution Choose a resolution for printing this image; 72 pixels is the default. URL Modifiers If you prefer to specify the URL modifiers that define your Image Preset, rather than the settings, enter the modifiers here. Sample Image URL Lists the “raw” URL string that the Scene7 Image Server uses to deliver images with the Image Preset you are adding or editing. This URL string encodes all the format settings you select in the Add Preset or Edit Preset screen. Editing, removing, or deactivating an image preset 1 Click Setup > Image Presets. 2 In the Image Presets screen, select a preset in the table, and then do one of the following: • Click Edit and then specify new options in the Edit Preset dialog box. • Click Delete to remove the preset from the list. • Deselect the Active check box next to a preset name to remove it from the entire Scene7 Publishing System user interface for MediaPortal users. Last updated 10/9/2014 26 USING SCENE7 Setup Activating or deactivating adaptive video presets Scene7 offers Adaptive Video encoding presets. It is a master list of presets that combines both 16:9 Adaptive Video presets and 4:3 Adaptive Video presets into one group. These predefined presets reflect the most common encoding settings and are optimized for playback on target mobile devices, tablets, and desktops. Only “Adaptive Video” encoding presets are activated (enabled or “turned on”) by default. You can deactivate it, if desired. Inactive Adaptive Video presets do not appear as a selectable option in the eVideo section of the Upload Job Options dialog box. See “Uploading and encoding videos” on page 211. To activate or deactivate adaptive video presets 1 Near the upper-right corner of Scene7 Publishing System, click Setup > Application Setup > Video Presets > Adaptive Video Presets. 2 On the Adaptive Video Presets page, deselect the check box next to a preset name to remove the preset from the eVideo Options list in the Upload Job Options dialog box. 3 Click Close. Video presets for encoding video files To choose an encoding preset, in the lower-right corner of the Upload page, click Job Options. In the Upload Job Options dialog box, expand eVideo Options and choose the video encoding presets you want. Note: With the exception of “Adaptive Video”, which is enabled by default, you may not see all of the other adaptive video or single video encoding presets in the Upload Job Options dialog box. Scene7 Administrators determine which video encoding presets are visible in the Upload Job Options dialog box. • Choose from the following adaptive video encoding or single encoding presets: 16:9 Adaptive Video Create 16:9 aspect ratio videos for delivery to desktops (compatible with Flash 9), mobile (iPhone, iPad, Android), and tablets (iPad, Android), optimized with the resolution and bit rate that best matches the viewer's connection speed. 4:3 Adaptive Video Create 4:3 aspect ratio videos for delivery to desktops (compatible with Flash 9), mobile (iPhone, iPad, Android), and tablets (iPad, Android), optimized with the resolution and bit rate that best matches the viewer's connection speed. Adaptive Video A single encoding preset that works with any aspect ratio to create videos for delivery to mobile, tablet, and desktop. Uploaded source videos that are encoded with this preset are set with a fixed height. However, the width automatically scales to preserve the video’s aspect ratio. This flexibility of having an “Auto-scale” is also available by default when you create your own custom video encoding preset. See “Adding or editing a video encoding preset” on page 220. Adaptive Video Encoding (16:9 or 4:3) Create both 16:9 and 4:3 aspect ratio videos for delivery to desktops (compatible with Flash 9), mobile (iPhone, iPad, Android), and tablets (iPad, Android), optimized with the resolution and bit rate that best matches the viewer's connection speed. See “Adaptive Video Encoding (16:9 or 4:3) video presets” on page 28. Single Encoding Presets •Desktop (compatible with Flash 9 and with HTML5 OGG) Create an MP4 file for delivering a streaming or progressive eVideo experience to desktop computers. See “Desktop video encoding presets” on page 29. Last updated 10/9/2014 27 USING SCENE7 Setup • Mobile (iPhone, iPad, Android) Create an MP4 file for delivery on iPhones, iPads, and Androids. See “Mobile video encoding presets” on page 30. • Tablet (iPad, Android) Create an MP4 file for delivery on iPads and Androids. Or, create an OGV file for delivering a progressive eVideo experience to desktop computers using the browser’s HTML5 video player. See “Tablet video encoding presets” on page 31. Note: To deliver video to iPads, you can choose a Mobile encoding preset or a Tablet encoding preset. Tablet presets are designed especially for the iPad, typically with higher resolution and quality to take advantage of the larger screen size and bandwidth connection. Delivering video files encoded with a Tablet preset requires you to include devicedetection code on your mobile site or application. This code switches between an iPhone or iPad video experience, depending on the playback device. Choosing a Mobile preset for delivering video files to the iPad is a more simplified workflow. The reason is because you can use the same video file for both iPhones and iPads. However, the quality is standardized to the lower resolution iPhone experience. • Under the Encoding Presets group, in the Sort Encoding Presets drop-down list, select Name or Size to sort presets by name or resolution size. • Choose an encoding preset based on the resolution size and bandwidth with which you plan to play the video. • You can select Adaptive Video Encoding and one or more encoding preset per video. For example, you can encode a file for both desktop and mobile in one upload job. After you click Start Upload, the original master video file is uploaded and encoded files are generated from the master file. About encoding preset options Parameters of the encoding preset options are the following: Target connection speed The Internet connection speed of the targeted end user. Encoded file suffix The suffix that is attached to the encoded video file for identification purposes. Video bit rate (data rate) The amount of data that is encoded to make up a single second of video playback (in kilobits per second). Pixel Width/Height The width dimension of the screen image, in pixels; the height dimension of the screen image (in pixels). Frame per second (fps) The number of frames, or still images, for each second of video. In the United States and Japan, most video is shot at 29.97 fps; in Europe and Asia (excluding Japan), most video is shot at 25 fps. Film is shot at 24 fps. Audio bit rate The amount of data that is encoded to make up a single second of audio playback, in kilobits per second. The following tables show you recommended best practices for selecting video presets and the naming conventions that are used to designate encoded files. Adaptive Video (default) An encoding preset that works with any aspect ratio to let you create videos for delivery to mobile, tablet, and desktop. Uploaded source videos that are encoded using this preset (the default and a best practice) are set to a fixed height while the width automatically scales to preserve the video’s aspect ratio. Last updated 10/9/2014 28 USING SCENE7 Setup Adaptive Video (default) Encoding Preset Name/Tooltip Text Encoded file suffix Video data rate (Kbps) Width/Height Fps (pixels) Audio bit rate (kbps) Recommendations 1 Auto x360, 800 Kbps _Mobile_Autox360p _800K 800 Autox360 Same as source 64 For mobile (iPhone, iPad, Android) 2 Auto x 480, 1400 Kbps _Tablet_Autox480p_ 1400K 1400 Autox480 Same as source 64 For tablet (iPad, Android) 3 Auto x 720, 2600 Kbps _Flash9_Autox720p_ 2600 2600K Autox720 Same as source 64 For desktop (compatible with Flash 9) Adaptive Video Encoding (16:9 or 4:3) video presets These adaptive video encoding presets combine a series of individual encode presets that are automatically selected for you based on the aspect ratio of the video that you uploaded. For example, if you upload a 4:3 video, it is automatically encoded using all five 4:3 presets found within the master preset list in the Adaptive Video Encoding (16:9 or 4:3) option. For information about encoding options parameters, see “About encoding preset options” on page 27. Adaptive Video Encoding (16:9 or 4:3) presets Encoding Preset Name/Tooltip Text Target Encoded file suffix connectio n speed (Kbps) Video data rate (Kbps) Width/Height Fps (pixels) Audio bit rate (kbps) Recommendations 1 16:9, 512x288, Mobile (iPhone, iPad, Android), (400 Kbps) 500 _Mobile_512x288_4 00K 400 512x288 Same as source 64 Low resolution, 3G 2 4:3, 384x288px, Mobile (iPhone, iPad, Android), (400 Kbps) 500 _Mobile_384x288_4 00K 400 384x288 Same as source 64 Low resolution, 3G 3 16:9, 512x288, Mobile (iPhone, iPad, Android), (600 Kbps) 700 _Mobile_512x288_6 00K 600 512x288 Same as source 64 Medium resolution, 3G 4 4:3, 384x288, Mobile (iPhone, iPad, Android), (600 Kbps) 700 _Mobile_384x288_6 00 600 384x288 Same as source 64 Medium resolution, 3G 5 16:9, 640x360, Tablet (iPad, Android), (800 Kbps) 900 _iPad_640x360_800K 800 640x360 Same as source 80 Medium resolution, WiFi 6 4:3, 640x480, Tablet (iPad, Android), (800 Kbps) 900 _iPad_640x480_800K 800 640x480 Same as source 80 Medium resolution, WiFi 7 16:9, 768x432, Tablet (iPad, Android), (1200 Kbps) 1.5 Mbps _iPad_768x432_1200 1200 K 768x432 Same as source 96 High resolution, WiFi Last updated 10/9/2014 29 USING SCENE7 Setup Encoding Preset Name/Tooltip Text Target Encoded file suffix connectio n speed (Kbps) 8 4:3, 768x576, Tablet (iPad, Android), (1200 Kbps) 1.5 Mbps 9 16:9, 1280x720, Desktop (Compatible with Flash 9), (2000 Kbps) 1 0 4:3, 1280x960, Desktop (Compatible with Flash 9), (2000 Kbps) Video data rate (Kbps) Width/Height Fps (pixels) Audio bit rate (kbps) Recommendations _iPad_768x576_1200 1200 K 768x576 Same as source 96 High resolution, WiFi 3.0 Mbps _1280x720_2000K 2000 1280x720 Same as source 128 High-definition, widescreen 3.0 Mbps _1280x960_2000K 2000 Kbps 1280x960 Same as source 128 High-definition Desktop video encoding presets Video encoding presets for MP4 and OGV on desktop computers. For information about encoding options parameters, see “About encoding preset options” on page 27. H264 Main 3.2 - Audio AAC, MP4 file extension Encoding Preset Name/Tooltip Text Target Encoded file suffix connectio n speed (Kbps) Video data rate (Kbps) Width/Height Fps (pixels) Audio bit rate (Kbps) Recommendations 1 16:9, 480x270 (400 Kbps) 500 _480x270_400K 400 480x270 Same as source 64 Low widescreen resolution 2 16:9, 640x360 (800 Kbps) 900 _640x360_800K 800 640x360 Same as source 80 Medium widescreen resolution 3 16:9, 800x450 (1200 Kbps) 1.5 Mbps _800x450_1200K 1200 800x450 Same as source 96 Medium-high resolution 4 16:9, 1280x720 (2000 Kbps) 3.0 Mbps _1280x720_2000K 2000 1280x720 Same as source 128 High-definition, widescreen 5 4:3, 320x240 (400 Kbps) 500 _320X240_400K 400 320x240 Same as source 64 Low resolution 6 4:3, 480x360 (800 Kbps) 900 _480x360_800K 800 480x360 Same as source 80 Medium resolution 7 4:3, 640x480 (1200 Kbps) 1.5 Mbps _640x480_1200K 1200 640x480 Same as source 96 Medium-high resolution 8 4:3, 1280x960 (2000 Kbps) _1280x960_2000K 2000 1280x960 Same as source 128 High-defintion 3.0 Mbps Last updated 10/9/2014 30 USING SCENE7 Setup OGG Theora Vorbis - OGV file extension Encoding Preset Name/Tooltip Text Target Encoded file suffix connectio n speed (Kbps) Video data rate (Kbps) Width/Height Fps (pixels) Audio bit rate (Kbps) Recommendations 1 16:9, 480x270 (400 Kbps), 500 OGG _OGG_480x270_400 K 400 480x270 Same as source 64 Low widescreen resolution 2 16:9, 640x360 (800 Kbps), 900 OGG _OGG_640x360_800 K 800 640x360 Same as source 80 Medium widescreen resolution 3 16:9, 800x450 (1200 Kbps), OGG 1.5 Mbps _OGG_800x450_120 0K 1200 800x450 Same as source 96 Medium-high resolution 4 16:9, 1280x720 (2000 Kbps), OGG 3.0 Mbps _OGG_1280x720_20 00K 2000 1280x720 Same as source 128 High-definition, widescreen 5 4:3, 320x240 (400 Kbps), OGG 500 _OGG_320X240_400 K 400 320x240 Same as source 64 Low resolution 6 4:3, 480x360 (800 Kbps), OGG 900 _OGG_480x360_800 K 800 480x360 Same as source 80 Medium resolution 7 4:3, 640x480 (1200 Kbps), 1.5 Mbps OGG _OGG_640x480_120 0K 1200 640x480 Same as source 96 Medium-high resolution 8 4:3, 1280x960 (2000 Kbps), OGG _OGG_1280x960_20 00K 2000 1280x960 Same as source 128 High-defintion 3.0 Mbps Mobile video encoding presets Same as source fps. Video encoding presets for iPhone, iPad, and Android mobile devices. For information about encoding options parameters, see “About encoding preset options” on page 27. H264 Baseline 2.1 - Audio AAC, MP4 file extension Encoding Preset Target Name/Tooltip Text Connection Speed (Kbps) Encoded file suffix Video bit Pixel Fps rate Width/Height (Kbps) Audio bit rate (Kbps) Recommendations 1 16:9, 512x288, Mobile (400 Kbps) 500 _Mobile_512x288_400K 400 512x288 Same as source 64 Low resolution, 3G 2 16:9, 512x288, Mobile (600 Kbps) 700 _Mobile_512x288_600K 600 512x288 Same as source 64 Medium resolution, 3G 3 16:9, 512x288, Mobile (800 Kbps) 900 _Mobile_512x288_800K 800 512x288 Same as source 80 Medium resolution, WiFi 4 16:9, 512x288, Mobile (1000 Kbps) 1.2 Mbps _Mobile_512x288_1000K 1000 512x288 Same as source 80 High resolution, Wi-Fi 5 16:9, 512x288, Mobile (1200 Kbps) 1.5 Mbps _Mobile_512x288_1200K 1200 512x288 Same as source 96 High resolution, Wi-Fi Last updated 10/9/2014 31 USING SCENE7 Setup Encoding Preset Target Name/Tooltip Text Connection Speed (Kbps) Encoded file suffix Video bit Pixel Fps rate Width/Height (Kbps) Audio bit rate (Kbps) Recommendations 6 4:3, 384x288, Mobile 500 (400 Kbps) _Mobile_384x288_400K 400 384x288 Same as source 64 Low resolution, 3G 7 4:3, 384x288, Mobile 700 (600 Kbps) _Mobile_384x288_600K 600 384x288 Same as source 64 Medium resolution, 3G 8 4:3, 448x336, Mobile 900 (800 Kbps) _Mobile_448x336_800K 800 448x336 Same as source 80 Medium resolution, WiFi 9 4:3, 448x336, Mobile 1.2 Mbps (1000 Kbps) _Mobile_448x336_1000K 1000 448x336 Same as source 80 High resolution, Wi-Fi 10 4:3, 448x336, Mobile 1.5 Mbps (1200 Kbps) _Mobile_448x336_1200K 1200 448x336 Same as source 96 High resolution, Wi-Fi Tablet video encoding presets Same as source fps. Video encoding presets for iPad, and Android tablet devices. For information about encoding options parameters, see “About encoding preset options” on page 27 H264 Main 3.1 - Audio HE-AACv1, MP4 file extension Encoding Preset Name/Tooltip Text Target Connection Speed (Kbps) Encoded file suffix Video bit rate (Kbps) Pixel Width/Height Fps 1 16:9, 512x288, iPad (400 Kbps) 500 _iPad_512x288_400K 400 512x288 Same as 64 source Low resolution, 3G 2 16:9, 512x288, iPad (600 Kbps) 700 _iPad_512x288_600K 600 512x288 Same as 64 source Medium resolution, 3G 3 16:9, 640x360, iPad (800 Kbps) 900 _iPad_640x360_800K 800 640x360 Same as 80 source Medium resolution, Wi-Fi 4 16:9, 640x360, iPad (1000 Kbps) 1.2 Mbps _iPad_640x360_1000K 1000 640x360 Same as 80 source High resolution, Wi-Fi 5 16:9, 768x432, iPad (1200 Kbps) 1.5 Mbps _iPad_768x432_1200K 1200 768x432 Same as 96 source High resolution, Wi-Fi 6 4:3, 384x288, iPad (400 Kbps) 500 _iPad_384x288_400K 400 384x288 Same as 64 source Low resolution, 3G 7 4:3, 512x384, iPad (600 Kbps) 700 _iPad_512x384_600K 600 512x384 Same as 64 source Medium resolution, 3G 8 4:3, 640x480, iPad (800 Kbps) 900 _iPad_640x480_800K 800 640x480 Same as 80 source Medium resolution, Wi-Fi 9 4:3, 640x480, iPad (1000 Kbps) 1.2 Mbps _iPad_640x480_1000K 1000 640x480 Same as 80 source High resolution, Wi-Fi 10 4:3, 768x576, iPad (1200 Kbps) 1.5 Mbps _iPad_768x576_1200K 1200 768x576 Same as 96 source High resolution, Wi-Fi Last updated 10/9/2014 Audio bit rate (Kbps) Recommendations 32 USING SCENE7 Setup Viewer Presets A Viewer Preset is a collection of settings that determine how users view rich-media assets on their computer screens and mobile devices. As an administrator, you can create Viewer Presets. Settings are available for an array of viewer configuration options. For example, you can change the viewer display size, zoom behavior, color schemes, borders, and fonts. As a best practice, use Scene7 HTML5 Video viewers. The presets used in HTML5 Video viewers are robust video players. By combining into a single player the ability to design the playback components using HTML5 and CSS, have embedded playback, and use adaptive and progressive streaming depending on the browser’s capability, you extend the reach of your rich media content to desktop, tablet, and mobile users, and ensure a streamlined video experience. See About HTML5 Viewers in the Adobe Scene7 Viewers Reference Guide. See “Scene7 Viewer Preset compatibility matrix” on page 33. See “Best practice: Using the HTML5 Video viewer” on page 207. Depending on the viewer, you can add community features. Community features include an Embed button, E-mail button, Link button, and Visit Site button. These buttons let people using the viewers share the viewer with others or open the Scene7 web site. See also Scene7 Viewers Reference Library Examples. Viewer support for responsive designed web pages Different web pages have different needs. Sometimes you will want a web page that provides a link that opens the HTML5 Viewer in a separate browser window. In other cases, it may be necessary to embed the HTML5 Viewer directly on the hosting page. In the latter case, the web page may have a static layout. Or, it may be "responsive" and display differently on different devices or for different browser window sizes. To accommodate these needs, the HTML5 Viewers that come with Scene7 support both static web pages and responsive designed web pages. See Responsive Static Image libraryin the Scene7 Image Serving API Help for more information on how to embed responsive viewers onto your web pages. Viewer Preset types Administrators can create and customize the following types of Viewer Presets: eCatalog Viewer Simulates the experience of reading a printed catalog. You can move from page to page, zoom in and out of items on a page, and use image maps to see more information about items on the page. You can also include an Info Panel to display detailed information and an image-mapped item if the map area has a valid rollover_key attribute. To include an Info Panel, specify an Information Server URL in the Info Panel Settings panel of the eCatalog Viewer Preset window. Swatch Set Viewer Displays an image in a different color, material, texture, finish, or fabric. Users click a thumbnail to see the variations in the image. Mixed Media Set Viewer Displays different types of media in one viewer. You can include Swatch Sets, Spin Sets, images, and videos. You can set up tabs to contain different types of content, such as a tab for image sets and a tab for videos. Videos played back from a Mixed Media Set use a standard video viewer with a timeline and video controls, such as Stop, Pause, Rewind, and Play. When you set up a Mixed Media Set Viewer preset, you specify which viewers you want to use for the different types of assets in your Mixed Media Set. You can also use the Grid Viewer or Carousel Viewer to view a Mixed Media Set. Spin Set Viewer Provides multiple views of an image so users can turn the object to examine the different sides and angles. Last updated 10/9/2014 33 USING SCENE7 Setup Video Viewer Displays videos using the resolution dimensions of the source file or a custom size. Scene7 comes with many predefined Viewer Presets for playing video, and if you are an administrator, you can create custom Video Viewer presets. There are more than a dozen different settings for configuring the Video Viewer. You can configure its size, foreground and background color, video and audio controls, progress bar, user-interface skin, social features, and Help. Video Recut Viewer For creating Video Recuts, provides sample audio, backgrounds, borders, captions, effects, graphics, transitions, and video. This content appears in the Sample eVideo Content panel in the Video Recut screen. Zoom Viewers Offers a choice of three types of zoom viewer: • Zoom Viewer Lets users zoom into the area by clicking it. They can click controls to zoom in, zoom out, and reset the image to its default size. • Zoom Viewer: Fly-out Displays a second image of the zoomed area next to the original image. There are no controls to use, users simply move the selection over the area they want to view. When determining the complete bandwidth usage for this viewer, consider that both the main image and the flyout image are served in the viewer. The main image size (Stage Width and Height) and the Zoom Factor determine the flyout image size. To keep the flyout file size from becoming too large, balance these two values: if you have a large main image size, lower the Zoom Factor value. (The Flyout Width and Flyout Height determine the size of the flyout window, but not the size of the flyout image that is served into the viewer.) For example, if your main image size is 350 by 350 pixels, with a Zoom Factor of 3, the resulting flyout image is 1050 by 1050 pixels. If your main image size is 300 by 300 pixels, with a Zoom Factor of 4, the flyout image is 1200 by 1200 pixels. Depending on the JPEG quality setting (recommended settings are between 80-90), you can decrease the file size significantly. Recommended zoom factors are 2.5 to 4, depending on the size of your main image. Scene7 Viewer Preset compatibility matrix The following table identifies the currently available Scene7 Viewer Presets. The table also specifies the viewer’s compatibility with desktop and mobile devices, and the technology that is used for each given viewer. See also Scene7 Viewers Reference Library Examples. For information about supported web browser and operating system versions for Viewers, you can review the Viewers Release Notes. See Scene7 Viewers Reference Release Notes. Viewer Technology Desktop Apple iPhone Apple iPad Android Android Smartphone Tablet HTML5 X X X X X Universal_HTML5_Zoom_inli HTML5 ne X X X X X Universal_HTML5_Zoom_da rk HTML5 X X X X X Universal_HTML5_Zoom_lig ht HTML5 X X X X X FlyoutZoom_Flash Flash AS3 X Zoom Viewers Universal_HTML5_Flyout Last updated 10/9/2014 34 USING SCENE7 Setup Viewer Technology Desktop Apple iPhone Apple iPad Android Android Smartphone Tablet FlyoutZoom2_Flash Flash AS3 X Legacy-Zoom-Guided Flash AS2 X Zoom Flash AS3 X Viewer Technology Desktop Apple iPhone Apple iPad Android Smartphon e Android Tablet Universal_HTML5_Flyout HTML5 X X X X X Universal_HTML5_ImageSet _dark HTML5 X X X X X Universal_HTML5_ImageSet _light HTML5 X X X X X FlyoutZoom_Flash Flash AS3 X FlyoutZoom2_Flash Flash AS3 X ImageSet Flash AS3 X ImageSet_Slideshow_Flash Flash AS3 X Legacy-ImageSet-Guided Flash AS2 X Viewer Technology Desktop Apple iPhone Apple iPad Android Smartphon e Android Tablet HTML5 X X X X X Universal_HTML5_SwatchSet HTML5 _dark X X X X X Universal_HTML5_SwatchSet HTML5 _light X X X X X FlyoutZoom_Flash Flash AS3 X FlyoutZoom2_Flash Flash AS3 X SwatchSet Flash AS3 X SwatchSet_Slideshow_Flash Flash AS3 X Image Set Viewers Swatch Set Viewers Universal_HTML5_Flyout Last updated 10/9/2014 35 USING SCENE7 Setup Viewer Technology Desktop Apple iPhone Apple iPad Android Smartphon e Android Tablet X X X X X HTML5 X X X X X eCatalog_Flash Flash AS3 X eCatalog_PopupViewers_Fla sh Flash AS3 X Legacy-eCatalog Flash AS2 X Viewer Technology Desktop Apple iPhone Apple iPad Android Smartphon e Android Tablet Universal_HTML5_SpinSet_d HTML5 ark X X X X X Universal_HTML5_SpinSet_li ght HTML5 X X X X X Spin Flash AS3 X Spin_Auto_Flash Flash AS3 X Spin_eCat_Flash Flash AS3 X eCatalog Viewers Universal_HTML5_eCatalog_ HTML5 Adv (Includes support for social media.) Universal_HTML5_eCatalog (Includes support for social media.) Spin Viewers Last updated 10/9/2014 36 USING SCENE7 Setup Viewer Technology Desktop Apple iPhone Apple iPad Android Smartph one Android Tablet Blackber Windows ry Phone Smartph one eVideo Viewers Scene7 supports mobile video playback for MP4 H.264 video. You can find Blackberry devices that support this video format at the following: Supported video formats on Blackberry You can also find Windows devices that support this video format at the following: Supported video formats on Windows Phone Universal_HTML5_Video HTML5 X X X X X X X HTML5 X X X X X X X Video Flash AS3 X Video_eCat Flash AS3 X Video_Caption Flash AS3 X (Includes support for closed captioning.) See “Best practice: Using the HTML5 Video viewer” on page 207. Universal_HTML5_Video_s ocial (Includes support for closed captioning and social media.) Viewer Technology Desktop Apple iPhone Apple iPad Android Smartphon e Android Tablet Flash AS3 X Viewer Technology Desktop Apple iPhone Apple iPad Android Smartphon e Android Tablet Universal_HTML5_MixedMe dia_dark HTML5 X X X X X Universal_HTML5_MixedMe dia_light HTML5 X X X X X MixedMedia_AutoSpin_Flas h Flash AS3 X Mixed_Media Flash AS3 X Video Recut Viewer VideoRecut Mixed Media Set Viewers Last updated 10/9/2014 37 USING SCENE7 Setup Supported Mobile Viewers Gestures matrix The following table identifies the mobile viewer gestures that are supported on iOS, Android 2.x, and Android 3.x devices. Gesture Flyout Zoom Zoom eCatalog Spin Drag Pans Pans Pans Pans Tap Shows flyout window Shows or hides the user Shows or hides the interface user interface Shows or hides the user interface Double-tap Does not apply Zooms in or resets Zooms in or resets Zooms in or resets Pinch open Does not apply Zooms in (iOS and Android 3x only) Zooms in (iOS and Android 3x only) Zooms in (iOS and Android 3x only) Pinch close Does not apply Zooms out (iOS and Android 3x only) Zooms out (iOS and Android 3x only) Zooms out (iOS and Android 3x only) Swipe Scrolls swatch bar Scrolls images Scrolls pages Spins Flick Scrolls swatch bar Scrolls images Scrolls pages Spins About the Viewer Preset screen Create and manage Viewer Presets on the Viewer Presets screen. To open this screen, click Setup > Viewer Presets. The Viewer Presets screen offers tools for doing these tasks: Adding a preset Click Add and make choices in the Add Viewer Preset dialog box. See “Adding and editing Viewer presets” on page 38. Editing a preset Select a preset, and then click Edit. See “Adding and editing Viewer presets” on page 38. Deleting a preset Select a preset, and then click Delete. Adding localization support to a preset Add locale map string values to Image Server under Publish Setup, then edit a Flash AS3 Viewer preset, and add localized tool tip text. See “Adding localization support to a Flash AS3 Viewer preset” on page 39. Exporting a preset Select an HTML5 or Flash AS3 viewer preset, and then click Export to download the viewer skin so that you can use it as the basis for creating and adding a new viewer preset. See “Exporting an HTML5 or a Flash AS3 Viewer Preset” on page 40. Filtering the Viewer Preset list Use these tools to filter the list: • Open the Active/Inactive drop-down list and choose an option to show active presets, inactive presets, or all presets. • Open the Platform drop-down list choose to show only viewers for the Flash AS3 platform. • Open the Viewer drop-down list and choose an option to see only viewers of a certain kind. Choose All Viewers to see all viewers. Sorting presets Click a column heading (Active, Universal, Type, Preset, or Platform) to sort the list on a column. Click a column heading a second time to sort the list in descending (or ascending) order. See “About Universal Viewers” on page 42. Activating and deactivating presets Select a preset and click its Active option to activate or deactivate it. Last updated 10/9/2014 38 USING SCENE7 Setup See “Activating or deactivating Viewer presets” on page 41. Click Preview on the right side of the Viewer Presets screen to see what an asset looks like in the Viewer Preset you selected. To see a different asset, you can click Browse in the Viewer Presets screen and select a different asset in the Select Asset Preview dialog box. Adding and editing Viewer presets Besides adding viewer presets using Add in the user interface, you can also use Export to add a viewer preset. You simply export an existing viewer preset for Flash AS3 or HTML5, and then use that as the basis for the new preset. See “Exporting an HTML5 or a Flash AS3 Viewer Preset” on page 40. To add and edit Viewer presets 1 Near the upper-right corner of Scene7 Publishing System, click Setup > Viewer Presets. You can filter on the list of presets. For example, to see only presets for Video Viewers, select Video Viewer from the Viewers drop-down menu on the toolbar directly above the table. 2 In the Viewer Presets screen, add or edit the Viewer Preset on the Viewer Presets screen. Adding Click Add on the toolbar. In the Add Viewer Preset dialog box, choose a platform, and choose a rich-media asset type. Click Save As when you have finished creating the Viewer Preset. Adding by starting from an existing Viewer Preset In the table, select a Video Viewer Preset, and then click Edit on the toolbar. After you reconfigure the Video Viewer, click Save As to save the preset using a different name in the Preset Name text field. Editing Select an existing Viewer Preset, and then click Edit. 3 In the Configure Viewer screen, in the Preset Name field, enter or edit the preset name. 4 Set the remaining options that you want. Note: Choose Same As Source to automatically size the Video Viewer to the resolution size of the encoded video itself. If you choose this option, you cannot enter the Stage Width and Stage Height. Instead, these options come from the video itself. If you choose Same As Source, set the Margin Size option to reflect the skin dimensions outside the video playback area. This margin size is the pixel height and width of the video controls. You can use the following illustration to help you determine the margin sizes that you want to use. The stage height and width and the margin height and width of a Video Viewer. Last updated 10/9/2014 39 USING SCENE7 Setup 5 Do one of the following: • Click Save As if you added a Viewer preset by starting from an existing preset. • Click Save if you added or edited a Viewer preset. Adding localization support to a Flash AS3 Viewer preset You can add localized tool tip text to a Flash AS3 Viewer. To accomplish this functionality you first define a locale map string on the Image Server. Then you edit the tool tip text of a Flash AS3 Viewer preset. See “Considerations when setting up localization of assets” on page 56. Be aware Scene7 Publishing System does not include fonts for Eastern languages such as Japanese, Chinese, or Korean. Such languages typically require UTF-8 or a different character set. Therefore, to use these languages for tool tip text you can log on to Scene7 from that locale and type the tool tip values that you want. Or, the tool tip text as UTF-8; that is, cut and paste the text from a word processor that runs the desired Eastern language. Besides the ability to use localized tool tips in a Viewer by following the steps below, there is an alternate method you can use. You can add localized tool tips and even localized graphics to a Viewer directly in the Viewer SDK. For instructions, see the Localization chapter in the Adobe Scene7 Viewer SDK for Adobe Flash PDF guide, available as part of the Adobe Scene7 Viewer SDK download from Adobe Developer Connection. Note: To setup Localization Support options, contact Adobe Scene7 Technical Support or send an email to [email protected] requesting setup help. To add localization support to a Flash AS3 Viewer Preset 1 Click Setup > Application Setup > Publish Setup > Image Server. 2 In the Image Server Publish panel, scroll down to the Localization Support section. Note: To setup Localization Support options, contact Adobe Scene7 Technical Support or send an email to [email protected] requesting setup. 3 In the Locale Map String text field, specify the languages that you want to support. For example, if you want to support English, Spanish, and Japanese in a Viewer, the proper syntax of the map string is en,en,|es,es,|ja,ja,. The parameter is LocaleStrMap. For each pair of two letter languages, the first two letter code is the name of the language. You could also spell out the name of the language instead of using a two letter code (as in English, en,). Regardless of the method you use, the list of languages you specify here also populates the list of languages that appear in the Locale drop-down list when you edit a Viewer Preset. It is also used when requesting a localized viewer by way of viewerURL&locale=en in the viewer URL. 4 Click Save, and then click OK. 5 In the left panel of the Setup screen, under Application Setup, click Viewers > Viewer Presets. 6 In the All Platforms drop-down list on the Setup toolbar, select Flash AS3. 7 Select an active Viewer Preset, and then on the Setup toolbar, click Edit. 8 In the Configure Viewer screen, from the Locale drop-down list, select a language whose tool tips you want to appear localized in the Viewer. 9 In the left panel of the Configure Viewer screen, click a component name, such as Pause Play Button or Full Screen Button. 10 In the component’s tool tip text field, type the value for the language that you selected. Last updated 10/9/2014 40 USING SCENE7 Setup 11 When you have finished entering tool tip values for the various components that make up a Viewer Preset, in the lower-right corner of the Configure Viewer screen, click Save As. 12 Repeat steps 8-10 if you are supporting additional languages. 13 In the Save As New Preset Name dialog box, type the new name of the Viewer Preset, and then click Save. Exporting an HTML5 or a Flash AS3 Viewer Preset You can export an existing HTML5 or Flash AS3 Viewer Preset to use as the basis for creating a new HTML5 or Flash AS3 Viewer Preset. This export option is useful because you do not have to create the viewer from scratch. Instead, you export a preset that looks and behaves close to what you want, then you can use that as a starting point to make design adjustments. If you are exporting an HTML5 Viewer Preset, be sure that you have the HTML5 Viewer SDK installed so that you can edit the exported CSS and related Javascript. Likewise, if you are exporting a Flash AS3 Viewer Preset, be sure that you have the Flash Viewer SDK installed on Adobe Flash Professional so that you can edit the exported FLA file. See “Developer resources” on page 4. To export an HTML5 or a Flash AS3 Viewer Preset 1 Click Setup > Viewer Presets. 2 On the Viewer Presets toolbar, in the second drop-down list from the left, select HTML5 or Flash AS3. 3 In the third drop-down list from the left, select All Viewers. 4 Select the viewer preset that you want to use as the basis for a new HTML5 or Flash AS3 Viewer Preset. 5 In the toolbar, click Export. 6 In the Export Selected Assets dialog box, click Submit Export. Following export, you get a zipped FLA file if you exported a Flash AS3 viewer. Or, if you exported an HTML5 viewer, you get a CSS file. Download and unzip the file. 7 Do one of the following depending on the viewer preset you exported: • Open the FLA file in Adobe Flash Professional and make your changes. Be sure that you have the Scene7 Viewer Flash SDK installed before you edit the file. Export the FLA file as a movie and save the resulting SWF file. • Open the CSS file in a CSS editor, make your changes, and then save the file. 8 Upload the SWF file or the CSS file to Scene7 Publishing System. See “Uploading files” on page 79. 9 Publish the SWF file or the CSS file to the Scene7 Image Server. See “Publishing files” on page 87. 10 Add the new viewer preset as usual. Depending on the viewer that you exported, select the viewer SWF or the viewer CSS file that you uploaded. See “Adding and editing Viewer presets” on page 38. Last updated 10/9/2014 41 USING SCENE7 Setup Activating or deactivating Viewer presets To create a URL for showing assets, users open the Presets drop-down list in the Preview dialog box, select a Viewer Preset, and click Copy URL (see “Copying the URL of a Viewer preset” on page 41). This Presets list offers Viewer Presets that administrators add and manage on the Viewer Presets screen. For example, all active eCatalog Viewer presets appear on the Presets drop-down list in the Preview dialog box when a user previews an eCatalog. Unless you deactivate Viewer Presets on the Viewer Presets screen, the Presets drop-down list in the Preview dialog box can get crowded. To activate or deactivate Viewer Presets 1 Choose Setup > Viewer Presets to open the Viewer Presets screen. 2 Select or deselect Active options to activate or deactivate Viewer Presets. More Help topics “About the Viewer Preset screen” on page 37 “About Universal Viewers” on page 42 Copying the URL of a Viewer preset After you publish an asset, you can copy a URL for displaying the asset with the settings from a Viewer Preset. The URL is copied to the Clipboard. You can use it as necessary in the HTML code of your web page, mobile device, or application. To copy the URL of a Viewer preset 1 Select the asset in the Browse Panel. 2 Above the Asset Browse panel, on the right side of the toolbar, do one of the following: • Click Grid View. In the Asset Browse panel, double-click a single asset to open it in Detail View. In the URLs and Embed Code panel on the right, click Copy URL to the right of the viewer you want. • Click Grid View. In the Asset Browse panel, select a single asset, and then below the thumbnail image, click Preview > Viewer List. In the Viewer List page, under the Actions column of the table, click Copy URL. • Click List View. In the Asset Browse panel, select a single asset, and then to the right of the thumbnail image, click Preview > Viewer List. In the Viewer List page, under the Actions column of the table, click Copy URL. • Click Grid View, List View, or Detail View. On the same toolbar, click Preview > Viewer List. In the Viewer List page, under the Actions column of the table, click Copy URL. Copying the embed code of a Viewer preset Using the Embed Code feature lets you review the viewer code for the selected Viewer Preset. You can also copy the code to the clipboard so you can paste it in your web pages for deployment of the viewer. Editing of the code is not permitted in the Embed Code dialog box. To copy the embed code of a Viewer preset 1 Select the asset in the Asset Browse Panel. Last updated 10/9/2014 42 USING SCENE7 Setup 2 Above the Asset Browse panel, on the right side of the toolbar, do one of the following: • Click Grid View. In the Asset Browse panel, double-click a single asset to open it in Detail View. In the URLs panel on the right, click Embed Code. • Click Grid View. In the Asset Browse panel, select a single asset, and then below the thumbnail image, click Preview > Viewer List. In the Viewer List page, under the Actions column of the table, click Embed Code. • Click List View. In the Asset Browse panel, select a single asset, and then to the right of the thumbnail image, click Preview > Viewer List. In the Viewer List page, under the Actions column of the table, click Embed Code. • Click Grid View, List View, or Detail View. On the same toolbar, click Preview > Viewer List. In the Viewer List page, under the Actions column of the table, click Embed Code. 3 In the Embed Code dialog box, click Copy to Clipboard. 4 Click Close. About Universal Viewers Note: Using Universal Viewers is not a best practice and, therefore, not recommended-they are intended for legacy use only. As a best practice use the HTML5 viewers that come with Scene7 Publishing System. See “Best practice: Using the HTML5 Video viewer” on page 207. See also “Scene7 Viewer Preset compatibility matrix” on page 33. You can use Universal Viewers to publish videos and images to multiple screens such as desktop, smartphones, and tablets, all from a single URL. In the past, because different platforms supported different technologies like Flash or HTML5, you had to create your own viewers. Then, you had to write your own device detection to be able to switch between those different experiences. Overall, the entire process required much more development work and also the maintenance of multiple URLs. When you set up Universal Viewers, Scene7 provides you with a single universal URL that you can deploy and integrate into your websites, mobile sites, and mobile apps. In addition, Scene7 Publishing System automatically does the device detection, and serves your customers the right content, in the right viewer, to the right device. The actual setup of Universal Viewers is done under Application Setup. The viewer types that you can set up include Zoom, Image Set, Swatch Set, Spin, eCatalog, Video. You can also use an existing Universal Viewer preset as the basis for creating own named, Universal Viewer profiles. For example, you may decide to create different viewers of the same type for localization purposes, for different business units within the same company, for product categories, or for each season (such as a Spring eCatalog Universal Viewer and a Summer eCatalog Universal Viewer). For each viewer type, such as Zoom, its targeted platforms and associated viewers are displayed, such as HTML-based Viewers or viewers based on Flash technology. For each different targeted platform, you drag-and-drop the viewer that you want to use with a particular device such as smartphone, tablet, or desktop. For handheld smartphones, Android-based and Apple-based smartphones are supported. For tablets, Android-based and Apple-based tablets are supported. For desktops, Flash Player is supported. To edit the setup of Universal Viewers later on, be sure that you publish a job to Scene7 Image Server so that your changes take effect. Last updated 10/9/2014 43 USING SCENE7 Setup See also Scene7 Viewer Library Examples. Setting up Universal Viewers Note: Using Universal Viewers is not a best practice and, therefore, not recommended-they are intended for legacy use only. As a best practice use the HTML5 viewers that come with Scene7 Publishing System. See “Best practice: Using the HTML5 Video viewer” on page 207. See also “Scene7 Viewer Preset compatibility matrix” on page 33. The viewers that are available for setup in Universal Viewers are a combination of all pre-defined Viewer Presets that came with Scene7, and any custom viewers that you have added. It excludes any kind of custom viewers that you have implemented but have not yet uploaded into Scene7 Publishing System. You can see what viewers are exposed and selectable in Universal Viewers by looking at the viewers that are listed in Viewer Presets. See “Viewer Presets” on page 32. If you are editing an existing Universal Viewer setup, be sure that you publish a job to Scene7 Image Server so that your changes take effect. To set up Universal Viewers 1 On the Setup menu, click Application Setup. 2 In the left panel, in the Application Setup tree, click Viewers > Universal Viewers. 3 Near the upper-left side of the Universal Viewers page, click a viewer type tab, or click the New Profile tab, and then do one of the following: Last updated 10/9/2014 44 USING SCENE7 Setup If the viewer type tab you clicked is Do the following: Zoom, Image Set, Swatch Set, Spin, or eCatalog In the HTML-based Viewers group box or the Viewers for Adobe Flash group box, drag the viewer that you want to use and drop it onto a device’s screen. Video To use the universal URL for video, you must group videos that are encoded at different bit rates into an Adaptive Video Set. The reason for this is because you should not use the same video for playback across different screens. For example, mobile devices typically require video at a lower bit rate, however, desktop screens can accommodate a higher bit rate. When you hover your pointer on a viewer, the device screens that are compatible with the viewer are highlighted in the user interface; incompatible device screens are dimmed (not available). • In the video viewers group box, drag the viewer that you want to use and drop it onto the screen for Desktop. If you intend to support adaptive streaming on desktop computers, use the AS3 "Video" viewer. • In the Smart Phone text field or the Tablet text field, enter a target bit rate for playback on each device. These fields apply only when there is no adaptive streaming. Adaptive streaming is supported on Apple iOS devices for customers with the eVideo streaming license. In such case, the video bit rate is automatically picked based on the detect bandwidth. Otherwise, Scene7 picks the video in the Adaptive Video Set that has the closest bit rate to your target without going over and plays that video by way of progressive download. Mobile devices have native, built-in video players and, therefore, do not have viewers. The bit rate is a measure of the video’s quality level. In other words, the higher the bit rate, the better the video quality. Conversely, the lower the bit rate the lower the video quality. For example, you can enter a lower target Kbps rate for smartphones because they are often used on a lower bandwidth connection. Whereas, for higher bandwidth connections, you can enter a higher bit rate for a tablet because your customers are likely using a Wi-Fi connection. It is recommended that you set the target bit rate of "500" in the Smartphone category and "1000" in the Tablet category. See “Best practices for video encoding” on page 215. New Profile • In the drop-down list on the New Profile tab, select a viewer preset on which to base your new Universal Viewer. • In the HTML-based Viewers group box or the Viewers for Adobe Flash group box, drag the viewer that you want to use and drop it onto a device’s screen. When you hover your pointer on a viewer, the device screens that are compatible with the viewer are highlighted in the user interface; incompatible device screens are dimmed (not available). • Double-click the New Profile tab, and then type the name of the new Universal Viewer in the text field. 4 (Optional) On the Select image preset fallback drop-down list, select the name of the image preset that you want to use. If Scene7 encounters an unsupported device or screen, a static image is displayed using the preset settings that you select from the drop-down list. The list is based on Image Presets that you have created and added in Scene7 Publishing System. See “Creating and editing Image Presets” on page 23. 5 In the lower-right of the Universal Viewer page, click Save. 6 Click Close to return to the Browse page. Last updated 10/9/2014 45 USING SCENE7 Setup Previewing Universal Viewers Note: Using Universal Viewers is not a best practice and, therefore, not recommended-they are intended for legacy use only. As a best practice use the HTML5 viewers that come with Scene7 Publishing System. See “Best practice: Using the HTML5 Video viewer” on page 207. See also “Scene7 Viewer Preset compatibility matrix” on page 33. You can preview the Universal Viewers that you have set to ensure that you have selected the right viewer for the right device. If you need to make any changes to the setup of Universal Viewers, be sure that you publish a job to Scene7 Image Server so that your changes take effect. See also Scene7 Viewers Reference Library Examples. To preview Universal Viewers 1 In the Asset Library panel on the left side, navigate to the Asset folder that contains the asset that you want to preview with a viewer. 2 Above the Assets Browse panel, on the right side of the toolbar, click Grid View, List View, or Detail View. 3 Depending on the View you are using, do one of the following: • In the Asset Browse panel of the Grid View or List View, select a single asset. In the Preview drop-down list near the thumbnail image, select Viewer List. • In the toolbar above the Assets window of the Grid View, List View, or Detail View, in the Preview drop-down list, click Viewer List. 4 Do one of the following: • In the Viewer List table, click the column heading Platform Type to sort the column by ascending or descending order. In the Platform Type column, locate the names of viewers whose platform type is Universal, and then click Preview in the row whose viewer you want to see. • Near the upper-right corner of the Viewer List table, in the Platform drop-down list, select Universal to filter the table on the Universal platform type. Click Preview in the row whose Universal Viewer you want to see. 5 Close the displayed viewer in the browser pop-up window to return to the Viewer List screen. 6 In the lower-right corner of the screen, click Close to return to the Assets window. Copying a Universal Viewer URL Note: Using Universal Viewers is not a best practice and, therefore, not recommended-they are intended for legacy use only. As a best practice use the HTML5 viewers that come with Scene7 Publishing System. See “Best practice: Using the HTML5 Video viewer” on page 207. See also “Scene7 Viewer Preset compatibility matrix” on page 33. You can copy a universal URL either from within the Viewer List window or the Detail View window. To copy a Universal Viewer URL 1 In the Asset Library panel on the left side, navigate to the Asset folder that contains the asset whose URL you want to copy. Last updated 10/9/2014 46 USING SCENE7 Setup 2 Do the following: To copy the Universal URL by way of Do one of the following: Viewer List • Above the Assets window, on the right side of the toolbar, click Grid View. In the Asset window, below a thumbnail image of an asset, click Preview > Viewer List. • Above the Assets window, on the right side of the toolbar, click List View. In the Asset window, select an asset, and then to the right of the thumbnail image, click Preview > Viewer List. • Above the assets window, on the right side of the toolbar, click Detail View. On the same toolbar, click Preview > Viewer List. • Above the Assets window, on the right side of the toolbar, click Grid View. In the Asset window, double-click the thumbnail image of a single asset to open it in Detail View. Detail View 3 (This step is optional for Grid View or List View; it does not apply if you are in Detail View) In the Viewer List window, in the URL Encoding for Copy URL Generation drop-down list near the lower-left corner, select the URL encoding that you want applied to the asset’s URL when it is copied. 4 Do one of the following: • If you are accessing by way of the Viewer List window, click Copy URL in the row that has Universal as the Platform type. • If you are accessing by way of Detail View, in the URLs panel, under the Universal Presets heading, click Copy URL. Copying the embed code of a Universal Viewer Note: Using Universal Viewers is not a best practice and, therefore, not recommended-they are intended for legacy use only. As a best practice use the HTML5 viewers that come with Scene7 Publishing System. See “Best practice: Using the HTML5 Video viewer” on page 207. See also “Scene7 Viewer Preset compatibility matrix” on page 33. Using the Embed Code feature lets you review the viewer code for the selected Universal viewer. You can also copy the code to the clipboard so you can paste it in your web pages for deployment of the viewer. Editing of the code is not permitted in the Embed Code dialog box. To copy the embed code of a Universal Viewer 1 in the Asset Library panel on the left side, navigate to an asset folder that contains an asset whose Universal viewer embed code you want to copy. 2 Above the Asset Browse panel, on the right side of the toolbar, do one of the following: • Click Grid View. In the Asset Browse panel, double-click a single asset to open it in Detail View. In the URLs and Embed Code panel on the right, under Universal Presets, click Embed Code to the right of the viewer you want. • Click Grid View. In the Asset Browse panel, select a single asset, and then below the thumbnail image, click Preview > Viewer List. In the Viewer List page, under the Actions column of the table, click Embed Code to the right of a viewer whose platform type is Universal. Last updated 10/9/2014 47 USING SCENE7 Setup • Click List View. In the Asset Browse panel, select a single asset, and then to the right of the thumbnail image, click Preview > Viewer List. In the Viewer List page, under the Actions column of the table, click Embed Code to the right of a viewer whose platform type is Universal. • Click Grid View, List View, or Detail View. On the same toolbar, click Preview > Viewer List. In the Viewer List page, under the Actions column of the table, click Embed Code to the right of a viewer whose platform type is Universal. 3 In the Embed Code dialog box, in the text field, specify a target DIV layer name for the Universal viewer embed code. You can specify any name you want. The name simply helps you to keep DIV layers organized and is used in the setTargetDiv tag of the embed code. 4 Click Get Embed Code. Editing the code is not permitted in the Embed Code dialog box. 5 Click Copy to Clipboard. 6 Click Close. Configuring Default Viewers You can use Default Viewers to configure the default viewer that is associated with an asset when you use Preview in Scene7 Publishing System. You can set up the default preview experience for the following asset types: • Image • Video • SpinSet • Catalog • ImageSet • SwatchSet • MediaSet • Video Recut “Previewing an asset” on page 102 To configure default viewers 1 In the Setup drop-down list, click Application Setup. 2 In the Setup window, in the left pane, expand Application Setup > Viewers 3 Click Default Viewers. 4 In the Default Viewers window, in the drop-down list for each asset type, select the viewer that you want to associate with the asset’s preview. 5 In the lower-right corner of the Default Viewers window, click Save Settings. 6 In the lower-right corner of the Setup window, click Close to return to the Asset window. Last updated 10/9/2014 48 USING SCENE7 Setup Metadata Views Metadata is standardized information about an asset. You can use metadata to streamline your workflow, organize your assets, and improve searching. Scene7 supports the IPTC (International Press Telecommunications Council) standard and the XMP (extensible metadata platform) standard. Before users view or enter metadata about an asset in Detail view, they can open the Metadata Views menu and choose the set of metadata fields that they want to view or use to describe the asset. Scene7 comes with pre-defined Metadata Views, and administrators can create their own Metadata Views for users to choose when they enter metadata. More Help topics “Viewing, adding, and exporting metadata” on page 108 Creating a Metadata View 1 Choose Setup > Application Setup > Metadata Views. 2 Click Add. 3 Enter a name for the view in the Preset Name field. 4 (Optional) Check Make Default to make this view the one that users see when they open the Metadata panel in Detail View. 5 (Optional) Select Include UDF to include user-defined fields in the view. User-defined fields appear at the top of the Metadata panel in Detail View. 6 Select the fields you want for the view (click Select All to select all the fields). 7 Click Save. The selected categories and fields for the view appear in the Preview panel. Managing Metadata Views 1 Choose Setup > Application Setup > Metadata Views. 2 Do any of the following: • To preview a view, select it. The fields in the view appear in the Preview panel. • To edit a view, select it and click Edit. Then select or deselect field names on the Preview panel, and select or deselect the Include UDF option. • To delete a view, select it and click Delete • To make a view the default, select it and click Make Default. The default view is the one that users see when they open an asset in Detail view and go to the Metadata panel. Metadata Presets Metadata Presets give administrators a way to control and regulate metadata that is assigned to assets. In Detail view, a user can enter metadata about an asset in fields provided for that purpose. For example, a user can enter an owner name, copyright description, and address. To ensure that users enter this information accurately and completely, you can create Metadata Presets. Choosing a Metadata Preset in Detail view populates metadata fields with pre-defined values. For example, an owner name, copyright description, and address are entered automatically. Create a Metadata Preset for each set of metadata values you want users to be able to enter automatically in Detail view to describe an asset. Last updated 10/9/2014 49 USING SCENE7 Setup More Help topics “Viewing, adding, and exporting metadata” on page 108 “User-Defined Fields” on page 49 Creating or editing a Metadata Preset 1 Choose Setup > Application Setup > Metadata Presets. 2 In the Metadata Presets screen, do one of the following: • To create a preset, click Add. Type a name for the preset in the Metadata Template Name field and then click Metadata Views and choose a view on the drop-down list (see “Metadata Views” on page 48). • To edit an existing preset, select the preset from the Metadata Presets list and click Edit. 3 Expand headings you want to include in the preset and enter values in the different fields you want to include in the preset. 4 Click Save. The selected categories and fields for the preset appear in the Preview panel. Managing Metadata Presets 1 Choose Setup > Application Setup > Metadata Presets. 2 Do any of the following: • To preview a preset, select the preset you want to preview. The preset information (categories and fields) appears in the Preview screen. • To delete a preset, select the preset and click Delete. User-Defined Fields A Media Portal Administrator or a Company Administrator can create custom, user-defined metadata fields. Custom field help you organize assets in the Scene7 Publishing System. The fields can also be marked as Active, as necessary. When activated, the names of these custom metadata fields appear in the Metadata panel in Detail view. Users can enter information in user-defined metadata fields to describe assets. Users can also make a user-defined metadata field a criterion in searches. One effective use of user-defined metadata fields is to delay the activation time of an asset for a specific launch or sale. You define an “activation” and a “deactivation” field, both based on the type Date. Then, using the Metadata panel in Detail view or File > Edit Info, you can specify when the asset is activated and when it is deactivated. Scene7 Publishing System checks the publish status of an asset, and the publish history. If it is not within the activation time, the publish status will show as “Not Published”. Note: To make user-defined fields appear in the Metadata panel in Detail view, include user-defined fields in Metadata Views. On the Metadata Views screen, select the Include UDF (user-defined fields) option. For more information, see “Metadata Views” on page 48. Important: To search for assets using custom, user-defined fields, click Setup > Personal Setup, and then select Include UDFs in Search. See “Personal Setup” on page 15. Creating a user-defined metadata field 1 Click Setup > Application Setup > Metadata > User-Defined Fields. 2 Click Add Last updated 10/9/2014 50 USING SCENE7 Setup 3 In the Custom Field dialog box, set the options you want. Name Enter a name for the metadata field. Type Choose an option that defines the type of information that users can enter in the metadata field: • String A text string. • Int An integer. • Float A floating-point number. • Yes/No A yes/no Boolean value. • Date A date. The MM/DD/YYYY format is accepted. • Filename The name of a file. • Color The name of a color. • Dimension The width and height of the asset. • Untyped For backwards-compatibility. Do not select this option. Default Value Optionally, enter the value users are most likely to enter in the field. The value you enter becomes the default value for the field you create. Applies To Optionally, choose an asset type if you want the metadata field to apply only to a specific type of asset. Important: Choose an Applies To option carefully because you cannot change the Applies To option after you create a user-defined field. Scene7 lets you edit the name, type, and default value of a user-defined field, but not the Applies To setting. 4 Click Save when you finish creating the metadata field. Manage user-defined fields The User-Defined Fields screen offers commands for managing custom, user-defined metadata fields. Only a Media Portal Administrator or a Company Administrator can manage user-defined fields. To open this screen, click Setup > Application Setup > Metadata > User-Defined Fields. Editing a field Select the field, and then click Edit. Deleting a field Select the field, and then click Delete. Activating and deactivating fields Click to select or deselect the Active option next to the name of a field. If you are in a company administration role, this option may not be shown. Because this option is related to MediaPortal, you must select (turn on) Show MediaPortal Features in Personal Setup to see the activating and deactivating fields. Optimize Files As you upload files to the Scene7 Publishing System, the system optimizes them for storage and publishing. If the upload process is interrupted, however, some images cannot be optimized. In this case, you see the “Image not yet optimized” message. You can, however, optimize these files if you are an administrator. Scene7 Publishing System searches through your files and optimizes only those images that were not fully optimized before. 1 Choose Setup > Application Setup, and then select Optimize Files. 2 Enter information for the optimization job and click Submit. Last updated 10/9/2014 51 USING SCENE7 Setup If you are working with more than one company, optimize files belonging to different companies separately. More Help topics “Checking job files” on page 93 Batch Set Presets Use the batch set presets to automatically create image sets or spin sets while a job is running to upload assets to the Scene7 Publishing System. Company administrators first define naming conventions for the assets that they want to group together in a set. You can then create abatch set preset to reference these images. Each preset is a uniquely named, self-contained set of instructions that defines how to construct the set using images that match the defined naming conventions in the preset recipe. All active batch set presets for a company are listed on the Upload Job Option dialog box, so you can specify which preset you want applied during each upload session. Company administrators see all active and inactive batch set presets. When you upload files, Scene7 automatically creates a set with all files that match the defined naming convention in the active presets. Default Naming The company administrator creates a default naming convention that is used in any batch set preset recipe. The default naming convention selected in the batch set preset definition may be all your company needs to batch-generate sets for all websites. A batch set preset is created to use the default naming convention you define. You are able to create as many Batch Set presets with alternate, custom naming conventions needed for a particular set of content in cases where there is an exception to the company-defined default naming. While setting up a default naming convention is not required to use batch set preset functionality, best practice recommends that you use the default naming convention to define as many elements of your naming convention that you want grouped in a set in order to streamline batch set creation. 1 Click Setup > Application Setup > Batch Set Presets > Default Naming. 2 Select View Form or View Code to specify how you want to view and enter information about each element. You can select the View Code check box to view the regular expression value building alongside your form selections. You are able to enter or alter these values to help define the elements of the naming convention, if the form view limits you for any reason. If your values are unable to be parsed in the form view, the form fields will become inactive. Note: De-activated form fields do not indicate invalid regular expression. There is no validation that your regular expressions are correct. You will see results of the regular expression you are building for each element after the Result line. The complete regular expression is visible at the bottom of the page. 3 Expand each element as necessary and enter the naming conventions you want to use. 4 As necessary, click Add to add another naming convention for an element. Or click Remove to delete a naming convention for an element. 5 Click Save As and type a name for the preset. Or click Save if you are editing an existing preset. Alternately, you can use View Code with no form fields available. In this view you create your naming convention definitions entirely using regular expressions. Last updated 10/9/2014 52 USING SCENE7 Setup Two elements are available for definition, Match and Base Name. These fields let you define all elements of a naming convention and identify the part of the convention used to name the set in which they are contained. A company’s individual naming convention may make use of one or more lines of definition for each of these elements. You can use as many lines for your unique definition and group them into distinct elements, such as for Main Image, Color element, Alternate View element, and Swatch element. Creating a batch set preset Scene7 uses batch set presets to organize assets that share some common information or content into sets of images for display in viewers. The batch set preset recipes automatically run alongside the asset import jobs you schedule in Scene7. Use Batch Set Preset to create, edit, and manage your batch set presets. You can create as many batch set presets as necessary to cover all asset ingest jobs you require. There are two forms of batch set preset definitions: one for a default naming convention that you might have set up, and one for custom naming conventions that you create on the fly. You can use the either the form field method to define a batch set preset or the code method, which lets you use regular expressions. As in Default Naming, you can choose Code View at the same time you are defining in the Form View and use of regular expressions to build your definitions. Alternately, you can uncheck either view to use one or the other exclusively. See also “Creating a batch set preset for the auto generation of a 2D Spin Set” on page 53. To create a batch set preset 1 Click Setup > Application Setup > Batch Set Presets > Batch Set Preset. View Form, as set in the upper-right corner of the Details page, is the default view. 2 In the Preset List panel, click Add to activate the definition fields in the Details panel on the right hand side of the screen. 3 In the Details panel, in the Preset Name field, type a name for the preset. 4 In the Batch Set Type drop-down menu, select a preset type. To autogenerate a 2D Spin Set, select Multi-Axis Spin Set from the Batch Set Type drop-down list. 5 Do one of the following: • If you are using a default naming convention that you previously set up under Application Setup > Batch Set Presets > Default Naming, expand Asset Naming Conventions, and then in the File Naming drop-down list, click Default. • To define a naming convention as you set up the preset, expand Asset Naming Conventions, and then in the File Naming drop-down list, click Custom. 6 For Sequence order, define the order for the images after the set is grouped together in Scene7. By default, your assets are ordered alphanumerically. However, you can use a comma-separated list of regular expressions to define the order. 7 For Set Naming and Creation Convention, specify the suffix or prefix to the base name you defined in the Asset Naming Convention. Also define where the image set will be created within the Scene7 folder structure. If you define large numbers of image sets, you may prefer to keep these separate from the folders that contain the assets themselves. Many customers create an Image Sets folder and redirect the application to place batch set generated sets here. 8 Click Save in the Details Panel. Last updated 10/9/2014 53 USING SCENE7 Setup Creating a batch set preset for the auto generation of a 2D Spin Set You can use the Batch Set Type Multi-Axis Spin Set to create a “recipe” that automates the generation of 2D Spin Sets. The grouping of images uses Row and Column regular expressions so that the image assets are properly aligned in the corresponding location in the multi-dimensional array. See also “Creating a batch set preset” on page 52. There is no minimum or maximum number of rows or columns that you must have in a multi-axis spin set. As an example, suppose you want to create a multi-axis spin set named spin-2dspin. You have a set of spin set images that contain three rows, with 12 images per row. The images are named as follows: spin-01-01 spin-01-02 … spin-01-12 spin-02-01 … spin-03-12 With this information, your Batch Set Type recipe might be created as follows: Batch Set Type recipe for a 2D Spin Set. Grouping for the shared asset name part of the spinset is added to the Match field (as highlighted). The variable part of the asset name containing the row and column is added to the Row and Column fields, respectively. Last updated 10/9/2014 54 USING SCENE7 Setup When the Spin Set is uploaded and published, you would activate the name of the 2D Spin Set recipe that is listed under Batch Set Presets in the Upload Job Options dialog box. To create a batch set preset for the auto generation of a 2D Spin Set 1 Choose Setup > Application Setup > Batch Set Presets > Batch Set Preset. View Form, as set in the upper-right corner of the Details page, is the default view. 2 In the Preset List panel, click Add to activate the definition fields in the Details panel on the right hand side of the screen. 3 In the Details panel, in the Preset Name field, type a name for the preset. 4 In the Batch Set Type drop-down menu, select Asset Set. 5 In the Sub Type drop-down list, select Multi-Axis Spin Set. 6 Expand Asset Naming Conventions, and then in the File Naming drop-down list, click Custom. 7 Use the Match and, optionally, Base Name attributes to define a regular expression for the naming of image assets that make up the grouping. For example, your literal Match regular expression might look like the following: (\w+)-\w+-\w+ 8 Expand Row Column Position, and then define the name format for the position of the image asset within the 2D Spin Set array. Use the parenthesis to embrace the row or column position in the file name. For example, for your row regular expression, it might look like the following: \w+-R([0-9]+)-\w+ or \w+-(\d+)-\w+ For your column regular expression, it might look like the following: \w+-\w+-C([0-9]+) or \w+-\w+-C(\d+) Remember that these are only examples. You can create your regular expression however you want to suit your needs. Note: If the combination of row and column regular expressions is unable to determine the position of the asset within the multi-dimensional spinset array, then that asset is not added to the set and an error is logged. 9 For Set Naming and Creation Convention, specify the suffix or prefix to the base name you defined in the Asset Naming Convention. Also define where the image set will be created within the Scene7 folder structure. If you define large numbers of image sets, you may prefer to keep these separate from the folders that contain the assets themselves. Many customers create an Image Sets folder and redirect the application to place batch set generated sets here. 10 Click Save in the Details Panel. 11 Upload and publish your Spin Set as usual making sure you activate the name of your 2D Spin Set in the Job Load Options dialog box, under Batch Set Presets. Last updated 10/9/2014 55 USING SCENE7 Setup See “Upload and publish assets” on page 79. Publish Setup The Publish Setup screen settings determine how assets are delivered by default from Scene7 servers to web sites or applications. If no setting is specified, the Scene7 server delivers an asset according to a default setting on a Publish Setup screen. For example, a request to deliver an image that does not include a resolution attribute yields an image with the Default Object Resolution setting on the Image Server screen. Administrators can change the default settings on the Image Server, Image Renderer, and Vignette screens to establish default settings for delivering assets from servers. To open the Publish Setup screens, click Setup > Application Setup > Publish Setup. Important: The Publish Setup screens are for use by experienced web site developers and programmers. Scene7 assumes that users who change settings on these screens are familiar with the Scene7 Publishing System, HTTP protocol standards and conventions, and basic imaging technology. Image Server The Image Server screen establishes default settings for delivering images from image servers. Settings are available in these five categories (see the Image Server screen itself for detailed descriptions of the settings). Change these settings only with the assistance of a Scene7 support person. Catalog Management These settings determine how Scene7 Publishing System and the catalog interact. Unlike most web servers, Scene7 Image Server URL calls go to a manifest, or catalog, file rather than an image file proper. The catalog file (not to be confused with an eCatalog) contains a list of all content published to the image server along with the path to each image. If you have a Digimarc ID, enter your user information in the Digimarc User Info section. Request Attributes These settings impose limits on images that can be delivered from the server. Default Request Attributes These settings pertain to the default appearance of images. Common Thumbnail Attributes These settings pertain to the default appearance and alignment of thumbnail images. Defaults for Catalog Fields These settings pertain to the resolution and default thumbnail type of images. Color Management Attributes These settings determine which ICC color profiles are used. Compatibility Attributes This setting enables leading and trailing paragraphs in text layers to be treated as they were in version 3.6 for backwards compatibility. Localization Support These settings let you manage multiple locale attributes. It also lets you specify a locale map string so you can define which languages you want to support for the various tooltips in Viewers. For example, if you are a multi-national brand that sells in different countries, you can ensure that each country has their own locale-specific Viewer. To accomplish this functionality, you specify a locale map string. Then you edit the tooltip text in a Viewer’s preset by adding the translated text strings for the language you want. Note: To set up Localization Support options, contact Adobe Scene7 Technical Support or send an email to [email protected] requesting setup help. For more information about setting up Localization Support, see “Considerations when setting up localization of assets” on page 56. See also “Adding localization support to a Flash AS3 Viewer preset” on page 39. Last updated 10/9/2014 56 USING SCENE7 Setup Considerations when setting up localization of assets Note: If you want to set up Localization Support options in Scene7 Publishing System, such as the Locale Map field, contact Adobe Scene7 Technical Support. Or, send an email to [email protected] requesting setup help. A common way to use the Scene7 Publishing System (SPS) is to manage the product imagery on e-Commerce websites. International businesses face the challenge that assets for similar products look different from country to country. Usually the differences are for a very few part of the overall media. Addressing such differences by copying all assets for each of the countries and over-write just the differences is a tremendous effort and contradicts the single master asset metaphor. Such differences for assets can endure, from country-specific videos with different audio tracks, to subtle but important differences in a power cord that is used with the product. S7 uses a basic lookup mechanism. You define an order of asset suffixes in which the Image Server is looking, starting from the required locale. How assets are localized The locale for an IS (Image Serving) request is identified with the following IS/IR (Image Rendering) command: locale= This command accepts a locale id (locId) string which is not case-sensitive. The locale id is typically a 2-6 character string composed of letters and “_”. IS supports arbitrary printable ASCII strings.The locale= command has a global scope, meaning that it is applied to the entire request, including all nested IS and IR requests, referenced templates, and image layers. Multiple locales per request, such as a different locale for each layer, is not supported. However, it is conceivable to allow explicit overrides in nested requests. If locale= is not specified, attribute::DefaultLocale is passed to the translation engines. Limited input validation is applied to the locale= value. Empty locale= values are permitted. Because locale= has a global scope, attribute::DefaultLocale is provided by the main catalog for the entire request. Some of the benefits of using locale= and attribute::DefaultLocale include the following: • Share contents for multiple locales. • Access locale-specific contents using generic ids. • Allow flexibility around naming conventions and the management of locale-specific contents, such as locale prefix versus suffix, or locale-specific contents in a separate catalog. • Support direct access to locale-specific versions. • Aggregate objects, such as image sets, may contain generic references to potentially locale-specific contents. • Supports all contents managed by catalogs that may need localization, including images, image sets, vignettes, materials, and viewer configuration records. • Minimize changes to the IPS database and IS manifest mechanisms. • Support for static contents such as videos and skins will be added when RFC IS-63 is implemented. • The default locale is configurable. Application scenarios Last updated 10/9/2014 57 USING SCENE7 Setup Application Scenario Viewer localization After static content catalogs are implemented, localization is controlled entirely with the locale= parameter, appended to all requests that are made to IS. Configuration records, skins, splash screens, and so on, can have locale-specific variants or not. The correct contents is provided by IS without the viewer needing to know which contents is localized and what its IDs are. Images and video Multi-national companies often have a mix of generic and locale-specific contents. With this mechanism, a reference to an image or video can be generic, and IS serves up the locale-specific contents if it is available. Image sets and Media sets The entire image set can be different for some locales--such as when a eCatalog is completely different--with the translation from a generic to a locale-specific image set handled by the viewer. More commonly, individual IDs in a generic set may refer to localized contents. For example, most photos of an appliance can be the same in all languages, except the photo of the control panel. IS automatically translate IDs, so there is no need to generate locale-specific image sets. Implementing asset localization Scene7 Publishing and Image Serving have an interface that allows for the localizations of images and static content. Without localization, an Image Server URL looks like the following: http://server/is/image/company/image With localization, an Image Server URL adds the locale= parameter to the path, as in the following: http://server/is/image/company/image?locale=de_DE On receipt of the http call by the Image Server, the locale= parameter is parsed through the localeMap field found in Setup > Application Setup > Publish Setup > Image Server > Localization Support group. The Locale Map field contains a list of entries that are separated using the pipe symbol (|). Each entry consists of a comma-separated list of values. The first value is the search value that is passed by the locale= parameter. The remaining values are suffix/replacement values that are subsequently tried until one results in an existing image. Whether a suffix value or a replacement value is applied depends on the Global Locale setting in Setup > Application Setup > Publish Setup > Image Server > Localization Support group. Note: The Global Locale setting is currently only possible when you set it through the API, not within the Scene7 Publishing System interface. Suffix example URL localeMap IDs Result http://serve r/is/image/c ompany/image ?locale=de_D E de_DE,_DE,|fr_FR,_FR, Notice that there is no GlobalLocale defined. The locale parameter de_DE is matched against the first entry in the localeMap. The first corresponding value _DE is added as a suffix to the asset image_DE and an attempt is made to find it on the Image Server. If it is found on the server, it is returned. Otherwise, the second value “” is used as a suffix, resulting in the image itself being returned. Last updated 10/9/2014 58 USING SCENE7 Setup Replacement example URL GlobalLocale and localeMap IDs Result In the replacement example above, GlobalLocale is set to main. The locale parameter de_DE is matched against the first entry in the localeMap. The GlobalLocale substring is found and replaced with the first corresponding value de in the localeMap: image-de-01. If it is found on the Image Server, it is returned. If not, the second value is replaced, resulting in image-main-01. http://server/is/ima GlobalLocale=main ge/company/imagemain-01?locale=de_DE localeMap de_DE,de,main|fr_FR,fr,main If no locale is defined in the URL, the Image Server takes the DefaultLocale, if it is defined, and applies it to the URL. If an unknown or empty locale parameter is supplied with locale=, then the localeMap is scanned for the empty value “starting with,”. It is important to configure this to have a default locale applied for unknown locales. About the defaultImage The Image Server tries the options for the requested locale, one after the other. If no match is found, the locale options are applied to the defaultImage, and the matching version is returned. Therefore, either each locale should include an option for the image without localization, or localized defaultImage versions should be made available in Scene7 Publishing System. Scenarios for finding the localeMap Suppose you want to support the following locales: en, en_us, en_uk, de, de_at, de_de, fr You map these locales to the suffixes _E, _G, and _F, for English, German, and French, respectively. For all examples, the generic input image ID is myImg. Standard behavior for finding the localeMap The locale IDs are mapped to their corresponding suffixes. If no locale-specific ID is found in the catalog, the generic ID is tried. Note the empty locSuffix values which map to the generic ID. attribute::LocaleMap=en,_E,|en_us,_E,|en_uk,_E,|fr,_F,|de,_D,|de_at,_D,|de_de,_D, locale= Output IDs to search en,en_us, en_uk myImg_E, myImg de,de_de,de_at myImg_D, myImg fr myImg_F, myImg All others - Finding the localeMap when the locale is unknown You can map unknown locales to specific IDs or to generic IDs. For our example, you can map unknown locales to the English IDs, or if they do not exist, to the generic IDs. attribute::LocaleMap=en,_E,|en_us,_E,|en_uk,_E,|fr,_F,|de,_D,|de_at,_D,|de_de,_D,|,_E, Last updated 10/9/2014 59 USING SCENE7 Setup locale= Output IDs to search de,de_de,de_at myImg_D,myImg fr myImg_F,myImg All others myImg_E,myImg You could also have a dedicated locSuffix, such as U, just for unknown locales, and force to the default image if no _U exists, as in the following: attribute::LocaleMap=en,_E,|en_us,_E,|en_uk,_E,|fr,_F,|de,_D,|de_at,_D,|de_de,_D,|,U Or, you can map directly to the generic ID, as in the following: attribute::LocaleMap=en,_E,|en_us,_E,|en_uk,_E,|fr,_F,|de,_D,|de_at,_D,|de_de,_D,|, Finding the localeMap using a multi-tiered lookup It is often desirable to group locales, such as European, Middle Eastern, and North American, to address regional standards, such as skin exposure. You can achieve this effect using a multi-tiered lookup. For this example, suppose you want to support collections for Western and Middle Eastern use. Both collections are based on the generic image collection, and both add or modify some images. Both collections are then further refined for specific locales, such as m1, m2 for two middle-eastern variants, and w1, w2, and w3 for three Western locales, except that images are shared for w1 and w3. Unknown locales are mapped only to the generic collection and do not have access to locale-specific images. The following is what the map would look like: attribute::LocaleMap=w1,-W,|w2,-W2,-W,|w3,-W,|m1,-M1,-M,|m2,-M2,-M,|, locale= Output IDs to search w1, w3 myImg-W, myImg w2 myImg-W2, myImg-W, myImg m1 myImg-M1, myImg-M, myImg m2 myImg-M2, myImg-M, myImg All others mylmg Finding the localeMap by searching for specific IDs Some image naming conventions may not support generic image IDs. The generic IDs from the request must be mapped to a specific ID in the catalog. However, there may be instances where the exact specific ID is not known. Using the first example as a basis, images for all languages may have the suffixes _1, _2, or _3. Images that are specific to French locales may have the suffixes _22 or _23 suffix. And images that are specific to German locales may have the suffixes _470 or _480. attribute::LocaleMap=,_1,_2,_3|fr,_22,_23,_1,_2,_3|de,_470,_480,_1,_2,_3|de_at,_470,_480,_1, _2,_3|de_de,_470,_480,_1,_2,_3 locale= Output IDs to search fr myImg_22, myImg_23, myImg_1, myImg_2, myImg_3 de, de_at, de_de myImg_470, myImg_480, myImg_1, myImg_2,myImg_3 All others myImg_1, myImg_2, myImg_3 Last updated 10/9/2014 60 USING SCENE7 Setup Important considerations when implementing localization support • Localization is limited to ID-based asset calls and cannot be used on path-based asset calls. Therefore, when calling videos with locale, it must be called as company/assetID; no full path to the video. This means that you cannot use rtmp with localization because that method is for use with path-based video calls only. • You cannot use a Mixed Media Set that contains a single video when localeMap is active, otherwise the call to the contents of the set fails. To work around this issue you can add a single video to an Adaptive Video Set. Then, add the Adaptive Video Set to a Mixed Media Set. • Certain requests are not localized, such as requests for the contents of an Adaptive Video Set. Therefore, if you intend to use Adaptive Video Sets with localization, you should place the Adaptive Video Set within a Mixed Media Set. Then, call the set into a Mixed Media viewer with the locale= parameter. Image Renderer The Image Renderer screen establishes default settings for delivering Image Sets from image rendering servers. Settings are available in these five categories (see the Image Server screen itself for detailed descriptions of the settings): Catalog Management These settings determine how Scene7 Publishing System and the catalog file interact. Scene7 Render Server URL calls are made to the catalog, which in turn calls to deliver images from the server. Change these settings only with the assistance of a Scene7 support person. Session Attributes These settings establish error parameters, the URL for relative image URLs, and whether object overlapping is permitted. Default Material Attributes These settings establish default resolution and sharpening settings for images. Response Image Attributes These settings pertain to the default appearance of images. Color Management Attributes These settings pertain to the default color settings of images. Vignette The Vignette screen offers settings for establishing the default appearance of vignettes (see the screen itself for detailed descriptions of options). Video SEO (Search Engine Optimization) SEO is the process of improving the volume of traffic to a Web site from search engines. While search engines excel at gathering information about text-based content, they cannot adequately acquire information about video unless this information is provided to them. Using Scene7 Video SEO, you can leverage video metadata to provide search engines with descriptions of your videos. Scene7 provides the ability to create Video Sitemaps and mRSS feeds. These are standard XML files for submitting video information to search engines: Video Sitemap Informs Google exactly where and what the video content is on a site. Consequently, videos are fully searchable on Google. For example, a Video Sitemap can specify the running time and categories of videos. For information about video Sitemaps, see http://www.google.com/support/webmasters/bin/answer.py?answer=80471. mRSS (Media Really Simple Syndication) feed Used by content publishers to feed media files into Yahoo! Video Search. For information about mRSS feeds, see http://www.rssboard.org/media-rss. Note: Google supports both the Video Sitemap and mRSS feed protocol for submitting information to search engines. Last updated 10/9/2014 61 USING SCENE7 Setup Scene7 can generate Video Sitemaps and mRSS feeds from metadata that is stored with each video. When you create Video Sitemaps and mRSS feeds, you decide which metadata fields from video files to include. In this way, you describe your videos to search engines so that search engines can more accurately direct traffic to videos on your web site Important: Before creating a Video Sitemap or mRSS feed, find out which fields the search engine requires in the XML file and how to structure these fields. To create a successful Video Sitemap or mRSS feed, it must satisfy the requirements of the search engine. Scene7 creates reports about Video Sitemaps and mRSS feeds after you generate them. These reports are available on the Video SEO Report screen. Important: For the Video Sitemaps and mRSS feeds, Scene7 captures metadata only from videos that are marked for publish. Mark videos for publish to include their metadata in Video Sitemaps and mRSS feeds. Choosing Video SEO settings Choose Video SEO settings for Video Sitemaps and mRSS feeds on the Video Search Engine Optimization Settings screen. To open this screen, choose Setup > Application Setup > Video SEO > Settings. In the General Setting area, choose whether to generate Video Sitemaps, mRSS feeds, or both. In the Generation Settings area, map metadata fields to input fields. After you choose settings, click Generate (or Save & Generate) to create the Video Sitemap, mRSS feeds, or both. Choosing General Settings On the Generation Mode drop-down list, choose a report mode: Video Sitemap Create a Video Sitemap. mRSS Feed Create a Media RSS (mRSS) feed. Both Create both types of XML files. Off Choose this option to stop generating Video Sitemaps and a Media RSS (mRSS) feeds. On the Automatic/Manual Mode drop-down list, choose whether to generate automatically or manually: Automatic Mode Scene7 automatically generates one Video Sitemap, Media RSS (mRSS) feed, or both, each day. Choose the Mark for Publish option to automatically mark for publish the XML file that Scene7 generates. Manual Mode Scene7 generates the Video Sitemap, Media RSS (mRSS) feed, or both, when you click Generate or Save & Generate in the Video Search Optimization Settings screen. Choose these options as well: • No Further Settings Doesn't mark for publish the XML file that is generated. • Mark for Publish Marks for publish the XML file that is generated. • Allow Partial Generation Search engines may reject an XML file if it doesn’t contain complete metadata information for all videos. This option generates the XML file even if metadata isn’t available for some videos. A warning is registered on the Report screen. Choose this option if you intend to export the XML file and process the missing information manually. Last updated 10/9/2014 62 USING SCENE7 Setup Choosing Generation Settings The Generation Settings area lists input fields for the Video Sitemap and/or mRSS feed, and in the Metadata panel, the names of metadata fields. Use the General Settings area to map input fields to metadata fields. By doing so, you tell Scene7 where to obtain metadata for the Video Sitemap and/or mRSS feed. 1 On the Metadata Views menu, choose a metadata view. After you choose a view, the names of metadata fields appear in the Metadata panel. (For information about metadata views, see “Metadata Views” on page 48.) 2 Drag metadata field names from the Metadata panel to the Landing Page, Title, Description, Tags, and Category input fields. The Landing Page, Title, and Description fields are required. Note: You can also manually enter data in input fields. 3 Click Save (to save your settings without generating the XML file), Generate (to generate the XML file), or Save & Generate (to save and generate the file). The XML file is generated and recorded in the Job log. Video Sitemap (video-sitemap) and a Media RSS (mRSS) feed (mrss-feed) files are stored in the root folder of your company. Note: You must publish the Video Sitemap or mRSS feed before you can submit it to search engines. Video Sitemap and Media RSS (mRSS) feed files are stored in the root folder of the company. Mark these XML files for publish, if necessary, and click Publish. Submitting Video Sitemap and mRSS-Feed files to search engines Video Sitemap and Media RSS (mRSS) feed files are stored in the root folder of the company: • http://{publish-server}/is/content/{companyname}/mrss-feed.xml • http://{publish-server}/is/content/{companyname}/video-sitemap.xml Copy one of these URLs into the search engine’s webmaster tools to submit your Video Sitemap or Media RSS (mRSS) feed file to search engines. Viewing Video SEO reports View Video SEO reports on the Video Search Engine Optimization Report screen. To open this screen, choose Setup > Application Setup > Video SEO > Reports. If errors occurred when a report was generated, they are listed on the Report screen. Administration Setup The Administration Setup screens are for administering Scene7 Publishing System users. Use these screens to enable users to work in the Scene7 Publishing System and to communicate by e-mail with users. ❖ To access Administration Setup options, click Setup > Personal Setup. Expand Administration Setup. User Administration All Scene7 users are assigned a role that determines their privileges and access rights to features in Scene7 Publishing System. Administrators determine the different roles and responsibilities for the companies to which they are assigned. Typically, Scene7 configures the first set of companies and assigns a company administrator. The company administrator then sets up and administers Scene7 Publishing System users. Last updated 10/9/2014 63 USING SCENE7 Setup Scene7 Publishing System supports three user roles. All three roles can access companies set up for the Scene7 Publishing System: SPS Administrator Can view and administer all features in Scene7 Publishing System, as well as set up companies and add administrators and users. Company Administrator Can view and administer only their own companies. A Company Administrator can also perform all administration functions, including adding administrators and users. A Company Administrator can add a user to the SPS company admin accounts. (This role is the default user role.) SPS User Can access companies to which they have been assigned; cannot perform any administrative duties. After you add a user, Scene7 Publishing System sends the user a Welcome e-mail message. The message includes a password and the Scene7 Publishing System URL. Adding a user or administrator 1 Click Setup > Application Setup > Administration Setup >User Administration. 2 Click Add. 3 Enter the name and email address of the user or administrator that you want to add, then click Next. Note: The apostrophe character (‘) is not allowed in email addresses. 4 Choose a Role option to assign a role to the user. See “User Administration” on page 62. 5 Select a company name to add a user to a company. 6 If you want to add the user to a group (if you are adding a Media Portal user or contributor), click Next and add the user. 7 Click Save to complete the user setup. After saving, a prompt asks if you want to add a user to another company. Click Add if you want to add the user to a company. All new users are given a randomly generated password; users are required to change passwords the first time they log in to Scene7 Publishing System. New users are sent a Welcome e-mail after you add them. The e-mail provides a temporary password and explains how to log on to the Scene 7 Publishing System. If the user does not receive the welcome email, have them go the SPS login page (http://s7sps1.scene7.com), and click Forgot My Password. The password is reset and a new email is sent. If the user does not receive the email and it is not in their Junk folder, contact Technical Support. When adding new Media Portal users, you can also go to Setup > Application Setup > User Administration, then click Upload User List and select a .csv file containing no more than 500 users. Deleting a user You can delete users from Scene7 Publishing System by making them invalid. Invalid users are removed from the system and all accounts. 1 Click Setup > Application Setup > Administration Setup > User Administration. 2 Select a user from the list, and then click Edit. 3 Deselect Valid. 4 Click Save. Last updated 10/9/2014 64 USING SCENE7 Setup Activating or deactivating users Users who have been deactivated no longer have permission to enter the account listed at the top of the Select Accounts To Access menu. 1 Click Setup > Application Setup > Administration Setup > User Administration. 2 In the user list, select or deselect the Active option next to the name of the user. Editing user information The user information that you can edit depends on your role as an administrator and the assigned role of the user whose information you want to edit. Options that are dimmed (unavailable) are not editable. 1 Go to Setup > Application Setup > Administration Setup > User Administration. 2 Select the user and click Edit. 3 Select the entry in the table that shows the company you are trying to modify permissions or access for, then click the Manage Company link. 4 Select the user role. 5 If you want to change the user’s group membership (if you are editing or adding a Media Portal user or contributor), click Next and edit the group membership. 6 Click Save. Filtering and sorting the user list You can filter and sort the user list to locate users. All users in all accounts you administer appear in the Users list, regardless of the account selected in the Select Account To Access menu. You can use the following user list filtering techniques: Filter by group Select the By Group menu and choose an option to narrow the list to users in a group. Filter by user role Select the By User Role menu and choose an option to narrow the list to users or administrators of different types. Filter by field name Select the Enable Filter By Field option. Then select the By Field Name menu, choose a column for filtering the list, and select the Filter Character menu and choose a letter. The list is filtered on one of the columns by the letter you chose. Deselect the Enable Filter By Field option to see the full list. Filter out invalid users Deselect the Include Invalid option. The search results display only users who are in the system. Invalid users have been deleted from the system and the accounts you administer. Sort by column heading Click a heading to sort all users by their status, alphabetically by first name, last name, or email, by user role, or by valid/invalid status. If you have many users, you can limit the size of the list by selecting the Max List Size menu and choosing a number. Bandwidth & Storage SPS Administrators can generate bandwidth, storage, and other types of reports for the companies they administer. These reports are available on the Bandwidth & Storage screen. To open this screen, click Setup > Personal Setup. Expand Administration Setup, and then click Bandwidth & Storage. Types of reports The following table describes reports that you can generate from the Bandwidth & Storage screen: Last updated 10/9/2014 65 USING SCENE7 Setup Report Information Use Bandwidth Bandwidth use by company Track bandwidth usage by company over specific date ranges to determine traffic patterns. Storage Storage usage Track the amount of data uploaded by company. Image Content The number of image requests by type Track the number of requests and volume for different image types. Domain The number of URL requests by domain Track image usage based on the domain of the image request for a specific company. (Scene7 can provide more than one domain per account. For more information, contact Technical Support.) Video Streaming Bandwidth usage for streaming video Track streaming video usage by company over specific date ranges to determine traffic patterns. Video Content Playing time of different videos Determine which are the most viewed and least viewed videos. The Image Content report provides information about requests for the following image types: Image Request Requests for images. Thumbnail Request Requests for swatch or alternate images in viewers. Mask Request Requests to images returning gray-scale masks. Viewer Tile Request Image requests loaded by a viewer. Vnt Object Request Image rendering requests that return an image with specified objects in the requested vignettes. Vnt Info Request Image rendering requests that return information concerning the requested vignettes. Note: The Video Streaming report applies to streaming videos only. It doesn’t track the viewing of progressive videos. Generating a report To generate a bandwidth, storage, image content, domain, video streaming, or video content report: 1 Choose Setup > Personal Setup. 2 Expand Administration Setup, and then click Bandwidth & Storage. 3 Click a tab: Bandwidth, Storage, Image Content, Domain, Video Streaming, or Video Content. See “Types of reports” on page 64. Viewing data in different ways After you generate a report on the Bandwidth & Storage page, you can choose options for viewing information. You can choose how information is presented, view information in a chart or data grid, and specify a time period for capturing information. In Data view, you can also sort information and rearrange columns. Viewing data in a chart or data grid Click the Chart View option to view data in a chart; click the Data View option to view data in a data grid. Choosing a report presentation type On the Report Type menu, choose Summary, Daily, or monthly to organize data in summary form, by day, or by month. Not all reports provide this option. Last updated 10/9/2014 66 USING SCENE7 Setup Specifying a time period Choose options to define a time period for your report, and then click Update after you define a time period: • Pre-defined time period On the Pre-defined Report menu, choose an option. For example, choose Last Month to capture data from the previous month. • Custom time period On the Pre-defined Report menu, choose Custom. Then choose a date on the Start Month (or Start Date) menu and a date on the # of Months (or # or Days) menu. For Domain and Video Content Reports, you can choose a specific start and end date for capturing report information. Sorting data (Data view only) To sort information on a column, click the column’s heading. Click again to sort in descending order. Rearranging columns (Data view only) To move a column to a different location on the data grid, drag its heading. Exporting and printing reports After you generate a report, you can export its data for use in spreadsheets and other applications. You can also print reports. Exporting report data In Data view, sort and arrange the data as necessary. Then open the Export menu and choose a format: Tab Delimited, Comma Separated, or HTML Formatted. The data is copied to the Clipboard in the format you chose. You can now paste the data into a spreadsheet or application. Printing a report Click Print, choose the options you want in the Print dialog box, and then click OK. More Help topics “Image Errors” on page 66 Image Errors SPS Administrators can generate Image Error reports. An Image Error report provides a list of the 20 most frequent image errors, for the past 24 hours, for the company you are currently logged in to. Follow these steps to generate an Image Error report: 1 Click Setup > Personal Setup. 2 Expand Administration Setup, and then click Image Errors. 3 (Optional) Do any of the following: • Click a heading to sort errors by the heading information. By default, errors are sorted by number of occurrences, highest to lowest. • Move the cursor over the Response field for an error to see the specific error message. • Move the cursor over the URL field or the Referrer field to see the link to the image or referrer web page. • Click URL Copy URL to copy the link to the actual image. You can paste this link in a browser window to go to the image and investigate the error. • Click Referrer Copy URL to copy the link to the referrer web page. Errors displayed are for the company you are currently logged in to. Each error includes the following information: Image ID ID for the offending image. Time The time range of the first time the error was reported to the last time the error was reported, within the last 24 hours. Count The number of errors reported on the image. Last updated 10/9/2014 67 USING SCENE7 Setup Response The specific error message. Errors are either 4xx or 5xx. URLs Lists the URL to the image on Scene 7. Referrer Specifies the URL for the web site where the initial request came from. The referrer can be any web site that has a link to the image. The URL and Referrer columns have Copy URL associated with them to simplify testing. More Help topics “Bandwidth & Storage” on page 64 Last updated 10/9/2014 68 Chapter 4: Media Portal Adobe® Scene7® Media Portal allows companies to easily acquire, control, and distribute approved creative assets to external partners and channels, and internal business users. This browser-based, “self-serve” environment provides Media Portal users with administrator-controlled “views” into Scene7 assets for easy access to , browse, search, preview, and export assets in corporate-approved formats. As an administrator, you control how users view, access, and use assets in Media Portal. Moreover, you can customize the Media Portal interface to match your web site and brand. You can specify font, font color, and font size, as well as incorporate branding elements such as logos in the Media Portal interface. System requirements For the best experience using Scene7 Media Portal, make sure that your system meets the following system requirements and recommendations: • Microsoft® Windows® 7 or later or Mac OS X 10.6 or higher Macintosh® Intel processor required. • 3 GB RAM or higher required (4 GB or higher recommended). • Color monitor. • Video card supporting True Color at 1280x1024 resolution or higher. • JAVA-enabled browser, Flash 11 or higher. • Windows-supported browsers: Internet Explorer 9 or higher; Firefox 23.0 or higher. • Macintosh-supported browsers: Safari 6.0 or higher, Firefox™ 23 or higher. Note: If your browser does not have Flash Player version 11, you can download it from Adobe at www.adobe.com/go/learn_sc7_flashplayer_en. Quick Start: Media Portal administration This Quick Start is designed to get you up and running quickly with Media Portal administration. At the end of each step is a cross-reference to a topic where you can get more information. 1. Understand Media Portal user roles Media Portal users fall in three roles — user, contributor, and user-contributor. Each role can perform a different set of tasks. For example, a contributor can rename and delete files and folders, but a user cannot do those tasks. Understand the different roles so that when you add users, you understand what responsibilities you give them. See “Media Portal user roles” on page 70. Last updated 10/9/2014 69 USING SCENE7 Media Portal 2. Create groups for managing users Groups determine the folders and files to which a user has access, what users can do in those folders and files, and which Image Presets are available. As an administrator, your first task is to create groups. For each group, decide which folders, files, and Image Presets group members can access. As well, grant read, write, and delete permissions to the group members. These permissions determine whether members can browse, edit, rename, and delete the folders and files to which they have access. See “Creating and managing Media Portal groups” on page 71. 3. Add users When you add a user, you assign the user a role (user, contributor, or user-contributor). You also assign the user to one or more groups. To speed the process of adding users, you can upload a user list in the form of a CSV file. New users are sent a Welcome e-mail message and instructions for logging on to Media Portal. See “Adding and managing Media Portal users” on page 73. 4. Manage FTP accounts You can have separate FTP accounts that are associated with Media Portal and mapped to a specific folder in your Scene7 Publishing System account. This kind of functionality means you can allow users to upload digital assets into your account using separate FTP accounts. See “Managing FTP accounts” on page 75. Note: Only Media Portal Administrators can administer these FTP accounts . In addition, only users with the role of Media Portal Contributor-User or Media Portal Contributor can upload files. See “Media Portal user roles” on page 70. 5. Specify export options Media Portal users, when they export files, can reformat the files and export original master files — if you give them permission to do that. As an administrator, you decide how users export files. See “Specifying export options available to Media Portal users” on page 76. 6. Create Image Presets An Image Preset is a collection of pre-defined settings that change the size, image quality, format, resolution, and other aspects of an image’s appearance when it is exported. You can create Image Presets to control how images are reformatted when users export them. See “Creating and enabling Image Presets” on page 77. 7. Create metadata presets and user-defined metadata fields Metadata describes and identifies a file; it is used for searching for and organizing assets. To make sure that metadata is entered correctly and that metadata fields that require data are filled in, you can create metadata presets. A metadata preset is a pre-defined set of metadata entries. You can also create metadata fields that uniquely describe the files you work with. See “Making more efficient use of metadata” on page 77. 8. Customize the Media Portal screen Media Portal style settings allow you to brand the Media Portal screen with your company logo and colors. Use the style settings to put your company stamp on Media Portal. Last updated 10/9/2014 70 USING SCENE7 Media Portal See “Customizing the Media Portal screen” on page 78. Media Portal user roles Media Portal provides the following roles, each with different access rights and permissions. When you sign up a user, you assign the user one of the following roles: Media Portal Administrator Can add and remove administrators, contributors, and users. The administrator can also set group access rights, manage FTP accounts, assign corporate-approved conversion formats (presets), send e-mail to Media Portal users, and view portal usage and storage reporting. Media Portal User Has access to folders and files. A user can only browse, preview, and download files. This role is suitable for channel or service partners that need access to your corporate-approved assets. Media Portal Contributor Can upload, preview, and browse files and metadata in areas to which an administrator has granted permissions. A contributor cannot download files. Contributors can edit metadata, change the names of files, move files to different folders, and delete files. Media Portal Contributor-User Has access to folders and files. A contributor-user can browse, preview, download, and upload images and metadata. Contributor-users can change the names of files, move files to different folders, and delete files. This table describes the tasks that users with different roles can do. Administrators and contributor-users can do all the tasks listed in this table: Task User Contributor Contributor-User Browse folders and files X X X Browse metadata X X X Preview files X X X Search for files X X X Upload files to Scene7 Publishing System X X Edit and import asset metadata X X Create, rename, and delete folders X X Export asset metadata X X Change file names X X Move files to different folders X X Rename files X X Delete files X X Export (download) files from SPS X X Last updated 10/9/2014 71 USING SCENE7 Media Portal Creating and managing Media Portal groups Groups are designed to help you administer Media Portal users. To access an asset, a user must be a member of at least one group that has permission to access that asset. When you add a user, you assign the user to one or more groups. In so doing, you grant the user access to folders to which the group has been assigned. You can also choose which Image Presets are available to a group. Using groups to restrict access to folders, assets, and Image Presets To grant access permission at different levels, you create groups. For each group, you assign read, write, and delete permissions to different folders and assets in folders. As well, you decide which Image Presets are available to the group. You then assign users to groups. A user can be a member of more than one group. The group concept gives you the flexibility to assign access to limited sets of the total content. If you don’t specifically grant a group permission to an asset or folder, that asset or folder inherits the permissions you assigned to its parent folder (the folder above it in the folder hierarchy). Grant permissions to a parent folder if you want to make sure that all its child folders inherit the same permissions. Note: Users can belong to more than one group. When a user belongs to two groups with different access permissions to a folder, the user is granted the highest access. Adding a group 1 Click Setup > Media Portal Setup > Groups. 2 Click Add. 3 In the Add Group dialog box, enter a name for the group in the Group Name box, and then click Add Group. 4 If you want, you can select the boxes next to the names of users to add users to the new group. 5 If you want to specify access permissions at this time, click the Asset Access Permissions tab, and then specify the options you want. See “Establishing asset access permissions for a group” on page 71. 6 If you want to choose which Image Presets are available to the group, click the Image Preset Access Permissions tab, and select Image Presets that the group can use. See “Choosing Image Preset access permissions for a group” on page 72. 7 Click Close. Establishing asset access permissions for a group 1 Click Setup > Media Portal Setup > Groups. 2 On the Groups list page, do one of the following: • To add a group and specify permissions, click Add. In the Add Group dialog box, enter a name for the group, click Add Group, and add users to the group. • To edit a group’s permissions, select the group, and then click Edit. 3 In the Add Group or Edit group dialog box, click the Asset Access Permissions tab. The right side of the tab offers boxes for establishing read, write, and delete permissions for folders and assets. You can expand and collapse folders and subfolders in the left pane. Last updated 10/9/2014 72 USING SCENE7 Media Portal 4 To assign rights to folders or individual assets, select the folder in the left pane. The folder contents appear in the right pane. Then assign rights for the group by selecting the boxes for the corresponding files or folders in the right pane. This table maps different tasks to read, write, and delete permissions. Task Read Browse folders and files X Write Edit files (crop, sharpen, adjust) X Change filenames X Move files to different folders X Rename files X Delete files Delete X 5 Click Close. Important: Access rights are established when you select a box. When you assign rights to a folder, its subfolders and all files within it are given the same rights as the parent folder. However, you can specify different rights for individual subfolders and asset files. Choosing Image Preset access permissions for a group Choose Image Preset access permissions for a group if you want to specify which Image Presets are available to group members when they export assets with Media Portal. See also “Specifying export options available to Media Portal users” on page 76. 1 Click Setup > Media Portal Setup > Groups. 2 On the Groups list page, do one of the following: • To add a group and specify which Image Presets are available to it, click Add. In the Add Group dialog box, enter a name for the group, click Add Group, and add users to the group. • To edit a group’s Image Preset options, select the group, and then click Edit. 3 In the Add Group or Edit group dialog box, click the Image Preset Access Permissions tab. 4 Select or deselect Image Presets to specify which presets are available to Media Portal users when they export assets. 5 Click Close. Edit and delete groups 1 Click Setup > Media Portal Setup > Groups. 2 On the Group List page, select a group and edit or delete it. Editing a group Click Edit, and then choose options in the Edit Group dialog box. Deleting a group Click Delete. Last updated 10/9/2014 73 USING SCENE7 Media Portal Adding and managing Media Portal users As an administrator, you can add and manage users, decide whether they can change passwords, edit user information, and upload user lists. These tasks are accomplished on the User Administration screen. To access this screen, click Setup > Application Setup > Administration Setup > User Administration. Important: Before you add users, set up groups for administering them. Media Portal does not let you add a user without assigning the user to one or more groups. For more information, see “Creating and managing Media Portal groups” on page 71. Handling Media Portal passwords Media Portal users, contributors, and contributor-users are sent a Welcome e-mail message with a password when you sign them up. Administrators can decide whether Media Portal users can change this password. 1 Click Setup > Media Portal Setup > General Settings. 2 On the General Settings page, select or deselect Allow Media Portal user to change Password. 3 Click Save. Note: Media Portal users who are allowed to change passwords can do so by clicking Setup > Personal Setup and changing passwords on the Personal Setup screen. Adding a Media Portal user 1 Click Setup > Application Setup > Administration Setup > User Administation. 2 On the User Administration page, click Add. 3 In the Add User dialog box, in the User Info panel, enter the First Name, Last Name, and Email address of the user, and then click Next. 4 In the Company/Role panel, in the Companies drop-down list, select a company or companies for the user. 5 In the Role list, select a Media Portal role, and then click Next. See “Media Portal user roles” on page 70. 6 In the Access Groups panel, select one or more groups. See “Creating and managing Media Portal groups” on page 71. 7 (Optional) Click Email Settings to choose e-mail settings different from the default settings. See “Setting up the Welcome e-mail message for Media Portal users” on page 75. 8 Click Add User. After you add a user, Media Portal sends the user a Welcome e-mail message. The message includes a temporary password and the Media Portal URL. Uploading a Media Portal user list If you have numerous users to add, you can upload a user list. The users are added automatically to the currently selected account. Create the user list as a CSV (comma-separated values) file containing the user information. After the list is uploaded, the users in the list are automatically added to the account with their specified group assignments. A Welcome e-mail is sent to each new user, including a link to Media Portal and a temporary password. Last updated 10/9/2014 74 USING SCENE7 Media Portal Creating the CSV file Create a CSV file (filename.csv) that conforms to the following format and fields. The first row of the file must contain the column headings listed in this table; you can order these columns as desired. All columns are required. Column name Description First Name The first name. Last Name The last name. Email A valid e-mail address. Password A case-sensitive password string. User Role MediaPortalAdmin MediaPortalUser MediaPortalContributor MediaPortalContributorUser Groups List of one or more account group assignments for each user, separated by commas. You specify the group by prefixing the account name, separated by forward slash (/). For example, PortalCo/IT, where PortalCo is the account and IT is the group within the PortalCo account. The following sample spreadsheet demonstrates how to lay out a CSV file: First Name Last Name Email Password User Role Groups Peter Peterson [email protected] welcome MediaPortalAdmin PortalCo/IT,PortalCo/Admin Kevin Marks [email protected] welcome MediaPortalUser PortalCo/MktgGroup, PortalCo/test Uploading the CSV file 1 Open the User Administration Setup screen. 2 Click Upload User List. 3 In the Select File to Upload dialog box, select the CSV file, and then click Open. Each user in the list is automatically added to the groups specified. A Welcome e-mail message is sent to each. Note: If the CSV file was not formatted correctly, the following error message appears: “An error occurred while processing the uploaded CSV file. Check the file contents for valid data.” In addition, if the CSV contains an existing IP or IPS user, the user is not added to the User List. Generating a selectable list of Media Portal users You can display the names and e-mail addresses of Media Portal users in a pop-up window. This list is useful if you want to cut and paste user names and addresses for use outside Media Portal. 1 Click Setup > Application Setup > Administration Setup > User Administration. 2 In the By User Role drop-down list, choose the name of a Media Portal user role, and click Refresh to display the names of one class of Media Portal user. 3 Click Popup List to open the pop-up window. You can copy and paste this list. Last updated 10/9/2014 75 USING SCENE7 Media Portal Setting up the Welcome e-mail message for Media Portal users You can send a Welcome e-mail when you add new Media Portal users, contributors, and contributor-users. You can configure this e-mail message or tell Scene7 not to send it. 1 Choose Setup > Application Setup > Administration Setup > User Administration. 2 In the User Administration Setup screen, click Email Settings button. 3 In the Email Settings dialog box, specify any of the following settings: Send Email Deselect this option if you don’t want to inform new users by e-mail that you have signed them up. Default Password Enter a temporary password for new users, or leave the field empty to have Scene7 generate random passwords. Users are asked to change passwords the first time they log in. Replacement URL Enter a URL different from the default if your users access Scene7 through a different URL. Other user management tasks Starting on the User Administration Setup screen, you can also do these tasks: Filter and sort the user list Filter the list of Media Portal users to locate users. See “Filtering and sorting the user list” on page 64. Delete users Delete a user from the list. See “Deleting a user” on page 63. Activate and deactivate users Suspend a user from accessing folders. See “Activating or deactivating users” on page 64. Edit user information Enter up-to-date information about a user. See “Editing user information” on page 64. Create user-defined fields Create custom, user-defined metadata fields to help organize assets in the Scene7 Publishing System. The fields can also be activated or deactivated, as necessary. See “User-Defined Fields” on page 49. Managing FTP accounts Only Media Portal Administrators can administer and manage FTP accounts. In addition, only users with the role of Media Portal Contributor-User or Media Portal Contributor can upload digital assets. Remember that you can activate or deactivate existing Media Portal users by way of the User Administration page in Administration Setup. See “Activating or deactivating users” on page 64. 1 Click Setup > Media Portal > FTP Accounts. 2 On the Add FTP Account page, in the FTP Accounts Username drop-list, select a user. If a user is not listed, you may need to first add them as a Media Portal Admin, a Media Portal Contributor-User, or a Media Portal Contributor by way of Administration Setup. After you add the user with the proper role, their user name is available from the drop-down list. Last updated 10/9/2014 76 USING SCENE7 Media Portal See “Adding a Media Portal user” on page 73. 3 In the Password and Confirm fields, type the password to the FTP account. 4 Click Save to add the account to the Existing Accounts table. To upload media assets, you need the FTP Account Username that is listed in the Existing Accounts table, and the password that is assigned to the account. See “Uploading files” on page 79. Deleting an existing FTP account 1 Click Setup > Media Portal > FTP Accounts. 2 On the Add FTP Account page, in the Existing Accounts table, select the FTP account that you want to remove. 3 Click Delete. Specifying export options available to Media Portal users If the administrator gives them permission, Media Portal users can reformat images as they export them. For example, they can change the size, file format, and image quality. Automatically reformatting images as they are exported saves time by not having to reformat images separately. Moreover, administrators can create a preset —a pre-established selection of image format settings. You can use a preset when exporting images to reformat them to the specifications of your company. The following two restrictions apply if you export image assets by way of a user-defined conversion or if you export original master images: • The compressed Zip export file has a maximum file size of 1 GB for the export job. • You can have a maximum of 500 total assets per export job. See also “Exporting assets from Scene7 Publishing System” on page 113. To specify export options available to Media Portal users 1 Click Setup > Image Presets. 2 In the Image Presets window, select any of the following: Enable User-Defined Conversion When selected, this option lets users choose other from the Size drop-down list in the Export Selected Assets window. Users can then choose a unit of measure such as pixels or centimeters, and then specify the desired width and height. When they export or download these files, the image files are reformatted. When pixels are chosen from the Size drop-down list, the resulting image width x height cannot exceed 100 million pixels. This size equates to 10,000 x 10,000 pixels for a square image, or roughly 8,000 x 12,000 pixels for a 2x3 aspect ratio image. This size limitation does not apply if you export original master images. Deselect this option if you want users to download files without reformatting them as they are downloaded. Enable Export Original Lets you export original master images. In the Export Selected Assets panel, users can open the Conversion drop-down menu and choose Export Original to export original files. Deselect this option if you want to force users to choose an Image Preset or choose conversion options when they export images. Last updated 10/9/2014 77 USING SCENE7 Media Portal More Help topics “Image Presets” on page 23 “Choosing Image Preset access permissions for a group” on page 72 Creating and enabling Image Presets When users export image assets using Media Portal, they can choose an Image Preset in the Export Selected Assets dialog box. An Image Preset is a collection of pre-defined settings that change the size, image quality, format, resolution, and other aspects of an image’s appearance when it is exported. Media Portal administrators can create Image Presets to control how images are reformatted when they are exported. Image Presets reformat images to the specifications of your company when users export images from the Scene7 Publishing System. Rather than reformatting images on their own, users export them to the precise specifications of an Image Preset. The following restrictions apply when you export image assets: • The width x height must be less than or equal to 100 MB per image. For example, the image cannot exceed 10K x 10K, or any aspect variation below, such as 8K x 12K. • There is a maximum of 1 GB total file size per export job. • You can have a maximum of 500 total assets per export job. Note: These restrictions apply only to the exporting of derived image assets, not the exporting of master files. To create Image Presets, see “Image Presets” on page 23. To enable users to choose Image Presets when they export files, see “Specifying export options available to Media Portal users” on page 76. To choose which Image Presets are available to the members of a group, see “Choosing Image Preset access permissions for a group” on page 72. Making more efficient use of metadata All files on the Scene7 Publishing System contain metadata. Metadata describes and identifies a file; it is used for searching for and organizing assets. To view an asset’s metadata, open it in Detail view and examine the Metadata panel. The metadata fields on this panel provide descriptive information about the asset. Metadata is not useful in searches and asset organization unless it is entered correctly in metadata fields. To enter metadata correctly and to make sure that all the right metadata fields contain metadata, you can create metadata presets. A metadata preset is a pre-defined set of metadata entries. Rather than enter metadata themselves, users can, in Detail view, choose a metadata preset to fill metadata fields with predefined information. To create metadata presets, see “Metadata Presets” on page 48. To create metadata fields that uniquely describe the assets you work with, see “User-Defined Fields” on page 49. Last updated 10/9/2014 78 USING SCENE7 Media Portal Customizing the Media Portal screen The Media Portal style settings allow you to brand the Media Portal screen with your company logo and colors. Use the style settings to put your company stamp on Media Portal. To access the style settings, choose Setup > Media Portal Setup > Style Settings. Be sure you click Save to save your settings after you make them. You can click Restore to bring back the default settings. As you make your choices, the Preview panel shows you what your choices look like. Logo Click Browse and choose a graphic in the Select Logo Image window. Application Create a gradient color blend by making choices on the Background Gradient Colors menus. Tree Choose a rollover color (the color that appears when you move the pointer over an item) and selection color (the color that appears when you select an item). Accordion Choose background colors, a border style, and rollover and selected colors for the accordion that appears on the right side of the screen in Details view. Accordion Header Choose whether to make text in the accordion header boldface. Datagrid Choose colors for the header row in data grids. Alert Choose a background color for alert message boxes. Progress Bar Choose a color for the bar that indicates the progress of uploads and downloads. For Media Portal users to see the style settings you choose, they must append ?company=(company name) to the URL with which they access Media Portal. For example, to see style settings, Media Portal users who access the PortalCo company at the following: http://s7sps1.scene7.com/MediaPortal would use the following URL instead: http://s7sps1.scene7.com/MediaPortal?company=PortalCo Including the company name in the URL enables Media Portal to recognize which company a user wants to access and apply the company’s style settings accordingly. You can learn more about communicating URL changes to Media Portal users, and setting up a Welcome e-mail message so new users receive the correct Media Portal URL. See Email Communications and “Setting up the Welcome e-mail message for Media Portal users” on page 75. Last updated 10/9/2014 79 Chapter 5: Upload and publish assets Your work in Scene7 falls in three basic areas: • Uploading file assets to the Scene7 Publishing System. • Managing your files so you can use them to build rich-media assets. • Publishing your asset files to a Scene7 server so that they are available for delivery to your website and application. When you upload asset files to SPS and when you publish asset files to Scene7 servers, the system records these file transfers on the Jobs page. You can go to this page to track and monitor your upload and publishing activities. Important: When you upload a file, Scene7 generates the URL for the file. This URL is not active until you publish the file. Note: A new Instant Publish feature was made available shortly after the release of SPS 6.0. This feature, which publishes assets immediately with one step, is being rolled out gradually, replacing the “Mark for Publish” functionality. Some users will continue to see the current interface and functionality for a while, until they are included in the rollout. In addition, some assets will continue to use the “Mark for Publish” process for a while after the rollout. Uploading files Before you upload assets files to the Scene7 Publishing System, make sure that the asset files are named correctly, and that your folder structure is set up and organized the way you want. You can upload files from a Scene7-provided FTP site or directly from your computer or network. Scene7 offers options for optimizing files as you upload them. If you installed Adobe Scene7 Publishing System desktop application, you can upload files and folders by dragging them directly from your desktop. (See “General Settings” on page 20.) Preparing your assets and folders for uploading Before uploading assets to the Scene7 Publishing System, make sure that they are in the right format and size. You also have to observe the Scene7 rules for naming assets. By setting up a folder organization and structure for the files, you make sure you can locate and work with files easily. Supported asset file formats This table lists the asset file formats that the Scene7 Publishing System supports. For information on supported Camera Raw files, see www.adobe.com/go/learn_s7_cameraraw_en. Asset file formats Description Audio AAC, HE-AAC, AC3, WAV, WMA, AIFF, MP3 Cascading Style Sheet CSS Color profiles ICC, ICM Flash FLA, FLV, SWF, SWC, F4V Fonts AFM, OTF, PFB, PFM, PhotoFont, TTC, TTF FXG FXG Illustrator AI, FXG Last updated 10/9/2014 80 USING SCENE7 Upload and publish assets Asset file formats Description Images BMP, FPX, GIF, JPEG, JPG, PNG, PICT (Windows only), TIF, TIFF InDesign INDD, INDT MS Office DOC, PPT, RTF, XLS PDF PDF Photoshop PSD, FXG, and Camera Raw PostScript EPS, PS Scene7 Image Authoring VNC, VNT, VNW SVG SVG, SVGX TAR TAR Video 3GP, AVI, F4V, FLV, M2P, M2T, M2TS, M2V, M4V, MOV, MP4, MPEG, MPG, MTS, OGV, TS, VOB, WMV/ASF XML XML ZIP ZIP TAR and ZIP upload support includes a check box to select if you want to unpack the files. Asset types To achieve optimal results with the Scene7 platform, be sure to use the recommended file formats and sizes. This table lists asset types, some with recommended formats and file sizes for commonly used assets. Asset type Description/Recommendations Audio Input audio asset formats include AAC, HE-AAC, AC3, WAV, WMA, AIFF, MP3. You can transcode audio to the following formats: MP3, AAC, and HE-AAC. Images (for Image Sizing, Zoom, Image Sets, Spin Sets) Images have to be at least 2000 pixels at the longest dimension; typical image sizes range from 1500 to 2500 pixels in the longest dimension. Lossless image formats, including TIFF and PNG files, are recommended. If you use a JPEG image, use the highest-quality settings. Animate GIF files are handled like other static content, such as SWF animations. eCatalogs Use high-resolution PDF files created in Adobe® Acrobat® or a Creative Suite application saved as “press-ready.” PDFs include all needed fonts, images, masks, and referenced graphical elements, either as single-pages, double-page spreads, or in a multi-page format. Order your pages by naming the files in alphanumeric order. Place all PDFs for your eCatalog in a single folder for ease of uploading. You can select cropping options on upload to remove the trim area from PDFs, including crop marks, registration targets, or color bars. Most press-ready PDF files are in the CMYK color space, so it is important to obtain the CMYK ICC color profile used with your PDF files. Templates Layered image or layout design that can include text, images, and layers. Image layers, text strings, and attributes, such as color and size, can be parameterized so that variable data can be customized. Image requirements for use in templates are the same as other images. Prepare your graphics in Photoshop or another image-editing program. Save each graphic as a flattened transparent file in TIFF or PNG format. Ensure that the image resolution is appropriate for expected use. Images for print should be 300 ppi. Videos Scene7 supports video files saved in the FLV, F4V, OGV, and MP4 format. You can transcode files to MP4 format at upload. See “Supported asset file formats” on page 79. Fonts Uploaded TrueType, Type1 (Windows Only), OpenType fonts, and PhotoFonts Images Images and layered image files. Last updated 10/9/2014 81 USING SCENE7 Upload and publish assets Asset type Description/Recommendations Image Sets and Swatch Sets A set of related images that can be displayed in a viewer. ICC profiles A color profile you can use to convert an uploaded image from its source color space into a different color space. Viewer SWFs Custom-designed FLA files you can use as "skins" for various Scene7 viewers. Vignettes Images authored with the Image Authoring program, as well as related files. Content files Adobe InDesign, Illustrator, or Photoshop content files. FXG files Resolution-independent graphic format files that you can use to create customizable templates for output to print, web, email, desktop, and devices. SVG files Scalable vector graphic files that Image Serving servers can render. XML files Files that define pre-processing rules that are used to modify the path and query portions of requests. Cascading Style Sheet files. Upload CSS skins for customization of HTML5 viewers. This is similar to uploading viewer skins (SWFs) for Flash viewers. JavaScript files Javascript files are used for viewer instrumentation to hold account information. Adobe Security recommends this only for client accounts that have a separate domain in use for delivery (to avoid cross site scripting). Note: When you upload image files and PDFs to SPS, the system converts these source files to P-TIFF (Pyramid TIFF) files. These P-TIFFs are the files that are later published to Scene7 Image Servers. Scene7 uses the Pyramid Tiff file format because it contains various zoom ratios that allow for fast zooming when viewed with a Scene7 Zoom Viewer. Supported Static File Formats Scene7 supports several static file formats. Static content is any asset that is published "as-is," such as XML, PDF, SWF, CSS, and so on. The following file types can be published: • Flash video • Viewer SWF • XML • PDF (when PDF is specifically marked for publish after upload, to avoid delivery of all PDFs for existing eCatalog/PDF workflow) • PrX video • Master video • ZIP • Animated GIF • CSS • JavaScript (when the company is configured with its own domain) • Audio files Scene7 does not provide the option to generate a preview URL of static content. Last updated 10/9/2014 82 USING SCENE7 Upload and publish assets Filename requirements Because filename extensions are stripped from filenames during the upload process, the system does not allow files to have the same root name. In the Scene7 system, the asset filename minus the filename extension becomes the asset ID for the asset. For this reason, no two assets can have the same name. Make sure that all users in your company understand these file naming rules: • Asset IDs with the same exact name are not allowed in the system. • Asset ID names are case sensitive. • As a best practice, make sure that asset IDs do not contain blank spaces (for example, black jacket.tif and blue jacket.jpg). Scene7 ASCII-encodes blank spaces in asset names when it uses asset names to construct URL strings. These ASCII codes are hard to read, which can make reading URLs more difficult. • Language-specific characters are permitted in filenames. However, the following characters are not permitted in filenames: \;/?:@&=+$,*"<>|'{}% If a filename contains one or more of the above characters, the characters are removed from the filename on upload. In most cases, an asset filename can be the same as its item number, product SKU, or other name as in the following: Item Filename Asset ID 896649 896649.jpg 896649 48A3_2X 48A3_2X.tif 48A3_2X Folder organization and structure Organize and structure folders and subfolders for your content in the Scene7 Publishing System before you upload your content to the system. Planning ahead this way has two major advantages: • When you upload your content to SPS via FTP, you can tell the system to replicate your folder structure during the upload. This way, your content is organized in the same folders and subfolders in SPS as it is on your computer or network. (To replicate your folder structure in SPS, select the Include Subfolders option when you upload assets via FTP.) • Reorganizing folders inside the system after files are uploaded is much more difficult than starting with a carefully considered folder structure. The folder-naming approach and structure you choose for storing your content on the Scene7 Publishing System depends on the needs of your organization. Here are some sample folder structures: SKU-based Folders are named according to SKUs or item numbers. For example, separate folders are created for all 0-, 20-, 30- number series. Brand-based For manufacturers with multiple brand lines and retailers who market other brands from other companies, separate files into product folders named for different brands. Project-based Folders are organized according to rollout/drop date or project name. Clients who primarily produce eCatalogs favor this approach. Mirror of web site folder hierarchy This folder structure mirrors the folder structure of the website, with the folders named, for example, for product categories. More Help topics “Working with asset folders” on page 97 Last updated 10/9/2014 83 USING SCENE7 Upload and publish assets Uploading your files You can upload individual files from the desktop or upload folders via FTP. If you want to upload more than 100 MB of files or upload entire folders and subfolders, select Via FTP. If you’ve installed the Scene7 Publishing System desktop application, you can drag files and folders directly from your desktop to the destination upload folder. The Scene7 Publishing System sends you an email message to confirm when your upload job begins and ends, and to notify you of any problems. During (or immediately after) a large upload job, some new items may display the “Image not yet optimized” message. This message appears because the files have not been fully processed and added to SPS. You can optimize these files later. (See “Optimize Files” on page 50.) More Help topics “Handling recurring upload and publish jobs” on page 94 “Using an upload or publish job as a trigger” on page 96 Upload files from the desktop using Scene7 1 On the Global Navigation bar, click Upload. 2 On the Upload page, click From Desktop. 3 Click Browse. 4 In the Select files to Upload dialog box, select the files you want to upload, and then click Open (Windows®) or Select (Mac OS®). Note: After you select files, Scene7 lists their names on the Filenames list. You can remove a file by selecting it and selecting the Delete button. 5 In the Choose Folder Destination group box, select a destination folder for the uploaded files. 6 Near the lower-right corner of the Upload page, click Job Options, and then specify the options you want. See “Upload options” on page 84. Note: Two upload options, Publish After Uploading and Overwrite in Any Folder, are available on the Upload Job Options dialog box. Other options might be available, depending on the settings in Applications Setup > General Settings > Upload to Applications > Overwrite Images. You can access other upload job options by clicking the Job Options button. For information about all the upload options, see “Upload options” on page 84. 7 Click Save. 8 Click Submit Upload. To see the progress of the upload, click Jobs on the Global Navigation Bar. You can continue working in Scene7 Publishing System and return to the Jobs page at any time to review an in-progress job. To cancel an upload job in progress, select Cancel next to the Duration time. More Help topics “Handling recurring upload and publish jobs” on page 94 “Using an upload or publish job as a trigger” on page 96 Last updated 10/9/2014 84 USING SCENE7 Upload and publish assets Upload files using SPS Desktop application The Scene7 Publishing System Desktop application lets you upload files and folders by dragging. 1 In the Scene7 Publishing System Desktop application, on the Global Navigation bar, click Upload. The Desktop File System dialog box opens 2 In the Desktop File System dialog box, in the bottom half, select the destination folder for the uploaded files or folders. 3 Drag one or more files or folders from list of files and folders on your computer or network (on the top half of the dialog box) to the bottom half of the dialog box. 4 Click Job Options, and then specify the options you want. See “Upload options” on page 84. 5 Click Upload Now. To cancel an upload job in progress, click Jobs, and then click Cancel. Upload files using Via FTP 1 Log in to the Scene7 FTP site that is specific to your particular region. Use the FTP user name and password that you received from your administrator. 2 In Scene7, on the Global Navigation bar, click Upload. 3 On the Upload page, click Via FTP. 4 Choose an FTP folder to upload files from, and then choose a destination folder in the Scene7 Publishing System. 5 Click Job Options and specify the options you want. See “Upload options” on page 84. Note: Two upload options, Publish After Uploading and Overwrite in Any Folder, are available on the Upload page. You can access other upload job options by clicking Job Options. For information about all the upload options, see “Upload options” on page 84. 6 Click Submit Upload. To see the progress of the upload, on the Global Navigation Bar, click Jobs. The Jobs page shows you the progress of the upload. You can continue working in Scene7 Publishing System and return to the Jobs page at any time to review an in-progress job. To cancel an upload job in progress, click Cancel next to the Duration time. More Help topics “Handling recurring upload and publish jobs” on page 94 “Using an upload or publish job as a trigger” on page 96 Upload options When uploading files, you can choose from the following options: Job Name Enter a name for this upload job. The job and other upload and publishing jobs are recorded on the Jobs page, where you can check the status of jobs. See “Checking job files” on page 93. Last updated 10/9/2014 85 USING SCENE7 Upload and publish assets Publish After Upload Select this option to automatically publish the assets that you upload. When you publish files, files are sent to live servers. URLs for these files can then be used on external websites and applications. This option is also available on the Upload page. See also Instant Publish Notice PDF. Overwrite in any folder, same base asset name regardless of extension Select this option if you want the files you upload to replace existing files with the same names. The name of this option could be different, depending on the settings in Application Setup > General Settings > Upload to Application > Overwrite Images. Job Options Click Job Options to open the Upload Job Options dialog box and choose options that affect the entire upload job. These options are the same for all file types. Note: You can choose default options for uploading files starting on the Application General Settings page. To open this page, choose Setup > Application Setup. Click the Default Upload Options button to open the Upload Job Options dialog box. • When (Via FTP uploads only) Select One-Time or Recurring. To set a recurring job, choose a Repeat option—Daily, Weekly, Monthly, or Custom—to specify when you want the publishing job to recur. Then specify the scheduling options as necessary. • Overwrite in any folder, same base asset name regardless of extension Select this option if you want the files you upload to replace existing files with the same names. This option is also available on the Upload page. The name of this option could be different, depending on the settings in Application Setup > General Settings > Upload to Application > Overwrite Images. • Include subfolders (Via FTP uploads only) Select this option if you want to upload subfolders of the folder you intend to upload. The names of the folder and its subfolders you upload are entered automatically in SPS. • Process metadata files (Via FTP uploads only) Select this option if you want to upload a tab-delimited or XML file to add metadata to multiple assets. See “Import metadata (via FTP)” on page 110. • Crop Options To automatically crop white-space pixels from an image, open the Crop menu, choose Manual, and enter pixel measurements in the Top, Right, Bottom, and Left fields to crop from the sides. You can also choose Trim on the Crop menu and choose these options: Trim Away Based On Choose whether to crop based on color or transparency: • Color: Choose the Color option. Then select the Corner menu and choose the corner of the image with the color that best represents the white-space color you want to crop. • Transparency: Choose the Transparency option. Tolerance Drag the slider to specify a tolerance from 0 through 1: • Trimming based on color: Specify 0 to crop pixels only if they exactly match the color you selected in the corner of the image. Numbers closer to 1 allow for more color difference. • Trimming based on transparency: Specify 0 to crop pixels only if they are totally transparent; numbers closer to 1 allow for more transparency. • Color Profile Options Choose a color conversion when you create optimized files that are used for Scene7 dynamic delivery: Default Color Preservation Last updated 10/9/2014 86 USING SCENE7 Upload and publish assets Maintains the source image colors whenever the images contain color space information; there is no color conversion. Nearly all images today have the appropriate color profile already embedded. However, if a CMYK source image does not contain an embedded color profile, the colors are converted to sRGB (standard Red Green Blue) color space. sRGB is the recommended color space for displaying images on web pages. Keep Original Color Space Retains the original colors without any color conversion at the point of ingestion into Scene7 Publishing System. For images without an embedded color profile, any required color conversion to process requests for the image are done using the default color profiles as configured in the Publish settings. These color profiles may not align with the color in the files created with this option. Therefore, you are encouraged to use the option Default Color Preservation. Custom From > To Opens menus so you can choose a Convert From and Convert To color space. This advanced option overrides any color information that is embedded in the source file. You should only select this option when all the images that you are submitting contain incorrect or missing color profile data. • Image Editing Options You can preserve the clipping masks in images, and choose a color profile. See “Image editing options at upload” on page 305. • PostScript Options You can rasterize PostScript® files, crop files, maintain transparent backgrounds, choose a resolution, and choose a color space. See “Working with PostScript and Illustrator files” on page 312. • Photoshop Options You can create templates from Adobe® Photoshop® files, maintain layers, specify how layers are named, extract text, and specify how images are anchored into templates. See “PSD upload options” on page 310. • PDF Options You can rasterize the files, extract search words and links, auto-generate an eCatalog, set the resolution, and choose a color space. See “PDF upload options” on page 308. • Illustrator Options You can rasterize Adobe Illustrator® files, maintain transparent backgrounds, choose a resolution, and choose a color space. See “Working with PostScript and Illustrator files” on page 312. • eVideo Options You can transcode a video file by choosing a Video Preset. See “Working with video encoding presets” on page 219. • Additional Metadata Options Enter keywords that describe the files you will upload. Separate keywords by comma. Keywords make searching for assets easier. See “Conducting an advanced search” on page 99. • Batch Set Presets If you want to create an Image Set, multi-axis Spin Set, or Swatch Set from the uploaded files, click the Active column for the preset you want to use. You can select more than one preset. You create the presets in the Application Setup/Batch Set Presets page. See “Batch Set Presets” on page 51. Follow an upload with another job When you upload items using FTP, you can schedule a subsequent job to begin as soon as the upload is complete. (If other jobs are scheduled to begin at that time, the job you schedule here will be queued after them.) Last updated 10/9/2014 87 USING SCENE7 Upload and publish assets The new job sends a notification to the address you specify so that the code at that location can be triggered. This follow-on publishing job uses the same name as the upload job, but with the text Pub_ added to the beginning. To follow an upload with another job 1 Click Upload, and click the VIA FTP tab. 2 In the Advanced section, choose one of the following from the Follow Upload With Another Job option: • HTTP Request • Image Serving Publish • Image Rendering Publish • Video Publish 3 Specify the HTTP address. 4 Specify if you want to execute only if files were uploaded. 5 Indicate whether you want to run this request every time this job completes, or only when files were published. Note: Regularly scheduled jobs may not result in any files being published. Publishing files You publish your assets to Scene7 Image Servers. You can publish assets on a one-time basis or arrange for Scene7 to publish assets on a recurring schedule. After your assets are published, they are available to you for delivery. You can copy the URL calls from the Scene7 Publishing System and add them to your website or application. Publish After Uploading Assets either in a published or unpublished state. By default, any assets that you upload into Scene7 are automatically marked for publishing. For more information, see the Instant Publish Notice PDF. Use these techniques to mark assets for publish: Publish After Uploading On the Upload page, near the bottom, select Publish After Uploading. The default is a selected state. Publish After Uploading In the Job Options dialog box, select Publish After Uploading. The default is a selected state. Some "child" assets are automatically marked for publish when their parents are marked for publish. This table lists child assets that are marked for publish automatically. Parent (group) item Child (member) items Image sets Images within the set. Swatch sets Swatches within the set. Spin sets Images within the set. Templates Template files, pages, and images. Last updated 10/9/2014 88 USING SCENE7 Upload and publish assets Derived images are also automatically marked for publish when their parent images are being published. Derived images include images you adjusted with image-editing options. You can see these derived images in Detail view under Built & Derivatives. Creating a publish job Create a publish job to publish assets you have uploaded to Scene7 servers but chose not to automatically published them yet. You can perform a one-time publish job or schedule jobs to recur on a regular basis. Scene7 offers advanced publishing options for publishing to specific servers and options for republishing assets that have already been published. To create a publish job 1 On the Global Navigation bar, click Publish. 2 In the Publish dialog box, choose whether you want a one-time or recurring publish job. See “Creating a one-time publish job” on page 88and “Creating a recurring publish job” on page 88. 3 Enter a job name. 4 Optionally, display the Advanced options and choose these options. See “Advanced publish options” on page 89. 5 Click Submit Publish. SPS tracks publish jobs on the Jobs page. You can review publish jobs on that page. Important: Assets you republish (you have published them before) do not appear immediately on your website because of the web caching mechanism on the content delivery network (CDN). See “Republished assets and CDN delays” on page 90. More Help topics “Canceling a publish job” on page 89 “Checking job files” on page 93 “Editing, deleting, pausing, and resuming recurring jobs” on page 94 Creating a one-time publish job Create a one-time publish job by selecting the One-Time option on the Publish page. If you want the publish job to occur at a later date, select the When menu, and choose Schedule For Later. Then use the Calendar and Time slider to select a day and time to execute the publish job. Creating a recurring publish job Create a recurring publish job by selecting the Recurring option on the Publish page. Then choose a Repeat option—Daily, Weekly, Monthly, or Custom—to declare when you want the publishing job to recur. Scene7 presents calendar tools for scheduling the recurring publish job. You can choose the Custom option and enter a rule in the Rule box to describe a custom job interval. See “Creating a custom upload or publish job time interval” on page 95. Note: Recurring publish (and upload) jobs are listed on the Jobs page. You can edit or delete a scheduled job by going to the Scheduled tab of the Jobs page. Last updated 10/9/2014 89 USING SCENE7 Upload and publish assets Advanced publish options You can display the Advanced options on the Publish page and choose these options for handling a publish job: Publish To Choose a server type to publish assets only to a specific server, not to all servers. Publish By default, SPS publishes only assets that are new and have not been published before (the New Since Last Publish option). However, you can choose Full Publish to also publish assets that have been updated or changed since they were last published. Choose Full w/ Search Data if you are publishing an eCatalog and you want readers to be able to search it by keyword. Run Job As Choose a user name from the list. You can sort jobs by user name on the Jobs page. By choosing a name, you associate a publish job with a user. HTTP Notification Enter a URL to trigger subsequent publish jobs. See “Using an upload or publish job as a trigger” on page 96.) Canceling a publish job You can cancel an in-progress publish job. Moreover, if you are an administrator, you can cancel an in-progress publishing job from the company Jobs page. To cancel a publishing job, go to the Jobs page and click Cancel. On the Scheduled tab of the Jobs page, you can pause or resume a job by deselecting or selecting the check box in the job’s Active column. Note: After you cancel a publish job, its status changes to “stopping” until the job reaches a point where it can stop safely. Stopping a publish job can take some time if the job is in the process of getting data from the database. Manually publishing assets You can publish individual assets manually instead of creating a publishing job. When you publish sets, such as an Image Set or an Adaptive Video Set, the set (or “parent”) and all members (or “children”) within that set get published. Unpublished assets are indicated in the user interface by a grey, round icon with a slash through it (unpublished state), to the left of the asset’s name. After an asset is published, the icon turns green and has a white check mark in the center (published state). To manually publish assets ❖ Do one of the following: • In the Grid View, List View, or Details View, use standard file selection methods to select one or more unpublished assets. On the Global Navigation Bar, click File > Publish. • In the Grid View, List View, or Details View, click the grey, round icon with a slash through it, to the left of the asset’s name. Manually unpublishing assets You can unpublish individual assets manually. When you unpublish sets, such as a Swatch Set or an eCatalog, the set (or “parent”) itself goes into an unpublished state. However, the members (or “children”) within that set are not affected; instead, they each retain their existing published or unpublished state. Published assets are indicated in the user interface by a round, green icon with a white check mark in the center (published state), to the left of the asset’s name. After an asset is unpublished, the icon turns grey with a slash through it (unpublished state), Last updated 10/9/2014 90 USING SCENE7 Upload and publish assets To manually unpublish assets ❖ Do one of the following: • In the Grid View, List View, or Details View, select one or more pubished assets. On the Global Navigation Bar, click File > Unpublish. • In the Grid View, List View, or Details View, click the round, green check mark icon to the left of the asset’s name. Getting an asset’s publish history The last date an asset was published is shown in Detail view at the top of the panel. You can get more details about the publishing history by opening the History & Published Servers panel in Detail view. From there, you can see when the asset was published and to which servers it was published. More Help topics “Checking job files” on page 93 Republished assets and CDN delays Scene7 assets are distributed on the content delivery network (CDN). CDN is a system of computer servers networked together that cooperate transparently to deliver content, especially large media content, to end users. In the CDN system, web content is stored in web caches across the Internet (called the edge cache network). Web content is delivered from these web caches to end users to make for faster deliveries. The first time someone downloads a web page, the assets are delivered to a CDN web cache server. They are stored on this server so that the next time someone in the same area accesses the web page, the same cached content can be delivered faster. The content is delivered faster because it is located closer to the end user. CDN makes for faster web page displays. It decreases bandwidth demands on the central server because content is delivered from the edge cache network, not from a central server in every instance. Newly published Scene7 content is available immediately to the end user and quickly populates the edge cache network. However, newly republished content—images that have the exact same names as images previously published to an image server—is not updated on CDN for up to ten hours. Instead, end users see what is in a web cache on the CDN network. For this reason, your Scene7 republished assets may not appear to end users for ten hours. If you want your newly republished image assets to be available sooner than the ten-hour delay, you can flush web caches on CDN. Flushing these web caches removes old content from CDN web caches and replaces it with your most recently published assets. To flush the cache, click File > Invalidate CDN. All selected files are removed from the cache. If there are no publishable assets, or if you are not a company admin, the Remove from CDN option is not available. Testing assets before making them public Secure Testing helps you define a secure test environment and build a robust B2B solution, based upon a configurable set of IP address and ranges. This functionality lets you match your Scene7 deployments with the architecture of your content management and commerce platform. With Secure Testing, you can preview the staging version of the website with unpublished content. Last updated 10/9/2014 91 USING SCENE7 Upload and publish assets You might prefer to create a staging environment rather than making assets publicly available for the following reasons: • Preview websites before public launch (staging website). • Serve assets that require restricted access, such as eCatalogs that show prices in a B2B web application. • Use assets behind a firewall as part of product information management system, customer service application, training site, and so on. Note: Secure Testing does not affect access to the Scene7 Publishing System. SPS security remains consistent and requires the usual credentials for access to SPS and related web services. How Secure Testing works Most corporations run their Internet behind a firewall. Access to the Internet is possible through certain routes and typically through a limited range of public IP addresses. From your corporate network, you can figure out your public IP address using websites like http://whatismyip.com or request this information from your corporate IT organization. With the Secure Testing, Scene7 establishes a dedicated Image Server for staging environments or internal applications. Any request to this server checks the origin IP address. If the incoming request is not within the approved list of IP addresses, a failure response is returned. The Scene7 Company Administrator configures the approved list of IP addresses for their company’s Secure Testing environment. Because the location of the original request must be confirmed, the traffic of the Secure Testing service is not routed through a content distribution network like public Scene7 Image Server traffic. Requests to the Secure Testing service might have a slightly higher latency compared to the public Scene7 Image Servers. Unpublished assets are immediately available from the Secure Testing services, without the need to publish. This allows you to run a preview before assets are published to their public facing image server. Note: Secure Testing services leverage the Catalog Server that is configured with an internal publish context. Therefore, if your company is configured to publish to Secure Testing, be aware that any uploaded assets in Scene7 Publishing System immediately become available on Secure Testing services. This functionality is true regardless of whether or not the assets are marked for publish on upload. The Secure Testing service currently supports the following asset types: • Images. • Vignettes (Render Server requests). • Sets, including image sets, eCatalog, render sets, and media sets. • Standard Scene7 rich media viewers. • Scene7 OnDemand JSP pages. • Static content, such as PDF files and progressively served videos. • HTTP video streaming. • Progressive video streaming. The following asset types and functionalities are currently not supported: • RTMP video streaming • Render Server requests • UGC services Last updated 10/9/2014 92 USING SCENE7 Upload and publish assets • Web-to-print • Scene7 Info or eCatalog search Testing the Secure Testing service You should test the Secure Testing service to make sure it works as expected. Prepare your account 1 Contact Technical Support and request that Secure Testing be enabled on your account. 2 In Scene7 Publishing System, click Setup > Publish Setup > Image Server. 3 On the Image Server Publish page, in the Publish Context drop-down list, select Test Image Serving. 4 For the Client Address Filter, click Add. 5 Select the check box to enable (turn on) the address, and then type an IP address and net mask in the respective text fields. 6 Repeat the previous two steps to add more IP addresses. Otherwise, continue to the next step. 7 At the lower-left of the Image Server Publish page, click Save 8 Upload the desired images to your Scene7 Publishing System account. See “Uploading files” on page 79. 9 Make sure some of the images are marked for publish and others are unmarked, and then submit the publish job. See “Publishing files” on page 87. 10 Determine the name of your Secure Testing service by clicking Setup > Application Setup > General Settings. 11 On the Application General Settings page, under the Servers group, find the name to the right of Test Publish Context Server Name. Contact Technical Support if the server name is missing or URLs to the server do not work. Prepare website variations You need two variations of a website that links the published and unpublished assets: • Public version: Link assets using your traditional Scene7 URL syntax • Staging version: Link assets using the same syntax but with the Secure Testing site name Run the tests Perform the following tests: 1 Check whether assets are visible from within your corporate network. From within the corporate network identified by the previously defined IP address range, the staging version of the website should display all images, whether marked for publish or not. This allows you to test without accidentally making images available before preview approval or product launch. Confirm that the public version of your site shows published assets as previously experienced with Scene7. 2 From outside your corporate network, verify that nonpublished assets (that is, unmarked for publish) are protected from third-party access. Access your network from outside (such as, from your home computer or over a 3G connection), then verify that the public version of the site shows all published assets but none of the unpublished content. Last updated 10/9/2014 93 USING SCENE7 Upload and publish assets Confirm that the staging version does not show any asset because you are accessing the Secure Testing service from an unapproved IP address. Checking job files To monitor file uploads to the Scene7 Publishing System and files you publish to Scene7 servers, SPS offers the Jobs page. You can review upload and publish jobs on the Jobs page, check the status of jobs, and cancel publishing jobs from this page. You can also schedule upload and publishing jobs. When you upload assets, a spinning icon appears next to the Jobs menu, indicating a job is in progress, and the number of files in progress. You can click the icon to see more information about the active job. Note: A list of your recently published jobs is also available on the Recent Activity page. Click Recent on the Global Navigation bar to open this page. About the Jobs page Select the Jobs button on the Global Navigation bar to open the Jobs page. By default, jobs are listed starting with the most recent. Jobs are listed in these categories on the History tab of the Jobs page: Job Type An icon indicates the job type: Upload and Publish are the most common job types. Job Name The name of the job. The name includes the user-entered portion of the name and the date-and-time stamp. Started When the job started. Total The number of files transferred. W (warnings) The number of warnings in the job (if any). Warnings indicate problems with the job that did not affect overall job completion. These warnings can usually be ignored because they report on hidden files. For example, .DS_store files (Macintosh) and Thumbs.db files (Windows) contain information about how to display image files to users. Warning entries regarding these files, however, can be ignored because they don’t pertain to how these files are used in Scene7. You can double-click a job name to get detailed information about warnings. E (errors) Lists the number of errors in the job (if any). You can double-click a job name to get detailed information about errors. Duration How long it took to complete the job. Status Shows the status of the job. Destination For upload jobs, the company name and folder to which the files were uploaded. This category doesn’t apply to publish jobs. Submitted By Lists who uploaded the assets. Note: You can cancel in-progress publish and upload jobs by clicking the Cancel button next to the progress bar. More Help topics “Changing views on the Jobs page” on page 94 Last updated 10/9/2014 94 USING SCENE7 Upload and publish assets Changing views on the Jobs page Use these techniques to sort jobs or change your view of the History tab of the Jobs page: Sorting Select a column name to sort the list by a particular column. You can select the switch beside the column name to sort in descending or ascending order. Date Range Select the Date Range menu and choose an option to narrow the list of jobs to the current date, the previous week, or the previous month. Choose Custom Date Range to enter a specific date range. Job Type Select the Job Type menu and choose Publish or Upload to narrow the list to publish jobs or upload jobs. Choose All to see both types of jobs. Show Choose Show > My Jobs or Show > All Jobs to narrow the list to jobs you ordered or jobs that people in your company ordered. More Help topics “About the Jobs page” on page 93 “Viewing, copying, or printing a Job Details report” on page 94 Viewing, copying, or printing a Job Details report Double-click the name of a report on the Jobs page to open the Job Details page. This page provides a summary report about the files in the job. Click View Detail to see an entry’s SPS ID, destination path, and status information. If you uploaded a PDF or PostScript file that requires fonts that are not available in SPS, the report lists the missing fonts. You can copy this information to the Clipboard. 1 Double-click the name of a report on the Jobs page to open the Job Details page. 2 Click View Detail to get a detailed report about an entry. 3 Click Copy to Clipboard. More Help topics “About the Jobs page” on page 93 Handling recurring upload and publish jobs Recurring upload and publish jobs that you create on the Upload and Publish pages are listed on the Scheduled tab of the Jobs page. You can edit and delete recurring jobs on the Scheduled tab. Select the Jobs button on the Global Navigation bar and, on the Jobs page, select the Scheduled tab to edit and delete recurring jobs. Note: You can filter the job list on the Scheduled tab with the Job Type and Show menus. Choose a Job Type to narrow the list to publish jobs of a specific kind. Choose a Show option to display jobs you created or jobs created by everyone in your company. Editing, deleting, pausing, and resuming recurring jobs Select a recurring job on the Jobs page and follow these instructions to edit or delete it: Editing a recurring job Select the Edit button and enter schedule information in the Edit Scheduled Job dialog box. If you want the job to recur at an interval of your choice, choose Repeat > Custom. See “Creating a custom upload or publish job time interval” on page 95. Last updated 10/9/2014 95 USING SCENE7 Upload and publish assets Deleting a recurring job Select the Delete button. Pausing (and resuming) a recurring job In the Active column, deselect a check box to pause a job; select a check box to resume a job that was paused. Creating a custom upload or publish job time interval To create a custom time interval for an upload (via FTP) or a publish job, choose Repeat > Custom on the Upload or Publish page. Then enter numbers and wildcards in the Rule box to describe a time interval for the upload or publish jobs to recur. The syntax for describing custom upload and publish time intervals in the Rule box is: [seconds] [minutes] [hour of day] [day of month] [month] [day of week] For example, 0 15 10 * * ? schedules a job at 10:15.00 every day. The following tables and list explain how to describe a time interval in the Rule box. This table shows the time increments, their allowed values, and the wildcards they support: Time increments Values allowed Comments Wildcards supported Seconds 0–59 ,-*/ Minutes 0–59 ,-*/ Hours 0–23 Note the use of a 24-hour clock. Day of the month 1–31 You cannot specify a numeric value for both , - * / ? L C “day of the month” and “day of the week.” One of these fields must use a ? wildcard character. Month 1–12 or Jan, Feb, Mar, Apr, May, Jun, Jul, Aug, Sep, Sep, Oct, Nov, Dec Values are case sensitive. Day of the week Mon, Tue, Wed, Thu, Fri, Sat, Sun Values are case sensitive. You cannot specify , - * / ? L C # a numeric value for both “day of the month” and “day of the week.” One of these fields must use a ? wildcard character. Year (optional) Empty or 1970–2099 ,-*/ ,-*/ ,-*/ This table describes the wildcard characters that are allowed in the Rule box and how to use them: Wildcard character Name What it describes * Asterisk All values (for example, “every minute”). ? Question mark No specific value (for example, “any minute within the specified hour”). , Comma Additional values (for example, “Monday and Wednesday”). - Hyphen Range of values (for example, “Monday through Friday”). / Forward slash Increments (for example, “every 15 minutes”). Last updated 10/9/2014 96 USING SCENE7 Upload and publish assets Wildcard character Name What it describes L Capital L Last “day of the month” or “day of the week” (available for these fields only). For example, if the month is January, an L value for the “day of the month” field schedules the job for January 31. For the “day of the week” field, you can enter this character alone to schedule the job on Saturday. You can use it with a number (for example, 6L) to specify the last Friday of the month. Do not specify L with the comma or hyphen wildcards. # Number sign “Nth” weekday of the month (available for the “day of the week” field only). For example, 6#3 in the “day of the week” field specifies the third Friday of the month. The 6 denotes “Friday” (the sixth day of the week) and the 3 denotes the third occurrence in the month. C # Capital C First calendar “day of the month” or “day of the week” (available for these fields only). For example, specifying a value of 1C for “day of the month” schedules the first day in the calendar that occurs on or after the fifth. For the “day of the week” field, specifying 1C schedules the first day in the calendar that occurs on or after Sunday This list gives examples of describing time intervals in the Rule box: • 0 0 12 * * ?: Noon every day • 0 15 10 ? * *: 10:15 am every day • 0 0/5 14 * * ?: Every 5 minutes between 2:00 and 2:55 pm every day • 0 0/5 14,18 * * ?: Every 5 minutes between 2:00 and 2:55 pm every day and every 5 minutes between 6:00 and 6:55 pm every day • 0 10,44 14 ? 3: Wed at 2:10 pm and 2:44 pm every Wednesday in March • 0 15 10 ? *: Mon–Fri at 10:15 am every weekday • 0 15 10 20 * ?: At 10:15 am on the 20th day of every month • 0 15 10 L * ?: At 10:15 am on the last day of every month • 0 15 10 ? * 6L: At 10:15 am on the last Friday of every month • 0 15 10 * * 6#3: At 10:15 am on the third Friday of every month Using an upload or publish job as a trigger When you upload assets via FTP or run a publish job, you can schedule a subsequent job to begin as soon as the upload is complete. (If other jobs are scheduled to begin at that time, the job you schedule here is queued behind them.) The new job sends a notification to the address you specify so that code at that location can be triggered. This follow-on upload job is given the same name as the current upload job, but with the prefix _Pub. To make one upload or publish job trigger another job, select Advanced on the Upload or Publish page. Then enter the URL in the HTTP Notification text field. Last updated 10/9/2014 97 Chapter 6: Managing assets Scene7 offers the Asset Library for managing assets. The Asset Library holds the folders where you store your asset files. Selecting a folder in the Asset Library displays the contents of the folder in the Browse Panel. You can view items in the Browse Panel in Grid, List, or Detail view. When you want to focus on a single asset, double-click it in the Browse Panel to display it in Detail view. The Browse Panel offers tools for viewing, selecting, locating, previewing, moving, renaming, and deleting assets. Assets that you delete are placed in the Trash folder; you can recover assets from this folder. When you want to examine or work with an asset, open it in Detail view. You can record metadata in Detail view to make locating and working with an asset easier. Working with asset folders File assets in the Scene7 Publishing System are kept in folders. These folders are listed in alphabetical order in the Asset Library Panel. Before you upload files from your computer or network to Scene7 Publishing System, you are asked to name a folder for storing the files. Create these folders before uploading any files. Be sure to establish a folder structure and organization for storing your files on Scene7 Publishing System before you upload files. Displaying, moving, hiding, and opening folders The Asset Library displays files in a folder tree. When you select a folder in the Asset Library, its contents appear in the Browse Panel. Use these techniques to locate folders in the folder tree: Displaying subfolders Select the Expand Folder icon to display the subfolders in a folder. This icon is located to the left of folder names. Moving a folder You can move a folder by dragging it and dropping it in its new location, or by selecting File >Move Folder. Hiding folders Select the Collapse Folder icon to collapse subfolders. This icon is located to the left of folder names. Opening a folder Select a folder to display its contents in the Browse Panel. You can hide or display the Asset Library by clicking the Expand/Collapse control on its left side. Collapse the Asset Library panel when you need more room to work in the Browse Panel. Creating folders Follow these steps to create a folder: 1 In the Asset Library, select the folder you want to create a folder in. 2 Select the Add Folder button . This icon is located at the top of the folder list. 3 Enter a descriptive name for your new folder or subfolder by typing it into the field next to the folder icon. Last updated 10/9/2014 98 USING SCENE7 Managing assets You can also create folders in Scene7 Publishing System when you upload files via FTP. Selecting the Include Subfolders option when you upload via FTP replicates the folder structure on your computer in the system. Files and subfolders on your computer or network are replicated in the Asset Library, and the assets you upload are placed in these folders. Deleting and renaming folders Select a folder and use these techniques to delete or rename it: Deleting Select the Remove Folder button . Assets in a deleted folder are placed in the Trash folder. You can recover them from there. Renaming Double-click the name and enter a new name. Important: You cannot copy folders or assets because doing so would create duplicate folders and assets on Scene7 Publishing System, and duplicates are not allowed on the system. Viewing assets in the Browse Panel You can change your view of assets in the Browse Panel by selecting a View button: Grid view Select the Grid View button to see assets in thumbnail form in a grid. In Grid view, you can drag the Thumbnail slider to change the size of the thumbnail images. List view Select the List View button to see assets in a list. The list tells you the name, type, creation date, and lastmodification date of each asset. Depending on the type of asset you are working with, you get other information as well. For example, you can see the dimensions and file size of an image. Detail view Select an asset, and then select the Detail View button to examine the asset in Detail view. You can also double-click an asset or select it and choose File > Details to see it in Detail view. If your administrator has specified the Show URL preference, URLs appear for all assets in Detail view; however, the URLs are only active once the asset has been published. You can select a default view for the Browse Panel and make the panel work to your specifications. See “Personal Setup” on page 15. Selecting assets in the Browse Panel Select an asset in the Browse Panel to work with it. Use these techniques to select assets: A single asset Click the asset (double-clicking opens the asset in Detail view). Several assets Ctrl+click (Windows) or Command+click (Macintosh) assets to select assets in different places on the Browse Panel. Shift+click (click one asset, and then Shift+click another) to select adjacent assets. All assets in the Browse Panel Choose Select > All. No assets Choose Select > None. Last updated 10/9/2014 99 USING SCENE7 Managing assets Searching assets To locate file assets in Scene7 Publishing System, you can view assets by type, sort assets in the Browse Panel, conduct a simple search, conduct an advanced search, and filter for assets. The Personal Setup screen offers options for choosing how you want to conduct searches. For example, you can choose a default search type and choose whether to include user-defined fields in searches. For more information, see “Personal Setup” on page 15. More Help topics “Navigation basics” on page 10 Viewing assets by type To see only files of a certain type as you browse, open the Show drop-down menu in the Asset Library, and then choose a file type. Only assets of the type you chose appear in the Asset Library. Sorting files in the Browse Panel To sort the contents of a folder or search results in the Browse Panel, select the Sort menu and choose an option. The options are Name, Size, Type, Date Created, and Last Modified. You can choose Ascending or Descending to sort assets in ascending or descending order by the criteria you choose. In List View, you can sort by clicking a column name. Conducting a simple search Use the Search field to conduct simple searches. You can search for items by name or search for items whose metadata contains a keyword. To conduct a simple search: 1 Select the folder in the Asset Library to search in a particular folder and its subfolders 2 Click in the Asset Library and choose an option that describes how narrow or broad you want the search to be. You can choose Within All Files & Folders, Within Selected Folder, or Within Selected Folder & Subfolders. 3 Enter a search term. 4 Click Go or press Enter. The results of your search appear in the Browse Panel. Scene7 tracks searches. To run a search a second time, select the Search button and choose the name of a search at the bottom of the Search menu. Conducting an advanced search Click Advanced Search in the Asset Library to search using many criteria, including values in metadata fields. Specify any of the following criteria in your search: Filter By Asset Type Narrow your search to one asset type only by choosing an asset type on the menu. Files and Folders Choose where you want to search: Within All Files & Folders, Within Selected Folder, or Within Selected Folder & Subfolders. Last updated 10/9/2014 100 USING SCENE7 Managing assets All Publish States Search for files that are marked ready for publish, are not marked ready for publish, or all files. Conditions If you specify metadata criteria for searching, select whether the search must match all conditions (an ALL search) or any condition (an OR search). Specify Metadata Search Criteria Create one or more search fields for searching metadata. To create search fields: 1 Open the Metadata View list (to the left of the Add a Field menu) and choose a Metadata View. You can choose compact View, IPTC, XMP, or a view your administrator set up. 2 Select the Add a Field menu and choose a field name on the drop-down list. 3 Choose a Contains option (Contains, Does Not Contain, Begins With, Ends With, or Equals). 4 For numeric fields, choose a value or enter a custom date range. 5 (Optional) Repeat steps 1–4 to create more search fields. You can click the Remove Search Field button to remove a search field. Click Search to begin your search. The results of the search appear in the Browse Panel. You can change any search condition and click Search to run the search again. Click Clear to clear search criteria and start a new search. Click Close when you finish searching to close the Search panel. More Help topics “Viewing, adding, and exporting metadata” on page 108 Filter assets using metadata Filter assets in the Filters tab of the Asset Library. To filter assets, you use metadata values as the criteria. After you choose a metadata field you want to use for filtering, the Filters tab lists all metadata values that were entered in the field you chose and the number of assets that were assigned each value. For example, in a filter operation on the Creator metadata field, the Filters tab lists all names that were entered in the Creator metadata field for different assets, and for each name, the number of assets assigned the name. You then click a metadata value to see all assets that were assigned that value. In the example, you click the Jimmy metadata value to see all assets in which the name Jimmy was entered in the Creator metadata field. You can filter using more than one metadata field as a filtering criterion. You can save filter operations in order to run them many times. Note: Only metadata fields in the default Metadata View can be used for filter operations. The Metadata Views screen shows the name of the default Metadata View. See “Metadata Views” on page 48. More Help topics “Viewing, adding, and exporting metadata” on page 108 Last updated 10/9/2014 101 USING SCENE7 Managing assets Running a filter operation Follow these steps to locate assets by filtering with their metadata values: 1 Click the Filters tab in the Asset Library. The criteria of your previous filter operation appear in the Filters pane. The Filters pane is divided into panels, with each panel representing a metadata field. Use the panels to choose which metadata fields to filter with, and within each field, to choose a metadata value for the filter operation. To run a filter operation you created and saved, click the Select Preset button and choose the operation’s name on the menu. See “Saving, repeating, and deleting filter operations” on page 101. 2 Clicking the Field button on a panel, follow these instructions to display the filtering menu and construct the filter operation: Choosing a metadata field Select the name of the field on the filtering menu. Note: Only the names of metadata fields in the default Metadata View appear on the filtering menu. See “Metadata Views” on page 48. Adding a metadata field Choose Add a Panel. After the panel appears on the Filters pane, click its Field button and choose the name of a metadata field on the filtering menu. Removing a metadata field Choose Remove This Panel on the filtering menu. When you choose a metadata field, its panel lists: • All metadata values entered in the field. • For each metadata value, the number of assets given the value. 3 Repeat Step 2 as many times as necessary to list all metadata fields for the filter operation on panels. 4 In each panel, select a metadata value to filter on. You can’t select more than one metadata value in each panel. Assets that match all the values you selected appear in the Browse panel. To temporarily remove a field from the filter operation, click Deselect All. This option is located at the top of each panel, above metadata values. 5 (Optional) To save the filter operation and be able to run it later, click the Select Preset button, choose Save Current As New Presets, and enter a name in the Save dialog box. Saving, repeating, and deleting filter operations Follow these instructions on the Filters tab to save, repeat, and delete filter operations: Saving a filter operation Click the Select Preset button, choose Save Current As New Presets, and enter a name in the Save dialog box. Repeating a filter operation Click the Select Preset button and choose the name of a filter operation on the menu. The menu lists filter operations that you saved. Deleting a filter operation from the Select Preset menu Run the filter operation. Then click the Select Preset button and choose Delete Preset on the menu. Using the metadata server The metadata server is a public API that you can use to search for assets by metadata via http requests. Last updated 10/9/2014 102 USING SCENE7 Managing assets To configure the metadata server, click Setup > Application Setup > Publish Setup >Metadata Server. The Metadata Server Publish screen opens. This screen lets you set the following options: Instant Publish Automatically pushes any metadata changes when they are made, including new assets, keyword changes, and so on. XMP Packet Publishes the XMP Packet. This packet is not used for searching, but provides the most up-to-date XMP/ Keywords Publishes your keywords to the metadata server for use in searches. Metadata Server Publish Fields Select the fields to include in the metadata. This enables you to determine how much information about your assets is available to the public. These fields are also displayed in Metadata Views, but can only be changed in the metadata server. Click Publish Now to start the job. A confirmation appears, telling you the job has started. Previewing an asset You can use Preview to see how a digital asset will look when viewed by a customer. The Preview uses the default viewer that is assigned to the asset. Default viewers are configured in Application Setup. See “Configuring Default Viewers” on page 47. If you are previewing a template asset with parameter layers, you can make changes to the parameters or change the image preset. Because your changes are made inline, you can view the results immediately from the same Preview window. See also Scene7 Viewer Library Examples. To preview an asset 1 In the Asset Library panel on the left side, navigate to the Asset folders that contains the asset you want to preview. 2 Do any one of the following: • Above the Assets window, on the right side of the toolbar, click Grid View. • Above the Assets window, on the right side of the toolbar, click List View. • Above the Assets window, on the right side of the toolbar, click Detail View. 3 Depending on the View you are using, do one of the following: • In the Asset window of the Grid View or List View, select a single asset, and then click Preview near the thumbnail image. • On the toolbar above the Assets window of the Grid View, List View, or Detail View, click Preview. Previewing an asset based on viewer platform type You can use Viewer List to preview how an asset appears on particular viewer platform type such as HTML5. Depending on the asset type and the associated viewer that you have selected to preview, not all platforms are available in Viewer List. You can also use Viewer List to copy a viewer’s URL or view and copy the viewer code for embedding in your web pages. For a given viewer platform, the Viewer List window lets you visually see what devices, such as tablets and Smartphones, thate viewer is available for use. Last updated 10/9/2014 103 USING SCENE7 Managing assets To preview an asset based on viewer platform type 1 In the Asset Library panel on the left side, navigate to the Asset folders that contains the asset you want to preview. 2 Do any one of the following: • Above the Assets window, on the right side of the toolbar, click Grid View. In the Asset window, select a single asset, and then below the thumbnail image, click Preview > Viewer List. • Above the Assets window, on the right side of the toolbar, click List View. In the Asset window, select a single asset, and then to the right of the thumbnail image, click Preview > Viewer List. • Above the Assets window, on the right side of the toolbar, click Detail View. On the same toolbar, click Preview > Viewer List. 3 (Optional) In the Viewer List window, click the column heading Name or Platform type to sort the column by ascending or descending order. 4 In the Viewer List window, under the Actions column of the table, click Preview to see how the asset appears for a selected viewer and platform type. Close the displayed preview to return to the Viewer List window. 5 (Optional) In the Viewer List window, in the URL Encoding for Copy URL Generation drop-down list at the bottom, select the URL encoding that you want applied to the asset’s URL when it is copied. 6 (Optional) Do any of the following: • In the Viewer List window, under the Actions column of the table, click Copy URL for a selected viewer and platform type. When you click Copy URL, its associated URL is automatically copied to the clipboard. • In the Viewer List window, under the Actions column of the table, click Embed Code. When you click Embed Code, the Embed Code window is opened where you can review the viewer code. Editing of the code is not permitted in the window. You can also copy the code to the clipboard so you can paste it in your web pages. Close the displayed preview to return to the Viewer List window. • In the upper-right corner of the Viewer List window, click Universal URL to copy the unpublished URL to the clipboard. See “About Universal Viewers” on page 42. 7 In the lower-right corner of the Viewer List window, click Close to return to the Assets screen. Previewing an image asset based on its Image Preset You can preview an image asset based on its Image Preset to find out what your image looks like when it is delivered dynamically to your web site or application at different sizes. An Image Preset is a collection of pre-defined settings that change the size, image quality, format, resolution, and other aspects of an image’s appearance when it is exported. See “Setting up Image Presets” on page 121. See “Creating and enabling Image Presets” on page 77. Last updated 10/9/2014 104 USING SCENE7 Managing assets To preview an image asset based on its Image Preset 1 In the Asset Library panel on the left side, navigate to the Asset folders that contains the image asset you want to preview. 2 Do any one of the following: • Above the Assets window, on the right side of the toolbar, click Grid View. In the Asset window, select a single image asset, and then below the thumbnail image, click Preview > Image Preset List. • Above the Assets window, on the right side of the toolbar, click List View. In the Asset window, select a single image asset, and then to the right of the thumbnail image, click Preview > Image Preset List. • Above the Assets window, on the right side of the toolbar, click Detail View. On the same toolbar, click Preview > Image Preset List. 3 In the Image Preset List window, in the table, select the name of a preset type whose image asset you want to preview inline in the right pane. 4 (Optional) In the Image Preset List window, in the URL Encoding for Copy URL Generation drop-down list at the bottom, select the URL encoding that you want applied to the image asset’s URL when it is copied. 5 (Optional) In the Image Preset List window, in the upper-right area of the preview pane, click Copy URL for the selected preset type. When you click Copy URL, its associated URL is automatically copied to the clipboard. 6 In the lower-right corner of the Image Preset List window, click Close to return to the Assets screen. Moving, renaming, and deleting assets You can move, rename, and delete assets from the Browse Panel. As well, you can delete many assets simultaneously with a text file. More Help topics “Selecting assets in the Browse Panel” on page 98 “Preparing your assets and folders for uploading” on page 79 “Restoring assets from the Trash folder” on page 116 Move assets You can move assets to different folders in the Browse Panel. ❖ Select the asset or assets in the Browse Panel, and do one of the following: • Display the folder you want to move the assets to in the Asset Library and drag the assets to the folder. • Choose File > Move, select a folder in the Move Assets window, and select Move. Rename assets To rename an asset: ❖ Select the asset in the Browse Panel, and do one of the following: • Select the name, type in a new name, and press Enter or click away from the name. Last updated 10/9/2014 105 USING SCENE7 Managing assets • Choose File > Rename. The name of the asset is highlighted. Enter a new name and press Enter. Be sure that you do not to enter the name of an existing Scene7 Publishing System asset. Delete assets You can delete selected assets in the Browse Panel as well as delete entire folders. Deleted assets and folders are moved to the Trash folder, where they remain for seven days before being permanently deleted. When you delete an asset, all assets derived from it are deleted as well. For example, deleting an image for which you created zoom targets deletes the zoom targets along with the image. Important: Zoom targets, image attributes, and history entries are permanently deleted when you delete the assets from which they derive. They are not moved along with the asset to the Trash folder; they cannot be restored from the Trash. ❖ Do any of the following: • To delete one or more assets, select the assets in the Browse Panel, and press Delete or choose File > Delete. • To delete a folder, select the folder in the Asset Library, and click Remove Folder . Deleting a folder deletes the folder, all the assets in the folder, as well as all assets in its subfolders. Important: Scene7 recommends overwriting asset files rather than deleting them if your reason for deleting an asset file is to replace it with another by the same name. Delete multiple assets with a text file To delete many assets at once throughout the Asset Library, you can list the assets you want to delete in a text file and submit the list to Scene7. Create the list of Scene7 Publishing System IDs and save it as a text (.txt) file. Each Scene7 Publishing System ID must be on its own line (followed by a hard return). After you create the list, follow these steps to use it to delete assets: 1 Choose File > Delete Asset List. 2 In the Delete Asset list dialog box, browse or type the path to the text file with the list of assets you want to delete. 3 Click the Delete button. When you delete assets with a text file, if any Scene7 Publishing System ID is not on the list, a message is displayed letting you know that Scene7 is “Unable to validate these entries in your list:” along with the list of entries. However, Scene7 will not generate an error on the Job screen. Working in Detail view You can work with and learn about an asset by opening it in Detail view. In Detail view, you see the asset size, attributes, derivatives, and metadata. You also see whether and when the asset was published and obtain the URL of published assets. Depending on the asset type, you can preview it at different sizes, zoom in on it, and perform sharpening, cropping, and other formatting operations. Last updated 10/9/2014 106 USING SCENE7 Managing assets An asset in Detail view. To open the folder where the asset is stored, you can click the folder path at the top of the Information panel. Open an asset in Detail view To closely examine, preview, or work on an asset, you can display it in Detail view. ❖ In the Browse Panel, do one of the following: • Double-click the asset. • Select the asset and then select the Detail View button . • Select the asset, and choose File > Details. You can page from asset to asset in the same folder in Detail view by selecting the Previous Asset or Next Asset button. These buttons are located in the upper-right corner in Detail view. Getting information in Detail view Detail view provides information about an asset or file. It shows this information about an item: the folder where it is stored, its filename, the date the item was uploaded to Scene7 Publishing System, and its publishing history. You can also view and edit metadata and add keywords for an asset in Detail view. You can obtain an asset URL in Detail view; however, the URL is not active until you publish the asset. For images, Detail view also provides a list of build and derived assets and metadata, such as zoom targets and Image Sets. More Help topics “Viewing, adding, and exporting metadata” on page 108 Last updated 10/9/2014 107 USING SCENE7 Managing assets Working with assets in Detail view Detail view offers tools for working with the asset you opened. Which tools are available depends on the type of asset you are working with, but Detail view always offers these functions: items for publish Click the Publish icon to the left of the name, or click File > Publish or File > Unpublish. Renaming the asset Select the name and enter a new name. Editing and adding metadata Select the Metadata panel and make changes as desired. See “Viewing, adding, and exporting metadata” on page 108. Editing and adding keywords Select Keywords and add or remove them as desired. See “Add or edit keywords” on page 109. Deleting the asset Click File > Delete. For discrete files—images, Image Sets, and fonts, for example—you can view the publishing and editing history, and check job details, in Detail view. This table shows which additional options are available with different types of assets in Detail view. Asset type Edit/adjust Preview Images Add Image Maps Yes; Zoom and Image Presets. Add zoom targets Crop Sharpen Create adjusted views Cabinet and window covering images No Thumbnail. eCatalogs Edit Yes. Info Panel also available. Flash source files No No. Fonts Edit font information No. FXG files Edit Yes. ICC profiles Edit profile information No. Illustrator Files No (unless converted to FXG) No. Image Sets Edit Yes. InDesign files No (unless converted to FXG) No. PDF files No No. PSD files Yes for individual layers Yes for individual layers. Spin sets Edit Yes. SVG files No No. Templates Edit Yes. Videos No Yes. Viewer SWF files No No. Last updated 10/9/2014 108 USING SCENE7 Managing assets Asset type Edit/adjust Preview Vignettes and rendered vignettes No Image is shown. You can view the contents and structure of the renderable elements of the vignette in XML format. XML files No Contents are shown. ZIP files No Contents are not shown. Viewing, adding, and exporting metadata You can store information specific to the files you work with in the Scene7 Publishing System; this information is called metadata. You can use metadata in Scene7 for organizing, searching, filtering, and sorting your assets. Metadata appears in Detail view along with Scene7-generated information, such as the file creation date, publishing date, and keywords. To view metadata, open the asset in Detail view and select the Metadata panel. You can enter and edit metadata in Detail view. Some metadata is embedded directly into a file. If a file contains this metadata, Scene7 automatically uploads it with the file. You can embed metadata into source assets in Adobe Photoshop, InDesign, Illustrator, and other applications; Scene7 recognizes this metadata. You can also add metadata to individual files in the Metadata panel in Detail view. To ensure consistency across assets, company administrators create Metadata templates that provide the metadata fields that can be filled in. For more information about embedded metadata, see www.adobe.com/go/learn_s7_xmp_en. More Help topics “Viewer Presets” on page 32 “Metadata Presets” on page 48 View metadata To view an asset’s metadata, open the asset in Detail view, and click the Metadata panel. Then choose an option on the Metadata View menu to select a set of metadata fields. Scene7 offers these Metadata Views: Compact View A basic list of values. IPTC Values as defined by the International Press Telecommunications Council. XMP Values as defined by the extensible metadata platform. Administrators can create Metadata Views. These views also appear on the Metadata Views menu. For information about creating Metadata Views, see “Metadata Views” on page 48. Manually enter metadata for an asset 1 Open the asset in Detail view. 2 Open the Metadata panel and do one or both of the following: • Choose a Metadata View to determine which metadata fields appear in the panel. • Choose a Preset Value and click Apply to populate metadata fields with preset values. Company administrators create these preset values. Last updated 10/9/2014 109 USING SCENE7 Managing assets 3 Enter values in the Metadata panel. To edit the metadata of several assets at once, select the assets and choose File > Edit Info. Edits you make to metadata in the Edit Info window apply to all the assets you selected. Add or edit keywords In addition to metadata, you can use keywords to assist in searching and managing your assets. If you’ve added keywords to other files during this session, or if you’ve removed keywords from your list, they appear in the Keyword Suggestions table. 1 Open the file in Detail View. 2 Click Keywords. 3 To add keywords, do any of the following: • Type a keyword in the text box and click Add. • Click a keyword in the Keyword Suggestions table. 4 To remove a keyword, select it and click Remove. It moves to the Keyword Suggestions table. Note: You can add keywords to files as you upload them to Scene7. In the Upload Job Options dialog box, choose Additional Metadata and enter keywords. See “Upload options” on page 84. Import metadata Rather than manually enter metadata one asset at a time, you can import metadata for many different assets from a tab-delimited or XML file. Entering the metadata in a tab-delimited or XML file and importing the file is less timeconsuming than entering metadata in individual assets. In the first row of the tab-delimited file, enter the ID and the names of fields for which you want to record metadata. In each subsequent row, enter an asset ID name followed by metadata values. Fields that are not included in the tab-delimited or XML file are not modified. To import metadata from an XML file, make sure that you conform to the DTD. Note: You can create a template for entering metadata so that it can be properly imported to Scene7 Publishing System. After you create the template, you can use it to enter the metadata. See “Create a template for entering metadata to upload” on page 111. You can find more information about standardized properties at: http://www.adobe.com/devnet/xmp.html 1 In the Browse Panel, select the images to which you want to add metadata from the tab-delimited or XML file. 2 Click File > Import Metadata. 3 In the Upload Metadata dialog box, click Browse. 4 In the Select files to upload dialog box, select the tab-delimited or XML file with the metadata. 5 Enter a job name. 6 Click Upload. Identifying different metadata types in the import Keep the following in mind when identifying different metadata types to import: • User Defined Fields are identified by their name as created in Setup > Application Setup > Metadata > User-Defined fields. Use the Generate file functionality to get a list of all defined UDFs in the correct import format. Last updated 10/9/2014 110 USING SCENE7 Managing assets • XMP Metadata properties must have the related XMP-prefix before the (property-) name. A colon separates the prefix and name. The XMP prefix can be found in Setup > Application Setup > Metadata > Metadata Schema editor. The technical names can be found in documentation of related XMP schema. Note that XMP properties names do not appear in the Generate file feature. • Metadata Schema properties must have the related prefix before the (property-) name. A colon separates the prefix and name. The prefix and the property names are defined in the Metadata Schema editor. Note that Metadata Schema properties names do not appear in the Generate file feature. For example: The XMP property for keywords is the XMP schema "Dublin Core" with the prefix "dc" and “subject” is the technical XMP name. The prefix and technical XMP name are combined into the "dc:subject" full property name. In the XML metadata import format, "dc.subject" must be the property name. In the tab-delimited import format it must be the column-header. Import Keywords Keywords can be imported as comma separated list. If a comma appears in any of the individual values, it needs to be escaped by a backslash (\). A literal backslash is the usual double-backslash (\\). For example, a metadata import file containing the value "Hello\, World!,back\\slash,foo" for "dc:subject" sets three XMP keywords on the asset: "Hello, World!," "back\slash," and "foo." Import XMP and Metadata Schema metadata XMP files The XML import accepts only valid XML. When importing XMP or Metadata Schema fields the namespace prefix is added and behaves here like a XMP-namespace. This namespace must be declare e.g. in the top-level tag. For example: <ips xmlns:dc="http://purl.org/dc/elements/1.1/"> <ghw_object vc_objectname="img_001" dc:subject="word1,word2" </ips> Import XMP and Metadata Schema metadata Tab Delimited files The prefix must be added to the related column header of the import field. Import metadata (via FTP) You can import metadata for multiple files by entering the metadata in a tab-delimited or XML file and selecting the Process metadata files option on the Upload (Via FTP) screen. Make sure the data in the tab-delimited or XML file is in the correct format. In the first row, enter the ID field followed by the names of metadata fields to be modified. In each subsequent row, enter an asset ID name followed by metadata values. Fields that are not included in the tab-delimited or XML file are not modified. Click the Upload button on the Global Navigation Bar, and on the Jobs screen, select the Via FTP tab to import the metadata. Then click Job Options. In the Upload Job Options dialog box, Choose Process metadata files. Batch rename IDs using metadata Using metadata imported from a tab-delimited file or XML file, you can rename Scene7 Publishing System IDs. The imported metadata is applied only to the images specified in the metadata file itself. It doesn't matter whether images are selected on the Browse Panel. To rename an image’s Scene7 Publishing System ID, add a column labeled newipsid to the tab-delimited file, or add a field called new_vc_objectname to the XML data. Last updated 10/9/2014 111 USING SCENE7 Managing assets For example: ipsid newipsid testjacket_1 Jacket_test_1 testjacket_blue Jacket_test_2 The job log for the Metadata job will show which IDs were successfully renamed and which ones were not. Create a template for entering metadata to upload Scene7 offers a command for creating a template for recording metadata. Using the template ensures that the metadata is entered in the right format so it can be uploaded correctly to Scene7 Publishing System. Follow these steps to create a template for use in recording and importing metadata to Scene7 Publishing System: 1 Select image assets with metadata fields you want for your template. 2 Choose File > Import Metadata. 3 Select Image for the Asset Properties Type. 4 From the Generate File menu, select Tab Delimited Template, Asset's XML Metadata, or XML DTD. 5 Click Generate. 6 In the dialog box that appears, copy the data. Use this data to construct the template. More Help topics “Import metadata” on page 109 Working with Metadata Schemas A company administrator can view a list of all available schemas. Open Application Setup -> Metadata -> Metadata Schema. Initially, the list of global standard schemas like XMP are hidden. They can be shown using the checkbox at the bottom of the list. The company administrator can create a new custom schema, or edit an existing custom schema. You can use the Metadata Schema Editor to perform the following actions: Action Description Add Adds a new property to the schema. A modal dialog collects the information: ID, Label, Structure and Data Type. Add Choice Value Adds a new selectable choice to a property with structure Open Choice or Closed Choice. All choice values have the same type. You must select the property itself to enable the button. Last updated 10/9/2014 112 USING SCENE7 Managing assets Action Description Edit Edit the Label of a property or choice value. You can only change the Label, ID, and type information is immutable. Move Up / Move Down The order in the schema is reflected in the UI. To change the order, select a property or choice value and move it with the buttons. Drag & drop is not supported at this time. Delete Deletes a property or choice value from the schema. This does not delete values from the XMP block or the Database. The property is no longer available for Metadata Views and is removed from the Asset Detail View.If the property was published to the Metadata Server, perform a force publish to remove the data from the public-facing Metadata Server. The system automatically generates a custom schema for User-defined fields with the prefix "s7udf". These are the existing User-defined Fields and are edited in their own Setup section. Note: Changes to the schema never change the asset metadata itself. However, they are not visible for all SPS and Metadata Server functionality and can't be accessed after being changed. Likewise, if metadata for an asset exists, the creation of the matching schema makes the metadata usable in SPS and the Metadata Server. The Metadata Schema Editor offers a graphical way to add or edit a custom company schema inside SPS. A schema is defined by a prefix, a namespace, and a list of properties. • Name UI-Name for the schema. Used to identify the properties in Metadata Views and Advanced Search. Similar to XMP Sections like Basic, IPTC, PDF. • Prefix Technical unique identifier for the schema. Restricted to the letters a-z and A-Z. The prefix is not visible in the SPS UI, but used, when metadata for an asset is stored in the XMP block and our database. The prefix is used, to uniquely identify metadata fields in metadata search queries on the Metadata Server or import. • Namespace Technical unique identifier for the schema, typically a URL in the form http://your.company.com/name/version/. See the list of standard schemas for examples. The namespace is not visible in the SPS UI, but is used to store metadata in the XMP block. • Description Free form description of the schema. Note: The prefix and namespace cannot be edited. To change these properties, you must delete and re-create the schema. Properties describe the metadata that can be stored with this schema in the XMP block. A property consists of: Last updated 10/9/2014 113 USING SCENE7 Managing assets Property Description ID Technical identifier for this property. The ID is not visible in SPS UI, but used, when metadata for an asset is stored in the XMP block and our database. The ID is used, to create search queries on the Metadata Server. The ID has some restrictions such as: • No spaces • No ".", ":", "$" • No number as first character • Best practice is to use a-z or A-Z as first character Once created, the ID cannot be changed. Label UI-Name for this property. Structure Determines the type of the property together with Data Type. Structure can be one of: Data Type • Simple Type: single value of data type • Sequence: a list of values of the same data type • Open Choice: select one item from a list of predefined values, or enter free text. Can be only of data type String or Integer • Closed Choice: select one item from a list of predefined values (a popup or combo-box) Select from these available types: • String • Integer • Float • Yes/No (Boolean) • Date When the property has the structure Open Choice or Closed Choice, you must provide at least one Choice Value. Open Choice can be changed. Closed Choice cannot be changed. All Choice Values have the data type of the property. Property Description ID Technical identifier for this value. The ID is not visible in the SPS UI, but is used when metadata for an asset is stored in the XMP block and the database. The ID is used in search queries on the Metadata Server. The ID cannot contain any spaces. Once created, the ID cannot be changed. Label UI-Name for this value. Exporting assets from Scene7 Publishing System You can save assets you edited in Scene7 Publishing System to a local network drive. Exported assets are bundled in a ZIP file for downloading or sending by e-mail. Last updated 10/9/2014 114 USING SCENE7 Managing assets The compressed Zip file has a maximum file size of 1 GB for the export job. Also, be aware that you are allowed a maximum of 500 total assets per export job. Scene7 keeps a record of export jobs in the Jobs screen. To export assets from Scene7 Publishing System 1 Select the assets you want to export, and then click File > Export. 2 In the Export Selected Assets window, click Image Options, and then specify any of the following options (administrators determine which options are available to their users): Presets Optionally, choose an Image Preset to format the asset when you export it. If you choose an Image Preset, the other formatting options are not available, as the asset adopts the formats defined by the Image Preset. Conversion Convert the asset file or the original image. Size You can select a standard size. Or, you can click Other from the Size drop-down list, choose the desired unit of measure, and then specify the width and height. See also “Specifying export options available to Media Portal users” on page 76. Format Choose an image format. Color Choose RGB, CMYK, or Gray. Resolution Choose 72, 150, or 300 ppi. Job Name You can assign a job name to the export. Send Email To Optionally, enter an e-mail address to send the assets by e-mail. The e-mail message lists the URL where the recipient can go to download the assets. 3 Click Export. Three basic export actions are supported: • Original File (export the original file for the asset) • Convert Using Preset (use an image preset to format the asset) • Convert Without Preset (use the export dialog to specify image modifiers) The following asset types cannot be exported. All others should generate an export. • Image Sets • Render Sets • Spin Sets • Media Sets • Multi-bitrate Sets • eCatalogs In addition, templates cannot be exported as an “original file.” You can use conversion to export the following asset types: • Images • Templates • Adjusted Images • PDF (will generate converted pages) Last updated 10/9/2014 115 USING SCENE7 Managing assets • Postscript The following behavior results when a large selection of various asset types are fed into the exporter: • All asset types which cannot be exported are removed from the list before job submittal • If a conversion is requested, all types which can be converted are, and all others are exported as original Sharing asset changes with peers in real time With multiple copies of Scene7 running on one or more computers in the same company, the following actions from any Scene7 client are updated in real-time with all peer clients: • Edit an asset (builder, image editor, etc.) • Rename an asset • Delete an asset • Move an asset • Upload one or more assets (both desktop and FTP) • Create, delete, or rename a folder After a change is made in the originating client, all peer clients logged into the same company are updated with the change. Changes are made to peers without notification, unless the peer is editing a changing asset in any of the image editors or builders. When you log in, Flash Player prompts you to allow or deny peer updates. You can "remember" the choice so you are only prompted once. To clear your choice, delete the appropriate site from the Peer Assisted Networking panel in Global Settings. If you are editing an asset that is changed by a peer, you are prompted to ingest the change into the builder or editor. If you choose Yes, then the builder or editor discards any changes made to the asset and imports the updated asset. If you choose No, the asset is unchanged in the builder or editor and any changes you’ve made persist in that session. When you save the asset, you are notified that a newer version exists and asked if you want to overwrite the asset with your changes. Printing assets Follow these steps to print an asset: 1 In the Browse Panel, select the asset or assets you want to print. 2 Choose File > Print or press Ctrl+P (Windows) or Command+P (Macintosh). 3 In the Print dialog box, choose how many copies to print and then select the Print button. Last updated 10/9/2014 116 USING SCENE7 Managing assets Managing the Trash folder Items that you delete from the Scene7 Publishing System are moved to the Trash folder. They remain for seven days in this folder until they are restored or permanently deleted. You can examine deleted items by selecting the Trash icon located at the bottom of the Asset Library and viewing items in the Trash folder. All users can restore items in the Trash folder to the folders from which they were deleted. All users can also empty the Trash folder of all its contents. Deleting items from the Trash folder permanently deletes items from Scene7 Publishing System; items deleted from the Trash folder can no longer be restored. For information on setting up notifications for company administrators when assets are about to be automatically deleted from the Trash, see “General Settings” on page 20. Important: Assets that have been moved to the Trash folder are still registered on the Scene7 Publishing System. If you try to upload a file that has the same name as a deleted file in the Trash folder, Scene7 treats the asset you want to upload as a duplicate asset. As such, a number is appended to its name. More Help topics “Delete assets” on page 105 About the Trash folder Deleting an item in a folder places the item in the Trash folder. The following happens when you delete an item and move it to the Trash folder: • Although the item has been removed from your Scene7 Publishing System folders, its ID cannot be assigned to another asset while it remains in the Trash folder. If you try to upload an asset with the same name as a file in the Trash folder, Scene7 appends a numeral to the name of the asset. • The item cannot be published. Even if the item was marked for publish when you deleted it, it is not published. • The item remains in the Trash folder until it is restored, seven days pass, or someone chooses the Empty The Trash command. After seven days, an automatic clean-up operation permanently deletes the item. Restoring assets from the Trash folder It isn’t necessary for the person who deleted an asset to restore it; anyone can restore assets from the Trash folder. Assets that are restored are placed in the folders from which they were deleted. If these folders no longer exist, the Scene7 Publishing System re-creates them, and the restored assets are placed in the re-created folders. Follow these steps to restore assets from the Trash folder to the folders from which they were deleted: 1 Select the Trash icon to open the Trash folder. 2 Select the asset or assets you want to restore. 3 Choose File > Restore From Trash. Permanently deleting assets in the Trash folder When you delete assets in the Trash folder, the assets are permanently deleted. Assets are automatically deleted from the Trash folder after seven days. Last updated 10/9/2014 117 USING SCENE7 Managing assets To permanently delete assets from the Trash folder, select the Trash icon individual assets or delete all the assets in the folder: , to open the Trash folder. Then delete Deleting individual assets Select the assets you want to permanently delete and choose File > Empty From Trash. Deleting all assets Choose File > Empty Trash. Organizing your work with Projects Projects provide an optional, secondary way for you to organize assets independently of the folders in which they are stored. An asset can be placed in only one folder, but it can be copied into more than one Project folder for organizational purposes. After you create a Project folder, you can place assets in it. However, assets in a Project are actually pointers to the Asset Library folder in which the assets are actually stored. You can place an asset in more than one Project. For example, an image of a blouse can be placed in both the “Blouses” and “Fall Collection” Project folders. You can create a Project when you upload files or create Projects in the Asset Library Panel. Scene7 recommends organizing assets with metadata rather than Projects. See “Viewing, adding, and exporting metadata” on page 108. Note: For you to organize assets in Projects, your administrator must have set you up to use them. If you don’t see a Projects folder section at the bottom of the Assets Library, this method of organizing assets is not available to you. See “General Settings” on page 20. Creating a Project folder You can create a Project folder starting in the Assets Library or when you upload files to the Scene7 Publishing System: In the Asset Library Scroll to the bottom of the Asset Library, to the Projects section, and select the Add Project button . Then enter a name for the project. When uploading files In the Upload screen, select the Add to Project menu and choose Create Project. Then enter a name for the project. Note: The Projects area in the Asset Library is a single level folder list; it doesn’t permit subfolders. Working with Project folders Follow these instructions to display, delete, and rename a Project folder: Browsing contents Select the name of the folder in the Asset Library. Its assets appear in the Browse Panel. Deleting Project folders Select the Project folder and then select the Remove Project button . Deleting assets from a Project folder does not delete them from Scene7 Publishing System; the assets remain in the original folders in which they are stored. Renaming Project folders Double-click the name of the folder in the Asset Panel, and then enter a new name. Last updated 10/9/2014 118 USING SCENE7 Managing assets Adding assets to a Project folder You can add images to a Project folder starting in the Browse Panel or when you upload files to the Scene7 Publishing System: From the Browse Panel Select the assets and drag them to a Project folder. You can also choose File > Add To Project, select a Project folder name in the Select Project dialog box, and select the Submit button. When uploading files In the Upload screen, click the Job Options button. In the Upload Job Options dialog box, choose Projects, and select a project name. Last updated 10/9/2014 119 Chapter 7: Image Sizing Image Sizing refers to the ability of Scene7 to create multiple derivative images based on a single high-resolution image. Rather than manually creating several images—for example, a thumbnail and enlarged-view image—for your web site or application, you provide a single master image. Scene7 generates all modified images just as you request them. Being able to deliver images dynamically from a single master image has many advantages: • You do not have to manually create several copies of the image at different sizes. You supply one master image to Scene7, and Scene7 generates different-sized derivatives from the master image. • You can quickly change the size of an image type throughout your web site or application. For example, to change all thumbnail images, you can modify the “thumbnail” Image Preset. An Image Preset—it’s similar to a macro—is a collection of size and formatting attributes. You can modify the “thumbnail” Image Preset to change the size of all thumbnail images throughout your web site or application. • You do not have to manage the masters and all of the various derivatives in any of your content or asset management systems internally or externally. 2000 pixels 2000 pixels Single master image (Recommend 1500-2500 pixels in longest dimension) 1. 2. 3. 4. Dynamically sized images (using Image Presets) Upload single master image file Create Image Presets (to define size, format, sharpening & other settings) Publish Copy URLs and use on Websites to display different sizes dynamically You can create multiple derivative images at different sizes from the same high-resolution master file. Quick Start: Image Sizing This Image Sizing Quick Start is designed to help you get up and running quickly with Image Sizing techniques in the Scene7 Publishing System. Follow steps 1 through 5. After each step is a cross-reference where you can find more information if you need it. Last updated 10/9/2014 120 USING SCENE7 Image Sizing 1. Uploading master images Start by uploading your master images to the Scene7 Publishing System. As to size, Scene7 recommends using images that are the largest size you anticipate using on your web site or application. For example, if you want viewers to zoom images, upload images that are at least 2000 pixels in the largest dimension. Scene7 supports many image file formats, but lossless TIFF and PNG images are recommended. Select the Upload button on the Global Navigation bar to upload files from your computer to a folder on the Scene7 Publishing System. See “Uploading master images” on page 121. 2. Setting up Image Presets Like a macro, an Image Preset is a collection of predefined size and formatting commands saved under a name. An Image Preset governs the size and formatting with which images are delivered from Scene7 Image Servers. You can set up Image Presets on your own if you have company administrator status. Scene7 also comes with default Image Presets, and you can use them to dynamically deliver images. To create an Image Preset (if you are an administrator), choose Setup > Application Setup. On the Setup screen, display the Application Setup options and choose Image Presets. Then select the Add or Edit button to create an Image Preset. The Image Preset you create is added to the Image Preset menu on the Preview screen. You can use your new Image Preset to display images dynamically on your web sites and applications. See “Setting up Image Presets” on page 121. 3. Previewing Image Presets The next step is to preview the Image Presets your administrator set up at the different preset sizes. To explore Image Presets, click Setup > Image Presets, and then browse to an Image Preset. Experiment with the different Image Presets. Find out what your image looks like when it is delivered dynamically to your web site or application at different sizes. See “Previewing an image asset based on its Image Preset” on page 103. 4. Publishing your master images Publishing your master image files serves two essential purposes: • Publishing your master images to Scene7 Image Servers so that images can be dynamically delivered to your web site and application. • Publishing activates the URL strings for calling images from Scene7 Image Servers to your web site or application. After publishing, you can copy and place the Scene7-generated URLs where necessary in your web site or application. Select the Publish button on the Global Navigation bar to initiate a publish. On the Publish screen, select the Start Publish button. See “Publishing master images” on page 123. 5. Linking URLs to your web application Scene7 creates URL callout strings for images. When you publish images to Scene7 Image Servers, the URLs become active. You can copy these URL strings from the Browse Panel (in Detail view) or Preview screen. After you copy the URL strings, you can use them in your web site and applications. The URL for image sizing replaces the reference to a static image name in your web page code. The URL references a master image name, which is replaced by your database for each new image to display. URL strings generated with Image Presets contain the name of an Image Preset. This name is enclosed in dollar signs ($). For example, $thumbnail$ can be the Image Preset designed to show master images at thumbnail size. See “Linking URLs to your web application” on page 123. Last updated 10/9/2014 121 USING SCENE7 Image Sizing Uploading master images Before uploading images to the Scene7 Publishing System, make sure they are the highest quality size and format. Scene7 recommends uploading high-quality images with a sufficient pixel count (from 1500 to 2000 pixels in the long dimension). This allows for any dynamic imaging that is required. For details on uploading images, see “Uploading files” on page 79. Preparing your master images for upload Prepare your master image files before you upload them to the Scene7 Publishing System: Image size Create the largest size images you anticipate using. Typical image sizes range from 1500 to 2500 pixels in the longest dimension. If you intend to use the Zoom feature, Scene7 recommends using images that are at least 2000 pixels in the longest dimension for optimal zoom detail. File formats Scene7 supports all standard image file formats, including TIFF, BMP, JPEG, PSD, GIF, and EPS. Lossless image formats—TIFF and PNG—are recommended. If you are using a JPEG image, use the highest quality settings. Color space RGB is the color space for web image presentations; CMYK images commonly used for printing are automatically converted to RGB when you upload them. Uploading CMYK images that have an embedded ICC color profile for the conversion to RGB is recommended. See also “ICC profiles” on page 315. Setting up Image Presets Like a macro, an Image Preset is a predefined collection of sizing and formatting commands saved under a name. To understand how Image Presets work, suppose your web site requires each product image to appear at two different sizes: 500 x 500 pixels and 150 x 150 pixels. You create two Image Presets, one called “Enlarge” to display images at 500x500 pixels and one called “Thumbnail” to display images at 150 x 150 pixels. To deliver images at the “Enlarge” and “Thumbnail” size, a Scene7 Image Server looks up the definition of the Enlarge Image Preset and Thumbnail Image Preset. Then the server dynamically generates an image at the size and formatting specifications of each Image Preset. Scene7 comes with several “best practice” Image Presets that are already set up for you to use. Administrators can create new Image Presets as well. To create an Image Preset, you can start from scratch or you can start from an existing one and save it under a new name. Images that are reduced in size when they are delivered dynamically from a server can lose sharpness and detail. For this reason, each Image Preset contains formatting controls for optimizing an image when it is delivered at a particular size. These controls make sure that your images are sharp and clear when they are delivered to your web site or application. Creating an Image Preset You can create your own Image Presets if you are a company administrator. You can create new Image Presets or start with a default Image Preset that Scene7 provides, edit it, and save it with a new name. To create an Image Preset 1 Click Setup > Image Presets. You can browse to an Image Preset name on this screen to preview an existing Image Preset. When you select an Image Preset name, the sample image in the Preview window changes size and appearance. Last updated 10/9/2014 122 USING SCENE7 Image Sizing 2 Do one of the following: Creating an Image Preset Click Add. Editing an Image Preset Browse to the Image Preset that is most like the one you want to create and then click Edit. 3 Enter a name for the Image Preset. 4 Enter Width and Height measurements in pixels. These measurements determine the size at which images are delivered. 5 Fill in the Add Preset or Edit Preset screen. For details, see “Image Preset options” on page 24. Scene7 recommends these “best practice” option choices to start: Format Choose JPEG or another format that meets your requirements. All web browsers support the JPEG image format; it offers a good balance between small files sizes and image quality. However, JPEG format images use a lossy compression scheme that can introduce unwanted image artifacts if the compression setting is too low. For that reason, Scene7 recommends setting the compression quality (on the slider) to 75. This setting offers a good balance between image quality and small file size. Sharpening Do not select Sharpening (this sharpening filter offers less control than Unsharp Masking settings). Resample Mode Choose Bi-Cubic. Unsharp Masking (USM) options Enter the settings shown here: Preset type Size USM: Amount USM: Radius USM: Threshold Cross-Sell (mini-thumbnail) 75 x 75 1.5 0.8 5 Thumbnail 150 x 150 1.1 1 5 Main 350 x 350 1 1 6 Enlarge 500 x 500 1.2 1.2 5 6 Click Save. The Scene7 “best practice” options for creating Image Presets listed here are general recommendations; sharpening is highly subjective. These “best practice” settings were based on a 2000 x 2000 master image; settings for larger or smaller masters can be different. If you want to adjust the Unsharp Masking settings, Scene7 recommends these ranges: Amount Between .8 and 1.5. Radius Between .6 and 2. Threshold From 1-6. To delete an Image Preset, select it on the Image Presets screen and select the Delete button. More Help topics “Creating and editing Image Presets” on page 23 “Image Preset options” on page 24 “Previewing an image asset based on its Image Preset” on page 103 Last updated 10/9/2014 123 USING SCENE7 Image Sizing Publishing master images Publishing your image files publishes them to Scene7 Image Servers, where they are available to your web site and application. What’s more, during the publishing process, the Scene7 Publishing System activates the URL strings you need for your web site and application. More Help topics “Publishing files” on page 87 Marking master images for publish Master images must be marked for publish in order for them to be copied to Scene7 Image Servers. You can mark your master images for publish in the Browse Panel by selecting the Mark for Publish icon . You can also mark images for publish when you upload them to the Scene7 Publishing System. Publishing your master images To publish master images to Scene7 Image Servers, start by selecting the Publish button on the Global Navigation bar. Then select a When option (One-Time or Recurring), optionally enter a name for the publish job, and select the Start Publish button. Important: The URL is not active until you publish the asset. Linking URLs to your web application Your web sites and applications access Scene7 Image Server content via URL strings. After you publish an image, Scene7 activates a URL string that references the Image Preset on Scene7 Image Servers. You can paste these URLs into a web browser for testing. To place these URL strings in your web pages and applications, copy them from the Scene7 Publishing System. To obtain a URL string generated with an Image Preset, go to the Preview screen or the Browse Panel (in Detail view). Obtaining an Image Preset URL You can obtain a URL string generated by an Image Preset from Preview or from Detail View. After you copy the URL, it lands on the Clipboard so you can paste it as necessary. Important: The URL is not active until you publish the asset. Obtaining an Image Preset URL from Preview 1 In the Asset Library panel on the left side, navigate to the Asset folders that contains the image asset you want to preview. 2 Do any one of the following: • Above the Assets window, on the right side of the toolbar, click Grid View. In the Asset window, select a single image asset, and then below the thumbnail image, click Preview > Image Preset List. • Above the Assets window, on the right side of the toolbar, click List View. In the Asset window, select a single image asset, and then to the right of the thumbnail image, click Preview > Image Preset List. Last updated 10/9/2014 124 USING SCENE7 Image Sizing • Above the Assets window, on the right side of the toolbar, click Detail View. On the same toolbar, click Preview > Image Preset List. 3 (Optional) In the Image Preset List window, in the URL Encoding for Copy URL Generation drop-down list at the bottom, select the URL encoding that you want applied to the image asset’s URL when it is copied. 4 In the Image Preset List window, in the upper-right area of the preview pane, click Copy URL for the selected preset type. 5 In the lower-right corner of the Image Preset List window, click Close to return to the Assets screen. Obtaining an Image Preset URL from the Browse Panel 1 In the Asset Library panel on the left side, navigate to the Asset folders that contains the image asset you want to preview. 2 Above the Assets window, on the right side of the toolbar, click Grid View. In the Asset window, select a single image asset. 3 Above the Assets window, on the right side of the toolbar, click Detail View. 4 Click URLs on the panel on the right side of the screen to unfold the list of Image Presets. 5 Click Copy URL link next to the name of the Image Preset with the URL you want to copy to the Clipboard. About Image Preset URL strings A URL call for Image Sizing to Scene7 Image Servers has the following basic syntax: path/name of Image Server/account name/image name?modifier1&modifier2&... In a Scene7 Image Server URL, instructions to the server for displaying the image appear after the question mark (?). For example, this URL call delivers an image named “backpack” at a width of 250 pixels: http://s71.scene7.com/is/image/S7learn/backpack?wid=250 An Image Preset URL contains all the modifier instructions for presenting the image at the proper size and formatting specifications. Without an Image Preset, notice all the modifier instructions after the question mark (?) in this URL string: http://s71.scene7.com/is/image/S7learn/backpack?wid=250&fmt=jpeg&qlt=80,0&resMode=sharp&op_u sm=1.1,0.5,1,0 However, in a URL string generated with an Image Preset, the name of the Image Preset appears in place of the instructions defined by the Image Preset. For example, referring to the long URL above, the URL string is: http://s71.scene7.com/is/image/S7learn/backpack?$Large$ Image Preset names in URLs are enclosed in dollar signs ($). When a Scene7 Image Server encounters the Image Preset portion of the URL (the Large in this case), using the size and formatting instructions defined by the “Large” Image Preset. More Help topics “Adding dynamic images to your web page” on page 124 Adding dynamic images to your web page To add dynamic images to your web page, the <IMG> tag in your HTML web page code typically is modified using the Scene7 URL string to make a request to Scene7 Image Servers. This string produces the image at the size and formatting specifications defined by the Image Preset. Last updated 10/9/2014 125 USING SCENE7 Image Sizing For example, instead of the typical call to open a static image such as img src="/company_images/products/backpack_thumbnail.jpg" you now use the <IMG> tag to replace the reference to a static image with an Image Preset call to the Scene7 platform. A sample call looks like this: img src="http://s7d2.scene7.com/is/image/S7learn/backpack_trns?$thumbnail$" In this example, a Scene7 Image Server “looks up” the definition of $thumbnail$ and dynamically generates the appropriate image with the sizing and formatting specifications defined by the thumbnail Image Preset. In a URL string, all items except the product image filename (backpack_trns in this case) are typically hardwired for the page template. The only element that is automatically inserted in the page template from your commerce server is the IPS ID or name of the image. More Help topics “About Image Preset URL strings” on page 124 Last updated 10/9/2014 126 Chapter 8: Zoom Zooming allows you to interactively view high-resolution details in images. For example, you can see the colors, options, angles, and details of an image in a dynamic, fully configurable, integrated viewer. This viewer can be embedded on a web page or appear in a pop-up window. You can inspect images at close range and pan images at high resolutions to examine them closely. Zooming gives your clients an engaging, informative, and interactive viewing experience. Scene7 also offers guided zooming—a means for you to highlight the important features in an image. For example, to focus the attention of viewers on a logo, you can create a zoom target for the logo. When viewers click this zoom target, they zoom to the logo. All zoom images are created and served from single master images, graphics, and database-driven attributes. Scene7 zooming greatly reduces the time and cost of producing and delivering images. You can use Zoom Viewers, available in both HTML5 and Flash AS3, to zoom images. The Zoom Viewer has buttons that you can click to zoom and pan; you can also pan by dragging onscreen. Using Zoom Viewer Presets, you can configure the Zoom Viewer in which you zoom images. Quick Start: Zoom This Zoom Quick Start is designed to get up and running quickly with Zoom techniques in Scene7. Follow steps 1 through 6. After each step is a cross-reference to a topic heading where you can find more information. 1. Uploading zoom Images Start by uploading your zoom images to the Scene7 Publishing System. For optimal zooming, Scene7 recommends that the images are at least 2000 pixels in the longest dimension. Select the Upload button on the Global Navigation bar to upload images from your computer or network to a folder on the Scene7 Publishing System. See “Uploading zoom images” on page 127. 2. Creating zoom targets for guided zooming Zoom targets present a way for you to highlight specific parts of an image. For example, you can direct attention to the parts of an image that make it unique or distinctive. In the Zoom Viewer window, zoom targets appear in the form of thumbnail images to the side of the image. Selecting one of these zoom target thumbnails automatically zooms to a part of the image that you specify. To create a zoom target, click the rollover Edit button and choose Zoom Targets, or open an image in the Browse Panel . Then use the Zoom tools on the Zoom Target Editor screen to in Detail view and click the Zoom Targets button isolate part of the image as a target. See “Creating zoom targets for Guided Zoom” on page 128. 3. Setting up Zoom Viewer Presets Zoom Viewer Presets determine the style and behavior of your Zoom Viewers. You can set up Zoom Viewer Presets if you are an administrator; Scene7 comes with default “best practice” Zoom Viewer Presets as well. To create a Zoom Viewer Preset, click the Setup button on the Global Navigation bar and choose Viewer Presets. Then click the Add button in the Viewer Presets screen, choose a platform, choose a Zoom Viewer, and click Add. Then choose options on the Configure Viewer screen. Last updated 10/9/2014 127 USING SCENE7 Zoom Scene7 offers Zoom Viewer Preset options that enable you to select the button style and overall look of the viewer. You can also customize the zoom settings for your web site. See “Setting up Zoom Viewer Presets” on page 130. 4. Previewing images with the Zoom Viewer You can preview images in a Zoom Viewer to see what the zooming experience is when images are zoomed. To explore different Zoom Viewer Presets and how they present the zooming experience, select an image in the Browse Panel and click the Preview button. The Preview screen opens. Choose Presets > Zoom, and then select a preset with the Zoom menus. Zoom buttons appear. You can see what the zoom images look like on your web site. Select the Zoom buttons (and zoom targets) to test the settings of the Zoom Viewer Preset you chose. See “Previewing image assets with different Zoom Viewers” on page 131. 5. Publishing zoom images Publishing your zoom images places them on Scene7 Image Servers so that they can be delivered to your web site and application. As part of the publishing process, the Scene7 Publishing System activates URL strings. These URL strings call zoom images from Scene7 Image Servers to your web site or application. Select the Publish button on the Global Navigation bar to initiate a publish. On the Publish screen, select the Start Publish button. See “Publishing zoom images” on page 132. 6. Linking Zoom Viewers to your web page Scene7 creates the URL callout strings necessary for zooming images, and activates them when you publish images to Scene7 Image Servers. You can copy these URL strings from the Preview screen. After you copy the URL strings, they are available to your web sites and applications. See “Linking Zoom viewers to your web pages” on page 132. Uploading zoom images Zoom images must have a high pixel count. A high number of pixels is needed so that viewers can clearly see image details when they zoom images. Make sure that the images you use are the appropriate size before uploading them to SPS. Select the Upload button on the Global Navigation bar to begin uploading images. For detailed instruction on uploading images, see “Uploading files” on page 79. Preparing your images for zooming To take best advantage of Scene7 Zoom features, prepare your zoom image files before you upload them: Image size Scene7 recommends using images files that are, at minimum, 2000 pixels in the longest dimension. This way, images can clearly be seen when users zoom them. File formats Scene7 supports all standard image file formats, including TIFF, BMP, JPEG, PSD, GIF, and EPS. Lossless image formats—TIFF and PNG—are recommended. If you are using a JPEG image, use the highest quality settings. Color space RGB is the color space for web image presentations; CMYK images are automatically converted to RGB when you upload them. Uploading CMYK images that have an embedded ICC color profile for the conversion to RGB is recommended. See also “ICC profiles” on page 315. More Help topics “Uploading files” on page 79 Last updated 10/9/2014 128 USING SCENE7 Zoom Creating zoom targets for Guided Zoom Zoom targets guide your viewers to certain parts of an image. As well as free-form zooming, viewers can click a zoom target thumbnail and zoom to the part of the image you want them to focus on. Zoom targets are an opportunity for you to highlight the attractive or interesting parts of an image. Thumbnail zoom targets in the Zoom Viewer. About zoom targets The maximum zoom percentage of zoom targets is 100 percent. The minimum zoom percentage varies based on a combination of the viewer size and the image size, as shown in this table: Image size Viewer size Zoom percentage Large Smaller Smaller minimum Small Larger Larger minimum You can change the size of the Zoom Viewer to match the size being used on your web page. To permanently change this setting, you can change the viewer size on the Setup screen (if you are an administrator). See “Setting up Zoom Viewer Presets” on page 130. Creating and editing zoom targets Create and edit zoom targets on the Zoom Target Editor screen. To open this screen, select an image and do one of the following: • Click the rollover Edit button and choose Zoom Targets. • In the Browse Panel, display the image in Detail view and click the Zoom Targets button . On the Zoom Target Editor screen, click the Select Target button (the arrow) to select a target before changing its size or position. Click the Add Targets button (the rectangle) to create a zoom target on the image. The Zoom Target Editor screen also offers tools for deleting, copying, and naming zoom targets. Last updated 10/9/2014 129 USING SCENE7 Zoom Creating a zoom target Open the Zoom Target Editor screen and follow these steps to create a zoom target: 1 Click the Add Targets button (the rectangle), move the pointer over the image, and click where you want to the zoom target to be. A thumbnail image of the zoom target appears in the panel on the right side of the screen. 2 Click the Select Target button (the arrow), click to select the zoom target you created, and adjust the size and position of the target. Resizing Move the pointer over a corner of the zoom target and drag to enlarge or shrink the target. Positioning Move the pointer over the zoom target and drag it to a different location. 3 Enter a name for the zoom target in the Name box. Important: What you enter in the Name box is more than a name. When users move the pointer over the zoom target, they see what you enter in the Name box. Enter a brief description of the zoom target in the Name box so users know what they can zoom on. 4 Optionally, enter user data in the User Data field. This field is for web site designers to add information to the zoom target. 5 Click the Save button. The coordinates and zoom level of the zoom target are saved. A thumbnail of your zoom target with the name you entered appears on the right side of the screen. To see what your zoom targets look like in a Zoom Viewer, click the Preview button in the Zoom Target Editor screen and choose a Zoom Viewer in the Preview screen. For information about this screen, see “Previewing image assets with different Zoom Viewers” on page 131. Editing zoom targets Use these techniques on the Zoom Target Editor screen to edit zoom targets: Repositioning With the Select Target button (the arrow), click the target to select it. Then drag the target to a different location. Resizing With the Select Target button (the arrow), click the target to select it. Then move the pointer over a corner of the zoom target and drag to enlarge or shrink the target. Deleting Click the target’s thumbnail image on the right side of the screen. Then click the Delete Target button. Renaming Click the target’s thumbnail image on the right side of the screen. Then enter a name in the Name box and click Save. Copying zoom targets You can copy zoom targets from one image to another. Copy targets when two images present similar content and their zoom targets belong in the same locations. Follow these steps to copy zoom targets to another image: 1 Open the image with zoom targets you want to copy in the Zoom Target Editor screen. 2 Click the Copy Targets To button. 3 In the Select Images dialog box, select an image and click the Select button. Last updated 10/9/2014 130 USING SCENE7 Zoom Setting up Zoom Viewer Presets Zoom Viewer Presets determine the style, behavior, and look of your Zoom viewers. Scene7 offers many options for customizing and skinning Viewers. Scene7 comes with default basic (fast), fly-out, and custom Zoom Viewer Presets. If you are an administrator, you can create new company Zoom Viewer Presets or edit a default preset and save it with a new name. All Zoom Viewers have buttons for zooming in, zooming out, panning, and resetting the image to its original state after zooming. What these buttons look like and what the window itself looks like depends on your choice of Zoom Viewer Presets. You can configure a Zoom Viewer Preset with different colors, borders, fonts, and image settings. When configuring a Guided Zoom Viewer, you can also choose where to place the zoom targets. Zoom targets are the thumbnails that users click to zoom to areas you specify. More Help topics “Adding and editing Viewer presets” on page 38 About Zoom Viewer Presets Scene7 offers these Zoom Viewer Presets: Zoom Viewer: Basic Provides a basic zoom on original image. Zoom Viewer: Fly-out Displays a second image of the zoomed area next to the original image. There are no controls to use, users simply move the selection over the area they want to view. When determining the complete bandwidth usage for this viewer, consider that both the main image and the flyout image are served in the viewer. The flyout image size is determined by the main image size (Stage Width and Height) and the Zoom Factor. To keep the flyout file size from becoming too large, balance these two values: if you have a large main image size, lower the Zoom Factor value. (The Flyout Width and Flyout Height determine the size of the flyout window, but not the size of the flyout image that is served into the viewer.) For example, if your main image size is 350 by 350 pixels, with a Zoom Factor of 3, the resulting flyout image is 1050 by 1050 pixels. If your main image size is 300 by 300 pixels, with a Zoom Factor of 4, the flyout image is 1200 by 1200 pixels. Depending on the JPEG quality setting (recommended settings are between 80-90), you can decrease the file size significantly. Recommended zoom factors are 2.5 to 4, depending on the size of your main image. Scene7 recommends these parameters for fly-out Zoom Viewer Presets: • Enlarged image size Approximately 1500 by 1500 pixels, not to exceed 2000 by 2000 pixels. • Image size 100KB or under, not to exceed 150KB (compress the file to keep it under 150KB). Zoom Viewer: Custom Provides guided or unguided zoom with images, Image Sets with multiple views, or Color Swatch Sets. Creating and editing Zoom Viewer Presets Follow these steps to create or edit a Zoom Viewer Preset: 1 Choose Setup > Viewer Presets. 2 Do one of the following: Creating a preset Click the Add button. In the Add Viewer Preset dialog box, choose a platform, choose a Zoom Viewer, and click Add. Then enter a name for the preset in the Preset Name box. Last updated 10/9/2014 131 USING SCENE7 Zoom Editing a preset Select a Zoom Viewer Preset and click the Edit button. 3 Specify settings as desired. To see a description of an option, click the Info Tip icon adjacent to the option. The preview screen displays the viewer as you update and change settings. 4 Click Save or Save As. 5 On the Viewer Presets screen, examine the Zoom Viewer Preset or Guided Zoom Viewer Preset you created. If it needs adjusting, click Edit, change settings on the Configure Viewer screen, and click Save. For information about managing Viewer Presets on the Viewer Presets screen, see “Viewer Presets” on page 32. Previewing image assets with different Zoom Viewers On the Viewer List screen, you can preview images using different Zoom Viewer Presets. See “Configuring Default Viewers” on page 47. See “Previewing an asset” on page 102. To preview image assets with different zoom viewers 1 In the Asset Library panel on the left side, in the Show drop-down list, select an image-based asset type such as Image or Image Set. 2 In the Asset Library panel on the left side, navigate the Asset folders that contain images that you want to preview with a Zoom Viewer. 3 Do one of the following: • Above the Assets window, on the right side of the toolbar, click Grid View. In the Asset window, below the thumbnail image, click Preview > Viewer List. • Above the Assets window, on the right side of the toolbar, click List View. In the Asset window, select an asset, and then to the right of the thumbnail image, click Preview > Viewer List. • Above the Assets window, on the right side of the toolbar, click Detail View. On the same toolbar, click Preview > Viewer List. 4 In the Viewer List window, in the table, click a viewer link to preview the asset in the selected viewer. 5 Close the displayed viewer to return to the Viewer List screen. 6 In the lower-right corner of the Viewer List window, click Close to return to the Assets screen. More Help topics “Setting up Zoom Viewer Presets” on page 130 “Configuring Default Viewers” on page 47 Last updated 10/9/2014 132 USING SCENE7 Zoom Publishing zoom images Publishing places your zoom images on Scene7 Image Servers so they can be made available to your web site and application. As part of the publishing process, SPS activates the URL strings. You can place these URL strings in the HTML code of your web site. More Help topics “Publishing files” on page 87 Marking images for publish Images must be marked for publish in order for them to be copied to Scene7 Image Servers. You can mark your images for publish in the Browse Panel by selecting the Mark for Publish icon . As well, you can mark images for publish when you upload them. Publishing the images To publish zoom images, start by selecting the Publish button on the Global Navigation bar. Then select a When option (One-Time or Recurring), optionally enter a name for the publish job, and select the Start Publish button. Linking Zoom viewers to your web pages Your web sites and applications access Scene7 Image Server content, including master images and associated zoom targets, and Zoom Viewer Presets, by way of URL strings or embedded code. These URL strings are activated during the publishing process. To place these URL strings or the embedded code in your web pages and applications, you copy them from the Scene7 Publishing System. Important: The URL is not active until you publish the asset. Copying a Zoom viewer URL 1 in the Asset Library panel on the left side, navigate to the asset folder that contains the Zoom viewer whose URL you want to copy. 2 Above the Asset Browse panel, on the right side of the toolbar, do one of the following: • Click Grid View or List View. In the Asset Browse panel, double-click a single asset to open it in Detail View. In the URLs and Embed Code panel on the right, click Copy URL to the right of the viewer you want. • Click Grid View. In the Asset Browse panel, select a single asset, and then below the thumbnail image, click Preview > Viewer List. In the Viewer List page, under the Actions column of the table, click Copy URL. • Click List View. In the Asset Browse panel, select a single asset, and then to the right of the thumbnail image, click Preview > Viewer List. In the Viewer List page, under the Actions column of the table, click Copy URL. • Click Grid View, List View, or Detail View. On the same toolbar, click Preview > Viewer List. In the Viewer List page, under the Actions column of the table, click Copy URL. Last updated 10/9/2014 133 USING SCENE7 Zoom Adding Zoom viewer URLs to your web page Typically, visitors to a web site zoom images by first selecting a Zoom icon (often the icon shows the image of a magnifying glass). Selecting this icon launches a dynamic web page (ASP or JSP) that displays the image in a pop-up window. The pop-up window is where visitors actually zoom the image. Here is an example of code that your IT staff can create to open a pop-up window for zooming: <a href="javascript:zoom_window();"> <img src="http://www.scene7.com/images/buttons/zoomMag.gif" width="50" height="50" border="0" /></a> Notice that the link calls a JavaScript function called zoom_window(). The zoom_window() function is placed above the </HEAD> tag in the HTML code of the web page: <script language="javascript"> <!-function zoom_window() { window.open("http://s7d4.scene7.com/s7ondemand/zoom/flasht_zoom.jsp ?company=S7Web&sku=Backpack1&zoomwidth=420&zoomheight=470& vc=skin=/is-viewers/flash/basicZoomSkin.swf","", "toolbar=no,location=no,directories=no," + "status=no,menubar=no,scrollbars=yes"+ "resizable=yes,width=500,height=450,top=0,left=0,right=0,bottom=0") } --> </script> Notice that the URL of the pop-up window is a Scene7 URL (http://s7d4.scene7.com/s7ondemand/zoom/flasht_zoom.jsp). This URL calls the zoom pop-up window (a JSP page) that contains the Zoom Flash Viewer and master image. The JSP page, Zoom Viewer, and master image are all located on Scene7 Servers. Replace the Scene7 URL in the code with your zoom URL. In the URL, notice a SKU parameter (&sku=Backpack1). The string after &sku= is Backpack1. The zoom feature popup link of each product contains a different product SKU that tells the Scene7 JSP page which product image to display. The user selects the zoom feature link on the product details page that launches the screen. Copying the embed copy of a Zoom viewer Using the Embed Code feature lets you review the viewer code for the selected Zoom viewer. You can also copy the code to the clipboard so you can paste it in your web pages for deployment of the viewer. Editing of the code is not permitted in the Embed Code dialog box. To copy the embed code of a Zoom viewer 1 in the Asset Library panel on the left side, navigate to the asset folder that contains the Zoom viewer whose embed code you want to copy. 2 Above the Asset Browse panel, on the right side of the toolbar, do one of the following: • Click Grid View. In the Asset Browse panel, double-click a single asset to open it in Detail View. In the URLs and Embed Code panel on the right, click Embed Code to the right of the viewer you want. • Click Grid View. In the Asset Browse panel, select a single asset, and then below the thumbnail image, click Preview > Viewer List. In the Viewer List page, under the Actions column of the table, click Embed Code. • Click List View. In the Asset Browse panel, select a single asset, and then to the right of the thumbnail image, click Preview > Viewer List. Last updated 10/9/2014 134 USING SCENE7 Zoom In the Viewer List page, under the Actions column of the table, click Embed Code. • Click Grid View, List View, or Detail View. On the same toolbar, click Preview > Viewer List. In the Viewer List page, under the Actions column of the table, click Embed Code. 3 In the Embed Code dialog box, click Copy to Clipboard. Editing the code is not permitted in the Embed Code dialog box. 4 Click Close. Last updated 10/9/2014 135 Chapter 9: eCatalogs An eCatalog is a digital, web version of print material—a catalog, brochure, flyer, product manual, or advertising circular, for example. An eCatalog is displayed in an eCatalog Viewer on a web site. This viewer simulates the experience of reading printed material. Depending on the settings you choose for your eCatalog, viewers can: • Page forward or backward by clicking the lower-left or lower-right corner of a page, or the Back or Next button. • Select a page number or page title to go to a specific page. • Zoom in, zoom out, and pan to examine items on a page. • Move the pointer over a page region (called an Image Map) to see a pop-up window with information about an item. • Click a page region to open a new web page with more information about an item. • Write a sticky note and attach it to an eCatalog page. • Tap image map icons to launch related web pages or in-context info panels. • Use gesture interactions, including pinching to zoom and swiping to turn pages. • Search by keyword for items. A B The eCatalog as it looks to users. A. eCatalog opening page B. eCatalog turned to page 2 To create an eCatalog, you typically use high-resolution PDF files created in Adobe® Acrobat® or another print program, but you can also create an eCatalog from image files. Last updated 10/9/2014 136 USING SCENE7 eCatalogs As part of creating your eCatalog, you can arrange pages or page spreads in the order you choose. You can also declare whether you want single pages, double-page spreads, or multi-page spreads. You can create Image Maps for page regions so that viewers can, for example, click an area on the page and open a new page on your web site. You can manage the rollover text that appears using InfoPanel settings within the eCatalog screen. You can also configure the eCatalog Viewer by choosing from more than 100 different configuration options. You can tailor the features and the appearance of your Viewer for your particular audience. Quick Start: eCatalog This eCatalog Quick Start is designed to help you get up and running quickly with eCatalogs. Follow steps 1 through 7. After each step is a cross-reference to a topic heading where you can find more information. 1. Uploading the PDF files Adobe PDF files are usually the source for an eCatalog. Because they are meant to be printed, PDF files usually contain CMYK images. The Scene7 Publishing System detects these images and converts them using a standard CMYK color profile. However, you may have to upload and use a custom color profile. Select the Upload button on the Global Navigation bar to start uploading PDF files or images for your eCatalog. You can upload files from your desktop or via FTP; FTP is recommended if you are uploading many files or files larger than 100 MB. Under PDF Options, the Upload screen provides options for uploading PDF files at the proper resolution and correct color space. A 150 pixels-per-inch resolution is recommended. You can select the Auto-Generate eCatalog option to create an eCatalog when you upload a PDF file. See “Uploading the PDF files” on page 138. 2. Creating an eCatalog Create your eCatalog by selecting PDF or image files in the Browse Panel, and then clicking the Build button and choosing eCatalogs. The eCatalog screen opens. On the Order Pages tab, select a Layout button—1 Up, 2 Up, or Custom—to choose whether you want single, double, or custom page spreads. You can rearrange pages or spreads by dragging them or, in a large eCatalog, choosing a page name on the Move To menu. To add pages, select a folder in the Asset Library, and then drag PDF or image files from into the Order Pages screen. Instead of default page numbers, you can provide custom page names or import a large number of page names. Click the Save button, enter a name for your eCatalog, choose an SPS folder for storing it, and select the Save button. Each time you change the page order or edit your eCatalog, save your changes by clicking the Save button. See “Creating an eCatalog” on page 139. 3. Creating Image Maps Image Maps add another dimension to eCatalog pages. An Image Map is a region on a page that delivers more information about an item. When viewers roll the pointer over an Image Map, they see a description of the item. Clicking an Image Map activates an external reference that opens a new web page where you can learn more about an item. To create an Image Map, open the eCatalog screen. Then go to the Map Pages tab of the eCatalog screen, and draw the or Polygon Image Map tool . You can adjust the position and size of map with the Rectangle Image Map tool Image Maps by dragging map borders with the Pan tool . Last updated 10/9/2014 137 USING SCENE7 eCatalogs After you draw the Image Map, enter the URL address that you want to go to when you click the Image Map. You can also enter the rollover text that appears when you move your pointer over the Image Map. See “Creating eCatalog Image Maps” on page 142. See “Embedding rich media in an eCatalog” on page 142. You can set up and manage the image map text using the Info Panel settings in the eCatalog screen. See “Managing Info Panel content” on page 145. 4. Setting up eCatalog Viewer Presets End users see your eCatalog in the eCatalog Viewer. If you are an administrator, you can configure the eCatalog Viewer. You can change its outline color and select a new “skin” to brand your eCatalog. Scene7 comes with several “best practice” eCatalog Viewer Presets. You can choose one of these presets for displaying your eCatalogs. You can also create an eCatalog Viewer Preset of your own if you are an administrator. To create an eCatalog Viewer Preset, click the Setup button on the Global Navigation bar and choose Viewer Presets. Then click Add, choose a platform, and choose eCatalog > Viewer. See “Setting up eCatalog Viewer Presets” on page 147. 5. Previewing eCatalogs in the eCatalog Viewer eCatalog Viewer Presets determine the style and behavior of your eCatalog Viewers. To find out how eCatalog Viewer Presets display your eCatalog, select your eCatalog in the Browse Panel and click Preview. The Preview screen opens in the default viewer. Notice the orientation, color scheme, what the controls for changing pages look like, and what pages look like when they are turned. See “Previewing eCatalogs in the eCatalog Viewer” on page 148. 6. Publishing eCatalogs Publishing your eCatalog places it on Scene7 Image Servers so that it can be delivered to your web site and application. As part of the publishing process, the Scene7 Publishing System activates the URL string for your eCatalog. Use this URL to call the eCatalog from Scene7 Image Servers to your web site or application. After marking your eCatalog for publish in the Browse Panel, select the Publish button on the Global Navigation bar to initiate a publish. On the Publish screen, click Start Publish. See “Publishing eCatalogs” on page 148. 7. Linking an eCatalog to a web page Scene7 activates the URL callout string necessary for displaying your eCatalog when you publish it to Scene7 Image Servers. You can copy this URL string from the Preview screen and the Browse Panel (in Detail view) by selecting URLs in the panel. After you copy the URL string, it is available to your web sites and applications. Work with your IT team to place the link to the eCatalog in the appropriate place in your web page. When users click the link, the eCatalog Viewer appears and users can browse your eCatalog. See “Linking an eCatalog to a web page” on page 149. Last updated 10/9/2014 138 USING SCENE7 eCatalogs Uploading the PDF files Typically, Adobe PDF files are the source for an eCatalog; these files contain all image information as well as fonts and vector graphics. You can build an eCatalog with images as well. After you have prepared your PDF files for uploading, select the Upload button on the Global Navigation bar to begin uploading the PDFs. Preparing your PDF files Prepare your PDF files before uploading them to the Scene7 Publishing System: • Place all the files in the same folder on your computer or network to make uploading the files easier. • Name the files in alphanumeric order by page. Ordering the pages will make it easier to place the pages in the proper order after the files are uploaded. • Examine the PDF pages to see whether they contain crop marks, registration targets, or color bars. These marks determine where to cut the paper when documents are printed; they must be removed before your eCatalog is placed on the web. Scene7 provides options for cropping marks when you upload PDF files. • If you want viewers to search your eCatalog by keyword, find out whether your PDF files are “flattened.” You cannot extract search words from flattened PDF files. To find out whether a PDF is flattened, try to select text inside it. If you can’t select text, the PDF is flattened and viewers cannot search by keyword in your eCatalog. • Because they are meant to be printed, PDF files usually contain CMYK images. By default, SPS can intelligently detect these CMYK images and convert them using an internal CMYK color profile. However, if you want to use a custom color profile to convert CMYK images, you can do so. See “ICC profiles” on page 315. Best practice PDF upload options For detailed information about the different upload methods, see “Uploading your files” on page 83. Select the files you want to upload, and then select these best practice PDF Options: Crop Select the Crop menu and choose Manual if the pages contain crop marks, registration marks, or other marks. Enter the number of pixels to crop from the top, right, bottom, and left sides of pages. Crop marks are usually set to a half-inch margin. Assuming that you choose 150 as the pixel-per-inch resolution (the recommended setting), entering 75, 75, 75, 75 in the Top, Right, Bottom, and Left text boxes crops a half inch from the margins (at 150 ppi, half of one inch equals 75 pixels). Processing Select the Processing menu and choose Rasterize. The PDF file must be rasterized so that all pages and images can be displayed in the eCatalog. Extract Search Words (optional) Select this option if you want your viewers to be able to search by keyword in your eCatalog. Auto-Generate eCatalog from multiple page PDF (optional) Select this option to automatically create an eCatalog when you upload. You can go straight to the eCatalog screen and begin working on your eCatalog without having to first select PDF files and select the Build command. The eCatalog is named after your PDF file. Resolution Scene7 recommends 150 pixels per inch. Colorspace Scene7 recommends choosing Detect Automatically. Usually, PDFs created for print output are in CMYK; PDFs for online viewing are RGB. If a PDF uses both color spaces, you can select a specific color space by choosing Force As RGB or Force As CMYK. PDFs use both color spaces, for example, when page graphics use a CMYK color Last updated 10/9/2014 139 USING SCENE7 eCatalogs space but pictures use RGB. If you uploaded an ICC profile, its name appears on the Colorspace menu and you can choose it there. See “ICC profiles” on page 315. Color Profile Choose a Color Profile option: • Convert To SRGB Converts to SRGB (Standard Red Green Blue). SRGB is the recommended color space for displaying images on web pages. • Keep Original Color Space Retains the original color space. • Custom From > To Opens menus so you can choose a Convert From and Convert To color space. You can choose a standard Photoshop color space or a color space you uploaded to SPS. See “ICC profiles” on page 315. Note: For details on all PDF options, see “PDF upload options” on page 308. Creating an eCatalog Creating an eCatalog entails ordering the pages, choosing the page layout, and linking the pages by drawing Image Maps and entering rollover and hypertext link data. Optionally, you can customize the TOC so that viewers see page names rather than page numbers in the eCatalog Viewer. Creating an eCatalog You can include image files as well as PDF files in your eCatalog. When you create an eCatalog, the Publish after save option affects the set and set members in the following ways: “Publish after save” option selected before saving? State of set after saving State of set members after saving Yes Published Published No Unpublished Set members retain their published or unpublished state. See also “Manually publishing assets” on page 89 and “Manually unpublishing assets” on page 89. To create an eCatalog 1 Begin creating your eCatalog with one of these techniques: Select the files first In the Browse Panel, select files and then click Build > eCatalogs. Start from the eCatalog screen Click Build > eCatalogs. Select a folder in the Asset Library and drag files from the folder into the Order Pages tab of the eCatalog page. Note: To view the items in the Asset Library by name instead of thumbnail, select the Name option for Default Asset Library View in Personal Setup. 2 Select an overall layout for your eCatalog. Click the 1 Up button for single pages, the 2 Up button for double-page spreads, or the Custom button for page spreads of more than two pages. The Change eCatalog Layout dialog box appears. Select the All Spreads options and click OK. Last updated 10/9/2014 140 USING SCENE7 eCatalogs 3 Optionally, change the layout of individual pages or page spreads by clicking them and then choosing the 1 Up button, 2 Up button, or Custom button. The Change eCatalog Layout dialog box appears. Select the Selected Spreads options and click OK. 4 Reorder the pages as necessary with one of these techniques: Dragging Drag a page or page spread to a new location. The vertical bar shows you where the page is being moved. Move To button Select a page or page spread, click the Move To button, and choose the page on the menu that you want your page to appear before. Sequence # In List View, enter page numbers in the Sequence # fields. 5 When you are finished, near the lower-right corner of the page, ensure that Publish after save is selected (default). 6 Click Save. 7 In the Save dialog box, select a folder for storing your eCatalog. In the File Name field, enter the spin set name. 8 Click Save. You can preview your eCatalog, after you save it, by clicking Preview. Editing an eCatalog Depending on whether you edit a published set or an unpublished set, the Publish after save option affects the set and set members in the following ways: Set already published? “Publish after save” option selected before saving your edit? State of set after saving State of set members after saving Yes Yes Published Published Yes No Published Existing set members retain their published state. Any new set members that you added during your edit retain their published or unpublished state. No Yes Published Published No No Unpublished Existing set members and any new set members that you added during your edit retain their published or unpublished state. See also “Manually publishing assets” on page 89 and “Manually unpublishing assets” on page 89. To edit an eCatalog 1 Click the eCatalog’s rollover Edit button. 2 Make your changes as necessary. 3 When you are finished editing, near the lower-right corner of the page, ensure that Publish after save is selected (default). 4 Click Save, select a storage folder, enter a name for the set, and then click Save. Last updated 10/9/2014 141 USING SCENE7 eCatalogs Deleting an eCatalog When you delete a set, the set itself is moved to the Trash. However, the members (or “children”) within that set are not affected; instead, they each retain their existing published or unpublished state. See also “Manually publishing assets” on page 89 and “Manually unpublishing assets” on page 89. To delete an eCatalog 1 In the Grid View, List View, or Details View, select one or more eCatalogs. 2 On the Global Navigation Bar, click File > Delete > Delete. Customizing the table of contents (TOC) Scene7 provides default page numbers in your eCatalog on the Order Pages tab of the eCatalog screen. For custom page names, you can change the page labels that constitute the table of contents (TOC). Renaming the front and back cover is recommended. For example, the front cover page can read “Cover” instead of “Page 0–1.” You can create a customized table of contents (TOC) for your eCatalog manually or by importing the page names from a CSV (Mac only)or XML file. Note: To restore default page titles, click the TOC Labels button on the Order Pages tab and choose Restore Defaults (All). Manually entering page names To manually enter page names one at a time, go to the Order Pages tab of the eCatalog screen. Then click in the page number field and enter a name. Enter a name for each page you want to name. Importing page names Importing page names is recommended if you are dealing with an eCatalog with many pages. You can import the names from a tab-delimited or XML file. The TOC label is stored in an image’s User Data field; format this data as a list of name=<value> pairs separated by two question marks “??”. For example, to set one label for a TOC field named tocEN, set the User Data of the image to: tocEN=<EN_page_label> To set separate labels for TOC fields named tocEN and tocFR: tocEN=<EN_page_label>??tocFR=<FR_page_label> To import the User Data field in a tab-delimited file, include the field userdata: IPSID Userdata <image_IPS_ID> tocEN=<EN_page_label>??tocFR=<FR_page_label> To import the User Data field in an XML file, include the attribute vc_userdata: <ips> <ghw_object vc_objectname="<image_IPS_ID>" … vc_userdata=" tocEN=<EN_page_label>??tocFR=<FR_page_label>" … /> </ips> To import page names from a tab-delimited or XML file, select the TOC Labels button and choose Import. The Upload Metadata dialog box appears. Click the Browse button and import the CSV file (Mac only) or XML file that associates each page with a page name. Last updated 10/9/2014 142 USING SCENE7 eCatalogs Creating eCatalog Image Maps An Image Map is a region on an eCatalog page that you can roll over with your mouse or click to trigger actions of various kinds. When you move the pointer over an Image Map, you see, for example, a rollover-text description of an item. When you click an Image Map, another action is initiated. For example, you can open a web page so that viewers can learn more about an item or purchase it or you can launch a video to see an item in use. Drawing eCatalog Image Maps For eCatalogs, you draw Image Maps on the Map Pages tab of the eCatalog screen. This screen consists of the Image Map area where eCatalog pages are displayed and, on the right, the Image Map list. As you create Image Maps, their names are entered on the Image Map List. 1 Click the eCatalog’s rollover Edit button. 2 Click Map Pages. 3 On the left of the Map Pages screen, select the page you want. 4 In the Image Map area, draw a rectangular or polygonal (many-sided) Image Map: Rectangular map Select the Rectangle Image Map tool and drag on the page to create the rectangle. Polygonal map Select the Polygon Image Map tool and click as many times as necessary around the perimeter of the image. As you click, Scene7 draws the borders of the Image Map. After you draw an Image Map, Scene7 assigns it a name in the Image Map list. To form the name, Scene7 appends a sequential number to the name of the eCatalog page in which you are working. 5 (Optional) In the Image Map list panel, under the Name column, enter a new name for the Image Map. Do not include blank spaces in the name you enter. 6 You can have viewers open a new web page when they click the Image Map. In the Image Map list panel, enter the URL of the web page in the URL column. Click Edit and enter a template to make entering URLs (Href templates) easier. See “Using a template to enter JavaScript and URLs” on page 296. 7 (Optional) In the Show drop-down list, click Rollover Text, and then enter the text that you want users to see onscreen when they move their pointers over the Image Map. 8 (Optional) In the Show drop-down list, click Other Actions, and enter an attribute to trigger a blur or focus action when users move their pointers over an Image Map. See “Defining other actions for Image Maps” on page 297. 9 Click Save. 10 (Optional) Click Preview to view the eCatalog with the default eCatalog Viewer preset. To delete an Image Map, select its name in the Image Map list and click Delete. To temporarily disable an Image Map on a page without deleting the Image Map, deselect the Image Map’s On option in the Image Map List panel. Embedding rich media in an eCatalog You can use eCatalog’s Rich Media option to add videos in MP4 format or spin sets to Image Maps that you have added to an eCatalog. When a user clicks the Image Map area in the eCatalog, the associated video or spin set pops up. This functionality is especially helpful if you want customers to see an item in use or see an item from different angles and perspectives. Last updated 10/9/2014 143 USING SCENE7 eCatalogs You can also optionally display tool tip text when customers move their pointers over your Image Map so they know what they are clicking. To embed rich media in an eCatalog 1 Draw an eCatalog Image Map. See “Drawing eCatalog Image Maps” on page 142. 2 In the Show drop-down list, select Rich Media. 3 In the Add Assets panel on the left, navigate to a folder that contains the spin set or video (MP4 format) asset that you want to embed. 4 Drag the asset onto the Image Map. 5 (Optional) In the Image Map list panel, under the Tool Tip column header, enter the text that you want viewers to see onscreen when they move their pointer over the Image Map. 6 Click Save. 7 (Optional) On the eCatalog screen, click Preview to preview the eCatalog with the default eCatalog_PopupViewers_Flash Viewer preset. Remember that you can edit the pop-up settings for the default eCatalog_PopupViewers_Flash viewer preset to get the look and feel you want. In particular, you can choose the Flash AS3 video viewer preset that you want to use for the pop-up video viewer, and the Flash AS3 spin viewer preset that you want to use for the spin set viewer. See “Adding and editing Viewer presets” on page 38. Editing eCatalog Image Maps Starting on the Map Pages tab of the eCatalog screen, use these techniques to edit eCatalog Image Maps: Adjusting the position Select the Pan tool and move the pointer near but not over the border of the map. When the pointer shows a four-headed arrow, drag the entire image map to a new location. See “Adjusting the position, shape, and size of Image Maps” on page 295. Changing the shape and size To resize a rectangular Image Map, select the Pan tool. Then move the pointer over a borderline or a corner, and when you see the double-headed arrow icon, drag. To resize a polygonal Image Map, drag a square selection handle. To create a selection handle, click the border of the Image Map and drag. See “Adjusting the position, shape, and size of Image Maps” on page 295. Deleting Image Maps Select the Pan tool, click the Image Map to select it, and then click Delete. To remove all Image Maps from an eCatalog, click the Order Pages tab, and then click Clear Maps. Handling overlapping Image Maps Drag to change the order of Image Maps on the Image Map list. See “Handling overlapping Image Maps” on page 295. Copying Image Maps to other pages Select the Copy Maps To button (make sure you are on the Map Pages tab). On the Select Images screen, select the page or pages where you want to copy the Image Maps, and click the Select button. See “Copying Image Maps” on page 296. Note: As well as copying Image Maps to different pages in an eCatalog, you can copy all the Image Maps in an eCatalog to a different eCatalog. See “Copying Image Maps between eCatalogs” on page 144. Last updated 10/9/2014 144 USING SCENE7 eCatalogs Reviewing and importing Image Map data The Map Summary screen provides metadata about your eCatalog. You can also batch-import Image Map data for your eCatalog starting on the Map Summary screen. Importing Image Map data this way makes it easier to enter Image Map URLs and rollover text. To see the Map Summary screen, on the Map Pages tab of the eCatalog screen click Summary. Review Image Map data summary 1 On the Map Pages screen, click Summary. The Map Summary screen displays how many Image Maps, URLs, rollover text descriptions, and other actions are in your eCatalog. 2 If there are rollover key errors, click the error in the Rollover_Key Error column to see what needs to change in your spreadsheet to correct the error. You can select and copy the text from this message and paste it into your spreadsheet. 3 Click Preview to examine a page in the eCatalog Viewer, click the X to close the Summary screen and return to the Map Pages screen, or click Close to return to Browse. Import Image Map data Rather than enter Image Map data on each page, you can import the data for your entire eCatalog into the Map Summary screen. You import the Image Map data in the form of a tab-delimited file or XML DTD. The fields in your file must be in the order shown in the Map Summary screen: Name, TOC Labels, Maps, URLs, Rollover Text, Other Actions, and Search Strings. Importing Image Map data saves you the trouble of entering the data in the Image Map List as you create each Image Map. Note: Before importing Image Map data, you must have already created the Image Maps. Starting on the Map Summary screen, follow these steps to import Image Map data for Image Maps you have created: 1 Click Import Map Data. 2 In the Import Metadata dialog box, click Browse, and then select the tab-delimited or XML DTD file. 3 In the Job Name field, type a name for the file (be careful to retain its extension). 4 Click Upload. Copying Image Maps between eCatalogs You can copy all the Image Maps in an eCatalog to a different eCatalog. Copying Image Maps this way is a convenient method of copying Image Maps between foreign-language translations of the same eCatalog. For the copying to be successful, Scene7 recommends copying between eCatalogs with the same number of pages and same images. Important: If the eCatalog to which you copy Image Maps already contains Image Maps, those Image Maps are deleted when the copy is made. Follow these steps to copy all the Image Maps in one eCatalog to another eCatalog: 1 Select the eCatalog with the Image Maps you want to copy, and click the eCatalog’s rollover Edit button. 2 On the Order Pages tab, click Copy Maps. 3 In the Select Asset dialog box, select the eCatalog where you want to copy the Image Maps, and then click Select. Last updated 10/9/2014 145 USING SCENE7 eCatalogs Scene7 displays a warning message if the target eCatalog (the eCatalog to which you copy Image Maps) has a different number of pages or images that are a different size. You can click Continue to copy the Image Maps in spite of the warning. Managing Info Panel content In addition to using Image Map text for your rollovers in eCatalogs, you can use an Info Panel to add larger quantities of rollover text, including links. You can also manage the InfoPanel by using timed caching and scheduling content updates. You can manage your InfoPanel setup and data using the following features in Scene7: • InfoPanel Setup panel lets you specify the template used to display the Info Panel text, a default response for errors, and the number of hours the information is cached. In addition, you can specify whether the eCatalogs is automatically published. • InfoPanel Datafeed panel lets you specify a CSV file containing the text you want to appear in the InfoPanel rollover text, as well as schedule times for updating the information. • Import Metadata dialog box (accessed from the Map Pages view) lets you import a tab-delimited TXT file containing the rollover text information. You can use this TXT option or the Datafeed panel with the CSV file option for your rollover text. • Map Pages view provides an option for previewing the xml that appears for specific image maps. Set up a Response Template You can select one of three preset response templates for displaying text in an Info Panel. These preset response templates determine how your information is presented in the Info Panel: how many columns and rows, typeface size, font, and so on. You can select a preset response template or create one of your own. Note: You can also set up the Response Template in the Viewer Preset. To use the Response Template in the Viewer Preset instead, add “fmt=1” to the end of the Information Server URL in the Viewer Preset. See “Setting up eCatalog Viewer Presets” on page 147. 1 Double-click your eCatalog to open it in Detail View. 2 Click the InfoPanel Setup panel to open it. 3 Select a Response Template: • Select a preset from the Response Template menu. The XML for the template design appears in the User Template box. • Select Custom to create your own response template. Type the template XML definition in the User Template box. You can use the preset templates as a base for your own. 4 (Optional) In the Default Response box, type the text you want to appear if Scene7 encounters an error in retrieving information for an image map. For example, if the system receives a company name and an eCatalog name, but no rollover identifier, this message appears for the user. 5 In the Response TTL box, enter the number of hours you want to wait before caching the data: • Set a lower number if the data is updated frequently throughout a day. • Set a higher number if the data is relatively stable and doesn’t require updating frequently throughout the day. The default is ten hours. Last updated 10/9/2014 146 USING SCENE7 eCatalogs 6 Click Publish. Import source content for the Info Panel You can use a comma-separated value file (CSV) or tab-delimited file (TXT) for the source text for an Info Panel for an eCatalog. Tab-delimited files must use UTF16 (Unicode) encoding. You import the different file types using different methods. When formatting source content, keep in mind the following guidelines: • Make sure that the tab- and comma-delimited data contains as many columns as are necessary for the rollover template. • Make sure that the first item or column of data is the rollover identifier (associated with the rollover_key value from the image map URLs). • Make sure that each tab- or comma-delimited item after the identifier is the item you want substituted into the response template (so the first column is substituted into $1$, the second column into $2$, and so on). Import CSV content from an externally hosted location 1 Double-click the eCatalog to open it in Detail View. 2 Click the InfoPanel Datafeed panel to open it. 3 Enter the URL for the CSV file in the Externally Hosted CSV File Location box. You can paste the URL into this field or type it directly. 4 (Optional) Specify a time to update the content using the Schedule Update menus and click Add. You can select multiple times for updating. Each update time appears in the Update Times box. (To remove a time, select it and click Delete.) 5 (Optional) Click Run Update Now to immediately update the content. Import a tab-delimited or CSV file 1 Double-click the eCatalog to open it in Detail View. 2 Click the InfoPanel Setup panel to open it. 3 Click Upload S7Info Content button. 4 Click Browse, select the tab-delimited TXT file, CSV or SSV file you want to use, and click Open. 5 Click Upload. Scene7 sends you an e-mail message letting you know if the upload was successful or not. Preview rollover key text for an Image Map Using the Map Pages screen, you can easily and quickly view Info Panel text for the Image Maps on a specific page of your eCatalog. 1 Click the Catalog’s rollover Edit button. 2 Click Map Pages. 3 At the top of the table on the right side of the screen, choose Info Panel from the Show menu. The rollover-key text appears next to each Image Map that contains Info Panel text. Last updated 10/9/2014 147 USING SCENE7 eCatalogs Setting up eCatalog Viewer Presets eCatalog Viewer Presets determine the style, behavior, and look of eCatalog Viewers. Scene7 provides eCatalog Viewer Presets, and you can create your own eCatalog Viewer Presets as well if you are an administrator. To create a new preset, you can start from scratch or start with a Scene7-provided eCatalog Viewer Preset and save it under a new name. You can create your own eCatalog Viewer Presets to present printed material in your company colors and set the tone. eCatalog Viewer Presets offer many settings for going from page to page, zooming, searching, and choosing “skins.” What these controls look like and what the Viewer itself looks like depends on your choice of eCatalog Viewer Presets. Follow these steps to create a eCatalog Viewer Preset (you must be an administrator): 1 Click Setup > Viewer Presets. 2 In the Viewer Presets screen, create an eCatalog Viewer Preset by starting anew or by starting from an existing eCatalog Viewer Preset: Creating an eCatalog Viewer Preset Click Add. In the Add Viewer Preset dialog box, choose a platform, choose eCatalog Viewer, and then click Add. Editing an eCatalog Viewer Preset Select an eCatalog Viewer Preset and click Edit. Click Save As after you finish creating the preset. 3 On the Configure Viewer screen, enter a name for your eCatalog Viewer Preset. 4 In the Configure Viewer screen, set the options you want. Click the Info Tip icon adjacent to the option to see its description. The preview screen displays the viewer as you update and change settings. 5 (Optional) In the Info Panel Settings, the Information Server URL option can include the following special tokens, which the viewer substitutes: Token Substituted with Notes $1$ rollover_key value The item identifier from the <area> element of the map. $2$ frame The sequence number of the currently shown frame in the image set. $3$ imageroot The first path element of the first item specified in the image command (typically the image catalog ID of the catalog entry specifying the image set). 6 (Optional) In the Info Panel Settings, in the Response Template box, type the text you want to appear if Scene7 encounters an error in retrieving information for an image map. For example, if the system receives a company name and an eCatalog name, but no rollover identifier, this message appears for the user. Important: To use this Response Template instead of the template defined in the eCatalog itself, add “fmt=1” to the end of the Information Server URL. For example: HTTP://.../$3$/$4$/$1$/?FMT=1. 7 Click Save. 8 Click Default if you want the eCatalog Viewer Preset you created to be the one that is used to display eCatalogs on your web page. To delete an eCatalog Viewer Preset, select it on the Viewer Presets screen and click Delete. Last updated 10/9/2014 148 USING SCENE7 eCatalogs More Help topics “Viewer Presets” on page 32 Previewing eCatalogs in the eCatalog Viewer You can use Preview to display your eCatalog using different eCatalog Viewer Presets. You can experiment with the different controls to turn pages, write sticky notes, and browse. See “Configuring Default Viewers” on page 47. See “Previewing an asset” on page 102. To preview eCatalogs in the eCatalog Viewer 1 In the Asset Library panel on the left side, in the Show drop-down list, select a video-based asset type such as Video or Video Set. 2 In the Asset Library panel on the left side, navigate the Asset folders that contain videos that you want to preview with an eCatalog Viewer. 3 Do one of the following: • Above the Assets window, on the right side of the toolbar, click Grid View. In the Asset window, below the thumbnail image, click Preview > Viewer List. • Above the Assets window, on the right side of the toolbar, click List View. In the Asset window, select an asset, and then to the right of the thumbnail image, click Preview > Viewer List. • Above the Assets window, on the right side of the toolbar, click Detail View. On the same toolbar, click Preview > Viewer List. 4 In the Viewer List window, in the table, click a viewer link to preview the asset in the selected viewer. 5 Close the displayed viewer to return to the Viewer List screen. 6 In the lower-right corner of the Viewer List window, click Close to return to the Assets screen. More Help topics “Setting up eCatalog Viewer Presets” on page 147 Publishing eCatalogs Publishing places your eCatalog on Scene7 Image Servers so it can be made available to your web site or application. As part of the publishing process, the Scene7 Publishing System activates the URL string. You can place this URL string in your HTML web page code. Make sure your eCatalog is marked for publish in the Browse Panel or Asset Details page before you publish it. To mark an eCatalog (or any other asset) for publish, select the Mark for Publish icon . To publish your eCatalog to Scene7 Image Servers: 1 Click Publish on the Global Navigation bar. 2 On the Publish screen, select a When option (One-Time or Recurring). 3 (Optional) Enter a name for the publish job, but keep the time-and-date stamp. Last updated 10/9/2014 149 USING SCENE7 eCatalogs 4 If you set up your eCatalog so that viewers can perform keyword searches, make sure that the keyword data is published. Click Advanced to display the Advanced options, select the Publish menu, and choose Full W/ Search Data. This option is selected by default. 5 Click Start Publish. More Help topics “Publishing files” on page 87 Linking an eCatalog to a web page Your web sites and applications access Scene7 Image Server content, including eCatalogs, by way of URL strings or embedded code. These URL strings are activated during the publishing process. To place the URL string or embedded code for your eCatalog in your web pages and applications, you copy it from the Scene7 Publishing System. Important: The URL is not active until you publish the asset. Copying an eCatalog URL 1 In the Asset Browse panel, in the Show drop-down list, click Catalog. 2 in the Asset Library panel on the left side, navigate to the asset folder that contains the eCatalog whose embed code you want to copy. 3 Above the Asset Browse panel, on the right side of the toolbar, do one of the following: • Click Grid View. In the Asset Browse panel, double-click a single asset to open it in Detail View. In the URLs and Embed Code panel on the right, click Copy URL to the right of the viewer you want. • Click Grid View. In the Asset Browse panel, select a single asset, and then below the thumbnail image, click Preview > Viewer List. In the Viewer List page, under the Actions column of the table, click Copy URL. • Click List View. In the Asset Browse panel, select a single asset, and then to the right of the thumbnail image, click Preview > Viewer List. In the Viewer List page, under the Actions column of the table, click Copy URL. • Click Grid View, List View, or Detail View. On the same toolbar, click Preview > Viewer List. In the Viewer List page, under the Actions column of the table, click Copy URL. Adding eCatalog URLs to your web page The most common way to deploy an eCatalog is to place a link in the form of an eCatalog thumbnail cover page on your web page. Work with your IT team to make sure that the eCatalog launches in a clean, centered pop-up window. Ask your IT team to keep the toolbar and address bar in the browser from showing. The following is an example of HTML code that launches a sample pop-up window eCatalog Viewer. To use this code, copy your eCatalog URL into this code and place this code on your web site or application. Last updated 10/9/2014 150 USING SCENE7 eCatalogs <html> <head> <script language="javascript"> <!-function openECatalog(){ window.open("http://s7d4.scene7.com/s7ondemand/brochure/ flash_brochure.jsp?company=YourCo&sku=june06"}; --> </script> </head> <body> <a href="javascript:openECatalog();">Click Here to View Your eCatalog</a> </body> </html> Copying the embed code of an eCatalog viewer Using the Embed Code feature lets you review the viewer code for the selected eCatalog. You can also copy the code to the clipboard so you can paste it in your web pages for deployment of the viewer. Editing of the code is not permitted in the Embed Code dialog box. To copy the embed code of an eCatalog viewer 1 In the Asset Browse panel, in the Show drop-down list, click Catalog. 2 in the Asset Library panel on the left side, navigate to the asset folder that contains the eCatalog whose embed code you want to copy. 3 Above the Asset Browse panel, on the right side of the toolbar, do one of the following: • Click Grid View. In the Asset Browse panel, double-click a single asset to open it in Detail View. In the URLs panel on the right, click Embed Code. • Click Grid View. In the Asset Browse panel, select a single asset, and then below the thumbnail image, click Preview > Viewer List. In the Viewer List page, under the Actions column of the table, click Embed Code. • Click List View. In the Asset Browse panel, select a single asset, and then to the right of the thumbnail image, click Preview > Viewer List. In the Viewer List page, under the Actions column of the table, click Embed Code. • Click Grid View, List View, or Detail View. On the same toolbar, click Preview > Viewer List. In the Viewer List page, under the Actions column of the table, click Embed Code. 4 In the Embed Code dialog box, click Copy to Clipboard. Editing the code is not permitted in the Embed Code dialog box. 5 Click Close. Last updated 10/9/2014 151 Chapter 10: Image Sets Scene7 Image Sets give users an integrated viewing experience. In the dynamic Image Set Viewer, users can see different views of an item by clicking a thumbnail image. Image Sets allow you to present alternative high-resolution views of an item. The Image Set Viewer offers zooming tools for examining images closely. If you want, you can make guided zoom targets and Image Maps part of your Image Set. Image Sets make for a more concerted, intimate viewing experience. Quick Start: Image Sets This Image Sets Quick Start is designed to get up and running quickly with Image Set techniques in Scene7. 1. Uploading your master images for multiple views and swatches Start by uploading the images for your Image Sets. Because users can zoom on images in the Image Set Viewer, take zooming into account when you choose images. Make sure that the images are least 2000 pixels in the largest dimension. Scene7 supports many image file formats, but lossless TIFF, PNG, and EPS images are recommended. Select the Upload button on the Global Navigation bar to upload files from your computer to a folder on the Scene7 Publishing System. See “Preparing Image Set assets for upload” on page 152 and “Uploading your files” on page 83. 2. Creating an Image Set In Image Sets, users click thumbnail images in the Image Set Viewer to see an image from a different side or angle. To create an Image Set, click the Build button and choose Image Sets. Then, on the Image Set screen, drag your images onto the screen to compose your Image Set. Organize, add, and delete images as needed. See “Creating an Image Set” on page 152. See also “Including zoom targets and Image Maps in Image Sets” on page 154 3. Setting up Image Set Viewer Presets, as needed Administrators can create or modify Image Set Viewer Presets. Scene7 comes with default Viewer Presets for each rich media type. Use the Zoom Viewer: Custom > Images or Image Sets/Multiple Views presets to view your Image Sets. You add or edit Viewer Presets from the Application Setup screen. See “Adding and editing Viewer presets” on page 38. 4. Previewing an Image Set Select the Image Set in the Browse Panel, and then click Preview. Your Image Set appears in the Preview screen. Click the thumbnail icons to examine your Image Set in the selected Viewer. You can choose different Viewers from the Presets menu. See “Previewing an asset” on page 102. Last updated 10/9/2014 152 USING SCENE7 Image Sets 5. Publishing an Image Set Publishing an Image Set places it on Scene7 servers and activates the URL string. Note: This step is not necessary if you selected Publish after save (default) at the time you created and saved the Image Set. Click the Mark for Publish icon screen, click Start Publish. to the left of its name in the Browse Panel. Then, click Publish. On the Publish See “Publishing files” on page 87. 6. Linking an Image Set to your Website Scene7 creates URL calls for Image Sets, and activates them after you publish. You can copy these URLs from the Preview screen. Select the Image Set, and then click the Preview button. The Preview screen opens. Select an Image Set Viewer Preset and click the Copy URL button. See “Linking an Image Set to a web page” on page 157. Preparing Image Set assets for upload Before uploading the images you need for Image Sets to the Scene7 Publishing System, make sure that the images are the right size and format. To create a multiple-view Image Set, you need images that show an item from different points of view or show different aspects of the same item. The goal is to highlight the important features of an item so viewers have a complete picture of what it looks like or does. Because users can zoom images in Image Sets, make sure that the images are at least 2000 pixels in the largest dimension. Scene7 supports many image file formats, but lossless TIFF, PNG, and EPS images are recommended. For detailed instructions on uploading assets, see “Uploading files” on page 79. More Help topics “Uploading your files” on page 83 “Working with vignette, window covering, and cabinet files” on page 312 Creating an Image Set To create a multiple-view Image Set, you need images that show an item from different points of view or show different aspects of the same item. The goal is to present viewers with images of an item so they get a solid idea of what an item looks like or does. Creating an Image Set When you create a set, the Publish after save option affects the set and set members in the following ways: Last updated 10/9/2014 153 USING SCENE7 Image Sets “Publish after save” option selected before saving? State of set after saving State of set members after saving Yes Published Published No Unpublished Set members retain their published or unpublished state. See also “Manually publishing assets” on page 89 and “Manually unpublishing assets” on page 89. To create an Image Set 1 Do one of the following: Select the images first In the Browse Panel, select the images you want for your Image Set, click Build > Image Sets. Start from the Image Set screen Click Build > Image Sets. The Image Set screen opens. Select a folder in the Asset Library and drag the images you want for your Image Set onto the Image Set screen. 2 To change the order of images, drag the images to new locations. 3 Near the lower-right corner of the page, ensure that Publish after save is selected (default). 4 Click Save, select a folder for storing your Image Set, enter a name for the set, and then click Save. 5 To see your Image Set in the Image Set Viewer, click Preview on the Image Set screen. You can click swatch thumbnails in the Image Set Viewer to see how they behave. Editing an Image Set Depending on whether you edit a published or an unpublished set, the Publish after save option affects the set and set members in the following ways: Set already published? “Publish after save” option selected before saving your edit? State of set after saving State of set members after saving Yes Yes Published Published Yes No Published Existing set members retain their published state. Any new set members that you added during your edit retain their published or unpublished state. No Yes Published Published No No Unpublished Existing set members and any new set members that you added during your edit retain their published or unpublished state. See also “Manually publishing assets” on page 89 and “Manually unpublishing assets” on page 89. To edit an Image Set 1 In the Grid view, browse to an ImageSet, and then below the image, click Edit. 2 Do any of the following: • To add an image (published or unpublished), drag it from a folder in Add Assets onto the Image Set’s Views page. • To remove an image, select it, and then click Delete on the toolbar. Last updated 10/9/2014 154 USING SCENE7 Image Sets • To reorder images, drag an image to a new position. 3 When you are finished editing the set, near the lower-right corner of the page, ensure that Publish after save is selected (default). 4 Click Save, select a storage folder for your set, enter a name for the set, and then click Save. Deleting an Image Set When you delete a set, the set itself is moved to the Trash. However, the members (or “children”) within that set are not affected; instead, they each retain their existing published or unpublished state. See also “Manually publishing assets” on page 89 and “Manually unpublishing assets” on page 89. To delete an Image Set 1 In the Grid View, List View, or Details View, select one or more Image Sets. 2 On the Global Navigation Bar, click File > Delete > Delete. Including zoom targets and Image Maps in Image Sets If you define zoom targets and Image Maps for the images in your Image Set, these targets and maps appear in the Image Set Viewer. Users, for example, can click an Image Map in the Image Set Viewer and open a new page on your web site with information about an item. Users can click a target thumbnail image in the Image Set Viewer and zoom automatically to part of an image. If you want to make zoom targets and Image Maps available to users, create zoom targets and Image Maps for the images in your Image Set. You can do that with the Image Maps or Zoom Targets tools in the Image Set screen or Browse Panel (in Detail view). More Help topics “Creating zoom targets for Guided Zoom” on page 128 “Creating Image Maps” on page 293 Managing info panel content In addition to using Image Map text for your rollovers in Image Sets, you can use an info panel to add larger quantities of rollover text, including links. You can also manage the InfoPanel by using timed caching and scheduling content updates. You can manage your InfoPanel setup and data using the following features in Scene7 Publishing System: • InfoPanel Setup panel lets you specify the template used to display the info panel text, a default response for errors, and the number of hours the information is cached. In addition, you can specify whether the Image Set is automatically published. • InfoPanel Datafeed panel lets you specify a CSV file containing the text you want to appear in the info panel rollover text, as well as schedule times for updating the information. • Import Metadata dialog box lets you import a tab-delimited TXT file containing the rollover text information. You can use this TXT option or the InfoPanel Datafeed panel with the CSV file option for your rollover text. Last updated 10/9/2014 155 USING SCENE7 Image Sets Setting up a response template You can select one of three preset response templates for displaying text in an Info Panel. These preset response templates determine how your information is presented in the Info Panel: how many columns and rows, typeface size, font, and so on. You can select a preset response template or create one of your own. To set up a Response Template 1 Double-click your Image Set to open it in Detail View. 2 Click InfoPanel Setup to unfold the panel. 3 In the Response Template drop-down list, do one of the following: • Select Default to use the default response. The XML for the template design appears, dimmed, in the User Template text box. • Select Custom to create your own response template. In the User Template text box, type the template XML definition. You can use the default template that is already defined in the text box as a base for your own response. 4 (Optional) In the Default Response box, type the text that you want to appear if Scene7 encounters an error in retrieving information for an image map. For example, if the system receives a company name and an Image Set name, but no rollover identifier, this message appears for the user. 5 In the Response TTL text field, enter the number of hours that you want to wait before caching the data. Set a lower number if the data is updated frequently throughout the day. Set a higher number if the data is relatively stable and does not require updating frequently throughout the day. The default is ten hours. 6 Click Upload to upload info panel content, based on the rollover_key values, to s7info. 7 In the S7Info Upload dialog box, browse to the file that you want to use, and then click Upload. Supported file formats are TAB delimited files with UTF-16 encoding and CSV files with ASCII encoding. For CSV files, non-ASCII characters must be HTML encoded. 8 In the InfoPanel Setup panel, click Publish. Importing source content for the info panel You can use a CSV (Comma-Separated Value) file with ASCII encoding (non-ASCII character must be HTML encoded) or a tab-delimited file for the source text for an info panel for an Image Set. Tab-delimited files must use UTF-16 (Unicode) encoding. You import the different file types using different methods. When formatting source content, keep in mind the following guidelines: • The tab- and comma-delimited data should contain as many columns as are necessary for the rollover template. • The first item or column of data should be the rollover identifier (associated with the rollover_key value from the image map URLs). • Make sure that each tab- or comma-delimited item after the identifier is the item that you want substituted into the response template (so the first column is substituted into $1$, the second column into $2$, and so on). Importing CSV content from an externally hosted location 1 Double-click the Image Set to open it in Detail View. 2 Click InfoPanel Datafeed to unfold the panel. Last updated 10/9/2014 156 USING SCENE7 Image Sets 3 In the Externally hosted CSV file location (HTTP) text field, enter the URL to the CSV file. 4 (Optional) In the Schedule Update fields, specify a time to update the content, and then click Add. You can select multiple times for updating. Each update time appears in the Update Times text box. To remove a scheduled time, select it, and then click Delete. 5 (Optional) Click Run Update to immediately update the content. Viewing Image Sets You can view your Image Sets in the Preview window, using your available presets. You use a Zoom Viewer: Custom Viewer Preset for Image Sets. Scene7 comes with default Viewer Presets. Administrators can create or modify the Viewer Presets. More Help topics “Viewer Presets” on page 32 Setting up Zoom Viewer presets for Image Sets You can create and customize Viewer Presets to suit your needs. 1 Click the Setup > Viewer Presets. 2 Create or edit a Viewer preset on the Viewer Presets screen by doing one of the following: Creating Click Add. In the Add Viewer Preset dialog box, choose a platform, choose Zoom Viewer:Custom, and click Add. You can also create a Zoom Viewer Preset by starting from an existing one. Display the name of the preset, select it, and then select the Edit button. On the Configure Viewer screen, enter a new name for the preset. Editing Display the name of a preset, select it, and then click the Edit button. 3 Choose options in the Configure Viewer screen. To see a description of an option, click the Info Tip icon adjacent to the option. The preview screen displays the viewer as you update and change settings. 4 Click Save (or Save As). Previewing Image Set Assets in a Viewer You can use Preview to see how an asset appears on particular viewer type platform such as HTML5. Depending on the asset type and associated viewer that you have selected to preview, not all platforms are available in Preview. 1 In the Asset Library panel on the left side, in the Show drop-down list, select Image Set. 2 In the Asset Library panel on the left side, navigate the asset folders to select the Image Set that you want to preview. 3 Do any one of the following • Above the Assets window, on the right side of the toolbar, click List View. In the Asset window, hover on an asset, and then click Preview. • Above the Assets window, on the right side of the toolbar, click Grid View. In the Asset window, in an asset thumbnail window, click Preview. • Above the Assets window, on the right side of the toolbar, click Detail View. On the same toolbar, click Preview. Last updated 10/9/2014 157 USING SCENE7 Image Sets • In the Asset window, select an asset. On the toolbar, click File > Preview. 4 (Optional) In the Preview window, in the drop-down list at the bottom, select the URL encoding that you want applied to the asset’s URL when it is copied. 5 Click a viewer link to preview the asset in the selected viewer. When you click a given viewer link, its associated URL is automatically copied to the clipboard. 6 Close the displayed viewer to return to the Preview screen. 7 Click Close to return to the Assets screen. Automated Image Set generation You can automate set generation as an independent job that is not dependent of an upload. To automate Image Set generation 1 Click File > Generate Set. 2 In the Generate Set dialog box, specify a job name. By default, the job is given a name that indicates it is a generated job and when the job was generated. 3 Select the preset that you want to apply. 4 Click Destination Folder and specify the folder that you want to use. 5 Click Submit. Linking an Image Set to a web page After you publish an Image Set, you can copy its URL or its embed code for use in your web site or application. Then you can deploy the URL or paste the embed code as necessary so users can view the Image Set on your web site or application. Important: The URL is not active until you publish the asset. More Help topics “Publishing files” on page 87 Copying an Image Set URL 1 In the Asset Browse panel, in the Show drop-down list, click Image Set. 2 in the Asset Library panel on the left side, navigate to the asset folder that contains the Image Set whose embed code you want to copy. 3 Above the Asset Browse panel, on the right side of the toolbar, do one of the following: • Click Grid View. In the Asset Browse panel, double-click a single asset to open it in Detail View. In the URLs and Embed Code panel on the right, click Copy URL to the right of the viewer you want. • Click Grid View. In the Asset Browse panel, select a single asset, and then below the thumbnail image, click Preview > Viewer List. Last updated 10/9/2014 158 USING SCENE7 Image Sets In the Viewer List page, under the Actions column of the table, click Copy URL. • Click List View. In the Asset Browse panel, select a single asset, and then to the right of the thumbnail image, click Preview > Viewer List. In the Viewer List page, under the Actions column of the table, click Copy URL. • Click Grid View, List View, or Detail View. On the same toolbar, click Preview > Viewer List. In the Viewer List page, under the Actions column of the table, click Copy URL. Adding Image Set URLs to your web page The most common way to deploy Image Sets is to place a link (via a navigation icon) on your web page. When clicked, the link launches a dynamic page (ASP or JSP) that displays the Image Set in a pop-up zoom window. The zoom link opens a pop-up window that contains the actual zoom feature. Here is an example of the code: <script language="javascript"> <!-function zoom_window() { window.open("http://sample.scene7.com/s7ondemand/zoom/flasht_zoom.jsp?company=S7Web&sku=swea ter_1_set","", "toolbar=no,location=no,directories=no,"+ "status=no,menubar=no,scrollbars=yes"+ "resizable=yes,width=500,height=450,top=0,left=0,right=0,bottom=0") } --> </script> The following URL call to the Scene7 platform follows the same protocol as all zoom viewers, except the SKU parameter is now the Image Set name. http://sample.scene7.com/s7ondemand/zoom/flasht_zoom.jsp?company=S7Web&sku=sweater_1_set In the above URL, notice a SKU number (sku=sweater_1_set). The string after sku= is the Image Set name (sweater_1_set). The user clicks the zoom feature link that launches a window. Copying the embed code of an Image Set viewer Using the Embed Code feature lets you review the viewer code for the selected Image Set. You can also copy the code to the clipboard so you can paste it in your web pages for deployment of the viewer. Editing of the code is not permitted in the Embed Code dialog box. To copy the embed code of an Image Set viewer 1 In the Asset Browse panel, in the Show drop-down list, click Image Set. 2 in the Asset Library panel on the left side, navigate to the asset folder that contains the Image Set whose embed code you want to copy. 3 Above the Asset Browse panel, on the right side of the toolbar, do one of the following: • Click Grid View. In the Asset Browse panel, double-click a single asset to open it in Detail View. In the URLs panel on the right, click Embed Code. • Click Grid View. In the Asset Browse panel, select a single asset, and then below the thumbnail image, click Preview > Viewer List. In the Viewer List page, under the Actions column of the table, click Embed Code. Last updated 10/9/2014 159 USING SCENE7 Image Sets • Click List View. In the Asset Browse panel, select a single asset, and then to the right of the thumbnail image, click Preview > Viewer List. In the Viewer List page, under the Actions column of the table, click Embed Code. • Click Grid View, List View, or Detail View. On the same toolbar, click Preview > Viewer List. In the Viewer List page, under the Actions column of the table, click Embed Code. 4 In the Embed Code dialog box, click Copy to Clipboard. Editing the code is not permitted in the Embed Code dialog box. 5 Click Close. Last updated 10/9/2014 160 Chapter 11: Swatch Sets Scene7 Swatch Sets give users an integrated viewing experience. In the dynamic Swatch Set Viewer, users can see an item rendered in a different color, material, texture, finish, or fabric merely by clicking a thumbnail. Quick Start: Swatch Sets This Swatch Sets Quick Start is designed to get up and running quickly with Swatch Set techniques in Scene7. 1. Uploading the images and swatch files Start by uploading the images and swatch files for your Swatch Sets. Click Upload on the Global Navigation bar to upload files from your computer to a folder on the Scene7 Publishing System. See “Preparing Swatch Set assets for upload” on page 161and “Uploading your files” on page 83. 2. Creating a Swatch Set To create a Swatch Set, click Build > Swatch Sets. On the Swatch Set screen, drag images and color swatches onto the screen. See “Creating a Swatch Set” on page 161. 3. Setting up Swatch Set Viewer Presets Administrators can create or modify Image Set Viewer Presets. Scene7 comes with default Viewer Presets for each rich media type. Use the Zoom Viewer: Custom > Image Sets/Color Swatches presets to view your Swatch Sets. See “Adding and editing Viewer presets” on page 38. 4. Previewing a Swatch Set Select the Swatch Set in the Browse Panel, and then click Preview. Your Swatch Set appears in this screen. Click the thumbnail and swatch icons to examine your Swatch Set in the selected Viewer. You can choose different Viewers from the Presets menu. See “Previewing an asset” on page 102. 5. Publishing a Swatch Set Publishing a Swatch Set places it on Scene7 servers and activates the URL string. Click the Mark For Publish icon screen, click Start Publish. to the left of its name in the Browse Panel. Then, click Publish. On the Publish See “Publishing files” on page 87. 6. Linking a Swatch Set to a web page Scene7 creates URL calls for Swatch Sets, and activates them after you publish. You can copy these URLs from the Preview screen. Select the Swatch Set, and then select the Preview button. The Preview screen opens. Select a Swatch Set Viewer Preset and select the Copy URL button. See “Linking a Swatch Set to a web page” on page 164. Last updated 10/9/2014 161 USING SCENE7 Swatch Sets Preparing Swatch Set assets for upload Before uploading the images you need, make sure that the images are the right size and format. Also assemble the swatch files you need. To create a Swatch Set, you need vignettes or different shots of the same image showing it in different colors, patterns, or finishes. You also need swatch files that correspond to the different colors, patterns, or finishes. For example, to present a Swatch Set showing the same jacket in black, brown, and green, you need: • A black, brown, and green shot of the same jacket. • A black, brown, and green color swatch. Because users can zoom images in Swatch Sets, make sure that the images are at least 2000 pixels in the largest dimension. Scene7 supports many image file formats, but lossless TIFF, PNG, and EPS images are recommended. For detailed instructions on uploading assets, see “Uploading files” on page 79. More Help topics “Working with vignette, window covering, and cabinet files” on page 312 Creating a Swatch Set A Swatch Set gives users the opportunity to view an item in a different color, pattern, or finish. To create a Swatch Set with color swatches, you need one image for each different color, pattern, or finish you want to present to users. You also need one color, pattern, or finish swatch for each color, pattern, or finish. For example, suppose you want to present images of caps with different color bills; the bills are red, green, and blue. In this case, you need three shots of the same cap. You need one shot with a red, one with a green, and one with a blue bill. You also need a red, green, and blue color swatch. The color swatches serve as the thumbnails that users click in the Swatch Set Viewer to see the red-billed, green-billed, or blue-billed cap. Creating a Swatch Set When you create a set, the Publish after save option affects the set and set members in the following ways: “Publish after save” option selected before saving? State of set after saving State of set members after saving Yes Published Published No Unpublished Set members retain their published or unpublished state. See also “Manually publishing assets” on page 89 and “Manually unpublishing assets” on page 89. To create a Swatch Set 1 Do one of the following: Select the images first In the Browse Panel, select the images, and then click Build > Swatch Sets. Start from the Swatch Set screen Click Build > Swatch Sets. Select a folder in the Asset Library and drag the images onto the Views section of the Swatch Set page. Last updated 10/9/2014 162 USING SCENE7 Swatch Sets 2 Drag swatch colors, patterns, or finishes into the Swatches placeholder box on the Swatch Set page. Make sure that the color, pattern, or finish swatch you drag into each placeholder represents the color, pattern, or finish of the adjacent image. 3 To change the order of images in your Swatch Set, drag the images to new locations. 4 Near the lower-right corner of the page, ensure that Publish after save is selected (default). 5 Click Save, select a folder for storing your color swatch Swatch Set, enter a name for the set, and click Submit. 6 To see your Swatch Set in the Swatch Set Viewer, click Preview on the Swatch Set screen. You can click swatch thumbnails in the Swatch Set Viewer to see how they behave. Editing a Swatch Set Depending on whether you edit a published or an unpublished set, the Publish after save option affects the set and set members in the following ways: Set already published? “Publish after save” option selected before saving your edit? State of set after saving State of set members after saving Yes Yes Published Published Yes No Published Existing set members retain their published state. Any new set members that you added during your edit retain their published or unpublished state. No Yes Published Published No No Unpublished Existing set members and any new set members that you added during your edit retain their published or unpublished state. See also “Manually publishing assets” on page 89 and “Manually unpublishing assets” on page 89. To edit a Swatch Set 1 In the Grid view, browse to an SwatchSet, and then below the image, click Edit. 2 Do any of the following: • To add an image (published or unpublished), drag it from a folder in Add Assets onto the Swatch Set’s Views page. • To remove an image, select it, and then click Delete on the toolbar. • To reorder images, drag an image to a new position. 3 When you are finished editing the set, near the lower-right corner of the page, ensure that Publish after save is selected (default). 4 Click Save, select a storage folder, enter a name for the set, and then click Save. Deleting a Swatch Set When you delete a set, the set itself is moved to the Trash. However, the members (or “children”) within that set are not affected; instead, they each retain their existing published or unpublished state. See also “Manually publishing assets” on page 89 and “Manually unpublishing assets” on page 89. Last updated 10/9/2014 163 USING SCENE7 Swatch Sets To delete a Swatch Set 1 In the Grid View, List View, or Details View, select one or more Swatch Sets. 2 On the Global Navigation Bar, click File > Delete > Delete. Including zoom targets and Image Maps in Swatch Sets If you define zoom targets and Image Maps for the images in your Swatch Set, these targets and maps appear in the Swatch Set Viewer. Users, for example, can click an Image Map in the Swatch Set Viewer and open a new page on your web site with information about an item. Users can click a target thumbnail image in the Swatch Set Viewer and zoom automatically to part of an image. If you want to make zoom targets and Image Maps available to users, create zoom targets and Image Maps for the images in your Swatch Set. You can do that with the Image Maps or Zoom Targets tools in the Swatch Set screen or Browse Panel (in Detail view). More Help topics “Creating zoom targets for Guided Zoom” on page 128 “Creating Image Maps” on page 293 Viewing Swatch Sets You can view your Swatch Sets in the Preview window, using your available presets. You use a Zoom Viewer: Custom Viewer Preset for Swatch Sets. Scene7 comes with default Viewer Presets. Administrators can create or modify the Viewer Presets. More Help topics “Viewer Presets” on page 32 Setting up Zoom Viewer presets for Swatch Sets You can create and customize Viewer Presets to suit your needs. 1 Click Setup > Viewer Presets. The Viewer Presets window opens. 2 Do one of the following: • To create a new preset, click Add. In the Add Viewer Preset dialog box, choose a platform, choose Swatch Set Viewer, and click Add. • To edit an existing Swatch Set Viewer preset, select the preset and click Edit. The Configure Viewer screen opens. 3 Type a name in the Preset Name box for the Swatch Set Viewer preset. 4 Choose options in the Configure Viewer screen. To see a description of an option, click the Info Tip icon adjacent to the option. Last updated 10/9/2014 164 USING SCENE7 Swatch Sets The preview screen displays the viewer as you update and change settings. 5 Click Save. Previewing Swatch Sets in a Viewer You can use Preview to see how an asset appears on particular viewer type platform such as HTML5. Depending on the asset type and associated viewer that you have selected to preview, not all platforms are available in Preview. 1 In the Asset Library panel on the left side, in the Show drop-down list, select an Swatch Set-based asset type such as Swatch Set. 2 In the Asset Library panel on the left side, navigate the Asset folders that contain Swatch Set that you want to preview with a viewer. 3 Do any one of the following: • Above the Assets window, on the right side of the toolbar, click List View. In the Asset window, hover on an asset, and then click Preview. • Above the Assets window, on the right side of the toolbar, click Grid View. In the Asset window, in an asset thumbnail window, click Preview. • Above the Assets window, on the right side of the toolbar, click Detail View. On the same toolbar, click Preview. • In the Asset window, select an asset. On the toolbar, click File > Preview. 4 (Optional) In the Preview window, in the drop-down list at the bottom, select the URL encoding that you want applied to the asset’s URL when it is copied. 5 Click a viewer link to preview the asset in the selected viewer. When you click a given viewer link, its associated URL is automatically copied to the clipboard. 6 Close the displayed viewer to return to the Preview screen. 7 Click Close to return to the Assets screen. Linking a Swatch Set to a web page After you publish a Swatch Set, you can use its URL or embed code in your web site or application. Then you can deploy the URL or embed code as necessary so users can view the Swatch Set on your web site or application. Important: The URL is not active until you publish the asset. More Help topics “Publishing files” on page 87 Copying a Swatch Set URL 1 In the Asset Browse panel, in the Show drop-down list, click Swatch Set. 2 in the Asset Library panel on the left side, navigate to the asset folder that contains the Swatch Set whose embed code you want to copy. Last updated 10/9/2014 165 USING SCENE7 Swatch Sets 3 Above the Asset Browse panel, on the right side of the toolbar, do one of the following: • Click Grid View. In the Asset Browse panel, double-click a single asset to open it in Detail View. In the URLs and Embed Code panel on the right, click Copy URL to the right of the viewer you want. • Click Grid View. In the Asset Browse panel, select a single asset, and then below the thumbnail image, click Preview > Viewer List. In the Viewer List page, under the Actions column of the table, click Copy URL. • Click List View. In the Asset Browse panel, select a single asset, and then to the right of the thumbnail image, click Preview > Viewer List. In the Viewer List page, under the Actions column of the table, click Copy URL. • Click Grid View, List View, or Detail View. On the same toolbar, click Preview > Viewer List. In the Viewer List page, under the Actions column of the table, click Copy URL. Adding Swatch Set URLs to your web page The most common way to deploy Swatch Sets is to place a link (via a navigation icon) on your web page. When clicked, the link launches a dynamic page (ASP or JSP) that displays the Swatch Set in a pop-up zoom window. The zoom link opens a pop-up window that contains the actual zoom feature. Here is an example of the code: <script language="javascript"> <!-function zoom_window() { window.open("http://sample.scene7.com/s7ondemand/zoom/flasht_zoom.jsp?company=S7Web&sku=swea ter_1_set","", "toolbar=no,location=no,directories=no,"+ "status=no,menubar=no,scrollbars=yes"+ "resizable=yes,width=500,height=450,top=0,left=0,right=0,bottom=0") } --> </script> The following URL call to the Scene7 platform follows the same protocol as all zoom viewers, except the SKU parameter is now the Swatch Set name. Note: This URL is intended to serve as an example of syntax only; it is not a live link. http://sample.scene7.com/s7ondemand/zoom/flasht_zoom.jsp?company=S7Web&sku=sweater_1_set In the above URL syntax, notice a SKU number (sku=sweater_1_set). The string after sku= is the Swatch Set name (sweater_1_set). The user clicks the zoom feature link that launches a window. Copying the embed code of a Swatch Set viewer Using the Embed Code feature lets you review the viewer code for the selected Swatch Set. You can also copy the code to the clipboard so you can paste it in your web pages for deployment of the viewer. Editing of the code is not permitted in the Embed Code dialog box. To copy the embed code of a Swatch Set viewer 1 In the Asset Browse panel, in the Show drop-down list, click Swatch Set. 2 in the Asset Library panel on the left side, navigate to the asset folder that contains the Swatch Set whose embed code you want to copy. Last updated 10/9/2014 166 USING SCENE7 Swatch Sets 3 Above the Asset Browse panel, on the right side of the toolbar, do one of the following: • Click Grid View. In the Asset Browse panel, double-click a single asset to open it in Detail View. In the URLs and Embed Code panel on the right, click Embed Code to the right of the viewer you want. • Click Grid View. In the Asset Browse panel, select a single asset, and then below the thumbnail image, click Preview > Viewer List. In the Viewer List page, under the Actions column of the table, click Embed Code. • Click List View. In the Asset Browse panel, select a single asset, and then to the right of the thumbnail image, click Preview > Viewer List. In the Viewer List page, under the Actions column of the table, click Embed Code. • Click Grid View, List View, or Detail View. On the same toolbar, click Preview > Viewer List. In the Viewer List page, under the Actions column of the table, click Embed Code. 4 In the Embed Code dialog box, click Copy to Clipboard. Editing the code is not permitted in the Embed Code dialog box. 5 Click Close. Last updated 10/9/2014 167 Chapter 12: Spin Sets A Spin Set simulates the real-world act of turning an object to examine it. Spin Sets make it possible to view items from any angle, gaining the key visual details from any angle. A Spin Set simulates a 360-degree viewing experience. Scene7 offers one-dimensional Spin Sets in which viewers can rotate an item, and two-dimensional Spin Sets in which viewers can rotate and flip the item. Moreover, users can “free-form” zoom and pan any of the views with a few simple mouseclicks. In this way, users can examine an item more closely from a particular viewpoint. Images for a spin set. Spin Sets also accept Image Maps. An Image Map is a region on an image within the Spin Set that displays a rollover panel with text. When the user clicks an Image Map, an action of some kind is triggered. For example, a web page is launched so that the user can learn more about a product. To call attention to the use of an image map in a Spin Set, an outline appears around the Image Map itself when the user moves their mouse pointer over it. See “Creating Image Maps” on page 293. Quick Start: Spin Sets This Spin Sets Quick Start is designed to get up and running quickly with Spin Set techniques in Scene7. Follow steps 1 through 7. At the end of each step is a cross-reference to a topic heading where you can find more information if you need it. 1. Creating and uploading the images At minimum, you need 8–12 shots of an item for a one-dimensional Spin Set and 16–24 for a two-dimensional Spin Set. The shots must be taken at regular intervals to give the impression that the item is rotating and being flipped. For example, if a one-dimensional Spin Set includes 12 shots, rotate the item 30 degrees (360/12) for each shot. Select the Upload button on the Global Navigation bar to upload spin images from your computer or network to the Scene7 Publishing System. See “Guidelines for shooting Spin Set images” on page 169. Last updated 10/9/2014 168 USING SCENE7 Spin Sets 2. Creating a Spin Set To create a Spin Set, click the Build button and choose Spin Sets. In the Spin Set Size dialog box, choose how many rows and cells you want, and click OK. Then drag images into the grid on the Spin Set screen. See “Creating a Spin Set” on page 168. 3. Editing a Spin Set To edit a Spin Set, select its Edit rollover button. The Spin Set screen opens. Add, remove, and change the position of images. You can change the position of rows in two-dimensional spin sets. See “Editing a Spin Set” on page 170. 4. Setting up Spin Set Viewer Presets Administrators can create Spin Set Viewer Presets. These presets determine the look of the Spin Set Viewer. To set up a new Spin Set Viewer Preset, select the Setup button on the Global Navigation bar. On the Setup screen, display Application Setup options, and then select Viewer Presets. On the Viewer Presets screen, select the Add menu and choose Spin Set Viewer in the Add Viewer Preset dialog box. Then choose options in the Configure Viewer screen. See “Setting up Spin Set Viewer Presets” on page 171. 5. Previewing a Spin Set Select your Spin Set in the Browse Panel and click its rollover Preview button. On the Preview screen, hold down the mouse button and drag the pointer left or right to visually “spin” the item. See “Previewing a Spin Set” on page 171. 6. Publishing a Spin Set Publishing a Spin Set places it on Scene7 servers so it can be dynamically delivered to your web site or application. It also activates the URL string that calls the Spin Set from Scene7 Image servers to your web site or application. To publish a Spin Set, mark it for publish by selecting the Mark for Publish icon beside its name in the Browse Panel. Select the Publish button on the Global Navigation bar to initiate a publish. On the Publish screen, click Start Publish. See “Publishing a Spin Set” on page 172. 7. Linking a Spin Set to a web page Scene7 creates URL callout strings for Spin Sets, and activates them after you publish them. You can copy these URLs from the Preview screen. Select the Spin Set, and then select the Preview button. The Preview screen opens. Select a Spin Set Viewer Preset. Then select the Copy URL button. See “Linking a Spin Set to a web page” on page 173. Creating a Spin Set To create an effective Spin Set, make sure that you shoot the images correctly. You can create a Spin Set in Scene7 by selecting the Build button and choosing Spin Sets. Edit Spin Sets in the Spin Sets screen. Last updated 10/9/2014 169 USING SCENE7 Spin Sets Note: Previous versions of Scene7 did not offer two-dimensional Spin Sets. If you created a Spin Set in a previous version of Scene7, you cannot save your one-dimensional Spin Set without first saving it under a different name. Click Save As in the Spin Set screen and enter a new name so that you can edit it in Scene7. Guidelines for shooting Spin Set images In general, the more images you have in a Spin Set, the better the image spinning effect is. However, including many images in the set also increases the amount of time it takes for the images to load. Scene7 recommends these guidelines for shooting images for use in Spin Sets: • At minimum, use 8–12 images in a one-dimensional spin set and 16–24 images in a two-dimensional Spin Set. • Use a lossless format; TIFF and PNG are recommended. • Mask all images so the item appears on a pure white or other high-contrast background. Optionally, add shadows. • Make sure that product details are well lighted and in focus. • Take spin images for fashion clothing with a mannequin or model. Often the mannequin is either completely masked (using a glass mannequin) or a stylized mannequin/dressform is shown in the image. You can create an onmodel spin set by defining the number of angles. Mark each angle with tape on the floor to guide the model to step and look in the direction of each shot. Creating a Spin Set Be aware that the order in which the Spin Set is authored or created in Scene7 Publishing System is important. Depending on how you order the assets when you drag and drop images into the grid on the Spin Set page, the Spin Set spins in a certain direction . Therfore, the order in which it is visually displayed in the builder is how the asset is spun when a user moves their mouse pointer or moves their finger, left to right. When you create a set, the Publish after save option affects the set and set members in the following ways: “Publish after save” option selected before saving? State of set after saving State of set members after saving Yes Published Published No Unpublished Set members retain their published or unpublished state. See also “Manually publishing assets” on page 89 and “Manually unpublishing assets” on page 89. After you save a Spin Set, you can use Preview in the Build: Spin Set page to see what your Spin Set looks like in the default viewer. To create a Spin Set 1 On the Build drop-down menu, click Spin Sets. 2 In the Spin Set Size dialog box, set the number of rows and cells that you want. To make a one-dimensional spin set, select one row only. To make a two-dimensional Spin Set, select two or more rows. 3 Click OK. 4 Drag and drop images into the grid on the Spin Set screen. 5 When you are finished, near the lower-right corner of the page, ensure that Publish after save is selected (default). Last updated 10/9/2014 170 USING SCENE7 Spin Sets 6 Click Save. 7 In the Save dialog box, select a folder for storing your spin set. In the File Name field, enter the spin set name. 8 Click Save. More Help topics “Editing a Spin Set” on page 170 Editing a Spin Set Depending on whether you edit a published set or an unpublished set, the Publish after save option affects the set and set members in the following ways: Set already published? “Publish after save” option selected before saving your edit? State of set after saving State of set members after saving Yes Yes Published Published Yes No Published Existing set members retain their published state. Any new set members that you added during your edit retain their published or unpublished state. No Yes Published Published No No Unpublished Existing set members and any new set members that you added during your edit retain their published or unpublished state. See also “Manually publishing assets” on page 89 and “Manually unpublishing assets” on page 89. To edit a Spin Set 1 Click the Spin Set’s rollover Edit button. 2 Do any of the following: Removing images Select the image, and then click Delete. Adding images Drag the image into a cell. Reordering rows (two-dimensional Spin Sets) Click a row-selector box (to the left of the row) and then click Move Row Down or Move Row Up. Adding rows and cells Enter a number in the Rows box and Cells box to determine the number of rows and the number of cells in each row. 3 When you are finished editing, near the lower-right corner of the page, ensure that Publish after save is selected (default). 4 Click Save, select a storage folder, enter a name for the set, and then click Save. Deleting a Spin Set When you delete a set, the set itself is moved to the Trash. However, the members (or “children”) within that set are not affected; instead, they each retain their existing published or unpublished state. Last updated 10/9/2014 171 USING SCENE7 Spin Sets See also “Manually publishing assets” on page 89 and “Manually unpublishing assets” on page 89. To delete a Spin Set 1 In the Grid View, List View, or Details View, select one or more Spin Sets. 2 On the Global Navigation Bar, click File > Delete > Delete. Setting up Spin Set Viewer Presets Spin Set Viewer Presets determine the style, behavior, and look of your viewers. Scene7 comes with default Spin Set Viewer Presets. If you are an administrator, you can create your own Spin Set Viewer Presets as well. You can configure a Spin Set Viewer Preset with different colors, borders, fonts, and image settings. Follow these steps to create a Spin Set Viewer Preset: 1 Click Setup > Viewer Presets. The Viewer Presets window opens. 2 Do one of the following: • To create a new preset, click Add, and in the Add Viewer Preset dialog box, choose a platform, and choose Spin Set Viewer. • To edit an existing Spin Set Viewer preset, select the preset and click Edit. The Configure Viewer screen opens. 3 Type a name in the Preset Name box for the Spin Set Viewer preset. 4 Specify other options as desired. To see a description of an option, click the Info Tip icon adjacent to the option. The preview screen displays the viewer as you update and change settings. 5 Click Save. Click Make Default to make the Spin Set Viewer Preset you created the company default for showing Spin Sets. See “Configuring Default Viewers” on page 47. To delete a Spin Set Viewer Preset, select it on the Viewer Presets screen and click the Delete button. More Help topics “Viewer Presets” on page 32 Previewing a Spin Set You can use Viewer List to preview how an asset appears on particular viewer type platform such as HTML5. Depending on the asset type and associated viewer that you have selected to preview, not all platforms are available in Viewer List. See “Configuring Default Viewers” on page 47. See “Previewing an asset” on page 102. Last updated 10/9/2014 172 USING SCENE7 Spin Sets To preview a Spin Set 1 In the Asset Library panel on the left side, in the Show drop-down list, select the Spin Set asset type. 2 In the Asset Library panel on the left side, navigate the Asset folders that contain the Spin Set that you want to preview with a viewer. 3 Do one of the following: • Above the Assets window, on the right side of the toolbar, click Grid View. In the Asset window, below the thumbnail image, click Preview > Viewer List. • Above the Assets window, on the right side of the toolbar, click List View. In the Asset window, select an asset, and then to the right of the thumbnail image, click Preview > Viewer List. • Above the Assets window, on the right side of the toolbar, click Detail View. On the same toolbar, click Preview > Viewer List. 4 In the Viewer List window, in the table, click a viewer link to preview the asset in the selected viewer. 5 Close the displayed viewer to return to the Viewer List screen. 6 In the lower-right corner of the Viewer List window, click Close to return to the Assets screen. More Help topics “Editing a Spin Set” on page 170 Publishing a Spin Set Publishing a Spin Set places the images in the set on Scene7 Image Servers, where they are available to your web site or application. What’s more, during the publishing process, SPS activates the Spin Set URL strings you need for your web site or application. More Help topics “Publishing files” on page 87 Marking a Spin Set for publish Mark your Spin Set for publish for it to be copied to Scene7 image servers. You can mark your Spin Set for publish in to the left of its name. All images in the set are marked for the Browse Panel by selecting the Mark for Publish icon publish when you mark the Spin Set itself for publish. Publishing the Spin Set To publish a Spin Set to Scene7 Image Servers, start by selecting the Publish button on the Global Navigation bar. Then select a When option, optionally enter a name for the publish job, and select the Start Publish button. Last updated 10/9/2014 173 USING SCENE7 Spin Sets Linking a Spin Set to a web page Web sites and applications access Scene7 Image Server content, including Spin Sets, by way of URL strings or embedded code. These URL strings are activated during the publishing process. To place the URL string or embed code for your Spin Set in your web pages and applications, you copy it from the Scene7 Publishing System. Important: The URL is not active until you publish the asset. Copying a Spin Set URL 1 In the Asset Browse panel, in the Show drop-down list, click Spin Set. 2 in the Asset Library panel on the left side, navigate to the asset folder that contains the Spin Set whose embed code you want to copy. 3 Above the Asset Browse panel, on the right side of the toolbar, do one of the following: • Click Grid View. In the Asset Browse panel, double-click a single asset to open it in Detail View. In the URLs and Embed Code panel on the right, click Copy URL to the right of the viewer you want. • Click Grid View. In the Asset Browse panel, select a single asset, and then below the thumbnail image, click Preview > Viewer List. In the Viewer List page, under the Actions column of the table, click Copy URL. • Click List View. In the Asset Browse panel, select a single asset, and then to the right of the thumbnail image, click Preview > Viewer List. In the Viewer List page, under the Actions column of the table, click Copy URL. • Click Grid View, List View, or Detail View. On the same toolbar, click Preview > Viewer List. In the Viewer List page, under the Actions column of the table, click Copy URL. Adding Spin Set URLs to your web page Spin Sets are deployed like all zoom viewers, by way of a dynamic page (ASP or JSP) that displays the Spin Set in a zoom window. The URL call to the Scene7 platform follows the same protocol on the zoom viewer. However, the Viewer Preset name depends on the Preset that your administrator defined as the default Spin Set Viewer Preset. For example, the following non-live, URL syntax example includes a Preset name called viewer.jsp and the SKU parameter is now the Spin Set name: http://sample.scene7.com/s7ondemand/spin/viewer.jsp?company=S7Web&sku=backpack_spin In this URL syntax example (the link is not live), notice a SKU number (sku=backpack_spin). The string after sku= is the Spin Set name (backpack spin). Copying the embed code of a Spin Set viewer Using the Embed Code feature lets you review the viewer code for the selected Spin Set. You can also copy the code to the clipboard so you can paste it in your web pages for deployment of the viewer. Editing of the code is not permitted in the Embed Code dialog box. To copy the embed code of a Spin Set viewer 1 In the Asset Browse panel, in the Show drop-down list, click Spin Set. 2 in the Asset Library panel on the left side, navigate to the asset folder that contains the Spin Set whose embed code you want to copy. Last updated 10/9/2014 174 USING SCENE7 Spin Sets 3 Above the Asset Browse panel, on the right side of the toolbar, do one of the following: • Click Grid View. In the Asset Browse panel, double-click a single asset to open it in Detail View. In the URLs and Embed Code panel on the right, click Embed Code to the right of the viewer you want. • Click Grid View. In the Asset Browse panel, select a single asset, and then below the thumbnail image, click Preview > Viewer List. In the Viewer List page, under the Actions column of the table, click Embed Code. • Click List View. In the Asset Browse panel, select a single asset, and then to the right of the thumbnail image, click Preview > Viewer List. In the Viewer List page, under the Actions column of the table, click Embed Code. • Click Grid View, List View, or Detail View. On the same toolbar, click Preview > Viewer List. In the Viewer List page, under the Actions column of the table, click Embed Code. 4 In the Embed Code dialog box, click Copy to Clipboard. Editing the code is not permitted in the Embed Code dialog box. 5 Click Close. Last updated 10/9/2014 175 Chapter 13: Template Basics Template Basics are dynamically created and addressable layered image files like layered files in image-editing applications such as Adobe® Photoshop®. Unlike a static file containing layers, such as a PSD file, a template can include parameters. Through parameters, the different aspects of the image can be addressed and customized. Note: You can also create templates from layout-based designs by using Template Publishing and files from Adobe Illustrator and InDesign. See “Template Publishing” on page 188. A template can contain any number of image layers and text layers. You can convert a static file containing layers, such as a layered PSD file, into a template, as well as create templates in Scene7. You can create text layers in templates using fonts that you uploaded into SPS. After you add text to a template, you can format it by changing its justification, fonts, font size, and color. Using the Parameters screen, you can convert any aspect of a template to an addressable parameter. In so doing, you can change which layered image to use or what text value to use in your template. Parameters are passed with the URL string, allowing you to change any parameter to dynamically customize the reply image generated from the image server. Quick Start: Template Basics This Quick Start is designed to get up and running quickly with Template Basics. 1. Upload the files Start by uploading the PSD file or image file for your template. Scene7 supports many image file formats in addition to PSD, but lossless TIFF and PNG images are recommended for templates because they allow for transparency. If you are using a PSD file to build your template, select the Create Template option on the Upload Job Options dialog box when you upload the PSD file. Also choose a Layer Naming option to tell Scene7 how to name PSD layers when they are uploaded to the Scene7 Publishing System. If you are using image files, you can crop the images and also create a mask from clipping paths in the images as you upload them. Select the Upload button on the Global Navigation bar to upload a PSD file or other image files from your computer to a folder on SPS. See “Uploading template files” on page 176. 2. Create a template To create a template from a PSD file, select the Create Template option when you upload the file. To create a template from images, choose Build > Template Basics, enter a width and height measurement for the canvas, select either Designer or Developer, and drag images onto the Template screen. You can also select the images before choosing Build > Template Basics. The Template screen offers tools for: • Adding image layers. To add a layer, drag an image into the Template screen. • Adding text layers. Select the Text tool and drag to draw a box for the text layer; then format the text with tools on the Text screen. • Changing the size and position of layers. • Changing the order of layers. Last updated 10/9/2014 176 USING SCENE7 Template Basics • Applying shadow and glow effects to image and text layers. See “Creating a template” on page 177. 3. Create template parameters The next step is to parameterize the properties on layers to determine which layer properties are included in the URL string. Parameters allow you to use templates with maximum flexibility. After you make a layer property into a parameter, you can change it dynamically. To parameterize a layer, open the template in the Template screen and select the Parameters button next to a layer name. On the Parameters screen, select the option next to each parameter you want to add. See “Creating template parameters” on page 184. 4. Publish templates Publishing your template places it on Scene7 Image Servers so that it can be dynamically delivered to your web site or application. Publishing also activates the URL to call the template from Scene7 Image Servers to your web site or application. Be sure to publish all images associated with your template. To publish a template, mark it for publish and select the Publish button on the Global Navigation bar. Then select the Start Publish button. See “Publishing templates” on page 186. 5. Link a template to a web page Scene7 creates URLs for templates, and activates the URLs when you publish templates to Scene7 Image Servers. You can copy these URL strings from the Template Preview screen. Select your template in the Browse Panel and click the Preview button to open the Template Preview screen. Then choose an Image Preset for delivering your template and select the Copy URL button. After you copy the URL from the Preview screen, you can use it in your web site or application. See “Linking a template to a web page” on page 186. Uploading template files Upload the files you need for your template into the Scene7 Publishing System before you begin building the template. You can build templates from an Adobe® Photoshop® PSD or an image file. TIFF and PNG images are recommended because they allow for transparency. Scene7 recommends using transparent TIFF or PSD images in your templates at the exact size you want to display them on your web site. When you publish the template, call the image with an Image Preset that is also the same size. Paying attention to size ensures that your template is not resized (resampled) at a size larger or smaller than the size at which it was designed. Templates can be created from Adobe Photoshop PSD files or image files. For detailed instructions on uploading files, see “Uploading files” on page 79. Keep the following in mind when uploading template files: • If you’re uploading a PSD file, you can create a template from it. Scene7 creates a separate image for each layer in the PSD. In the Upload Job Options dialog box, select Photoshop Options, select the Maintain Layers option, and select the Create Template option. Then choose an option on the Layer Naming menu for naming the images that Scene7 creates from layers in the PSD. See “PSD upload options” on page 310. Last updated 10/9/2014 177 USING SCENE7 Template Basics • If uploading images, you can create a mask from its clipping path. This option applies to images created with imageediting applications in which a clipping path was created. In the Upload Job Options dialog box, select Image Editing Options and select the Create Mask From Clipping Path option. See “Image editing options at upload” on page 305. More Help topics “Uploading your files” on page 83 “Working with PSD files” on page 310 Creating a template To create a template, click Build > Template Basics. Select either Designer or Developer. On this page, you can add image and text layers. You can also reorder layers, change the size and position of layers, and apply shadow and glow effects to images and text. Note: If you edit a template created in an earlier version of Scene7 Publishing System, you may receive the a prompt upon saving asking “Do you want to add a canvas layer?” Choose No to avoid adding a new base layer. If you accidentally choose Yes, delete the “&allowCanvasPrompt” and “&layer=0” modifiers in the URL and press Enter or Return. Creating the initial template When you create a template set, the Publish after save option affects the set and set members in the following ways: “Publish after save” option selected before saving? State of set after saving State of set members after saving Yes Published Published No Unpublished Set members retain their published or unpublished state. See also “Manually publishing assets” on page 89 and “Manually unpublishing assets” on page 89. You can create a template from an existing template. Open the template, click Save As, and enter a new name in the Save As dialog box. To create the initial Temple Set 1 To create your template use one of the following methods: Select the PSD or images first In the Browse Panel, select the PSD file or images you want for your template, click Build > Template Basics. Start from the Template screen Click Build > Template Basics. Select either Designer or Developer. 2 In the Enter Canvas Size dialog box, enter width and height measurements for your template. 3 Select a folder in the Asset Library and drag the PSD file or images you want for your template onto the Template screen. 4 When you are finished, near the lower-right corner of the page, ensure that Publish after save is selected (default). 5 Click Save. 6 Select a folder for storing your template, enter a name for the template, and click Submit. Last updated 10/9/2014 178 USING SCENE7 Template Basics Scene7 shrinks images if necessary to fit them on the canvas, the area on the Template screen for defining your template. More Help topics “Creating image layers” on page 179 “Creating a text layer” on page 179 Editing a Template Set Depending on whether you edit a published set or an unpublished template set, the Publish after save option affects the set and set members in the following ways: Set already published? “Publish after save” option selected before saving your edit? State of set after saving State of set members after saving Yes Yes Published Published Yes No Published Existing set members retain their published state. Any new set members that you added during your edit retain their published or unpublished state. No Yes Published Published No No Unpublished Existing set members and any new set members that you added during your edit retain their published or unpublished state. See also “Manually publishing assets” on page 89 and “Manually unpublishing assets” on page 89. To edit a Template Set 1 In the Grid view, browse to an Template Set, and then below the image, click Edit. 2 Make changes to the template as necessary. 3 When you are finished editing, near the lower-right corner of the page, ensure that Publish after save is selected (default). 4 Click Save, select a storage folder, enter a name for the set, and then click Save. Deleting a Template When you delete a Template set, the set itself is moved to the Trash. However, the members (or “children”) within that set are not affected; instead, they each retain their existing published or unpublished state. See also “Manually publishing assets” on page 89 and “Manually unpublishing assets” on page 89. To delete a Template 1 In the Grid View, List View, or Details View, select one or more Templates. 2 On the Global Navigation Bar, click File > Delete > Delete. Last updated 10/9/2014 179 USING SCENE7 Template Basics Understanding the Template screen The Template screen offers tools for manipulating and parameterizing layers. Use these tools on the Template screen to create templates: Pan tool Allows you to select layers, move them around the canvas, resize them, or rotate them. Text tool Creates a text layer. Drag on the canvas to create a text layer, and then enter the text in the layer. See “Creating a text layer” on page 179. Preview button Opens the Preview screen and shows the template in a Zoom Viewer. You see what the template looks like to users on your web site or application. Parameter Summary button Opens the Parameter Summary screen. You can see the name of each layer in a template, and on each layer, the names of parameters that have been activated. Text Editor v4.3 and Text Editor v4.2 You can choose to use the latest and most fully featured text editor, Text Editor v4.3, or the previous text editor, Text Editor v4.2. When creating new templates, Text Editor v4.3 is selected by default. When editing older templates, Text Editor v4.2 is selected by default. Text Editor v4.3 does not currently support word wrap, so when editing older templates that use word wrap, use Text Editor v4.2 to keep the template’s fidelity fully intact. If your older template does not use word wrap, you can choose Text Editor v4.3 to take advantage of the many new features it offers such as Increase Margins, Decrease Margins, Set Text In All Caps, and Copy Fit Text. Note: Text Editor v4.2 will eventually be removed as an option in Scene7, so it is recommended that you use Text Editor 4.3 when possible. The Word Wrap option will be incorporated into a future release of the Text Editor. Designer and Developer Select the option that best describes your role. Canvas Defines the total available area, in pixels, for defining your template. The default size is 300 x 300 pixels. Layers are placed on the canvas. Layers list Lists the name of layers in the template. To select a layer, select its name in the Layers list. The Layers list offers tools for adding effects to layers, deleting layers, reordering layers, and parameterizing layers. See “Working with layers” on page 181. Layer Properties area Offers tools for changing the background color, opacity, size, and position of a layer, as well as the background color, opacity, and size of the canvas. You can also adjust shadow and glow effects. See “Working with layers” on page 181. Creating image layers ❖ Drag the image from the Asset Library to the canvas. The ID name of the image appears in the Layers list. Note: If necessary, Scene7 shrinks images to make them fit in the canvas when you create an image layer. More Help topics “Working with layers” on page 181 Creating a text layer 1 Select the Text tool . 2 Drag to create a text box on the canvas or on an image. Last updated 10/9/2014 180 USING SCENE7 Template Basics 3 In the Text screen that opens, add text by doing any of the following on the Preview tab: • Type text in the text box. Choose Copy Fit Text to make the text fit n the text box. • Paste text from the Clipboard into the text box. 4 Click Apply, and then close the Text screen. Format text Follow these steps to format text in a text layer: 1 In the Layers list, double-click the name of the text box with text you want to edit. The Text Editor opens. 2 In the text box, select the text you want to format. You can select all the text, portions of the text, as well as individual characters. 3 Specify any of these formatting options, and then click Apply. Font Choose a font on the Font menu. If a font you want does not appear on the menu, you can upload it into the Scene7 Publishing System. See “Fonts” on page 314. Font Size Choose a font size from the menu, type a specific size in the box, or click the up or down arrows to increase or decrease the size by two points. Color Click to choose a color for text. Bold, Italic, or Underline Select the text, and then click the icon for the type of formatting you want to apply to the text. All Caps, Superscript, or Subscript Select the text, and then click the icon for the type of formatting you want to apply to the text. Alignment Choose an Alignment button to left-align, center, or right-align text in the text layer. Tracking Kerning Line Spacing Type or select a numeric value by which to adjust the amount of space between words. Type or select a numeric value by which to adjust the amount of space between characters. Type or select a numeric value by which to adjust the amount of space between lines. Baseline Shift Type or select a numeric value by which to move a selected character up or down relative to the baseline of the surrounding text. This option is especially useful when you’re hand-setting fractions or adjusting the position of inline graphics. Click Undo to reverse your last action. Click Redo if you change your mind about reversing an action after you click Undo. Format paragraphs 1 In the Layers list, double-click the name of the text box with text you want to edit. The Text Editor opens. 2 Select the paragraph you want to format. 3 Specify any of these formatting options, and then click Apply. Alignment Click to specify the type of alignment: align left, align center, align right, or justify. End of Paragraph Justification Click to specify the type of justification for the last line in the paragraph: last line aligns left; last line aligns center; and last line aligns right. Line Spacing Type or select a numeric value by which to adjust the amount of space between all the lines in the paragraph. Indent All Click to increase the amount the text is indented. Last updated 10/9/2014 181 USING SCENE7 Template Basics Remove Indent Indent First Line Click to decrease the amount the text is indented. Specify the amount by which you want to indent the first line of text. Space Before Paragraph Specify the amount of space you want to appear above the first line of text in the paragraph. Space After Paragraph Specify the amount of space you want to appear below the last line of text in the paragraph. Vertical Align Select where you want the text to appear vertically within the text box: Top, Middle, Bottom. Text Direction Select the direction in which you want the text to display: Right-To-Left or Left-To-Right. Adjust text layer properties 1 In the Template Basics screen, select the text box you want to adjust. 2 In the Layer Properties panel, select any of the following: Shrink Text (Text Editor v4.2 only) Select to shrink the text to fit within the text box. Word Wrap (Text Editor v4.2 only) Select a wrap option to specify if or how the text wraps: • Wrap Wraps the text to fit into a text box that is too small horizontally. • No Wrap Does not wrap the text when the text box is too small horizontally, and instead, cuts off a portion of the text. • NB Wrap (Nonbreaking wrap) Wraps text to fit into a textbox, and does not break words. Position Specifies the location of the text box on the canvas. Padding Adds margins or crops the layer rectangle. Specify the number of pixels to add or remove for Left, Top, Bottom, and Right. Enter positive numbers to add a margin; enter negative numbers to crop. More Help topics “Changing the size and position of layers and the canvas” on page 182 View and edit text source code The information provided in Source tab of the Text Editor is for your reference. Edit the text only if you are familiar with editing source code. 1 In the Layers list, double-click the name of the text box with text you want to edit. The Text Editor opens. 2 Click the Source tab in the Text Editor to reveal the source code for the text. 3 View or edit the text as desired. Changes remain intact if you switch back and forth between Preview and Source view. 4 Click Apply to render the edits. Working with layers Use the Layers list and Layer Properties area to work with layers. You can reorder layers, change their size and position, rotate layers, and determine the background color, foreground color, opacity, and blend mode of a layer. You can also change the size of the canvas, choose its background color, and change its opacity setting. Last updated 10/9/2014 182 USING SCENE7 Template Basics Reordering layers Changing layer order can effect appearance, especially when transparency or overprinting is involved. Be sure to preview the outcome before committing your changes. ❖ Use one of these techniques to reorder the layers in a template: • Select a layer in the Layers list. Then click the Up or Down button as many times as necessary to place it in the correct position in the list. • Drag a layer up or down in the Layers list. Changing the size and position of layers and the canvas Layers must be small enough to fit on the canvas. You can change the size of a layer or the canvas manually or by entering size measurements. You can change the position of a layer manually or by entering offset measurements. You can also rotate a layer. Scene7 recommends creating an Image Preset that is the exact size of your template. Matching the Image Preset size to the template size ensures that the final output size and sharpening options for the template are set correctly. After you’ve created this Image Preset, you can choose it from the Apply Preset menu on the Template Preview screen. The screen shows you what the image looks like when it is delivered from the server. See “Setting up Image Presets” on page 121. Changing the size of a layer To change the size of a layer or the canvas, select the layer or canvas on the Layers list and use one of these techniques: Manually changing size Select and drag a corner of the layer or canvas. With text layers, you can also drag a side of the layer. Hold down the Shift key as you drag to change size but maintain the aspect ratio (the shape). Entering layer size measurements Enter pixel measurements in the W (Width) and H (Height) text boxes in the Layer Properties area. Beside changing the size of a layer, you can pad it. To do so, enter a Padding measurement in the Left, Right, Top, and Bottom box of the Layer Properties area. Padding adds a margin to the current layer to offset it from the perimeter of its base layer. Padding is useful if you add a drop shadow or outer glow effect and you want to make the effect more visible. Padding increases the size of a layer and displays its background color in the extended, padded area. The base layer repositions itself relative to the new size of the layer. For example, if the current layer is centered on the base layer, extending the left side of the layer moves it further to the right of the base layer. Changing the position of a layer To change the position of a layer on the canvas, select its name in the Layers list and use one of these techniques: Manually changing position Move the pointer near to but not over a layer boundary, and when you see the four- headed arrow cursor, click and start dragging. Entering position offset measurements Enter X and Y offset measurements in the X and Y text boxes. These measurements represent the x, y offset of the anchor point in pixels. Rotating a layer The Rotate box lists the angle to which the layer was rotated. To rotate a layer, select its name in the Layers list and use one of these techniques: Manually rotating Move the cursor near to but not over a corner of the layer. When you see the rotation cursor, drag the corner of the layer. Hold down the Shift key as you drag to rotate by 15-degree increments. Last updated 10/9/2014 183 USING SCENE7 Template Basics Entering a degree measurement Enter the number of degrees to rotate the layer. Rotation is clockwise; to rotate in a counterclockwise fashion, enter a negative number. Hiding a layer or a layer effect You can hide a layer or layer effect by clicking the eye icon next to a layer name or effect name. Hidden layers do not appear in previews or output. The layer information is not deleted from the URL. Instead, “hide=1” is added to the URL to note that the layer is currently hidden from view. For example: layer=5&src=is{PortalCo/title}&pos=274,192&effect=-1&.effect=Drop Shadow&blendmode layer=5&src=is{PortalCo/title}&pos=274,192&hide=1&effect=-1&.effect=Drop Shadow&blendmode Determining the background color, opacity, and blend mode To choose a background color, opacity, and blend mode for a layer or the canvas, select the layer or canvas and use these techniques: Foreground color Click the Foreground Color button and choose a color swatch to change the color of the shadow or glow. You can also enter a color-value parameter in the box. The background color applies only to layers that use transparency. For example, it applies to a partially transparent layer in a price tag or the background of a text field. Layers that consist of a PSD, TIFF or PNG image with transparency turned on can have transparent backgrounds. Background color Click the Background Color button and choose a color swatch to change the color of the padded areas. Opacity Drag the Opacity slider to make any layer translucent so that part of the underlying image shows through. The 100-percent setting is completely opaque; the 0 setting is transparent. Blend mode Choose an option to simulate one of the blend modes available in Photoshop. The options are Normal, Dissolve, Lighten, Darken, Multiply, and Screen. These options are available for layers, not the canvas. Using shadow and glow effects on layers You can apply a shadow or glow to a layer. The shadow or glow is applied to the perimeter of the layer and extends inward or outward, depending on the shadow or glow option you choose. If your template originated with a PSD file with shadow and glow effects, you can adjust these effects in the Scene7 Publishing System. After you apply a shadow or glow effect, you can adjust its size, color, opacity, and position in the Layer Properties area of the Template screen. Applying a shadow or glow effect to a layer To apply a shadow or glow effect: 1 Select a layer in the Layers list. 2 Select the Add Effect menu and choose an option: Drop Shadow Applies a shadow to the bottom and right side of the layer. Inner Shadow Applies a shadow effect inside all edges of the layer. Outer Glow Applies a glow effect around all edges of the layer. Inner Glow Applies a glow effect inside all edges of the layer. An effect name appears on the Layers list after you apply an effect. To delete an effect, select its name on the Layers list and then select the Delete button. Last updated 10/9/2014 184 USING SCENE7 Template Basics Note: You sometimes can’t see the effect of a drop shadow or outer glow if the underlying layer is not large enough to display it. If you can’t see the shadow or glow, consider adding Padding values to the layer or reordering the layer. See “Changing the size and position of layers and the canvas” on page 182and “Reordering layers” on page 182. Adjusting a shadow or glow effect To adjust a shadow or glow effect, start by selecting its name in the Layers list. Then change its settings in the Layer Properties area of the Template screen: Color Select the Color button and choose a color swatch to change the color of the shadow or glow. You can also enter a color-value parameter in the box. Opacity Drag the slider to determine how intense the effect is. Less opaque effects are more transparent. Blend Mode Choose an option to simulate one of the blend modes available in Photoshop. The options are Normal, Dissolve, Lighten, Darken, Multiply, and Screen. Size Enter measurements in the X and Y box to enlarge or shrink the shadow effect. Size options are only available for inner shadows and drop shadows. Grow Drag the slider to extend the effect inward or outward. Blur Drag the slider to control feathering at the edges of the effect. Effects with more blur are more feathered. Masking layers The Layers list offers a Mask button that specifies how the mask or alpha channel of a layer is used. Using the Mask button, you can apply the effect of a background layer to a particular layer or the entire parent layer in your template. to cycle through these states: Select a layer in the Layers list and select the Mask button • The background of the layer is opaque. • The layer content is inverted and the background of the layer is filled with solid black. • The background of the layer is filled with solid black. Creating template parameters Parameters enable you to use templates with maximum flexibility; they allow you to dynamically customize a template image. You can decide which text and image layers to include in the template, and in each layer, which parameters to display. For example, to call attention to a product that is on sale, you can create an On Sale text layer. Later, you can remove this layer but still retain the rest of the template image by removing the On Sale parameter. When you create template parameters, you in effect declare which parts of the template to call in a URL string. A URL constructed with parameters exposes those items in the URL string. With parameters exposed, you can create custom results from the way the template image is dynamically constructed from the Image Server. In this way, you can change a template dynamically because you can call some or all of its parameters in a URL. In text layer parameters, you can also make the text string a dynamic field linked to values in a database. Being able to link text to a database is useful, for example, in promotions. You can customize template images to make them show client or customer names. You can also, for example, link a text layer parameter to a prices database to show the price of an item in a template image. Last updated 10/9/2014 185 USING SCENE7 Template Basics You can refer to a parameter more than once. Use the combo box for each command in the parameter dialog box to select any parameter that matches that particular command. (For example, all size parameters are available for the size= command, etc). You can reassign the parameter reference to any parameter already in the combo box, and rename to something not in the combo box. In the the latter case, the name must be unique. Otherwise, an error states that the parameter already exists. When you delete a parameter reference, the parameter is removed from the URL if it is not referenced anywhere else.When you change the default value for a text parameter, all references to that parameter update. You can see the update in the layer table, in the rendering of the template, and in the URL.When you change a layer attribute by manipulating resize handles or typing in values in the property panel, the parameter value is updated and all references to the parameter update. For example, if you have parameterized the size of two layers using one parameter, both layer sizes update when either of the layer sizes are changed. When you preview a template and change a parameter, all references to that parameter are updated. Parameterizing a layer For each layer in your template, follow these steps to create template parameters: 1 In the Layers list, select the Parameters button next to the name of the layer you want to create parameters for. The Parameters screen opens. It lists the names of each parameter on the layer, its value, and its type. 2 Select the On option beside the name of each parameter you want to include in the template image. 3 Select the Close button to close the Parameters screen. You can rename parameters in the Parameters screen. Renaming a parameter makes the parameter easier to identify in URL strings and easier to use as a database value. To rename a parameter, select its On option, click its name, and enter a new name in the Name field. To see a list of the parameters you have created for your template, select the Parameter Summary button on the Template screen. The Parameter Summary screen opens. It lists the name of each layer, and if you have created parameters for a layer, the parameter names and values. Creating dynamic text parameters For text layers, you can additionally make the text string a dynamic field linked to a database value. Follow these steps: 1 On the Template screen, select the Parameters button next to the name of the text layer for which you want to create dynamic text parameters. The Parameters screen opens. 2 Select the On option next to the name of the text attribute (textAttr). 3 Select the Text tab in the Parameters screen. 4 Click the Add Parameter button. A default parameter name appears. You can replace this name by selecting it and typing over it. The current text string becomes the new name of the parameter. 5 Select the Close button to close the Parameters screen. To make the parameter name use a database value, append the following string to the Template URL: ?$_2(parameter name)=(database value) The parameter name will be replaced by names in a database field or Java code indicating, for example, the current price of an item or a customer name. Last updated 10/9/2014 186 USING SCENE7 Template Basics Publishing templates Publishing your template places it on Scene7 Image Servers, where it is available to your web site and application. During the publishing process, the Scene7 Publishing System activates the URLs you need for your web site and application. Important: To use your template, publish all content that went into making it, including fonts and images. If you don’t include all the required files, an error message appears when you publish. Marking templates for publish Templates and all their support files must be marked for publish in order for them to be placed on Scene7 Image Servers. You can mark these items for publish in the Browse Panel by selecting the Mark for Publish icon . More Help topics “Publish After Uploading” on page 87 Publishing your template To publish templates to Scene7 Image Servers, start by selecting the Publish button on the Global Navigation bar. Then select a When option, optionally enter a name for the publish job, and select the Start Publish button. More Help topics “Creating a publish job” on page 88 Linking a template to a web page Your web sites and applications access Scene7 Image Server content via URL strings. After you publish a template, Scene7 activates a URL string that references the template on Scene7 Image Servers. You can paste this URL in a web browser for testing. To place URL strings in your web pages and applications, copy them from the Scene7 Publishing System. To obtain a Template URL string generated with an Image Preset, go to the Preview screen or the Browse Panel (in Detail view). Then select an Image Preset and select the copy URL button. Important: The URL is not active until you publish the asset. Obtaining a template URL You can obtain a template URL string generated by an Image Preset from the Template Preview screen. After you copy the URL, it lands on the Clipboard so you can paste it as necessary. Follow these steps to obtain a template URL string generated with an Image Preset from the Template Preview screen: 1 Click the template’s rollover Preview button or choose File > Preview. The Preview screen opens. 2 Using the Preset’s menus, choose the Image Preset with which you want to deliver the template image. The Preview screen shows you what the template looks like when it is delivered from the server. 3 Click the Copy URL button to copy the URL to the Clipboard. Last updated 10/9/2014 187 USING SCENE7 Template Basics Adding template URLs to your web page To add a template to your web page, consult with your web page development team to modify the <IMG> tag in your HTML web page code using the Scene7 URL string to make a request to Scene7 Image Servers. The commerce engine or dynamic web page code inserts the template image at the size and with the formatting specification defined by the Image Preset you choose for your template. More Help topics “Adding dynamic images to your web page” on page 124 Managing content variations Use template sets to manage the way asset variations are published. Create a template set to manage variations of a template. You can control which variation is used without changing the code on your site. This helps content managers rotate content without requiring IT to change a URL in the Web code. Universal URLs are used to display the the template variation that appears on the page, based on the order they are listed in the set. The template at the top of the template set list is always published. You can use any image preset URL from the list. Image preset URLs are like universal URLs. There can be more than one image preset URL. 1 Click Build > Template Sets. The builder opens. 2 Select a template, then click Add/Preview. 3 Modify the template properties and click Save As to create a new version. 4 Type a name and click Save. You must publish both the asset and the template. 5 Go to the Detail page to get a copy URL from the URLs section. You can move a template in the template order (for example, to the top of the list) by dragging it to its new location. Publish again to submit the new order. Note: You might need to clear the cache to see the changes. The change only appears on the website after the change has made its way through the cache cycle. Last updated 10/9/2014 188 Chapter 14: Template Publishing Adobe® Scene7® Web-to-Print lets you create professionally branded print content that is easy for your customers, clients, and staff to customize and personalize. You can maintain corporate content and brand identity throughout the publishing process. End users can customize the print content — but only the part of the content that you allow them to customize. Personalized stationary, business cards, posters, greeting cards, labels, checks, gifts, clothing, calendars, scrapbooks, and photo albums are examples of customized print products that you can deliver. Corporations can maintain a common brand identity in their signage that can be customized for different regions, franchises, stores, and branch offices. You start by designing a template in Adobe Illustrator®. The template carefully defines what is constant and what is variable — the variable components being the ones that can be customized. For example, after text in an Illustrator file is parameterized, end users can enter text of their own. Similarly, a background color, after it is parameterized as a variable component, can be swapped for a different background color. Scene7 offers two Template Publishing workflows, one for basic use cases and one for advanced use cases. Basic use cases entail creating a design in Adobe Illustrator, uploading it to Scene7, and defining variable elements with parameters in SPS. Advanced use cases require a more comprehensive definition of variability. Advanced use cases entail creating variable elements in Adobe Illustrator, uploading the file to Scene7, and directly manipulating those elements on a XML-level with URL calls. This scenario is called DOM manipulation. Note: For more information about Scene7 web-to-print workflows, template creation, parameterization, DOM manipulation, and more, see the Web-to-Print Workflow Guide here: www.adobe.com/go/learn_s7_webtoprint_en. Download the Zip file to your local hard drive and extract its contents (the Scene7 Web-To-PrintWorkflow Tutorial document and tutorial assets). Quick Start: Template Publishing This Quick Start describes the basic workflow for using Illustrator files to create high-quality, customizable print products. 1. Design your Illustrator file for Template Publishing In Illustrator, design your template. If you want to use the advanced, DOM manipulation method to customize your template, define s7:elementIDs for variable elements in Illustrator. See “Create the initial template in Illustrator” on page 189 and “DOM manipulation” on page 196. 2. Convert your template to Scene7 FXG and upload it to Scene7 Publishing System Adobe Creative Cloud users can use the Adobe Illustrator Plug-in for Web-to-Print. This plug-in converts templates to Scene7 FXG. If a template contains fonts, corresponding font files must be uploaded to the Scene7 Publishing System before uploading the FXG file. See “Upload files for Template Publishing” on page 189. Last updated 10/9/2014 189 USING SCENE7 Template Publishing 3. View, define, or refine parameters in Scene7 In the Template Publishing Preview and Build screens, you can define and refine variable elements via parameters, preview the results, and test the results. In these screens, you can: • Create and modify parameters. • Specify default values for parameter properties and attributes. • Click Copy URL to copy the preview URL to the Clipboard and preview the result in a browser window. See “Parameterizing a template in Scene7” on page 190. 4. Publish the FXG template After you finish defining and testing parameters and attributes, publish the file. Publishing your FXG template places it on the Scene7 Image Servers and activates the URL. Be sure to publish all images and fonts associated with your FXG template. See “Publish FXG templates” on page 197. 5. Obtain the URL Via its URL, the template is now ready to be embedded in your web site for end users to personalize variable content. See “Linking an FXG template to a web page” on page 198. Create the initial template in Illustrator Begin by creating the initial artwork and template in Illustrator. Make sure that your Illustrator template meets these specifications so that it can be successfully parameterized: • Carefully determine which template components you want to be variable. • Make sure that layers are in the correct order so that no object is unintentionally obscured. • Remove unnecessary layers. Removing these layers prevents them from being used mistakenly as parameters. • Upload all fonts for your template to the Scene7 Publishing System. Do so before you upload your template (and make sure that the upload job is complete before you upload the template). Scene7 needs these fonts to render text correctly in the template. • Set the resolution to 300ppi if you intend to print the final document at high quality. Upload files for Template Publishing To create files for Scene7 Template Publishing, convert your Illustrator file to the Scene7 FXG file format and upload the file to SPS. More Help topics “Uploading your files” on page 83 Last updated 10/9/2014 190 USING SCENE7 Template Publishing Preparing the file for upload Do the following before you manually upload the Scene7 FXG file to the Scene7 Publishing System: • Upload fonts separately before you upload the FXG file. • Upload related images found in the assets folder created by the FXG plug-in. Defining variability: Parameterization versus DOM manipulation Scene7 offers two techniques for managing variable content in a template. With both techniques, you design the initial template in Illustrator, convert the template to the Scene7 FXG file format, and upload it to SPS. However, the techniques differ in the degree of control you have over variable elements and the skill required to use them: Parameterizing in the Scene7 Publishing System This technique entails defining variability in the Template Publishing Build and Preview screens in SPS, or in the Adobe Illustrator Plug-in for Web-to-Print. Either method provides the tools for you to create parameters, assign parameter values, and test the results. Using DOM manipulation This technique lets you take control over the design and the template on an XML level. Scene7 FXG files are XML. With this approach, you can edit your design template directly by way of its XML DOM (display object model). In Illustrator you mark variable elements with s7:elementIDs to later manipulate them with URL commands. More Help topics “Parameterizing a template in Scene7” on page 190 “DOM manipulation” on page 196 Parameterizing a template in Scene7 After you upload an Illustrator template that you saved as Scene7 FXG to the Scene7 Publishing System, you can define its variable elements. Do so by parameterizing variable elements in the Template Publishing Build and Preview screens. Scene7 offers tools for defining text and object parameters on layers and their respective properties. You can also create different versions of a template. Parameterizing an FXG template allows you to customize the variability of text, images, and graphics in the template. For example, you can parameterize a line of text so that end users can modify the text through a web user interface. You can define empty text fields as variable so that end users can fill these fields with personalized text. You can also parameterize the attributes and properties of design elements in the S7 Template Publishing Build screen. Note: Parameterizing the template in Scene7 is not required if you plan to use DOM manipulation. More Help topics “Create the initial template in Illustrator” on page 189 “Upload files for Template Publishing” on page 189 Last updated 10/9/2014 191 USING SCENE7 Template Publishing Defining parameters in FXG templates Follow these steps in Scene7 to define parameters for an FXG template: 1 In the Browse window, select the FXG file. 2 Click Build and choose Template Publishing, or click the file’s Edit button. The Template Publishing screen opens. A B C D Parameterizing a template in the Template Publishing screen. A. Click eye icon to show or hide layer B. Select layer to display its properties C. Assign name to attribute to make it variable D. Specify default value for attribute 3 In the Layers panel in the Template Publishing screen, select the layer with the elements that you want to parameterize. Click the eye icon on and off to make sure that you select the object you want. 4 In the Properties panel, click a parameter in the Name column (to parameterize text) or Parameter column (to parameterize objects). Text Click in the text field (scroll to the bottom of the Properties list to find it). The Parameters dialog box appears. Select the text that you want to parameterize and click Add. You can create multiple parameters from the same text Last updated 10/9/2014 192 USING SCENE7 Template Publishing property by selecting different portions of the text and adding parameters for each portion. To change the name of the parameter, click it, enter a new name, and click Close. Objects Click a box in the Parameter column. The Edit Parameter dialog box appears. Enter a name and click OK. To customize multiple attributes at once with the same value, use the same parameter name for each attribute. For example, if your template has a rectangle and a star, you can type newcolor as the Parameter name for the SolidColor color attribute of each. Whenever you change the newcolor value, both the rectangle and the star change to the new color. 5 Specify a default value for the attribute in the Value or Data field. Set all properties for the selected object to specify the exact appearance you want. 6 (Optional) Repeat steps 3- 5 for all objects or layers that you want to parameterize. 7 Click Save or Save As. 8 Click Preview to open the FXG Preview window and see the parameters you created with their default values. Show or hide an object or layer in the FXG template Hidden objects and layers are not visible in preview or output, but are not deleted from the file. You can make them visible again as desired. Visibility is an attribute that you can make variable. Clicking the eye icon on or off sets the default value for the visibility of an object or layer. 1 In the Objects panel, click the eye icon next to an object or layer name to hide it in the file. 2 Click again to make the object visible. Create different versions of a template You can edit attributes to create different versions of the template for different uses. In the Template Publishing screen, click Save As to save the file as a new FXG template without overwriting the original FXG template. Using stroked text Stroked text is an example of how you can parameterize attributes. Scene7 supports these stroked text features: • Width of stroke • Dashed stroke pattern • Different join styles • Different cap end styles • Overprinting of stroke • Separate color handling for stroke, including spot color support This table describes the attributes that support stroked text. Attribute Description s7:fill <Boolean> (S7FXG Only) Specifies whether fill is enabled for text. Default is true. s7:stroke <Boolean> (S7FXG Only) Specifies whether stroke is enabled for text. Default is false. s7:weight <number> (S7FXG Only) Specifies the weight of the stroke for text in points. Default is 1 point. Last updated 10/9/2014 193 USING SCENE7 Template Publishing Attribute Description s7:joints <string> (miter, round, bevel) (S7FXG Only) Specifies the type of join of the stroke. Default is round. s7:caps <string> (none, round, square) (S7FXG Only) Specifies the type of cap of the stroke. Default is round. s7:miterLimit <number> (S7FXG Only) Specifies the limit of the miter when join is miter join for the stroke. Default is 4. s7:strokeOverprint <Boolean> (S7FXG Only) Specifies whether the overprint is enabled for stroke. Default is false. s7:strokeColorName (S7FXG Only) Same as s7:colorName, except it defines the name of the color for the stroke. s7:strokeColorValue (S7FXG Only) Same as s7:colorValue, except it defines the value of the color being used for the stroke. s7:strokeColorspace (S7FXG Only) Same as s7:colorspace, except it defines the colorspace of the stroke. flm:dashPattern <array> (S7FXG Only) By default there are no patterns for the dashes and gaps. This attribute defines the dash/gap pattern of the stroke. The first value is the dash of the stroke. The second is the gap in between the dashes. You can extend the array for multiple values in the same manner with alternate values being specified as dash and gap. Using warped text Warped text enables you to modify the appearance of text with effects like wave, flag, stretch, and so on. Warped text is supported for RichText objects. Text can be vertical or horizontal, and can be point text, area text, and type-on-a-path text. The entire text object must be selected before warped text can be applied. Warped text can be created in Adobe Illustrator. When warping text, you can set the following attributes: • Style • Direction • Bend • Horizontal distortion • Verticle distortion Each attribute contains a set of values. Attribute Values Default Styles7:warpStyle nonearcarcLowerarcUpperarchbulg eshellLowershellUpperflagwavefi shrisefishEyeinflatesqueezetwis t none Directions7:warpDirection horizontalvertical horizontal Last updated 10/9/2014 194 USING SCENE7 Template Publishing Attribute Values Default Bends7:warpBend -1 to 1 0.5 Horizontal Distortions7:warpHorizontalDi -1 to 1 0 -1 to 1 0 stortion Verticle Distortions7:warpVerticalDist ortion Note: For inflate and fishEye, changing the s7:warpDirection flag between horizontal and vertical does not have any effect on the output. For more information about creating and using warped text, see the Adobe Illustrator documentation. Preview and update template attributes The FXG Template Preview screen displays all the parameters you customized for the template. All values reflect the default attributes. You can change the values for any of the parameters listed, as well as preview and publish the altered file. 1 If the template is not already open in the FXG Template screen, open the FXG template in Detail view and click Edit. 2 In the Template Publishing screen, click Preview (located at the top of the window). The template displays using the default parameters. Last updated 10/9/2014 195 USING SCENE7 Template Publishing Default parameters in the FXG Template Preview screen. Note: Click the Up or Down Arrow buttons to go to different pages of a multi-page template. 3 To change the value for a parameter, type a new value in the Value box or select a new value from the menu. To swap out a graphic, enter the URL for the new graphic. The file preview dynamically updates to show the new values. Last updated 10/9/2014 196 USING SCENE7 Template Publishing New values are dynamically reflected. 4 To view the template using a different preset size, choose the size from the Presets menu. 5 To create a file for previewing, choose PDF or SWF from the Format menu, and then click Apply Format. 6 To copy the URL for the template, click Copy URL. 7 To return to the Template Publishing screen and save your changes, click Edit, or close the FXG Template Preview screen. Note: The URL is available for you to copy, but is not active until the template has been published. The URL automatically includes the selected variable data and preset setting. DOM manipulation DOM (document object model) manipulation is a technique for editing a design file by directly manipulating its XML code. DOM manipulation gives you more control over variable design elements, including changing their content and appearance; you can even create new elements on an as-needed basis. Scene7 lets you manipulate the DOM of a Scene7 FXG template by way of URL commands after the template is published. Design elements in the FXG template are manipulated by passing commands through the URL. In this way, you can dynamically manipulate and add attributes to graphics. Last updated 10/9/2014 197 USING SCENE7 Template Publishing To use DOM manipulation, you create s7:elementIDs in your Illustrator file before converting it to a Scene7 FXG file and uploading it to SPS. Important: When using DOM manipulation commands, all values passed in must be URL-encoded. Note: Illustrator Plug-in for Web-to-Print (for converting Illustrator files) converts to FXG 2.0. For information about this specification, see www.adobe.com/go/learn_s7_fxg2_en. More Help topics “Defining variability: Parameterization versus DOM manipulation” on page 190 Creating s7:elementIDs in Illustrator files To use DOM manipulation with a design created in Illustrator, create s7:elementIDs in your Illustrator design. Creating s7:elementIDs enables design elements to be modified with URL commands after the template is published. Creating s7:elementIDs for DOM manipulation of text To create an s7:elementID for DOM manipulation of a text object, open the Layers panel in Illustrator. Then, on the text layer that holds variable text, name the layer with a s7:elementID. To do so, enter the letters id (for identification), a colon (:), and a name. Following are examples of s7:elementID text layer names: id:BirthdayBoyName id:DateofBirth id:EnterFirstNameHer Creating s7:elementIDs for DOM manipulation of objects Create s7:elementIDs for objects when you want end users to be able to change the attributes of objects. Objects can constitute entire text frames, graphics, and images. A color background is an example of an object element ID. As the seasons change, the end user can swap out the background color of a poster to make the poster appropriate to the season. Before you create an s7:element ID for an object in Illustrator, create a separate layer for the object. Follow these steps to create an s7:elementID for an object in Illustrator: 1 Select the object. 2 Choose Windows > Layers. The Layers panel opens. 3 Name the object layer with an s7:elementID. To do so, enter the letters id (for identification), a colon (:), and description to identify the element. Following are examples of s7:elementID object layer names: id:BackgroundColor id:RotationPercentage id:JacketJPG Publish FXG templates Publishing your FXG template places it on the Scene7 servers, where it is available to your web site and application. During the publishing process, the Scene7 Publishing System activates the URLs you need for your web site or application. Last updated 10/9/2014 198 USING SCENE7 Template Publishing Note: To use your FXG template, publish all content that went into making it, including fonts and images. If you don’t include all required files, an error message appears when you publish. More Help topics “Publishing files” on page 87 Mark FXG templates for publish Templates and all their support files must be marked for publish for them to be placed on Scene7 Image Servers. 1 In the Browse Panel, select the FXG template along with any graphics, images, and fonts used. 2 Click the Mark For Publish icon . Publish your FXG template 1 Click the Publish button on the Global Navigation bar. 2 Select a When option, and optionally enter a name for the publish job. 3 Click the Start Publish button. Text overflow indicator display A text overflow indicator shows when text exceeds the space allocated for it in a text frame (or in the last text frame in the case of threaded text). The indicator is a red box with a plus sign in it. Text overflow indicators on SPS are always enabled. Text overflow indicators are controlled with the markOverflowingTextFrame modifier. Use the modifier as follows: Modifier/Values Description markOverflowingTextFrame=0,1 The 1 value makes text flow indicators appear. Default is 0. (Although the default is 0, text overflow indicators in SPS are always enabled.) Note that the markOverflowingTextFrame modifier is casesensitive. Linking an FXG template to a web page After you publish an FXG template, Scene7 activates a URL string that references the FXG template on Scene7 servers. You can paste this URL in a web browser for testing. To place URL strings in your web pages and applications, copy them from the Scene7 Publishing System. To obtain an FXG template URL string generated with an Image Preset for viewing the template at a specific size, go to the FXG Template Preview screen or the Browse Panel (in Detail view). Then select an Image Preset and click the copy URL button. Important: The URL is not active until you publish the asset. Follow these steps to obtain an FXG template URL string generated with an Image Preset from the FXG Template Preview screen: 1 Select the FXG template in the Browse Panel. 2 Click the Preview button or choose File > Preview. The FXG Template Preview screen opens. 3 Select the Copy URL button to copy the URL to the Clipboard. Last updated 10/9/2014 199 USING SCENE7 Template Publishing Creating a PDF document The final step in the Web-to-Print process is generating the customized PDF. After end-users personalize the template using the web application you created, they create a final PDF document. This final PDF is generally sent to a print service provider for professional-grade printing. To make sure that the final PDF prints as expected, developers use the correct joboptions file and set up fonts, printer marks, and colors correctly. Setting up PDF Presets Specify the PDF compatibility level and printer settings by creating and uploading a PDF joboptions file to the Scene7 Server. For example, you can choose to select PDF/X-4 compliant PDF output (recommended for PDF print publishing workflows). You can create the joboptions file in your authoring software (such as Adobe Illustrator), or in Acrobat. Always check with your printer, who can advise you on the appropriate job option settings for your print job. For more information on creating joboptions files, and for information on creating a joboptions file in Acrobat, see Adobe Acrobat Help. To create a joboptions file in Illustrator: 1 Choose Edit > Adobe PDF Presets. 2 In the dialog box, select the preset you want to use. The following Job Option Settings are supported by Scene7: General Images Fonts • Compatibility • Object Level Compression • Embed thumbnails • Optimize for fast web view • Downsample • Resolution • Threshold • Compression for color, gray, and mono • Embed all fonts (fonts are embedded by default) • Embed OpenType fonts • Subset embedded fonts when percent of characters used is less than: • Always Embed List • Never Embed List Last updated 10/9/2014 200 USING SCENE7 Template Publishing Color RGB Gray • Color Strategy (Tag only images is treated as tag everything) • Document Rendering Intent • Only the following working spaces are supported for 4.2.5. 4.3 will allow you to use any customer provide profile that has been uploaded to IPS. • As a workaround you can specify the destination color space for the artwork to be converted to using the default color profiles for the company. • e-sRGB • scRGB with encoding range [-4.0, 4.0] • Lab D50 • PCS XYZ • Flat XYZ • Linear ROMM-RGB • ROMM-RGB • sYCC 8-bit • e-sYCC 8-bit • Gray Gamma 1.8 • Gray Gamma 2.2 • Dot Gain 10% • Dot Gain 15% • Dot Gain 20% • Dot Gain 25% • Dot Gain 30% • sGray Preserve CMYK values for calibrated CMYK color spaces Advanced Preserve OPI comments is always turned on Standards Compliance Standard Note: Scene7 ignores printer mark settings in the joboptions file. Rather, printer marks are configured through the use of Scene7 URL commands. 3 Click Export, then specify a name and location and click Save. 4 Upload the job options file as an asset to the Scene7 Publishing System. Last updated 10/9/2014 201 USING SCENE7 Template Publishing Use it with your published template by referring to it in the URL. For example: http://yourpublishserver.scene7.com/is/agm/SiliconPublishing/PetNews?&fmt=pdf,cmyk&jobopti on=SPSfilenameid Preparing the PDF for print Before finalizing the PDF for print, make sure you follow the guidelines in this section. Images Make sure that all images in your publish job have been uploaded to your Scene7 Server and published. Fonts Make sure that all fonts in your publish job have been uploaded to your Scene7 Server and published. Be certain that you have legal rights to host the fonts if you plan to allow end-users to change them. Image resolution (pixels per inch) The resolution of bitmap images is preserved by the Scene7 server in generated print-ready PDFs. Scene7 upscales image resolution if necessary. For optimal results, leave the resolution at the default value (typically 72 dpi) when previewing on web. The default resolution for all the images in your company is set in the Publish Settings/Image Server window in the Default Print Resolution section. Higher resolutions (such as 300dpi) can result in longer processing time and should only be applied to a print-ready PDF. Use the imageRes= command in the URL to manually override the default resolution for PDF jobs. Color Management Your document and images can use grayscale, CMYK, named spot colors, RGB, or Lab color models. Each can be either uncalibrated or calibrated by employing an ICC color profile. For best results, embed the profile in the generated print-ready PDF. The Scene7 Server does this by default. Make sure that all required color profiles have been uploaded to the Scene7 platform. Preferably, make sure that the color management options set in your design application, match those set in your Scene7 Server: Design application color management settings: In the Color Settings of your authoring application (such as Adobe Illustrator), specify the RGB and CMYK color profiles in the Working Spaces section. Scene7 color management settings: Typically, the color management settings in the design application should match the default color profiles in your Scene7 server. You can find these settings in the Publish Setup/Image Server window. Displaying printer marks You might create a PDF for either of these cases: • A finished document • An intermediate document, such as a film or plate, which may be sent to a printer for production An intermediate document might contain additional production content, such as bleed margins, printer marks, and so on. This content is usually shown outside the boundaries of the finished page. All marks available from the "Add Printer Marks" screen in Acrobat are supported. The printer marks are controlled with the printerMark parameter. The syntax is &printerMark=trim marks, bleed marks, registration marks, color bars, page information, style, line weight, layer embed. • trim marks = 0|1 Last updated 10/9/2014 202 USING SCENE7 Template Publishing • bleed marks = 0|1 • registration marks = 0|1 • color bars = 0|1 • page information = 0|1 • style = Illustrator | IllustratorJ | QuarkXPress • line weight = 0.125 | 0.25 | 0.50 • layer embed = 0|1 When preparing a document for print production, printer marks may be needed to help the print service align separation films for producing proofs, measure film for correct calibration and ink density, trim film to size, and so on. Printer marks indicate the boundaries of document boxes such as trim boxes and bleed boxes. Production-related content may include: Media box The boundaries of the physical medium on which the page will be printed. Content outside the media box can safely be discarded without affecting the meaning of the file. Bleed box The region to which the contents of the page are clipped when output in a production environment. The bleed box may include areas needed to accommodate the physical limitations of cutting, folding, and trimming equipment. The default value is the page's crop box. Trim box The intended dimensions of the finished page after trimming. The trim box may be smaller than the media box to allow for production-related content, such as printing instructions, cut marks, and color bars. The default value is the page's crop box. Art box The extent of the page's meaningful content (including potential white space) as intended by the page's creator. The default value is the page's crop box. You can use the modifiers shown in this table to replicate the printer marks available in Adobe Illustrator, InDesign, and Acrobat: Modifier/Values Description bleedMargin=top,left,bottom,right Specified in Acrobat with the Set Page Boxes option. Select BleedBox, then specify the margins with the Margin Controls option. Values represent the distance of the top, left, bottom, and right edges from the original edges of the artwork (the media box) going inwards. Values (0–1000) are in points. New height=original height - (top+bottom) New width= original width - (left+right) mediaMargin=top,left,bottom,right Specified in Acrobat with the Set Page Boxes option. Modify Custom Page Size under the Change Page Size option. Values represent the distance of the top, left, bottom, and right edges from the original edges of the artwork (the media box) going outwards. Values (0–1000) are in points. New height=top+bottom+original height New width=top+bottom+original width The new height and new width values determine the new page size of the generated PDF. Once a new Media Box is defined, all calculations of trim margin and bleed margin need to consider the new Media Box as the edge of the artwork. Last updated 10/9/2014 203 USING SCENE7 Template Publishing Modifier/Values Description trimMargin=top,left,bottom,right Specified in Acrobat with the Set Page Boxes option. Select Trim Box, then specify the margins with the Margin Controls option. Values represent the distance of the top, left, bottom, and right edges from the original edges of the artwork (the media box) going inwards. Values (0–1000) are in points. New height=original height - (top+bottom) New width=original width - (left+right) printerMark= trim marks, bleed marks, registration marks, color bars, page information, style, line weight, layer embed Values are as follows: trim marks = 0,1 (default is 0) bleed marks = 0,1 (default is 0) registration marks = 0,1 (default is 0) color bars = 0,1 (default is 0) page information = 0,1 (default is 0) style = Default, InDesignJ1, InDesignJ2, Illustrator, illustratorJ, QuarkXPress (default is Default) line weight= 0.125–0.2, both values inclusive (default is 0.25) layer embed = 0, 1, with 1 creating a new layer containing all printer marks (default is 1) Depending on what style is used, the marks and color bars appear different and match with the corresponding styles used by Acrobat. Note the following about printer marks: • Specify bleed margins, trim margins, and media margins through URL calls when specifying printer marks. Specifying printer marks without specifying these margins causes these marks to appear outside the visible region of the generated PDF. Also, the trim marks and bleed marks overlap. • Specifying the same margin values for the trim margin and bleed margin results in trim marks and bleed marks overlapping when both these flags are set to 1 in &printerMark. • Specifying fmt=swf/image formats through URL calls results in output without any printer marks or margins because this feature is specific to PDF output. • Specifying &printerMark= through the URL results in default values being used for all parameters. Specifying &printerMark=1 results in trim marks being set to 1 and default values for other parameters. But to set the nth element to ON, all the (n-1) parameters need to be specified through URL. • Specifying only one value for &trimMargin, &bleedMargin, and &mediaMargin results in that value being applied to all the top, bottom, left, and right margins of the original artwork. • Specifying only the top and left values through &trimMargin, &bleedMargin, and &mediaMargin results in the top value being assigned to the bottom value and the left value being equal to the right. • Not specifying the right value through &trimMargin, &bleedMargin, and &mediaMargin results in the left value being assigned to the right. • For a multi-page PDF, printer marks/margins are applied to all the pages (in Acrobat, users can select page ranges for printer marks/margins). • The output of a PDF with printer marks/margins enabled matches exactly with Acrobat X unless otherwise specified. Last updated 10/9/2014 204 USING SCENE7 Template Publishing If you want to create a PDF/X-4 compliant PDF file through the &joboption modifier in the URL, you should be aware of the limitations related to printer marks specified in the PDF ISO_15930-7-2008.pdf: • Each Page object of a PDF file includes a MediaBox. Each Page object in a PDF/X-4 conforming file shall include a TrimBox or an ArtBox, but not both. The MediaBox may be included by inheritance. • If the BleedBox is present, the ArtBox or the TrimBox shall not extend beyond the boundaries of the BleedBox. If the CropBox is present, none of the ArtBox, the TrimBox, or the BleedBox shall extend beyond the boundaries of the CropBox. • None of the ArtBox, the TrimBox, the CropBox, or the BleedBox shall extend beyond the boundaries of the MediaBox. • Some industry practices require the use of the BleedBox. Appropriate trade practices should be followed. • The use of the TrimBox is recommended over the use of the ArtBox. • All annotations other than TrapNet and PrinterMark annotations shall have a value for Rect lying completely outside the BleedBox (or the TrimBox or the ArtBox if no BleedBox is present). All PrinterMark annotations shall have a value for Rect lying completely outside the TrimBox or ArtBox. A PDF/X-4 conforming reader may completely ignore annotations except for PDF TrapNet annotations. • A Rect shall be regarded as completely outside a bounding box if all of the coordinates of the Rect lie either outside the bounding box or on its edge, and the intersection of the two rectangles is zero. • If the ViewerPreferences dictionary contains the ViewArea, ViewClip, PrintArea or PrintClip keys, each of these keys present shall have the value MediaBox or (if a BleedBox is present in all page objects of the file) BleedBox. Last updated 10/9/2014 205 Chapter 15: Video Adobe® Scene7 eVideo is an end-to-end solution that makes it easy to publish high-quality Adaptive Video for streaming across multiple screens, including desktop, iOS, Android, Blackberry, and Windows mobile devices. An Adaptive Video Set groups versions of the same video that are encoded at different bit rates and formats such as 400 kbps, 800 kbps, and 1000 kbps. The desktop computer or mobile device detects the available bandwidth. For example, on an iOS mobile device, it detects a bandwidth such as 3G, 4G, or Wi-Fi. Then, it automatically selects the right encoded video from among the various video bit rates within the Adaptive Video Set. The video is streamed to desktops, mobile devices, or tablets. In addition, video quality is dynamically switched automatically if network conditions change on the desktop or on the mobile device. Also, if a customer enters full-screen mode on a desktop, the Adaptive Video Set responds by using a better resolution, thereby improving the customer’s viewing experience. Using Adaptive Video Sets provides you with the best possible playback for customers playing Scene7 video on multiple screens and devices. The logic that a video player uses to determine which encoded video to play or to select during playback is based on the following algorithm: 1 Playback is started using the video in the Adaptive Video Set with the bit rate that is closest to the target set for “Initial Desktop Bitrate” in the video player. 2 Eliminate encoded videos with a height that is greater than 150% of the player height. 3 Eliminate encoded videos with a bit rate that is greater than 70% of the detected download speed. 4 From the remaining encoded videos, select the rendition with the highest bit rate. 5 The video player then checks bandwidth speed every four seconds during playback and adjusts as necessary. For managing single video and Adaptive Video Sets, Scene7 supports the following: • Uploading video from numerous supported video formats and audio formats and encoding video to MP4 H.264 format for playback across multiple screens. You can use predefined Scene7 adaptive video presets, single video encoding presets, or customize your own encoding to control the quality and size of the video. When an adaptive video set is generated, it includes MP4 videos and F4V videos. Note: Master/source videos, OGG videos, and any other source format video are not added to an Adaptive Video Set. • Video captioning in the Univeral_HTML5_Video, Universal_HTML5_MixedMedia_dark, and Universal_HTML5_MixedMedia_light viewers, or Video_Caption (Flash AS3) viewer, and video chapter navigation in the Univeral_HTML5_Video, Universal_HTML5_MixedMedia_dark, and Universal_HTML5_MixedMedia_light viewers. See “Adding captions to video” on page 229. See “Adding chapter markers to video” on page 231. • Organize, browse, and search video with full metadata support for efficient management of video assets. • Deliver Adaptive Video Sets to the web as well as to desktops, and mobile devices, including the iPhone, iPad, Android™, Blackberry, and Windows phone. Adaptive video streaming is supported on a variety of iOS platforms. See the latest support in the Scene7 Viewers Reference Guide. Last updated 10/9/2014 206 USING SCENE7 Video Scene7 supports mobile video playback for MP4 H.264 video. You can find Blackberry devices that support this video format at the following website: See Supported video formats on Blackberry. You can find Windows devices that support this video format at the following: See Supported video formats on Windows Phone. • Play back the video using Scene7 Viewer Presets, including the following: • Single video viewers. • Mixed Media viewers that combine both video and image content. • Configure video players to meet your branding needs. • Integrate video to your website, mobile site, or mobile application with a simple URL or embed code. See “Quick Start: Video” on page 209. Working with HTML5 video While HTML5 is a common standard for delivering mobile video experiences, you will want to consider some of the following limitations of HTML5 as a platform for delivering your desktop video experiences: • HTML5 provides only a suboptimal desktop video experience. There is no video streaming standard across web browsers for HTML5. Therefore, you can only deliver your videos to customers by way of a progressive download experience. Such an experience means longer load times and longer seeking in the video. And, a temporary copy of the video is stored on the user’s desktop. Furthermore, adaptive video streaming is not available. With adaptive video streaming, the video player detects a user’s network connection and serves the right video quality, dynamically. In other words, a lower quality video is served for a slow bandwidth and a higher-quality video is served for faster connections. Without this dynamic streaming, every user experiences a “one-size-fits-all” video playback experience, regardless of their bandwidth. • More videos for you to encode and manage. There is no video format and codec that all browsers support. To compensate, you must encode to at least two, and up to four, different video formats (such as MP4, OGG Theora, and WebM). This encoding is necessary just to get the same video to play back across Firefox, Chrome, Internet Explorer, Safari, and other web browsers. • Limited ability to customize the video player. Each HTML5 browser has its own default appearance for video player controls. As a result, it is difficult to create a consistent video viewer experience for users because video player customization is limited. • Limited reach to users. Not all desktop browsers are HTML5-compatible. For example, Internet Explorer versions 7 and 8 do not support HTML5 video tags. This limitation means that you cannot get full reach across desktop users. The supported system requirements for HTML5 video codecs include the following: Last updated 10/9/2014 207 USING SCENE7 Video OGG MP4 • Firefox 3.5 or higher (desktop) • Internet Explorer 9 or higher (desktop and mobile) • Chrome 3.0 or higher (desktop) • Android 3.0 or higher (tablet) • Android 2.3 or higher (mobile) • iOS 3.1 or higher (mobile) • Chrome 29 (latest version; Chrome updates automatically to the latest version) • Safari 5.1 (Mac OS only) See “Uploading and encoding videos” on page 211. While these limitations are significant, there are two alternatives that you can use, one being a best practice for delivering your rich media content: • Use the HTML5 Video viewers in Scene7 Publishing System. As a best practice, use the Universal_HTML5_Video viewer to solve many of the issues described above regarding HTML5 video playback. The video viewer is a single player that lets you take advantage of the following two things at the same time. 1 Design the player’s functionality using HTML5 and CSS. 2 Play back the video using either adaptive streaming or progressive streaming download to reach the majority of desktop and mobile users - even on browsers that do not support HTML5. The player can dynamically use Flash or HTML5 playback based on the browser that is used and plug-in compatibility. See “Best practice: Using the HTML5 Video viewer” on page 207. See Dynamic video playback. See also About HTML5 Viewers in the Adobe Scene7 Viewers Reference Guide. • Use the Universal URL feature. Use Scene7 Publishing System to set up a universal video profile using the Flash video viewer on desktop and native device player on mobile and tablet devices. Note: One of the advantages of using the HTML5 Video viewer–which is a best practice–is that, unlike using the Universal URL feature, it does not open the video in another window, thereby taking your customers away from your website. Instead, it keeps the entire playback experience on the same web page. Using the HTML5 Video viewer also means that you can play the video embedded on a mobile web page and customize the video player for a consistent, branded experience on both desktop computers and on mobile devices. See “Using the Universal URL” on page 233. Best practice: Using the HTML5 Video viewer The Scene7 HTML5 Video viewer presets are robust video players. You can use them to avoid many common issues that are associated with HTML5 video playback and issues associated with mobile devices such as lack of adaptive streaming delivery and limited desktop browser reach. On the design side of the player, you can design all of the video player’s functionality using standard web development tools. For example, you can design the buttons, controls, and custom poster image background using HTML5 and CSS to help you reach your customers with a customized appearance. Last updated 10/9/2014 208 USING SCENE7 Video On the playback side of the viewer, it automatically detects the browser’s video capability. It then serves the video using Flash or Apple streaming (adaptive video streaming). Or, if those delivery methods are not present then HTML5 progressive is used instead. By combining into a single player the ability to design the playback components using HTML5 and CSS, have embedded playback, and use adaptive and progressive streaming depending on the browser’s capability, you extend the reach of your rich media content to both desktop and mobile users and ensure a streamlined video experience. See also About HTML5 Viewers in the Adobe Scene7 Viewers Reference Guide. How the HTML5 video viewer works on desktop computers For desktop adaptive video streaming, the videos used for bit rate switching are based first on all F4V videos in the Adaptive Video Set. If none exist, then it is based on all MP4 videos in the Adaptive Video Set. The following table describes the workflow that the HTML5 Video viewer uses to determine how videos are played on desktop computers. Question Answer Does the desktop browser have Flash player installed? The HTML5 Video viewer plays the video with Flash-based HTTP adaptive streaming that automatically adjusts playback based on network bandwidth capacity, and also lets the customer seek. Yes - see description on right. No - continue to next question below. Is the desktop browser Apple Safari? Yes - see description on right. No - continue to next question below. Is the desktop browser HTML5 compatible, and the video uses H.264 codec? Yes - see description on right. The HTML5 Video viewer plays the video in Safari using Apple’s iOS standard for HTTP adaptive video streaming that automatically adjusts playback based on network bandwidth capacity, and also lets the customer seek. The HTML5 Video viewer plays the video using the HTML5 <video> tag. This tag allows the video to be progressively downloaded and play natively on the desktop without any plugins. No - continue to next question below. Flash player is unavailable in either Firefox or Internet Explorer 8 or earlier? Unable to play the video. How the HTML5 video viewer works on mobile devices For mobile adaptive video streaming, the videos used for bit rate switching are based first on all MP4 videos in the Adaptive Video Set. The following table describes the workflow that the HTML5 Video viewer uses to determine how to play videos on mobile devices. Last updated 10/9/2014 209 USING SCENE7 Video Question Answer Is the mobile device an iOS-based smartphone or The HTML5 Video viewer plays the video using Apple’s iOS tablet? standard for HTTP adaptive video streaming that automatically adjusts playback based on network bandwidth capacity, and also Yes - see answer on right. lets the customer seek. No - continue to next question below. Is it a supported Android, Blackberry, or Windows The HTML5 Video viewer plays the video using HTML5 mobile device? progressive video download. Yes - see description on right. No - continue to next question below. Is it an unsupported device? Unable to play the video. Quick Start: Video The following step-by-step workflow description is designed to help you get up and running quickly with adaptive video sets in Scene7. After each step is a cross-reference to a topic heading where you can find more information. 1. Uploading and encoding videos Upload and generate adaptive video sets using one of the following two scenarios: • Upload pre-encoded videos - If your videos were already encoded outside Scene7, click Upload on the Global Navigation bar to browse and upload MP4 or F4V video files directly to Scene7 Publishing System. Then, click Build > Adaptive Video Sets. Browse to your video files. Drag-and-drop the video files you want into the Adaptive Video Set table, and then save the set. • Upload master source videos - If your videos are not encoded, click Upload on the Global Navigation bar to upload master video source files (non-MP4, non-FLV, and non-F4V files) and have Scene7 Publishing System encode them to MP4 files for you. In the Upload Job Options dialog box, under EVideo Options, select Adaptive Video Encoding (16:9 or 4:3). This preferred option lets you create an Adaptive Video Set that automatically applies the correct encoding preset to the video, whether it is 16:9 or 4:3, to match the dimensions of the video you uploaded. When you submit your upload job, an Adaptive Video Set is automatically created for you which includes five video encodes in the correct aspect ratio. Or, in the same Job Options dialog box, under EVideo Options, expand Single Encoding Presets and select individual video encoding presets that you want from Desktop, Mobile (iPhone, iPad, Android), and Tablet (iPad, Android) so that you create the MP4 files. • Or, you can reprocess a master video using the Reprocess feature. The newly encoded videos are added to the existing Adaptive Video Set. See “Uploading and encoding videos” on page 211. See also “Best practices for video encoding” on page 215 Optional Scene7 offers numerous predefined video encoding presets. These predefined presets reflect the most common video encoding settings used today and are optimized for playback on target screens. Last updated 10/9/2014 210 USING SCENE7 Video However, if further customization is needed, administrators can create Video Presets to customize the size and playback experience of Videos to end users. Administrators can add and manage Video Presets from the Video Presets page available under Setup > Application Setup > Video Presets > Single Encoding Presets. The Video Presets page offers options for adding, editing, deleting, and activating Video Presets. See “Working with video encoding presets” on page 219. 2. Previewing videos in a video viewer To see how a video plays for end users on a desktop, your website, or on a mobile device, select the video in the Browse Panel, and then click Preview. See “Previewing videos in a video viewer” on page 222. You can play the video on the Preview screen. You can also choose different Video Viewers to find out what your video looks like in different players. As a best practice, use the HTML5 video player for multi-screen playback on desktop, tablet, and mobile devices. Optional Viewer Preset customization - Scene7 offers predefined Viewer Presets for delivering video. These presets determine the look of the Viewer and how its playback controls work. To customize the video viewer, Administrators can add and manage Viewer Presets from the Viewer Presets page. To open this page, in the upper-right corner of the Scene7 Publishing System, click Setup > Viewer Presets. The Viewer Presets page offers commands for adding, editing, deleting, and activating Viewer Presets. See “Working with video viewer presets” on page 223. 3. Deploying videos to your websites and mobile sites To integrate video into your website, you can do either one of the following: • Display the video in its own pop-up or modal window, in which case you should use the Copy URL feature. To obtain the URL for a video, in the Grid View or List View, select it in the Browse Panel. Click Preview, and then click Copy URL to the right of Universal_HTML5_Viewer. When you click Copy URL, the URL is copied to the Clipboard. Place this code in the HTML of your website, mobile site, or application. Note: URLs are activated only after you publish the video or Adaptive Video Set. • Display the video embedded on the web page, in which case you should use the Embed Code feature. To obtain the embed code for a video, in the Grid View or List View, select the video in the Browse Panel. Click Preview > Viewer List. Under the Actions column of the table, click Embed Code to the right of Universal_HTML5_Video. Editing the code is not permitted. Click Close and paste the embed code in your web pages. Note: Embed code is only activated after you publish the video or Adaptive Video Set. See “Deploying video to your websites and mobile sites” on page 224. Last updated 10/9/2014 211 USING SCENE7 Video Uploading and encoding videos To create single video or adaptive video sets for delivery to the web or mobile devices, you first upload your master video files to the Scene7 Publishing System. Scene7 encodes videos to MP4 format and it publishes video in the following file formats: MP4 Scene7 recommends MP4 as the preferred video file format. Use MP4 files for the following: • HTTP Dynamic Streaming on desktops. • HTTP Live Streaming (Apple’s streaming protocol). • Progressive video delivery to Android, Blackberry, and Windows mobile devices OGG Theora Use OGV files for progressive video delivery to non-Flash enabled desktops and mobile devices. Flash FLV and F4V files Use FLV and F4V files for progressive or streaming video delivery to Adobe Flash Players on the desktop. Scene7 offers two workflows for uploading video files: Pre-encoded Videos You upload FLV, F4V, and MP4 files directly to Scene7. With this workflow, files are not encoded at the time you upload them. The files are pre-encoded in preparation for delivery to the desktop and to mobile devices. Master source videos Upload master source video files and, at upload, encode these files to MP4 files. Encoded videos are labeled “Video” in the Browse panel. Scene7 supports the encoding of video files in many formats. • Make sure the master source video files you want to encode are supported. See “Supported video file types for encoding” on page 214. • Choose a video encoding preset. See “Video presets for encoding video files” on page 26. See “Best practices for video encoding” on page 215. Scene7 also generates video thumbnails. You can learn more about video thumbnails, how to obtain their URLs, and modifying poster frames. See “Working with video thumbnails” on page 228. To upload and encode videos ❖ Do one of the following: Last updated 10/9/2014 212 USING SCENE7 Video Last updated 10/9/2014 213 USING SCENE7 Video If your videos are already encoded 1 On the Global Navigation bar, click Upload. 2 In the Upload screen, click From Desktop tab. 3 On the Upload page, in the Select Files for Upload panel, click Browse, navigate to an MP4 or F4V video file, and then click Open. 4 In the Choose Folder Destination panel, select a folder for the uploaded file. 5 On the Upload page, make sure Publish After Uploading is checked. 6 Click Submit Upload. If you want to encode your videos using Scene7 Publishing System 1 On the Global Navigation bar, click Upload. 2 In the Upload screen, click From Desktop tab. 3 In the Select Files to Upload panel, click Browse, navigate to a master source video file, and then click Open. 4 In the Choose Folder Destination panel, select a folder for the uploaded file. 5 In the lower-right corner of the page, click Job Options, 6 In the Upload Job Options dialog box, expand EVideo Options. 7 Do one of the following: • Best practice is to use the following method. Select Adaptive Video Encoding (16:9 or 4:3). See “Adaptive Video Encoding (16:9 or 4:3) video presets” on page 28. • Optional, if you want to use individual encoding settings, do the following. Expand Single Encoding Presets, and then select the encoding options you want for Desktop, Mobile, and Tablet. See “Desktop video encoding presets” on page 29, “Mobile video encoding presets” on page 30, “Tablet video encoding presets” on page 31. 8 In the Upload Job Options dialog box, click Save. 9 On the Upload page, make sure Publish After Uploading is checked. 10 On the Upload page, in the lower-right corner, click Submit Upload. Last updated 10/9/2014 214 USING SCENE7 Video If you want to re-encode a video file that you previously uploaded 1 In Scene7, in the Browse panel, navigate to the video and select it. 2 Click File > Reprocess. 3 In the Reprocess Assets dialog box, expand EVideo Options. 4 Do one of the following: • Best practice is to use the following method. Select Adaptive Video Encoding (16:9 or 4:3). See “Adaptive Video Encoding (16:9 or 4:3) video presets” on page 28. • Optional, if you want to use individual encoding settings, do the following. Expand Single Encoding Presets, and then select the encoding options you want for Desktop, Mobile, and Tablet. See “Desktop video encoding presets” on page 29, “Mobile video encoding presets” on page 30, “Tablet video encoding presets” on page 31. 5 In the Reprocess Assets dialog box, click Submit. When you use an Adaptive Video Encoding preset or you use multiple single encoding presets, the result is an Adaptive Video Set that is automatically created with multiple video encodings. You can also manually create an Adaptive Video Set by selecting individual videos. Only MP4 and M4V file types are created when you generate an Adaptive Video Set either automatically or manually. More Help topics “Best practices for video encoding” on page 215 “Working with video encoding presets” on page 219 Supported video file types for encoding The following table lists video file types (with permitted video codecs) that you can encode to MP4 or OGV format when you upload files. The table lists file formats and codecs: Video file formats Similar to a ZIP file, a video file format determines how files are contained in the video file. A video file usually contains multiple tracks — a video track (without audio) and one or more audio tracks (without video) — that are interrelated and synchronized. The video file format determines how these different data tracks and metadata are organized. Video codecs A video codec describes the algorithm by which a video is encoded. A video player decodes the video according to its codec and then displays a series of images, or frames, on the screen. Codecs minimize the amount of information that video files are required to store to play video. Rather than information about each individual frame, only information about the differences between one frame and the next are stored. Because most videos change little from one frame to the next, codecs allow for high compression rates, which results in smaller file sizes. Last updated 10/9/2014 215 USING SCENE7 Video Video file format Video codecs 3GP H.263, H.264 AVI DivX, DV F4V H.264 FLV H.263 M2P MPEG-2 PS M2T MPEG-2 TS M2TS MPEG-2 TS M2V MPEG-2 ES M4V H.264 MOV DV, DVCPro 50, H.261, H.263, H.264, Sorenson Video 1 MP4 H.264/MPEG-4 AVC MPEG MPEG-2 SS MPG MPEG-2 SS MTS MPEG-2 ProRes APCN , APCS, APCO, APCH, AP4H TS DVCPro 50 VOB MPEG-2 WMV/ASF VC-1, Windows Media Video 7, Windows Media Video 8 Note: The Jobs screen alerts you if you upload and attempt to encode a video file but the file is rejected because it contains an incompatible codec or file container. For more information, see “Checking job files” on page 93. Best practices for video encoding The following are best-practice tips for encoding source video files in Scene7 Publishing System. For advice about video encoding, see the following: • Article: Streaming 101: The Basics — Codecs, Bandwidth, Data Rate, and Resolution:www.adobe.com/go/learn_s7_streaming101_en. • Video: Video Encoding Basics:www.adobe.com/go/learn_s7_encoding_en. More Help topics “Quick Start: Video” on page 209 “Uploading and encoding videos” on page 211 “Working with video encoding presets” on page 219 “Working with video viewer presets” on page 223 Last updated 10/9/2014 216 USING SCENE7 Video Source video files When you encode a video file, use a source video file of the highest possible quality. Avoid using previously encoded video files because these files are already compressed, and further encoding creates a subpar quality video. The following table describes the recommended size, aspect ratio, and minimum bit rate that your source video files should have when you encode them: Size Aspect ratio Minimum bit rate 1024 X 768 4:3 4500 kbps for most videos. 1280 X 720 16:9 3000 - 6000 kbps, depending on the amount of motion in the video. 1920 X 1080 16:9 6000 - 8000 kbps, depending on the amount of motion in the video. Obtaining a file’s metadata You can obtain a file’s metadata by viewing its metadata in Scene7, using a video editing tool, or using an application designed for obtaining metadata. Following are instructions for using MediaInfo, a third-party application, to obtain a video file’s metadata: 1 Go to this web page: http://mediainfo.sourceforge.net/en/Download. 2 Select and download the installer for the GUI version, and follow the installation instructions. 3 After installation, either right-click the video file (Windows only) and select MediaInfo, or open MediaInfo and drag your video file into the application. You see all metadata associated with your video file, including its width, height, and fps. Aspect ratio When you choose or create a video encoding preset for your master video file, make sure that the preset has the same aspect ratio as the master video file. The aspect ratio is the ratio of the width to the height of the video. To determine the aspect ratio of a video file, obtain the file’s metadata and note the file’s width and height (see “Obtaining a file’s metadata” on page 216). Then use this formula to determine the aspect ratio: width/height = aspect ratio The following table describes how formula results translate to common aspect ratio choices: Formula result Aspect ratio 1.33 4:3 0.75 3:4 1.78 16:9 0.56 9:16 For example, a video that is 1440 width x 1080 height has an aspect ratio of 1440/1080, or 1.33. In this case you choose a video encoding preset with a 4:3 aspect ratio to encode the video file. Data rate The data rate (also called the bit rate) is the amount of data that is encoded to make up a single second of video playback. The data rate is measured in kilobits per second (Kbps). Last updated 10/9/2014 217 USING SCENE7 Video Important: Because all codecs use lossy compression, data rate is the most important factor in video quality. With lossy compression, the more you compress a video file, the more the quality is degraded. For this reason, all other characteristics being equal (the resolution, frame rate, and codec), the lower the data rate, the lower the quality of the compressed file. When you choose a video encoding preset, take into account the target end user’s connection speed. Choose a preset with a data rate that is 80 percent of that speed. For example, if the target end user’s connection speed is 1000 Kbps, the best preset is one with a video data rate of 800 Kbps. This table describes the data rate of typical connection speeds. Speed (Kbps) Connection type 256 Dial-up connection. 800 Typical mobile connection. For this connection, target a data rate in the range of 400 to a maximum of 800 for 3G experiences. 2000 Typical broadband desktop connection. For this connection, target a data rate in the 800–2000 Kbps range, with most targets averaging 1200–1500 Kbps. 5000 Typical high-broadband connection. Encoding in this upper range is not recommended because video delivery at this speed is not available to most consumers. Resolution Resolution describes a video file’s height and width in pixels. Most source video is stored at a high resolution (for example, 1920 x 1080). For streaming purposes, source video is compressed to a smaller resolution (640 x 480 or smaller). Resolution and data rate are two integrally linked factors that determine video quality. To maintain the same video quality, the higher the number of pixels in a video file (the higher the resolution), the higher the data rate must be. For example, consider the number of pixels per frame in a 320 x 240 resolution and a 640 x 480 resolution video file: Resolution Pixels per frame 320 x 240 76,800 640 x 480 307,200 The 640 x 480 file has four times more pixels per frame. To achieve the same data rate for these two example resolutions, you apply four times the compression to the 640 x 480 file, which can reduce the quality of the video. Therefore, a video data rate of 250 Kbps produces high-quality viewing at a 320 x 240 resolution, but not at a 640 x 480 resolution. In general, the higher data rate you use, the better your video looks, and the higher resolution you use, the higher data rate you need to maintain viewing quality (compared to lower resolutions). Because resolution and data rate are linked, you have two options when encoding video: • Choose a data rate and then encode at the highest resolution that looks good at the data rate you chose. • Choose a resolution and then encode at the data rate necessary to achieve high-quality video at the resolution you chose. When you choose (or create) a video encoding preset for your master video file, use this table to target the correct resolution: Last updated 10/9/2014 218 USING SCENE7 Video Resolution Height (pixels) Screen size 240p 240 Tiny screen 300p 300 Small screen typically for mobile devices 360p 360 Small screen 480p 480 Medium screen 720p 720 Large screen 1080p 1080 High-definition large screen Fps (frames per second) In the United States and Japan, most video is shot at 29.97 frames per second (fps); in Europe, most video is shot at 25 fps. Film is shot at 24 fps. Choose a video encoding preset that matches the fps rate of your master video file. For example, if your master video is 25 fps, choose an encoding preset with 25 fps. By default, all custom encoding uses the master video file’s fps. For this reason, you do not need to explicitly specify the fps setting when you create a video encoding preset. Video encoding dimensions For optimal results, select encoding dimensions such that the source video is a whole multiple of all your encoded videos. To calculate this ratio, you divide source width by encoded width to get the width ratio. Then, you divide source height by encoded height to get the height ratio. If the resulting ratio is a whole integer, it means that the video is optimally scaled. If the resulting ratio is not a whole integer, it impacts video quality by leaving leftover pixel artifacts on the display. This effect is most noticeable when the video has text. As an example, suppose that your source video is 1920 x 1080. In the following table, the three encoded videos provide the optimal encoding settings to use. Video Type Width x Height Width Ratio Height Ratio Source 1920 x 1080 1 1 Encoded 960 x 540 2 2 Encoded 640 x 360 3 3 Encoded 480 x 270 4 4 Encoded video file format Adobe Scene7 recommends using MP4 H.264 video encoding presets. Because MP4 files use the H.264 video codec, it provides high-quality video but in a compressed file size. Last updated 10/9/2014 219 USING SCENE7 Video Working with video encoding presets Master video files created with video production equipment and video-editing software are often too large and not in the proper format for delivery to online destinations. To convert digital video to the proper format and specifications for playback on different screens, you can transcode video files (a process also known as encoding). During the encoding process, the video is compressed to a smaller, efficient file size for optimal delivery to the web and to mobile devices. See “Uploading and encoding videos” on page 211. Scene7 gives you a library of predefined video encoding presets that reflect the most common encoding settings used today. These encoding presets are optimized for playback on target screens. In addition, administrators can create their own video encoding presets to customize the size and playback quality of videos to end users. All video encoding presets, whether out-of-the-box from Scene7, or custom-made, output video in the MP4 file format. On the Video Presets screen, administrators can set up and manage video encoding. They can do the following: • Activate and deactivate video encoding presets. • Create a video encoding preset. • Edit video encoding presets. • Delete video presets. Any video that you upload to Scene7 Publishing System or that you encode in Scene7 Publishing System is treated as “video”. In other words, this asset classification means that you can deliver the video for playback on desktops, mobile devices, or both. For example, you can preview these types of videos in Scene7 Publishing System. You can also generate URLs (using the Copy URL feature) and code that you can embed (using the Embed Code feature) for use with video players, on websites, and so on. See “Previewing videos in a video viewer” on page 222. See “Linking a video URL to a mobile site or a website” on page 225. See “Embedding the video viewer on a web page” on page 225. For video assets that you upload and encode in Scene7 Publishing System, you can deliver video in the following file formats: MP4 H.264 Scene7 recommends MP4 as the preferred video file format. Use MP4 files for the following: • HTTP Dynamic Streaming on desktops. • HTTP Live Streaming (Apple’s streaming protocol). • Progressive video delivery to Android, Blackberry, and Windows mobile devices. OGG Vorbis Use OGV files for progressive video delivery to non-Flash enabled desktops. F4V H.264, FLV VP6, and FLV H.263 Use Flash FLV or F4V files for progressive or streaming video delivery to Adobe Flash Players on the desktop. Any other video format and codec that is not in the list above is treated as a “Master Video”. This asset classification means that the video is a source video file and cannot be used for delivery playback on desktops or mobile devices. For example, you cannot preview these types of videos in Scene7 Publishing System. You also cannot generate Copy URLs or Embed Code for use in video players, on websites, and so on. Filtering the list of video encoding presets The Video Presets page and the Adaptive Video Presets page consist of a table that lists the active status, preset name, intended playback device, video dimension, and target data rate of each video preset. Last updated 10/9/2014 220 USING SCENE7 Video You can refine the list by choosing to filter on Both, Active, or Inactive, to see all Video Presets or narrow the list to presets that are active or inactive. You can also filter based on a playback device option to narrow the list to Video Presets designed for playing videos on all devices, desktop, mobile, or tablets. To filter the list of video encoding presets 1 In Scene7, click Setup > Application Setup > Video Presets > Adaptive Video Presets or Single Encoding Presets. The pages for Adaptive Video Presets and Single Encoding Presets include a table that lists the Active status, Preset name, intended Playback Device, video dimensions, and Target data rate of each video preset. 2 On the Single Encoding Presets page called Video Presets, on the Video Presets toolbar, use the two drop-down lists to refine the list of presets in the table based on Active status, and playback device. • On the first, narrower drop-down list, choose Both to see all Video Presets, or choose Active or Inactive or narrow the list to presets that are active or inactive. • On the second, wider drop-down list, choose a playback device option to narrow the list to Video Presets designed for playing videos on desktops. or for playing videos on mobile or tablet devices. Activating or deactivating video encoding presets Activated Video Presets show up in the Upload Job Options dialog box. This is the dialog box that appears when a user uploads video files during the upload process. They can choose from a list of all activated encoding presets. To activate or deactivate video encoding presets 1 In Scene7, click Setup > Application Setup > Video Presets. 2 Do one of the following: • Click Adaptive Video Presets. • Click Single Encoding Presets. 3 Do one of the following: • To activate a video preset, on the presets page, under the Active column, select the box next to a preset name. • To deactivate a video preset, deselect the box next to the video presets that you want to make inactive. Inactive Video Presets do not appear in the Upload Job Options dialog box. 4 In the lower right corner of the page, click Close. Adding or editing a video encoding preset You can create your own custom single encoding video presets and add them to the Video Presets table. You can also make changes to any pre-defined single encoding Video Presets that came with Scene7, provided you save the edited preset with a new name. Scene7 has set maximum limits on the target data rate, resolution height, and resolution width to ensure a proper playback experience. Warning messages appear if you exceed these limits which are the following: • For computer playback, the limits are: (Width/16) * (Height/16) < 8192. • For mobile playback, the limits are: (Width/16) * (Height/16) < 660; target data rate < 4000. • For tablet playback, the limits are: (Width/16) * (Height/16) < 3600. To add or edit a video encoding preset 1 In Scene7, click Setup > Application Setup > Video Presets. Last updated 10/9/2014 221 USING SCENE7 Video 2 Click Single Encoding Presets to open the Video Presets page. 3 In the Video Presets page, do any one of the following: • On the Video Presets toolbar click Add to add a new Video Preset. • Select a Video Preset. In the toolbar, click Edit. You cannot edit Scene7 predefined presets; you can only create a preset from an existing one by choosing Save As. 4 On the Add Video Preset page or the Edit Video Preset page, set the Video Preset options you want. See “Best practices for video encoding” on page 215 for recommended settings. Video Preset option Description Preset Name Enter a descriptive name for the Video Preset. The name you enter appears in the Upload Job Options dialog box, in which users choose transcoding options. Description Describe the Video Preset. What you enter appears as a tool tip when you move the pointer over the name of the preset in the Upload Job Options dialog box in which users choose transcoding options. Playback Device Choose the device that the video is intended to play back on. The options are Computer (compatible with Flash 9), Mobile (iPhone, iPad, Android); or Tablet (iPad only). This setting automatically determines the appropriate video and audio codec that is used during encoding. Target Data Rate Enter the average Internet connection speed (in kilobits per second) of the target end user. You can enter the rate or drag the slider to enter it. The User Connection Speed spectrum lists typical speeds for broadband, DSL, mobile, and dial-up connections. This setting automatically determines the combined video and audio data rate. In other words, the amount of data that is encoded to make up a single second of video playback. The higher the data rate, the better the quality of the resulting video. However, data rates that are too high result in large file sizes that create subpar viewing experiences for users with a low bandwidth. As a best practice, strike a balance between high and low data rates. Aim to create an adequate quality playback experience without alienating users who have narrow bandwidths. Aspect Ratio Aspect ratio is the ratio of the width to the height of the video. The first two aspect ratios listed below are commonly used to display video horizontally: • 4:3 - Used for almost all standard definition TV broadcast content. • 16:9 - Used for almost all wide-screen, high-definition TV content (HDTV) and movies. • Auto-scale - (Default) A single encoding preset that works with any aspect ratio to create videos for delivery to mobile, tablet, and desktop. Uploaded source videos that are encoded with this preset are set with a fixed height. However, the width automatically scales to preserve the video’s aspect ratio (width to height ratio). • Custom - Used when you want to define a non-standard video size. The aspect ratio you choose determines the width and height settings for the Resolution Size; the width and height value automatically scale to the proper aspect ratio. Last updated 10/9/2014 222 USING SCENE7 Video Video Preset option Description Resolution Size Resolution size, expressed by the number of pixels wide by the number of pixels high, determines the dimension. Enter a width and height value in pixels or drag the slider to enter these values. The Resolution spectrum lists typical resolution sizes. The width and height values automatically adhere to the aspect ratio you selected. For example, if you select 4:3 as the aspect ratio and enter 400 for width, 300 is entered automatically for height. If you selected Auto-scale for the Aspect Ratio setting, then the Width value for the Resolution Size is automatically set to Auto. Click Preview to open a browser window and see your resolution choices there. Encode File Suffix Enter a suffix. This suffix is appended to the resulting encoded video file. You can enter a hyphen and underscore in the name; blank spaces and special characters are not allowed. Other Settings Scene7 determines all other encoding settings automatically according to best-practice encoding guidelines. 5 Do one of the following: • Click Save if you added or edited a Video Preset. • Click Save As if you added a Video Preset by starting from an existing preset. Deleting a video encoding preset Administrators can delete custom Video Presets. Video presets that come with Scene7 cannot be deleted. To delete a video encoding preset 1 In Scene7, click Setup > Application Setup > Video Presets. 2 Click Single Encoding Presets to open the Video Presets page. 3 In the Video Presets page, select a Video Preset in the table that you no longer want or need. 4 On the Video Presets toolbar, click Delete. 5 In the Delete Preset dialog box, click Delete. Previewing videos in a video viewer You can preview what a video looks like and how it plays in the Video Viewer. See “Adding and editing Viewer presets” on page 38. To preview videos in a video viewer 1 In the Asset Library panel on the left side, in the Show drop-down list, select Video (single encoded videos) or Adaptive Video Set (when the Adaptive Video encoding preset is used, it results in a set of multi-bitrate encoded videos). 2 In the Asset Library panel on the left side, navigate the asset folders to select the video that you want to preview. 3 Do any one of the following • Above the Assets window, on the right side of the toolbar, click List View. In the Asset window, hover on an asset, and then click Preview. • Above the Assets window, on the right side of the toolbar, click Grid View. In the Asset window, in an asset thumbnail window, click Preview. Last updated 10/9/2014 223 USING SCENE7 Video • Above the Assets window, on the right side of the toolbar, click Detail View. On the same toolbar, click Preview. • In the Asset window, select an asset. In the toolbar, click File > Preview. 4 (Optional) In the Preview window, in the drop-down list at the bottom, select the URL encoding that you want applied to the asset’s URL when it is copied. 5 Click the Preview link to preview the asset in the selected viewer. 6 Close the displayed viewer to return to the Preview screen. 7 Click Close to return to the Assets screen. Note: Scene7 provides a convenient method of previewing MP4 video on the desktop. Use this method to preview mobile content on the desktop without physically testing it on mobile devices. Be aware, however, that what you see in the desktop preview does not realistically show what playback looks like on the mobile device. To preview how video looks and plays on a mobile device, go to the Preview screen, select the Copy URL and enter that URL in the web browser of a mobile device. For more information, see “Deploying video to your websites and mobile sites” on page 224. More Help topics “Best practices for video encoding” on page 215 “Working with video encoding presets” on page 219 Working with video viewer presets Users watch videos in the Video Viewer. How the Video Viewer behaves, what it looks like, and how its playback controls work depends on the Viewer Preset you choose for playing the video. You choose a Viewer Preset on the Preview screen. After you choose a preset, you can obtain the URL or the embed code for playing the video using the Viewer Preset you chose. Scene7 comes with many predefined Viewer Presets for playing video, and if you are an administrator, you can create custom Viewer Presets. There are more than a dozen different settings for configuring the Video Viewer. You can configure its size, color, video and audio controls, progress bar, user-interface skin, and social features. See also “Previewing videos in a video viewer” on page 222. Adding or editing a video viewer preset You can use Viewer Presets to see various viewer types and their pre-defined settings. You can also add and edit your own customized viewer presets or edit existing viewer presets that come with Scene7 Publishing System. In Viewer Presets you can activate, filter, sort, and preview Viewer Presets. See “Viewer Presets” on page 32. To add or edit a video viewer preset 1 Near the upper-right corner of Scene7 Publishing System, click Setup > Viewer Presets. To see only presets for Video Viewers, select Video Viewer from the open the Viewers drop-down list in the toolbar directly above the table. 2 Add or edit a Viewer Preset for showing video: Adding Click Add in the toolbar. In the Add Viewer Preset dialog box, choose a platform and viewer from the respective drop-down lists, and then click Add. See also “Adding and editing Viewer presets” on page 38. Last updated 10/9/2014 224 USING SCENE7 Video Adding by starting from an existing Viewer Preset In the table, select a Video Viewer Preset, and then click Edit in the toolbar. After you reconfigure the Video Viewer, click Save As to save the preset using a different name in the Preset Name text field. Editing Select a Video Viewer Preset, and then click Edit. 3 In the Configure Viewer screen, in the Preset Name field, enter or edit the preset name. 4 Set the remaining options that you want. To see a description of an option, click its Info Tip icon . 5 Do one of the following: • Click Save As if you added a Viewer Preset by starting from an existing preset. • Click Save if you added or edited a Viewer Preset. Deploying video to your websites and mobile sites Websites, mobile sites, and desktop applications access Scene7 server content, including video, by using URL strings or embedded code. Scene7 activates these URL strings during the publishing process. To place the URL string or embed code for your video in your web pages, mobile pages, and desktop applications, copy it from the Scene7 Publishing System. Important: The URL or embed code is not active until you publish the asset. Publishing video Publishing a video enables Scene7 Servers to deliver video to your website, mobile site, or application. There are two different methods you can use to publish video: • Publish videos automatically and instantly on upload As part of the video upload process, Scene7 can automatically publish videos when they are uploaded and encoded. This ability to instantly publish means that there is no need to publish videos separately after the fact. • Publish video manually after upload If you do not want to publish videos immediately, you can manually publish videos at any time. After you publish videos, the Scene7 Publishing System activates the URL strings for your HTML page or application code. To publish video ❖ Do one of the following: • To publish videos automatically and instantly on upload, in the Upload screen, click Publish after uploading. You have finished; there are no further steps to complete. • To publish videos manually after upload, in the Browse Panel, select the videos, and then on the Global Navigation bar, click Publish. More Help topics “Publishing files” on page 87 Last updated 10/9/2014 225 USING SCENE7 Video Linking a video URL to a mobile site or a website After you publish a video, you can obtain its URL for use in your website, mobile site, or desktop application. Use the video URL when you want to display video in a pop-up or modal window on top of the web page. When a customer clicks the link, their device, bandwidth, and screen size are automatically detected. The appropriate video is displayed for playback in a pre-defined viewer for desktop, or in the mobile device's native video player for smartphones and tablets. See also “Embedding the video viewer on a web page” on page 225. To link a video URL to a mobile site or a website 1 In the Asset Browse panel, in the Show drop-down list, click Video or Adaptive Video Set. 2 in the Asset Library panel on the left side, navigate to the asset folder that contains the video or adaptive video set you want to link. 3 Above the Asset Browse panel, on the right side of the toolbar, do one of the following: • Click Grid View or List View. In the Asset Browse panel, double-click the video thumbnail of a single asset to open it in Detail View. In the URLs and Embed Code panel on the right, under HTTP Streaming, click Copy URL to the right of the viewer you want. As a best practice, copy the URL associated with the Universal_HTML5_Video viewer. • Click Grid View. In the Asset Browse panel, select a single asset, and then below the thumbnail image, click Preview > Viewer List. In the Viewer List page, under the Actions column of the table, click Copy URL. As a best practice, copy the URL associated with the Universal_HTML5_Video viewer. • Click List View. In the Asset Browse panel, select a single asset, and then to the right of the thumbnail image, click Preview > Viewer List. In the Viewer List page, under the Actions column of the table, click Copy URL. As a best practice, copy the URL associated with the Universal_HTML5_Video viewer. • Click Grid View, List View, or Detail View. On the same toolbar, click Preview > Viewer List. In the Viewer List page, under the Actions column of the table, click Copy URL. As a best practice, copy the URL associated with the Universal_HTML5_Video viewer. 4 Paste the HTML5 video URL link on your website and mobile site. Embedding the video viewer on a web page Use the Embed Code feature when you want to play the video embedded on the web page. You copy the embed code to the clipboard so you can paste it in your web pages. Editing of the code is not permitted in the Embed Code dialog box. See also “Linking a video URL to a mobile site or a website” on page 225. To embed the video viewer on a web page 1 In the Asset Browse panel, in the Show drop-down list, click Video or Adaptive Video Set. 2 in the Asset Library panel on the left side, navigate to the asset folder that contains the video or adaptive video set whose embed code you want to copy. Last updated 10/9/2014 226 USING SCENE7 Video 3 Above the Asset Browse panel, on the right side of the toolbar, do one of the following: • Click Grid View or List View. In the Asset Browse panel, double-click the video thumbnail of a single asset to open it in Detail View. In the URLs and Embed Code panel on the right, under HTTP Streaming, click Embed Code to the right of the viewer you want. As a best practice, click Embed Code that is associated with the Universal_HTML5_Video viewer. • Click Grid View. In the Asset Browse panel, select a single asset, and then below the video thumbnail image, click Preview > Viewer List. In the Viewer List page, under the Actions column of the table, click Embed Code. As a best practice, click Embed Code that is associated with the Universal_HTML5_Video viewer. • Click List View. In the Asset Browse panel, select a single asset, and then to the right of the thumbnail image, click Preview > Viewer List. In the Viewer List page, under the Actions column of the table, click Embed Code. As a best practice, click Embed Code that is associated with the Universal_HTML5_Video viewer. • Click Grid View, List View, or Detail View. On the same toolbar, click Preview > Viewer List. In the Viewer List page, under the Actions column of the table, click Embed Code. As a best practice, click Embed Code that is associated with the Universal_HTML5_Video viewer. 4 In the Embed Code dialog box, click Copy to Clipboard. Editing the code is not permitted in the Embed Code dialog box. 5 Click Close. 6 Paste the embed code in your web pages. Implementing embed code for using HTML5 video with MP4 and OGG video assets If you do not use the Scene7 HTML5 video player, but instead want to use the native HTML5 <video> tag with MP4 and OGG video assets, you can use the following embed code sample: <video poster="S7 video thumbnail URL" controls> <source src="S7 OGG video asset URL (no player)" type='video/ogg; codecs="theora, vorbis"'/> <source src="S7 MP4 mobile progressive video asset URL (no player)" type='video/mp4; codecs="avc1.4D401E, mp4a.40.2"'/> <p>This is fallback content</p> </video> • Replace "S7 video thumbnail URL" with the video’s thumbnail URL. This is the video’s thumbnail image that a user sees before they play the video. See “Obtaining video thumbnail URLs” on page 228. • Replace "S7 OGG video asset URL (no player)" with the video’s progressive URL for OGG video. See “Linking a video URL to a mobile site or a website” on page 225. • Replace "S7 MP4 mobile progressive video asset URL (no player)" with the video’s mobile progressive URL. See “Linking a video URL to a mobile site or a website” on page 225. Deploying video using a third-party video player If you use a third-party video player or a custom built video player instead of a Scene7 video viewer, you can obtain the direct video URL that works for HTTP and iOS multi-bitrate video streaming or progressive download. Last updated 10/9/2014 227 USING SCENE7 Video To deploy video using a third-party video player 1 In Scene7 Publishing System, on the Global Navigation bar, click Setup > Application Setup > General Settings. 2 Depending on the type of URL you want to use, do one of the following tasks: To generate a direct HTTP streaming video URL for desktop (multi-bitrate) 1 On the Application General Settings page, in the Servers group, in the Published Server Name text field, construct the direct URL using the following syntax: server/is/content/company/folder/filename.f4m For example, suppose the Published server name is http://s7d9.scene7.com/. Using the syntax in step 2, the direct URL might look like the following: 2 To generate a direct iOS streaming video URL (multi-bitrate) http://s7d9.scene7.com/is/content/GeoRetail/AdobeRIA-AVS.f4m ❖ On the Application General Settings page, in the Servers group, in the Published Server Name text field, construct the direct URL using the following syntax: server/is/content/company/folder/filename.m3u8 For example, suppose the Published server name is http://s7d9.scene7.com/. Using the syntax in step 2, the direct URL might look like the following: http://s7d9.scene7.com/is/content/GeoRetail/AdobeRIA-AVS.m3u8 To generate a direct HTTP streaming video URL for desktop (single bit rate) 1 On the Application General Settings page, in the Servers group, in the iOS Streaming Server Name text field, replace hls/vod with hds/vod in the server name. 2 Construct the direct eVideo URL using the following syntax: server/company/folder/filename.ext.f4m For example, using the syntax above, an example direct eVideo URL might look like the following: http://s7mbrstream.scene7.com/hdsvod/eVideoQA/MBR/ToyStory3_Teaser1_High_iPad_768x432_1296K.mp4.f4m To generate a direct iOS streaming video URL (single bitrate): ❖ On the Application General Settings page, in the Servers group, in the iOS Streaming Server Name text field, combine server/company/folder/filename.ext.m3u8with the name of the iOS streaming server. For example, suppose the iOS streaming server name is http://s7mbrstream.scene7.com/hls-vod/. Using the syntax in step 2, the direct eVideo URL might look like the following: http://s7mbrstream.scene7.com/hlsvod/eVideoQA/MBR/ToyStory3_Teaser1_High_iPad_768x432_1296K.mp4.m3u8 Last updated 10/9/2014 228 USING SCENE7 Video To generate a direct progressive video URL ❖ On the Application General Settings page, in the Servers group, in the Progressive Video Server Name text field, construct the direct eVideo URL using the following syntax: server/company/folder/filename For example, suppose the progressive video server name is http://s7d9.scene7.com/e2/. Using the syntax in step 2, the direct eVideo URL might look like the following: http://s7d9.scene7.com/e2/GeoRetail/SourceVideo/outdoors.mp4 Working with video thumbnails Scene7 generates thumbnails for Video Recuts, encoded videos, and pre-encoded videos. You can use video thumbnails like any image asset. Moreover, you can obtain URLs for the video thumbnails that Scene7 generates and deploy these URLs outside SPS. For example, you can deploy the thumbnails in search results, related video listings, and video play lists on a website. Thumbnails are generated based on the first heterogeneous frame (not an all black frame, or an all white frame, and so forth) of the video. See also “Video Recuts” on page 234. Obtaining video thumbnail URLs Scene7 generates video thumbnails automatically during the upload process. The thumbnails appear in the Browse panel in List view and Grid view. To generate URLs for video thumbnails, perform a publish operation. See “Publishing video” on page 224. After publishing, you can obtain video thumbnail URLs in Detail View in the URLs and Embed Code panel. Click Copy URL to the right of the video thumbnail to copy its URL Modifying poster frames in video viewers The poster frame is the initial frame that appears in Video viewers before the video begins playing. Scene7 uses video thumbnails as poster frames. You can apply image modifiers to the poster frame. For example, you can crop the poster frame or make it transparent. To modify the poster frame, open the video viewer configuration screen and enter modifiers in the Poster Image Modifiers section. See “Adding or editing a video viewer preset” on page 223. See www.adobe.com/go/learn_s7_image_server_guide_en. You can also modify video thumbnails by appending modifiers to video thumbnail URLs. Last updated 10/9/2014 229 USING SCENE7 Video Adding captions to video You can extend the reach of your videos to global markets by adding captioning to single videos or to Adaptive Video Sets. By adding captioning you avoid the need to dub the audio, or the need to use native speakers to rerecord the audio for each different language. The video is played in the language that it was recorded. Foreign language subtitles appear so that people of different languages can still understand the audio portion. Captioning also allows for greater accessibility by using closed captioning for people who are deaf or hard of hearing. Note: The video player that is used must support the display of captions. See “Adding or editing a video viewer preset” on page 223 to configure the Caption Effect and to edit the Caption Menu itself, including the menu’s text for any of the following viewers: • Universal_HTML5_Video viewer (HTML5). • Universal_HTML5_MixedMedia_dark viewer (HTML5). • Universal_HTML5_MixedMedia_light viewer (HTML5). • Video_Caption viewer (Flash AS3). See also “Adding and editing Viewer presets” on page 38. See “Adding localization support to a Flash AS3 Viewer preset” on page 39 to add localization support to a video caption viewer. If desired, you can create and brand your own custom video viewer with captions instead of using a video viewer preset. For instructions on creating your own HTML5 viewer with captions, in the Adobe Scene7 Viewer SDK for HTML5 guide, in the Adobe Scene7 Viewer SDK, reference the classes s7sdk.video.VideoPlayer and s7sdk.common.ClosedCaptionButton. Or, to create your own Flash AS3 viewer with captions, see the Adobe Scene7 Viewer SDK for Adobe Flash also found in the Adobe Scene7 Viewer SDK. The Adobe Scene7 Viewer SDK is available as a download from the following location: Adobe Developer Connection. Scene7 has the capability of converting caption files to JSON (JavaScript Object Notation) format. This conversion means you can embed the JSON text into a web page as a hidden but complete transcript of the video. Search engines can then crawl and index the content to make the videos more easily discoverable and give customers additional details about the video content. See Serving static (non-image) contents in the Scene7 Image Serving API Help for more information about using the JSON function in a URL. To add captions to video 1 Using a third-party application outside Scene7 Publishing System, create your video caption file based on the viewer type that you are using. Last updated 10/9/2014 230 USING SCENE7 Video Viewer type Captioning file HTML5 If you are using an HTML5 video viewer, ensure that the caption file you create follows the WebVTT (Web Video Text Tracks) standard. The captioning filename extension is .vtt. You can learn more information about the WebVTT captioning standard. See WebVTT: The Web Video Text Tracks format. There are both free and paid for tools and services that you can use to author caption files outside Scene7 Publishing System. For example, to create a simple video caption file with no styling, you can use the following free online caption authoring and editing tool: WebVTT Caption Maker For best results, use the tool in Internet Explorer 9 or above, Google Chrome, or Safari. In the tool, in the Enter URL of video file field, paste the URL of your video file and then click Load. For example, if you are using a Scene7 URL for your video file, in SPS, double-click an individual video asset (not an Adaptive Video Set or a Master Video) to open it in Detail View. In the right panel of the Detail View, expand URLs and Embed Code. Then under the Mobile group, to the right of Mobile (Progressive), click Copy URL. This process gives you the URL to the video file itself which you can then paste into the Enter URL of video file field. Internet Explorer, Chrome, or Safari can then natively play back the video. Now follow the onscreen instructions from the site to author and save your WebVTT file. When you have finished, copy the caption file contents and paste it into a plain text editor and save it with a .vtt filename extension. Note: For global support of video captions in languages other than English, be aware that the WebVTT standard requires that you create separate .vtt files and calls for each language you want to support. Generally, you want to name the caption VTT file the same name as the video file, and append it with captions. By doing so, it can help you with automating the generation of the video URLs using your existing web content management system. Flash AS3 If you are using a Flash video viewer, ensure that it follows the DFXP (Distribution Format Exchange Profile) standard or the SMPTE (Society of Motion Picture & Television Engineers) standard. For more information about captioning standards, see the following: Timed Text DFXP SMPTE To learn more about recommended captioning tools and captioning services that support the necessary formats and standards, see Adobe Flash accessibility design guidelines. For an example of a caption XML file, see Sample Caption File. If you have multiple languages that you want to support, your captioning file can have a language section that repeats for each language. You do not need to create separate captioning files for each language. Generally, you want to name the caption XML file the same name as the video file, and append it with captions. By doing so, it can help you with automating the generation of the video URLs using your existing web content management system. 2 In Scene7 Publishing System, upload your WebVTT, DFXP, or SMPTE XML caption file. See “Uploading files” on page 79. 3 In the Asset Library panel on the left side, navigate to the asset folder that contains the video file that you want to associate with the caption file that you uploaded. 4 In the Asset Browse panel, select a single video asset, and then below the thumbnail image of the asset, click Preview > Viewer List. Last updated 10/9/2014 231 USING SCENE7 Video 5 In the Viewer List table, find the HTML5 viewer named Univeral_HTML5_Video, Universal_HTML5_MixedMedia_dark, or Universal_HTML5_MixedMedia_light, or find the Flash AS3 viewer named Video_Caption, and then do one of the following: • For a pop-up video viewer experience, click Copy URL to the far right of the name. Append the copied URL of the video with the following syntax to associate it with the copied URL to your caption file: &captionasset=<full Copy URL path to the caption file .vtt,1> Note the ,1 at the end of the caption URL path. Immediately following the .vtt filename extension in the path, you have the option to enable or disable the closed caption button on the video player bar by setting to 1 or 0, respectively. • For an embedded video viewer experience, click Embed Code to the far right of the name. In the Embed Code dialog box, click Copy to Clipboard. For the Flash AS3 Video_Caption viewer, append the copied embed code with the following: document.write('<param name="captionasset" value="companyname/captionfilename">'); or For the HTML5 Universal_HTML5_Video, Universal_HTML5_MixedMedia_dark, or Universal_HTML5_MixedMedia_light viewers, append the copied embed code with the following: videoViewer.setParam("caption","<full Copy URL path to the caption file .vtt,1>" Note the ,1 at the end of the URL path. Immediately following the .vtt filename extension in the URL path, you have the option to enable or disable the caption button on the video player bar by setting to 1 or 0, respectively. Adding chapter markers to video You can make your long form videos easier to watch and navigate by adding chapter markers to single videos or to Adaptive Video Sets. When a user plays the video, they can click the chapter markers on the video timeline (also known as the video scrubber) to easily navigate to their point of interest, or immediately jump to new new content, demonstrations, tutorials, and so on. Note: The video player that is used must support the use of chapter markers. See “Adding or editing a video viewer preset” on page 223 to configure the chapter navigation cue points and chapter title pop-up text for the Universal_HTML5_Video viewer (HTML5). See also “Adding and editing Viewer presets” on page 38. If desired, you can create and brand your own custom video viewer with chapters instead of using a video viewer preset. For instructions on creating your own HTML5 viewer with chapter navigation, in the Adobe Scene7 Viewer SDK for HTML5 guide, in the Adobe Scene7 Viewer SDK, reference the heading “Customizing Behavior Using Modifiers” under the classes s7sdk.video.VideoPlayer and s7sdk.video.VideoScrubber. The Adobe Scene7 Viewer SDK is available as a download from the following location: Adobe Developer Connection. Last updated 10/9/2014 232 USING SCENE7 Video You create a chapter list for your video in much the same way that you create captions. That is, you create a WebVTT file. Note, however, that this file must be separate from any WebVTT caption file that you may also be using; you cannot combine captions and chapters into one WebVTT file. You can use the following sample as an example of the format you use to create a WebVTT file with chapter navigation: WEBVTT Chapter 1 00:00.000 --> 01:04.364 The bicycle store behind it all. Chapter 2 01:04.364 --> 02:00.944 Creative Cloud. Chapter 3 02:00.944 --> 03:02.937 Ease of management for a working solution. Chapter 4 03:02.937 --> 03:35.000 Cost-efficient access to rapidly evolving technology. In the example above, Chapter 1 is the cue identifier and is optional. The cue time of 00:00:000 --> 01:04:364 specifies the start time and end time of the chapter, in 00:00:000 format. That last three digits are milliseconds and can be left as 000, if preferred. The chapter title of The bicycle store behind it all is the actual description of the chapter’s contents. The cue identifier, the starting cue time, and the chapter title all appear in a pop-up in the video player when a user hovers their mouse pointer over a visual cue point in the video’s timeline. Because you are using an HTML5 video viewer, ensure that the chapter file you create follows the WebVTT (Web Video Text Tracks) standard. The chapter filename extension is .vtt. You can learn more information about the WebVTT captioning standard. See WebVTT: The Web Video Text Tracks format. To add chapter markers to video 1 Using a simple text editor outside Scene7 Publishing System, create your video chapter file. Note: For global support of video chapters in languages other than English, be aware that the WebVTT standard requires that you create separate .vtt files and calls for each language you want to support. 2 Save the .vtt file in UTF8 encoding to avoid problems with character rendition in the chapter title text. Generally, you want to name the chapter VTT file the same name as the video file, and append it with chapters. By doing so, it can help you with automating the generation of the video URLs using your existing web content management system. 3 In Scene7 Publishing System, upload your WebVTT chapter file. See “Uploading files” on page 79. 4 In the Asset Library panel on the left side, navigate to the asset folder that contains the video file that you want to associate with the chapter file that you uploaded. 5 In the Asset Browse panel, select a single video asset, and then below the thumbnail image of the asset, click Preview > Viewer List. Last updated 10/9/2014 233 USING SCENE7 Video 6 In the Viewer List table, find the HTML5 viewer named Univeral_HTML5_Video, and then do one of the following: • For a pop-up video viewer experience, click Copy URL to the far right of the name. Append the copied URL of the video with the following syntax to associate it with the copied URL to your caption file: &navigation=<full Copy URL path to the chapter navigation file .vtt> • For an embedded video viewer experience, click Embed Code to the far right of the name. In the Embed Code dialog box, click Copy to Clipboard. For the HTML5 Universal_HTML5_Video viewer, append the copied embed code with the following: videoViewer.setParam("navigation","<full Copy URL path to the chapter navigation file .vtt>" Exporting source and encoded videos In the Browse panel, source videos are labeled “Master Video.” Encoded videos are labeled “Video.” You can export source videos as well as master videos. To export video files, select them in the Browse panel and choose File > Export. See “Exporting assets from Scene7 Publishing System” on page 113. More Help topics “Uploading and encoding videos” on page 211 Using the Universal URL You can use the following workflow in Scene7 Publishing System for when you want to encode and publish videos to multiple screens. Note: While you can use this alternate workflow, the best practice is to use the HTML5 video viewer instead. • Use Scene7 Publishing System to upload and encode your videos to MP4 H.264. MP4 is a format that users can play on desktop and mobile screens, including iOS and Android devices. You can even use an out-of-box adaptive video encoding setting which simplifies encoding with a single checkbox selection. • Set up a universal video profile to use a Flash video viewer for desktop and default to the native device player on mobile/tablet. • Publish your videos using the smart Universal Viewer URL in Scene7. See also “About Universal Viewers” on page 42. Last updated 10/9/2014 234 Chapter 16: Video Recuts In Scene7, you can enhance master videos into Video Recuts by using Adobe Premiere Express technology. This technology provides easy-to-use editing capabilities to create interactive shopping experiences directly within the video. For example, you can add clickable product hotspots to provide related information, or add call-to-action buttons to enable purchase from the video. You create Video Recuts in the Video Recut editor window by combining video, audio (for secondary soundtracks or voice-overs), photos, graphics (for overlays), text (for titles and captions), and transitions. You can create Video Recuts for specific promotions or campaigns. In addition, you can create templates for your Video Recuts. Video Recut Templates allow you to modify contents of the Video Recut at runtime, enabling targeted and personalized video. To make your Video Recuts more compelling, you can create pop-up information panels for Video Recuts with detailed product descriptions and images. The information panel appears when the end user moves the pointer over the Video Recut screen. An information panel can contain text, images, and URL links. Quick Start: Video Recuts The following step-by-step workflow description is designed to get up and running quickly with Video Recuts. After each step is a cross-reference to a topic heading where you can find more information. 1. Set up Video Presets Scene7 offers many predefined encoding Video Presets designed specifically for delivering Video Recuts on Adobe Flash Players in both the Flash and MP4 video format. These predefined presets reflect the most common encoding settings and have been optimized for playback on target screens. In addition, administrators can create Video Presets to customize the size and playback experience of Video Recuts to end users. Administrators can add and manage Video Presets by clicking Setup > Application Setup > Video Presets > Single Encoding Presets > Add. On the Playback Device drop-down menu, choose Desktop (compatible with Flash 9), Desktop (compatible with HTML5 OGG), Mobile (iPhone, iPad, Android), or Tablet (iPad, Android). Set or edit the remaining options as necessary. See “Video Presets” on page 235. 2. Upload (and transcode) video files To create Video Recuts, use FLV, F4V, or MP4 files, or transcode other video types to MP4 when you upload the files. To transcode a file for use as a Video Recut, click Job Options in the Upload screen to open the Job Options dialog box. Then, under eVideo Options, choose an option. See “Uploading and transcoding video for Video Recuts” on page 236. 3. Set up Recut Viewer Presets Recut Viewer Presets determine the look of the viewer and how its playback controls work. Scene7 offers predefined Recut Viewer Presets for delivering Video Recuts, and you can create your own as well if you are an administrator. Add and manage Recut Viewer Presets from the Viewer Presets screen. To open this screen, choose Setup > Viewer Presets. Last updated 10/9/2014 235 USING SCENE7 Video Recuts See “Setting up Viewer Presets for Video Recuts” on page 236. 4. Create the Video Recut Create Video Recuts in the Video Recut window. Drag assets you want to include in the Video Recut into the stage or timeline. The Video Recut window offers tools for adding image, graphics, audio, backgrounds, borders, captions, effects, and transitions. You can use sample assets from the Sample eVideo Content panel or add your own assets to enhance your Video Recuts. See “Creating Video Recuts” on page 237. By parameterizing a Video Recut, you can modify it by replacing the content at runtime. You can create templates from Video Recuts that dynamically update the video, overlays (images, graphics, backgrounds, borders, captions), soundtracks, effects, and transitions. See “Create a Video Recut Template” on page 248. To create pop-up information panels for Video Recuts, create a response template. When the end user moves the pointer over the Video Recut screen, the information panel appears. It can contain text, images, and URL links. See “Creating information panels for Video Recuts” on page 249. 5. Preview Video Recuts in a Viewer To see how a Video Recut plays for end users on your web site, select the video in the Browse Panel. Then click the Preview button, choose File > Preview, or click the rollover Preview button. The Preview screen opens. See “Previewing Video Recuts in a Viewer” on page 252. 6. Publish your Video Recut Publishing a Video Recut places it on Scene7 servers so it can be delivered to your web site. As part of the publishing process, Scene7 activates the URL string for calling the Video Recut from Scene7 servers to your web site. Note: Video requires both Image Server and Video Server publishes. You use the Video Server to publish the actual video asset. And, you use the Image Server to publish related video assets such as the video thumbnail, set information for any Adaptive Video Set, and the XML file for Video Recuts. To publish Video Recuts, mark them for publish by selecting the Mark For Publish icon in the Browse Panel. Then click Start Publish. See “Publishing a Video Recut” on page 252. 7. Deploy Video Recuts to your web sites To obtain the URL for a Video Recut, select it in the Browse Panel, click the Preview button, and click Copy URL. After you click a Copy URL button, the URL is copied to the Clipboard. Place this code in the HTML of your web site. See “Deploying a Video Recut on your web site” on page 253. Video Presets To create Video Recuts, you can use FLV, F4V, or MP4 files, or you can transcode other video types to MP4 when you upload the files. During the transcoding process, the video is compressed to an optimal size for use as a Video Recut. Last updated 10/9/2014 236 USING SCENE7 Video Recuts Scene7 offers a library of predefined encoding presets for Video Recuts that reflect the most common encoding settings. In addition, administrators can create their own encoding Video Presets to customize the size and playback quality of Recut Videos to end users. You can learn more about Video Presets, including how to create them, activate and deactivate them, delete them, and manage them in the Video Presets screen. See “Working with video encoding presets” on page 219. Uploading and transcoding video for Video Recuts Scene7 offers two options for uploading files for Video Recuts: Video serving Upload FLV, F4V, or MP4 files directly to Scene7. With this workflow, files are not transcoded at upload. Video streaming Upload master/source files and, at upload, transcode these files to MP4 format. • Make sure the master/source files you want to transcode are supported. See “Supported video file types for encoding” on page 214. • Choose an encoding preset when you upload the file. Click the Job Options button in the Upload screen, and in the Upload Job Options dialog box, display the eVideo Options, and choose a preset. For descriptions of transcoding options, see “Adaptive Video Encoding (16:9 or 4:3) video presets” on page 28. More Help topics “About encoding preset options” on page 27 Thumbnails for Video Recuts Scene7 generates thumbnails for Video Recuts (as well as encoded videos and pre-encoded videos). You can see these thumbnails in the Browse panel. To obtain a Video Recut thumbnail, Scene7 uses the first frame of the first video in the recut. In a Video Recut with more than one video, the first video, first frame is used. You can obtain Video Recut thumbnail URLs and deploy them outside SPS on websites. Scene7 uses video thumbnails for poster frames, the initial frame that appears in Video viewers and Video Recut viewers before the video begins playing. In Flash AS3 Video Recut viewers, you can apply image modifiers to the poster frame. You can learn more about video thumbnails, obtaining video thumbnail URLs, and modifying poster frames. See “Working with video thumbnails” on page 228. Setting up Viewer Presets for Video Recuts End users watch the Video Recuts you create in a Video Recut Viewer. This viewer determines what the Video Recut looks like and how its playback controls work. For example, the viewer determines the size, color, video and audio controls, progress bar, and user-interface skin. You choose a Viewer Preset on the Preview screen. After you choose a preset, you can click Copy URL to obtain the URL for playing the video using the Viewer Preset you chose. Last updated 10/9/2014 237 USING SCENE7 Video Recuts Scene7 comes with many predefined Viewer Presets for playing Video Recuts, and administrators can create custom presets by choosing from more than a dozen different settings. Follow these steps to set up a Viewer Preset for showing Video Recuts: 1 Click Setup > Viewer Presets. The Viewer Presets screen opens. This screen lists Viewer Presets for all types of viewers. To see only presets for showing Video Recuts, choose Flash AS3 on the Platform menu, and open the Viewers drop-down list and choose Video Recut Viewer. You can learn more about activating, filtering, sorting, and previewing Viewer Presets on this screen. See “Viewer Presets” on page 32. 2 Add or edit a Viewer Preset for showing Video Recuts: Adding Click Add. In the Add Viewer Preset dialog box, in the Platform drop-down list, click Flash AS3. In the Viewer drop-down list, click Video Recut Viewer, and then click Add. Adding by starting from an existing Viewer Preset Select a Video Recut Viewer Preset, and then click Edit. After you reconfigure the Video Recut Viewer, click Save As to save the preset under a different name. Editing Select a Video Recut Viewer Preset, and then click Edit. The Configure Viewer screen appears. 3 Enter (or edit) the preset name. 4 In the Common Settings category, choose a screen size for the Video Recut viewer: Same as Source Click Same as Source to make the Video Recut Viewer size automatically to the width and height of the video being previewed. Custom Size Click Custom Size and enter pixel measurements in the Video Width and Video Height fields to establish a fixed size for the Video Recut Viewer. 5 Choose options in the Configure Viewer screen. The preview screen displays the viewer as you update and change settings. To see a description of an option, click its Info Tip icon . 6 Do one of the following: • Click Save As if you added a Video Recut Viewer Preset by starting from an existing preset. • Click Save if you added or edited a Video Recut Viewer Preset. Creating Video Recuts Video Recuts are remixes of master video files. You create Video Recuts by using FLV, F4V, or MP4 files and combining these files with audio, images, graphics, text, and transitions in the Video Recut window. Create Video Recuts to easily enhance your video to highlight features and targeted promotions. Users view Video Recuts in a Scene7 Video Recut Viewer, not a Video Viewer (and they must use Flash Player 10 or later). Last updated 10/9/2014 238 USING SCENE7 Video Recuts Assets you can use in Video Recuts Video Recuts are composed of scenes. Use captions, graphics, visual effects, soundtracks, and other Scene7 assets to enhance scenes in your Video Recut. Each scene can have six different assets. Note: Scene7 provides sample assets that you can use in Video Recut, and you can upload your own assets. The sample assets are available in the Sample eVideo Content panel of the Video Recut window (located, at the bottom of the Asset Library). To use your own assets, see “Design and tag assets” on page 246 . Audio Apply a soundtrack to your entire Video Recut. Use the Property Inspector to control the soundtrack volume in video scenes that contain their own embedded audio. Background Apply a custom background color to a scene. You can choose from many different colors in the Property Inspector. Border Add a graphic overlay that frames a scene as it plays. For example, the Drapes border adds curtains over the video to give the effect of watching the video in a theater. Borders are not adjustable, and are always the topmost layer. You can use one border per scene, or apply the same border to all scenes by dragging it to the Global drop zone. Caption Add a text box that appears onscreen. Scene7 offers different kinds of captions, including bubble captions, banners, and sticky notes. After you enter text for your caption, choose a font, font size, and font color for the text. If desired, you can rotate the text. You can use multiple captions per scene, or apply a caption to all scenes by dragging it to the Global drop zone. Effect Change the tone or character of a scene. For example, you can blur, lighten, or darken scenes, or add brilliance or contrast to scenes. Effects apply to entire scenes. After you apply an effect, you can fine-tune it in the Property Inspector window. You can use multiple effects to obtain your desired result. The effects are stacked as you drag-anddrop them. You can change the order of the effects to apply them on different layers. You can apply an effect to all scenes by dragging it to the Global drop zone. Graphic Place a graphic on top of videos or other images by dragging it to the stage or the sceneline. A graphic used this way is called an overlay. You can use any image as a graphic if you designate it as an overlay. After you place a graphic on the stage, you can open the Property Inspector window and choose transparency commands, depth level (z-order), and layer-blending commands for the graphic. You can specify how long the graphic is displayed onscreen by dragging the image end-time control handle out to as long as 60 seconds (if the overlay is on top of a video, it appears as long as the video scene). You can use up to six graphics per scene (there is a maximum of six total assets per scene). Transition Helps you clearly mark the passage between scenes or ease the transition from one scene to the next. In a blur transition, for example, the first scene ends in a blur; the next scene begins in a blur and gradually comes into focus. In the Property Inspector, you can control the duration of transitions as well as make the audio fade in and out as the transition occurs. Video Create scenes using uploaded videos that have been encoded with a Scene7 Video preset. You can scrub the . You can also video to choose your desired edit point and split the video into two parts using the Scissors button change the In and Out points of each video to clip a longer video into smaller segments. You can combine multiple videos into on Video Recut. Note: You can add a link to any visible asset in your Video Recut. You cannot add links to transitions or video frames. More Help topics “Design and tag assets” on page 246 Video Recut window overview The Video Recut window provides all the tools you need for creating, editing, and previewing a Video Recut. Last updated 10/9/2014 239 USING SCENE7 Video Recuts To open the window, click the Build button and choose Video Recuts. Scenes you add to your Video Recut appear on scene tiles in the sceneline. To add additional assets, display the Add Assets panel on the left side of the window. A B C D Video Recut window. A. Stage B. Sceneline with scene tiles and transition tiles C. Soundtrack drop zone D. Global drop zone Use the Play , Rewind , and Pause buttons to preview a recut. To move to different parts of a scene or to different scenes in the recut, drag the playhead . To adjust audio, drag the volume slider or click the Mute icon . Note: The volume controls are for playing video in the Video Recut window, not for choosing volume settings. You can learn more about choosing volume settings for scenes and Video Recuts, see “Adjust volume” on page 243. The Video Recut window contains the following components. Stage Use the stage to create a scene, play a scene, and add or manipulate borders, captions, effects, and overlays in scenes. Last updated 10/9/2014 240 USING SCENE7 Video Recuts Sceneline The sceneline displays one scene tile for each scene in your Video Recut. Use the sceneline to create a scene by dragging videos or images, add a transition between scenes, change the order of scenes, and play your Video Recut. The timeline below the sceneline tells you how long your Video Recut is. When you select a scene tile, a portion of the timeline is filled in. This filled-in portion shows you how much of the video the scene you selected occupies. You can drag the on the timeline or sceneline to advance or rewind your Video Recut. Playhead Soundtrack drop zone Use the Soundtrack drop zone to choose an audio file to play throughout your Video Recut. Choose an audio file in the Asset Library and drag it to the Soundtrack drop zone. The audio file loops—it starts from the beginning and replays after it has finished playing. See “Adjust volume” on page 243. Global drop zone Choose an asset in the Asset Library and drag it to the Global drop zone to apply the asset to every scene in your Video Recut. For example, to place the same border on every scene, drag a border from the Asset Library to the Global drop zone. Borders, captions, effects, and graphics can be applied globally to all scenes. Images, videos, and transitions cannot be applied to the Global drop zone. Property Inspector The Property Inspector has various tools for adjusting your scenes. For example, you can control the volume of a scene or the volume of a soundtrack; or reorder, remove, or adjust the overlays, captions, graphics, and other effects applied to the scene. You can also use the Property Inspector to add links to scenes, objects, or the entire video. Using the Property Inspector can be helpful when adjusting an asset or effect that is behind another asset or effect. To open the Property Inspector, double-click a scene tile or click the Wrench icon window, click Return To Sceneline . . To close the Property Inspector Property Inspector You can do any of the following in the Property Inspector: • Adjust an asset or effects controls. Select an asset or effect from the list on the right to reveal its controls. Its sizing controls also become available in the video window. • Add a link and tool tip text to any visible asset in the Video Recut. Last updated 10/9/2014 241 USING SCENE7 Video Recuts • Reorder the asset or effects for a scene. Click the Up or Down Arrows next to the selected asset or effect’s icon to reorder them. Topmost assets and effects in the list are frontmost in the video. The video clip must be at the bottom of the list. • Remove an asset. Select it in the list, and then click Trash . • Control the video volume and soundtrack volume in a scene. Drag the volume sliders to increase or decrease volume. • Add Rollover Key text that appears when a user moves the pointer over the video. • Parameterize the video, overlay asset, link, tool tip, or rollover key so that you can create a video template. See “Create a Video Recut Template” on page 248. Edit Parameter options and dialog box Use the Edit Parameter dialog box to specify and name the different properties of your Video Recut that you want to make variable. The Edit Parameter dialog box is accessed through the Property Inspector for the scene containing the next to their names. content you want to make variable. Properties that can be made variable have an icon To open the Edit Parameter dialog box, click the Parameter button . See “Create a Video Recut Template” on page 248. Create and edit Video Recuts You create a Video Recut by combining video scenes, audio, images, transitions, and other assets. After you create the initial scene, you can add assets and a soundtrack. A soundtrack is a looping audio file that plays throughout a Video Recut. Scene7 includes sample assets in the Sample eVideo Content panel of the Asset Library. However, you can create your own assets by using Adobe Flash authoring environment, Adobe Photoshop, and Adobe Illustrator. Important: To use sample eVideo content in Video Recuts, choose Show Sample eVideo Content on the Application General Settings screen. To open this screen, choose Setup > Application Setup > General Settings. See “Assets you can use in Video Recuts” on page 238. See “Asset file types” on page 246. Create a Video Recut 1 Select a video in the Browse panel, and then click Build and choose Video Recuts. 2 For the Recut Stage size, enter a width and height setting, and then click Apply. 3 In the Video Recut window, drag an FLV file or an image from the Asset Library to the stage or the sceneline. Dragging an asset to the stage creates a scene at the end of the Video Recut. Dragging an asset to the sceneline creates the scene at the point in the Video Recut where you drop the asset. 4 To customize the Video Recut, do any of the following: • To add a colored background scene, select a background from the Asset Library and drag it to the stage or sceneline. Double-click the scene tile to open the Property Inspector, and select Background. Then click the and choose a color. Background Color button • To add a border, caption, effect, or overlay (an image or graphic), select it in the Asset Library and drag it to the stage or sceneline. Or, to apply it to all scenes, drag it to the Global drop zone. Last updated 10/9/2014 242 USING SCENE7 Video Recuts Note: After you apply these types of assets, you can adjust them in the Property Inspector window. Borders cannot be adjusted. • To add a soundtrack, select an audio file in the Asset Library and drag it to the Soundtrack drop zone. You can use an MP3 file. • To add a transition, select it in the Asset Library and drag it to a transition tile on the sceneline. Transition tiles appear between scene tiles on the sceneline. See “Edit applied assets” on page 244. Note: Move the pointer over a scene tile to see the name of the video file or image with which it was created. 5 Preview the Video Recut to make sure that it plays as you expect. 6 Click Save. Open a saved Video Recut for editing Use these techniques to open a Video Recut for editing: • Click Edit. • Double-click the Video Recut in the Browse window. Then, in Detail View, click Edit. Handle scenes and sounds The Video Recut window offers controls for handling scenes, sound, changing the length of a scene, splitting a scene, and removing portions of a scene. Reorder scenes ❖ Drag scene tiles on the sceneline to change their order. Scenes are renumbered after you reorder them. Reorder layers or effects within a scene ❖ In the Property Inspector, click the Up or Down Arrows next to the selected asset or effect’s icon to reorder them. Topmost assets and effects in the list are frontmost in the video. The video clip must be at the bottom of the list. You can learn more about changing the depth level (z-order). See “Change the depth level (z-order) of an overlay or caption” on page 245. Delete a scene or transition ❖ Select a scene tile or transition tile in the sceneline, and click Trash . Add a link You can add links to visible assets such as images, graphics, and captions. By default, links open in a new browser window (and always open in a new browser window when previewing), but you can choose to have the link open in the same window. 1 Do one of the following: • To apply the link to the entire Video Recut, select an asset in the Global drop zone, and click the Wrench icon for the asset. • To apply the link to one scene, select the asset (border, background, caption, or image) within that scene, and click the Wrench icon for that asset. Last updated 10/9/2014 243 USING SCENE7 Video Recuts 2 In the Property Inspector, type the URL for the link in the Link box. Be sure to include the http:// part of the URL. 3 To add a tool tip that appears when the cursor moves over the link in the video, type the text in the Tool Tip box. 4 (Optional) Specify any of the following: Color Click to choose a color for the tool tip text or tool tip background. Opacity Drag the slider to specify the level of opacity for the tool tip text. Open Link In Specify whether the link opens in a new browser window or the same browser window. By default, the link opens in a new browser window. When previewing in Scene7, the link always opens in a new browser window, regardless of the option you select. Size Specify the size of the tool tip text from the list of values. Adjust volume In the Video Recut window, you can adjust the volume of a global soundtrack, or the audio included in an individual scene. 1 Select a scene tile on the sceneline and double-click the scene tile or click its Wrench button Inspector window opens. . The Property 2 Do one of the following: • To adjust the volume for the soundtrack, drag the Soundtrack Volume slider. • To adjust the volume for the audio in a scene, drag the Video Volume slider. Note: The volume controls in the lower-left corner of the Video Recut window control the volume level when you play a video in the Video Recut window. These controls do not affect volume levels in the video itself. Remove a soundtrack ❖ Click the Soundtrack drop zone to select the audio file, and then click the Trash button . Change the length of an image or background scene ❖ Drag the End Point on the stage timeline. The stage timeline tells you in seconds how long the scene is. By default, scenes created with images and backgrounds are 3 seconds long. Remove or restore a portion of a scene 1 To remove a portion of a scene, do of the following: • To remove the start of a video scene, drag the start point on the stage timeline to the right until the entire segment you want removed turns gray. • To remove the end of a video scene, drag the end point on the stage timeline to the left until the entire segment you want removed turns gray. • To remove a section from the center of a video scene, split the scene where you want to remove it, and then remove the beginning or end of one of the split scenes. 2 To restore a removed segment drag the start or end point back over the removed segment (the gray area). Split a scene Splitting a scene is necessary if you want to apply assets to different portions of a scene or remove the middle of a scene. 1 In the stage timeline, drag the playhead to the point at which you want to split the scene. Last updated 10/9/2014 244 USING SCENE7 Video Recuts 2 Click the Scissors button . Two scenes are created, with a segment removed from the end of the first scene and a segment removed from the start of the second scene. 3 (Optional) To rejoin the video scenes, delete one of them and restore the removed segment in the other scene. Edit applied assets You can edit applied captions, overlays, transitions, and effects by using the Property Inspector window. Borders cannot be edited. You edit transitions as you apply them. More Help topics “Design and tag assets” on page 246 Edit an effect 1 Double-click a scene tile or the Global drop zone, or click the Wrench button to open the Property Inspector. 2 Adjust effect settings as desired. (All effects have different settings.) On the stage, you can see the results of your option choices. Edit a transition ❖ Double-click the transition icon and do one of the following: • Drag the Duration slider to change the length of the transition. • Select the Fade Audio option to make the audio fade out and in as the transition occurs. Edit a caption 1 Select the caption on the stage, and enter text for your caption in the caption toolbar that appears. 2 Use the toolbar to choose a font, a font size, and a font color, and to align text. Note: Fonts are embedded in caption SWF files. For that reason, you can’t choose a font for a caption other than the fonts that are available on the caption toolbar. 3 Choose transparency and layer-blending settings. See “Set transparency and layer effects for captions and overlays” on page 245. 4 Resize, reposition, and rotate the caption. See “Resize, reposition, and rotate captions and overlays” on page 245. 5 Change the depth level (z-order) of the caption. See “Change the depth level (z-order) of an overlay or caption” on page 245. Edit an overlay 1 Double-click a scene tile or the Global drop zone, or click the Wrench button 2 Select the name of your overlay. 3 Choose transparency and layer-blending settings. See “Set transparency and layer effects for captions and overlays” on page 245. 4 Resize, reposition, and rotate the overlay. Last updated 10/9/2014 to open the Property Inspector. 245 USING SCENE7 Video Recuts See “Resize, reposition, and rotate captions and overlays” on page 245. 5 Change the depth level (z-order) of the overlay. See “Change the depth level (z-order) of an overlay or caption” on page 245. Set transparency and layer effects for captions and overlays Captions and overlays appear in the forefront of scenes. By default, these assets are 100 percent opaque—they obscure the assets below them. However, you can choose a transparency setting for these assets as well as a layer-blending option to make them fit better onscreen. 1 On the stage, select the caption or overlay. 2 Double-click the scene tile or click its Wrench button to open the Property Inspector window. If the caption or overlay appears in every scene, double-click the Global drop zone to open its Property Inspector window. 3 Choose options for the caption or overlay: Transparency Drag the slider to choose a setting. At 100 percent, the caption or overlay is completely visible; at 1 percent, it is transparent. Layer blending Choose an option to define how the caption or overlay blends with the layer below. These options have different effects depending on the background color and the color and transparency of the caption or overlay. Move the pointer over an option to see its effect on the stage. Flip Vertical or Flip Horizontal (Captions only) Select one to flip the caption. Drop Shadow (Captions only) Select to make the letters cast a faint shadow on the screen. Resize, reposition, and rotate captions and overlays 1 Select the caption or overlay. Boundaries and selection handles appear. 2 Do any of the following: • To resize the asset, drag a selection handle at the corner or side of the boundary. • To reposition the asset, move the pointer over the asset until the cursor changes to a four-headed arrow; then drag the asset to a new location. • To rotate the asset, drag the rotation handle. If the asset you are working with is a global asset—if you placed it in the Global drop zone—the asset is resized, repositioned, or rotated in all scenes. Change the depth level (z-order) of an overlay or caption Overlays and captions can overlap if more than one is in the same scene. Reordering these assets is necessary when they overlap and you want one asset to appear in front of or behind another. 1 In the sceneline, select the scene tile with the scene that has overlapping assets. Or, if the overlapping assets are applied globally, select the Global drop zone. 2 Double-click the scene tile (or Global drop zone) or click its Wrench button . The Property Inspector window opens. It lists all assets, with the frontmost assets at the top of the list. Arrows appear next to the names of assets that you can move up or down in the list. 3 Click the Up or Down Arrow to change the z ordering in the list. Important: Global assets that appear on every scene appear in front of other assets. You cannot move these assets behind other assets. Last updated 10/9/2014 246 USING SCENE7 Video Recuts Remove an asset You can remove a border, effect, caption, or overlay applied to individual scenes or to all scenes. Assets you place in the Global drop zone are applied to all scenes. 1 In the sceneline, select the scene containing the asset you want to remove. 2 Select the asset on the stage and click the Trash button , or drag the asset off the stage. Note: If you have trouble selecting an asset on the stage, open the Property Inspector window (click the Wrench button to open), select the asset in the asset list and click the Trash button. Design and tag assets Scene7 provides sample audio, backgrounds, borders, captions, effects, graphics, transitions, and video in the Sample eVideo Content panel of the Asset Library. As well as using these sample assets, you can create your own assets for use in Video Recuts. You can create your own assets using the Adobe Flash authoring tool, Adobe Photoshop, or Adobe Illustrator. Publish asset files as Flash 9 or above, ActionScript 3 SWF files. After you create an asset and upload it to Scene7, tag it as a Video Recut asset. Tagging lets Scene7 recognize it as a Video Recut asset. (You can’t create an effect or transition on your own; contact Scene7 if you need this capability). Important: Consider how assets you use in your Video Recut will appear in the viewer that you choose for end users to watch your video. Most importantly, each asset needs a high enough resolution to display well in the viewer you choose. Ideally, videos should be the same resolution as the viewer, although they still play if they have a lower resolution. The aspect ratio of assets should match the viewer you choose. Asset file types This table describes asset file types that are used to create Video Recuts. Asset type Allowable file type(s) Audio MP3 Background GIF, PNG, SWF Border GIF, PNG, SWF (mark as border) Caption SWF (mark as caption) Effect SWF (use samples from Scene7) Graphic GIF, JPG, PNG, SWF (mark SWF files as overlays) Transition SWF (use samples from Scene7) Video FLV, F4V, MP4 Important: Use Flash Player 9 or above, ActionScript 3 SWF files in Video Recuts. Other types of SWFs are not allowed. Note: Scene7 provides effect and transition files; you cannot upload these files for use in Video Recuts. Effects and transitions are available in the Sample eVideo Content panel in the Video Recut window. Contact Scene7 if you want to design your own effects and transitions. Last updated 10/9/2014 247 USING SCENE7 Video Recuts Design and tag a border You can design borders for your Video Recuts with the Adobe Flash Professional, Adobe Photoshop, Adobe Illustrator, or Adobe Fireworks®. Scene7 recommends using a SWF file; PNGs and GIFs can show blurriness or pixelation when they are scaled. 1 Use Adobe Flash Professional, Adobe Photoshop, Adobe Illustrator, or Adobe Fireworks to create a border, and follow these guidelines: • Flash Player 9 or above SWF (static or animated), PNG, or GIF file format • Set SWF files to ActionScript3 • 24 frames per second (fps) • Do not reference any Document class in a SWF file 2 Create animations in the main timeline only. Do not nest animations within video clips. If the border doesn’t touch the edges of the stage and you would like that space maintained in the Video Recut, place a transparent movie clip, the size of your viewer preset, over all layers. Scene7 tries to scale the border to fit the stage. 3 Upload the border file to Scene7, and open it in Detail view. 4 Open the Metadata panel, open the Recut SWF Type menu, and choose Border. Design and tag a caption 1 Use Adobe Flash Professional CS3 or later to create captions, and publish them in the Flash Player 9 or above SWF file format. Embed the font into the text field on the stage, but specify a character range. Basic Latin is sufficient for captions in English. 2 Add a dynamic text object to allow for input and display of the caption. In the Properties panel, name the object inputField. You can set its default font, color, and size in the Properties panel, as well as add additional graphics. 3 Upload the caption to Scene7, and open it in Detail view. 4 Open the Metadata panel, open the Recut SWF Type menu, and choose Flash Caption. Design and tag an overlay graphic Use vector graphics to create an overlay to achieve better image quality when scaling. If you’re using bitmap images, Adobe recommends using PNG files because they produce better transparency, but you can also use JPG and GIF files for overlays. 1 Use a vector graphics application such as Adobe Flash Professional to create overlays, and follow these guidelines: • Flash Player 9 or above SWF, JPG, GIF, or PNG file with a transparent canvas (PNG is recommended because they produce better transparency). • 24 frames per second. • You cannot reference any Document class in a SWF file. • Create animations in the main timeline. Do not nest animations within video clips. 2 Upload the graphic file to Scene7, and open it in Detail view. 3 Open the Metadata panel, open the Recut SWF Type menu, and choose Overlay. Last updated 10/9/2014 248 USING SCENE7 Video Recuts Create a Video Recut Template Video Recut Templates let you create a single recut, and then modify it as desired by replacing the content at runtime. You can create templates from Video Recuts that dynamically update the overlays, soundtracks, transitions, and even the video itself. As with Basic Templates and FXG Templates, in Video Recut Templates, you create parameters for the properties you want to make variable. You can create parameters for the URL of content, hotspot tool tips and links, rollover key, and caption text. Creating parameters for the URL of content lets you substitute a different video, image, soundtrack, or overlay. Creating a parameter to change the URL for a video or image, changes all the instances of that video or image in the Video Recut. When you replace content that differs in length, the timeframe in the template changes to match the new content. You can use the same parameter name for the text in different assets, such as captions, in your Video Recut, to change the text in all instances at the same time. Create variable properties 1 Double-click the scene tile, or click the Wrench button for the scene containing the property you want to make variable. If the property is global, click the Wrench button in the Global drop zone. 2 In the Property Inspector, click the Parameter button next to the property. The Edit Parameter dialog box opens, displaying the default parameter name and value. 3 Click OK to accept the default parameter name, or type a new name in the box, and then click Apply. Note: Properties are not variable by default. Open the Edit Parameter dialog box and click Apply for any property you want to make variable. Remove parameterization from a property 1 In the Property Inspector, click the Parameter button next to the property. 2 In the Edit Parameter dialog box, click Remove. Substitute content in variable properties After you’ve parameterized properties for a Video Recut, you can substitute values for variable properties while previewing it. 1 In the Video Recut window, click Preview. The Recut appears in the Preview window, with the variable names and values in a panel along the left side of the window. 2 To change a variable value, type a new value in the variable’s box or click the Browse button to choose an asset. The variable value or asset is replaced and appears in the preview. 3 Click Close to return to the Video Recut window. Last updated 10/9/2014 249 USING SCENE7 Video Recuts Creating information panels for Video Recuts You can create information panels for Video Recuts. When the end user moves the pointer over the overlay, the information panel appears. It can contain text, images, and URL links. Information panels are an excellent way to add value to your Video Recuts, make them interactive, and make them more compelling. To create an information panel for a Video Recut, follow these basic steps: 1 Enter rollover key identifiers: In the Video Recut window, open the Property Inspector for an overlay and enter an identifier name in the Rollover Key field. This identifier name is used to plug in content for the information panel. See “Enter rollover key identifiers” on page 249. 2 Write the code for the response template: The response template formats the information panel in the Video Recut; it also provides placeholders for content — for the text, images, and URLs that appear in the panel. See “Write the code for the response template” on page 250. 3 Create the response template in a Video Recut Viewer Preset: Create or edit a Video Recut Viewer Preset, and in the Configure Viewer screen, activate the information panel and enter the response template code. See “Create the response template in a Video Recut Viewer Preset” on page 250. 4 Create a TXT or UTF-16 file: This file lists identifier names from Rollover Key fields in your Video Recuts (the identifiers you entered in step 1). For each identifier name, the file provides the HTML and XML code that describes how to fill the placeholders in the response template. See “Create a TXT or UTF-16 file with information panel content” on page 250. 5 Upload the TXT or UTF-16 file: Upload the file to the Scene7 Publishing System. Uploading the file data makes it available to the response template. See “Upload the TXT or UTF-16 file” on page 251. 6 Publish the information panel: Activate a Video Recut’s information panel by publishing it to the Scene7 Publishing System. In Detail view, open the InfoPanel Setup panel, and click the Publish button. See “Publish the information panel” on page 251. You can maintain a master TXT or UTF-16 file with content for all the information panels in your Video Recuts. To update the content in information panels, you can change the code in the TXT or UTF-16 file and re-import the file. In this way, you can update information panels for all your Video Recuts from one central location. As your needs change, you can continue to communicate effectively with your customers in information panels. Enter rollover key identifiers On the Video Recut screen, the Property Inspector provides a Rollover Key field for entering identifiers for use in making information panels. Entering an identifier in this field allows you to associate an asset overlay with code in a TXT or UTF-16 file. This code, in turn, provides content to the information panel. Follow these steps in the Video Recut screen to enter an identifier for use in an information panel: 1 Select the scene that you want to have an information panel. 2 Double-click the scene tile or click the Wrench button to open the Property Inspector. 3 Click the overlay asset to associate it with an information panel. You can use any visible asset overlay, including images, graphics, and captions. 4 In the Rollover Key field, enter an identifier name. Do not include blank spaces in the name. Last updated 10/9/2014 250 USING SCENE7 Video Recuts 5 Click the Save button. Repeat these steps for each overlay asset in the Video Recut that you want to have an information panel. Write the code for the response template The response template code formats the information panel and provides placeholders for entering content. The response template can be divided into two parts: variable default values and response format. The variable defaults are used in case the rollover key does not have a value. Variable values are demarcated as $1$,$2$,$3$,…. Following is the syntax used in response template code: <info><var name='1'></var> <var name='2'></var> <var name='3'>CompanyName/ImageID</var> <var name='4'></var><![CDATA[<b>Var 1</b> = $1$<br><b>Var 2</b> = $2$<br><b>Var 3<b> = $3$<br><b>Var 4</b> = $4$]]></info> This URL is demarcated as follows: $1$ <info><var name='1'></var> <var <br><b>Var 2</b> = name='2'></var> <var name='3'>CompanyName/ImageID</var> <var name='4'></var><![CDATA[<b>Var 1</b> = $2$ $3$ $4$ <br><b>Var 3<b> = <br><b>Var 4</b> = ]]></info> Create the response template in a Video Recut Viewer Preset As a best practice, create a Video Recut Viewer Preset for each Video Recut that has an information panel, and enter the response template in the preset. Follow these steps to create the response template in the Viewer Presets screen: 1 Click Setup > Viewer Presets. 2 Add or edit a Video Recut Viewer: Adding Click Add to add a Video Recut Viewer. In the Add Viewer Preset dialog box, choose a platform, choose Video Recut Viewer, and then click Add. Editing Select a Video Recut Viewer, and then click Edit. 3 Select Info Panel Settings. 4 For the Use Information Server setting, select On. Note: After you click On, a URL appears in the Information Server URL field. Do not change the information server URL. 5 In the Response Template box, enter or paste the response template code. 6 Choose or enter settings to define the border of the information panel. You can click the Info Tip button for setting explanations. 7 Click the Save button (or enter a preset name and click Save As if you are editing a Video Recut Viewer Preset). Create a TXT or UTF-16 file with information panel content Using Microsoft Excel®, create a spreadsheet with rollover key identifier names in the first column, and to the right of each name, the variable content that is plugged into the response template. Variable content is mapped to the $1$,$2$,$3$,… demarcations in the response template. See “Write the code for the response template” on page 250. Last updated 10/9/2014 251 USING SCENE7 Video Recuts This table demonstrates what the spreadsheet looks like when it is formatted correctly. In this example, variable 1 is the descriptive text; variable 2 is the image thumbnail; and variable 3 is the link URL for the information panel. The data in each row indicates what will be displayed in the information panel associated with the rollover key. Rollover key identifier $1$ kitchenInfo Offered in a variety of colors including Pearl Company/p34915z Metallic and Nickel Pearl, which complement our Pro Line Series of Appliances $2$ $3$ <a href="http://bit.ly/9nKA2X">Details ></a> After you enter the data, save it as a TXT file (Windows® users) or UTF-16 file (Mac® users) in Excel by following these steps: 1 Click File > Save As. 2 On the Save As Type menu, choose TXT (tab delimited) or UTF-16. 3 Click Save. Upload the TXT or UTF-16 file Scene7 gets variable data for information panels from TXT and UTF-16 files. This data is plugged into the response template. Follow these steps to upload the TXT or UTF-16 file data to the Scene7 Publishing System: 1 Double-click the Video Recut to open it in Detail View. 2 Select the InfoPanel Setup panel. 3 Click Upload, and in the S7 Info Upload dialog box, click Browse and select your TXT or UTF-16 file, and click Open. 4 Click Upload. Publish the information panel Activate a Video Recut’s information panel by publishing it to the Scene7 Publishing System. After you publish, viewers can see the information panel when they play the Video Recut. Note: Before publishing the information panel, upload the TXT or UTF-16 file with identifier names from Rollover Key fields. For more information, see “Upload the TXT or UTF-16 file” on page 251. Follow these steps to publish an information panel: 1 Double-click the Video Recut to open it in Detail view. 2 Select the InfoPanel Setup panel. 3 In Response TTL box, enter the number of hours you want to wait before caching the data: • Set a lower number if the data is updated frequently throughout a day. • Set a higher number if the data is relatively stable and doesn’t require updating frequently throughout the day. The default is ten hours. 4 Click Publish. Last updated 10/9/2014 252 USING SCENE7 Video Recuts Previewing Video Recuts in a Viewer You can use Viewer List to see how an asset appears on particular viewer type platform such as HTML5. Depending on the asset type and associated viewer that you have selected to preview, not all platforms are available in Viewer List. See “Configuring Default Viewers” on page 47. See “Previewing an asset” on page 102. 1 In the Asset Library panel on the left side, in the Show drop-down list, select the Video Recut asset type. 2 In the Asset Library panel on the left side, navigate the Asset folders that contain the Video Recut assets that you want to preview with a viewer. 3 Do one of the following: • Above the Assets window, on the right side of the toolbar, click Grid View. In the Asset window, below the thumbnail image, click Preview > Viewer List. • Above the Assets window, on the right side of the toolbar, click List View. In the Asset window, select an asset, and then to the right of the thumbnail image, click Preview > Viewer List. • Above the Assets window, on the right side of the toolbar, click Detail View. On the same toolbar, click Preview > Viewer List. 4 In the Viewer List window, in the table, click a viewer link to preview the asset in the selected viewer. 5 Close the displayed viewer to return to the Viewer List screen. 6 In the lower-right corner of the Viewer List window, click Close to return to the Assets screen. Publishing a Video Recut Publishing a Video Recut enables Scene7 servers to deliver it to your web site or application. Note: Video Recuts require that you publish to Video Server and also to Image Server. You use Video Server to publish the actual videos that you marked for publishing. And, you use Image Server to publish related assets, such as the video thumbnails, set information for any Adaptive Video Set, and the XML file for Video Recuts. After you publish a Video Recut, the Scene7 Publishing System activates the URL strings for your HTML page or application code. To publish a Video Recut 1 Do one of the following: • In the Browse Panel, click Mark For Publish • In the Upload screen, click Mark For Publish next to each filename that you want to publish. next to each filename that you want to publish. 2 On the Global Navigation bar, click Publish. 3 Set the scheduling options you want. 4 (Optional) In the Job Name field, type a name for the publish job. 5 In Advanced options, in the Publish To drop-down list, select Video Server. See “Advanced publish options” on page 89 for additional options you can set. 6 Click Submit Publish. Last updated 10/9/2014 253 USING SCENE7 Video Recuts 7 Repeat steps 2- 4 above. 8 In Advanced, in the Publish To drop-down list, select Image Server. See “Advanced publish options” on page 89 for additional options you can set. 9 Click Submit Publish. More Help topics “Publishing files” on page 87 Deploying a Video Recut on your web site Web sites and applications access Scene7 server content, including Video Recuts, by using URL strings or embedded code. Scene7 activates these URL strings during the publishing process. To place the URL string or embed code for your Video Recut in your web pages and applications, copy it from the Scene7 Publishing System. Note: The URL is not active until you publish the asset. Copying a Video Recut URL 1 In the Asset Browse panel, in the Show drop-down list, click Video Recut. 2 in the Asset Library panel on the left side, navigate to the asset folder that contains the Video Recut whose embed code you want to copy. 3 Above the Asset Browse panel, on the right side of the toolbar, do one of the following: • Click Grid View. In the Asset Browse panel, double-click a single asset to open it in Detail View. In the URLs and Embed Code panel on the right, click Copy URL to the right of the viewer you want. • Click Grid View. In the Asset Browse panel, select a single asset, and then below the thumbnail image, click Preview > Viewer List. In the Viewer List page, under the Actions column of the table, click Copy URL. • Click List View. In the Asset Browse panel, select a single asset, and then to the right of the thumbnail image, click Preview > Viewer List. In the Viewer List page, under the Actions column of the table, click Copy URL. • Click Grid View, List View, or Detail View. On the same toolbar, click Preview > Viewer List. In the Viewer List page, under the Actions column of the table, click Copy URL. Adding a Video Recut to your web page or application Deploy Video Recuts by using a dynamic page (ASP or JSP) that displays the video in a Scene7 Video Recut Viewer. The URL call to the Scene7 platform follows the same protocol. The player serves a video that your web team can upload to the Scene7 Publishing System for publishing to a Scene7 video server. Copying the embed code of a Video Recut viewer Using the Embed Code feature lets you review the viewer code for the selected Video Recut. You can also copy the code to the clipboard so you can paste it in your web pages for deployment of the viewer. Editing of the code is not permitted in the Embed Code dialog box. Last updated 10/9/2014 254 USING SCENE7 Video Recuts To copy the embed code of a Video Recut viewer 1 In the Asset Browse panel, in the Show drop-down list, click Video Recut. 2 in the Asset Library panel on the left side, navigate to the asset folder that contains the Video Recut whose embed code you want to copy. 3 Above the Asset Browse panel, on the right side of the toolbar, do one of the following: • Click Grid View. In the Asset Browse panel, double-click a single asset to open it in Detail View. In the URLs and Embed Code panel on the right, click Embed Code to the right of the viewer you want. • Click Grid View. In the Asset Browse panel, select a single asset, and then below the thumbnail image, click Preview > Viewer List. In the Viewer List page, under the Actions column of the table, click Embed Code. • Click List View. In the Asset Browse panel, select a single asset, and then to the right of the thumbnail image, click Preview > Viewer List. In the Viewer List page, under the Actions column of the table, click Embed Code. • Click Grid View, List View, or Detail View. On the same toolbar, click Preview > Viewer List. In the Viewer List page, under the Actions column of the table, click Embed Code. 4 In the Embed Code dialog box, click Copy to Clipboard. Editing the code is not permitted in the Embed Code dialog box. 5 Click Close. Last updated 10/9/2014 255 Chapter 17: Mixed Media Sets Scene7 Mixed Media Sets give users an integrated viewing experience. Mixed Media Sets can include images, Image Sets, Swatch Sets, Spin Sets, and videos. Users can click different tabs within the Mixed Media Viewer to see the items in the different viewers. If no tabs are specified, all assets are displayed together in the swatch row. Mixed Media Set Viewer Presets include community options for end users to embed code, copy URLs, and link to the main web site. Users can use these options to share information about products on their personal web sites or social networking sites. Quick Start: Mixed Media Sets This Mixed Media Sets Quick Start is designed to get up and running quickly with Mixed Media Set techniques in Scene7. 1. Uploading the images, swatch files, and videos Start by uploading the images, swatch files, and videos for your Mixed Media Sets. Because users can zoom on images in the Mixed Media Set Viewer, take zooming into account when you choose images. Make sure that the images are least 2000 pixels in the largest dimension. Click Upload on the Global Navigation bar to upload files from your computer to a folder on the Scene7 Publishing System. See “Uploading your files” on page 83. 2. Creating media sets for use within the Mixed Media Set You can add images, Image Sets, Swatch Sets, Spin Sets, and videos to your Mixed Media set. Prepare the media sets before you add them to the Mixed Media Set. See “Creating an Image Set” on page 152, “Creating a Swatch Set” on page 161, and “Creating a Spin Set” on page 168. 3. Creating a Mixed Media Set Click the Build button and choose Mixed Media Sets. Drag the images, Swatch Sets, Image Sets, and videos onto the Mixed Media Set screen. To add a soundtrack, drag an audio file to the Soundtrack box. See “Creating a Mixed Media Set” on page 256. 4. Setting up Mixed Media viewer presets Scene7 comes with default viewer presets for Mixed Media Sets. Administrators can create or modify Mixed Media Set viewer presets. When setting up a Mixed Media Set viewer preset, add the viewer presets for all of the other assets in your set. For example, if your Mixed Media Set includes videos, add a video viewer preset to the Mixed Media Set viewer preset. You can also add a soundtrack to the viewer. This soundtrack plays while the viewer is open, but does not play when a video is active. See “Setting up a Mixed Media Set Viewer Preset” on page 258 and “Adding and editing Viewer presets” on page 38. Last updated 10/9/2014 256 USING SCENE7 Mixed Media Sets 5. Previewing a Mixed Media Set Click the Mixed Media Set’s rollover Preview button. The Mixed Media Set appears. You can click the thumbnail and swatch icons to examine your Mixed Media Set in the Mixed Media Set Viewer. You can choose different Viewers from the Presets menus. See “Previewing an asset” on page 102. 6. Publishing a Mixed Media Set Publishing an Mixed Media Set places it on Scene7 servers and activates the URL string. Mixed Media Sets require that you publish to Video Server and also to Image Server. You use Video Server to publish the actual videos that you marked for publishing. And, you use Image Server to publish related assets, such as the video thumbnails, set information for any Adaptive Video Set, and the XML file for Video Recuts. See “Publishing a Mixed Media Set” on page 260. 7. Linking a Mixed Media Set to a web page Scene7 activates URL calls for Mixed Media Sets after you publish them. You can copy these URLs from the Preview screen. Select the Mixed Media Set, and click Preview. In the Preview screen, select a Mixed Media Set Viewer Preset and click the Copy URL button. See “Linking a Mixed Media Set to a web page” on page 260. Creating a Mixed Media Set Create a Mixed Media Set when you want to combine multiple types of viewers in one presentation. Make sure your files, Image Sets, Swatch Sets, and Spin Sets are ready to publish before you add them to the Mixed Media Set. A B C D Viewing a Mixed Media Set. A. Image Set B. Spin Set C. Swatch Set D. Videos Last updated 10/9/2014 257 USING SCENE7 Mixed Media Sets Create a Mixed Media Set When you create a set, the Publish after save option affects the set and set members in the following ways: “Publish after save” option selected before saving? State of set after saving State of set members after saving Yes Published Published No Unpublished Set members retain their published or unpublished state. See also “Manually publishing assets” on page 89 and “Manually unpublishing assets” on page 89. To create a Mixed Media Set 1 Click Build > Mixed Media Sets. 2 Drag the videos, Image Sets, Spin Sets, and swatches from the Asset Library to the Mixed Media Set screen. Note: Mixed Media Sets do not support assets with filenames that contain any of the following characters: ( ) { }. 3 Do any of the following: • To add a soundtrack, drag an audio file from the Asset Library to the Soundtrack box. The soundtrack plays while images are displayed. It stops when video is played. • To change the order of sets, drag them to new locations on the Mixed Media Set screen. The order of sets on the screen determines the left-to-right order in which users see sets in the Mixed Media Set Viewer. • (Optional) To add a custom thumbnail to represent a video in the Viewer, drag an image file from the Asset Library to the Thumbnail placeholder box. 4 Near the lower-right corner of the page, ensure that Publish after save is selected (default). 5 Click Save, select a folder for storing your Mixed Media Set, enter a name for the set, and click Save. Click Preview to see what your combo Image Set looks like in an Image Set Viewer. Edit a Mixed Media Set You can edit a Mixed Media Set. If you want to edit a set within a Mixed Media Set, open that set separately, edit it, and save it. The edits appear in the Mixed Media set. Depending on whether you edit a published or an unpublished set, the Publish after save option affects the set and set members in the following ways: Set already published? “Publish after save” option selected before saving your edit? State of set after saving State of set members after saving Yes Yes Published Published Last updated 10/9/2014 258 USING SCENE7 Mixed Media Sets Set already published? “Publish after save” option selected before saving your edit? State of set after saving State of set members after saving Yes No Published Existing set members retain their published state. Any new set members that you added during your edit retain their published or unpublished state. No Yes Published Published No No Unpublished Existing set members and any new set members that you added during your edit retain their published or unpublished state. See also “Manually publishing assets” on page 89 and “Manually unpublishing assets” on page 89. To edit a Mixed Media Set 1 Click the Mixed Media Set’s rollover Edit button. 2 Do any of the following: • To remove items, select them and click Delete. • To reorder items, drag them to new locations. 3 When you are finished editing the set, near the lower-right corner of the page, ensure that Publish after save is selected (default). 4 Click Save or Save As. Deleting a Mixed Media Set When you delete a set, the set itself is moved to the Trash. However, the members (or “children”) within that set are not affected; instead, they each retain their existing published or unpublished state. See also “Manually publishing assets” on page 89 and “Manually unpublishing assets” on page 89. To delete a Mixed Media Set 1 In the Grid View, List View, or Details View, select one or more Mixed Media Sets. 2 On the Global Navigation Bar, click File > Delete > Delete. Setting up a Mixed Media Set Viewer Preset Mixed Media Set Viewer Presets determine the style, behavior, and look of your main viewer. When configuring a preset, you specify which other viewers you want to appear inside the Mixed Media Viewer. For example, if you’ve included an Image Set in your Mixed Media Set, specify an Image Set Viewer Preset for the Mixed Media Set Viewer. Last updated 10/9/2014 259 USING SCENE7 Mixed Media Sets You can choose to include all or some community features in the Mixed Media Set Viewer. The Embed feature adds a link to the viewer that lets users copy the code required to display the viewer in an external page (such as a blog, web site, or social networking site). The Link feature provides the URL to the viewer, so users can link back to this viewer. The Visit feature provides a link to the web site you specify. 1 Click Setup > Viewer Presets. The Viewer Presets window opens. 2 Do one of the following: • To create a new preset, click Add. In the Add Viewer Preset dialog box, choose a platform, choose Mixed Media Set Viewer, and click Add. • To edit a Mixed Media Set Viewer preset, select it and click Edit. The Configure Viewer screen opens. 3 Type a name in the Preset Name box for the Mixed Media Set Viewer preset. 4 Specify Tabs or No Tabs. Tabs separate items by type, such as videos, swatches, and spin sets. When you specify no tabs, all items appear in a row under the preview window. 5 In the Name box, type a name for the viewer you want to add. For example, if you’re adding a Swatch Set to your Mixed Media Set, type Swatch Set A. 6 From the Viewer menu, choose the type of asset you want to view, such as Swatch Sets. 7 From the Preset menu, choose a preset for the chosen asset type. For example, if you’re adding a Swatch Set, choose SwatchSet1-Colors. 8 Click Add. The new Viewer preset appears in the list. 9 Repeat steps 6 - 9 for all the Viewer presets you want to add. 10 To edit the preset list, do any of the following: • To delete a preset from the list, select it and click Delete. • To reorder presets in the list, select a preset and click the blue Up or Down arrow. 11 To add community features (Embed, Link, Visit) to the viewer, specify options for any of the following: Email Click On to enable an Email button in the viewer. When users click the Email button while viewing the set, an email containing the link to the set opens. Embed Click Live. In the Embed Button Label box, type the name you want displayed in the viewer for the Embed Button. If desired, click Browse to locate and select a custom skin for the button. Link Click Live. In the Link Button Label box, type the name you want displayed in the viewer for the Link Button. If desired, click Browse to locate and select a custom skin for the button. Visit Click Live. In the Visit Button Label box, type the name you want displayed in the viewer for the Visit Button. In the Visit URL box, type the URL to the web site that you want to open when the link is clicked. 12 Specify other options as desired. To see a description of an option, click the Info Tip icon The preview screen displays the viewer as you update and change settings. 13 Click Save. Last updated 10/9/2014 adjacent to the option. 260 USING SCENE7 Mixed Media Sets More Help topics “Adding and editing Viewer presets” on page 38 Publishing a Mixed Media Set Create a publish job to publish an Mixed Media Set that you have marked for publish to Scene7 Video Server and Image Server. Scene7 offers advanced publishing options for publishing to specific servers and options for republishing assets that have already been published. Note: Mixed Media Sets require that you publish to Video Server and also to Image Server. You use Video Server to publish the actual videos that you marked for publishing. And, you use Image Server to publish related assets, such as the video thumbnails, set information for any Adaptive Video Set, and the XML file for Video Recuts. Scene7 Publishing System tracks publish jobs on the Jobs screen. See “Publishing files” on page 87. To publish a Mixed Media Set 1 Do one of the following: • In the Browse Panel, click Mark For Publish • In the Upload screen, click Mark For Publish next to each filename that you want to publish. next to each filename that you want to publish. 2 On the Global Navigation bar, click Publish. 3 Set the scheduling options you want. 4 (Optional) In the Job Name field, type a name for the publish job. 5 In Advanced options, in the Publish To drop-down list, select Video Server. See “Advanced publish options” on page 89 for additional options you can set. 6 Click Submit Publish. 7 Repeat steps 2- 4 above. 8 In Advanced, in the Publish To drop-down list, select Image Server. See “Advanced publish options” on page 89 for additional options you can set. 9 Click Submit Publish. Linking a Mixed Media Set to a web page After you publish a Mixed Media Set, you can obtain its URL for use in your web site or application. Then you can deploy the URL as necessary so users can view the Mixed Media Set on your web site or application. More Help topics “Publishing files” on page 87 Last updated 10/9/2014 261 USING SCENE7 Mixed Media Sets Obtain a Mixed Media Set URL 1 In the Asset Browse panel, in the Show drop-down list, click Media Set. 2 in the Asset Library panel on the left side, navigate to the asset folder that contains the media set whose embed code you want to copy. 3 Above the Asset Browse panel, on the right side of the toolbar, do one of the following: • Click Grid View. In the Asset Browse panel, double-click a single asset to open it in Detail View. In the URLs and Embed Code panel on the right, click Copy URL to the right of the viewer you want. • Click Grid View. In the Asset Browse panel, select a single asset, and then below the thumbnail image, click Preview > Viewer List. In the Viewer List page, under the Actions column of the table, click Copy URL. • Click List View. In the Asset Browse panel, select a single asset, and then to the right of the thumbnail image, click Preview > Viewer List. In the Viewer List page, under the Actions column of the table, click Copy URL. • Click Grid View, List View, or Detail View. On the same toolbar, click Preview > Viewer List. In the Viewer List page, under the Actions column of the table, click Copy URL. Add Mixed Media Set URLs to your web page The most common way to deploy Mixed Media Sets is to place a link (via a navigation icon) on your web page. When clicked, the link launches a dynamic page (ASP or JSP) that displays the Mixed Media Set in Mixed Media Set Viewer. Copying the embed code of a Mixed Media Set viewer Using the Embed Code feature lets you review the viewer code for the selected Mixed Media Set. You can also copy the code to the clipboard so you can paste it in your web pages for deployment of the viewer. Editing of the code is not permitted in the Embed Code dialog box. To copy the embed code of a Mixed Media Set viewer 1 In the Asset Browse panel, in the Show drop-down list, click Mixed Media Set. 2 in the Asset Library panel on the left side, navigate to the asset folder that contains the Mixed Media Set whose embed code you want to copy. 3 Above the Asset Browse panel, on the right side of the toolbar, do one of the following: • Click Grid View. In the Asset Browse panel, double-click a single asset to open it in Detail View. In the URLs and Embed Code panel on the right, click Embed Code to the right of the viewer you want. • Click Grid View. In the Asset Browse panel, select a single asset, and then below the thumbnail image, click Preview > Viewer List. In the Viewer List page, under the Actions column of the table, click Embed Code. • Click List View. In the Asset Browse panel, select a single asset, and then to the right of the thumbnail image, click Preview > Viewer List. In the Viewer List page, under the Actions column of the table, click Embed Code. • Click Grid View, List View, or Detail View. On the same toolbar, click Preview > Viewer List. Last updated 10/9/2014 262 USING SCENE7 Mixed Media Sets In the Viewer List page, under the Actions column of the table, click Embed Code. 4 In the Embed Code dialog box, click Copy to Clipboard. Editing the code is not permitted in the Embed Code dialog box. 5 Click Close. Last updated 10/9/2014 263 Chapter 18: Adobe Analytics Instrumentation Kit Adobe Analytics is the industry-leading product that provides marketers with one place where they can measure, analyze, and optimize integrated data from all online initiatives across multiple marketing channels. After integrating Adobe Analytics with the Scene7 Publishing System, you can get reports about the behavior of website visitors using Scene7 viewers on your website. For example, when a website visitor clicks a zoom target in a Scene7 Zoom Viewer, Adobe Analytics records this action. Adobe Analytics reports can gather cumulative information about user activity in Scene7 viewers. Using Adobe Analytics reports, you can get a clear picture of the activity of customers on your website. You can determine which product presentations lead to conversion and which do not draw customer interest. See also Measuring Video in Adobe Analytics. Note: A valid Adobe Analytics account is required to integrate Analytics with the Scene7 Publishing System and generate Analytics reports. Enabling Adobe Analytics Video Reports Using Adobe Analytics heartbeat-based video reporting, you no longer need to enable the four video viewer events (Play, Pause, Stop, Milestone) when you configure Adobe Analytics in Scene7. Video Heartbeat works with out-of-thebox Scene7 HTML5 Video and MixedMedia viewers. The video player generates tracking data for viewing within Adobe Analytics Video Reports. • The integration of Adobe Analytics video reports with Scene7 supports solution variables, but not custom variables. See Configure Analytics Video Reporting for more information about solution variables and custom variables. • Out-of-the-box segments of one minute increments is supported. However, custom segment reporting, such as customer-defined milestones based on time increments, % milestone, or offset milestones, is not supported. For more information about Video Heartbeat requirements and setup, see Measuring Video in Adobe Analytics using Video Heartbeat. If you are customizing your own viewer and want to use Video Heartbeat, see Enabling Adobe Analytics Video Reports in the Adobe Scene7 HTML5 Viewer SDK available for download through Adobe Developer Connection at www.adobe.com/go/learn/learn_s7_devresources_en. Note: If your licensed solution of Adobe Analytics does not include Video Heartbeat, you will need to continue using the steps described in this chapter to assign Adobe Analytics variables to Scene7 viewer events and variables. Quick Start: Integrating Scene7 and Adobe Analytics This Quick Start is designed to get you up and running quickly with Adobe Analytics Instrumentation Kit. Last updated 10/9/2014 264 USING SCENE7 Adobe Analytics Instrumentation Kit 1. Log in to Adobe Analytics by way of Scene7 and download Adobe Analytics report variables Note: Before you can configure Adobe Analytics reports and match Adobe Analytics report variables to Scene7 events, verify that you are added as a member of the Web Service Access group in Adobe Analytics. Members in this group can access all reports in the specified report suites by way of the Marketing Cloud’s Web Services API regardless of the permissions set in the interface. To add a member to the group, in Adobe Analytics, click Admin Tools > User Management > Edit Groups. After you have verified that you are a member of the Web Service Access group, in Scene7, click Setup > Application Setup > Adobe Analytics. On the Adobe Analytics Configuration page, click Adobe Analytics Login. See “Log in to Adobe Analytics” on page 265. In the Adobe Analytics Login dialog box, type your credentials and then click Login. On the Report Suite drop-down menu, select the name of the report suite that you want to use. 2. Assign Adobe Analytics report variables to Scene7 viewer events and Scene7 variables On the Adobe Analytics Configuration page, specify the information you want in Adobe Analytics reports. For each Scene7 viewer event that you want information about, choose an Adobe Analytics variable (from your report suite) and a Scene7 variable. • Viewer events describe the user activity that you want to measure in reports. • Scene7 variables describe the data about user events that you want the reports to deliver. The Adobe Analytics Configuration also offers tools for activating, editing, and deleting viewer events. After you click Save in the Adobe Analytics Configuration screen, customized tracking code for measuring user activity is inserted in Scene7 viewers. This functionality lets you track user activity in Adobe Analytics reports. See “Configuring Adobe Analytics reports” on page 265. 3. Publish your Scene7 viewers Publish your Scene7 viewers so that the viewers (with code for tracking user activity in Adobe Analytics reports) are loaded on Scene7 servers. After you publish, this information is included in viewers and can be used for analyses by Adobe Analytics. See “Publishing Adobe Analytics configuration information” on page 269. 4. Place Scene7 viewers in your website Place the Scene7 viewers with Adobe Analytics tracking code on your website. 5. Test the Adobe Analytics integration by viewing an Adobe Analytics report To view Adobe Analytics reports, go to the Adobe Analytics website. The Reporting page lets you view data and generate graphs and charts to measure user activity with different viewers. See “Testing the integration by viewing an Adobe Analytics report” on page 270. Last updated 10/9/2014 265 USING SCENE7 Adobe Analytics Instrumentation Kit Log in to Adobe Analytics Before you log in to configure Adobe Analytics reports and match Adobe Analytics report variables to Scene7 events, verify that you are added as a member of the Web Service Access group in Adobe Analytics. Members in this group can access all reports in the specified report suites by way of the Marketing Cloud’s Web Services API regardless of the permissions set in the interface. To add a member to the group, in Adobe Analytics, click Admin Tools > User Management > Edit Groups. To log in to Adobe Analytics 1 Click Setup > Application Setup. 2 In the left pane, under Application Setup, click Adobe Analytics. 3 In the Adobe Analytics Configuration screen, click Adobe Analytics Login. 4 In the Login dialog box, enter your company name, user name, and password. 5 Click Login. 6 Choose a report suite, then click OK. Note: The first time you log in to Adobe Analytics, the Report Suite drop-down list is blank. You do not choose a report suite the first time you log in. After you log in for the first time, log out, and then return to the Adobe Analytics screen. Log in again to be able to choose a report suite. More Help topics “Configuring Adobe Analytics reports” on page 265 Configuring Adobe Analytics reports To tell Adobe Analytics what information you want in Adobe Analytics reports, go to the Adobe Analytics Configuration screen. After you configure reports, this screen lists, for each viewer event you want information about, a corresponding Adobe Analytics variable and Scene7 variable. These viewer events–Adobe Analytics variable–Scene7 variable combinations determine what information is reported. As well as associating viewer events with variables, the Adobe Analytics Configuration screen offers tools for activating, editing, and deleting viewer events. Important: Whenever you change Adobe Analytics Report settings within Adobe Analytics, be sure you log back on to Adobe Analytics from within Adobe Scene7 Publishing System, re-save your Adobe Analytics configuration settings, and then re-publish. See “Log in to Adobe Analytics” on page 265. See “Publishing Adobe Analytics configuration information” on page 269. Assigning Adobe Analytics variables to Scene7 viewer events and variables Use the Adobe Analytics Configuration screen to associate viewer events with Adobe Analytics variables and Scene7 variables. For each viewer event, choose one Adobe Analytics variable and one Scene7 variable. For instructions about opening the Adobe Analytics Configuration screen, see “Log in to Adobe Analytics” on page 265. Last updated 10/9/2014 266 USING SCENE7 Adobe Analytics Instrumentation Kit To assign Adobe Analytics variables to Scene7 viewer events and variables 1 After you log in to Adobe Analytics from within Scene7 and select a report suite, on the Adobe Analytics Configuration page, in the far right column of the table, activate a viewer event by clicking Enable. 2 Under the Variables column, display the variable pair chooser by clicking the arrow button for the desired Viewer Event. See “Viewer events” on page 266. 3 Add a Scene7 variable. See “Scene7 variables” on page 268. 4 Add an Adobe Analytics variable. 5 (Optional) To add another variable pair, click Add. 6 Click Save. After you click Save, the viewer event, its Adobe Analytics variable, and its Scene7 variable, are listed in the Adobe Analytics Configuration screen. 7 In the lower right corner, click Close. 8 Click Publish > Submit Publish to run an Image Serving publish. Publishing is necessary so that the information contained in the viewers is available on Scene7 servers. More Help topics “Activating, editing, and deleting viewer events” on page 269 Viewer events Viewer events describe actions that users perform with Scene7 viewers. When a user initiates a certain action, such as clicking on a thumbnail or starting or stopping a video, the viewer “broadcasts” an event to the web page, along with data associated with that event. The following table describes viewer events you can add to the Adobe Analytics Configuration screen. Viewer event AS3 Viewer Platform support HTML5 Viewer Platform support and viewers Description LOAD When tracking manager component is integrated into the viewer. X (eCatalog, Flyout, SpinSet, Video, Zoom) When a user starts the viewer. PAGE When tracking manager component is integrated into the viewer. X (eCatalog) In eCatalogs, when a user turns a page; in targeted zoom viewers, when a user clicks a different target or a color swatch. SWAP When tracking manager component is integrated into the viewer. X (eCatalog, Flyout, SpinSet, Video, Zoom) When a user clicks a different thumbnail to view a different image. Last updated 10/9/2014 267 USING SCENE7 Adobe Analytics Instrumentation Kit Viewer event AS3 Viewer Platform support HTML5 Viewer Platform support and viewers Description ITEM When tracking manager component is integrated into the viewer. X (eCatalog) In viewers that support Image Maps in which rollovers are defined, when a user hovers the pointer over an Image Map to read the rollover text. HREF When tracking manager component is integrated into the viewer. X (eCatalog) In viewers that support Image Maps, when a user clicks a URL in an Image Map. TARGET When tracking manager component is integrated into the viewer. In targeted zoom viewers, when a user clicks a zoom target to zoom to part of an image. SEARCH When tracking manager component is integrated into the viewer. In eCatalogs, when a user conducts a word search. PLAY When tracking manager component is integrated into the viewer. X (Video) When tracking manager component is integrated into the viewer. X (Video) When tracking manager component is integrated into the viewer. X (Video) PAUSE STOP In Video viewers, when a user clicks Play to start playing a video. As an alternate to enabling this viewer event, see “Enabling Adobe Analytics Video Reports” on page 263. In Video viewers, when a user clicks Pause to pause a video. As an alternate to enabling this viewer event, see “Enabling Adobe Analytics Video Reports” on page 263. In Video viewers, when a user clicks Stop to stop playing a video. Note: For the HTML5 viewer platform, this viewer event is only available for custom HTML5 Viewers that you have created using the Adobe Scene7 HTML5 Viewer SDK. As an alternate to enabling this viewer event, see “Enabling Adobe Analytics Video Reports” on page 263. MILESTONE X X (Video) In Video viewers, milestone events are generated when the user watches 0, 25, 50, 75, or 100 percent of the video. As an alternate to enabling this viewer event, see “Enabling Adobe Analytics Video Reports” on page 263. Last updated 10/9/2014 268 USING SCENE7 Adobe Analytics Instrumentation Kit Viewer event AS3 Viewer Platform support SWATCH HTML5 Viewer Platform support and viewers Description X (Flyout, Zoom) This viewer event is mapped to the PAGE viewer event in Scene7 Publishing System. Note: This HTML5 platform viewer event is only available for custom HTML5 Viewers that you have created using the Adobe Scene7 HTML5 Viewer SDK. ZOOM PAN SPIN X (eCatalog, SpinSet, Zoom) Not tracked by Adobe Analytics. X (eCatalog, SpinSet, Zoom) Not tracked by Adobe Analytics. X (SpinSet) Not tracked by Adobe Analytics. Note: This HTML5 platform viewer event is only available for custom HTML5 Viewers that you have created using the Adobe Scene7 HTML5 Viewer SDK. Note: This HTML5 platform viewer event is only available for custom HTML5 Viewers that you have created using the Adobe Scene7 HTML5 Viewer SDK. Note: This HTML5 platform viewer event is only available for custom HTML5 Viewers that you have created using the Adobe Scene7 HTML5 Viewer SDK. Scene7 variables For each viewer event on Adobe Analytics Configuration screen, choose a Adobe Analytics variable and a Scene7 variable. Scene7 variables represent data you can obtain for a report. For example, the searchTerm variable lists keywords used in eCatalog searches. The following table describes Scene7 variables. Scene7 variable Description asset Scene7 Publishing System asset ID or video path file. viewerId An arbitrary number that is assigned to each different viewer type. pageLabel In eCatalogs, the page that a viewer displays. label The label value (a string). frame The page or page reference in an Image Set. rollover_keyRaw The entire HREF value, not just any processed part of it. Last updated 10/9/2014 269 USING SCENE7 Adobe Analytics Instrumentation Kit Scene7 variable Description rollover_keyProc The ID of an item that is referenced in an Image Map (valid for href and item events). searchTerm A term that is used in eCatalog search. timeStamp Play, Stop, and Pause chosen in video viewers. progress The percentage of a milestone event that is complete. targetId The id value (a number). Activating, editing, and deleting viewer events On the Adobe Analytics Configuration screen, you can activate, edit, and delete viewer events: Activating Select or deselect the Active check box activate or deactivate a viewer event. Editing Select a viewer event and click the Edit button. In the Adobe Analytics Variable dialog box, choose a different Adobe Analytics variable and Scene7 variable, and click Save. For more information, see “Assigning Adobe Analytics variables to Scene7 viewer events and variables” on page 265. Deleting Select a viewer event and click the Delete button. Publishing Adobe Analytics configuration information Publish your Scene7 viewers so that information about configuring Adobe Analytics reports is sent to Scene7 servers. This information is embedded in viewers. Publishing is necessary so that the information contained in the viewers is available on Scene7 servers. From the servers, it can be relayed to Adobe Analytics after users perform activity on the viewers. Important: Whenever you change Adobe Analytics Report settings within Adobe Analytics, be sure you log back on to Adobe Analytics from within Adobe Scene7 Publishing System, re-save your Adobe Analytics configuration settings, and then re-publish. See“Log in to Adobe Analytics” on page 265. See “Configuring Adobe Analytics reports” on page 265. To publish configuration information 1 On the Global Navigation bar, click Publish. 2 In the Publish dialog box, click Start Publish. Instrumenting a viewer using the Adobe Analytics Instrumentation Kit You can use the Adobe Analytics Instrumentation Kit to integrate an ActionScript 3.0 (AS3) viewer with Adobe Analytics. Last updated 10/9/2014 270 USING SCENE7 Adobe Analytics Instrumentation Kit If you use any of the predefined Scene7 HTML5 viewer presets, be aware that they already contain all the implementation code needed to send data to Adobe Analytics--no further instrumentation is required by you. However, if you choose to create your own custom HTML5 viewers using the HTML5 Viewer SDK, see the Adobe Scene7 HTML5 Viewer SDK User Guide for instructions on how to use the Adobe Analytics Tracking Manager component. The Adobe Scene7 HTML5 Viewer SDK User Guide is available as part of the SDK download from Adobe Developer Connection. See www.adobe.com/go/learn/learn_s7_devresources_en. Set up Adobe Analytics tracking from Scene7 Publishing System For all AS3 Flash viewers, add the following JavaScript to the HTML container, usually in the <head> element: <!-- ***** Site Catalyst Tracking ***** --><script type="text/javascript" src="http://s7d6.scene7.com/s7viewers/s_code.jsp?company=<SPS Company ID>&preset=companypreset-1"></script> Company is set to the SPS company name. &preset is optional unless the company preset name is not companypreset. In such cases, it could be companypreset-1, companypreset-2, and so on. The higher number is a newer instance of the preset. To determine the correct company preset value name, click Copy URL , and then look at the preset= parameter to find the company preset name. Continuing, you will now you add a function that transmits the viewer event to the Adobe Analytics tracking code. Add the s7ComponentEvent() function to the container HTML (or JSP, or ASPX or other): function s7ComponentEvent(objectId, componentClass, instanceName, timeStamp, eventData) { s7track(eventData); } The function name is case sensitive. The only parameter passed to s7componentEvent that is required is the last one: eventData. s7track() is defined in s_code.jsp included above. s7track handles all tracking per each event. (To further customize data transmitted to Adobe Analytics, this area is the place to do it.) Enabling HREF and ITEM events You can enable HREF (rollover) and ITEM (mouse clicks/touch) events in the viewers through Image Map editing. Define the identifiers for the HREF and ITEM within the Image Map that is associated with viewer content. Add a &rolloverKey= parameter to the HREF value within the Image Map. Testing the integration by viewing an Adobe Analytics report After you have created the necessary variables in Adobe Analytics, linked them to Scene7 events and completed the necessary implementation steps, then you should test the setup. You can test and verify that the data is being captured, inside Adobe Analytics itself. If the setup works here, then no further steps are needed. Assuming you followed the steps above and linked your Scene7 event data to one or more custom traffic variables, then follow this workflow to test your data inside Adobe Analytics. Last updated 10/9/2014 271 USING SCENE7 Adobe Analytics Instrumentation Kit To test the integration by viewing a Adobe Analytics report 1 Launch a Scene7 viewer from your account, particularly one that broadcasts the metric that you want to capture, and interact with it to create some event data. For example, if you want to measure the most popular alternative views in an Image Set, then preview an Image Set and click on the different thumbnails images. 2 Inside Adobe Analytics, go to Custom Traffic > Custom Traffic 1-10 > [Name of prop], selecting your traffic prop name from the menu choices. For example, to access the LoadAsset prop in our sample account, the proper menu choice would be Custom Traffic > Custom Traffic 1-10 > LoadAsset. If you have more than ten custom props, then you may see additional menu choices as well. 3 View the chart produced by Adobe Analytics. Note that this is typically just the data for a single metric. If you also want to know with which asset this data is associated (e.g., which video is being watched to only 50%, or which image in a set is most popular), be sure to capture the asset data of this event as well. Note: All Scene7 viewer data is displayed and reported in Custom Traffic reports or Custom Conversion reports of Adobe Analytics. For more information, see www.adobe.com/go/learn_sc7_sitecatalystguide_en. Disabling Adobe Analytics tracking To disable Adobe Analytics tracking 1 Turn off all events in the Adobe Analytics Configuration page in Scene7 Publishing System. 2 Save and publish. This turns off the support through Scene7 and through URLs obtained from the CopyURL feature. If you implement custom tracking, disable the Adobe Analytics tracking as set up in the Configuration page to prevent conflicts with the custom implementation. Last updated 10/9/2014 272 Chapter 19: Test&Target integration Adobe® Test&Target™ puts control directly in the hands of marketers to quickly and continually execute multiple A/B and multivariate tests, measure effectiveness, and increase relevance of online content through segmentation, targeting, and automated personalization. The Scene7 Publishing Systems allows you to create offers and offer sets for Test&Target campaigns. For example, you can create an offer set with three variations of the same rich media asset and have Test&Target determine which asset provides better conversion lift. You can create offers and offer sets from a Basic Template or from individual images. After the offer set is pushed, or saved, to Adobe Test&Target, where the offers are associated with mBoxes and experiences, Test&Target can run campaigns to determine which variation of a web site is likely to perform best for click-throughs and conversion. For greater customization of dynamic Scene7 content, use Test&Target HTML offers. See the Test&Target product documentation for more information. Note: A valid Adobe Test&Target account is required to use Test&Target with the Scene7 Publishing System. Quick Start: Test&Target integration This Quick Start is designed to get you up and running quickly with Test&Target HTML offer sets. Follow steps 1 through 3. After each step is a cross-reference to a topic heading where you can find more information. 1. Enter your Test&Target URL in the Application General Settings screen. Scene7 needs your Test&Target URL to integrate with Test& Target. Copy the portion of your Test&Target URL up to and including .com, and enter it in the Scene7 Application General Settings screen. See “Integrating Scene7 with Test&Target” on page 273. 2. Create the offer set Use a parameterized template or images to create an offer set. You create HTML offer sets on the Test&Target Offer Set screen. To open this screen, select your template or images, and choose Build > Test&Target Offer Set. To create an offer with a template, click the Add & Preview button, and in the Add & Preview screen, change parameter values. To create an offer with images, drag images into the Test&Target Offer Set screen. You can click the Preview button to choose an Image Preset for an image or all the images in the offer set. Save the offer set after you create it. See “Creating an offer set” on page 273. 3. Push the offer set to Test&Target In the Test&Target Offer Set screen, click the Push Offers button, and enter your login credentials in the Test&Target Login dialog box. See “Pushing offer sets to Test&Target” on page 276. Last updated 10/9/2014 273 USING SCENE7 Test&Target integration Integrating Scene7 with Test&Target Before you can integrate Scene7 with Test&Target, you must enter your Test&Target URL in the Scene7 Application General Settings screen. Follow these steps to obtain your Test&Target URL and enter it in the Application General Settings screen: 1 Go to the Test&Target Login window at this address: https://admin.testandtarget.omniture.com. 2 Enter your credentials and click the Login button. 3 After you log in, in your browser’s address bar, copy the URL up to and including .com. For example, if the fictional URL (URLs paths always contain forward slashes, not back slashes as in these two examples) in the address bar is https:\\admin16.testandtarget.ommnture.com/admin/home.do, copy this portion of the fictional URL: https:\\admin16.testandtarget.ommnture.com. In step 5, you paste the portion of the URL you copied into the Scene7 Application General Settings screen. 4 In Scene7, choose Setup > Application Setup to open the Application General Settings screen. 5 In the Test&Target Server Name field, paste the URL you copied in step 3. 6 Click Close. Creating an offer set You can create any of the following types of offer sets: • Video recut • Video • Parameterized template • Image For video recuts and templates, click Add and Preview, then set the parameters you choose. The other offer set types do not include parameters, but you can still customize them by clicking Preview and changing the available presets. Scene7 offers tools for editing as well as creating offer sets. Important: Before creating an offer set, be sure you publish all assets that you intend to use for the set to the Scene7 Publishing System. See “Manually publishing assets” on page 89 and “Manually unpublishing assets” on page 89. More Help topics “Creating template parameters” on page 184 “Create a Video Recut Template” on page 248 Types of offer sets Create an offer set from the following types of offer sets: Images You can assemble images for an offer set. Each image comprises a different offer in the set. Image template You can parameterize image templates in Scene7 with the Build > Template Basics command. Through parameters, components of the template — the text in text frames, the different images — can be swapped out and customized. For an offer set, you can use template parameters to create variations on the same image in your Last updated 10/9/2014 274 USING SCENE7 Test&Target integration offer set, for example. For information about creating and parameterizing image templates, see “Creating template parameters” on page 184. Video You can assemble video for an offer set. Each video is a different offer in the set. Video recut You can enhance master videos into Video Recuts to create interactive shopping experiences directly within the video. For example, you can add clickable product hotspots to provide related information, or add call-toaction buttons to enable purchase from the video. Creating an offer set with a paremeterized template or video recut When you create an Offer Set, the Publish after save option affects the set and set members in the following ways: “Publish after save” option selected before saving? State of set after saving State of set members after saving Yes Published Published No Unpublished Set members retain their published or unpublished state. See also “Manually publishing assets” on page 89 and “Manually unpublishing assets” on page 89. To create an offer set with a parameterized template or video recut 1 Select the template, banner, or video recut. 2 Click Build > Test&Target Offer Set. The Test&Target Offer Set screen opens. This screen lists offers in the offer set. The first item on the list is the object. 3 Select the object and click Add & Preview. The left side of the page lists parameters in the template and their values. 4 Change parameter values to create the offer. For example, enter different text in a text field, change the size of a layer, swap one image for another, or choose a different viewer preset. 5 Click Save or Save As to save the offer as part of the offer set. The Test&Target Offer Set screen lists the offers you created. 6 Repeat steps 3 through 5 to create more offers for the set. 7 When you are finished, near the lower-right corner of the page, ensure that Publish after save is selected (default). 8 Click Close, enter a name for the offer set, and click Save. Before closing the Test&Target Offer Set screen, push the offer set to Test&Target. See “Pushing offer sets to Test&Target” on page 276. More Help topics “Editing an Offer Set” on page 275 Creating an offer set with images or videos When you create an Offer Set, the Publish after save option affects the set and set members in the following ways: Last updated 10/9/2014 275 USING SCENE7 Test&Target integration “Publish after save” option selected before saving? State of set after saving State of set members after saving Yes Published Published No Unpublished Set members retain their published or unpublished state. See also “Manually publishing assets” on page 89 and “Manually unpublishing assets” on page 89. To create an offer set with images or videos 1 Assemble images or videos for the offer set by starting in the Test&Target Offer Set screen or in the Grid View or List View and use one of the following methods: Test&Target Offer Set screen Click Build > Test&Target Offer Set. Drag images or videos onto the screen. To create varying sizes of videos or images, drag in multiple copies of the image or video and set each size individually. Grid or List view Select the images or videos and click Build > Test&Target Offer Set. 2 Optionally, select an image or video and click Preview. On the Preview Offers page, you can change the size and look of the image or video you selected or all images or videos in the offer set. • Choose a Preset to change the look and size of the image or video. • Click the Select Presets to All check box to apply the preset you chose to all the offers in the offer set. Click Save to save your changes to the image or video offer. Then click Close to return to the Test&Target Offer Set page. 3 After you finish creating offers for the offer set and choosing Image Presets for different images, near the lower- right corner of the page, ensure that Publish after save is selected (default). 4 Click Save and enter a name for the offer set, and click Save. Before closing the Test&Target Offer Set screen, push the offer set to Test&Target. See “Pushing offer sets to Test&Target” on page 276. Editing an Offer Set Depending on whether you edit a published set or an unpublished set, the Publish after save option affects the set and set members in the following ways: Set already published? “Publish after save” option selected before saving your edit? State of set after saving State of set members after saving Yes Yes Published Published Yes No Published Existing set members retain their published state. Any new set members that you added during your edit retain their published or unpublished state. No Yes Published Published No No Unpublished Existing set members and any new set members that you added during your edit retain their published or unpublished state. Last updated 10/9/2014 276 USING SCENE7 Test&Target integration See also “Manually publishing assets” on page 89 and “Manually unpublishing assets” on page 89. To edit an Offer Set 1 To edit an offer set, display the offer set in Grid view or List view and click its Edit rollover button. The Test&Target Offer Set screen opens. 2 Do any of the following: Removing an offer Select the offer and click the Delete button to remove an offer from the set. Adding an offer How you add an offer depends on the type of offer set you’re working with: • Templates and Video Recuts: Click Add & Preview, and on the Add & Preview Offers page, create another offer. • Images and videos: Drag an image or video onto the Test&Target Offer Set page. Note: You cannot delete an offer set that is associated with a campaign. To delete an offer set associated with a campaign, log on to Test&Target and remove the campaign associations first. Even after un-associating from a campaign, the asset can only be deleted from Scene7 Publishing System, requiring a login to Test&Target, and not from within Test&Target. 3 When you are finished editing, near the lower-right corner of the page, ensure that Publish after save is selected (default). 4 Click Save, select a storage folder, enter a name for the set, and then click Save. Deleting an Offer Set When you delete an Offer Set, the set itself is moved to the Trash. However, the members (or “children”) within that set are not affected; instead, they each retain their existing published or unpublished state. See also “Manually publishing assets” on page 89 and “Manually unpublishing assets” on page 89. To delete an Offer Set 1 In the Grid View, List View, or Details View, select one or more Offer Sets. 2 On the Global Navigation Bar, click File > Delete > Delete. Pushing offer sets to Test&Target After you create or edit an offer set, push it to Test&Target by following these steps: 1 In the Test&Target Offer Set screen, click the Push Offers button. 2 Enter your login credentials. 3 Click the Login button. During the transfer to Test&Target, the prefix S7_ is attached automatically to the start of offer names. This prefix is attached to ensure that you can easily find Scene7 offers in the Test&Target offer list. For example, the offer appears as S7_<name of offer set>_<offer name>. Last updated 10/9/2014 277 USING SCENE7 Test&Target integration SPS pushes into Test&Target widget offers. You can use Widget offers to host your own offer content outside of Test&Target. Widget offers are similar to a standard offer hosted outside of Test&Target. They allow Test&Target to deploy offer content that’s stored on your server, allowing for more sophisticated and dynamic usage. Widget offers retrieve content from a URL, caching and serving that content for approximately two hours.Widget offers provide some dynamic content generation capabilities that other offers outside of Test&Target do not. If the mbox serving the offer contains mbox parameters such as mboxProductID and mbox.offerId, the productId=[PRODUCT_ID] and offerID=[OFFERID] URL parameters are appended to the requested URL. These parameters can be used by a service available at the Widget offer URL to return content outside of Test&Target that uses product or order information from your mboxes.The Widget offer is also accessible through the API to programatically create offers outside Test&Target. Last updated 10/9/2014 278 Chapter 20: User-generated content Using UGC (user-generated content) consists of uploading assets to a dedicated Scene7 storage repository and performing related operations. UGC supports the following file formats: • Raster: JPG, PNG, TIFF • Vector: AI, EPS, PDF (only when the PDF file is previously opened and saved in Adobe Illustrator CS6) Before uploading assets, you obtain a shared-secret key. You use this key to retrieve an upload token. You submit the upload token when you upload assets and perform other UGC tasks. After you retrieve a shared-secret key and upload token, you can perform the following operations for user-generated content: • Upload an asset. See “Uploading an image asset or a vector asset” on page 278. • Get image asset metadata. See “Getting asset metadata for images” on page 283. • Delete an uploaded asset. See “Deleting an uploaded asset” on page 286. • Get information about a company’s disk space usage. See “Getting disk usage information” on page 287. Uploading an image asset or a vector asset Before you can upload an image asset, you first request a shared-secret key. You use this shared-secret key to retrieve an upload token. You then use the upload token to upload image assets or vector assets. Requesting a shared-secret key Request a shared-secret key by sending an email to Scene 7 Technical Support at [email protected]. In the email message, provide the company name that you want to use to upload image assets. After you receive the key from Scene7, save it locally for future use. Retrieving the upload token The upload token ensures that no one can use the same shared-secret key to upload assets. It ensures that the upload is legitimate and comes from a trusted source. The upload token is an alphanumeric string that is available only for a specific amount of time. Use the following URLs, substituting your shared-secret key, to retrieve the upload token. • Image Last updated 10/9/2014 279 USING SCENE7 User-generated content https://s7ugc1.scene7.com/ugc/image?op=get_uploadtoken&shared_secret=fece4b21-87ee-47fc9b99-2e29b78b602 In this example, the shared-secret key is fece4b21-87ee-47fc-9b99-2e29b78b602 • Vector https://s7ugc1.scene7.com/ugc/vector?op=get_uploadtoken&shared_secret=2d19f60e-890a-4e79a1a5-9ac2875429b9 In this example, the shared-secret key is 2d19f60e-890a-4e79-a1a5-9ac2875429b9 By default, the upload token expires five minutes (300 seconds) after you retrieve it. To request more time, include expires in the URL and the amount of time you require in seconds. For example, the following sample image URL retrieves an upload token that is valid for 1800 seconds: https://s7ugc1.scene7.com/ugc/image?op=get_uploadtoken&shared_secret=fece4b21-87ee-47fc9b99-2e29b78b602&expires=1800 The successful response for images looks like the following: <?xml version="1.0" encoding="UTF-8" standalone="no" ?> <scene7> <user_generated_content> <response> <serviceName>User Generated Content - Images</serviceName> <version>1.0.0</version> <operationName>get_uploadtoken</operationName> <serviceStatus>SUCCESS</serviceStatus> <title>Upload Token for fece4b21-87ee-47fc-9b99-2e29b78b602</title> <message> <uploadtoken>aa2a378a-cd25-4c80-994d-312094e0ef20_1800</uploadtoken> <expiration_in_seconds>1800</expiration_in_seconds> </message> </response> </user_generated_content> </scene7> Save the upload token locally for use with future requests. You can use the following fields in the query URL string to retrieve an upload token: URL parameter Required or optional Value op Required get_uploadtoken shared_secret Required The shared-secret key for the company that is doing the upload. expires Optional Number of seconds that the upload token is valid. Default is 300 seconds, if not specified. Sample image URL: https://s7ugc1.scene7.com/ugc/image?op=get_uploadtoken&shared_secret=fece4b21-87ee-47fc9b99-2e29b78b602&expires=600 Sample vector URL: http://s7ugc1.scene7.com/ugc/vector?op=get_uploadtoken&shared_secret=2d19f60e-890a-4e79a1a5-9ac2875429b9&expires=5000 Allowed HTTP methods: GET and POST Last updated 10/9/2014 280 USING SCENE7 User-generated content You can now upload an image asset. See “Uploading an image asset” on page 280. Uploading an image asset After you retrieve an upload token that is valid for a specific amount of time, you can upload an image asset. You upload the asset as a multipart/form post while sending the rest of the values as a URL query string, as shown in this example: https://s7ugc1.scene7.com/ugc/image?op=upload&upload_token=aa2a378a-cd25-4c80-994d312094e0ef20_18000&company_name=000Company The upload_token and company_name fields are required. See “Retrieving the upload token” on page 278. See “Requesting a shared-secret key” on page 278. You can also send other optional values as URL query strings, as in this example: https://s7ugc1.scene7.com/ugc/image?op=upload&upload_token=aa2a378a-cd25-4c80-994d312094e0ef20_18000&company_name=000Company&file_limit=2000000&file_exts=jpg,gif Thefile_limit parameter specifies the file-size limit in bytes. The file_exts parameter specifies the filename extensions that are allowed for upload. Both of these values are optional. A global limit is set in the application for the file size limit and the filename extensions allowed. If what you send in the request is a subset of the global limits, it is honored. The global limits are the following: Global limit Value File size for all clients 20 MB Supported image file formats for upload BMP, GIF, JPG, PNG, PSD The following HTML form lets a user upload an asset. The form asks the user to enter the following information: • A company name • An upload token • A file size limit • A list of filename extensions • The name of the file to upload An HTML form for uploading an asset. Last updated 10/9/2014 281 USING SCENE7 User-generated content The following HTML code is displayed when you right-click in the browser window, and then click View Source for the form shown in the illustration. The code shows the corresponding URL query string and the POST method that are run when the user clicks Submit. <html> <body> <script language="javascript"> function uploadImage() { var preserve_colorprofile = "false"; if(document.image_upload.preserve_colorprofile[0].checked == true){ preserve_colorprofile = "true"; } var preserve_filename = "false"; if(document.image_upload.preserve_filename[0].checked == true){ preserve_filename = "true"; } document.image_upload.action="https://s7ugc1.scene7.com/ugc/image?op=upload&company_name="+d ocument.image_upload.company_name.value+"&upload_token="+document.image_upload.upload_token. value+"&file_limit="+document.image_upload.file_limit.value+"&file_exts="+document.image_upl oad.file_exts.value+"&preserve_colorprofile="+preserve_colorprofile+"&preserve_filename="+pr eserve_filename; return true; } </script> <form method="POST" enctype="multipart/form-data" name="image_upload" id="image_upload" onSubmit="return uploadImage();"> <table> <tr><td colspan="2"><strong> UGC Image Upload Test Page: </strong></td></tr> <tr><td colspan="2"></td></tr> <tr><td><strong> Company Name</strong></td><td><input type="text" size="40" name="company_name"></td></tr> <tr><td><strong> Upload Token </strong></td><td><input type="text" size="40" name="upload_token"></td></tr> <tr><td><strong> File Size Limit (in bytes) </strong></td><td><input type="text" size="40" name="file_limit"> bytes</td></tr> <tr><td><strong> File Extensions allowed </strong></td><td><input type="text" size="40" name="file_exts"></td></tr> Last updated 10/9/2014 282 USING SCENE7 User-generated content <tr><td><strong> Preserve Color Profile</strong></td><td><input type="radio" name="preserve_colorprofile" value="true">Yes <input type="radio" name="preserve_colorprofile" value="false" checked>No</td></tr> <tr><td><strong> Preserve File Name</strong></td><td><input type="radio" name="preserve_filename" value="true">Yes <input type="radio" name="preserve_filename" value="false" checked>No</td></tr> <tr><td colspan="2"></td></tr> <tr> <td><strong>File to upload: : </strong></td> <td><input name="filename" type="file" id="filename" size="58" maxlength="1024" /></td> </tr> <tr><td colspan="2"></td></tr> <tr> <td><strong>Click Submit to upload your image: </strong></td> <td><input type="submit" value="Submit"></td> </tr> </table> </form> </body> </html> To view the XML response in Internet Explorer, click View > Source. To view XML response in Firefox, click View > Page Source. Firefox is recommended for viewing XML responses. The following is a sample response from a successful upload: <?xml version="1.0" encoding="UTF-8" standalone="no" ?> <scene7> <user_generated_content> <response> <serviceName>User Generated Content - Images</serviceName> <version>1.0.0</version> <operationName>upload</operationName> <serviceStatus>SUCCESS</serviceStatus> <title>Your file has been uploaded Successfully.</title> <message> <url>http://s7w2p1.scene7.com/is/image/ </url> <path>000Company/ugc/1442564.tif</path> <fullurl>http://s7w2p1.scene7.com/is/image/000Company/ugc/1442564.tif </fullurl> </message> </response> </user_generated_content> </scene7> Note: The uploaded asset (JPG, GIF, and so on) is converted to the PTIFF format and the response sends a direct link to that PTIFF asset. The asset is like any other ImageServing resource; you can apply processing queries to it. For example, the following URL requests an asset that is stretched to the specified width and height. http://s7w2p1.scene7.com/is/image/S7WebUGC/ugc/9536356.tif?&wid=800&hei=100&fit=stretch Send the asset to upload as a multipart/form post while sending the rest of the values as a URL query string. You can use the following fields in the URL query string to upload an asset: Last updated 10/9/2014 283 USING SCENE7 User-generated content URL Parameter Required or optional Value op Required upload upload_token Required Upload token for the shared-secret key associated with the company. company_name Required Name of the company performing the upload. file_limit Optional File size limit, in bytes, for the asset. file_exts Optional List of allowable extensions for the image asset file. preserve_colorprofile Optional preserve_filename Optional Preserves any embedded color profile while converting the uploaded file to PTIFF format. Possible values are true or false. Default is false. Preserves the filename of the uploaded asset. Possible values are true or false. Default is false. Note: You are required to send the asset to be uploaded as the only field in a multipart POST request. Sample URL: https://s7ugc1.scene7.com/ugc/image?op=upload&upload_token=aa2a378a-cd25-4c80-994d312094e0ef20_18000&company_name=000Company Allowed HTTP method: POST Getting asset metadata for images You can use image_info to retrieve metadata for an asset that you uploaded, as shown in the following example: https://s7ugc1.scene7.com/ugc/image?op=image_info&shared_secret=fece4b21-87ee-47fc-9b992e29b78b602&image_name=1442564.tif An example of a successful response looks like the following: <?xml version="1.0" encoding="UTF-8" standalone="no" ?> <scene7> <user_generated_content> <response> <serviceName>User Generated Content - Images</serviceName> <version>1.0.0</version> <operationName>image_info</operationName> <serviceStatus>SUCCESS</serviceStatus> <title>More information on 1442564.tif</title> <message> File created on Tue Sep 08 19:02:04 CDT 2009, File Size = 243494 bytes <imageFormat>Tiff</imageFormat> <colorSpace>Rgb</colorSpace> <width>686</width> <height>457</height> </message> </response> </user_generated_content> </scene7> You can use the following fields in the URL query string to request information for an asset: Last updated 10/9/2014 284 USING SCENE7 User-generated content URL Parameter Required or optional Value op Required image_info shared_secret Required The shared-secret key for the company. image_name Required Name of the image. Sample URL: https://s7ugc1.scene7.com/ugc/image?op=image_info&shared_secret=fece4b21-87ee-47fc-9b992e29b78b602&image_name=1442564.tif Allowed HTTP method: GET and POST Uploading a vector asset After you retrieve an upload token that is valid for a specific amount of time, you can upload a vector asset. You upload the asset as a multipart/form post while sending the rest of the values as a URL query string, as shown in this example: https://s7ugc1.scene7.com/ugc/image?op=upload&upload_token=aa2a378a-cd25-4c80-994d312094e0ef20_18000&company_name=000Company The upload_token and company_name fields are required. See “Retrieving the upload token” on page 278. See “Requesting a shared-secret key” on page 278. You can also send other optional values as URL query strings, as in this example: https://s7ugc1.scene7.com/ugc/vector?op=upload&upload_token=aa2a378a-cd25-4c80-994d312094e0ef20_18000&company_name=000Company&file_limit=2000000&file_exts=ai,pdf Thefile_limit parameter specifies the file-size limit in bytes. The file_exts parameter specifies the filename extensions that are allowed for upload. Both of these values are optional. A global limit is set in the application for the file size limit and the filename extensions allowed. If what you send in the request is a subset of the global limits, it is honored. The global limits are the following: Global limit Value File size for all clients 20 MB Supported vector file formats for upload AI, EPS, PDF (only when the PDF is previously opened and saved in Adobe Illustrator CS6) The following HTML form lets a user upload an asset. The form asks the user to enter the following information: • A company name • An upload token • A file size limit • A list of filename extensions • The name of the file to upload Last updated 10/9/2014 285 USING SCENE7 User-generated content An HTML form for uploading an asset. The following HTML code is displayed when you right-click in the browser window, and then click View Source for the form shown in the illustration. The code shows the corresponding URL query string and the POST method that are run when the user clicks Submit. <body> <script language="javascript"> function uploadImage() { document.image_upload.action="vector?op=upload&company_name="+document.image_upload.company_ name.value+"&upload_token="+document.image_upload.upload_token.value+"&file_limit="+document .image_upload.file_limit.value+"&file_exts="+document.image_upload.file_exts.value; return true; } </script> <form method="POST" enctype="multipart/form-data" name="image_upload" id="image_upload" onSubmit="return uploadImage();"> <table> <tr><td colspan="2"><strong> UGC Vector Upload Test Page: </strong></td></tr> <tr><td colspan="2"></td></tr> <tr><td><strong> Company Name</strong></td><td><input type="text" size="40" name="company_name"></td></tr> <tr><td><strong> Upload Token </strong></td><td><input type="text" size="40" name="upload_token"></td></tr> <tr><td><strong> File Size Limit (in bytes) </strong></td><td><input type="text" size="40" name="file_limit"> bytes</td></tr> <tr><td><strong> File Extensions allowed </strong></td><td><input type="text" size="40" name="file_exts"></td></tr> <tr><td colspan="2"></td></tr> <tr> <td><strong>File to upload: : </strong></td> <td><input name="filename" type="file" id="filename" size="58" maxlength="1024" /></td> </tr> <tr><td colspan="2"></td></tr> <tr> <td><strong>Click Submit to upload your Vector: </strong></td> <td><input type="submit" value="Submit"></td> </tr> </table> </form> </body> To view the XML response in Internet Explorer, click View > Source. To view XML response in Firefox, click View > Page Source. Firefox is recommended for viewing XML responses. The following is a sample response from a successful upload: Last updated 10/9/2014 286 USING SCENE7 User-generated content <?xml version="1.0" encoding="UTF-8" standalone="no" ?> <scene7> <user_generated_content> <response> <serviceName>User Generated Content -Vector</serviceName> <version>1.0.0</version> <operationName>upload</operationName> <serviceStatus>SUCCESS</serviceStatus> <title>Your file has been uploaded Successfully.</title> <message> <url>http://s7w2p1.scene7.com/is/agm</url> <path>W2PTest/ugc/8875744.fxg</path> <fullurl> http://s7w2p1.scene7.com/is/agm/W2PTest/ugc/8875744.fxg </fullurl> </message> </response> </user_generated_content> </scene7> Note: The uploaded asset (AI, EPS, PDF so on) is converted to the FXG format and the response sends a direct link to that FXG asset. The asset is like any other Web-to-print resource; you can apply processing queries to it. For example, the following URL converts an FXG resource into a 500x500 png image. http://s7w2p1.scene7.com/is/agm/W2PTest/ugc/8875744.fxg?fmt=png&wid=500&hei=500 Send the asset to upload as a multipart/form post while sending the rest of the values as a URL query string. You can use the following fields in the URL query string to upload an asset: URL Parameter Required or optional Value op Required upload upload_token Required Upload token for the shared-secret key associated with the company. company_name Required Name of the company performing the upload. file_limit Optional File size limit, in bytes, for the asset. file_exts Optional List of allowable extensions for the asset file. Note: You are required to send the asset to be uploaded as the only field in a multipart POST request. Sample URL: https://s7ugc1.scene7.com/ugc/vector?op=upload&upload_to ken=aa2a378a-cd25-4c80-994d312094e0ef20_18000&company_name=000Company Allowed HTTP method: POST Deleting an uploaded asset You can use the delete parameter in this format to delete an asset: Last updated 10/9/2014 287 USING SCENE7 User-generated content https://s7ugc1.scene7.com/ugc/image?op=delete&shared_secret=fece4b21-87ee-47fc-9b992e29b78b602&image_name=1442564.tif The following is an example of a response when an image asset is deleted: <?xml version="1.0" encoding="UTF-8" standalone="no" ?> <scene7> <user_generated_content> <response> <serviceName>User Generated Content - Images</serviceName> <version>1.0.0</version> <operationName>delete</operationName> <serviceStatus>SUCCESS</serviceStatus> <title>Delete request for1442564.tif</title> <message>Your file was successfully deleted</message> </response> </user_generated_content> </scene7> You can use the following fields in the URL query string to delete an asset: URL parameter Required/optional Value op Required delete shared_secret Required The shared-secret key for the company. • Required Name of the asset to delete. For images: image_name • For Vector: fxg_name Sample image URL: https://s7ugc1.scene7.com/ugc/image?op=delete&shared_secret=fece4b21-87ee-47fc-9b992e29b78b602&image_name=1442564.tif Sample vector URL: https://s7ugc1.scene7.com/ugc/vector?op=delete&shared_secret=2160a8fa-cec6-45ba-8d59ca595f6d2b47& &fxg_name=8875744.fxg Getting disk usage information You can use the disk_info parameter to retrieve information about a company’s disk space usage, as shown in the following example: https://s7ugc1.scene7.com/ugc/image?op=disk_info&shared_secret=d03b7e0b-c9dc-4c6c-af0b419beeea1c63 A sample response looks like the following: Last updated 10/9/2014 288 USING SCENE7 User-generated content <?xml version="1.0" encoding="UTF-8" standalone="no" ?> <scene7> <user_generated_content> <response> <serviceName>User Generated Content - Images</serviceName> <version>1.0.0</version> <operationName>disk_info</operationName> <serviceStatus>SUCCESS</serviceStatus> <title>Disk Information for d03b7e0b-c9dc-4c6c-af0b-419beeea1c63</title> <message>Total Space available = 1395402342400 bytes. Total Space used = 0 bytes.</message> </response> </user_generated_content> </scene7> You can use the following fields in the URL query string to get disk usage information: URL parameter Required/optional Value op Required disk_info shared_secret Required The shared-secret key for the company The following sample code gets disk information for 000Company: https://s7ugc1.scene7.com/ugc/image?op=disk_info&shared_secret=fece4b21-87ee-47fc-9b992e29b78b9602 Last updated 10/9/2014 289 Chapter 21: Master files Master files are files you use to create rich-media assets in Scene7. These files include images, PDF files (for creating eCatalogs), and AI, ID, and PSD files (for creating web-to-print templates). Scene7 also supports SWF files for use as skins in the different viewer presets—the Zoom Viewer, eCatalog Viewer, and other viewers. The Scene7 Publishing System offers tools for editing images. You can create Image Maps and zoom targets for images. You can also crop, sharpen, and adjust images. Best practices for optimizing the quality of your images Optimizing image quality can be a time consuming process as many factors contribute to rendering acceptable results. The outcome is partly subjective because individuals perceive image quality differently. Structured experimentation is key. Scene7 includes more than 100 image serving commands for tuning and optimizing images and rendering results. The following guidelines can help you streamline the process and achieve good results quickly using some essential commands and best practices. Best practices for image format (&fmt=) • JPG or PNG are the best choices to deliver images in good quality and with manageable size and weight. • If no format command is supplied in the URL, Scene7 Image Serving defaults to JPG for delivery. • JPG compresses at a ratio of 10:1 and usually produces smaller image file sizes. PNG compresses at a ratio of about 2:1, except in some cases, such as when images contain a white background. Typically though, PNG file sizes are larger than JPG files. • JPG uses lossy compression, meaning that picture elements (pixels) are dropped during compression. PNG on the other hand uses lossless compression. • JPG often compresses photographic images with better fidelity than synthetic images with sharp edges and contrast. • If your images contain transparency, use PNG because JPG does not support transparency. As a best practice for image format, start with the most common setting &fmt=JPG. Best practices for image size Dynamically reducing image size is one of the most common tasks that Scene7 Image Serving performs. It involves specifying the size and, optionally, which downsampling mode is used to downscale the image. • For image sizing, the best and most straightforward approach is to use &wid=<value> and &hei=<value> or just &hei=<value>. These parameters automatically set the image width in accordance to the aspect ratio. • &resMode=<value> controls the algorithm used for downsampling. Start with &resMode=sharp2. This value provides the best image quality. While using the downsampling value =bilin is faster, it often results in the aliasing of artifacts. As a best practice for image sizing, use &wid=<value>&hei=<value>&resMode=sharp2 or &hei=<value>&resMode=sharp2 Last updated 10/9/2014 290 USING SCENE7 Master files Best practices for image sharpening Image sharpening is the most complex aspect of controlling images on your website, and where many mistakes are made. Take the time to learn more about how sharpening and unsharp masking works in Scene7 by referring to the following helpful resources: Best practices white paper Sharpening images in Adobe Scene7 Publishing System and on Image Server. On Adobe TV, watch Sharpening an image with unsharp mask. With Scene7, you can sharpen images on ingestion, on delivery, or both. In most cases, however, you should sharpen images using only one method or the other, but not both. Sharpening images on delivery, on a URL, typically gives you the best results. There are two image sharpening methods that you can use: • Simple sharpening (&op_sharpen) - Similar to the sharpen filter used in Photoshop, simple sharpening applies basic sharpening to the final view of the image following dynamic resizing. However, this method is not userconfigurable. The best practice is to not use &op_sharpen unless required. • Unsharp masking (&op_USM) - Unsharp masking is an industry standard sharpening filter. The best practice is to sharpen images with unsharp masking following the guidelines below. Unsharp masking lets you control the following three parameters: • &op_sharpen=amount,radius,threshold • amount (0-5, strength of the effect.) • radius (0-250, width of the "sharpening lines" drawn around the sharpened object, as measured in pixels.) Keep in mind that the parameters radius and amount work against each other. Reducing radius can be compensated by increasing amount. Radius allows finer control as a lower value sharpens only the edge pixels, whereas a higher value sharpens a wider band of pixels. • threshold (0-255, sensitivity of effect.) This parameter determines how different the sharpened pixels must be from the surrounding area before they are considered edge pixels and the filter sharpens them. Threshold helps to avoid over-sharpening areas with similar colors, such as skin tones. For example, a threshold value of 12 ignores slight variations in skin tone brightness to avoid adding "noise", while still adding edge contrast to high contrast areas, such as where eyelashes meet skin. For more information about how you set these three parameters, including best practices to use with the filter, see the following resources: Scene7 Help topic on Sharpening an image. Best practices white paper Sharpening images in Adobe Scene7 Publishing System and on Image Server. • Scene7 also lets you control a fourth parameter: monochrome (0,1). This parameter determines if unsharp masking is applied to each color component separately using the value 0 or to the image brightness/intensity using the value 1. As a best practice, start with the unsharp mask radius parameter. Radius settings that you can start with are the following: • Website: 0.2-0.3 pixels • Photographic printing (250-300 ppi): 0.3-0.5 pixels • Offset printing (266-300 ppi): 0.7-1.0 pixels Last updated 10/9/2014 291 USING SCENE7 Master files • Canvas printing (150 ppi): 1.5-2.0 pixels Gradually increase the amount from 1.75 to 4. If sharpening is still not the way you want, increase the radius by a decimal point and run the amount again from 1.75 to 4. Repeat as necessary. Leave the monochrome parameter setting at 0. Best practices for JPEG compression (&qlt=) • This parameter controls JPG encoding quality. A higher value means a higher-quality image but a large file size; alternatively, a lower value means a lower quality image but a smaller file size. The range for this parameter is 0-100. • To optimize for quality, do not set the parameter value to 100. The difference between a setting of 90 or 95 and 100 is almost imperceptible, yet 100 unnecessarily increases the size of the image file. Therefore, to optimize for quality but avoid image files becoming too large, set the qlt= value to 90 or 95. • To optimize for a small image file size but keep image quality at an acceptable level, set the qlt= value to 80. Values below 70 to 75 results in significant image quality degradation. • As a best practice, to stay in the middle, set the qlt= value to 85 to stay in the middle. • Using the chroma flag in qlt= • The qlt= parameter has a second setting that lets you turn on RGB chromaticity downsampling using the value ,1 or off using the value ,0. • To keep it simple, start with RGB chromaticity downsampling turned off (,0). This setting usually results in better image quality, especially for synthetic images with lots of sharp edges and contrast. As a best practice for JPG compression use &qlt=85,0. Best practices for JPEG sizing (&jpegSize=) jpegSize is a useful parameter if you want to guarantee that an image does not exceed a certain size for delivery to devices that have limited memory. • This parameter is set in kilobytes (jpegSize=<size_in_kilobytes>). It defines the maximum allowed size for image delivery. • &jpegSize= interacts with the JPG compression parameter &qlt=. If the JPG response with the specified JPG compression parameter (&qlt=) does not exceed the jpegSize value, the image is returned with &qlt= as defined. Otherwise, &qlt= is gradually decreased until the image fits in the maximum allowed size, or until the system determines it cannot fit and returns an error. As a best practice, set &jpegSize= and add the parameter &qlt= if you are delivering JPG images to devices with limited memory. Best practices summary As a best practice, to achieve a high image quality and small file size, start with the following combination of parameters: fmt=jpg&qlt=85,0&resMode=sharp2&op_usm=1.75,0.3,2,0 This combination of settings products excellent results under most circumstances. If the image requires further optimization, gradually fine-tune sharpening (unsharp masking) parameters by starting with a radius set to 0.2 or 0.3. Then, gradually increase the amount from 1.75 to a maximum of 4 (equivalent to 400% in Photoshop). Check to see that the desired result is achieved. Last updated 10/9/2014 292 USING SCENE7 Master files If sharpening results are still not satisfactory, increase the radius in decimal increments. For every decimal increment, restart the amount at 1.75 and gradually increase it to 4. Repeat this process until you achieve the desired result. While the values above are an approach that creative studios have validated, remember that you can start with other values and follow other strategies. Whether the results are satisfactory to you or not is a subjective matter, therefore structured experimentation is key. As you experiment, you may also find the following general suggestions helpful to optimize your workflow: • Try out and test different parameters in real time, either directly on a Scene7 URL or using the Scene7 Publishing System's image adjustment functionality which provides real-time previews for adjustment operations. • As a best practice, remember that you can group Scene7 Image Serving commands into an image preset. An image preset is basically URL command macros with custom preset names such as $thumb_low$ and &product_high$. The custom preset name in a URL path makes a call to these presets. Such functionality helps you manage commands and quality settings for different usage patterns of images on your website and shortens the overall length of URLs. • Scene7 also provides more advanced ways to tune image quality, such as applying sharpening images on ingestion. For advanced use cases where this may be an option to further tune and optimize rendering results, Adobe Professional Services can help you with customized insight and best practices. Editing images The Scene7 Publishing System offers many tools for creating rich-media effects. These tools are available by clicking the rollover Edit button and in the Browse Panel in Detail view. You can do the following image-editing tasks in Scene7: Create Image Maps Select the Image command or Image Map button to create an Image Map. An Image Map is a hotspot on an image, or an eCatalog page, or an image in a SpinSet, that displays a panel with rollover text. Users can click an Image Map, for example, to launch a new web page. See “Creating Image Maps” on page 293. Create Zoom targets Select the Zoom Targets command or the Zoom Targets button to create thumbnail targets. Users can click a thumbnail target in the Zoom Viewer to zoom directly to a particular part of an image. See “Creating zoom targets for Guided Zoom” on page 128. Crop an image Select the Crop command or the Crop button to crop an image. See “Cropping an image” on page 299. Sharpen an image Select the Sharpen command or the Sharpen button to sharpen an image and make its outlines less blurry and more distinct. See “Sharpening an image” on page 300. Adjust an image Select the Adjust command or the Adjust button to flip, rotate, blur, colorize, or alter the color balance of an image. See “Adjusting an image” on page 304. Edit layers Click the Layers tab to display individual, editable layers in a PSD file. When you upload a PSD file, all layers are uploaded individually as separate files so that you can edit them within Scene7. As well as using these tools to edit images, you can edit images as you upload them to the Scene7 Publishing System. For example, you can crop images, create a mask from a clipping path, and select a color profile for an image as you upload it. Last updated 10/9/2014 293 USING SCENE7 Master files Creating Image Maps An Image Map is a region on an image, an eCatalog page, or an image in a SpinSet, that displays a rollover panel with text. When the user clicks an Image Map, an action of some kind is triggered. For example, a web page is launched so that the user can learn more about a product. To call attention to Image Maps, an outline appears around an Image Map when the user moves the pointer over it. Besides the ability to create an image map in Scene7, or you can also create image maps when you design a catalog in Adobe Acrobat or Adobe InDesign. When you create Image Maps you can do any of the following: • Enter rollover text. • Enter JavaScript and URLs for launching web pages. • Create URL templates for Image Maps. • Copy Image Maps to other images, or eCatalog pages, or SpinSets. • Export Image Maps to CSV or to XML. • Import image metadata from a tab delimited file or from an XML file. • Define other actions as determined by the World Wide Web Consortium. • Preview Image Maps. Drawing and adjusting an Image Map 1 Do one of the following: • If you are working with an image in the Grid View or List View, in the Edit drop-down list click Image Map. Or, open it in Detail View, and then click Image Map above the image. • If you are working with a SpinSet in the Grid View or List View, click Edit. Or, open it in Detail View, and then click Edit. Select an image asset, and then click Image Map . • If you are working with an eCatalog, in the Grid View, List View, Detail View, click Edit. Click the Map Pages tab. Last updated 10/9/2014 294 USING SCENE7 Master files Creating an Image Map. 2 Draw a rectangular or polygonal (many-sided) Image Map: Rectangular map Select the Rectangle Image Map tool and drag on the page to create the rectangle. To add a point to a rectangular map (thus changing it to a polygon map), press Ctrl, then place the insertion tool at the desired location and click. Polygonal map Select the Polygon Image Map tool and click points on the perimeter of the area of the image you want to enclose. Use the polygon density slider to vary the point density in the polygon. The original density is remembered if you select other maps. If any point is added, deleted, or moved in the polygon, the original density is lost and the slider is reset to its maximum value. 3 Enter a name for the Image Map, if desired, in the Image Map list. After you draw an Image Map, Scene7 assigns it a name. To create the name, Scene7 appends a sequential number to the name of the image or eCatalog page you are working with. You can enter a name of your choice. 4 If you want users to open a new web page when they click the Image Map, enter the URL in the Image Map list. See “Using a template to enter JavaScript and URLs” on page 296. 5 To display rollover text when users move the pointer over your Image Map, enter the text in the Image Map list. In the Image Map list, select the Show menu and choose Rollover Text. Then enter the text you want users to see onscreen. You can write the text in a word processor and copy it into the Rollover text field. 6 If you want another action effect to occur when users move the mouse over an Image Map, define the action. In the Show drop-down list, click Other Actions. Enter the attributes of the action. (Click Show > Both to create rollover text and an action for an Image Map.) See “Defining other actions for Image Maps” on page 297. 7 (Optional) Do any of the following: • Click Preview to preview Image Maps. Last updated 10/9/2014 295 USING SCENE7 Master files • To delete an Image Map or polygon vertex, select a shape on the image, and then click Delete. Or, for an eCatalog, on the Order Pages tab, click Clear Maps to remove Image Maps from all pages. • To temporarily remove an Image Map from an image, an image in a SpinSet, or an eCatalog page, without deleting it, deselect the appropriate On option in the Image Map list. 8 Click Save. Adjusting the position, shape, and size of Image Maps To change the position, shape, and size of an Image Map, select the Image Map button and follow these instructions: . Then select the Pan tool Changing position Move the pointer near to but not over the border of the Image Map. When you see the four-headed arrow icon, drag the map to a new location. Changing the size and shape How you change the shape and size of an Image Map depends on whether you are working with a rectangular or polygonal Image Map: • Rectangular Image Map Move the pointer over a side or corner of the Image Map. When you see the doubleheaded arrow icon, start dragging. Hold down the Shift key as you drag to change size but maintain the aspect ratio (the shape). • Polygonal Image Map Drag a square selection handle. To create a selection handle, click the border of the Image Map and start dragging. You can drag the Size slider at the bottom of the screen to change views and get a better look at your Image Map. Handling overlapping Image Maps If your image or eCatalog page includes more than one Image Map and the maps overlap, you can determine how maps overlap. To do so, change the order of maps on the Image Map list. Drag their names higher or lower on the list. How high a name is on the list determines whether its Image Map overlaps other Image Maps. Importing Image Map data Rather than enter Image Map data on each page, you can import the data for your image, Spin Set, or eCatalog into the Map Summary screen. You import the Image Map data in the form of a tab-delimited file or XML DTD. The fields in your file must be in the order shown in the Map Summary screen: Name, TOC Labels, Maps, URLs, Rollover Text, Other Actions, and Search Strings. Importing Image Map data saves you the trouble of entering the data in the Image Map List as you create each Image Map. To import Image Map data 1 Go to the Image Map editor page (for images or images in SpinSets) or the Map Pages tab of the eCatalog editing screen. 2 Click Import Metadata. 3 In the Upload Metadata dialog box, click Image or Image Map to upload the metadata from desired asset property type. 4 In the Generate File drop-down list, select the type of file that you want to create. 5 (Optional) Click Generate to preview the resulting data based on the type of file you want to create. Click Close to return to the Upload Metadata dialog box. 6 Browse to the file that you want to upload. In the File Name text field, specify the name of the generated file. 7 (Optional) In the Job Name field, specify a name for the metadata upload job. Last updated 10/9/2014 296 USING SCENE7 Master files 8 Click Upload. Copying Image Maps You can copy Image Maps from an image or an eCatalog page to another. Use Copy Image Map to get a head start creating them. You can also copy Image Maps to re-create them in images or pages that share the same layout or mapping structure. For example, copying Image Maps in an eCatalog is a convenient way to copy all image maps between foreign language versions of the same eCatalog. For best results, copying is most successful if you copy between eCatalogs with the same number of pages and same images. If the eCatalog to which you copy already contains Image Maps, be aware that those Image Maps are deleted when the copy is made. To copy Image Maps 1 Go to the Image Map editor page (for images or images in SpinSets) or the Map Pages tab of the eCatalog editing screen. 2 Click Copy Maps to. 3 Do one of the following, based on if you are copying Image Maps from images or copying Image Maps from an eCatalog: • (Images) In the Select Images screen, select the images that you want to copy the Image Maps to. • (eCatalog) In the Select Asset screen, select the images or eCatalog pages that you want to copy the Image Maps to. 4 Click Select. Using a template to enter JavaScript and URLs You can define a URL template (also known as an Href template) to make entering Image Map URLs easier and more efficient. Define a URL template if most of your Image Map URLs share a common, fixed format. By entering the portion of the URL that is fixed as the URL template, you do not have to enter this portion of the URL each time you create an Image Map. Your URL Template can also contain JavaScript commands, pathnames, and parameters. By default, the URL template contains a proprietary Scene7 JavaScript handler called loadProduct that opens the image in a new window. Note: Be aware that when you add the Javascript code into the HREF attribute of your image map, the code is run on the client's computer. Therefore, make sure that the Javascript code is secure. About URL templates The URL template works by substituting the contents of the URL column in the Image Map list with the double dollar signs (‘$$’) in the template: Javascript:loadProduct('$$');void(0); You place all of the values that do not change between Image Maps in the URL template. Add only the values that do change in the URL column in the Image Map list. For example: • URL template: javascript:loadProduct('http://www.examplesitehere.com/$$');void(0); • URL value: product.htm • Actual URL generated: javascript:loadProduct('http://www.examplesitehere.com/product.html);void(0); Last updated 10/9/2014 297 USING SCENE7 Master files By default, the URL template includes a proprietary Scene7 JavaScript handler called loadProduct that opens a new window with the URL destination. However, you can use any JavaScript code to replace this JavaScript handler or use one of the following Scene7 handlers: • loadProductCW Displays the URL target specified in the URL column in the current window. This handler is primarily for eCatalogs that are integrated into a page within a website. • loadProductPW Displays the URL target specified in the URL column in the parent window (the page that opened the current one). The current window remains open, but the parent window changes to display the URL target. Note: The handler loadProductPW does not support DHTML and HTML5 viewers. Creating a URL template To create a URL template: 1 On the Map Editor screen (images or SpinSets) or the Map Pages tab of the eCatalog screen (eCatalogs), select Edit next to the URL Template option. The Edit Map Template dialog box opens. 2 Enter the JavaScript code and the complete URL (with the variable portion replaced by dollar signs [$$]). You can paste the code by right-clicking and choosing Paste. 3 Select the Save button. Handling URL templates The Map Editor page (images and SpinSets) and the Map Pages tab of the eCatalog screen (eCatalogs) offer these commands for handling URL templates: URL Template option Select the URL Template option to apply your URL template to all the Image Maps on an image or eCatalog page. Template option Deselect a Template option in the URL Image Map list if you do not want an individual Image Map to use the URL template. Defining other actions for Image Maps You can select the Show menu and choose Other Actions to trigger actions other than rollover text and web page launches. When the user moves the pointer over an Image Map, you can initiate an action. These actions are attributes defined for client-side Image Maps by World Wide Web Consortium HTML specifications. They include: accesskey Triggers an action when the user presses a designated key on the keyboard. onfocus Triggers an event when the Image Map receives focus—by the cursor, by tabbing, or by pressing an access key. For example, you can launch a web page when the Image Map receives focus and close it when your Image Map loses focus. onblur Triggers an event when the Image Map loses focus, either by the cursor or by tabbing. To define other actions for Image Maps 1 On the Map Editor screen (images and SpinSets) or Map Pages tab of the eCatalog screen (eCatalogs), select the Show menu and choose Other Actions. 2 Using the syntax specified by the World Wide Web Consortium HTML specifications, add the supported attributes in the Other Actions column of the Image Map list. Last updated 10/9/2014 298 USING SCENE7 Master files 3 Click Save. Select the Show menu and choose Both if you want an Image Map to have rollover text as well as an action. Creating Image Maps in Adobe Acrobat or Adobe InDesign You can create Image Maps while designing your eCatalog in Adobe Acrobat or Adobe InDesign. In Acrobat or InDesign, create hyperlink references where you want the Image Maps to appear, and specify URL locations for the image map. Selecting the Extract Links option when uploading the PDF file into Scene7 automatically converts the links to Image Maps. For more information, see InDesign Help or Acrobat Help. To create Image Maps in Adobe InDesign 1 In InDesign, click Window > Interactive > Hyperlinks to open the Hyperlinks panel. 2 Select the text, frame, or graphic that you want to make into an Image Map. 3 In the Hyperlinks panel, click New Hyperlink from the panel menu. 4 In the New Hyperlink dialog box, choose URL from the Link To menu. 5 Type or paste the product ID in the URL box, and click OK. (Scene7 completes the URL using the Image Map URL template.) Note: You do not need to set appearance options in InDesign. You can specify appearance in Scene7. 6 Repeat steps 2 through 5 for all the Image Maps you want to create. 7 Export the file as a PDF. 8 Upload the PDF to Scene7 and select Extract Links from the PDF Options. To create Image Maps in Adobe Acrobat 1 In Acrobat, choose Tools > Advanced Editing > Link Tool. 2 Drag to create the Image Map. The Create Link box opens. 3 Select Custom Link, and click Next. Note: You do not need to set appearance options in Acrobat. You can specify appearance in Scene7. 4 In the Link Properties box, click Actions. 5 Select Open A Web Link from the Select Action menu, and then click Add. 6 Type the product ID for the Image Map in the Edit URL box, and click OK. (Scene7 completes the URL using the image map URL template.) 7 Repeat steps 1 through 7 for all the Image Maps you want to create. 8 Save the file. 9 Upload the PDF to Scene7 and select Extract Links from the PDF Options. Last updated 10/9/2014 299 USING SCENE7 Master files Cropping an image You can crop images in the Scene7 Publishing System. The system retains information about images that were cropped so you can restore them to their original state. You can also crop an image and save the cropped version under a new name. You can crop an image to remove white space around it, or crop an area of the image. Note: After you crop, you can click the Save As button and save a cropped version of the image under a different name. In the Save As window, choose Save As New Master to save a second copy of the image. Choose Save As Addition View Of Master to save the original and its cropped version under a different name. Choose Replace Original to delete the original file from which you cropped your image. Then enter a name for the image and select the Submit button. More Help topics “Image editing options at upload” on page 305 “Cropping white space from a PDF file” on page 309 “Cropping from the sides of PDF pages” on page 309 Crop to remove white space around an image You can crop off the transparent or solid-color pixels from the edge of an image. 1 To crop an image, click its rollover Edit button and choose Crop, or display it in the Browse Panel in Detail view and click the Crop button . The Crop Editor screen opens. 2 Do one of the following: • To trim color pixels, select the Trim menu and choose Color. The Auto Crop By Color dialog box appears. Select the Corner menu and choose a corner with the background color to crop away. Then enter a Tolerance setting from 0 through 1. The 0 setting crops pixels only if they exactly match the color you selected in the corner of the image. Numbers closer to 1 allow for more color difference. Select the Crop button. • To trim transparent pixels, select the Trim menu and choose Transparent. The Auto Crop By Transparency dialog box appears. Enter a tolerance setting from 0 through 1. The 0 setting crops crop pixels only if they are totally transparent. Numbers closer to 1 allow for more transparency. Select the Crop button. 3 Click Save. Note: To restore an image to its original state after you’ve cropped it, display the image in the Crop Editor screen and select the Reset button. Select an area to crop 1 To crop an image, click its rollover Edit button and choose Crop, or display it in the Browse Panel in Detail view and click the Crop button . The Crop Editor screen opens. 2 Place the part of the image you don’t want to crop in the crop box. What appears inside the box remains when you select the Save button and crop the image. 3 To adjust the crop area, do one of the following: • Drag a side or corner of the box. Hold down the Shift key as you drag to change size but maintain the aspect ratio (the shape) of the crop box. • Enter pixel measurements in the Size boxes. Last updated 10/9/2014 300 USING SCENE7 Master files • Drag to move the crop box. Move the pointer inside the boundary of the box. When you see the four-headed arrow, drag the box to a new location on the image. 4 Click Save. Note: To restore an image to its original state after you’ve cropped it, display the image in the Crop Editor screen and select the Reset button. Sharpening an image Sharpening is an image-manipulation technique for making the outlines of a digital image look more distinct. Sharpening increases the contrast between edge pixels and emphasizes the transition between dark and light areas. Sharpening increases local contrast and brings out fine detail. There is no strict formula for correctly sharpening all images. Too little sharpening can make for a soft image, but over-sharpening adds halos, artifacts, and noise. Scene7 highly recommends using Image Presets for all images. This ensures a uniform size, and sharpening is enforced on any image called with an Image Preset. Furthermore, you can edit and change an Image Preset’s sharpening parameters quite easily. The next time you publish, all images called with that preset are given the new values. Scene7 also recommends adding sharpening to Viewer Presets, and then calling a viewer with that preset. This ensures that images within your viewers are crisp and appealing. However, whether you use Image Presets and Viewer Presets, or some alternate method of sharpening, the bottom line is that you should sharpen your images. If you do not, your images (and website) might look soft and fuzzy. Important: The Sharpen commands override Image Preset settings, including their sharpening effects. An Image Preset governs the size and formatting with which images are delivered from Scene7 Image Servers. Scene7 highly recommends using Image Presets to deliver all images to make sure that images are delivered at a uniform size and sharpening. After the sharpening settings of an individual image have been changed, however, Image Preset sharpening settings no longer apply to the image. It is delivered without Image Preset sharpening settings. It is often necessary to sharpen images. Scene7 SPS and Image Servers offer several sharpening options. It is important to understand what sharpening does to an image and how much sharpening you need. Most images need some sharpening but the amount required depends upon the image. Image sharpening increases the contrast of pixels to create the effect of accentuating edges. Humans perceive this enhanced edge contrast as sharpness. Although it is easy to enhance an image by running sharpening filters on an image, it is also easy to over-sharpen an image. Over sharpening an image creates a halo effect, or banding of the edge’s lines. There are best practices you can follow to optimize the sharpening of your images in Scene7 Publishing System and on Scene7 Image Server. See Best practices for sharpening images in Scene7 Publishing System and on Scene7 Image Server. To sharpen an image To sharpen an image, click its rollover Edit button and choose Sharpen, or open it in the Browse Panel in Detail view . The Sharpness Editor screen opens with sharpening commands. Choose commands and click the Sharpen button and select the Save button. Before sharpening an image, you can select the Apply Preset menu and choose an Image Preset to see what its sharpening effects are. The sharpening effects of an Image Preset may be suitable for your image. The Apply Preset menu is located on the bottom of the Sharpness Editor screen. Last updated 10/9/2014 301 USING SCENE7 Master files Sharpening options The following table shows the Image Server sharpening options. Name URL Protocol Values Example Simple Sharpening op_sharpen 0 | 1 op_sharpen=1 Resample Mode resMode bilin | bicub | sharp2 | trilin resMode=sharp2 bilin: Selects standard bi-linear interpolation. Fastest resampling method; some aliasing artifacts may be noticeable. bicub: Selects bi-cubic interpolation. More CPUintensive than bilin, but yields sharper images with less noticeable aliasing artifacts. sharp2: Selects a modified Lanczos Window function as an interpolation algorithm. May produce slightly sharper results than bi-cubic at a higher CPU cost. trilin: Selects a modified trilinear interpolation, which uses both higher and lower resolutions, if available. Recommended only when aliasing is an issue. Reduces JPEG sizes due to reduced high frequency data. Unsharp Mask op_usm amount, radius, threshold, monochrome op_usm=1,1,10,0 amount: filter strength factor (real 0…5) radius: filter kernel radius in pixels (real 0…250) threshold: filter threshold level (int 0…255) monochrome: set to 0 to unsharp-mask each color component separately, set to 1 to unsharp-mask image brightness (intensity) Select the Sharpening menu and choose an option: None Disables sharpening. Sharpen Runs a simple sharpening pass on the file after it is resized. This is similar to the “Sharpen” filter in Photoshop and does support any user parameters. Normally, you would use this filter or Unsharp Mask but not both. As a best practice, this method is not recommended, but it can help compensate for blurriness. (URL: op_sharpen) Unsharp Mask Allows you to fine-tune a sharpening filter effect on the final downsampled image. You can control intensity of effect, radius of the effect (measured in pixels) and a threshold of contrast that will be ignored. This effect uses the same options as Photoshop’s “Unsharp Mask” filter. (URL: op_usm) Choose these options to fine-tune sharpening with Unsharp Mask: • Amount Controls the amount of contrast applied to edge pixels. The default is 0.0. For high-resolution images, you can increase it to as high as 5.0. Think of Amount as a measure of filter intensity. Be aware that the Amount setting in Scene7 is not the same as the Amount setting in Photoshop. Photoshop uses an amount in the range of 1% to 500%, whereas Scene7 scales from 0.0 to 5.0. (5.0 is roughly equivalent to 500% in Photoshop, 0.9 is similar to 90%, and so on.) • Radius Determines the number of pixels surrounding the edge pixels that affect the sharpening. The effect runs on all pixels in the image and radiates in all directions. The best radius value depends on the size of the image. A low value sharpens only the edge pixels. A high value sharpens a wider band of pixels. Last updated 10/9/2014 302 USING SCENE7 Master files For example, to get a similar sharpening effect for a 2000 x 2000 pixel image and 500x 500 pixel image, you might set a radius value of two pixels on the 2000 x 2000 pixel image. Then, set a radius value of one pixel on the 500 x 500 pixel image (a larger value for an image with more pixels). • Threshold Determines the range of contrast to ignore when the unsharp mask filter is applied. This option determines how different the sharpened pixels must be from the surrounding area before they are considered edge pixels and are sharpened. Threshold uses a value from 0-255, which is the number of brightness steps in a grayscale image. 0=black, 128=50% gray and 255=white. For example, a threshold value of 12 ignores slight variations is skin tone brightness, so as not to add noise, while still adding edge contrast to contrasty areas, such as where eyelashes meet skin. As an example, suppose you have a photo of someone’s face. The Unsharp Mask affects the parts of the image with the most contrast and the smooth skin itself. Even the smoothest skin exhibits subtle changes in brightness values. If you do not use a threshold value, the filter accentuates these subtle changes in skin pixels, creating a noisy effect (probably undesirable) while also increasing the contrast on the eyelashes, enhancing sharpness (probably desirable). To avoid this issue, use a threshold value that tells the filter to ignore pixels that do not change contrast dramatically, like smooth skin. To avoid introducing noise, experiment with values between .02 and 0.2. The default value of 0 sharpens all pixels in the image. • Apply To Choose Each Color to apply sharpening separately to each color component; choose Brightness to apply to sharpening to image brightness areas. Resampling Select the Resampling menu and choose an option. These options sharpen the image when it is downsampled: None Turns off resampling. Bilinear The fastest resampling method; some aliasing artifacts are noticeable. Bicubic Increases CPU usage on the Image Server, but yields sharper images with less noticeable aliasing artifacts. Sharpen2 May produce slightly sharper results than the Bicubic option, but at even higher CPU cost on the Image Server. Trilinear Uses both higher and lower resolutions if available; recommended only when aliasing is an issue. This method reduces JPEG size due to reduced high-frequency data. Sharpening and image presets You could mix all three sharpening effects to achieve your final result. However, this is not recommended. Scene7 recommends you save your sharpening effects as part of an Image Preset.Image Presets allow you to package the most often used image modifiers to create a dynamically resized image in a small text string. An Image Preset contains values for the file format (usually JPEG for the web), pixel count and image sharpening. Instead of appending the URL with each image modifier needed to create a specific type of image size, you create a named Image Preset, such as “thumbnail,” configure the thumbnail Image Preset with the appropriate size, file format, and sharpening options, and then call the image using the Image Preset name. Image Presets shorten the length of the overall URL.These two URLs produce the same 350x350 JPEG image with sharpening: • http://sample.scene7.com/is/image/S7train/Backpack_A?wid=350&hei=350&fmt=jpeg&qlt=85,0&resM ode=sharp2&op_usm=0.9,1.0,8,0 • http://sample.scene7.com/is/image/S7train/Backpack_A?$!_s7product$ Image Presets can be changed and updated at any time. You will see the results of a change to an Image Preset after you publish and after the cache for the URL clears. Last updated 10/9/2014 303 USING SCENE7 Master files If you use one preset for every image in a size category, any Company Administrator can update the definition of that Image Preset, republish, and affect every image using that format, without changing any web code. As a best practice, use one Image Preset per unique size on your site. To add an image preset, go to Setup > Application Settings > Image Presets. Then, Add or Edit an existing preset. The only required field is the name of the preset itself. However, you should include some level of sharpening in every preset. JPG Quality The JPG Quality options control the JPG compression level: JPG Quality Select this option if you want to control compression levels and chrominance downsampling. Slider Determines the JPG compression level. This setting affects both file size and image quality. The JPG quality scale is 1–100. Enable JPG Chrominance Downsampling Because the eye is less sensitive to high-frequency color information than high-frequency luminance, JPEG images divide image information into luminance and color components. When a JPEG image is compressed, the luminance component is left at full resolution, while the color components are downsampled by averaging together groups of pixels. Downsampling reduces the data volume by one half or one third with almost no impact on perceived quality. Downsampling is not applicable to grayscale images. This technique reduces the amount of compression useful for images with high contrast (for example, images with overlaid text). Setting company-wide sharpening options If you do not use an Image Preset or pass specific Image Server sharpening protocols along the URL string, then your image is not sharpened when it is downsampled. However, you may set default sharpening values if this occurs and then any image will always have some sharpening. To set your company’s default sharpening options, go to Setup > Application Setup > Publish Setup > Image Server. If you set the Default Resampling Mode to Sharp2, it will always sharpen the image when downsampling. Adding sharpening to viewer presets Unless you add sharpening image modifiers to the preset, the small initial load image can look soft because it is downsampled to fit into the viewer window without being sharpened. In SPS, Viewer Presets (like Image Presets) allow you to centralize many options into one location, including choice of skin and viewer options (such as including a Print button or controlling the speed of the zoom animation). Viewer Presets are found in the same section as Image Presets, under Setup > Application Settings > Viewer Presets. The Modifiers option is found under the Core Settings section of all eCatalog, Spin, and Custom Zoom Viewer Presets. By adding the URL sharpening commands to the Modifiers box, you add sharpening every time that viewer is called with that viewer preset. To call the Viewer Preset, use the config= command on the viewer URL. Here is an example of calling an Image Set (shoes) with a Viewer Preset (FantasticoZoom2009): http://sample.scene7.com/s7/zoom/flasht_zoom.jsp?company=S7train&sku=shoes&config=S7train/Fa ntasticoZoom2009&locale=en The preset here sharpens and changes the default skin of the viewer. Last updated 10/9/2014 304 USING SCENE7 Master files Creating image-specific overrides The last, and least recommended, sharpening method is to create sharpening overrides on an image-by-image basis. This overrides the sharpening in an Image Preset with its own specific values. However, this overrides all other sharpening methods at any size. The best use case for this method is if some of your images are not high resolution, and the values in the Image Presets are too high for these small images. In this case, some per-image sharpening might be needed. In SPS, select any image, go to the Detail View (by double-clicking or pressing the Detail View button), and click Sharpen. Change any parameter, then click Save. This tells the Image Server to use these sharpening parameters rather than any command you call in the URL, such as a sharpening modifier or Image Preset. You must publish to see the changes take effect. Adjusting an image Scene7 offers various commands for adjusting the appearance of an image. You can flip, rotate, blur, alter the color balance, and colorize an image. As you experiment with these commands, you can see their effects on the image you are working with. See also “Creating an alias for an image” on page 305. 1 Click the image’s rollover Edit button and choose Adjust, or in the Browse Panel, double-click the image to open it in Detail view. 2 Select a size and Image Preset (in the bottom of the window). 3 Use the commands on the right side of the Adjust Editor window to adjust the image: • Use the Flip options to flip an image horizontally or vertically. • Use the Rotate slider to rotate the image. You can enter values in the Rotate field to rotate an image. Positive values rotate it clockwise; negative values rotate it counterclockwise. • Use the Blur slider or its corresponding box to blur an image. The higher the value, the more blurry the image becomes. • Use the Contrast, Brightness, Saturation, Hue, and Color Balance options to adjust the color and brightness. These effects are cumulative. For example, changes to the Magenta/Green settings are added to changes made to the Hue settings. • Use the Colorize options to colorize an image while preserving shadows and highlights. Changes to the Colorize options are also cumulative. Choose the Brightness menu and choose No Compensation to disable automatic brightness compensation. Set the contrast value to 0 to preserve the contrast range of the original image, or specify a contrast range with a value greater than 0. A value of 100 maximizes the contrast. Typical values are in the 30–70 range. 4 When you have finished adjusting the image, do one of the following: • Click Save. • To replace the original of the image, click Save As. In the drop-down list, select Replace original, and then click Save. • To save the image as a new master image, click Save As. In the drop-down list, select Save as new master. In the Folder Name list box, select the folder where you want the new master image saved. Last updated 10/9/2014 305 USING SCENE7 Master files Click Save. • To save the image as additional view of the master image. you can create an alias for it. Click Save As. In the Save As dialog box, in the drop-down list, click Save as additional view of master. In the Folder Name list box, select the folder where you want the new master image saved. Click Save. Creating an alias for an image When you have adjusted an image, you may want to save it as additional view of the master image. To do so, you can create an alias for the image by using the Save as additional view of master feature. 1 In the Grid View or List View, in the Edit drop-down list next to an image for which you want to create an alias, click Adjust. 2 In the lower-right corner of the page, click Save As. 3 In the Save As dialog box, in the drop-down list, click Save as addition view of master. 4 In the Folder Name list box, select the folder where you want to save the aliased image. 5 In the File Name field, type the name you want to use for the alias. 6 Click Save. Image editing options at upload When uploading image files, including AI, EPS, and PSD files, you can take the following editing actions in the Upload Job Options dialog box: • Crop white space from the edge of images. • Crop manually from the sides of images. • Choose a color profile. • Create a mask from a clipping path. • Sharpen images with unsharp masking options • Knockout Background These options are located on the Upload screen under Image Editing Options. Cropping white space from images To automatically crop white-space pixels from an image, select the Crop menu and choose Trim. Then choose these options: Trim Away Based On Choose whether to crop based on color or transparency: • Color Choose the Color option. Then, from the Corner drop-down list, select the corner of the image with the color that best represents the white-space color you want to crop. • Transparency Choose the Transparency option. Last updated 10/9/2014 306 USING SCENE7 Master files Tolerance Drag the slider to specify a tolerance from 0 through 1: • Trimming based on color Specify 0 to crop pixels only if they exactly match the color you selected in the corner of the image. Numbers closer to 1 allow for more color difference. • Trimming based on transparency Specify 0 to crop pixels only if they are totally transparent; numbers closer to 1 allow for more transparency. Cropping manually from the sides of images To manually crop from the sides of an image, select the Crop menu and choose Manual. Then enter the number of pixels to crop from any side or each side of the image. How much of the image is cropped depends on the ppi (pixels per inch) setting in the image file. For example, if the image displays 150 ppi and you enter 75 in the Top, Right, Bottom, and Left text boxes, a half-inch is cropped from each side. Choosing a color profile Choose a Color Profile option to select a color space for the image: Convert To sRGB Converts to sRGB (Standard Red Green Blue). sRGB is the recommended color space for displaying images on web pages. Keep Original Color Space Retains the original color space. Custom From > To Opens menus so you can choose a Convert From and Convert To color space. You can choose a standard Photoshop color space or a color space you uploaded to SPS. See “ICC profiles” on page 315. Creating a mask from a clipping path Select Create Mask From Clipping Path to create a mask for the image based on its clipping path information. This option applies to images created with image-editing applications in which a clipping path was created. Sharpening an image using Unsharpen Mask This filter lets you fine-tune a sharpening filter effect on the final downsampled image, controlling the intensity of the effect, the radius of the effect (as measured in pixels), and a threshold of contrast that is ignored. This effect uses the same options as Photoshop’s Unsharp Mask filter. Contrary to what the name suggests, Unsharp Mask is a sharpening filter. Under Unsharp Masking, set the options you want. Setting options are described in the following table: Last updated 10/9/2014 307 USING SCENE7 Master files Unsharp Mask options Description Amount Controls the amount of contrast that is applied to edge pixels. Think of it as the intensity of the effect. The main difference between the amount values of Unsharp Mask in SPS and the amount values in Adobe Photoshop, is that Photoshop has an amount range of 1% to 500%. Whereas, in SPS, the value range is 0.0 to 5.0. A value of 5.0 in SPS is the rough equivalent of 500% in Photoshop; a value of 0.9 is the equivalent of 90%, and so on. Radius Controls the radius of the effect. The value range is 0-250. The effect is run on all pixels in an image and radiates out from all pixels in all directions. The radius is measured in pixels. For example, to get a similar sharpening effect for a 2000 x 2000 pixel image and 500 x 500 pixel image, you would set a radius of two pixels on the 2000 x 2000 pixel image and a radius value of one pixel on the 500 x 500 pixel image. A larger value is used for an image that has more pixels. Threshold Threshold is a range of contrast that is ignored when the Unsharp Mask filter is applied. This is important so that no "noise" is introduced to an image when this filter is used. The value range is 0-255, which is the number of brightness steps in a grayscale image. 0=black, 128=50% gray and 255=white. For example, a threshold value of 12 ignores slight variations is skin tone brightness to avoid adding noise, but still add edge contrast to contrasty areas such as where eyelashes meet skin. For example, if you have a photo of someone’s face, the Unsharp Mask affects the contrasty parts of the image, such as where eyelashes and skin meet to create an obvious area of contrast, and the smooth skin itself. Even the smoothest skin exhibits subtle changes in brightness values. If you do not use a threshold value, the filter accentuates these subtle changes in skin pixels. In turn, a noisy and undesirable effect is created while contrast on the eyelashes is increased, enhancing sharpness. To avoid this issue, a threshold value is introduced that tells the filter to ignore pixels that do not change contrast dramatically, like smooth skin. In the zipper graphic shown earlier, notice the texture next to the zippers. Image noise is exhibited because the threshold values were too low to suppress the noise. Monochrome Select to unsharp-mask image brightness (intensity). Deselect to unsharp-mask each color component separately. See also “Sharpening an image” on page 300. See also Sharpening images in Scene7 Publishing System and on Image Server. Knockout Background You can use Knockout Background to automatically remove the background of an image when you upload it. This technique is useful to draw attention to a particular object and make it stand out from a busy background. Last updated 10/9/2014 308 USING SCENE7 Master files KnockOut Background options Description Knockout Background Select to enable or “turn on” the Knockout Background feature and options.. Corner Required. The corner of the image that is used to define the background color to knockout. You can choose from Upper Left, Bottom Left, Upper Right, or Bottom Right. Fill Method Required. Controls pixel transparency from the Corner location that you set. You can choose from the following fill methods: Tolerance • Flood Fill - turns all pixels transparent that match the Corner that you have specified and are connected to it. • Match Pixel - turns all matching pixels transparent, regardless of their location on the image. Optional. Controls the allowable amount of variation in pixel color matching based on the Corner location that you set. Use a value of 0.0 to match pixel colors exactly or, use a value of 1.0 to allow for the greatest variation. More Help topics “Cropping an image” on page 299 Working with PDFs PDF (Portable Document Format) files are most often used in Scene7 to create eCatalogs. When you upload a PDF file, Scene7 rasterizes, or rips, the pages by default so that the pages can be used to build rich media. PDF upload options When you upload a PDF file, you can format it in various ways. You crop its pages, extract search words, enter a pixelsper-inch resolution, and choose a color space. PDF files often contain a trim margin, crop marks, registration marks, and other printer’s marks. You can crop these marks from the sides of pages as you upload a PDF file. Options for uploading PDF files are located on the Upload screen under PDF Options. Processing The Processing options are as follows: Rasterize (Default) Rips the pages in the PDF file and converts vector graphics to bitmap images. Choose this option to create an eCatalog. Extract Search Words Extracts words from the PDF file so that the file can be searched by keyword in an eCatalog Viewer. Extract Links Extracts links from the PDF files and coverts them to Image Maps that are used in an eCatalog Viewer. Last updated 10/9/2014 309 USING SCENE7 Master files Auto-Generate eCatalog With Multiple Page PDF Automatically creates an eCatalog from the PDF file. The eCatalog is named after the PDF file you uploaded. (This option is only available if you rasterize the PDF file as you upload it.) Resolution Determines the resolution setting. This setting determines how many pixels are displayed per inch in the PDF file. The default is 150. Color Space Select the Color Space menu and choose a color space for the PDF file. Most PDF files have both RGB and CMYK color images. The RGB color space is preferable for online viewing. Detect Automatically Retains the color space of the PDF file. Force As RGB Converts to the RGB color space. Force As CMYK Converts to the CMYK color space. Force As Grayscale Converts to the Grayscale color space. Color Profile Choose a Color Profile option: Convert To sRGB Converts to sRGB (Standard Red Green Blue). sRGB is the recommended color space for displaying images on web pages. Keep Original Color Space Retains the original color space. Custom From > To Opens menus so you can choose a Convert From and Convert To color space. You can choose a standard Photoshop color space or a color space you uploaded to SPS. See “ICC profiles” on page 315. Cropping white space from a PDF file 1 To automatically crop white-space pixels from a PDF file as you upload it, select the Crop menu and choose Trim. 2 Specify the following options: Trim Away Based On Choose whether to crop based on color or transparency: • Color Choose the Color option. Then select the Corner menu and choose the corner of the PDF with the color that best represents the white-space color you want to crop. • Transparency Choose the Transparency option. Tolerance Drag the slider to specify a tolerance from 0 through 1: • Trimming based on color Specify 0 to crop pixels only if they exactly match the color you selected in the corner of the PDF. Numbers closer to 1 allow for more color difference. • Trimming based on transparency Specify 0 to crop pixels only if they are totally transparent; numbers closer to 1 allow for more transparency. Cropping from the sides of PDF pages You can manually remove printer’s marks from the sides of the pages in a PDF file as you upload it. 1 Select the Crop menu and choose Manual. Last updated 10/9/2014 310 USING SCENE7 Master files 2 Enter pixel settings in the Top, Right, Bottom, and Left text boxes to crop from the top, bottom, and sides of pages. How much of the page is cropped depends on the Resolution PX/Inch setting you enter for the PDF file. For example, if you enter 150 (the default) as the Resolution PX/Inch setting and you crop 75 pixels from the sides of pages, a halfinch is cropped because, at 150 pixels per inch, 75 pixels equals a half-inch. Working with PSD files PSD (Photoshop Document files) are most often used in Scene7 to create templates. When you upload a PSD file, you can create a Scene7 template automatically from the file (select the Create Template option on the Upload screen). SPS creates multiple images from a PSD file with layers if you use the file to create a template; it creates one image for each layer. PSD upload options Options for uploading PSD files are located under Photoshop Options in Upload Job Options. You can crop a file, choose a color profile for it, use it to create a template, and select an anchor. These options are available when uploading PSD files: Crop (located under Crop Options.) Choose Trim to automatically crop white space from the edges of a PSD file; choose Manual to crop sides of the PSD file: • Trim Select the Trim Away Based On menu and choose Color or Transparency. If you choose the Color option, select the Corner menu and choose the corner of the PSD with the color that best represents the white-space color you want to crop. Drag the slider to specify a tolerance from 0 through 1: To trim based on color, specify 0 to crop pixels only if they exactly match the color you selected in the corner of the PSD. Numbers closer to 1 allow for more color difference. To trim based on transparency, specify 0 to crop pixels only if they are totally transparent; numbers closer to 1 allow for more transparency. • Manual Enter the number of pixels to crop from any side or each side of the image. How much of the image is cropped depends on the ppi (pixels per inch) setting in the image file. For example, if the image displays 150 ppi and you enter 75 in the Top, Right, Bottom, and Left text boxes, a half-inch is cropped from each side of the image. Color Profile (Located under Color Profile Options.) Choose an option: • Convert To sRGB (default) Converts to sRGB (Standard Red Green Blue). sRGB is the recommended color space for displaying images on web pages. • Keep Original Color Space Retains the original color space of the image. • Custom From > To Opens menus so you can choose a Convert From and Convert To color space. You can choose a standard Photoshop color space or a color space you uploaded to SPS. See “ICC profiles” on page 315. Maintain Layers Rips the layers in the PSD, if any, into individual assets. The asset layers remain associated with the PSD. You can view them by opening the PSD file in Detail view and selecting the layer panel. See “Viewing and editing layers in a PSD file” on page 311. Create Template Creates a template from the layers in the PSD file. Extract Text Extracts the text so that users can search for text in a Viewer. Last updated 10/9/2014 311 USING SCENE7 Master files Extend Layers To Background Size Extends the size of ripped image layers to the size of the background layer. Layer Naming Layers in the PSD file are uploaded as separate images. Choose an option to name these images in the Scene7 Publishing System: • Layer Name Names the images after their layer names in the PSD file. For example, a layer named Price Tag in the original PSD file becomes an image named Price Tag. However, if the layer names in the PSD file are default Photoshop layer names (Background, Layer 1, Layer 2, and so on), the images are named after their layer numbers in the PSD file, not their default layer names. • Photoshop and Layer Number Names the images after their layer numbers in the PSD file, ignoring original layer names. Images are named with the Photoshop filename and an appended layer number. For example, the second layer of a file called Spring Ad.psd is named Spring Ad_2 even if it had a non-default name in Photoshop. • Photoshop and Layer Name Names the images after the PSD file followed by the layer name or layer number. The layer number is used if the layer names in the PSD file are default Photoshop layer names. For example, a layer named Price Tag in a PSD file named SpringAd is named Spring Ad_Price Tag. A layer with the default name Layer 2 is called Spring Ad_2. Anchor Specify how images are anchored in templates that are generated from the layered composition produced from the PSD file. By default, the anchor is the center. A center anchor allows replacement images to best fill the same space, no matter the aspect ratio of the replacement image. Images with a different aspect that replace this image, when referencing the template and using parameter substitution, effectively occupy the same space. Change to a different setting if your application requires the replacement images to fill the allocated space in the template. Viewing and editing layers in a PSD file If you selected the Maintain Layers option when you uploaded your PSD, Scene7 ripped the individual layers into assets. You can view and edit the asset layers belonging to a PSD file by opening the file in the Browse Panel in Detail view. 1 Double-click the full PSD file in the Browse Panel to open it in Detail view. Note: Make sure that you open the full asset and not one of the PSD layers. 2 Click Layers to open the Layers panel. All the layers appear as separate images in the Layers panel. 3 Double-click a layer to open it and do any of the following: • Click the Image Map icon to create an image map on the layer. (See “Creating Image Maps” on page 293.) • Click the Zoom Targets icon to create zoom targets on the layer. (See “Creating zoom targets for Guided Zoom” on page 128.) • Click the Crop icon to crop the layer. (See “Cropping an image” on page 299.) • Click Sharpen to sharpen the layer. (See “Sharpening an image” on page 300.) • Click the Adjust to adjust the layer. (See “Adjusting an image” on page 304.) 4 Click Save or Save As. 5 To view or edit a different layer, click an arrow at the bottom of the layer preview. 6 To exit the layer Detail view, click the Grid view icon. Last updated 10/9/2014 312 USING SCENE7 Master files Working with PostScript and Illustrator files You can use Adobe® PostScript® (EPS) and Adobe® Illustrator® (AI) files in the Scene7 Publishing System. Scene7 offers commands for configuring these files as you upload them. When you upload PostScript (EPS) or Illustrator (AI) image files, you can format them in various ways. You can rasterize the files, convert them to FXG for Template Publishing, maintain the transparent background, choose a resolution, and choose a color space. Options for formatting PostScript and Illustrator files are available on the Upload screen under PostScript Options and Illustrator Options in the Upload Job Options box. Processing Choose Rasterize to convert vector graphics in the file to the bitmap format. Maintain Transparent Background In Rendered Image Maintains the background transparency of the file. Resolution Determines the resolution setting. This setting determines how many pixels are displayed per inch in the file. Color Space Select the Color Space menu and choose a color space: • Detect Automatically Retains the color space of the file. • Force As RGB Converts to the RGB color space. • Force As CMYK Converts to the CMYK color space. • Force aA Grayscale Converts to the Grayscale color space. Working with vignette, window covering, and cabinet files Users of the Scene7 Image Authoring tool can use vignettes (VNT files), window coverings (VNW files), and cabinets (VNC files) in Scene 7. These files cannot be created or edited in the Scene7 Publishing System. Vignettes, window coverings, and cabinets are authored images. Using a different Scene7 program called Image Authoring, you mask objects in an image so users can see the same image in a variety of textures or colors. For example, users see a couch upholstered with a variety of fabrics, a window decorated with a variety of window treatments, or a cabinet finished with different types of wood. Upload vignettes, window covering, and cabinets as you would any other file. Working with Viewer SWF files In the Scene7 Publishing System, SWF files are used as user-interface skins for the different Viewers. When users configure a viewer, they can choose a SWF skin for it. Viewer SWFs work in combination with the other viewer configuration settings to determine how a viewer looks and works. As well as choosing a SWF file that determines the overall look of a viewer, users can choose SWFs that do the following: • Display a loading animation when a viewer first appears. • Determine the appearance of the Help topics available for the viewer. • Play a waiting animation when a viewer is waiting for a response. Last updated 10/9/2014 313 USING SCENE7 Master files Note: The Scene7 Publishing System provides default SWFs for the loading animation and waiting animation. You can use these default SWFs or choose loading and waiting SWFs of your own. Unless you choose a Help button SWF file for a viewer, the Help button is hidden by default. Before you can choose SWFs for a viewer, upload the SWF files to SPS and publish the files. More Help topics “Viewer Presets” on page 32 Last updated 10/9/2014 314 Chapter 22: Support files Support files are files that Scene7 uses to display fonts and convert image files from one color space to another. Support files also include XML files and various other types of files. For a complete list of supported file formats, see “Supported asset file formats” on page 79. Fonts In some cases, the Scene7 Publishing System requires you to upload a font file to enter or render text in a particular font. For example, to use a particular font for text on a template layer, upload the font file. To display eCatalog Viewer page numbers in a particular font, upload the font file. Scene7 supports these font types: • All TrueType fonts • PostScript® fonts • OpenType/TrueType fonts • OpenType/PostScript fonts • PhotoFonts After a font file has been uploaded, you can change its SPS ID, font name, and type information on the Edit Info screen. Important: Scene7 recommends uploading all font styles (bold, italic, bold/italic, and regular) if you plan to use fonts in template layers. Scene7 needs these font styles to process requests. Uploading all PostScript/Adobe Type 1 files associated with a font is also recommended because some of these fonts contain detailed kerning information. Uploading font files Upload font files with the same techniques you use to upload other files. You can store font files in any SPS folder. See “Uploading your files” on page 83. Editing font file information You can change the ID name of a font as well as its type information. Editing a font file can be helpful in searches and making fonts easier to identify. In the Browse Panel, select the font file you want to edit in Detail view and choose File > Edit Info. The Edit Info screen opens. Choose the following options and select the Submit button. Font Name This name identifies the font when it is published. PostScript Name This name is the full PostScript name for the font. It usually indicates the weight or style. RTF Name This name appears on a pop-up menu in the RTF editor where template text layers are created. Font Family Name This name lists the font name without the style, weight, or font-type indicator. Font Style The options are Plain, Bold, Italic, and Bold-Italic. Font Type The options are TrueType and Adobe Type 1. If you call these fonts by another name, you can enter it. Last updated 10/9/2014 315 USING SCENE7 Support files Font Type Abbreviation The options are as follows: • TTF TrueType font files used for PDF/PostScript rendering and image serving. • AFM Adobe PostScript font files that contain Adobe Font Metrics information and are used for image serving. • PFM Adobe PostScript font files that contain binary font metric information. • PFB Adobe PostScript font files that contain binary font outline information and are used for PDF/PostScript rendering and image serving. ICC profiles An ICC (International Color Consortium) profile is a file that describes how to correctly convert image files from one color space to another. ICC profiles help you to get the correct colors for your images. For example, to correctly display images designed for printing on a computer monitor, you can choose an ICC profile. This profile converts the image to a different color space and makes sure that the colors display correctly online. In the Scene7 Publishing System, you can choose an ICC profile to convert images to a different color space when you upload the images. All standard Photoshop ICC profiles are available by default on SPS. To see the names of color profiles on the Upload screen, select the Color Profile menu. Then choose Custom From > To, and choose an ICC profile name on the Converted From and Converted To menus. See “Image editing options at upload” on page 305. As well as using the default ICC profiles, you can upload other ICC profiles to SPS and make them available for color space conversion. Switch to Detail view in the Browse Panel to investigate the profile class, color space type, and PCS type of an ICC profile. Uploading ICC profiles Upload ICC profiles with the same techniques you use to upload files. You can store ICC profiles in any SPS folder. See “Uploading your files” on page 83. Examining an ICC profile To examine an ICC profile, select it in the Browse Panel and display it in Detail view. Detail view provides this information about ICC profiles: Profile Class The ICC (International Color Consortium) defines each class to cover a type of application. For example, Input profiles apply to devices such as digital cameras and scanners, and Output profiles apply to printers. Color Space Type This number is the "input" color space of the profile, as defined by the ICC. The color space type defines the number of components of the color space and the interpretation of those components. For example, RGB is a color space with three components: red, green, and blue. The color space type does not define the particular color characteristics of the space (for example, the chromaticities of the primaries). PCS Type This PCS type is the "output" color space of the profile—its profile connection space. For example, a color profile can convert RGB to the PCS, which then converts it to CMYK. For an input, display, or output profile useful for tagging colors or images, the PCS type is either XYZ or Lab. Interpret this profile as the corresponding specific color space defined in the ICC specification. Last updated 10/9/2014 316 USING SCENE7 Support files XML files Web sites that use an XML-based system to manage images and image information can upload XML files to the Scene7 Publishing System. You can designate one of these files as the preprocessing rule set file for Image Serving. This file restructures the standard Image Serving protocol format to meet the business logic of your commerce server. On the Setup screen, you can specify an XML file to serve as the rule set definitions file path. This path setting is located under Catalog Management on the Image Server Publishing screen. See “Image Server” on page 55. Last updated 10/9/2014


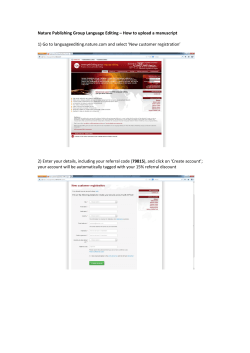


© Copyright 2026