
CradlePoint Vehicle Installation Guide – COR IBR1100 & IBR1150 Introduction
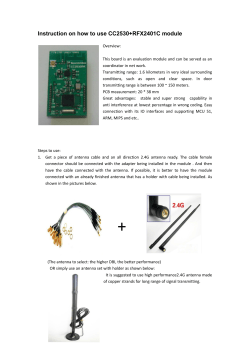
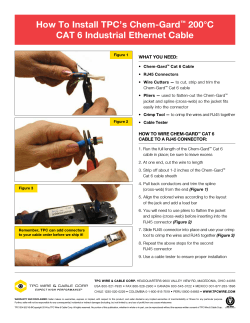
CradlePoint Vehicle Installation Guide – COR IBR1100 & IBR1150
Introduction
Power & GPIO
Installation
Ignition Sensing
Antennas
Vehicle Antenna Options
Mounting
Introduction
The CradlePoint COR IBR1100 Series is a compact, ruggedized 3G/4G/LTE networking solution designed for mission critical connectivity in the most challenging environments.
Ideal for in-vehicle networks including police cars, ambulances, and mass transit, this cloud-managed solution provides organizations the ability to scale deployments quickly
and manage their vehicle networks easily in real-time.
With an extensive list of safety and hardening certifications, the COR IBR1100 is engineered to protect against extreme temperatures, humidity, shocks, vibrations, dust, water
splash, reverse polarity and transient voltage.
Power & GPIO
The CradlePoint COR IBR1100/IBR1150 includes a two meter, 22 AWG direct wire power and GPIO cable (includes ESD-protected general input and output pins):
This diagram shows the connector pinout. This is the view into the router (or the rear view of the cable connector):
Pin
Definition
Details
Wire Color
1
Ground
–
Black
2
Power
9–36 V DC
Red
3
Input
3 V input high threshold (36 V tolerant)
Orange
4
Output
capable of sinking 250 mA
Blue
The wire colors shown are for the power/GPIO cable that is included with the COR IBR1100 and IBR1150 or available as an accessory. Other wiring setups may have different
colors.
If you need a power/GPIO cable that is longer than two meters, we recommend the following wire gauges (AWG):
22 gauge wire for up to 4 meters (~13 ft)
20 gauge wire for up to 6 meters (~20 ft)
18 gauge wire for up to 12 meters (~40 ft)
For additional power source options, see the adapters and cables accessories page.
Installation
The red wire (power) should connect to the positive (red) terminal of the battery, and the black wire (ground) should connect to the chassis. To enable ignition sensing
functionality, connect the orange wire (input) to the ignition, or accessory, switch. The power and ignition wires can be attached directly or through the fuse panel.
The red power wire requires an inline fuse at 2.0 or 2.5 A. Either use an extra slot in the fuse panel for this fuse, or splice an inline fuse directly into the wiring. Here is an
example of how to attach an inline fuse: http://youtu.be/RDOZT-dTITo.
Wire connections vary depending on the installation. Make sure your connectors are rated for the gauge of your wires (e.g., the included power/GPIO cable is 22 AWG). See
the sample crimp connectors below, and see this video example for how to attach a quick splice connector: http://youtu.be/zxt3LVpvjcw.
Ignition Sensing
Ignition sensing allows you to set the router to power on when the ignition key is turned to ACC/ON, and then power off after the ignition key is turned off with a designated
time delay. For example, set your router to remain on for an hour after the vehicle is turned off and then shut off. When the vehicle is turned on again, the router will also turn
back on.
Edit these settings on the GPIO Connector administration page. Go to the configuration pages for your device or group in CradlePoint Enterprise Cloud Manager or log into the
local device administration pages and go to System Settings → GPIO Connector.
In the Input Pin section, (this is synced to the orange wire in the included GPIO cable), set the Input Mode to Ignition Sensing. Then set the Timeout field to the
desired number of seconds: this is how long the router will remain on after the vehicle is turned off. (If the vehicle is turned back on before the timeout is reached, no action is
taken.)
Antennas
Antennas are NOT included in the product package because of the diverse needs of customers. Both the COR IBR1100 and COR IBR1150 have two connectors for 3G/4G
modem antennas (SMA) and one connector for GPS (SMA):
Addtionally, the COR IBR1100 has two connectors for dual-band dual-concurrent 2.4/5 GHz WiFi (RSMA):
See the CradlePoint antenna accessories page for recommended options for antennas. Also see the Antenna Ordering and Installation Guide, available as a PDF in the
Resources section of antenna and router product pages.
Vehicle Antenna Options
Antenna Type
Mounting
Recommended Antenna
Part Number
5-in-1 Screw-mount antenna (includes 3M cables)
Modem, WiFi, & GPS
Screw
two 3G/4G modem
two 2.4/5 GHz WiFi
one GPS-GLONASS
170654-000
3-in-1 Screw-mount antenna (includes 3M cables)
Modem & GPS
Screw
GPS
Magnet
GPS-GLONASS magnetic-mount antenna (includes 3M cable)
170652-000
GPS
Screw
GPS-GLONASS Screw-mount antenna (includes 3M cable)
170651-000
Mounting
two 3G/4G modem
one GPS-GLONASS
170653-000
The COR IBR1100/IBR1150 includes four integrated mounting holes for secure mounting. We recommend the following mounting screws:
For sheet metal installation, use #8 self-drilling screws.
For tapped holes, use M4 machine screws.


© Copyright 2026