
Accessibility Overview for OS X
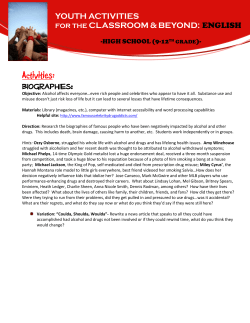
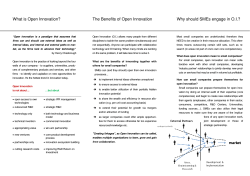
Accessibility Overview
for OS X
Contents
About OS X Accessibility 5
At a Glance 5
Why Make Your App Accessible? 6
Designing an Accessible OS X Application 6
The OS X Accessibility Model 6
Enhancing the Accessibility of Standard AppKit Controls 6
Implementing Accessibility for Custom Controls 7
Testing Accessibility 7
Accessibility Keyboard Shortcuts 7
How to Use This Document 7
See Also 7
Why Make Your App Accessible? 9
Increase Your User Base 9
Enter New Markets 9
Take Advantage of OS X Assistive Features 10
It’s Not Difficult 10
Designing an Accessible OS X App 11
Basic Design Requirements 11
Considering Specific Disabilities 12
Visual Disabilities 12
Hearing Disabilities 12
Motor and Cognitive Disabilities 13
The OS X Accessibility Model 14
The Accessibility Model 14
The Accessibility Hierarchy 15
An Example of Accessibility 17
Enhancing the Accessibility of Standard AppKit Controls 19
Enhancing the Default Behavior 20
Implementing Accessibility for Custom Controls 22
2014-10-16 | Copyright © 2004, 2014 Apple Inc. All Rights Reserved.
2
Contents
Adopting a Role-Specific Protocol 22
Customizing the Role 23
Notifying the Accessibility Client 24
Controls Without Views 24
Testing for Accessibility on OS X 26
Using Accessibility Inspector 26
Using Accessibility Verifier 29
Accessibility Keyboard Shortcuts 30
Document Revision History 33
2014-10-16 | Copyright © 2004, 2014 Apple Inc. All Rights Reserved.
3
Figures and Tables
The OS X Accessibility Model 14
Figure 3-1
Figure 3-2
Figure 3-3
Figure 3-4
Communication between your app and an accessibility client 14
The accessible element hierarchy 15
Complete inheritance hierarchy of a button in a window 16
Appropriate accessibility hierarchy of a button in a window 16
Testing for Accessibility on OS X 26
Figure 6-1
Figure 6-2
The Accessibility Inspector locked on the Spotlight icon in System Preferences. The AXPress
action for the element is selected and can be activated by clicking the Perform Action button.
27
The Accessibility Inspector locked on the System Preferences main window. The AXPosition
property for the element is selected and can be modified because it is writable (W). 28
Accessibility Keyboard Shortcuts 30
Table A-1
Table A-2
Key combinations used with screen zooming 30
Key combinations for moving focus in full keyboard access mode 31
2014-10-16 | Copyright © 2004, 2014 Apple Inc. All Rights Reserved.
4
About OS X Accessibility
Accessible apps help users with disabilities access information and information technology. It focuses on
enabling individuals and supporting their viewpoints and working styles.
Apple’s commitment to accessibility is rooted in the Macintosh’s legendary ease-of-use and is enhanced by
the Universal Access features in OS X. Beginning in OS X v. 10.2, Apple introduced the accessibility architecture,
which defines how an assistive technology, such as a screen reader or head-tracking mouse, communicates
with applications running in OS X.
With OS X v. 10.10, Apple introduced a new API with the following goals:
●
Replace the old, key-based API with a simpler, method-based API.
●
Provide protocols that guide developers through the process of creating accessible controls.
●
Bring the OS X accessibility API in line with the iOS accessibility API.
●
Provide backward compatibility, letting developers mix and match the new and old APIs.
For more information on the old, key-based API, see Accessibility Programming Guidelines for Mac .
At a Glance
The accessibility API provides accessibility clients, like VoiceOver, with information about your app. Standard
AppKit views and controls already adopt the accessibility API. These controls automatically provide a basic
description to any accessibility clients; however, you may want to add additional information to make the
controls more useful within the context of your app. If your app uses custom controls, those controls need to
adopt the appropriate accessibility protocols to ensure that they provide the required information to accessibility
clients.
2014-10-16 | Copyright © 2004, 2014 Apple Inc. All Rights Reserved.
5
About OS X Accessibility
At a Glance
Note: The new accessibility API is backward compatible with the old key-based API. This means, if
you have controls that are already accessible, you can continue to use them. You can even convert
a control to the new API in stages, implementing the new method-based API for some features,
leaving others in the old key-based API.
If there’s a conflict between the new and old APIs, the new method-based API takes precedence.
This is particularly important for frameworks that provides accessible controls. If you convert those
controls to the new API, then the system ignores any legacy code that modifies their attributes. For
this reason, if you create third-party libraries, you may want to wait to upgrade your library until
you’re sure that all your clients have updated their applications.
Why Make Your App Accessible?
Over the years, the emphasis on accessibility has changed. Accessibility has shifted from a bonus add-on to a
must-have feature for all high-quality apps. This section describes how adopting the accessibility API benefits
your users, and explains why all apps should be accessible.
Relevant Chapter: Why Make Your App Accessible? (page 9)
Designing an Accessible OS X Application
This chapter describes some issues you should consider when developing an accessible app.
Relevant Chapter: Designing an Accessible OS X App (page 11)
The OS X Accessibility Model
This chapter describes how accessibility clients communicate with your app. It also provides a high-level
overview of the accessibility API.
Relevant Chapter: The OS X Accessibility Model (page 14)
Enhancing the Accessibility of Standard AppKit Controls
If your application uses standard AppKit controls and views, accessibility is already built in. Much of the work
has been done for you. Still, you might need to customize the default information returned by the controls to
provide better descriptions or additional context for the user.
2014-10-16 | Copyright © 2004, 2014 Apple Inc. All Rights Reserved.
6
About OS X Accessibility
How to Use This Document
Relevant Chapter: Enhancing the Accessibility of Standard AppKit Controls (page 19)
Implementing Accessibility for Custom Controls
Custom views and controls need to adopt the proper accessibility protocols. These protocols then guide you
through the process of implementing the required properties and methods. By using the correct protocols,
you ensure that your control can communicate effectively with accessibility clients.
Relevant Chapter: Implementing Accessibility for Custom Controls (page 22)
Testing Accessibility
Implementing an accessible user interface is only half the battle. You must also test the interface to make sure
that users can operate it effectively. This chapter covers some of the tools and techniques for testing an
accessible UI.
Relevant Chapter: Testing for Accessibility on OS X (page 26)
Accessibility Keyboard Shortcuts
This chapter describes all the accessibility shortcuts provided by OS X.
Relevant Chapter: Accessibility Keyboard Shortcuts (page 30)
How to Use This Document
This document provides an introduction to the new OS X accessibility architecture. Because all apps should
be accessible, all Cocoa application developers should read this document. Additionally, if you’re developing
an accessibility client—for example, a screen reader or an assistive input device—this document provides a
solid background on the information and actions that you can access from an accessible app.
See Also
●
Accessibility Programming Guidelines for Mac provides a detailed description of the old, key-based API.
This is a valuable reference when mixing the new and old APIs.
2014-10-16 | Copyright © 2004, 2014 Apple Inc. All Rights Reserved.
7
About OS X Accessibility
See Also
●
NSAccessibility Informal Protocol Reference provides the complete list of properties and action methods
used by the OS X accessibility API.
●
OS X Human Interface Guidelines accessibility clients expect your user interface to follow the guidelines
specified in the HIG. It is considerably easier to accessibility-enable your app when you follow these
guidelines.
2014-10-16 | Copyright © 2004, 2014 Apple Inc. All Rights Reserved.
8
Why Make Your App Accessible?
Accessibility encompasses more than just providing an alternative to a mouse-driven user interface. At its core,
it’s about enabling individuals and supporting their viewpoints and working styles. This chapter presents
several compelling reasons why you should access-enable every app you develop.
Increase Your User Base
Millions of people have a disability or special need. These include visual and hearing impairments, physical
disabilities, and cognitive and learning challenges. Access to computers is vitally important for these populations,
because computers can provide a level of independence that is difficult to attain any other way.
Additionally, as populations around the world age, an increasing number of people experience age-related
disabilities, such as vision or hearing loss. Unlike earlier generations, members of the currently aging population
are more accustomed to using computers in their daily lives. They are more likely to store a large portion of
their meaningful data in digital form and to embrace digital communication. Current and future generations
of the elderly expect to be able to continue using their computers and accessing their data, regardless of the
state of their vision and hearing. Apps that support customizable text displays, access by a screen reader, or
the replacement of visual cues by audible ones can serve this population well.
Even people who don’t necessarily identify themselves as disabled can benefit from alternate ways of interacting
with apps. Think of a person suffering from carpal tunnel syndrome (a painful condition caused by the
compression of a nerve in the wrist) who prefers an app that provides keyboard alternatives to its mouse-driven
user interface. By providing alternate ways to use your app, you allow users to choose their own ways to work
and express themselves, which ultimately broadens your user base.
Enter New Markets
Federal regulations like section 508 of the Rehabilitation Act of 1973 in the United States stipulate that computers
used in government or educational settings must provide reasonable access for people with disabilities. As
this regulation and others like it take effect, entrance into these markets is dependent upon your ability to
supply accessible apps.
2014-10-16 | Copyright © 2004, 2014 Apple Inc. All Rights Reserved.
9
Why Make Your App Accessible?
Take Advantage of OS X Assistive Features
Like the localization issue a few years ago, accessibility has evolved from a good idea to an essential component
of competitive apps. Apple is committed to providing the best platform from which to enter these markets.
By access enabling your app and deploying it on OS X, you make your app more attractive to these markets.
Take Advantage of OS X Assistive Features
OS X is designed to accommodate assistive technologies and has many built-in features to help people with
disabilities. Users access most of this functionality through the Universal Access pane of System Preferences.
Some of these built-in technologies take advantage of the same accessibility architecture that allows external
assistive technologies to access your app.
For example, VoiceOver, the built-in spoken interface introduced in OS X version 10.4, relies on the accessibility
architecture to make the navigation and use of the system accessible to users with visual disabilities. As soon
as you access-enable your app, VoiceOver helps a visually impaired user interact with it.
It’s Not Difficult
AppKit integrates accessibility into its API. This means that most of accessibility comes for free when you
develop apps for OS X. This lets you focus on providing your app-specific information to assistive technologies,
which enhances the user’s experience and highlights your app’s unique features.
If you have an established app, you’ll find that the OS X accessibility architecture is designed to allow you to
access-enable your app in a selective way. This allows you to enjoy the benefits of accessibility without having
to redesign your app.
2014-10-16 | Copyright © 2004, 2014 Apple Inc. All Rights Reserved.
10
Designing an Accessible OS X App
Designing your app with accessibility in mind not only allows you to reach a larger group of users, it results in
a better experience for all your users. You’ve already made the design decision to develop an app that runs in
OS X. Now, make sure you can deliver the Macintosh experience to all your users.
Basic Design Requirements
As a first step in the design process, you should familiarize yourself with the information in OS X Human Interface
Guidelines . That document presents the best practices of app design that help you create a first-rate app for
OS X. In addition, Apple Human Interface Guidelines provides detailed specifications for designing and
implementing an intuitive, consistent, and aesthetically pleasing user interface that delivers the superlative
experience Macintosh users have come to expect.
During the design process, you also should be aware of the accessibility perspective on many basic design
considerations. This section describes how you can support accessibility in your most fundamental design
decisions. As with most accessibility design considerations, incorporating them with your design results in a
better user experience for all users.
The design principles described here are especially important to consider when developing an accessible app:
●
Support full keyboard navigation. For many users, a mouse is difficult, if not impossible, to use.
Consequently, a user should be able to perform all your app’s functions using the keyboard alone.
Taking this consideration into account makes access enabling your app an even easier task.
●
Don’t override built-in keyboard shortcuts. This applies both to the keyboard shortcuts OS X reserves
(listed in the OS X Human Interface Guidelines appendix “Keyboard Shortcuts Quick Reference”) and to
the accessibility-related keyboard shortcuts (listed in Accessibility Keyboard Shortcuts (page 30)). As a
general rule, you should never override reserved keyboard shortcuts. In particular, if you override
accessibility-related keyboard shortcuts, your app is not accessible to users who enable full keyboard
access.
A corollary to this principle is to avoid creating too many new keyboard shortcuts that are specific to your
app. Users should not have to memorize a new set of keyboard commands for each app they use.
●
Provide alternatives for drag-and-drop operations. If your app relies on drag-and-drop operations in its
workflow, you should provide alternate ways to accomplish the same tasks. This may not be easy; in fact,
it may require the design of an alternate interface for apps that are heavily dependent on drag and drop.
2014-10-16 | Copyright © 2004, 2014 Apple Inc. All Rights Reserved.
11
Designing an Accessible OS X App
Considering Specific Disabilities
For example, the original OS X Finder app was designed to provide a simple drag-and-drop interface to
the file system. In keeping with its accessibility goals, however, the Finder adds keyboard support that
allows users to copy and move files using keyboard commands instead of the mouse.
●
Make sure there’s always a way out of your app’s workflow. This is important for all users, of course,
but it’s essential for users of assistive technologies. A user relying on an assistive app to use your app may
have a somewhat narrower view of your app’s user interface. For this reason, it’s especially important to
make canceling operations and retracing steps easy.
Considering Specific Disabilities
Following the guidelines in Basic Design Requirements (page 11) help you design an easy-to-use app that is
easy to access-enable. There may be specific information about particular disabilities you don’t know, however,
and this information is useful to keep in mind during the design process.
The following sections describe some broad categories of disabilities and offer suggestions for specific design
solutions and adaptations you can make. The main theme of these suggestions is to provide as many alternate
modes of content display as possible. The more ways your app presents information, the easier it is for your
users to find an approach that fits their needs.
Visual Disabilities
Visual disabilities include blindness, color blindness, and low vision. In addition to making your app accessible
to assistive apps, such as screen readers, you should also consider the following:
●
Although color can greatly enhance a user interface, make sure it is not the only source of information. A
color blind user may not be able to distinguish between two objects that differ only in color.
●
Provide an audio option to all visual cues and feedback. Your app should make it easy to replace visual
communication with audio communication.
●
Provide an option to present images and animated content in an alternate manner. If your app displays
an image or animation, consider providing your own succinct descriptions of these elements so blind or
low-vision users can benefit from the information they convey.
Hearing Disabilities
People with hearing disabilities may have difficulty distinguishing your app’s sound effects from ambient noise
or may not be able to hear them at all. Users without hearing disabilities may find themselves in circumstances
in which audio output from an app is inappropriate (in a library, for example). Be sure to consider these points
as you design the audio output of your app.
2014-10-16 | Copyright © 2004, 2014 Apple Inc. All Rights Reserved.
12
Designing an Accessible OS X App
Considering Specific Disabilities
Your app should not override the audio-output settings the user selects in System Preferences. In addition,
you should provide a visual option to all audio cues and feedback. Your app should make it easy to replace
audio communication with visual communication. For example, a “beep” can be replaced or accompanied by
a flash of the display screen.
Motor and Cognitive Disabilities
People with motor disabilities may need to use alternatives to the standard mouse and keyboard input devices.
Other users may have difficulty with the fine motor control required to double-click a mouse or to press key
combinations on the keyboard. Users with cognitive or learning disabilities may need extra time to complete
tasks or respond to alerts.
For the most part, support for motor disabilities is provided at the hardware or operating system level. OS X
provides many such solutions in the Universal Access preferences. The Sticky Keys feature, for example, allows
a user to type the keys in a key combination sequentially, instead of simultaneously. As an app developer,
therefore, the most important thing you can do is to access-enable your app so your users can deploy the
assistive technologies of their choice.
A feature such as Sticky Keys can also be helpful to a user with a cognitive or learning disability that makes it
difficult to perform simultaneous tasks. An app that provides its output in both visual and auditory modes
(especially simultaneously) can enhance comprehension. Users with such disabilities also benefit from the
redundancy provided by an app that employs both audio and visual output.
In addition to making your app accessible, you should consider incorporating the following features:
●
Provide options to adjust the length of expected response times. Users who have difficulty quickly
responding to app events benefit from having extra time to respond. When a timed response is
required—such as notification that a regularly scheduled action is about to take place—you should provide
at least one response method that does not require users to respond within the timed interval. Alternatively,
you should provide at least one method that allows users to adjust the response time to at least five times
the default setting.
●
Avoid using regularly blinking cursors or other objects on screen. The frequency of a blinking object must
not be in the range of 2 hertz to 55 hertz, inclusive. Objects that blink in this frequency range can cause
medical complications, such as seizures, in some people.
2014-10-16 | Copyright © 2004, 2014 Apple Inc. All Rights Reserved.
13
The OS X Accessibility Model
The Accessibility Model
Accessibility clients helps a user interact with the applications on the user’s computer. To do this, an accessibility
client must be able to access everything in the application’s user interface and perform all the application’s
functions. To be accessible, therefore, an application must provide information about its user interface and
capabilities in a standard manner that any accessibility client or technology can understand.
Access-enabling your app is the process of adding the necessary interface to allow accessibility clients to
effectively communicate with and control your app. There are three different ways that apps and accessibility
clients interact (see Figure 3-1).
●
Informational Properties. The NSAccessibility protocol defines a number of properties that provide
information about your control. If you are working with a subclass of a standard AppKit control or view,
you can either set the desired property, or override its getters and setters. By default, just overriding the
getter tells the accessibility client that it has read-only access to the property. Overriding the setter tells
the accessibility client that it also has write access to the property.
●
Action Methods. The NSAccessibility protocol also defines a number of methods that simulate button
presses, mouse clicks and selections in your controls. By implementing these methods, you give accessibility
clients the ability to drive your controls.
●
Notifications. Your control may need to let the accessibility client know that changes have occurred.
Constants of NSAccessibility Informal Protocol Reference defines a number of notifications that you can
send using the NSAccessibilityPostNotification method. These notifications are not included in
the role-specific protocols; however, standard AppKit controls already send appropriate messages for their
standard usage patterns. You typically need to send your own notifications only when you are creating a
custom control or when you are using a standard control in a non-standard way.
Figure 3-1
Communication between your app and an accessibility client
2014-10-16 | Copyright © 2004, 2014 Apple Inc. All Rights Reserved.
14
The OS X Accessibility Model
The Accessibility Hierarchy
While this sounds like a lot of work, it is actually quite easy. If you are using standard AppKit controls, much of
the work has been done for you. Typically, access-enabling these controls is a matter of fine-tuning the default
values stored in the information properties. For more information on using Standard AppKit Controls, see
Enhancing the Accessibility of Standard AppKit Controls (page 19) Controls.
If you are using custom controls, you need to add the informational properties, action methods and notifications
for your control. Fortunately, the accessibility API includes a wide range of role-specific protocols that guide
you through the steps necessary to access-enable your control. For more information on creating custom
controls, seeImplementing Accessibility for Custom Controls (page 22).
The Accessibility Hierarchy
The OS X accessibility model represents an application’s user interface as a hierarchy of accessible elements.
For the most part, the hierarchy is defined by parent-child relationships. For example, an application’s dialog
window might contain several buttons. The accessible element representing the dialog contains a list of child
accessible elements, each representing a button in the dialog. In turn, each button knows that its parent is the
accessible element representing the dialog.
Of course, the accessible elements representing the menu bar and windows in an application are children of
the application-level accessible element. Even the application-level accessible element has a parent, which is
the system-wide accessible element. An application never needs to worry about its system-wide parent because
it is out of the application’s scope. However, an assistive application might query the system-wide accessible
element to find out which running application has keyboard focus.
Figure 3-2 (page 15) shows the hierarchy of accessible elements in a simple application.
Figure 3-2
The accessible element hierarchy
2014-10-16 | Copyright © 2004, 2014 Apple Inc. All Rights Reserved.
15
The OS X Accessibility Model
The Accessibility Hierarchy
A strength of the accessible element hierarchy is that it can leave out implementation-specific details that are
irrelevant to an assistive application and, by extension, to the user. For example, in Cocoa, a button in a window
is usually implemented as a button cell within a button control, which is in a content view within a window.
A user has no interest in this detailed containment hierarchy; she only needs to know that there’s a button in
a window. If the application’s accessibility hierarchy contains an accessible element for each of these intermediate
objects, however, an assistive application has no choice but to present them to the user. This results in a poor
user experience because the user is forced to take several steps to get from the window to the button. Figure
3-3 shows how such an inheritance hierarchy might look.
Figure 3-3
Complete inheritance hierarchy of a button in a window
To exclude this unnecessary information, the accessibility API lets you specify that an object should be ignored.
When you set an accessible element’s accessibilityElement property to NO, the accessibility clients ignore
it. NSView sets this property to NO by default, because users typically aren’t interested in the view, they only
want to know about the view’s contents.
The ability to hide elements lets an application present only the significant parts of the user interface to an
accessibility client. Figure 3-4 (page 16) shows how the same hierarchy shown in Figure 3-3 (page 16) might
be presented to an assistive application.
Figure 3-4
Appropriate accessibility hierarchy of a button in a window
2014-10-16 | Copyright © 2004, 2014 Apple Inc. All Rights Reserved.
16
The OS X Accessibility Model
An Example of Accessibility
An accessibility clients also helps a user perform tasks by telling the accessible elements to perform actions.
For the most part, actions correspond to things a user can do with a single mouse click. Each accessible element
implements action methods that correspond to the actions it supports, if any. For example, the accessible
element representing a button supports the press action. When a user wants to press a button, he communicates
this to the accessibility client. The client then determines whether the button’s accessible element implements
the accessibilityPerformPress method. If it does, the accessibility client calls this method.
The OS X accessibility protocol defines only a handful of actions that accessible elements can support. At first,
this might seem restrictive, because applications can perform huge numbers of tasks. It’s essential to remember,
however, that an assistive application helps a user drive an application’s user interface, it does not simulate
the application’s functions. Therefore, an assistive application has no interest in how your application responds
to a button press, for example. Its job is to tell the user that the button exists and to tell the application when
the user presses the button. It’s up to your application to respond appropriately to that button press, just as
it would if a user clicked on the button with the mouse.
An Example of Accessibility
This example gives a detailed description of how a fictitious screen reader with speech recognition and speech
synthesis capability might communicate with your application:
1.
The user says, “Open Preferences window.”
2.
The screen reader sends a message to the application accessible element, asking for a reference to the
menu bar accessible element. It then queries the menu bar for a list of its children, and queries each child
for its title. As soon as it finds the one whose title matches application’s name (that is, the application
menu). A second iteration lets it find the Preferences menu item within the application menu. Finally, the
screen reader tells the Preferences menu item to perform the press action.
3.
The application opens the Preferences window and then the window sends a notification broadcasting
that a new window is now visible and active.
4.
The screen reader queries the window for its list of children.
5.
For each child, the screen reader queries the child’s label, role, role description and children.
6.
Among the responses, the screen reader learns that the pane contains several children (for example, three
buttons).
7.
The screen reader queries each button, asking for the following:
●
label (defaults to the button’s title)
●
role (button in this case)
●
role description (“button”)
●
value (none in this case)
2014-10-16 | Copyright © 2004, 2014 Apple Inc. All Rights Reserved.
17
The OS X Accessibility Model
An Example of Accessibility
●
children (none in this case)
8.
After the screen reader, has determined which objects are available, it reports this information to the user
using speech synthesis.
9.
The user might then ask for more information about one of the buttons.
10. The screen reader queries the specified button for its help text. It reports this string to the user using
speech synthesis.
11. The user then tells the screen reader to activate the button.
12. The screen reader sends a press message to the button.
13. The application broadcasts any notifications triggered due to the changes made by the button press.
2014-10-16 | Copyright © 2004, 2014 Apple Inc. All Rights Reserved.
18
Enhancing the Accessibility of Standard AppKit
Controls
When it comes to accessibility, AppKit does a lot of the heavy lifting for you. AppKit views and controls adopt
the NSAccessibility protocol. This provides appropriate default values and implementations for all the
information properties and action methods. The AppKit elements also send the appropriate notifications, based
on their expected usage.
The system also attempts to fill in many of the information properties with meaningful default values. For
example, an NSButton object’s accessibilityLabel property automatically defaults to the button’s title.
This means, in many cases, standard AppKit controls do not require any additional work on your part. They are
accessibility-enabled straight out of the box.
However, while the AppKit’s default properties are complete, they are not always as useful as we would like.
In some cases, you may need to modify these default values to better represent your app, to provide additional
context, or to modify the user’s flow through the app. Typically we do this by modifying the information
properties.
You can modify these properties in three ways:
●
Using Interface Builder. When using Interface Builder, the Accessibility Identity settings in the Identity
inspector let you modify some of the information properties. Specifically, the Description field lets you set
the element’s accessibilityLabel property while the Help field let’s you set its accessibilityHelp
property.
●
Assigning Programatically. You can assign a new value to any of the properties in code.
●
Overriding Accessor Methods. If you subclass the AppKit element, you can override the accessor methods
for its information properties. This can be more efficient when working with dynamic controls. Here, you
simply return the current state upon request—rather than trying to update the property in response to
changes.
2014-10-16 | Copyright © 2004, 2014 Apple Inc. All Rights Reserved.
19
Enhancing the Accessibility of Standard AppKit Controls
Enhancing the Default Behavior
Note: Accessible elements (anything that inherits from a standard AppKit element or the
NSAccessibilityElement class) can freely implement any of the information properties or action
methods listed in the NSAccessibility protocol. You do not need to adopt the NSAccessibility
protocol. The accessibility clients can find and use any action methods or information properties
that are available.
Enhancing the Default Behavior
When modifying a control’s default accessibility behaviors, start by focusing on the following:
●
Follow the HIG. Make sure your user interface follows the guidelines listed in the OS X Human Interface
Guidelines . Accessibility clients expect your app to behave in certain ways. It is considerably easier to
accessibility-enable your app when you follow the guidelines in the HIG.
●
Assign a useful label. Every element that the user can interact with must have a meaningful value set for
its accessibilityLabel property. Ideally, this label is a single word that briefly describes the control.
Add, Play, Delete, Search, Favorites, and Volume all make ideal labels.
Do not include the type of control in the label. For example, use Add not Add Button. The control’s
accessibilityRoleDescription property already captures the control type.
Also, to ensure that VocieOver reads the label with the correct inflection, the label should start with a
capital letter. Do not put a period at the end. Finally, always localize your control’s label.
●
Modify the role description, if necessary. Accessibility clients use the accessibilityRoleDescription
property when describing the control. Most of the time, the default value for the role description works
perfectly well; however, you might find a few cases where you can make the control’s intent clearer by
replacing the default role description. This is particularly true when you are using a standard control in a
non-standard manner.
●
Use help text to describe the effect. Accessibility clients use the accessibilityHelp property to
describe the results of performing an action. Essentially, the help text acts like a tool tip.
Use help text only when the results are not obvious from the control’s label. Just like the label, strive to
make the help text as short as possible. Start with a capital letter. Begin with a verb and omit the subject.
For example, use “Plays the song” not “This button plays the song.” Also, do not include a description of
the action, gesture, view or control. Finally, always localize your help text.
●
Define links and groups to provide context. Visual users often know that sets of controls go together
due to their proximity on screen. However, you must explicitly define these relationships before accessibility
clients can use them as well. For example, a view could adopt the NSAccessibilityGroup protocol,
indicating that its contents should be treated as a group of controls. Similarly, you can use the
2014-10-16 | Copyright © 2004, 2014 Apple Inc. All Rights Reserved.
20
Enhancing the Accessibility of Standard AppKit Controls
Enhancing the Default Behavior
accessibilityLinkedUIElements property to define the relationship between a list item and the
contents displayed in different pane or window. You can also use the accessibilityTitleUIElement
to specify the static text element that acts as this control’s label.
●
Focus users on the important parts of the interface. Use the accessibilityElement property to focus
the users on the important parts of the interface. If this property is set to NO, accessibility clients ignore
this element, skipping directly to its children (if any). By default, NSView and its subclasses set this value
to NO. Users are not typically interested in the views. They want to access the things inside the views.
However, if your NSView subclass adopts one of the role-specific accessibility protocols, the system
automatically changes the accessibilityElement property’s value to YES.
It’s often useful to observe how VoiceOver treats these properties. For example, when you select a control,
VoiceOver reads the label and the role description. If you pause with a UI element selected, VoiceOver provides
additional guidance and then reads the help text (if any).
2014-10-16 | Copyright © 2004, 2014 Apple Inc. All Rights Reserved.
21
Implementing Accessibility for Custom Controls
At it’s most basic, implementing accessibility for custom controls is as simple as adopting a protocol and then
implementing any missing methods. The real challenge comes when you want to modify the control’s behavior
beyond what is provided by the protocol, or when you are working with specialized controls—for example,
controls that are not backed by a view.
Adopting a Role-Specific Protocol
The first step in implementing accessibility is to identify the role-specific protocol that best matches your
control’s intended behavior. For example, if your control is something that triggers actions when the user clicks
on it, it should probably adopt the NSAccessibilityButton protocol.
The accessibility API provides 18 role-specific protocols. These protocols represent the most common control
types found in apps. For more information about a particular protocol, see that protocol’s reference
documentation.
●
NSAccessibilityButton
●
NSAccessibilityCheckBox
●
NSAccessibilityRadioButton
●
NSAccessibilitySwitch
●
NSAccessibilityStaticText
●
NSAccessibilityNavigableStaticText
●
NSAccessibilityImage
●
NSAccessibilityProgressIndicator
●
NSAccessibilitySlider
●
NSAccessibilityStepper
●
NSAccessibilityTable
●
NSAccessibilityOutline
●
NSAccessibilityList
●
NSAccessibilityRow
2014-10-16 | Copyright © 2004, 2014 Apple Inc. All Rights Reserved.
22
Implementing Accessibility for Custom Controls
Customizing the Role
●
NSAccessibilityLayoutArea
●
NSAccessibilityLayoutItem
●
NSAccessibilityGroup
●
NSAccessibilityContainsTransientUI
After you have selected an appropriate protocol, adopt that protocol. Xcode then warn you about any missing
methods. Simply implement these methods, and your control is ready to use.
Note: Unlike normal protocols, when you adopt one of the role-specific protocols, Xcode may ask
you to reimplement methods that have already been implemented by one of your ancestors.
In order to ensure that your control returns accurate and useful information, some methods are
tagged with the NS_PROTOCOL_REQUIRES_EXPLICIT_IMPLEMENTATION attribute. For these
methods, you need to override your superclass’s implementation with your own.
To see which methods require explicit implementations, see the specific protocols reference document.
The methods in these protocols represent the minimum required to act according to the specified role. If your
control’s intended use closely matches the role, this may be all you need. However, you can further customize
your control’s behavior both by implementing additional accessibility methods and properties, and by sending
notifications to the accessibility client.
Customizing the Role
The NSAccessibility protocol declares all the information properties and action methods used by the
accessibility API. Your control can freely adopt any of these methods or properties. You don’t need to adopt
the NSAccessibility protocol—in fact, you generally shouldn’t adopt this protocol. Accessibility clients
automatically detect and use any of these methods as soon as they are available.
In particular, the role-specific protocols often require an information property’s getter method, but not its
setter method. If you just implement the getter method, accessibility clients are granted read-only access to
the data. If you implement both the getter and the setter, accessibility clients are granted read-write access.
This allows users to modify the property’s value using an accessibility client.
2014-10-16 | Copyright © 2004, 2014 Apple Inc. All Rights Reserved.
23
Implementing Accessibility for Custom Controls
Notifying the Accessibility Client
Note: You can fine tune the accessibility client’s access rights by overriding your control’s
isAccessibilitySelectorAllowed: method. Return YES if the accessibility client is allowed
to call the specified selector; otherwise, NO.
For controls that store values, you often want to implement both the accessibilityValue and the
setAccessibilityValue: accessor methods. Implementing setAccessibilityValue: lets users modify
the control’s value through an accessibility client.
Additionally, if your control doesn’t quite fit any of the roles, pick the role that most-closely represents your
control’s intended use, and then add other information properties and action methods needed to flesh out its
desired abilities and behaviors.
Notifying the Accessibility Client
After you adopt a role-specific protocol, Xcode’s compiler warnings lead you through the process of
implementing the required information properties and action methods. However, it does not help with
notifications. Controls often need to alert the accessibility clients to changes. For example, if your control’s
value changes, you need to send a NSAccessibilityValueChangedNotification notification.
These notifications do not use the standard NSNotification system. Instead, these notifications are sent to
the accessibility client’s process using the accessibility API. For more information, see AXUIElement.h Reference .
To send these notification, use the NSAccessibilityPostNotification method. For the complete list of
notifications, see the constant declarations in NSAccessibility Informal Protocol Reference . In particular, look
through the Element notifications in NSAccessibility Informal Protocol Reference and Miscellaneous notifications
in NSAccessibility Informal Protocol Reference . Make sure you are posting these notifications as appropriate.
Controls Without Views
The previous discussion assumes that your control inherits from NSView or one of the standard AppKit controls.
In some cases, however, your controls may simply be visual elements that are drawn and managed by their
containing view. If you want to make accessibility clients aware of—and able to interact with—these controls,
you must create a custom NSAccessibilityElement subclass to represent them.
To work properly, you must do the following:
2014-10-16 | Copyright © 2004, 2014 Apple Inc. All Rights Reserved.
24
Implementing Accessibility for Custom Controls
Controls Without Views
●
Instantiate your NSAccessibilityElement subclass using either the
accessibilityElementWithRole:frame:label:parent: convenience method, or set your element’s
accessibilityRole, accessibilityLabel and accessibilityParent properties.
●
Either add the NSAccessibilityElement subclass to its parent’s accessibilityChildren array, or
call the parent’s accessibilityAddChildElement: convenience method.
●
Set your NSAccessibilityElement subclass’s accessibilityFrameInParentSpace property. Unlike
accessibilityFrame, this property ensures that your control moves with its superview.
●
Adopt a role-specific protocol, customize the role, and post notifications just like any other accessible
control.
2014-10-16 | Copyright © 2004, 2014 Apple Inc. All Rights Reserved.
25
Testing for Accessibility on OS X
Whether you’re designing a new application or access-enabling an existing one, you should plan to test the
accessibility of your product. Testing for accessibility is a bit different than standard user-interface testing, and
Apple provides a couple of tools that make the process easier. After you’ve discovered accessibility bugs with
VoiceOver, inspect your app with these tools to resolve the problems.
Application developers should read this chapter to find out how to exercise the accessibility of their applications.
Using Accessibility Inspector
Apple provides the Accessibility Inspector testing tool that can be launched by selecting Xcode > Open
Developer Tool > Accessibility Inspector in the menu bar or Dock. You can download Xcode from
the Mac App Store for free. Accessibility Inspector presents a utility window that displays the information
properties (and values), action methods, and position in the accessibility hierarchy of the object currently under
the mouse pointer.
If you’re beginning to access-enable your application for assistive technologies like VoiceOver, try using
Accessibility Inspector to view the accessibility information other applications provide. Although Accessibility
Inspector is not an assistive application, it uses the same APIs assistive applications use to get information from
the accessibility objects it encounters.
To use Accessibility Inspector, first ensure that “Enable access for assistive devices" is enabled in the Accessibility
pane of System Preferences. Launch the Accessibility Inspector and move your mouse over the UI element you
wish to inspect. If you're using VoiceOver to navigate, you can move the mouse to the VoiceOver cursor by
pressing Command-Option-Control-F5. You can lock the Accessibility Inspector on the item under the mouse
to examine its attributes, perform its actions, and access its parent and children (if any), by pressing Command-F7.
When you do this, the Accessibility Inspector display pauses, allowing you to move the mouse without changing
the object on which the tool is focused. In the main utility window, you can go to the object’s parent, children,
or other related objects, such as the containing window or the top-level AXApplication. You can also perform
2014-10-16 | Copyright © 2004, 2014 Apple Inc. All Rights Reserved.
26
Testing for Accessibility on OS X
Using Accessibility Inspector
the actions supported by the accessibility object, allowing you to see how this affects the values of various
attributes and the application itself. If you click the rectangular button in the bottom right corner of the
Accessibility Inspector panel, you'll see light blue overlay over the locked UI element.
Figure 6-1
The Accessibility Inspector locked on the Spotlight icon in System Preferences. The AXPress action for
the element is selected and can be activated by clicking the Perform Action button.
Accessibility Inspector also includes the ability to navigate the Accessibility tree hierarchy using visible buttons
or keyboard commands. While holding the Control and Command keys, use the arrow keys to navigate. The
Up and Down Arrows navigate to parents or children, while the Left and Right Arrows navigate to siblings of
the current element.
2014-10-16 | Copyright © 2004, 2014 Apple Inc. All Rights Reserved.
27
Testing for Accessibility on OS X
Using Accessibility Inspector
You can use Accessibility Inspector to modify any properties that are marked as writable, as denoted by a W
in parentheses. For example, navigate up to the AXWindow, and select its AXPosition property. Change the
values of the X and Y text fields and click the Set Value button. The window changes its position on the screen.
You can also perform certain actions such as AXPress and AXShowMenu by selecting the action and clicking
the Perform Action button.
Figure 6-2
The Accessibility Inspector locked on the System Preferences main window. The AXPosition property
for the element is selected and can be modified because it is writable (W).
As you access-enable your application, use Accessibility Inspector to make sure your objects contain the
appropriate information. If you find that a specific object is not accessible, you can focus Accessibility Inspector
on that object and examine its information property values and trigger its action methods to find the problem.
2014-10-16 | Copyright © 2004, 2014 Apple Inc. All Rights Reserved.
28
Testing for Accessibility on OS X
Using Accessibility Verifier
Using Accessibility Verifier
Apple provides the Accessibility Verifier tool that can be launched by selecting Accessibility Inspector
> Window > Accessibility Verifier. Accessibility Verifier displays the accessibility hierarchy comprising
all currently instantiated objects in the selected application. To use Accessibility Verifier, be sure to enable
assistive applications in the Accessibility pane of System Preferences.
Use Accessibility Verifier to perform any or all of the following tests (select the tests you want to run by clicking
the Choose Tests... button):
●
Parent/Child. This test checks the integrity of the accessibility hierarchy by making sure each parent-child
pair forms a closed loop. For example, if a child listed in a parent object’s accessibilityChildren
property does not refer to that object as its parent, this parent-child pair is invalid. Invalid parent-child
pairs can prevent an assistive application from correctly traversing an application’s accessibility hierarchy.
●
Window. This test checks that all objects contained in a window contain a reference to that window in
their accessibilityWindow property. An object contained in a window is not necessarily the child of
that window, but it should refer to its containing window as a convenience for assistive applications.
●
Missing AXDescription. This test checks the element’s accessibilityLabel property. All accessible
elements must provide some context-specific, descriptive label.
●
Role Verification. This test verifies that an accessibility object implements all the properties and methods
required for its role.
When you click Verify, Accessibility Verifier runs the tests you selected and displays the results for each. The
problems are reported as warnings or errors, depending on their severity (you can filter the results by selecting
a severity level in the Report Level pop-up menu).
It’s important to note that eliminating all errors and warnings Accessibility Verifier displays does not guarantee
a perfectly accessible application. You should always test your application with various assistive technologies
like VoiceOver to make sure there are no problems.
2014-10-16 | Copyright © 2004, 2014 Apple Inc. All Rights Reserved.
29
Accessibility Keyboard Shortcuts
This appendix lists keyboard shortcuts that are reserved for use with various Universal Access features in OS
X.
To turn VoiceOver on or off, use Command-F5.
Table A-1 lists the keyboard shortcuts that are reserved for use with screen zooming in OS X. A user turns on
the zoom feature in the Seeing pane of Universal Access preferences.
Table A-1
Key combinations used with screen zooming
Key combination
Action
Option-Command-8
Turns screen zooming on or off
Option-Command-=
Zooms in
Option-Command-- (hyphen)
Zooms out
Command-Option-Control-8
Inverts the screen colors
Command-Option-Control-,
Reduces contrast
Command-Option-Control-.
Increases contrast
OS X provides the option of full keyboard access mode, in which users can navigate through windows, dialogs,
menus, toolbars, and the Dock using the keyboard alone, without a mouse or other pointing device.
Users can turn on full keyboard access in the Keyboard Shortcuts pane of Keyboard & Mouse preferences.
Control-F1 is a reserved keyboard shortcut for turning full keyboard access on or off. Control-F7 toggles between
keyboard access for all controls in windows and dialogs and the default state, in which only text fields and
scrolling lists are accessed with the keyboard. Don’t use these combinations for any other purpose.
With keyboard access turned on in windows and dialogs, the arrow keys move between values within a control.
For example, if the user selects a slider with the Tab key, the arrow keys move the slider control along the slider
track. For vertically oriented choices, such as menu items, the Up Arrow and Down Arrow keys move the
selection. For horizontally oriented choices, such as a row of tabs, the Right Arrow and Left Arrow keys move
the selection. In some cases, it makes sense to support both orientations. For example, a vertical slider could
use both the Up Arrow and the Right Arrow to increase the value.
2014-10-16 | Copyright © 2004, 2014 Apple Inc. All Rights Reserved.
30
Accessibility Keyboard Shortcuts
In some cases, such as radio buttons, moving the focus to an item selects it as well. In other cases, such as push
buttons, the user activates a selected item by pressing the Space bar. In full keyboard access mode, pressing
the Space bar is equivalent to clicking the mouse button.
The Esc (Escape) key is used to cancel a dialog and to cancel a selection in a pop-up menu or list. In a Dock
menu, Esc dismisses the menu and moves focus to the frontmost window.
The user can also quickly place focus in the menu bar, the Dock, toolbars, and utility windows using key
combinations described in Table A-2.
This behavior is provided for all applications that use the standard controls. If you are implementing your own
controls, you need to provide these behaviors for your users.
Table A-2 lists the key combinations used in full keyboard access mode.
Table A-2
Key combinations for moving focus in full keyboard access mode
Key combination
Action
Control-F1
Turns full keyboard access on or off
Control-F2
Moves focus to the menu bar
Control-F3
Moves focus to the Dock
Control-F4
Moves focus to the active (or next) window
Shift-Control-F4
Moves focus to the previous window
Control-F5
Moves focus to the toolbar
Control-F6
Moves focus to the first (or next) utility window
Shift-Control-F6
Moves focus to the previous utility window
Control-F7
Toggles the keyboard access mode in windows and dialogs between
all controls and just text fields and scrolling lists
Control-Tab
Moves focus to the next grouping of controls in a dialog or the next
table (when Tab moves to next cell)
Shift-Control-Tab
Moves focus to the previous grouping of controls
Command-Tab
Moves focus to the first (or next) open application’s Dock icon
Command-Shift-Tab
Moves focus to the previous open application’s Dock icon
2014-10-16 | Copyright © 2004, 2014 Apple Inc. All Rights Reserved.
31
Accessibility Keyboard Shortcuts
Key combination
Action
Arrow key
Moves focus to the next or previous value in a text field or certain
controls, such as menus; also opens Dock menus
Control–arrow key
Moves focus to another value or cell within a control such as a table
Command-` (grave accent)
Activates the next open window in the frontmost application
Command-Shift-` (grave accent)
Activates the previous open window in the frontmost application
Command-Option-` (grave
accent)
Moves focus to the window drawer
Space bar
Selects the highlighted control (equivalent to clicking the mouse
button)
Return (Enter)
Selects the default button
Esc
Cancels a dialog or a selection in a pop-up menu or list; in a Dock
menu, Esc closes the menu and moves the focus to the frontmost
window
Note: Users can change the default combinations listed above in the Keyboard Shortcuts pane of
Keyboard & Mouse preferences or in the Keyboard pane of Universal Access preferences. When full
keyboard access is on, user-defined combinations override any combinations used in applications.
2014-10-16 | Copyright © 2004, 2014 Apple Inc. All Rights Reserved.
32
Document Revision History
This table describes the changes to Accessibility Overview for OS X .
Date
Notes
2014-10-16
Updated with information about the new accessibility API.
2013-10-22
Described the difference between the position value an accessibility object
reports and the value an assistive app receives.
2012-07-23
Updated the Testing for Accessibility chapter to comply with OS X
Mountain Lion.
2011-10-26
Added information about App Sandbox.
2011-06-30
Migrated relationships between roles and attributes to its own document.
See Accessibility Roles and Attributes Reference .
2008-03-11
Removed the Children attribute from the Busy Indicator role information.
2007-12-11
Changed the description of the window role's focused attribute.
2007-09-04
Made minor fixes to required attributes for accessibility objects of the
image and combo box roles.
2007-02-08
Added information on the group role and its attributes.
2006-06-28
Made minor corrections.
2005-11-09
Made minor bug fixes.
2005-04-29
Updated attributes supported by Menu, Menu Item, and Menu Bar Item
roles.
2014-10-16 | Copyright © 2004, 2014 Apple Inc. All Rights Reserved.
33
Document Revision History
Date
Notes
New document that explains the accessibility features built into OS X.
Some content was previously in "Making Carbon Applications Accessible
to Users With Disabilities."
2014-10-16 | Copyright © 2004, 2014 Apple Inc. All Rights Reserved.
34
Apple Inc.
Copyright © 2004, 2014 Apple Inc.
All rights reserved.
No part of this publication may be reproduced,
stored in a retrieval system, or transmitted, in any
form or by any means, mechanical, electronic,
photocopying, recording, or otherwise, without
prior written permission of Apple Inc., with the
following exceptions: Any person is hereby
authorized to store documentation on a single
computer or device for personal use only and to
print copies of documentation for personal use
provided that the documentation contains
Apple’s copyright notice.
No licenses, express or implied, are granted with
respect to any of the technology described in this
document. Apple retains all intellectual property
rights associated with the technology described
in this document. This document is intended to
assist application developers to develop
applications only for Apple-branded products.
Apple Inc.
1 Infinite Loop
Cupertino, CA 95014
408-996-1010
Apple, the Apple logo, Carbon, Cocoa, Finder,
Mac, Macintosh, OS X, Sand, Spotlight, and Xcode
are trademarks of Apple Inc., registered in the
U.S. and other countries.
App Store and Mac App Store are service marks
of Apple Inc.
IOS is a trademark or registered trademark of
Cisco in the U.S. and other countries and is used
under license.
APPLE MAKES NO WARRANTY OR REPRESENTATION,
EITHER EXPRESS OR IMPLIED, WITH RESPECT TO THIS
DOCUMENT, ITS QUALITY, ACCURACY,
MERCHANTABILITY, OR FITNESS FOR A PARTICULAR
PURPOSE. AS A RESULT, THIS DOCUMENT IS PROVIDED
“AS IS,” AND YOU, THE READER, ARE ASSUMING THE
ENTIRE RISK AS TO ITS QUALITY AND ACCURACY.
IN NO EVENT WILL APPLE BE LIABLE FOR DIRECT,
INDIRECT, SPECIAL, INCIDENTAL, OR CONSEQUENTIAL
DAMAGES RESULTING FROM ANY DEFECT, ERROR OR
INACCURACY IN THIS DOCUMENT, even if advised of
the possibility of such damages.
Some jurisdictions do not allow the exclusion of
implied warranties or liability, so the above exclusion
may not apply to you.


© Copyright 2026