
FedEx Ship Manager User Guide Version 2180
FedEx Ship Manager
User Guide
Version 2180
Additional Information
Technical Support
•
In the U.S., dial 1 888 670-8981 and select option 1.
•
In Canada, dial 1 877 853-4485 and select option 2.
Online Help
•
•
For “How To” instructions, click any Help button or select Help Topics from
the Help menu. Then double-click on any topic from the Contents page.
Be sure to check the FedEx Bulletin Board for messages from FedEx.
FedEx Web Site
•
•
For the latest information about FedEx, click the fedex.com button at the top
of the FedEx shipping screen to visit the FedEx Web site.
Then click on any link to explore the latest features and news from Federal
Express. For example, see how FedEx flew two giant pandas from Beijing to
the Memphis Zoo!
The information contained in this Quick Guide is confidential and proprietary
to FedEx. No part of this Quick Guide may be distributed or disclosed in
any form to any third party without the written permission of FedEx.
This Quick Guide is provided to you under and its use is subject to the
terms and conditions of the FedEx PowerShip Placement Agreement. Any
conflict between the information contained in this Quick Guide and the
applicable FedEx Service Guide will be controlled by the FedEx Service
Guide.
© 1998-2003. Federal Express Corporation. Unpublished.
FedEx Ship Manager
User Guide
Table of Contents
Welcome
5
Installation
7
Ship Domestic Packages
15
Shipping to One Recipient
15
Shipping to a Group of Recipients
17
Sender Information
18
Package Details
19
Billing Details
23
Shipping Options
24
FedEx Domestic Special Services
26
Shipping C.O.D.
28
Printing a Return Label
30
Sending a Multiple-Piece Shipment
31
FedEx Domestic Services
36
Ship International Packages
37
Shipping to One Recipient
37
Shipping to a Group of Recipients
38
Sender Information
39
Package Details
40
Billing Details
Shipping Options
43
44
FedEx International Special Services
45
Shipping Documents
46
Shipping Commodities
47
Shipper’s Export Declaration (SED)
49
Commercial Invoice
51
Terms of Sale
52
FedEx International Services
53
3
More Shipping Power
How to Modify Shipments
How to Delete Shipments
How to Repeat Shipments
54
54
55
56
How to Reprint a Commercial Invoice
57
Shipping Profiles
58
How to Customize Shipping Profiles
How to Assign Sender Profiles
59
66
How to Customize Shipping References
67
Databases
70
Back Up Databases
Restore Databases
70
71
Import and Export Databases
72
Tracking
78
How to Print a Proof of Delivery Letter
How to Track by Number
78
79
How to Track by Reference
80
How to Track from Shipping History
81
Shipping Reports
82
How to Print Shipping Reports
How to Print the Ship Log
How to Customize Shipping Reports
Close Shipments
82
84
85
91
How to Close FedEx Express Shipments
How to Close FedEx Ground Shipments
4
91
92
FedEx Ship Manager I 2180 I User Guide
Introduction
Welcome!
Welcome to FedEx Ship Manager®, your online shipping solution from Federal Express.
FedEx Ship Manager provides fast and easy shipping options, whether your shipments are
processed in one central location, or directly from your desktop. FedEx Ship Manager gives
you the reliability and shipping power you expect from FedEx.
Shipping Features
Fast, accurate shipping at your fingertips
•
Ship domestic and international packages to more than 210 countries worldwide
•
Print convenient shipping labels or plain paper airbills
•
•
•
•
•
•
•
Store addresses, preferences, and additional databases so there’s no need to rekey
Obtain a courtesy rate quote before you complete your shipment
Automatically send a FedEx ShipAlert message when a shipment is on the way
Automatically receive a delivery notice when the package arrives
Print return shipping labels (U.S. only)
Copy, modify, and delete shipments before you end the day
Change the return address printed on your labels
Return Label
(U.S. only)
Print a
return shipping
label for your
shipment
Return Address
Change the return
address printed on
your label
Repeat Shipments
Repeat any packages
shipped today
5
Courtesy Rate Quote
Receive a rate quote before
shipping a package
FedEx Ship Manager I 2180 I User Guide
Introduction
Tracking Options
Up-to-the-minute tracking information directly from FedEx Express
•
Print or view a Signature Proof of Delivery letter from your tracking screen
•
Track packages by tracking number, date, references, and sender id
•
Track packages from your shipment history file
•
Track packages by the door tag number on a delivery slip
•
Find out the date and time the next delivery attempt will be made for a package that has
not yet been delivered
Customize Your System
•
Select shipping preferences for individual shippers
•
Customize reference field names and redesign your shipping screen
•
Customize over 20 standard reports and create your own reports
Signature Proof of Delivery
Print or view a FedEx Proof of Delivery Letter
Track by Number
Track by package
tracking number or
door tag number
Track History
Track packages
shipped by sender,
recipient, and
shipment date
6
FedEx Ship Manager I 2180 I User Guide
Installation
Minimum Hardware and Software Requirements
FedEx Ship Manager runs on your own PC with the following requirements. If you meet
these requirements, complete the installation instructions on the next page and begin shipping
right away! If your system is already installed, begin shipping on page 15.
If you have a LAN
or ISP and use a
proxy server, you
must have ports
443 and 80 open
for secured
communication
and web
browsing.
•
Pentium II 266 MHz recommended (Pentium 133 MHz minimum)
•
128 MB RAM recommended (64 MB RAM minimum)
•
150 MB disk space
•
Microsoft® Windows® 98, Microsoft® Windows® 2000, Microsoft® Windows® NT (4.0
or higher), Microsoft® Windows® Me, or Microsoft® Windows® XP
•
LAN or DSL Internet access recommended (dial-up telephone line access minimum)
•
4X CD-ROM or higher
•
3 1/2” floppy drive
•
Microsoft® Internet Explorer v.5.0 or higher or Netscape® 6.0 or higher
•
Laser and/or inkjet printer for reports and labels
•
Minimum screen resolution of 800 x 600 pixels
Before you install FedEx Ship Manager, you need
A FedEx
Signature
Release Number
authorizes
delivery of
packages without
your signature.
Go to any FedEx
station to fill out
a form.
•
Printers for reports and labels installed on the local drive
•
9-digit FedEx account number
•
FedEx Signature Release Number for FedEx Express shipments, if required for your
shipping needs (optional)
Note: You can enter this number after installation.
•
Employer Identification Number (EIN/tax ID), if you send international shipments
(optional)
Note: You can enter this number after installation.
•
Protocol DCOM98 for Windows 98, if Microsoft® Windows® 98 is the operating system
on your PC (Go to microsoft.com and enter dcom98 as your search keyword. Download
DCOM98, and then install it before installing FedEx Ship Manager.)
7
FedEx Ship Manager I 2180 I User Guide
Installation
Network Administrator Tips
• BASIC (BASE64 also known as NETSCAPE) and Microsoft NTLM are used for the
authentication schemes.
• You must have port 443 open for outbound and secured communication to FedEx and
port 80 open for web-browsing.
• If your company requires a proxy server, enter the IP address and port number. In
addition, enter the user name and password, if one has been assigned and is required.
Proxy Settings:
Follow these steps to enter your proxy server and port number in Proxy Server:
1. Enter a colon at the beginning of the field.
2. Enter the DNS name for the customer’s proxy server (customer.proxy.com).
3. Enter a colon after the proxy server.
4. Enter the port number.
Look at the following sample formats:
:customer.proxy.com:portnumber
:xxx.xxx.xx.xxx:yyyy
Note: Spaces are not allowed in Proxy Server.
To install FedEx Ship Manager, you must have administrator priviledges on the PC on
which you are installing the software. FedEx Ship Manager periodically updates the FedEx
registry.
8
FedEx Ship Manager I 2180 I User Guide
Installation
How to Install FedEx Ship Manager
Follow these steps to install FedEx Ship Manager on your PC:
1. Close all programs, and insert the FedEx Ship Manager CD-ROM into the CD-ROM
drive.
2. The FedEx Ship Manager Welcome screen displays. If it does not, double-click My
Computer on your desktop, and double-click the CD-ROM drive where the CD was
inserted.
If Microsoft®
Windows® 98 is the
operating system on
your PC, go to
microsoft.com and
download the
protocol DCOM98
for Windows 98
before installing
FedEx Ship
Manager.
3. Click Next.
4. Read the FedEx Ship Manager Software License Agreement. Click Yes to agree and to
continue the installation. If you select No, the setup program closes, and the software
does not install.
5. Click Next to install FedEx Ship Manager in the default destination folder, or click
Browse to choose your own directory.
6. Click Next to add icons to the program folder FedEx Ship Manager. You can also type a
new folder name, or select a folder from the list of existing folders.
The InstallShield Wizard installs the software on your PC.
7. FedEx Ship Manager requires the Java Runtime Engine. The setup program prompts
you to install it. If Java is already installed on your PC, click No and the setup program
closes.
Click Yes to install Java on your PC now, and follow the on-screen directions.
9
FedEx Ship Manager I 2180 I User Guide
Installation
8. From the Java Welcome screen, click Next to install the Java 2 Runtime Engine.
If you ever need
to uninstall
FedEx Ship
Manager, go to
Add/Remove
programs in the
Control Panel to
remove the
application.
9. Read the Sun Microsystems, Inc., Binary Code License Agreement. Click Yes to agree
and to continue the installation. If you click No, the setup program closes.
10. Click Next to install the application in the default destination folder, or click Browse to
choose your own directory.
11. Click Next. Microsoft Internet Explorer is already selected as the default browser.
The InstallShield Wizard installs the application on your PC.
12. Click Finish to complete the installation, and restart your PC. You must restart your
computer before registering FedEx Ship Manager.
10
FedEx Ship Manager I 2180 I User Guide
Installation
How to Register FedEx Ship Manager
After installation, you must register FedEx Ship Manager before you can ship FedEx packages
using the application. During registration, you configure your printer, configure software
communications with FedEx, and enter your FedEx account information.
Double-click the desktop icon or click Start -> Programs-> FedEx Ship Manager to register
FedEx Ship Manager and start the application.
Configure Your Printer
1. From the FedEx Ship Manager Registration screen, click Next to display the FedEx Ship
Manager Printer Configuration screen.
2. Click one of the printer options for shipping FedEx packages, and click Next.
3. Select your report and label printers, and click Next to display the FedEx Ship Manager
Communication Configuration screen. Refer to Configure Software Communication to
continue registering.
11
FedEx Ship Manager I 2180 I User Guide
Installation
Configure Software Communications
Refer to Network
Administrator
Information on
page 3 for help
with proxy
settings.
1. From the FedEx Ship Manager Communication Configuration screen, click Next. Click
one of the following options to indicate your communications connection:
•
•
•
I will use my LAN or ISP to communicate with FedEx
I have a LAN or ISP but do not want to use it to communicate with FedEx
I do not have a LAN or ISP
2. If you have a LAN or ISP and use a proxy server, click I use a proxy server to connect
to the internet, and enter the proxy information. Your company may have set up a proxy
configuration for your system. Please contact your network administrator to obtain the
correct data to complete this section.
3. Click Next. If you clicked I will use my LAN or ISP to communicate with FedEx, skip
steps 4 - 6.
4. If you clicked either I have a LAN or ISP but do not want to use it to communicate with
FedEx or I do not have a LAN or ISP, the FedEx Dial Up Preferences screen displays.
The option I want to use FedEx Dialup is already checked for you to use a dial-up
telephone line.
5. Enter the name of your modem and customize any dialing properties.
6. Click Next to display the FedEx Ship Manager Customer Information screen.
12
FedEx Ship Manager I 2180 I User Guide
Installation
Enter FedEx Customer Information
1. From the FedEx Ship Manager Customer Information screen, enter your account information. See the sample screen below.
Enter FedEx
customer
information to
complete
registration.
2. Click Next to continue registration. Enter the additional information on international
shipping and Signature Release, if applicable. This information is optional.
13
FedEx Ship Manager I 2180 I User Guide
Installation
Information on
International
Shipping and
Signature Release is
optional. You can
skip this screen and
enter this
information later.
3. Click Finish. After shipping and tracking information is downloaded, the following
screen displays.
Please record your
meter number in the
space provided in
the product folder.
Refer to this number
when you have
questions or need
assistance with
FedEx Ship
Manager.
4. Click Ship Now to begin shipping with FedEx.
14
FedEx Ship Manager I 2180 I User Guide
Ship Domestic
Ship Domestic Packages
How to Ship Packages within the U.S. and within Canada
If you are in the U.S. or Canada and are shipping to a recipient in the same country, start
your shipments here. Begin with the Recipient Id field and FedEx Ship Manager will guide
you each step of the way.
Shipping to One Recipient
1
Ship to group
To ship similar packages to more than one recipient, go to page 17.
2
Recipient Id
•
•
3
button beside the Recipient
To select a recipient from the address book, click the
Id field and select a recipient code from the address list. Then select the sender
information shown on the next page.
If the recipient is not in the choice list, enter a new code in the Recipient Id field or
skip this field
Recipient address
Complete the recipient information if you are not using a recipient from the address list.
Country Select US to ship domestic packages within the US or CA to ship domestic
packages within Canada.
Contact name/Company name You must enter at least one of these fields.
Address 1 Enter the recipient street address. Up to 35 characters print on the shipping
label for FedEx Express shipments. Up to 32 characters print on the label for FedEx
Ground shipments.
Recipient Id
To use the address
book, select a
recipient code or
enter a new code in
the Recipient Id field.
15
FedEx Ship Manager I 2180 I User Guide
Ship Domestic
3
Recipient address
City, State/Province, Zip/Postal Code
Enter the city, state or province, and Zip or postal code. Or skip the city and state fields
if you are using the Auto Populate feature within the U.S.
Auto Populate City and State (U.S. only)
To save time entering U.S. domestic addresses, Auto Populate fills in the recipient city
and state after you enter the Zip code. To use this feature, select Auto Populate City/
State on the FedEx Express Cust Admin screen on the System Settings screen.
Note: Auto populate is not currently offered for intra-Canada shipments. The recipient
City, Province, and Postal Code must be entered manually.
4
This is a residential address
If the delivery address is a residential address, check “This is a residential address.”
FedEx Express and FedEx Home Delivery services are available when shipping to a
residential address.
Note: You must check this option to include the residential surcharge in your rate quote
and on the doc tab portion of the shipping label.
5
Save in/Update my address book
Check this option to add the recipient to the address book or to save any changes made
to the recipient’s address.
Auto Populate
(U.S. only)
Auto Populate
automatically fills in
the city and state
when you enter the
Zip code.
Address Book
To save the recipient
address, check
“Save in/Update my
address book.”
16
FedEx Ship Manager I 2180 I User Guide
Ship Domestic
Shipping to a Group of Recipients
A group includes a unique code, description, and a list of recipients from the address book.
When you ship to a group, you enter the shipping information once, and FedEx Ship
Manager prints shipping labels for each recipient in the group. When you ship to a group,
the service, package type, and ship date must be the same for each recipient.
Important: If a service is not available for a recipient in a group shipment, you will not
receive a shipping label for the recipient unless you select group shipping preferences.
See page 64 to select preferences.
1 Ship to group
To ship similar packages to a group of recipients, check “Ship to group.”
2
3
4
Click the
button in the Recipient Id field and select the group from the choice list.
If the group is not in the choice list, create a new group or temporary group below.
New group
To create a new group, enter a new code in the Recipient Id field and press the Tab key.
Enter a brief description and select Domestic for the Group type. Then enter or select
each recipient in the group.
Temporary group
To select recipients without saving a group in the group database, select “Create/
Modify a temporary group” at the top of the Recipient Id choice list.
Enter a Recipient Id or select a recipient from the choice list and click the Add button.
Select each recipient of the package and click OK.
Ship to group
A group includes a
list of recipients from
the address book.
17
FedEx Ship Manager I 2180 I User Guide
Ship Domestic
Sender Information
1
2
Change sender
Check whether the sender name and address in the Sender information section is the
actual shipper. If not, click the
button in the Change sender field and select the
current sender.
Shipping preferences
The current sender’s shipping preferences are used to ship the package. Shipping
preferences include shipping preferences and defaults. Here are some examples:
• Bill sender payment type
• Priority Overnight service
• A $10.00 handling charge
• Required references
See pages 59 through 66 for assistance selecting shipping preferences.
Change return address
The sender code you select is used to print the return address on the shipping label.
• To print the current sender’s address on the label, select Current sender in this field.
• To print a different return address on the label, select the sender code you want to
use from the choice list.
• To print a different remittance address on a COD return label for U.S. shipments,
select the sender code in the choice list. You can create a COD remittance code in
the sender database. For more information, see page 61.
Current Sender
Shipping preferences
change when you
change the current
sender. The
preferences for the
current sender
become active.
18
FedEx Ship Manager I 2180 I User Guide
Ship Domestic
Package Details
1
Number of packages
Enter the total number of packages in the shipment. If you are shipping only one
package, enter 1.
2
Identical packages
• When shipping multiple packages with the same weight, packaging, and references,
check the “Identical packages” box. You must be shipping all of the packages to the
same recipient at the same time.
• If the packages are not exactly the same, see “Sending a Multiple-Piece Shipment”
on page 31.
3
Package weight
Enter the weight of the package. If there is more than one package in the shipment,
enter the weight of the first package.
4
Service type
Select a service type from the choice list. For delivery commitments, see “FedEx Domestic
Services” on page 36.
Shipping Preferences
You can select shipping preferences, and other package details, to automatically fill in
the service type for your shipments. And you can customize shipping preferences for
individual shippers. To update shipping preferences, see pages 59 through 64.
Identical Packages
Identical packages
have the same
weight, size, and
service type.
19
FedEx Ship Manager I 2180 I User Guide
Ship Domestic
5
Package type
• If you are using FedEx packaging, select the type of packaging you are using from
the choice list.
• If you are using your own packaging, select Your Packaging.
Shipping Preferences
• If you use the same type of packaging for your shipments, select shipping preferences
to fill in the packaging type for you. For example, if you use your own packaging,
select Your Packaging. For more information, see pages 59 through 64.
6
Package dimensions
• If you are using your own packaging, click the
button beside the Package
dimensions field and select the package dimensions if they appear in the choice list.
• If the package dimensions do not appear in the choice list, select Z-Enter Dimensions
Manually and enter the package dimensions.
Dimensions database
• If you use your own packaging, add the package dimensions to the dimensions
database. To update the database, select Dimensions from the Database menu.
Package Type
Shipping
preferences
automatically fill in
shipment
information, such as
Your Packaging for
FedEx Ground
shipments.
20
FedEx Ship Manager I 2180 I User Guide
Ship Domestic
7
Ship date
• The ship date is the date when you give the package to FedEx. The ship date is
usually the current date. If the ship date on your screen is correct, skip this field and
go to the next step.
•
To prepare your shipment for a future date, you can specify a future ship date up to
10 days from now. To enter a future ship date, continue below.
Ship date
The ship date is the
date you give the
package to FedEx.
You do not need to
change the date
unless you will give
the package to FedEx
on a future date.
Future Shipment
To change the ship date, follow these instructions.
• Click on the calendar box beside the Ship date field.
Future ship date
To change the ship
date, click the
calendar button.
• Select the date when you will give your shipment to
FedEx. The date can be up to 10 days from now.
• If you only want to change the date for this package,
check Apply to this package only.
• To send additional future shipments, change the ship
date to the current date when you finish processing
the future shipments.
21
FedEx Ship Manager I 2180 I User Guide
Ship Domestic
8
Declared value
• Declared value is the maximum liability to FedEx for loss, damage, or delay to the
shipment, up to $100, unless a higher value is declared for an additional fee.
•
9
FedEx Letters and FedEx Paks have pre-determined carriage value limits. Please
refer to your local FedEx Service Guide or the visit the FedEx website at
www.fedex.com for more information.
Signature Release
• Check Signature Release to allow FedEx to deliver the package if no one is available
to sign for it. The current sender must have a valid FedEx Express Signature Release
Authorization Number in the sender database.
• If you do not have an authorization number, contact FedEx Customer Service or ask
your FedEx courier for a FedEx Signature Release Authorization form.
Signature Release
The current sender
must have a FedEx
Signature Release
Authorization
Number to select
Signature Release.
22
FedEx Ship Manager I 2180 I User Guide
Ship Domestic
Billing Details
1
Bill shipment to
Select the payment type from the choice list. If you select Recipient or Third Party, enter
the FedEx Acct number for billing.
2
Department
• You can select a department code from the Department database, or you can tab to
the next Department field and enter a description. The information you enter can be
used to print department and charge-back reports.
• To add a department code to the department database, enter a new code in the first
Department field and click the Tab key. Next enter the department name that you
want to appear on your reports.
3
Customer reference
• You can enter up to 35 characters for references to print on the shipping label.
References can be also used to print reports and to track packages. You can also
enter additional references fields on the Options screen.
• If you want to display prompts to enter specific reference information on the shipping
screen, see pages 67 through 69. You can customize references to prompt for and
require information.
4
Add’l handling
• To charge the recipient an additional handling fee, click the Add’l handling button
and click on the option you want to use.
•
•
To calculate handling charges for FedEx Ground shipments using FedEx list rates,
select Percent of Shipping Charges or Percent of Shipping and Surcharges. These
options should display on your screen for FedEx Ground shipments.
U.S. shippers may also calculate handling charges for FedEx Express shipments. If
these options are not available on your screen, download FedEx Express list rates to
your system.
Note: Downloading of FedEx Express list rates is not available for Canada origin
shippers.
Handling Charges
You can calculate
handling charges to
print on the doc-tab
portion of the label.
23
FedEx Ship Manager I 2180 I User Guide
Ship Domestic
Shipping Options
Domestic shipping options vary for U.S. and Canada origin shipments. Some options may
not apply to your region.
1 Special services
Click on the Options tab at the top of the Shipping screen. Select any of the special
services that are available for your package. Refer to pages 26 and 27 for a description
of FedEx special services.
2
Optional information
Enter additional references in the Optional information section of the screen.
To display prompts for specific reference information on the shipping screen, see
pages 67 through 69.
3
FedEx ShipAlert
Shipment notification
Check Shipment notification to automatically send an email message that indicates the
shipment is on its way. The shipment notification includes the tracking number, service
type, and ship date.
Delivery notification
Check Delivery notification to receive a delivery notification when the package is
delivered. The message includes the time and date the package is delivered.
Email address
Indicate who you want the notifications sent to by entering the email address Ids or fax
number. Sample email address Ids include [email protected] or [email protected].
Delivery
notification
Check this option
to automatically
receive a message
when the package
is delivered.
24
FedEx Ship Manager I 2180 I User Guide
Ship Domestic
4
FedEx InSight®
FedEx InSight allows you to view the status of inbound, outbound, and third-party
shipments without a tracking number. FedEx InSight also provides proactive notification
of critical shipment events so you can manage the supply chain processes more
effectively. FedEx InSight is a separate application that requires enrollment through
FedEx. Please contact your FedEx Account Executive for more information.
Shipment Contents
If you and your recipient are enrolled in the FedEx InSight program, you can enter
shipment information that can be used to view the status of the shipment.
Block Shipment Data
If you are enrolled in FedEx InSight, this option allows you to monitor the status of your
shipment while preventing the recipient or third party from viewing detailed information
about the shipment.
5
Ship Package
• When you complete the shipment information, see page 30 if you want to print a
return shipping label.
• If you don’t want to print a return label, click the orange “Ship” button in the
bottom right corner of the screen. FedEx Ship Manager prints the shipping label
and returns to the Shipment details screen.
FedEx InSight
FedEx InSight gives
you and your
recipients greater
visibility into the
status of your
shipments.
25
FedEx Ship Manager I 2180 I User Guide
Ship Domestic
FedEx Domestic Special Services
FedEx Express Shipments
•
Alcohol (U.S. only)
Choose the Contents and Packaging and enter the Quantity and Volume of the alcohol.
The alcohol contents print in the References section of the shipping label.
Alcohol
Alcohol contents
print in the
References section
of the label.
•
COD (U.S. only)
See page 28 to ship COD.
•
Dry Ice Only
If your shipment contains dry ice, enter the weight of the dry ice.
•
Hold at Location
Select this option if the recipient will pick up the shipment at a FedEx location. For
example, if the recipient’s business is closed on Saturday, the recipient can pick up the
package at a FedEx location that offers Saturday services. When you select Hold at
Location, enter the FedEx station address where you want the package held.
•
Inside Delivery (U.S. only)
Deliver freight shipments inside the recipient’s building. Freight shipments weight
more than 150 lbs.
Inside Pickup (U.S. only)
Pick up freight shipments inside the sender’s building. Freight shipments weight more
than 150 lbs.
•
•
Return Label (U.S. only)
To print a return label, see page 30.
•
Saturday Pickup
Pick up a package on Saturday if Saturday service is available for the ship date, service
type, and pickup location.
•
Saturday Delivery
Deliver a package on Saturday if Saturday service is available for the ship date, service
type, and destination.
•
Signature Required (U.S. only)
The courier is required to obtain the recipient’s signature in order to deliver the package.
For example, a signature is required for shipments that contain pharmaceutical drugs.
26
FedEx Ship Manager I 2180 I User Guide
Ship Domestic
FedEx Ground and FedEx Home Delivery Special Services
•
Acknowledgement of Delivery (U.S. only)
Recipient signature required.
•
AutoPOD
Proof of delivery is sent through email, fax, or regular mail.
•
COD
The COD amount paid on delivery is sent to the recipient through the mail as cash or a
check. See page 29 for detailed instructions.
Special Services
For additional
information, please •
refer to the FedEx
Service Guide. •
•
Hazardous Materials (U.S. only)
Indicates the package contains hazardous materials.
Non-Standard Packaging (Oversize)
Check this option for irregular or infrequent package sizes and dimensions.
Return Label (U.S. only)
To print a return label, see page 30.
FedEx Home Delivery Special Services (U.S. only)
•
Acknowledgement of Delivery (U.S. only)
Recipient signature required.
•
AutoPOD
Proof of delivery is sent through email, fax, or regular mail.
•
Appointment Delivery
Schedule delivery on the date and time that you indicate.
•
Date Certain Delivery
Schedule delivery on a certain date Monday through Saturday. Click on the Delivery
Date calendar box and select the delivery date.
•
Evening Delivery
Schedule delivery between 5:00 P.M. and 8:00 P.M.
•
Return Label (U.S. only)
To print a return label, see page 30.
•
Signature Service
Require a signature at the recipient’s residence in order to deliver the package.
Date Certain
Schedule a FedEx
Home Delivery
package to arrive
on a certain date.
27
FedEx Ship Manager I 2180 I User Guide
Ship Domestic
Shipping COD
How to Ship FedEx Express COD (U.S. only)
1
COD Click the COD box on the Options page.
2
Amount Enter the COD amount, excluding additional shipping charges.
3
Collection type Select secured or unsecured. A secured check is a cashier’s check or
money order.
4
Freight charges to add You can add the COD surcharge, the shipping charge, or both
to the COD amount. Or add no additional charges to the total COD amount.
5
Make the declared value equal to the COD amount Automatically make the declared
value equal to the COD amount. The declared value displays on the Shipment details
screen.
6
Remittance address Select the sender code to print the remittance address on the COD
return label. The remittance address may differ from the current sender’s address. When
you select a sender from the choice list, the sender name and information display on the
COD screen so you can verify which sender to use.
Remit address
Select the sender
code to use to print
the COD
remittance address
on the COD return
shipping label.
Note: For your convenience, you can create a COD remittance code in the sender
database. Once created, select the COD sender code for the default COD Remittance
Code in your Domestic Shipping Profiles.
28
FedEx Ship Manager I 2180 I User Guide
Ship Domestic
Shipping COD
How to Ship FedEx Ground COD
1
COD Click the COD box on the Options page.
2
Amount Enter the COD amount, excluding additional shipping charges.
3
Collection type Indicate how you want the COD amount collected.
4
Freight charges to add To add freight charges to the COD amount, select one of the
items on the choice list.
5
Make the declared value equal to the COD amount Check this option if you want to
automatically make the declared value equal to the COD amount. The declared value
displays on the Shipment details screen.
Reference
You can print one
of the reference
fields from the
shipment on the
COD label.
6
Reference
You can print one reference field from the shipping information on the COD label.
Choose one of the reference fields to use.
7 Remittance address Select the sender code to print the remittance address on the COD
return label. The remittance address may differ from the current sender’s address. When
you select a sender from the choice list, the sender name and information display on the
COD screen so you can verify which sender to use.
Note: For your convenience, you can create a COD remittance code in the sender
database. Once created, select the COD sender code for the default COD Remittance
Code in your Domestic Shipping Profiles.
29
FedEx Ship Manager I 2180 I User Guide
Ship Domestic
Printing a Return Label (U.S. only)
Follow these steps to print a return label with your shipment.
1
To print a return label for your shipment, check Return Label on the Options screen.
2
When you finish entering all of the shipment information, click on the Return label tab.
3
Return to Choose a sender from the choice list. The sender information prints in the
recipient section of the return shipping label.
To print the current sender’s name and address in the recipient section, select Current
sender. To view additional information, click the View/Edit button.
4
Return from Select a recipient from the choice list. The recipient information prints in
the sender section of the return shipping label.
5
Print return shipper instructions Check this option if you want to print instructions for
using the return label on your report printer.
6
Package details Complete the package details.
7
Service type FedEx Ground or FedEx Home Delivery is required.
8
FedEx InSight If you and the recipient are enrolled in the FedEx InSight program, click
the Shipment Contents button and complete the details for your package.
9
Billing details Choose Bill Sender or Bill Third Party for the payment type. Enter any
additional information you like, including departments and reference information.
Return Label
FedEx Ground and
FedEx Home
Delivery are the
only services
available for the
return shipment.
10 Ship Package When you complete the Return label screen, click the orange Ship button
in the bottom right corner of the screen. FedEx Ship Manager prints the shipping label
and the return shipping label.
30
FedEx Ship Manager I 2180 I User Guide
Ship Domestic
Sending a Multiple-Piece Shipment
Follow these instructions when you ship more than one package to the same recipient. The
service type must be the same for each package.
Shipment Details
1
Recipient Id
•
•
button and select the
To ship a multiple-piece shipment to a recipient, click the
recipient from the address book choice list.
If the recipient is not in the choice list, complete the recipient information. To add
the recipient to the address book, enter a new code in the Recipient Id field. When
you complete the recipient information, check Save in/Update my address book.
2
Sender information
Change sender Select the current sender from the choice list.
Change return address To print the current sender’s address in the return address
section of the label, select Current sender in the choice list. To print a different sender
address on the label, choose a sender code from the choice list.
3
Package and shipment details
Complete the package and shipment details including the following information.
Number of packages Enter the total number of packages in the shipment.
Package weight Enter the weight of the first package in the Weight field.
4
Complete the billing information.
5
Click the Multiple-Piece Shipment button on the shipping screen.
Note: The Multiple-piece shipment button is not active until you enter the information
above the button.
Number Packages
Enter the total
number of
packages in the
shipment.
MPS Button
The Multiple-piece
shipment button is
available after you
enter the billing
information.
31
FedEx Ship Manager I 2180 I User Guide
Ship Domestic
Multiple-Piece Shipment Information
Shipment Information
• Information for each package
This option allows you to enter information for each package in the shipment. This
option is automatically selected for FedEx Express shipments and is one of the options
you can choose for FedEx Ground shipments. To use this option, continue below.
•
Note: The option to enter information for each package in a multiple-piece shipment is
not currently available for FedEx Express shipments from Canada.
Parse pak (FedEx Ground only)
This option automatically divides the total shipment weight by the number of packages
in the shipment. This option is available for FedEx Ground shipments only. To use this
option, continue on page 35.
Parse Pak
This option assigns
the same package
weight to each
package in the
shipment.
Information for
each package
This option lets you
enter the weight of
each package in
the shipment.
32
FedEx Ship Manager I 2180 I User Guide
Ship Domestic
Information for each package
1
Information for each package
Check this option for FedEx Express shipments and for FedEx Ground shipments if you
want to enter the weight of each package individually.
2
Special services
Click the Special services button in the top left of the screen if you want to select
special services for the entire shipment.
For more information about special services, see pages 26 and 27.
To print all labels
after you enter the
last package
wieght, check the
box beside “Print
labels after I have
completed this
shipment.”
3
4
Print labels after I have completed this shipment
• Check this option in the bottom left section of the screen if you want to print all
labels after you enter the last package in the shipment.
• If you do not select this option, you will receive a label for each package after you
complete each individual package.
Package information
Package weight Enter the weight of the package.
Package dimension Enter or select the dimensions of each package, if required.
Declared value You can enter a declared value for each package in the shipment.
33
FedEx Ship Manager I 2180 I User Guide
Ship Domestic
5
Optional package information
Override preferences When you enter optional information for each package, you can
override the information that fills in the screen by clicking the Override preferences
button in the bottom left section of the screen.
References Enter optional references for each package.
Department Select a department code from the choice list.
Special services Select special services for this package only.
Shipment contents Click this button if you are enrolled in the FedEx InSight program.
Additional handling Enter additional handling charges for this package.
6
When you finish entering information for the package, click the Ship button below the
Additional handling button.
7
Repeat steps 4 through 6 for each package, or repeat the previous package as shown in
the next step.
Repeat previous package
Click the Repeat previous package button to automatically fill in the package details
from the previous package. You can modify the package details that fill in the screen.
8
Note: To enter additional information for the package, click the Override preferences
button in the bottom left section of the screen.
9
Click Done when you finish entering information for the last package in the shipment.
Repeat Previous
Package
Click this button to
repeat the previous
package. Then
enter any changes
needed.
34
FedEx Ship Manager I 2180 I User Guide
Ship Domestic
Multiple-Piece Shipment Information
Parse Pak
1
Parse pak (FedEx Ground only)
This option automatically divides the total shipment weight by the number of packages
in the shipment.
# of Packages This is the total number of packages in the shipment.
Total weight Enter the total weight of the shipment.
Parse Pak
Check this option to
use the same weight
for each package.
2
3
4
Special services
Click the Special services button in the top left section of the screen if you want to select
special services for the entire shipment.
For more information about special services, see pages 26 and 27.
Ship Now
When you are ready to complete the shipment and print the labels, click the Ship Now
button in the bottom right section of the screen. Verify the total number of packages and
the weight of each package in the shipment.
Save & Edit
Click this button to save the total number of packages and total weight of the shipment
and return to the Shipment details screen.
35
FedEx Ship Manager I 2180 I User Guide
Ship Domestic
FedEx Domestic Services
FedEx Express Services
•
•
•
•
•
FedEx First Overnight® delivers typically by 8:30 A.M. (U.S.) and 9:00 A.M.
(Canada) the next business day
FedEx Priority Overnight® delivers typically by 10:30 A.M. in the U.S. and Canada
the next business day
FedEx Standard Overnight® delivers typically by 3:00 P.M. the next business day
(U.S. only)
FedEx 2Day® delivers typically by 4:30 P.M. the second business day (U.S. only)
FedEx Express Saver® delivers typically by 4:30 P.M. within 3 business days (U.S.
only)
FedEx Express Freight Services (U.S. only)
•
•
•
FedEx 1Day Freight® delivers typically by 10:30 A.M. the next business day
FedEx 2Day Freight® delivers typically by 12:00 P.M. the second business day
FedEx 3Day Freight® delivers typically by 3:00 P.M. within 3 business days
FedEx® Ground Service
•
•
•
•
Delivers typically in 1 to 5 business days in the U.S., depending on destination
Delivers typically in 1 to 7 business days in Canada, depending on destination
Allows packages up to 150 lb or 68 kg each
Allows packages up to 108" or 274.32 cm in length and 130" or 330.2 cm in length
plus girth
FedEx® Home Delivery (U.S. only)
•
•
•
Delivers typically in 1 to 5 business days depending on destination
Allows packages up to 70 lb and 130" length plus girth
Delivers from businesses to residential addresses
For more information about FedEx features of service and delivery commitments, please
refer to the FedEx Service Guide at fedex.com.
Note: For service and delivery commitments in Alaska and Hawaii, please refer to the
FedEx Service Guide at fedex.com.
36
FedEx Ship Manager I 2180 I User Guide
Ship International
Ship International Packages
How to Ship International Packages from the U.S. and Canada
FedEx provides reliable, customs-cleared shipping to over 210 countries worldwide. And by
using FedEx Ship Manager, you can be sure your international shipments clear customs and
arrive on time. Plus you’ll enjoy the convenience of printing shipping labels or plain paper
air waybills, along with a Commercial Invoice.
Shipping to One Recipient
1
Recipient Id
Click the button in the Recipient Id field and select the recipient from the choice list.
If the recipient is not in the choice list, complete the recipient information below.
To add the recipient to the address book, enter a new recipient code in the Recipient Id
field and complete the following information.
To ship similar packages to more than one recipient, see the following page.
2
Recipient Address
Country Enter or select the two-character country code from the choice list.
Contact name/Company name You must enter at least one of these fields.
Address 1 Up to 35 characters print on the shipping label for FedEx Express shipments.
Up to 32 characters print on the label for FedEx Ground shipments.
City, State/Province, Zip/Postal code Enter the city, state/province code, and Zip or
postal code.
Tax ID/EIN Enter the recipient’s tax Id number or employer Id number.
3
This is a residential address Check this option when shipping to a residential address.
4
Save in/Update my address book Check this option to automatically add the recipient
to the address book or to save changes to the address book.
Ship International
Ship packages to
more than 210
countries around
the world.
37
FedEx Ship Manager I 2180 I User Guide
Ship International
Shipping to a Group of Recipients
A group includes a group code or Id, description, and a list of recipients from the address
book. When you ship to a group, enter the shipping information once, and FedEx Ship
Manager prints shipping labels for each recipient in the group. When you ship to a group,
the service, package type, and ship date must be the same for each recipient.
1 Ship to group
To ship similar packages to a group of recipients, check the Ship to group box.
2
3
4
Click the button in the Recipient Id field and select a group code from the choice list.
If the group is not in the choice list, create a new group or a temporary group.
New group
To create a new group, enter a new code in the Recipient Id field and press the Tab key.
Enter a brief description and select International for the Group type. Then enter or
select each recipient you are shipping the package to.
Temporary group
To select recipients without adding a group to the group database, select Create/
Modify a temporary group at the top of the Recipient Id choice list.
Click the International button for the Group type on the right. Select a recipient from the
list and click the Add button. Select each recipient of the package and click OK.
Ship to group
Send an
international
shipment to a
group of recipients
in different
countries.
38
FedEx Ship Manager I 2180 I User Guide
Ship International
Sender Information
When you ship an international package, FedEx Ship Manager looks for a Tax ID/EIN or
social security number for the current sender. If this information is not included in the
sender database, FedEx Ship Manager prompts you to enter it when you complete the
shipment. FedEx Ship Manager also saves the Tax ID/EIN or social security number in the
sender database.
1 Change sender
Check whether the name and address in the Sender information section is the actual
shipper name and address. If not, click the
button in the Change sender field and
select the current (actual) sender.
2
Shipping profile
The current sender’s shipping profile is used to ship the package. Shipping profiles
include information such as currency code, terms of sale, and bill duty/tax/fees.
Change return address
• To print the current sender’s name and address on the shipping label, select Current
sender in the Change return address field.
•
To print a different return address on the label, select the sender code you want to
use from the choice list.
Current sender
If the current sender
does not include a
Tax ID/EIN or SSN,
FedEx Ship
Manager prompts
you to enter it when
you finish the
shipment.
39
FedEx Ship Manager I 2180 I User Guide
Ship International
Package Details
1
2
Package contains
Documents only
Check this option if your shipment contains documents, such as bank statements,
business correspondence, or office records. Document shipments usually do not require
a commercial invoice.
Commodities
Check this option if you are not shipping documents. Commodities are dutiable goods
and usually require a commercial invoice. For more information, please refer to the
FedEx Service Guide.
Number of packages
Enter the total number of packages in the shipment. If you are shipping only one
package, enter 1.
3
Total shipment weight
Enter the total weight of the package and select lbs or kgs for the weight type.
Note: Weight is required for all shipments, including document shipments.
4
Service type
Select one of the FedEx services shown on page 53.
Number of Packages
This field is required.
Enter 1 if there is
only one package in
the shipment.
40
FedEx Ship Manager I 2180 I User Guide
Ship International
5
6
7
Package type
Select the appropriate packaging if you are using FedEx packaging. If you are using
your own packaging, select Your Packaging.
Package dimensions
• If you are using your own packaging, select the package dimensions from the
choice list. If the dimensions are not in the list, select Enter Dimensions Manually
and type in the package dimensions.
• If you use your own packaging, add the packages to your dimensions database so
you can choose dimensions to fill in for your shipments. To add to your database,
select Dimensions from the Databases menu at the top of the screen.
Ship date
• The ship date is the date when you give the package to FedEx. If the ship date on
your screen is correct, skip this field and go to the next step.
• To prepare your shipment for a future date, you can specify a future ship date up to
10 days from now. To enter a future ship date, continue below.
Future ship date
• To change the ship date, click on the calendar box
beside the Ship date field.
• Select the date when you will give your shipment
to FedEx. The date can be up to 10 days from now.
• If you only want to change the date for this package,
check Apply to this package only.
If not, change the ship date back to the current
date when you finish entering future shipments.
Follow the above steps to change the ship date
back to the current date.
41
FedEx Ship Manager I 2180 I User Guide
Ship International
8
Total Value
FedEx Ship Manager prompts you to enter Total carriage value for commodity shipments
or Total customs value for document shipments.
Total Carriage Value
Declared value is the maximum liability to FedEx for loss, damage, or delay to the
shipment, up to $100, unless a higher value is declared for an additional fee.
Total Customs Value
For document shipments, enter zero (0) or one (1) for the Total customs value. If you
enter the incorrect value, FedEx Ship Manager displays the correct value when you
click the Ship button and allows you to return to the Total customs value field.
Note: Declared value is required for all shipments, including document shipments.
9
Signature Release
• Check Signature Release to allow FedEx to deliver the package if no one is available
to sign for it.
• The sender information for the current sender must include a valid FedEx Express
Signature Release Authorization Number.
10 Waybill
• Check the Waybill box if your shipment requires a standard, multi-ply air waybill.
Then enter the tracking number of the air waybill.
• The FedEx Express International Air Waybill must be included in your Form Settings.
Total Value
This field is required.
Enter zero (0) or one
(1) if you are
shipping documents.
42
FedEx Ship Manager I 2180 I User Guide
Ship International
Billing Details
1
Bill shipment to
Select the payment type from the choice list. If you select Recipient or Third Party,
enter the FedEx Acct number for billing.
Note: If you are shipping documents instead of commodities, skip the next step.
2
Bill duties/taxes/fees
Select the payment type for duties, taxes, and fees. Enter the FedEx account number for
billing, if required.
Note: This information is not needed if you are shipping documents instead of
commodities.
3
Department
You can select a department code from the department database, or you can tab to the
next Department field and enter a description. The information you enter can be used to
print department and charge-back reports.
4
Customer reference
You can enter optional references to print on the shipping label. References can be also
used to print reports and to track packages.
Add’l handling
• To charge the recipient an additional handling fee, click the Add’l handling button
and check the option you want to use.
• If you charge a handling fee for many of your shipments, be sure to select handling
fees preferences in your shipping profiles.
5
Additional Handling
Select default values
for additional
handling charges in
your shipping
preferences.
43
FedEx Ship Manager I 2180 I User Guide
Ship International
Shipping Options
1 Special services
Click on the Options tab at the top of the Shipping screen. Select any of the special
services that are available for your package. See the following pages for assistance
using special services.
2
Optional information
Enter up to 3 references in the Optional information section of the screen.
3
FedEx ShipAlert
Shipment notification
Check this option to automatically send an email message that indicates the shipment is
on its way.
Delivery notification
Check this option to automatically receive a delivery notification when the package is
delivered.
Email address
Indicate who you want the notifications sent to by entering the email Ids or fax number.
4
FedEx InSight
Shipment Contents
If you and your recipient are enrolled in the FedEx InSight service, you can enter
shipment information that can be used to view the status of the shipment.
Block Shipment Data
This option allows you to monitor the status of your shipment while preventing the
recipient or third party from viewing detailed information about the shipment.
Delivery Notification
Automatically
receive an email
message when the
package is delivered.
44
FedEx Ship Manager I 2180 I User Guide
Ship International
FedEx International Special Services
•
Alcohol (U.S. only)
To ship alcohol, you must meet service conditions stated in the FedEx Service Guide.
Specify Contents, Packaging, Quantity, and Volume.
•
Broker Select Option
Broker Select Option (BSO) allows you to select a customs broker, other than FedEx.
Broker Select
You can select your
own customs
broker or allow
FedEx to clear your
shipment through
customs.
Special Services
Some special
services require a
separate contract
with Federal
Express.
•
Dry Ice Only
Enter the weight of the dry ice in lbs if you are shipping from the U.S. or kgs if you are
shipping from Canada.
Note: For Canadian shipments, the total dry ice weight prints in kgs on the label.
•
Hold at Location
Enter the FedEx location where you want the package held for pickup by the recipient.
•
International Controlled Exports
FedEx provides pre-customs clearance and door-to-door delivery of international
controlled exports, including:
• Items moving under a U.S. State Department License
• Items moving under DEA export permits 36, 236, and 486
• In-bond shipments moving under a transportation and exportation from a foreign
trade zone or a bonded warehouse.
•
Saturday Delivery
Check this option to deliver your shipment on Saturday. Saturday Delivery displays on
the special services list if it is available for the ship date, service type, and destination.
•
Saturday Pickup
Check this option to pick up your shipment on Saturday. Saturday Pickup must be
available for the ship date, service type, and pickup location.
45
FedEx Ship Manager I 2180 I User Guide
Ship International
Shipping Documents
If you are shipping documents, complete the information below. If you are shipping
commodities, go to the next page.
1 Type of document
Click the
button to choose the type of document you are shipping.
2
Country of manufacture
Select the country where the documents were created.
3
Description
Enter a description of the document.
4
Add to Shipment
Click the Add to Shipment button.
Ultimate destination
Choose the country where the shipment will reach final destination.
View, edit, and delete the document description if needed.
Print Commercial Invoice (optional)
To print a Commercial Invoice for the shipment, check “I want to print a Commercial
Invoice.” Refer to page 51 for help completing the Commercial Invoice screen.
Ship
Click the Ship button at the bottom of the screen to complete the shipment and print the
shipping label.
5
6
7
8
Document Shipments
Choose a document
type from the choice
list. Select the
country of
manufacture and
click the Add to
Shipment button.
46
FedEx Ship Manager I 2180 I User Guide
Ship International
Shipping Commodities
If you are shipping commodites, complete the information below. If you are shipping
documents, return to the previous page.
1 Commodity ID
Click the
button and select the commodity code if it displays in the choice list.
If the commodity is not in the choice list, complete the commodity information described
below. To add the commodity to the commodity database, enter a new code in the
Commodity ID field.
2
Commodity description
Enter a detailed description of the commodity.
3
Number of units
Specify how many units you are shipping of the commodity type.
4
Unit of measure
Click the
button and select an option from the choice list that indicates how to
measure one unit of the commodity type, for example, each, dozen, pair.
5
Unit value
Enter the declared value for one unit of the commodity type.
6
Country of manufacture
Select the country where the commodity was manufactured or produced.
Commodities
Add commodity
types to your
commodity
database to fill in
commodity details
for your shipments.
47
FedEx Ship Manager I 2180 I User Guide
Ship International
7
Harmonized code
• If applicable, enter the Harmonized commodity classification number or Schedule B
Commodity Number. The harmonized code is required for shipments from the U.S.
that require an SED.
• The harmonized system is the global classification system that is used to describe
most world trade goods.
8
Part number
If applicable, enter any part number or manufacturer number associated with the
commodity. If your recipient is enrolled in FedEx InSight, the recipient may view detailed
information about the shipment by using a part number.
9
Marks/Numbers
Enter any distinquishing marks or numbers that identify the shipment.
10 SKU/Item/UPC
If applicable, enter the unique SKU or Item number used to identify the commodity. If
your recipient is enrolled in FedEx InSight, the recipient may view information for the
shipment by the SKU/Item/UPC number.
11 Add to Shipment
• If your shipment does not require an SED, click the Add to Shipment button. Then
repeat the previous steps for each commodity in the shipment.
• If your shipment requires an SED, go to the next page.
Note: SED does not apply to shipments from Canada.
12 Complete the Commodity summary and optional information on page 50.
48
FedEx Ship Manager I 2180 I User Guide
Ship International
Shipper’s Export Declaration (U.S. export only)
A Shipper’s Export Declaration (SED) is required for shipments from the U.S. that meet
any of the criteria below. If your shipment does not require an SED, go to the next page.
When an SED is required
An SED is required if any commodity meets the following criteria:
• The declared value for any commodity in the shipment is $2,500 USD or higher, unless
the commodity is shipped on an export license.
• The shipment destination is a proscribed country.
• A commodity is shipped under a commerce export license or is subject to International
Traffic Arms Regulations but exempt from license requirements.
FedEx files the SED for you
•
Export license/Expiration date
An export license is a government document that authorizes exports of specific goods
from a particular country of origin to a particular destination.
•
License exception symbol
If an export license is not required, click the [v] button and select a License exception
symbol from the choice list.
•
ECCN
Enter the Export Commodity Control Number if an export license is required. The ECCN
is provided by the U.S. Department of Commerce.
•
ITAR exemption
Enter the International Traffic in Arms Regulation (ITAR) number if you are eligible for
an ITAR exemption.
•
When you finish entering the commodity information, click the Add to Shipment button.
Then enter the commodity information for each commodity in the shpment.
Exporter files the SED
•
If your shipment requires an SED and you file the SED, enter the AES/FTSR number and
Entry number below.
AES/FTSR
If applicable, enter the AES exemption number or the FTSR exemption number. AES
refers to the U.S. Automated Export System. An FTSR exemption number is assigned by
the U.S. Foreign Trade Statistics Regulations.
The FTSR exemption number should include the exact section where the exemption is
described in Title 15 of the Code of Federal Regulations sections 30.50 through 30.58.
For example: FTSR 30.52.
•
Entry number
Enter the Import Entry Number.
•
Shipment XTN Number
49
FedEx Ship Manager I 2180 I User Guide
Ship International
Commodity Summary
1
Ultimate destination
Click the
button and select the country where the shipment will reach final destination.
2
Additional charges
Click the Additional charges button to add a handling fee to the cost of the shipment.
3
View, Edit, or Delete commodity details
• To edit or view the commodity information, select the commodity and click the View/
Edit button.
•
To delete a commodity from the summary, select the commodity and click the Delete
button.
Additional Information
1
The shipper and recipient are related
Check this option if the shipper and recipient are related, such as subsidiaries or branches
of a parent company.
2
An intermediate consignee is involved with the shipment
Check this option if an intermediate consignee will deliver the shipment to the ultimate
consignee or party. Click the View/Edit button and complete the intermediate consignee
name and address.
3
I want to print a Commercial Invoice
Check this option to print the commercial invoice on your report printer.
4
I want to enter USPPI information
Check this option if you want to enter the USPPI. Click the View/Edit button and complete
the USPPI information.
Print Commercial
Invoice
To print the
commercial
invoice, check the
box at the bottom
of the Commodity
screen.
50
FedEx Ship Manager I 2180 I User Guide
Ship International
Commercial Invoice
1
2
To print a commercial invoice, check the I want to print a Commercial Invoice box on the
Commodities screen as shown on the previous page.
Click the Commercial Invoice tab and complete the following information.
3
Commercial invoice information
4
5
button and select one of the terms of sale shown on the
•
Terms of Sale Click the
following page.
•
Reference Optional references
•
Purpose A brief description of the purpose up to 35 characters
•
Invoice number An optional invoice number to print on the commercial invoice
•
Number of copies The number of copies of the Commercial Invoice to print
•
Comment 1, 2, 3 Up to 3 optional comments lines to print at the bottom of the
commercial invoice
•
Include NAFTA statement The shipper and recipient are located in the U.S., Canada,
or Puerto Rico and if at least one commodity in the shipment was produced in one of
these countries.
•
View/Edit Importer of Record If the recipient is not the importer of record, click the
View/Edit Importer of Record button and enter the importer’s name and address.
Additional charges
Enter additional charges as needed.
Ship
Click the Ship button to complete the shipment and print the shipping label and commercial
invoice if included with your shipment.
Print Commercial
Invoice
If you can’t access
this screen, check
the Print
commercial invoice
button on the
Commodity screen.
51
FedEx Ship Manager I 2180 I User Guide
Ship International
Terms of Sale
1
Free Carrier/Free on Board (FCA/FOB)
Seller is responsible for all costs of delivering the goods to the point of destination.
2
Carriage Insurance Paid/Cost Insurance and Freight (CIP/CIF)
Seller is responsible for the cost of freight, insurance, and miscellaneous charges to the
point of destination.
3
Carriage Paid To/Cost and Freight (CPT/C&F)
Seller is responsible for the cost of freight to the point of destination.
Buyer is responsible for the cost of insurance.
4
Ex Works (EXW)
Seller makes the goods available to the buyer.
Buyer is responsible for all costs of delivering the goods to the point of destination.
5
Delivered Duty Unpaid (DDU)
Seller is responsible for the cost of delivering the goods to the place of destination.
Buyer is responsible for the cost of clearing the goods through customs.
6
Delivery Duty Paid (DDP)
Seller is responsible for the cost of delivering the goods to the point of destination,
including duties, taxes, and miscellaneous fees.
Terms of Sale
Terms of Sale
indicate which
costs the buyer and
seller are
responsible for.
52
FedEx Ship Manager I 2180 I User Guide
Ship International
FedEx International Services
FedEx Express Services
•
FedEx International Priority®
Delivers typically in 1 to 3 business days
•
FedEx International Economy®
Delivers typically in 4 to 5 business days
•
FedEx International Priority® Freight
Delivers typically in 1 to 3 business days
•
FedEx International Economy® Freight
Delivers typically in 5 business days (U.S. only)
FedEx Ground Services
•
U.S. to Canada
Delivers typically in 3 to 6 business days by 5:00 P.M.
•
U.S. to Puerto Rico
Delivers typically in 3 to 7 business days by 5:00 P.M.
•
Canada to the U.S.
Delivers typically in 3 to 6 business days by 5:00 P.M.
53
FedEx Ship Manager I 2180 I User Guide
Shipping List
More Shipping Power
How to Modify Shipments
You can modify shipments before you close the day. When you modify a shipment, FedEx
Ship Manager assigns a new tracking number and prints a new shipping label.
Note: To modify or delete a package in a multiple-piece shipment, you must delete the entire
shipment and process it again.
1
If you know the tracking number, click the Cancel/Modify shipment button at the bottom
of the Shipping screen.
2
If you don’t know the tracking number, click the Shipping List button at the top of the
Shipping screen.
3
Select Domestic or International.
4
Select the package you want to modify.
5
Click the Modify shipment button.
6
When you modify a shipment, FedEx Ship Manager automatically deletes the package
tracking number. To continue, click Yes.
7
Enter your changes on the Shipping screen and click the Ship button when you finish.
8
Replace the original shipping label with the new label.
Modify Shipments
You can modify
shipments before you
close the day. Be
sure to replace the
old label with the
new label.
54
FedEx Ship Manager I 2180 I User Guide
Shipping List
How to Delete Shipments
To delete a package, follow the steps below if you have not closed your shipments for the
day. The package will not be included in your Courier Report or Invoice.
Important: If you have already closed your shipments, please call the FedEx Ship Manager
Support Center. In the U.S., call 1 888 670-8981. In Canada, call 1 877 853-4485.
1
If you know the tracking number, click the Cancel/Modify shipment button at the bottom
of the Shipping screen.
Enter the tracking number and click the Cancel shipment button.
2
If you don’t know the tracking number, click the Shipping List button at the top of the
Shipping screen.
3
Select Domestic or International.
4
Select the package you want to delete from the Shipping List screen.
Delete Shipments
To delete a package
in a multiple-piece
shipment, you must
delete the entire
shipment.
5
Click the Delete button.
6
Click Yes to delete the package.
55
FedEx Ship Manager I 2180 I User Guide
Shipping List
How to Repeat Shipments
You can repeat today’s domestic and international shipments before you end your shipping
day. When you repeat a shipment, FedEx Ship Manager fills in the shipment information on
your screen, so you can make any changes needed before you print the shipping label.
There are two ways to repeat shipments.
To repeat the previous package
1
Click the Repeat button immediately after you process a shipment you want to repeat.
2
Enter any changes to the new shipment.
3
Click the Ship button when you finish.
To repeat a shipment from the shipping list
1
Click the Shipping List button at the top of the Shipping screen.
2
Select Domestic or International.
3
Select the shipment from the Domestic or International Shipping List.
4
Cick the Repeat button.
Repeat Shipments
Select the shipment
you want to repeat
from the Shipping
List.
56
FedEx Ship Manager I 2180 I User Guide
Shipping List
How to Reprint a Commercial Invoice
FedEx Ship Manager allows you to reprint a Commercial Invoice for today’s shipments and
for previous shipments. The information is the same as the original Commercial Invoice and
can be viewed on your screen, saved to a file, or printed on your report printer.
1
Click the Report button at the top of the screen.
2
Click the Commercial Invoice tab (the last tab on the right).
Reprint CI
You can reprint a
Commercial Invoice
from the Report
screen.
3
Identify the shipment by entering a tracking number, shipment date, recipient name,
destination, or business code.
4
Click Search.
FedEx Ship Manager displays the shipments that meet your search criteria, so you can
choose the correct shipment.
5
Select the shipment from the search results.
6
Click Screen, Print, or Save File to print or view the Commercial Invoice.
57
FedEx Ship Manager I 2180 I User Guide
Shipping Profiles
Shipping Profiles
Shipping Preferences
To save time shipping packages, select shipping preferences to automatically fill in shipment
information while you ship.
• For example, if you ship most of your packages using FedEx Priority Overnight service,
select FedEx Priority Overnight as a constant preference.
• Or if you repeat the same department notes for a series of shipments, select a carry over
preference for department notes.
Customize Shipping Profiles
Your system has a default domestic shipping profile and a default international shipping
profile which you can customize and change to streamline your shipping. You can also add
shipping profiles to customize preferences for indivdiual shippers’ needs.
If you create a new shipping profile, you must assign the profile to the appropriate sender
in the sender database to apply the sender’s preferences. Then be sure to select the
appropriate current sender to activate the sender’s preferences on the shipping screen.
To customize shipping preferences, select a domestic or international shipping profile and
follow the instructions on the following pages. Then update senders if you create new
shipping profiles.
Handling Charge
To print handling
charges on the doc
tab, see Handling
Charge on page 62.
Doc Tab Comments
To print comments
on the doc tab, see
Configure Doc Tab
Data on page 63.
Service
To automatically fill
in the service type,
select a Constant or
Carry over preference
for the Service field.
See page 60.
Label Format
The label format in
this example is 354. To
select your label
format, see Label
Format on page 63.
58
FedEx Ship Manager I 2180 I User Guide
Shipping Profiles
How to Customize Shipping Profiles
To customize preferences for individual shippers, create additional shipping profiles and
select individual preferences.
1
Choose Shipping Profiles from the Customize menu at the top of the screen.
2
To modify a shipping profile, select the profile and click Update.
3
To add a shipping profile, click the Add button and enter a new name and description. Or
highlight a shipping profile and click the Add by Duplication button.
4
When you update domestic shipping profiles, select Outbound for the Preference Type
on the left of the screen.
Default Profiles
Your system has a
default domestic
and international
shipping profile.
Plus you can create
additional profiles.
Outbound
Select Outbound for
the Preference Type,
unless you want to
select preferences
for return labels.
59
FedEx Ship Manager I 2180 I User Guide
Shipping Profiles
Field Preferences and Behavior
5
Scroll through the list of fields on the Field Preferences tab. To select a preference,
highlight one of the fields inside the box. For example, highlight Service if you ship most
of your packages using FedEx Priority Overnight® service.
6
Choose one of the options for the Behavior:
Constant
Check this option to automatically fill in the same information for each shipment. For
example, if you choose FedEx Standard Overnight® service for all of your domestic
packages, choose Constant for the behavior. Then select the field value in step 7 below.
To change the information for an individual shipment, press the F11 key on the shipping
screen. To change the information for all shipments, update this screen.
Carry
Check this option to carry over or repeat information from one shipment to the next.
When you change the information for one shipment, your changes carry over to the
next shipment. If you enter the same information for a series of shipments, such as
References or Department/Notes, choose Carry for the behavior.
None
Check this option if you do not want to assign a default setting for a field.
Skip
Choose Skip if you want to skip a field when you process shipments. The Skip option
appears on the shipping profiles screen only for fields that are optional.
7
If you choose Constant for the behavior, select the information (value) to fill in
automatically for your shipments. For example, select FedEx Standard Overnight service
for the service type.
Field Preferences
In this example,
FedEx Standard
Overnight service
will fill in for your
domestic shipments.
60
FedEx Ship Manager I 2180 I User Guide
Shipping Profiles
Other Preferences
COD Remittance
Create a sender code
which contains the
COD remittance
address. Then select
the sender code for
your COD shipments.
8
COD Remittance Code
The COD remittance address on your COD return label may differ from the sender
address. To print a different COD remittance address, first create a sender code and
enter the remittance address. Then select the sender code in the COD Remittance Code
choice list.
9
Default Recipients to Residential
If you ship all packages to residential addresses, select this option to automatically
check the Residential box for each shipment.
10 Validate and Require Department/Notes
Check this option if you require Department/Notes for each shipment. The department
notes entered on the shipping screen must be included in the Department database.
Note: This option cannot be selected if there is a constant default for Department/
Notes.
Start Position
11 Start Position
Your cursor can begin in the Recipient ID field or the Contact Name field when you ship
a package. Choose the field you want to come first.
12 Continue selecting defaults on the next page. When you finish, you must assign the
shipping profile to the appropriate sender if you have more than one domestic or
international shipping profile.
61
FedEx Ship Manager I 2180 I User Guide
Shipping Profiles
Other FedEx Express Preferences
These options are available for FedEx Express shipments, in addition to Field Preferences
and Group Ship Preferences. These options are for FedEx Express shipments only. For
additional FedEx Ground preferences, see page 65.
1
Click the Other FedEx Express Prefs tab on the Shipping Profile Maintenance screen.
2
Tracking # Overwrite (Domestic Shipments)
FedEx Ship Manager automatically assigns tracking numbers and prints the tracking
numbers on your shipping labels. If you have pre-assigned tracking numbers or print
standard airbills, select this option so you can enter tracking numbers by hand.
3
Insert Department/Notes in References
Choose this option to print Department/Notes in the References field.
4
Require References
Check this option if you require references for FedEx Express shipments. If you customize
references, you must also select this option if you require references.
5
Reference Label (Domestic Shipments)
For FedEx Priority Freight shipments, you may print an optional label to provide additional
delivery information. To print an optional label, check the corresponding freight service.
6
Handling Charge
• To print an additional handling charge on the doc-tab portion of the label, check the
Include Handling Charge box.
• To charge the same amount for each shipment, check the Flat Charge box. and enter
the dollar amount in the box to the right. To charge a percentage of shipping charges,
check the corresponding option and enter the percentage.
Handling Charge
You can print
handling charges on
the doc tab portion
of the label.
62
FedEx Ship Manager I 2180 I User Guide
Shipping Profiles
7
Label Format
To identify the label stock you use for your shipments, choose the label format number
from the choice list. The label format is printed at the bottom of your labels.
8
Configure Doc Tab Data
You can print up to 3 optional comments lines on the doc-tab portion of your labels. To
enter comments, click the Configure Doc Tab Data button and enter the text to print on
the doc tab. You can also print the declared value for carriage by checking the Include
Carriage Value box.
Doc Tab Comments
Click the Configure
Doc Tab button to
enter comments to
print on the doc tab.
Return Recipient
Select a sender code
with the name and
address you want to
print on return
shipping labels.
9
Return Recipient (Domestic Shipments)
•
If you print domestic return shipping labels, select a sender code for the Return
Recipient at the bottom of the screen. The sender’s name and address print in the
recipient section of your return shipping labels.
•
All domestic shipping profiles use the same return recipient. When you select a
return recipient in one shipping profile, the same sender code is automatically
selected in all shipping profiles.
10 International Air Waybill Format
For international shipments, you may print the standard multi-ply air waybill on your
report printer. If you use standard air waybills for any of your international shipments,
select the label format from the choice list.
11 Continue selecting preferences on the following page. When you finish, you must
assign the appropriate shipping profile to individual senders if you have more than
one domestic or international shipping profile.
63
FedEx Ship Manager I 2180 I User Guide
Shipping Profiles
Group Ship Preferences
If a service or special service is not available for a recipient in a group shipment, you will not
receive a shipping label for the recipient unless you select group shipment preferences.
Group shipping preferences indicate whether to automatically upgrade or downgrade services
that are not available.
1
Click the Group Ship Prefs tab on the Shipping Profile Maintenance screen.
2
For each service on the screen, you can select upgrade, downgrade, or none.
Upgrade Service
If a service is not available for a recipient, choose upgrade if you want to ensure the
package arrives on time. In most cases, an upgrade costs more than the service selected
for the group shipment.
Downgrade Service
If a service is not available for a recipient, choose downgrade if you do not want to incur
an additional fee to upgrade the service. In most cases, the package is delivered one or
two days after the service selected for the group shipment.
None
Choose None if you do not want to upgrade or downgrade a service.
3
Continue selecting preferences for domestic or international shipments. When you finish,
you must assign the appropriate shipping profile to individual senders if you have more
than one domestic or international shipping profile.
Group Preferences
If a service is not
available for a
recipient in a group
shipment, a service
upgrade or
downgrade will
change the service
for the recipient
and print the label.
64
FedEx Ship Manager I 2180 I User Guide
Shipping Profiles
Other FedEx Ground Preferences
These options are available for FedEx Ground shipments, in addition to Field Preferences
and Group Ship Preferences. These options are for FedEx Ground shipments only. For
additional FedEx Express preferences, see page 62.
1
Click the Other FedEx Ground Prefs tab on the Shipping Profile Maintenance screen.
2
Require References
Check this option if you require references for FedEx Ground shipments. You can customize
references from the Field Preferences tab, but you must also select Require References
if you require references for your FedEx Ground shipments.
3
Handling Charge
• To print an additional handling charge on the doc-tab portion of the shipping label,
check the Include Handling Charge box.
• To charge the same dollar amount for each shipment, check the Flat Charge box.
Then enter the dollar amount in the box to the right.
• To charge a percentage of shipping charges, check the corresponding option and
enter the percentage.
4
Label Format
To identify the label stock you use for your shipments, choose the label format number
from the choice list. The label format is printed at the bottom of your labels.
5
Continue selecting preferences for domestic or international shipments. When you finish,
you must assign the appropriate shipping profile to individual senders if you have more
than one domestic or international shipping profile.
Ground Preferences
If you ship packages
using FedEx Ground
or Home Delivery,
select preferences for
these shipments on
this screen.
65
FedEx Ship Manager I 2180 I User Guide
Shipping Profiles
How to Assign Sender Profiles
When you create a shipping profile for an individual shipper, follow these instructions to
select the shipping profile on the sender’s database information screen. To use the sender’s
preferences, update the current sender before shipping packages. The current sender’s
shipping profiles are used to ship packages.
1
Select the Sender database from the Customize menu.
2
Select the sender to assign a shipping profile and click the View/Edit button.
3
Select the domestic or international shipping profile in the Shipping profiles section on
the left.
Default Profiles
Default shipping
profiles are
automatically
assigned to the
senders in your
sender database.
Senders
If you create new
shipping profiles,
select the new
profiles you want
individual senders
to use.
66
FedEx Ship Manager I 2180 I User Guide
Shipping Profiles
How to Customize Shipping References
There are 4 reference fields you can use to record references for your domestic and
international shipments. These include:
• Customer Reference
• Additional Reference 1
• Additional Reference 2
• Additional Reference 3
You can customize any of these reference fields to prompt for reference information while
you ship packages. You can create more than one prompt for each reference field and
choose whether each prompt is required.
References
This example
includes 2 field
prompts that will
display on the
shipping screen.
If you require reference information for any of the 4 reference fields on the shipping screen,
you must also select Require References for Other FedEx Express Preferences or Other
FedEx Ground Preferences. To customize shipping references, continue below.
Customize Shipping References
1
Select Shipping Profiles from the Customize menu at the top of the screen.
2
Select the shipping profile you want to update and click the Update button.
3
Select Customer Reference for the primary reference field. To customize other reference
fields, select Additional References 1, 2, or 3.
Configurable
Select one of the
reference fields in the
Field Prefs window
and click the
Configurable button
on the right.
67
FedEx Ship Manager I 2180 I User Guide
Shipping Profiles
4
Select Configurable. The View Configurable References screen displays.
5
Click the Add button. The Configurable References Maintenance screen displays.
6
Field Prompt
When you customize references, a popup box displays in the references field on the
shipping screen. Enter the text you want to display in the popup box that will prompt
you to enter references. For example, enter Ticket # to prompt for a ticket number.
7
Field Length
Enter the maximum number of characters you can enter for this prompt.
8
Field Data Type
Select the type of characters to allow for this prompt.
9
Field Behavior
None Select None if you can enter any reference information for this prompt.
View References
This screen will be
blank the first time
you customize
references.
Carry Select Carry to carry over reference information from one shipment to the next.
Constant Select Constant to automatically fill in reference information for this prompt.
Then enter the reference information to fill in.
For example, to print Ticket # in the reference field, enter Ticket #.
Constant
You can enter the
reference information
you want to print for
any field prompt. Or
you can allow the
shipper to enter
reference information
for the field prompt.
68
FedEx Ship Manager I 2180 I User Guide
Shipping Profiles
10 Field Required
Check this box if you require reference information for this prompt. This option allows
you to require reference information for some prompts and not others.
Important: If you require references for each shipment, select Require References on the
Other FedEx Express Preferences screen or the Other FedEx Ground Preferences screen.
11 Click OK.
12 If you want to add another field prompt for the reference field, click the Add button and
repeat steps 6 through 11.
For example, enter a second field prompt to enter the actual ticket number.
Multiple Field
Prompts
You can add more
than one field
prompt for each
reference field.
13 To see how the field prompt (or prompts) will appear on the shipping screen, click the
Show Screen button at the bottom of the View Configurable References screen.
Show Screen
Click the Show
Screen button to see
what the field
prompt(s) will look
like on the shipping
screen.
69
FedEx Ship Manager I 2180 I User Guide
Databases
Back Up Databases
Databases store information such as recipient addresses, package dimensions,
commodities, and IATA dangerous goods articles. Once you enter information in a database,
you can select the information to fill in for your shipments.
When to Back Up Databases
It’s important to maintain current backup files of your databases. Below are suggested
guidelines for when to back up databases.
• Schedule weekly or monthly backups. And as a reminder, select Require Backup on the
System Settings screen.
• Always back up an existing FedEx Ship Manager database before you import a database
to replace or add to the existing database.
• Back up databases after you enter a lot of changes or import a database.
How To Back Up Databases
1
Select File Maintenance from the Databases menu at the top of the screen.
2
Select Backup.
Back Up Databases
Back up databases
regularly so that you
can restore a
database from a
backup diskette if a
database becomes
damaged or lost.
3
Select one or more databases or click the Select All button to back up all databases and
click OK.
4
Insert a formatted diskette (high density) and click OK. FedEx Ship Manager displays
a message to let you know that the backup is complete.
70
FedEx Ship Manager I 2180 I User Guide
Databases
Restore Databases
By keeping backup diskettes of your databases, you can restore a database from a backup
diskette if a database is damaged or lost on your FedEx Ship Manager system.
How To Restore Databases
1
Select File Maintenance from the Databases menu at the top of the screen.
2
Click Restore.
The File Maintenance screen displays the databases you can restore.
Restore Databases
Restore a database
from a backup
diskette only if it is
damaged or cannot
be used.
3
Select the database to restore.
4
Select Replace or Append and click OK.
• Replace
If you select Replace, the data on the diskette will replace all of the data in your
current FedEx Ship Manager database. All data in your current database will be
removed.
•
5
Append
If you select Append, the data on the diskette will be added to your current FedEx
Ship Manager database. None of the data in your current database will be removed.
When prompted, insert the backup diskette and follow the instructions on your screen.
71
FedEx Ship Manager I 2180 I User Guide
Databases
Import and Export Databases
Database Templates
You can import data to and from FedEx Ship Manager in ASCII format using import and
export templates provided by FedEx Ship Manager. You can also modify templates and
create your own. When you import data, you can add data that may be missing from the
source file. For example, add the Customs ID when importing senders or recipients.
Important: The first step in importing or exporting data is choosing a template.
How to Add or Update Templates
Follow these instructions to add or update templates. These instructions also include how
to import default values on page 74.
• IMP is the file extension for import templates.
• EXP is the file extension for export templates.
1 Select Templates from the Databases menu at the top of the screen. The View Templates
screen displays.
Templates
Import templates
have the extension
.IMP
Export templates
have the extension
.EXP
2
3
4
To use an existing template, select the template and click the View/Edit button.
To duplicate a template, select the template to copy and click the Add By Duplication
button. Then enter a name for the new template.
To create a new template:
• Click the Add button. Enter an ID and a description of the template.
• For Type, select Import or Export to describe the type of template you are creating.
• In the Database choice list, select the database you are importing or exporting.
• Enter a default import or export file name, such as sender.csv or a:\sender.csv.
72
FedEx Ship Manager I 2180 I User Guide
Databases
5
For Format, choose Delimited or Fixed.
• Delimited Format
Fields are usually surrounded by single or double quotation marks and separated
by commas or spaces. See the example below.
"SENDER1","Jane Doe","PetsRus","1 Front Street","Fairfield","Ohio"
• Fixed Format
Each field has a fixed number of characters. See the example below.
SENDER1 Jane Doe PetsRus 1 Front Street Fairfield Ohio
Database Fields
All of the fields a
FedEx Ship Manager
database can include
are shown on the left.
6
Select the Default Country Code for the information in the database.
7
To add a field to the template, select the field from the Database Fields section and click
Add. The field will move to the Template Fields section on the right.
8
To remove a field from the template, select the field from the Template Fields section on
the right and click the Remove button.
9
If needed, you can reduce the Length (number of characters) of a field. Select the field
in the Template Fields section and click on the Length for the field. Then enter the
number of characters in the Length field.
10 Continue adding or modifying fields to include in the template.
11 To export a database, click OK and go to page 77.
To import a database, continue on the next page for additional features.
73
FedEx Ship Manager I 2180 I User Guide
Databases
Import Default Values
When you import a database to FedEx Ship Manager, you can import information that is
not included in the file you are importing. For example, you can add a Customs ID number
to your Sender database. To import information, first complete the steps on pages 72 and
73. Then follow the instructions below.
How to Import Default Values
1
2
3
4
5
Complete the instructions on pages 72 and 73.
To modify a field in an import template, select the field from the Template Fields
section. For example, select Customs ID/EIN to add a Customs ID/EIN value.
Find the Spec. Fmt (Special Format) column on the far right. If the Special Format
(Spec. Fmt) column does not display in the Template Fields box, move the scroll bar to
the right. See the sample screen below.
Click on the Spec. Fmt area of the screen for the field that is highlighted.
Choose an option from the Spec. Fmt list to specify the format of the data you want to
import. Examples include Character or Numeric.
Special Format
Select the format of
the data you want to
add or modify.
6
7
With the field highlighted, click on the Default (Deflt.) Value area of the screen in the
example below.
Then enter the text you want to import in the Default Value field.
8
9
Continue adding or modifying fields to include in the template. Then click OK.
To test and import the database, continue on the next page.
Default Value
Enter the data or
information you want
to import.
74
FedEx Ship Manager I 2180 I User Guide
Databases
Import Databases
You can import a database file from another FedEx system or a non-FedEx system, such as
a Microsoft Excel or Microsoft Access file, in ASCII format. Before you import a database
file, select the template, copy the database to a test file, and import the test file.
How to Test Databases
1
Copy the file you are going to import to FedEx Ship Manager. You can remove data
from the test file if you want to test a smaller amount of information.
2
Back up your existing FedEx Ship Manager database onto a diskette. See page 70.
3
Select File Maintenance from the Databases menu at the top of the screen.
4
Select Import. The File Maintenance-Import screen displays.
5
Select the import Template Name.
See pages 72 through 74 to add or modify a template. You can also modify the template
to import default data not included in the database as shown on page 74.
6
Insert the test database diskette.
7
For Input Filename, enter a:\ followed by the test file name. For example, a:\test.csv.
8
For Import Behavior, select Append, so your current FedEx PowerShip database will
not change.
9
You can automatically assign codes by clicking Auto-assign codes. You can assign a
code prefix, the length of a numeric suffix, and a starting suffix number.
Import a Test File
Before you import a
database, import a
test file and view
the results.
10 Click OK. The system notifies you when the import is complete.
11 Select the database from the Database menu and view the new data.
12 Make any changes needed to the template or the import database before you import
the actual database file.
13 To import the database, continue on the next page.
75
FedEx Ship Manager I 2180 I User Guide
Databases
How to Import Databases
1
Back up the existing FedEx Ship Manager database onto a diskette. See page 70.
2
If you have not tested the import file, see the instructions on the previous page.
3
Select File Maintenance from the Databases menu at the top of the screen.
4
Select Import. The File Maintenance-Import screen displays.
5
Select the import Template Name.
See pages 72 through 74 to add or modify a template. You can also modify the template
to import data not included in the database.
Insert the diskette which contains the import file into the a: drive.
Important:
Back up the current
database from
FedEx Ship
Manager before you
import the database
file.
6
7
For the Input Filename, enter a:\ followed by the default import file name. Or click the
Browse button and select the import file.
8
For Import Behavior, select Append if you want to add data to your existing FedEx Ship
Manager database.
Select Replace if you want to replace your existing FedEx Ship Manager database with
the import data. (Make sure you have a current backup diskette first!)
9
You can automatically assign codes by clicking Auto-assign codes. You can assign a
code prefix, the length of a numeric suffix, and a starting suffix number.
10 Click OK.
The system notifies you when the import is complete.
11 Select the database from the Database menu and view the new data.
76
FedEx Ship Manager I 2180 I User Guide
Databases
Export Databases
FedEx Ship Manager exports data in ASCII format using the template you specify.
1
If you have not chosen an export template, select Templates from the Databases menu
at the top of the screen.
2
Select an export template from the View Templates screen. Then see pages 72 and 73 to
view the contents of the template and make any changes needed.
3
After you view the export template and make any changes required, select File
Maintenance from the Databases menu at the top of the screen.
4
Insert a blank diskette in the a: drive.
5
Select Export.
The Export Maintenance screen displays.
Export Template
To export a FedEx
Ship Manager
database, you must
use an export
template.
Shipment History
You can export
shipment history
using the
Shipment.Exp
template.
6
Select the export template to use.
7
For Output Filename, enter a:\ followed by the file name you want to export. For example,
a:\shipments.csv. Or you can search for your file by clicking Browse.
8
Click OK.
The system exports the database file and saves it to diskette.
77
FedEx Ship Manager I 2180 I User Guide
Track Packages
Tracking
With FedEx Ship Manager, you can track the latest status of your shipments directly from
Federal Express. After you request tracking information, continue using FedEx Ship Manager
and you will receive a message when the tracking results are ready for you to view. Click the
Track Results tab from the tracking screen and enjoy the following features:
• Print or view tracking results on your report printer or screen
• Display packages with exceptions only
• Display undelivered packages only
• Request a Signature Proof of Delivery letter
How to Print a Proof of Delivery Letter
After a package is delivered, you can print or view a Proof of Delivery letter as shown below.
1 Click the Track by numbers and reference tab on the Tracking screen.
2 Enter the tracking number in the Tracking number field and click Add.
3 Select the tracking number on the right side of the screen and click Track.
4 When you receive a message indicating the tracking results are available, click OK.
5 Select the shipment on your screen and click Show details.
6 Click the Request Proof of Delivery Letter button.
7 Select View/Print Proof of Delivery letter, or select Fax Signature Proof of Delivery Letter
if you want to print the recipient’s signature. If you choose Fax, you need the recipient’s
fax number, as well as your own. Click OK.
8 When you receive a message indicating the letter is available, click Show details.
9 Click the View Proof of Delivery Letter button.
Proof of Delivery
You can print, view,
or fax a proof of
delivery letter after a
shipment is
delivered.
78
FedEx Ship Manager I 2180 I User Guide
Track Packages
How to Track by Number
Use the Track by Number screen to track packages by tracking number or door tag number.
Door Tag Number
A door tag number begins with the letters “DT” and is followed by 12 numbers. A door tag
is assigned to a FedEx Express shipment if the recipient is not available when the courier
attempts to deliver a package. The door tag number will appear on the delivery slip.
Follow these instructions to track by tracking number or door tag number.
1 Click the Track button at the top of the screen.
2 In the Tracking number field, enter a FedEx tracking number or door tag number and
click the Add button. You can enter more than one package number to track more than
one package at a time.
Note: To track a multiple-piece shipment, enter a tracking number for any package in the
shipment.
3 Enter any additional tracking numbers or door tag numbers you want to track.
4 Click the Track button to begin tracking.
Note: You can continue using FedEx Ship Manager and you will receive a message
when the tracking results are available.
Door Tag Number
If no one is home
when a courier
attempts to deliver a
package, the courier
may leave a delivery
slip with a door tag
number.
79
FedEx Ship Manager I 2180 I User Guide
Track Packages
How to Track by Reference
When you track packages by reference, you need to provide the following information.
• Enter the exact reference information that was entered on the shipping screen
• Select the FedEx account number that was used when the packages were shipped
• Specify the ship date or range of dates when the packages were shipped
To track by reference, follow these steps.
1 Click the Track button at the top of the screen.
2 If you are tracking FedEx Express shipments, click the FedEx Express reference button.
If you are tracking FedEx Ground shipments, click a reference button to indicate which
reference field was used to enter shipping references.
• FedEx Ground references
• FedEx Ground invoice number
• FedEx Ground P.O. number
• FedEx Ground shipment ID
Note: FedEx Express references and FedEx Ground references are entered on the
Shipment Details screen. Other FedEx Ground references are entered on the Shipment
Options screen.
3 Enter the exact reference information that was entered on the shipping screen in the
Reference value field.
4 Choose the FedEx account number for your shipments.
5 Enter the ship date or range of dates when tracking FedEx Express shipments. Enter the
ending date when tracking FedEx Ground shipments.
Track by Reference
FedEx Express
references and FedEx
Ground references
are entered on the
Shipment Details
screen.
80
FedEx Ship Manager I 2180 I User Guide
Track Packages
How to Track from Shipping History
When you track packages from your shipment history, you indicate what parameters you
want to use to identify the packages you want to track. Like track by reference, you will enter
a ship date or range of dates. In addition to ship dates, you can track shipments by the
following criteria:
Tracking Criteria
• References
• Recipient country, company name, contact name, or id
• Sender company name, contact name, or id
• Department
• Package contents
• Special services
• Multiple piece shipments
• COD return shipments
To track from shipment history, follow these steps.
1 Click the Track button at the top of the screen.
2 Click the Track from shipping history tab.
3 Enter the starting and ending ship dates of the shipments you want to track.
4 Enter any additional information on the remainder of the screen.
5 Click the Search for shipments button.
Next, FedEx Ship Manager displays the shipments that match your criteria on the right.
6 Choose each package you want to track on the right.
7 Click the Track button.
Track from History
Explore the
numerous ways to
identify and track
packages shipped
on your system.
81
FedEx Ship Manager I 2180 I User Guide
Reports
Shipping Reports
With FedEx Ship Manager, you can print more than 25 standard reports and other types of
reports listed below. You can also create only additional reports you may need.
• Shipment reports
• Shipment history reports
• Shipping log
• Commercial Invoices
You can print reports for a shipment date or range of dates and select the types of shipments
to include, such as domestic and international. To print reports, see the following instructions.
To reprint a commercial invoice, see page 57. To customize reports, see page 85.
How To Print Shipment Reports
Follow these steps to print reports for recent shipment activity and shipment history. FedEx
Ship Manager automatically moves shipments to your history file as often as the Ship
History Purge dates in your System Settings. Shipments remain in your history file so you
can print reports without having to restore previous shipments from a backup diskette.
1
Click the Report button at the top of your screen.
2
To print reports for recent shipping activity, click on one or more reports on the left of
the report screen.
3
To print reports using shipment history, click on the Shipment History tab.
4
Date Range
To print reports for a particular ship date or range of dates, enter the dates in the Date
Range fields.
Print Reports
Print reports by
ship date, invoice,
or cycle number.
82
FedEx Ship Manager I 2180 I User Guide
Reports
5
Invoice/Cycle Number
To print reports showing the shipping activity for a particular invoice or cycle number,
click on one of the invoice or cycle options. Then select the invoice number or cycle
number from the choice list.
6
Override
To choose the types of shipments for the report, click the Override Include button. Then
check the shipments to include in the report. For example, check FedEx Express and
FedEx Ground domestic and international shipments.
Override
Identify which
types of shipments
to include in your
reports.
7
Output
Select an output option for printing or viewing the report.
• Screen To view the report on your screen, click the Screen button.
• Print To print the report on your report printer, click the Print button.
• Save File To save the report in a file, enter a file name and click the Browse button to
select the directory.
History Reports
After a certain
number of days,
shipments are moved
to your history file
for convenience
printing reports.
83
FedEx Ship Manager I 2180 I User Guide
Reports
How to Print the Ship Log
The Ship Log displays package information for the shipment date or range of dates you
indicate. You can include domestic and international shipments in your listing. And you can
include deleted shipments or shipments with errors. The Ship Log cannot be customized like
your other reports.
1
Click the Report button at the top of your screen.
2
Click on the Ship Log tab on the report screen.
3
Date Range
Enter the shipment date or dates of the packages to include in the log.
Include
Selet the types of shipments to include in the log.
• Include domestic
• Include international
• Include errors
• Include deleted packages
4
5
Output
Select an output option for printing or viewing the report.
Ship Log
The ship log lists
packages shipped
on the dates you
request.
84
FedEx Ship Manager I 2180 I User Guide
Reports
How to Customize Shipping Reports
FedEx Ship Manager has over 25 shipping reports and allows you to create and customize
any additional reports you may need.
1
Click the Report button at the top of your screen.
2
Click the Customize Shipment Reports button on the left of the Reports screen.
3
4
To modify an existing report, select the report and click the View/Edit button.
To create a new report, click the Add button. Or select a similar report and click the Add
by Duplication button.
Report Section 1
1
Report Title
If this is a new report, enter a unique Report Title.
2
Database
From the Database menu in the top right corner of the screen, choose the type of data
to include in the report.
• Choose Shipments for shipping reports.
• Choose Receive to customize inbound reports.
• Choose a Multiweight option to customize multiweight pricing reports.
Print Options (optional)
Check one of the Print Options if you want to print the report automatically at the end of
the day. If not, omit Print Options.
If your report includes FedEx Express or FedEx Ground shipments only, check the
corresponding Print Option.
3
1
Report Fields
Fields that are
included in the
report display on
the left.
85
FedEx Ship Manager I 2180 I User Guide
Reports
Report Section
Data to Include 2
To select the types of shipments you want to include in the report, begin by clicking the
Data to Include button on the left.
1
Data to Include
Click this button
to select the types
of shipments to
include in your
report.
2
Report Section 3
1
Check any (or all) of the types of shipments to include in your reports. For example, to
include all shipments, except deleted shipments, see the sample screen below.
Note: To select data for an individual report, click the Override Include button when you
print the report. The Override Include button does not save your entries.
Data to Include
This screen also
displays by
clicking the
Override Include
button when you
print reports.
3
86
FedEx Ship Manager I 2180 I User Guide
Reports
Report Section 4
1
Add fields
To add a field to the report, select the field from the Field choice list on the left. Then
choose the following options.
Length of field
If you do not need to include the maximum number of characters, enter a lesser number.
2
3
Left margin of field
To add a left margin, enter the number of spaces to indent.
4
Line break after field
Check this option if you want to include a blank line below the field on the report.
Add
Click the Add button to add the field to the report.
5
Report Section 5
1
Move fields
To change the order in which the field appears on the report, select the field from the field
listing and click the up or down arrow.
4
Print Field List
To add a field to the
report, select a field
from the choice list.
5
87
FedEx Ship Manager I 2180 I User Guide
Reports
Report Section 6
1
Add comments
To add comments to the report, select ***Comment*** from the Field list.
2
Comments text
Enter the text that you want printed on the report in the Comment text field.
3
Left margin of field
To add a left margin before the comments, enter the number of spaces to indent.
4
Add
Click the Add button.
5
Move comments fields
Click the up or down arrow key to place the comments in the order you want them to
appear on the report.
Comments
To add comments,
select *Comment*
at the top of the
choice list.
6
88
FedEx Ship Manager I 2180 I User Guide
Reports
Report Section 7
1
Add a sort field
To add a sort field, click the Add button in the middle of the screen, under the Sort field
list section.
Add Sort Fields
To add a sort field,
click the Add button
7
2
Sort field
In the Add Sort Fields box, select a field from the choice list.
3
Start position
Enter 1 to begin sorting the field with the first character. To begin sorting with another
character, such as the third character, enter 3.
Length
Enter the number of characters to sort the field. For example, sort only 5 characters for
department notes: ABC111, ABC122, ABC133.
Print subtotals
Check this option if you want to print subtotals.
Click OK. The sort field moves to the Sort field list.
In the Sort field list, move the sort fields in the order you want them sorted, beginning
with the first sort field. Use the arrow keys to place the fields in sequential order so that
the first sort field is at the top of the list.
Choose Sort Fields
Select the sort field
from the choice list.
4
5
6
7
89
FedEx Ship Manager I 2180 I User Guide
Reports
Report Section 8
•
Create the layout of the report
Choose any options in the Layout section of the screen.
Print line length displays the maximum number of characters you can include for the
report width.
The actual number of characters included in the report appears to the right of the Print
Line field. This includes field lengths, spaces, and margins.
As you modify fields in the report, the actual number of characters updates automatically.
If the actual number of fields in the report exceeds the Print line length number, you are
prompted to modify the length of the report.
9
8
Report Section 9
•
Add subtotals
To print subtotals for a certain field, select the field in the Subtotal field list section and
click Add.
You can move subtotal fields in the order you want them to appear on the report. To move
a subtotal field, select the field and click the Move Up or Move Down button.
When finished modifying the report, click OK to save your changes.
90
FedEx Ship Manager I 2180 I User Guide
Close Shipments
Close the Day
After you process shipments, you must close them by the end of the day. The Close
procedure performs all necessary file maintenance, creates reports, and prints the FedEx
courier manifest.
There is a separate close procedure for FedEx Express shipments and FedEx Ground
shipments. You must perform the close routine for the types of packages you ship. If you
ship both types of packages, complete both close routines.
Important: If your system includes hardware provided by Federal Express, do not turn off
your hardware system when you complete the close routine. Leave your system on at all
times.
How to Close FedEx Express Shipments
FedEx Ship Manager automatically closes FedEx Express shipments at the Close Time
specified in your System Settings. If necessary, the Administrator can change the Close
Time on the System Settings screen. In addition, you can manually close your FedEx
Express shipments at any time necessary.
Close Shipments Manually
1
Click the Close Express button at the top of the screen.
2
Click the End Your FedEx Express Shipping Day button on the Close screen.
3
FedEx Ship Manager prints the FedEx courier manifest and shipping reports that are
set up for automatic printing after the Close process has finished.
If you do not want to print shipping reports automatically, select Hold for operator
selection.
Close Express
You must close
Express shipments
after you finish
shipping FedEx
Express packages for
the day.
91
FedEx Ship Manager I 2180 I User Guide
Close Shipments
How to Close FedEx Ground Shipments
If you ship FedEx Ground packages, you must close them when you finish shipping for the
day. When you close, FedEx Ship Manager automatically sends the EPDI file to FedEx and
prints the FedEx Ground Manifest.
Important: If you are using hardware provided by Federal Express, do not turn off your
system after you close the day. Leave your system on at all times.
Close Shipments
1
Click the Close Ground button at the top of the screen.
The FedEx Ground Close screen displays.
Close Ground
You must close
Ground shipments
after you finish
shipping FedEx
Ground packages for
the day.
2
Click the End Your FedEx Ground Shipping Day button to begin the close procedure.
3
FedEx Ship Manager prints the FedEx Ground Manifest automatically after the close
process has finished. FedEx Ship Manager also prints FedEx Ground reports that are
set up for automatic printing at the end of day, unless you select Hold for operator
selection.
Select Hold for operator selection if you do not want to automatically print end of day
reports after closing the day.
92

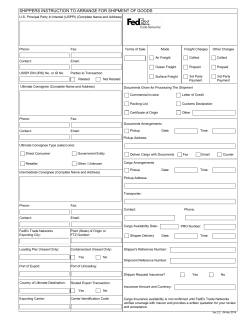


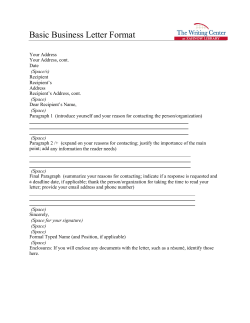


© Copyright 2026