
1 DRAGON AGE: ORIGINS
1
DRAGON AGE: ORIGINS
2
DRAGON AGE: ORIGINS
TABLE OF CONTENTS
STORY
CONTROLS
PC
FAQ
ACHIEVEMENTS
CODEX
COMPANIONS
GIFTS
LEGENDARY WEAPONS AND ARMORS
SPECIALIZATIONS
WALKTHROUGH
ORIGINS
DALISH ELF- A CHILD OF THE DALISH
DWARF COMMONER – ON THE STREETS OF DUST TOWN
CITY ELF – LIFE IN THE ALIENAGE
MAGI – IN THE HIGH TOWER OF THE MAGES
NOBLE HUMAN – THE COUSLANDS OF HIGHEVER
DWARF NOBLE – THE PRIDE OF AEDUCAN
MAIN QUESTS
JOINING THE GREY WARDENS
TAINTED BLOOD
THE GREY WARDENS’ CACHE
AFTER THE JOINING
THE TOWER OF ISHAL
LOTHERING AND THE IMPERIAL HIGHWAY
A VILLAGE UNDER SIEGE
THE ATTACK AT NIGHTFALL
THE ARL OF REDCLIFFE
THE URN OF THE SACRED ASHES
A TEST OF FAITH
GATHER AN ARMY
BROKEN CIRCLE
LOST IN DREAMS
NATURE OF THE BEAST
A PARAGON OF HER KIND
A PRINCE’S FAVOR: THE FIRST TASK
A LORD’S TRUST: THE FIRST TASK
A PRINCE’S FAVOR: THE SECOND TASK/A LORD’S TRUST: THE SECOND TASK
THE LANDSMEET
RESCUE THE QUEEN
CAPTURED!
UNREST IN THE ALIENAGE
THE FINAL ONSLAUGHT
SIDE QUEST
OSTAGAR
LOTHERING
REDCLIFFE
CIRCLE OF MAGI
BRECELIAN FOREST
ORZAMMAR
DENERIM
PARTY CAMP AND COMPANIONS
DLC
THE WARDENS’ KEEP
THE STONE PRISONER
RETURN TO OSTAGAR
COPYRIGHTS
3
DRAGON AGE: ORIGINS
AUTHOR’S NOTE
This is my third and final update I’m making during the second playthrough of the game, I’ve added almost everything I
wanted to add and checked it fully for mistakes. If there are still any mistakes or misspells then contact so that I can
correct them.
Lately, I’ve been getting some stupid mails about codex, if you can’t find the thing there then try looking the next room
instead of complaining. C’mon I’m a human being, you can’t except me to collect 330 codex without any mistakes. I tried
collecting as many mistakes I can in the second playthrough, if there are still any mistakes then contact me properly and
stop flaming. As for the beginners who are playing this awesome epic game for the first time, please go through the
tabbed section below for extra [USEFUL] tips:
•
It’s an epic game with 60 hours of game [TOOK ME 53:30 AND 47:00 HOURS TO BEAT IT COMPLETELY],
adopt a habit of saving the game frequently. Save, save, save, save, save. Save every dialoguing and movements
of your game, you’ll never know when you need to reload. We should really thank Bioware for giving unlimited
save slots, we would have been toasted if they made it limited save slots or auto-save every time we reach a
checkpoint.
•
I’m not the type who’ll write how many enemies are dwelling in each room, I’m a lazy person and I can’t do that
much work. NO WAY. If you can’t deal with couple of Genlocks and Hurlocks then quit playing instead of telling
me to write how to defeat them. If there’s really that much tough battle then I’ll mention it, besides that
there’s no telling how many creatures can be find in each area. It depends on difficulty level of the game, plus
there are places where creatures respawn due to a glitch . I’ve already written how to defeat each and every
boss, if you are still having trouble then change your difficulty level.
•
Some asking me how to find codex. Well it’s pretty easy, go to every room and hold Tab to highlight usable
objects. This is how everyone finds them so it should work for you as well.
•
Combat system of the game is very different from the others. IT IS A ROLE-PLAYING GAME but instead of
controlling one, you control four of your characters. Choose wisely when you choosing your origins,
specializations and weapon expertise for your main character, the same apply for the remaining NPCs as well.
Don’t try to change NPCs weapon expertise and specializations. For example: giving a two-handed sword for
Alistair when his originally a sword and shield type or giving reaver specialization with templar. Try to balance
the abilities when choosing specialization, Alistair is a templar and a good tank, give him berserker or
champion, which’ll increase his attack strength.
•
Decision making is the best feature in the game, the ability to weave the game as you want. Wow! Right? So
choose wisely when you are taking decisions, save those moments so that you can play as both good and evil.
This is definitely a game worth two-three playthroughs, try different things every time you play. Don’t stick to
same game play all the time, try to be evil kick-ass character. Believe me its damn too fun.
•
Plan your game, don’t go to the toughest place first and get your ass kicked. Start from the easier one, save
the tough ones for later. The best possible order I can think of is: Origins, Ostagar and Korcari Wilds,
Lothering, Redcliffe Village and Castle, Haven, Circle of Magi, Brecelian Forest, Orzammar, Denerim and The
Final Battle. When I first played this game, I went to Orzammar after completing Redcliffe Village, and yes as
you guys already guessed I got my ass beat up by the time I came out of the deep roads. Don’t do the same
mistake I did and get killed.
•
Finally, the most simple and important tip – keep gaming until your thumbs go red, grew numb and burst to
pieces and have fun!
STORY
You’ll begin the game as one of the six origins namely Dalish Elf, Dwarf Commoner, City Elf, Magi, Human Noble and
Dwarf Noble, each with its own storyline and characteristics. During the origin you’ll meets a NPC called Duncan, Leader
of the Grey Wardens, who brings the turning point by recruiting you to the Grey Wardens, an order of specialized
veterans of/from all races pledged to fight the Darkspawns till death.
In Ostagar, you’ll complete your Joining Ritual becoming a fully pledged Grey Warden. Soon the Darkspawns reach the
fortress and Duncan and King Cailon takes the front line while you and Alistair travels to the Tower of Ishal to light the
beacon to signal Loghain’s men to charge from the flank. After killing several Darkspawns that dwelled inside the tower
waiting for prays, you’ll manage light the beacon but Loghain pulls back his men and retreats to the capital and Cailon and
Duncan dies with remaining Grey Wardens and Soldiers.
4
DRAGON AGE: ORIGINS
After several days, Flemeth, the witch of the wilds manages to carry your half-dead bodies from the tower and heals
your injuries. In her hut, it becomes apparent that an Archdemon, a tainted Old Dragon God has been awaken and
leading the Darkspawn to the surface. With the loss of your beloved leader, Duncan, you and Alistair decides to use the
treaties to gather forces and slay the Archdemon. Meanwhile in Denerim, Queen Anora, Cailon’s wife and Loghain’s
daughter nominates her father as the regent to the throne.
When traveling to meet Arl Eamon, Alistair reveals he is the second son of King Maric and half-brother to King Cailon.
But in order to prove he is true heir to the throne you need to call the landsmeet and before that you need to gather an
army strong enough to push back the Darkspawn to the Deep Roads. With new companions to aid in your journey you’ll
travel to the deep cities of Orzammar, which is in turmoil without king and princes and landlords fighting for the throne,
ancients forests, which has been hunted by werewolves from centuries, dangerous Circle of Magi filled with powerful
abominations of blood mages and sick Arl of Redcliffe, who has poisoned by Loghain’s men, solving their problems and
making them pledge alliance to the Grey Wardens.
Finally, the sick Arl Eamon calls the Landsmeet to prove Loghain’s treachery to the nobles and to return the throne to
its rightful heir. Riodorn, a Grey Wardens from the neighbouring country, informs that only the Grey Wardens must
personally engage in battle and slay the Archdemon sacrificing their own life. In the Final Battle, you’ll be made to
choose between your life or your fellow Grey Warden’s life, which’ll decide the final outcome of the game.
CONTROLS
NOTE: GAME’S NOT SUPPORTING MY XBOX CONTROLLER SO… HOPE YOU CAN UNDERSTAND. SORRY.
PC
SELECT FULL PARTY
SELECT PARTY MEMBER 1
SELECT PARTY MEMBER 2
SELECT PARTY MEMBER 3
SELECT PARTY MEMBER 4
ADD PARTY MEMBER 1 TO GROUP
ADD PARTY MEMBER 2 TO GROUP
ADD PARTY MEMBER 3 TO GROUP
ADD PARTY MEMBER 4 TO GROUP
QUICKBAR
QUICKBAR
QUICKBAR
QUICKBAR
QUICKBAR
QUICKBAR
QUICKBAR
QUICKBAR
QUICKBAR
QUICKBAR
1
2
3
4
5
6
7
8
9
10
FIX CAMERA UP
FIX CAMERA DOWN
FIX CAMERA LEFT
FIX CAMERA RIGHT
MOVE CAMERA LEFT
MOVE CAMERA RIGHT
FIX CAMERA
ZOOM IN
ZOOM OUT
MOVE FORWARD
MOVE BACKWARD
MOVE LEFT
PARTY SELECTION
=
F1
F2
F3
F4
Shift + F1
Shift + F2
Shift + F3
Shift + F4
QUICKBAR
1
2
3
4
5
6
7
8
9
0
CAMERA CONTROLS
Up
Down
Left
Right
A
D
Middle-Click
Scroll Forward
Scroll Backward
PLAYER CONTROLS
W
S
A
5
DRAGON AGE: ORIGINS
MOVE RIGHT
TOGGLE RUN/WALK
SWAP WEAPON SETS
CHARACTER RECORD
JOURNAL
INVENTORY
SKILLS
SPELLS & TALENTS
MAP
WORLD
MAIN MENU
TACTICS
PAUSE
HOLD POSITION/ MOVE FREELY
HIGHLIGHT USABLE OBJECTS
QUICK SAVE
QUICK LOAD
SCREENSHOT
HIDE MAIN INTERFACE
D
NUMPAD /
/
MENUS
C
J
I
K
P
M
N
Esc
\
MISCELLANEOUS
Space
H
Tab
F5
F9
Print Screen
V
FAQ
ACHIEVEMENTS
LAST OF THE LINE
Complete the Noble Human origins
CORRUPTED
Complete the Dalish Elf origins
CONSCRIPTED
Complete the City Elf origins
HARROWED
Complete the Magi origins
CASTELESS
Complete the Dwarf Commoner origins
KINSLAYER
Complete the Dwarf Noble origins
LAST OF THE WARDENS
Complete Ostagar
STANDARD-BEARER
Use the Grey Wardens treaties and recruit all allies
HERO OF REDCLIFFE
Complete ‘The Arl of Redcliffe’
RABBLE-ROUSER
Complete ‘The Landsmeet’
MERCENARY
Complete 15 job-boards quests
RECRUITER
Recruit all party members
PERFECTIONIST
Discover all possible endings
EDUCATED
Use a tome to learn a new skills
MAGIC SYMPATHIZER
Side with the mages in the ‘Broken Circle’
ANNULMENT INVOKER
Side with the templars in the ‘Broken Circle’
SLAYER
Side with the werewolves in ‘Nature of the Beast’
GAME SCORE
10 G
10 G
10 G
10 G
10 G
10 G
20 G
20 G
20 G
20 G
20 G
25 G
50 G
15 G
20 G
20 G
20 G
6
DRAGON AGE: ORIGINS
POACHER
Side the elves in ‘Nature of the Beast’
SACRILEGIOUS
Side with the cultists in ‘The Urn of the Sacred Ashes’
CEREMONIALIST
Side with the Guardian in ‘The Urn of the Sacred Ashes’
BHELEN’S ALLY
Side with Bhelen in ‘A Paragon of her Kind’
HARROWMONT’S ALLY
Side with the Harrowmont in ‘A Paragon of her Kind’
LIBERATOR
Side with Caridin and destroy the Anvil of the Void
PRAGMATIST
Side Branka and preserve the Anvil of the Void
HEAVY HITTER
Inflict 250 damage in a single hit
BLOODIED
Complete an origin without dying
TRAVELER
Travel to all possible destinations in the game
MASTER OF ARMS
Raise your main character to level 20 warrior
SHADOW
Raise your main character to level 20 rogue
ARCHMAGE
Raise your main character to level 20 mage
PILGRIM
Complete a chanter’s board quest
GREY WARDEN
Kill 100 Darkspawns
MASTER WARDEN
Kill 500 Darkspawns
BLIGHT-QUELLER
Kill 1000 Darkspawns
TINKERER
Craft an item
PERSUASIVE
Succeed in 5 persuasion
SILVER TONGUE
Succeed in 25 persuasion
BULLY
Succeed in 5 intimidation
MENACING
Succeed in 10 intimidation
VETERAN
Learn a new specialization
ELITE
Learn two specializations
MASTER OF THE PEAK
Complete ‘The Warden’s Keep’ DLC
ROCK AND A HARD PLACE
Complete ‘The Stone Prisoner’ DLC
A DARK PROMISE
Complete the game through Morrigan’s secret ritual
THE ULTIMATE SACRIFICE
Make the ultimate sacrifice and kill the Archdemon
DRAGONSLAYER
Kill the High Dragon in the Ruined Temple
DEFENDER
Defend the gates of Denerim in ‘The Final Onslaught’
DIABOLIST
20 G
20 G
20 G
20 G
20 G
20 G
20 G
10 G
10 G
35 G
25 G
25 G
25 G
10 G
20 G
25 G
25 G
10 G
10 G
20 G
10 G
20 G
25 G
30 G
25 G
25 G
50 G
50 G
30 G
20 G
25 G
7
DRAGON AGE: ORIGINS
Gain the power of blood specialization by drinking Avernus’s experiment in The Warden’s Keep DLC
STONE’S LAMENT
Complete ‘A Golem’s Memories’ side quest in The Stone Prisoner DLC
IN WAR, VICTORY
Defeat the Risen Ogre in Return to Ostagar DLC
25 G
25 G
NOTE: SOME OF THE CODEX ARE STILL MISSING, I’LL TRY TO FIND THEM AS SOON AS POSSIBLE THOUGH I
DON’T KNOW WHERE ELSE TO LOOK. IF THERE’S ANY MISTAKE THEN PLEASE LET ME KNOW, I’LL TRY TO
CORRECT THEM.
CODEX
CATEGORY
LOCATION
1.
2.
3.
4.
5.
6.
7.
#
ABOMINATION
ARCANE HORROR
ARCHEDEMON
ASH WRAITH
BEAR
BRONTO
BROODMOTHER
Creatures
Creatures
Creatures
Creatures
Creatures
Creatures
Creatures
8.
9.
10.
11.
CORPSE
DEEPSTALKER
DESIRE DEMON
DRAGON
Creatures
Creatures
Creatures
Creatures
12.
13.
14.
15.
GENLOCK
GHOUL
GOLEM
HALLA
Creatures
Creatures
Creatures
Creatures
16.
17.
HURLOCK
MABARI WAR HOUND
Creatures
Creatures
18.
NUG
Creatures
19.
20.
OGRE
PRIDE DEMON
Creatures
Creatures
21.
22.
RAGE DEMON
RAT
Creatures
Creatures
23.
24.
25.
26.
27.
REVENANT
SHADE
SHRIEK
SKELETON
SLOTH DEMON
Creatures
Creatures
Creatures
Creatures
Creatures
28.
29.
GIANT SPIDER
WILD SYLVAN
Creatures
Creatures
30.
WEREWOLF
Creatures
31.
WISP
Creatures
32.
WOLF
Creatures
33.
34.
MABARI DOMINANCE
THE LITANY OF ADRALLA
Creatures
Items
Encounter an abomination
Encounter an arcane horror
Talk to Duncan in Ostagar
Encounter an ash wraith
Encounter a bear
Encounter a bronto
Encounter the broodmother inside
the dead trenches
Encounter a corpse
Encounter a deepstalker
Encounter a desire demon
Encounter a dragonling, drake,
dragon and high dragon in Haven
Encounter a genlock
Encounter a ghoul
Encounter a golem
Encounter a halla in the Brecelian
Forest
Encounter a hurlock
Meet your hound in Noble Human
origins or talk to the Kennel
Master in Ostagar or encounter a
mabari hound
Talk to the nug dealer in
Orzammar
Encounter a ogre
Defeat Uldred in the circle of
Magi
Encounter a rage demon
Encounter a rat in Noble Human
origins or inside the fade
Encounter a revenant
Encounter a shade
Encounter a shriek
Encounter a skeleton
Encounter a sloth demon in Magi
origins or in the Circle of Magi
Encounter a giant spider
Encounter a wild sylvan in the
Brecelian Forest
Encounter a werewolf in Brecelian
Forest
Encounter a wisp in Magi origins or
inside the fade
Encounter a wolf in Dalish Elf
origins or in the Korcari Wilds
Activate the mabari domination
Pick up the litany of adralla from
Niall’s body in the Circle of Magi
8
DRAGON AGE: ORIGINS
35.
ARCHONS OF THE IMPERIUM
Items
36.
HAVARD’S AEGIS
Items
37.
ANCIENT ELVEN ARMOR
Items
38.
39.
AODH
BARD’S DANCING SHOES
Items
Items
40.
BLOOD RING
Items
41.
BOW OF THE GOLDEN SUN
Items
42.
43.
CAMENAE’S BARBUTE
DARK MOON
Items
Items
44.
45.
KATRIEL’S GRASP
THE LIFE DRINKER
Items
Items
46.
THE MAGISTER’S SHIELD
Items
47.
SHADOW OF THE EMPIRE
Items
48.
THE SUMMER SWORD
Items
49.
50.
51.
THORN OF THE DEAD GODS
THROVAL’S LUCK
YUSARIS: THE DRAGONSLAYER
Items
Items
Items
52.
ANDRUIL: GODDESS OF THE HUNT
Magic and Religion
53.
DIRTHAMEN: KEEPER OF THE
SECRETS
Magic and Religion
54.
ELGAR’NAN: GOD OF VENGEANCE
Magic and Religion
55.
FALON’DIN: FRIEND OF THE DEAD,
THE GUIDE
Magic and Religion
56.
FEN’HAREL: THE DREAD WOLF
Magic and Religion
57.
Magic and Religion
58.
GHILAN’NAIN: MOTHER OF THE
HALLA
JUNE: GOD OF THE CRAFT
59.
MYTHAL: THE GREAT PROTECTOR
Magic and Religion
60.
SYLAISH: THE HEARTKEEPER
Magic and Religion
61.
THE AEONAR
Magic and Religion
62.
ANDRASTE: BRIDE OF THE MAKER
Magic and Religion
63.
THE RITE OF ANNULMENT
Magic and Religion
64.
65.
APOSTATES
THE BLACK CITY
Magic and Religion
Magic and Religion
66.
THE CHANT OF LIGHT: THE BLIGHT
Magic and Religion
Magic and Religion
Trade or loot the book from the
Mad Hermit in the Brecelian
Forest
Loot it from the ogre in the Tower
of Ishal
Collect all the pieces of
Juggernauts armor in the
Brecelian Forest
Loot it from Cristof in Denerim
Purchase it from Bodhan and
Sandal in the Party Camp
Win all the illegal fights in
Orzammar
Loot it from Davera inside the
elven alienage
Purchase it from Gorim in Denerim
Purchase it from Varathorn in
Brecelian Outskirts
Purchase it from Gorim in Denerim
Loot it from the High Dragon in
Haven
Steal it from the deserted
building in Denerim
Purchase it from Legnar in
Orzammar
Loot it from Ser Cautherien in
Denerim
Collect all the thorn pieces
Purchase it from Gorim in Denerim
Loot it from Shah Wyrd in the
Circle of Magi
Examine the statue of Andruil
inside the Dalish Camp
Examine the scrolls near
Varathorn’s shop in the Dalish
Camp
Examine its statue inside the
Dalish Camp
Pick it up from the Dragon Hoard
in the upper level of the ruins in
the Brecelian Forest
Examine its statue in the Dalish
Camp
Examine the head-less statue
inside the Dalish Camp
Examine the God of Craft statue
in the Dalish Camp
Loot the shield from the skeleton
in the Eastern Brecelian Forest
Examine the statue of Slyaish in
the Dalish Camp
Examine the scroll inside the
wonders of thedas
Examine the book at the entrance
of the ruined temple
Examine the book in the entrance
of templar’s nightmare
Talk to Jowan in Redcliffe Castle
Examine the statue inside the raw
fade
Examine the scroll near the
9
DRAGON AGE: ORIGINS
67.
Magic and Religion
68.
THE COMMANDMENTS OF THE
MAKER
THE MAKER
69.
THE CHANT OF LIGHT: REDEMPTION
Magic and Religion
70.
THE IMPERIAL CHANTRY
Magic and Religion
71.
CHANTRY HIERARCHY
Magic and Religion
72.
73.
TEMPLARS
THE FOUNDING OF THE CHANTRY
Magic and Religion
Magic and Religion
74.
THE FRATERNITY OF ENCHANTERS
Magic and Religion
75.
HIERARCHY OF THE CIRCLE
Magic and Religion
76.
HISTORY OF THE CIRCLE
Magic and Religion
77.
THE FADE
Magic and Religion
78.
THE HARROWING
Magic and Religion
79.
LYRIUM
Magic and Religion
80.
MALEFICARUM
Magic and Religion
81.
MANA AND THE USE MAGIC
Magic and Religion
82.
DEMONIC POSSESSION
Magic and Religion
83.
THE CARDINAL RULES OF MAGIC
Magic and Religion
84.
Magic and Religion
90.
BLOOD MAGIC: THE FORBIDDEN
SCHOOL
THE FOUR SCHOOLS OF MAGIC:
CREATION
THE FOUR SCHOOL OF MAGIC:
ENTROPY
THE FOUR SCHOOLS OF MAGIC:
PRIMAL
THE FOUR SCHOOLS OF MAGIC:
SPIRIT
BEYOND THE VEIL: SPIRITS AND
DEMONS
THE TRANQUIL
91.
THE SACRED ASHES OF ANDRASTE
Magic and Religion
92.
93.
94.
THE VEIL
ARAVELS
THE DALES
Magic and Religion
Culture and History
Culture and History
95.
THE LONG WALK
Culture and History
96.
UTHENERA
Culture and History
85.
86.
87.
88.
89.
Magic and Religion
Magic and Religion
Magic and Religion
Magic and Religion
Magic and Religion
Magic and Religion
Magic and Religion
infirmary in Ostagar
Examine the book in Redcliffe
chantry
Examine the altar in Lothering
chantry
Talk to the sisters outside the
chantry in Denerim
Examine the book in Lothering
chantry
Examine the book inside Brother
Genitivi’s house
Unlock templar specialization
Examine the books in Redcliffe
chantry
Examine the book inside Irving’s
study room in the Circle of Magi
Examine the book inside the mage
asunder
Examine the bookcase inside mage
asunder
Talk to Wynne in Ostagar or enter
the fade
Examine the book inside mage
asunder
Examine a lyrium vein in the fade
or in the deep roads
Examine the books in the templars
nightmare
Examine the book inside the
apprentice quarters in the Circle
of Magi
Examine the book in Redcliffe
chantry
Examine the book inside the mage
asunder
Talk to Jowan in Magi origins or in
Redcliffe castle
Collect all the books regarding the
magic schools in mage asunder
Collect all the books regarding the
magic schools in the mage asunder
Collect all the books regarding the
magic schools in the mage asunder
Collect all the books regarding the
magic schools in the mage asunder
Examine the statue in the
entrance of the raw fade
Examine the books inside the mage
asunder
Examine the books in Lothering
chantry
Enter the fade
Talk to Elora in the Dalish Camp
Talk to Sarel in the Dalish Camp
and agree to listen to the story
Examine the scroll near
Varathorn’s shop in the Dalish
Camp
Collect all the pieces of
Juggernaut armor and complete
‘The Mages’ Treasure’ in the
10
DRAGON AGE: ORIGINS
97.
VALLASLIN: THE BLOOD WRITING
Culture and History
98.
THE HISTORY OF THE DRYDENS
Culture and History
99.
THE HISTORY
CHAPTER 1
THE HISTORY
CHAPTER 2
THE HISTORY
CHAPTER 3
THE HISTORY
CHAPTER 4
OF SOLDIER’S PEAK:
Culture and History
OF SOLDIER’S PEAK:
Culture and History
OF SOLDIER’S PEAK:
Culture and History
OF SOLDIER’S PEAK:
Culture and History
100.
101.
102.
103.
THE ANDERFELS
Culture and History
104.
ANTIVA
Culture and History
105.
THE AVVARS
Culture and History
106.
THE BANNORN
Culture and History
107.
THE BRECELIAN FOREST
Culture and History
108.
THEDAS CALENDAR
Culture and History
109.
THE CHASIND
Culture and History
110.
THE CITY ELVES
Culture and History
111.
112.
113.
ALIENAGE CULTURE
ARLATHAN: PART ONE
ARLATHAN: PART TWO
Culture and History
Culture and History
Culture and History
114.
THE DALISH ELVES
Culture and History
115.
DENERIM
Culture and History
116.
DRAGON CULTS
Culture and History
117.
HISTORY OF FERELDEN: BOOK 1
Culture and History
118.
HISTORY OF FERELDEN: BOOK 2
Culture and History
119.
CULTURE OF FERELDEN
Culture and History
120.
DOGS IN FERELDEN
Culture and History
121.
GEOGRAPHY OF FERELDEN
Culture and History
122.
THE FREE MARCHES
Culture and History
123.
POLITICS OF FERELDEN
Culture and History
124.
THE FROSTBACK MOUNTAINS
Culture and History
125.
GWAREN
Culture and History
126.
HIGHEVER
Culture and History
Brecelian Forest
Examine the ink near Arthras in
the Dalish Camp
Talk to Levi Dryden in the Party
Camp
Examine the statue near the main
gates
Examine the book in the first floor
of Soldier’s Peak
Examine the altar in the second
floor of Soldier’s Peak
Examine the corpse inside
Avernus’s laboratory in Soldier’s
Peak
Examine the book at the counter
of pearls in Denerim
Examine the book in Arl of
Denerim’s estate
Examine the book beside the
villager’s house in Haven
Examine the book inside your room
in Denerim’s estate
Examine the fallen tree in the
Brecelian Forest
Examine the book in Redcliffe
chantry
Listen to the conversation near
Sten’s cage in Lothering
Examine the book inside the
apartment in elven alienage
Travel to the elven alienage
Talk to Lanaya in the Dalish Camp
Examine the scroll inside camp in
Dalish Elf origins
Travel to the Brecelian Outskirts
and talk to Zatharian
Examine the book inside the
wonders of thedas
Examine the book inside Brother
Genitivi’s house
Examine the books inside the
second floor in Redcliffe Castle
Examine the book inside Eamon’s
estate in Denerim
Examine the book inside the pearl
in Denerim
Examine the scroll in the third
floor of Tower of Ishal
Examine the book inside the
wonders of thedas
Examine the book inside the room
where Zervan is standing in Arl’s
estate in Denerim
Travel to the gnawed noble tavern
in the market district
Examine the books inside the
ruined temple
Examine the [ONLY] book inside
the library in Arl of Denerim’s
estate
Talk to the scholar inside the
11
DRAGON AGE: ORIGINS
127.
LAKE CALENHAD
Culture and History
128.
129.
LOTHERING
KING MARIC THEIRIN
Culture and History
Culture and History
130.
NEVARRA
Culture and History
131.
THE NOBLE FAMILIES OF FERELDEN
Culture and History
132.
THE OLD GODS
Culture and History
133.
THE ORLESIAN EMPIRE
Culture and History
134.
135.
THE CASTELESS
THE CASTES
Culture and History
Culture and History
136.
LIFE IN ORZAMMAR
Culture and History
137.
DEEP ROADS
Culture and History
138.
139.
THE CITY OF ORZAMMAR
CUT TO KAL SHAROK
Culture and History
Culture and History
140.
LEGION OF THE DEAD
Culture and History
141.
Culture and History
142.
HOUSE AEDUCAN, SHIELD OF
ORZAMMAR
THE PARAGONS
143.
ORZAMMAR POLITICS
Culture and History
144.
THE PROVING
Culture and History
145.
DWARVEN FAITH
Culture and History
146.
STALATA NEGAT
Culture and History
147.
ORZAMMAR HISTORY: CHAPTER ONE
Culture and History
148.
Culture and History
149.
ORZAMMAR’S HISTORY: CHAPTER
TWO
OSTAGAR
150.
PAR VOLLEN: THE OCCUPIED NORTH
Culture and History
151.
THE QUNARI
Culture and History
152.
153.
REDCLIFFE
RIVAIN
Culture and History
Culture and History
154.
THE TEVINTER IMPERIUM
Culture and History
155.
LEGEND OF THE JUGGERNAUT
Culture and History
Culture and History
Culture and History
library in Noble Human origins
Examine the sign post in Redcliffe
docks
Travel to Lothering
Teyrn Cousland and Arl Howe in
Noble Human origins or Teyrn
Loghain in Ostagar
Examine the book inside gnawed
noble tavern
Talk to the scholar inside the
library in Noble Human origins or
examine the book inside gnawed
noble tavern
Examine the books inside the
ruined temple
Examine the book inside Eamon’s
study room in Redcliffe Castle
Examine the rubble in dust town
Examine the wall carving in
Orzammar commons
Examine the wall carving inside the
weapon shop in Orzammar
Examine the book inside the
shaperate in diamond quarters
Travel to Orzammar
Examine the sign board near the
deep roads
Examine the book inside the
shaperate in diamond quarters
Examine the wall carving in
Orzammar diamond quarters
Examine the Paragons statue in
the entrance of Orzammar
Examine the book inside the
shaperate in diamond quarters
Examine the wall carving inside the
proving grounds in Orzammar
commons
Examine the book inside the
shaperate in diamond quarters
Examine the rune stone in the
dead trenches
Examine the statue in caridin’s
cross
Examine the statue at the
entrance of dead trenches
Talk to the guard near the bridge
in Ostagar
Examine the book inside Eamon’s
estate in Denerim
Talk to Sten in Lothering or
examine the book inside the
wonders of thedas
Travel to Redcliffe
Examine the book inside gnawed
noble tavern
Examine the book in the third
floor of Circle of Magi
Collect all the pieces of
Juggernauts armor in the
Brecelian Forest
12
DRAGON AGE: ORIGINS
156.
GEOGRAPHY OF THEDAS
Culture and History
157.
Culture and History
158.
159.
160.
161.
VHENADAHL: THE TREE OF THE
PEOPLE
THE GREY WARDENS
THE KORCARI WILDS
DARKSPAWN
THE BLIGHTS
Culture and History
Culture and History
Culture and History
Culture and History
162.
163.
ALISTAIR
ANORA
Characters
Characters
164.
165.
BHELEN AEDUCAN
KING CAILAN THEIRIN
Characters
Characters
166.
SER CAUTHRIEN
Characters
167.
168.
CONNOR GUERRIN
DOG
Characters
Characters
169.
170.
171.
DUNCAN
ARL EAMON GUERRIN
KING ENDRIN AEDUCAN
Characters
Characters
Characters
172.
FLEMETH
Characters
173.
BROTHER FERINAND GENITIVI
Characters
174.
KNIGHT-COMMANDER GREAGOIR
Characters
175.
176.
LORD PYRAL HARROWMONT
ARL RENDON HOWE
Characters
Characters
177.
FIRST ENCHANTER IRVING
Characters
178.
ARLESSA ISOLDE
Characters
179.
180.
181.
LELIANA
TEYRN LOGHAIN MAC TIR
MORRIGAN
Characters
Characters
Characters
182.
183.
OGHREN
SHALE
Characters
Characters
184.
185.
STEN
BANN TEAGAN GUERRIN
Characters
Characters
186.
VALENDRIAN
Characters
187.
WYNNE
Characters
188.
KEEPER ZATHRIAN
Characters
189.
ZERVAN ARAINAI
Characters
Examine the book inside the
wonders of thedas
Examine the tree inside the elven
alienage
Talk to Duncan in your origins
Travel to Ostagar
Talk to Duncan in your origins
Examine the rubble in Caridin’s
Cross or Ortan Thaig
Meet Alistiar in Ostagar
When you first see her in the cut
scene when you are traveling to
Lothering
Meet Bhelen in Orzammar
Teyrn Cousland and Arl Howe in
Noble Human origin or meet King
Cailon in Ostagar
When you first see her in the cut
scene at the end of Ostagar’s
battle
By Isolde in Redcliffe Village
Complete ‘Mischief in the Ladder’
in Noble Human origins or ‘The
Mabari Hound’ side quest in
Ostagar
Meet Duncan in your origins
By Alistair in Flemeth’s Hut
Talk to the guard at the entrance
of Orzammar commons
Complete ‘The Tower of Ishal’ in
Ostagar
Complete ‘The Arl of Redcliffe’ in
Redcliffe or talk to Weylon in his
house in Denerim
Meet Greagoir in the Circle of
Magi
Meet Harrowmont in Orzammar
Meet Howe in Noble Human origins
or in ‘The Landsmeet’ in Denerim
Meet Irving in Magi origins or in
the Circle of Magi
Complete the ‘The Attack at
Nightfall’ in Redcliffe
Meet Leliana in Lothering
Meet Loghain in Ostagar
Complete ‘The Grey Wardens’
Cache’ in the Korcari Wilds
Meet Oghren in Orzammar
Meet Shale in the villahe of
Honnleath
Meet Sten in Lothering
Meet Bann Teagan in Redcliffe
chantry
Meet Valendrain inside the elven
alienage
Meet Wynne in Ostagar or in the
Circle of Magi
Meet Zathrian in the Brecelian
Outskirts
Complete the ‘Broken Circle’ and
meet Zervan in the ambush
13
DRAGON AGE: ORIGINS
190.
WITHERFANG
Characters
191.
SOPHIA DRYDEN
Characters
192.
AVELIN, THE KNIGHT OF ORALIS
Books and Songs
193.
BALLAD OF AYESLEIGH
Books and Songs
194.
MEDITATIONS AND ODES TO BEES
Books and Songs
195.
ADVENTURES OF THE BLACK FOX
Books and Songs
196.
THE HOLY BRAZIER
Books and Songs
197.
THE LEGEND OF CALENHAD: CHAPTER
1
THE LEGEND OF CALENHAD: CHAPTER
2
THE LEGEND OF CALENHAD: CHAPTER
3
CARIDIN’S JOURNAL
Books and Songs
HISTORY OF CHANTRY: CHAPTER
Books and Songs
HISTORY OF CHANTRY: CHAPTER
Books and Songs
HISTORY OF CHANTRY: CHAPTER
Books and Songs
HISTORY OF CHANTRY: CHAPTER
Books and Songs
205.
THE
1
THE
2
THE
3
THE
4
THE
TALE OF ILOREN
Books and Songs
206.
207.
DANE AND THE WEREWOLF
DEATH OF A TEMPLAR
Books and Songs
Books and Songs
208.
209.
Books and Songs
Books and Songs
210.
A VERY CHEWED AND MOIST BOOK
THE NOLADAR ANTHOLOGY OF
DWARVEN POETRY
THE FEAST DAY FISH
211.
THE FIRST BLIGHT: CHAPTER 1
Books and Songs
212.
THE FIRST BLIGHT: CHAPTER 2
Books and Songs
213.
THE FIRST BLIGHT: CHAPTER 3
Books and Songs
214.
THE FIRST BLIGHT: CHAPTER 4
Books and Songs
215.
THE MAKER’S FIRST CHILDREN
Books and Songs
216.
THE LEGION OF STEEL
Books and Songs
217.
IN UTHENERA
Books and Songs
218.
Books and Songs
219.
THE LEGEND OF LUTHIAS
DWARFSOM
IN PRAISE OF THE HUMBLE NUG
220.
TRADITIONAL DWARVEN FOLK
Books and Songs
198.
199.
200.
201.
202.
203.
204.
Books and Songs
Books and Songs
Books and Songs
Books and Songs
Books and Songs
By Zathrian in the Brecelian
Outskirts
Talk to Levi Dryden in the Party
Camp
Examine the book inside Connor’s
room in Redcliffe castle
Examine the book inside Dernal’s
house in Redcliffe
Examine the book inside the
library in Eamon’s estate in
Denerim
Examine the book in Lothering
chantry
Light the braziers inside the
temple in Haven
Examine the book inside Kaitlyn’s
house in Redcliffe
Examine the book near Jowan’s cell
in Redcliffe castle
Examine the book inside gnawed
noble tavern
Examine the book near Branka’s
journal in ortan thaig
Examine the books inside the
Tower of Ishal
Examine the book in the third
floor of the Circle of Magi
Examine the book inside Brother
Genitivi’s house
Examine the book inside wonders
of thedas
Complete the ‘Cammen’s Lament’
side quest in the Dalish Camp
Examine the book inside the pearl
examine the book inside the
villager’s house in Haven
Have your dog search the area
Examine the book in the open
market
Examine the book inside the room
where Oghren is standing in Arl’s
estate in Denerim
Examine the book in Lothering
chantry
Examine the book inside Arl’s room
in Redcliffe
Examine the book inside the
temple in Haven
Examine the book inside Arl of
Denerim’s estate
Examine the book inside the
gauntlet
Examine the book inside the
shaperate in diamond quarters
Open the chest near the keeper in
Dalish Camp
Talk to the ash warriors’ leader in
Ostagar
Examine the book inside the
shaperate in diamond quarters
Examine the book inside the
14
DRAGON AGE: ORIGINS
221.
SONGS
THE SERMONS OF DIVINE RENATA I
Books and Songs
222.
JOURNAL OF THE TRANQUIL
Books and Songs
223.
TRAIN’S JOURNAL
Books and Songs
224.
THE JOURNAL OF ENCHANTER
WILHELM
CAUTIONARY TALES OF THE
ADVENTUROUS
SOPHIA DRYDEN’S JOURNAL
Books and Songs
CAILAN’S DOCUMENTS – PAGE 3 OF 3
BERWICK’S LETTER
A LETTER TO SOMEONE IN
HIGHEVER
A LETTER FROM KING ENDRIN
Notes
Notes
Notes
Notes
232.
A NOTE FROM THE HONNLEATH
VILLAGE COUNCIL
A NOTE FROM SER HENRIC
233.
A LETTER FROM RICA
Notes
234.
A CRAVEN ELVEN TABLET
Notes
235.
A TATTERED SHOPPING LIST
Notes
236.
GRAFFITI IN REDCLIFFE’S TAVERN
Notes
237.
A DECADES-OLD LETTER
Notes
238.
Notes
239.
A LETTER FROM BANN MATHUIN
WULFF
AVERNUS’S NOTES
240.
A PLEA FROM COMMANDER ATHLAR
Notes
241.
LOAD LIMIT REACHED
Notes
242.
243.
244.
THE BLACK VIALS
CORRESPONDENCE INTERRUPTUS
CIRCLES WITHIN CIRCLES
Notes
Notes
Notes
245.
DESIRE AND NEED
Notes
246.
247.
THE NOTES OF ARL FORESHADOW
IRVING’S MISTAKE
Notes
Notes
248.
PROMISES OF PRIDE
Notes
249.
EXTRACURRICULAR STUDIES
Notes
250.
251.
252.
GREASE FIRE
ENTROPIC DEATH
PARALYSIS EXPLOSION
Spell Combinations
Spell Combinations
Spell Combinations
225.
226.
227.
228.
229.
230.
231.
Books and Songs
Books and Songs
Notes
Notes
Notes
shaperate in diamond quarters
Examine the books inside the
temple’s library in Haven
Examine the book inside the room
next to Eamon’s study in Redcliffe
Castle
Examine the book or letter inside
the royal palace in Orzammar
Examine the book inside the
basement in Honnleath
Examine the book inside Kaitlyn’s
house in Redcliffe
Examine the book in the second
floor of Soldier’s Peak
Cailan’s chest in Ostagar
From Brewick in Redcliffe tavern
Have your mabari search the area
in Lake Calenhad
Examine the scroll inside
Harrowmont’s estate in Orzammar
Examine the scroll on the round
table in Honnleath
Loot it from the dead templar in
Lothering imperial highway
Examine the scroll inside one of
the rooms in Orzammar royal
palace
Loot it from the sarcophagus
inside the lower ruins in Brecelian
Forest
Examine the book inside Redcliffe
general store
Examine the graffiti in Redcliffe
tavern
Examine the scroll inside Wilhelm’s
basement in Honnleath
Examine the book in the first floor
of Soldier’s Peak
Examine the book inside the
laboratory in Soldier’s Peak
Examine the book inside the first
floor in Soldier’s Peak
Examine the rubble near Hespith
in dead trenches
Kill all the black vial revenants
find all the love letters in Ferelden
Examine the torn paper inside the
bookcase in Irving’s study room
Loot it from the possessed
templar in the Circle of Magi
Steal it from Arl Foreshadow
Examine the book inside Irving’s
study room in the Circle of Magi
Loot it from one of the
abominations in the Circle of Magi
Collect all the notes written by the
templars in the Circle of Magi
Grease + Fire
Death Hex + Death Cloud
Glyph of Paralysis + Glyph of
Repulsion
15
DRAGON AGE: ORIGINS
253.
254.
255.
256.
257.
258.
259.
260.
261.
STORM OF THE CENTURY
FLAME-QUENCHER
SHOCKWAVE
IMPROVED DRAIN
ADVANCED REANIMATION
NIGHTMARE
SHATTERING
TACTICS
PARTY APPROVAL
Spell Combinations
Spell Combinations
Spell Combinations
Spell Combinations
Spell Combinations
Spell Combinations
Spell Combinations
Controls
Controls
262.
263.
264.
AREA MAP
HEAVY ARMOR
ARMY PICKER
Controls
Controls
Controls
265.
RETRIEVE YOUR EQUIPMENT
Controls
266.
267.
268.
THE JOB BOARD
CODEX ENTRIES
COMBAT BASICS
Controls
Controls
Controls
269.
COMBAT BASICS – MAGE
Controls
270.
271.
272.
273.
274.
RANKED CREATURES
INJURIES
INJURIES
HEALTH POULTICES
CONTROLLING PARTY MEMBERS
Controls
Controls
Controls
Controls
Controls
275.
276.
277.
CRAFTING
RECIPES
DEFENDING THE GATES
Controls
Controls
Controls
278.
DISGUISED!
Controls
279.
280.
281.
282.
EXPLORATION
FATIGUE
GIFTS
FRIENDLY FIRE
Controls
Controls
Controls
Controls
283.
284.
INVENTORY
RUNES AND ENCHANTMENT
Controls
Controls
285.
286.
JOURNAL
LEVEL UP
Controls
Controls
287.
288.
289.
290.
291.
292.
293.
Controls
Controls
Controls
Controls
Controls
Controls
Controls
294.
SUSTAINED ABILITIES
INVENTORY OVERLOAD
PARTY MEMBER
PARTY CAMP
LOCKED ITEM
PLOT HELPER
SHAPESHIFTER: BURNING MAN
FORM
SHAPESHIFTER: GOLEM FORM
295.
FADE SHAPESHIFTING
Controls
296.
SHAPESHIFTING: SPIRIT FORM
Controls
297.
298.
SPECIALIZATIONS
STEALTH
Controls
Controls
Controls
Spell Might + Blizzard + Tempest
Grease + Fire + Blizzard
Force Field + Crushing Prison
Vulnerability Hex + Drain Life
Spell Might + Animate Dead
Sleep + Horror
Freeze + Melee Attack
Open your tactics menu
Try to raise your companions’
approval meter
Open your area map menu
Equip a heavy armor
During ‘The Final Onslaught’ in
Denerim
Retrieve your stripped equipments
from the chest
Examine a job board
Collect a codex entry
Encounter your first enemy in your
origins
Encounter your first enemy in your
Magi origins
Encounter a ranked creature
Acquire an injury
Acquire a severe injury
Pick up a health poultices
Meet your first companion in your
origins
Acquire a skill point
Find a crafting recipe
During ‘The Final Onslaught’ in
Denerim
During ‘Rescue the Queen’ in
Denerim
At the beginning of the game
Equip a heavy armor
Find a gift for your companions
Engage in a fight with your archer
or mage
Open your inventory menu
Find a rune or talk to Bodahn and
Sandal in your Party Camp
Open your journal menu
Acquire enough experience to level
up
Activate a sustained ability
Fill your inventory
Meet your first party member
Travel to your Party Camp
Encounter a locked item
Receive your first task
Acquire the burning man form
inside the fade
Acquire the golem form inside the
fade
Acquire the rat form inside the
fade
Acquire the spirit form inside the
fade
Reach level 7
Perform a stealth or recruit
16
DRAGON AGE: ORIGINS
299.
300.
301.
MERCHANTS
WORLD MAP
A ROLLED-UP NOTE
Controls
Controls
Quest-Related
302.
SUMMONING SCIENCE
Quest-Related
303.
THE DEAD CASTE
Quest-Related
304.
THE CROSSCUT DRIFTERS
Quest-Related
305.
THE GANGUE SHADE
Quest-Related
306.
THE KEY TO THE CITY
Quest-Related
307.
THE SHAPER’S LIFE
Quest-Related
308.
TOPSIDER’S HONOR
Quest-Related
309.
JAMMER’S STASH
Quest-Related
310.
LETTER FROM THE BLACKSTONE
IRREGULARS
BLACKSTONE LETTER OF
CONSCRIPTION
Quest-Related
312.
BLACKSTONE LETTER OF
CONDOLENCE
Quest-Related
313.
A PINCH OF ASHES
Quest-Related
314.
LETTER OF JOGBY
Quest-Related
315.
FAREWELL LETTER TO JOGBY
Quest-Related
316.
RIGBY’S LAST WILL AND
TESTAMENT
Quest-Related
317.
SIGNS OF CHASIND
Quest-Related
318.
319.
THE MAGES’ COLLECTIVE
ASUNDER
Quest-Related
Quest-Related
311.
Quest-Related
Leliana or Zervan
Visit a merchant
Enter the world map
Examine the scroll inside the
basement in Redcliffe Castle
Collect all the notes written by the
apprentices and complete the
‘Summoning Science’ side quest in
the Circle of Magi
Collect all the armors pieces and
the insignia and complete the
‘Dead Castes’ side quest in
Orzammar
Examine the rubble pile near the
fractured statue in Caridin’s cross
Examine the statue inside the
dead trenches
Collect all the information about
Orzammar and complete the ‘The
Key to the City’ side quest in
Orzammar
Collect all the runes and complete
the ‘Wall of Memories’ side quest
in Orzammar
Collect all the pieces of topsider
and complete the ‘Topsider’s
Honor’ side quest in the deep
roads
Collect all the cheapest items and
complete ‘Jammer’s Stash’ in the
carta
Meet a Blackstone Liaison
Collect the letters for ‘Greasing
the Wheels’ or ‘Dereliction of
Duty’ side quest from the
Blackstone Liaison
Collect the letters for ‘Notices of
Death’ side quest from the
Blackstone Liaison
Loot it from the dead soldier near
the bridge and complete ‘A Pinch
of Ashes’ side quest in the Korcari
Wilds
Loot it from the dead body
traveler and complete ‘The
Missionary’ side quest in the
Korcari Wilds
Open the chest mentioned in
Jogby’s note
Loot the body near the river and
complete the ‘Last Will and
Testaments’ side quest in the
Korcari Wilds
Locate all the signs of Chasinds
and complete the ‘Signs of
Chasinds’ side quest in the Korcari
Wilds
Meet a Mages Collectives Liaison
Collect all the bloody sacks and
complete the ‘Asunder’ side quest
17
DRAGON AGE: ORIGINS
320.
UNBOUND
Quest-Related
321.
CAGED IN STONE
Quest-Related
322.
BY ORDER OF EMER THOROGOOD
Quest-Related
323.
SCROLLS OF BANASTOR
Quest-Related
324.
FRIENDS OF RED JENNY
Quest-Related
325.
FIVE PAGES, FOUR MAGES
Quest-Related
326.
WATCHGUARD OF THE REACHING
Quest-Related
327.
MALEFICARUM REGRETS
Quest-Related
328.
RENOLD’S PLEA
Quest-Related
329.
THE SPOT
Quest-Related
330.
LETTER OF TERMINATION
Quest-Related
in the deep roads
Collect all the dead adventures
journal and complete the ‘unbound’
side quest in Denerim
Activate the throne and complete
the ‘Caged in Stone’ side quest in
Orzammar royal palace
Loot the note from the ambushers
and complete the ‘Sign if Safe
Passage’ side quest in the
Brecelian Forest
Collect all the scrolls and complete
the ‘Scrolls of Banastor’ side quest
Collect the painted box from
Irving’s room and the letter from
the dead ambusher and complete
the ‘Friends of Red Jenny’ side
quest in Denerim
Collect all the torn papers and
complete the ‘Five Pages, Four
Mages’ side quest
Collect all the notes written by the
apprentices and complete the
‘Watchguard of the Reaching’ side
quest in the Circle of Magi
Loot it from the dead mage in
Lothering imperial highway
Examine the scroll inside Redcliffe
Castle and complete ‘Have You
Seen Me?’ side quest in Denerim
Examine the apprentices
footlocker in the first floor of
Circle of Magi
Collect the letters for ‘Notices of
Termination’ side quest from the
Mages Collectives
COMPANIONS
RACE
CLASS
SPECIALIZATION
LEVEL
GIFTS
REQUIREMENT
SIDE QUEST
ALISTAIR
Human
Alistair is a trained templar who then becomes a Grey
Warrior
Warden. He’ll join you in the early stage of the game and
Templar
stays with you till the end unless your [HARSH] decision
Depends on your level and
results in killing him in the landsmeet. He is the second son
game progression
and the true heir to King Maric’s throne though he likes to
Alistair’s Mother Amulet*
hide his origin and act like he too lucky to die as a Grey
Black Runestone
Warden.
Duncan’s shield*
Joining Chalice
TACTICS: Alistair serves as a powerful tank if you equip
Onyx Demon Statuette
him with good weapons and armors. Work a bit on his health
Small Carved Statuette
and he can take the frontline in the battle allowing you to
Stone Dragon Statuette
sneak behind the target and finish them off.
Stone Warrior Statuette
White Runestone
His templar skills become very handy if you are fighting
Complete ‘Joining the Grey
against a blood mage and he’ll become a massive damage
Wardens’ in Ostagar
dealer if you raise his sword and shield expertise. When
Alistair’s Family
choosing specialization, go for berserker. It’ll raise his
attacking strength making him a killing machine.
APPROVAL: Alistair is a fun character to have around, you’ll
18
DRAGON AGE: ORIGINS
never get bored if he’s in the team. He likes to joke around
and can take a few teasing and flirting but never dare to
bad mouth Duncan in front of him.
Baby sitting him is the best way to raise his approval, he is
the most easiest character to take care off, try not to
hurt his feelings and don’t mention about his father or him
being the heir to the throne and you’ll get by pretty easily
without any gifts or decisions.
There’s around three situation where Alistair decides to
leave the party: [a] if you hurt his feelings for his family
after meeting his sister, [b] if you FORCE him to become
the king and [c] if you take Loghain into the Grey Wardens,
avoid these three and he’ll stick around your back like your
shadow.
RACE
CLASS
SPECIALIZATION
LEVEL
GIFTS
REQUIREMENT
SIDE QUEST
RACE
CLASS
SPECIALIZATION
LEVEL
GIFTS
REQUIREMENT
SIDE QUEST
Mabari War Hound
War Dog
Depends of your level and
game progression
Beef Bone
Lamb Bone
Large Bone
Ox Bone
Veal Bone
Complete ‘Mischief in the
Ladder’ in Noble Human
origins or ‘The Mabari
Hound’ in Ostagar
None [C’MON WHAT KIND
OF A SIDE QUEST A DOG
CAN GIVE?! GO FETCH MY
BONE?]
DOG
You can acquire your dog by completing ‘Mischief in the
Larder’ in Human Noble origins or ‘The Mabari Hound’ in
Ostagar.
TACTICS: Try gaining his overwhelm ability in the early
stage of the game, your dog will be replaced as you meet
other companions but until you find them you need his
overwhelming skill as it can kill a non-boss unit in a single
blow.
Having your dog in the team nets you three things: [a] he’ll
fetch you random things if you have him search the place,
[b] activating mabari dominance increases his attacking
strength and [c] having him lick your bloody gore gives him
a little health boost [AND KEEPS YOU CLEAN].
APPROVAL: His rating never drops below 100% but you can
always fetch him a bone or two so that he can play with
them. J
LELIANA
Human
Leliana’s a migrant from Orel, she spent most of her time
Rogue
as a bard and an under covered spy who then joins the
Bard
chantry trying to spread the chant of light to the four
Depends on your level and
corners of the world. You’ll meet Leliana in Lothering’s
game progression
tavern, she’ll voluntarily joins your team saying she was sent
Andraste’s Grace*
by The Maker to help you fight against the Darkspawns.
Blue Satin Shoes
Bronze Symbol of Andraste
TACTICS: Best possible weapon expertise for Leliana is
Chantry Amulet
either archery or duel-weapons. Though it’s best to avoid
Cute Nug*
her in hand-to-hand combat, raise her archery skill and
Etched Silver Symbol
she’ll become one of the handiest character in the team,
Golden Symbol of Andraste
especially in the early stage of game where you can’t afford
Silver Sword of Mercy
to buy weapons and have to rely on chests and lockers.
Steel Symbol of Andraste
Inside the tavern in
APPROVAL: As a religious person Leliana always excepts you
Lothering
to respect her culture never bad mouth Andraste and The
Leliana’s Past
Maker. She’ll always supports you for doing good deeds and
tries to speak out her words if you try to cheat her culture.
For example: If you try to poison the Urn in the temple
then she’ll turn against you and helps the guardian kill you,
but if you have high concretion skill then you can intimidate
her to stay in the team.
19
DRAGON AGE: ORIGINS
RACE
CLASS
SPECIALIZATION
LEVEL
GIFTS
REQUIREMENT
SIDE QUEST
LOGHAIN
Human
Loghain will join your team if you let him live in the
Warrior
landsmeet but doing so will result in Alistair leaving your
Champion
team. Loghain replaces Alistair in most of the places
including being a good tank, standing in the same place as
Depends on your level and
Alistair in the party camp and giving the same pose on the
game progression
Ancients Map of Imperium
companions screen. But as we all know he can’t replace that
Botanist’s Map of Thedas
blondie-bastard who tries to make fun out of everything.
Current Map of Ferelden
Map of the Anderfels
TACTICS: Loghain skills are as same as Alistair, he’ll
Map of Occupied Ferelden
replace Alistair as a powerful tank taking the frontline and
can inflict a bit more damage than Alistair. He comes with
In ‘The Landsmeet’ in
Denerim
champion specialization, which he’ll teach you if you ever
None
manage to raise his approval to warm or higher status.
APPROVAL: As the senior most member of the team,
Loghain talks very little. The only way to raise his approval
is by gifts, try talking about Anora and agree he know
what’s best for her, this’ll give you a little boost in the
rating.
RACE
CLASS
SPECIALIZATION
LEVEL
GIFTS
REQUIREMENT
SIDE QUEST
MORRIGAN
Human
After escaping from the tower of ishal, Flemeth offers her
Mage
daughter’s assistance to help you guide in the wilds. But
Shapeshifter
Morrigan plays a major role rather than just guiding
Depends on your level and
through wilds providing one of the four possible endings
game progression
after slaying the archdemon.
Black Grimore*
Flemeth’s Grimore*
TACTICS: Try to acquire blood mage specialty when dealing
Golden Amulet
with Connor, with this in hand she can become a nightmare
Golden Demon Pendant
to your foes dispatching them with her AoE spells and
Golden Earrings
curses. Her shape shifting abilities are good but as not as
Golden Mirror*
good as her magic.
Golden Rope Necklace
Tribal Necklace
If you are planning to acquire her master shape shifting
Complete ‘The Tower of
skill then acquire arcane warrior in the Brecelian Forest
Ishal’ in Ostagar
instead of blood mage. If not then work on her paralyzing
Flemeth’s Grimore
spells like cone of cold and crushing prison, with this you
can freeze your enemies including the boss units and create
an opening for your warriors to strike.
APPROVAL: Morrigan is more of a practical type than a
sentimental, she don’t like wasting time and money on
foolish things and helping others with their headaches.
You’ll get around -5 to -10 drop in her approval every time
you try to help others.
You can easily raise her rating by giving her gifts, which are
available in vast number or by simply talking to her in the
camp, for example: when she says she doesn’t believe in love
and all, agree love is unnecessary and people only seek to
gain more power. These kinda conversations give you huge
boost in her rating. Morrigan will only leave your team if you
turn down her offer before the final battle against the
archdemon.
RACE
CLASS
SPECIALIZATION
Dwarf
Warrior
Berserker
OGHREN
Oghren forces himself into the team while looking for her
wife, Paragon Branka in the deep roads and decides to come
with you so that he can get good variety of ale.
20
DRAGON AGE: ORIGINS
LEVEL
GIFTS
REQUIREMENT
SIDE QUEST
Depends on your level and
game progression
Ale
Alley King’s Flagon
Chasind Sack Mead
Garlbog’s Backcountry
Reserve
Golden Scythe 4:90 Black
Legacy of White Shear
Sun Blonde Vint-1
Wilhelm’s Special Brew
Complete ‘A Prince’s Favor/A
Lord’s Trust: The Second
Task’ in Orzammar
Oghren’s Flame
TACTICS: Two-handed weapons works wonders with his
berserker skill dealing massive damage to the enemies. If
you are playing Orzammar in the final stages of the game
then its fine, if not then you need to work a lot on his
health since he’ll die with two or three critical hits from a
moderate level foe.
Oghren’s best if you use him in the second row having your
tank taking all the damage and allowing him to strike from
behind, like I said increase his health then his berserker
skill and two-handed weapons expertise and he’ll become
handy fighter in tough situations.
APPROVAL: Oghren likes to drink, yes he loves to drink
more than his dead wife. Fetch him some powerful ale from
the nearby taverns and he’ll stay on your tail till the end.
When you are talking to him in the camp, try consulting for
his lose instead of talking about his wife, leave him if he
don’t wish to talk you to gain a boost.
SHALE
RACE
CLASS
SPECIALIZATION
LEVEL
GIFTS
REQUIREMENT
SIDE QUEST
Golem
Warrior
None
Depends on your level and
game progression
Remarkable Amethyst
Remarkable Diamond
Remarkable Emerald
Remarkable Garnet
Remarkable Greenstone
Remarkable Malachite
Remarkable Ruby
Remarkable Sapphire
Remarkable Topaz
Complete ‘The Stone
Prisoner’ DLC
A Golem’s Memories
Shale in one of few surviving golems in Ferelden, she was
born in Cadhas Thaig as a dwarven woman then scarifies
her life to become a golem. She has no memories of her
past since she spent last few decades as a scare crow in
Honnleath Village.
TACTICS: She have good defense and can replace Alistair
or Loghain as a tank. Unlike others she don’t have multiple
slots for equipments, she only got two slots. One for
offense and one for denfense. If you manage to get two
same color crystals then she’ll receive a bonus, just like
you wearing same class/metal equipments.
APPORVAL: To be frank I don’t know much about her to
tell how to raise her approval. She’s a golem who spent
decades as a scare crow, hurting her feelings with these
things will cause major drop in her approval. She like
crystals so fetching them is the best way to raise her
approval.
STEN
RACE
CLASS
SPECIALIZATION
LEVEL
GIFTS
REQUIREMENT
SIDE QUEST
Qunari
Warrior
None
Depends on your level and
game progression
Painting of the Rebel Queen
Portrait of a Goose Girl
Silver Framed Still-Life
Sword of Beresaad
Totem
Water-Stained Portrait
Complete ‘The Qunari
Prisoner’ in Lothering
The Sword of Beresaad
Sten can be found in the northern part of Lothering, if
you don’t free him there then he’s gone for good. He
comes to Ferelden to help in the Blight but instead gets
hurt and separated from his remaining team, a group of
farmers found him wounded in the wilds and treats his
injuries but he sub coconsciously kills them thinking they
are the one who tried to kill him in the battle.
After realizing he slaughtered an entire family who saved
him, he surrenders to the local templars feeling guilty for
what he has done. The only way to recruit him to the team
is by offering him salvation fighting in the blight and
helping you kill the Archdemon.
TACTICS: Sten’s becomes the life of the team has he is
the most powerful warrior in the group. Two-handed
weapons are best suited for him since he can slice
21
DRAGON AGE: ORIGINS
oversized foes with his swords and axes.
Complete his two-handed weapon expertise acquiring the
final skills like critical-hit, death-blow, etc and throw him
some of the best armors and he’ll become a killing machine
taking on five-six troops at a time.
APPROVAL: You’ll lose a bit of rating eve time you decide
to help others, which’ll stop you from reaching the
Archdemon. As a born warrior, he likes to stay on his
enemy’s tail until he kills them. Don’t talk to him anything
except for the blight, Darkspawns and Archdemon. The
only way to raise his rating is by gifting him some
paintings, for which he’s mysteriously fond of.
RACE
CLASS
SPECIALIZATION
LEVEL
GIFTS
REQUIREMENT
SIDE QUEST
WYNNE
Human
Wynne’s a scholar and a first enchanter in the Circle of
Mage
Magi, who then decides to leave the Circle and go with you
Spirit Healer
to help you defeat the blight, in which she failed in
Ostagar. She’s another one of those who voluntarily joins
Depends on your level and
your team to fight against the darkspawns and stays with
game progression
Discovering Dragon’s Blood
you unless your decisions makes them leave or die.
Potions, Tinctures and Spicy
Sauce
TACTICS: As a spirit healer Wynne’s a valuable asset to
Fancy Scroll
the team, if you are replacing Morrigan by Wynne then try
The Guerrins of Ferelden: A
acquiring blood mage specialty since arcane will do no good
Genealogical History
to her ability as a mage.
Tattered Notebook
The Rose of Orlais
With the combination of blood magic and spirit healing
The Search for the True
she’ll become the most reliable NPC to count on in
Prophet
toughest battles like the High Dragon, Flemeth and
Wine
Archdemon, for which you need a dedicated healer along
During the ‘Broken Circle’ in
with a powerful mages to drain life out of enemies souls.
the Circle of Magi
Wynne’s Regret
APPROVAL: She’s not the one who likes to hang out and
talk with friends, she likes to discuss about particular
topics rather than random things like Morrigan and will
leave you in two situations: [a] if you decide to poison the
Urn and [b] if you decide to kill all the mages in the Circle
of Magi before confronting Uldred, she’ll turn into a blood
mage and attacks you.
As a scholar she likes books, scrolls and etc and excepts
you to respect everything in the world without bad
mouthing or sharing your thoughts, she’s more like Leliana,
who wants you to do good deeds and help others, when
they need you the most.
RACE
CLASS
SPECIALIZATION
LEVEL
GIFTS
REQUIREMENT
Elf
Rogue
Assassin
Depends on your level and
game progression
Anitva Leather Boots*
Dalish Gloves*
Medium Gold Bar
Medium Silver Bar
Small Gold Bar
Small Silver Bar
After completing the
ZERVAN
Zervan’s an assassin, who was sent by Loghain to kill you
and Alistair, he’ll ambush you trying to kill you but then
joins your team [IF YOU LET HIM]. He’s bloodthirsty
assassin who likes to plunge his blade into his enemies’
neck and see their blood spill to the ground.
TACTICS: A deadly assassin who’ll become more deadlier
with twin blades. He’ll become the most valuable member
in the team with his rogue skills allowing you to pick locks
and chests. Put him in stealth before the fight starts and
navigate him behind the target’s back to see his true
power put test, he can inflict massive damage on boss
22
DRAGON AGE: ORIGINS
SIDE QUEST
‘Broken Circle’ in the Circle
of Magi
None
units using his rogue and assassins skills to backstab the
targets brining them to their knees.
APPROVAL: He’s a bloodthirsty murderer who likes to kill
people, he’ll enjoy spilling blood and wants you to be like
him. He’s a funny character who likes to tease others even
if it means hurting his own feelings. He thinks of what’ll
get in return and will not think twice to betray you if he’s
going to get a better pay from your opponents unless you
have warm or higher relationship with him.
GIFTS
RECEPTIONIST
LOCATIONS
ALE
ALISTAIR’S MOTHER AMULET
Oghren
Alistair
ALLEY KING’S FLAGON
ANCIENT MAP OF IMPERIUM
ANDRASTE’S GRACE
Oghren
Loghain
Leliana
ANTIVAN LEATHER GLOVES
Zervan
BEEF BONE
Dog
BLACK GRIMORE
Morrigan
BLACK RUNESTONE
BLUE SUEDE SHOES
Alistair
Leliana
BOTANIST’S MAP OF THEDAS
Loghain
BRONZE SYMBOL OF ANDRASTE
Leliana
CHANTRY AMULET
Leliana
CURRENT MAP OF FERELDEN
Loghain
CHASIND SACK MEAD
Oghren
CUTE LITTLE NUG
DALISH GLOVES
Leliana
Zervan
DIRTY PANTALOONS
DISCOVERING DRAGON’S BLOOD
POTIONS, TINCTURES AND
SPICY SAUCES
DUNCAN’S SHIELD
Misc
Wynne
Bartender in gnawed noble tavern.
Inside Arl Eamon’s study room in
Redcliffe castle.
Legnar inside Orzammar commons.
Wonders of thedas in Denerim.
Near the landmark tree in Redcliffe
village.
Chest inside the general store in
Haven.
Chest near the dogs kennel in the
tower of ishal.
Inside Irving’s study room in the
Circle of Magi.
One of the chests inside ortan thaig.
Ox merchant randomly encountered
in world map.
Chest inside Eamon’s study room in
Denerim.
Chest near the Revered Mother in
Lothering.
Fallen templar inside the Circle of
Magi.
General store inside the elven
alienage after completing ‘Unrest in
the Alienage’ quest.
Pile of scrolls inside the Temple in
Haven.
Nug dealer in the Orzammar.
Camp near the great oak tree in the
Brecelian Forest.
Randomly found by your dog.
Bookshelves inside the temple in
Haven.
ETCHED SILVER SYMBOL
FANCY SCROLL
Leliana
Wynne
FLEMETH’S GRIMORE
Morrigan
FOUND CAKE
Misc
Alistair
Inside the Grey Wardens’ cache in
Denerim’s warehouse. After
completing ‘Rescue the Queen’ quest
during the landsmeet. Go to the
warehouse near gnawed noble tavern
and examine the bookshelves to
reveal the hidden cache.
Ruck inside the ortan thaig.
Complete the ‘Elven Ritual’ quest and
kill the ghost woman in the Brecelian
Forest.
Chest inside Flemeth’s Hut after
completing ‘Flemeth’s Grimore’ quest.
Randomly found by your dog.
23
DRAGON AGE: ORIGINS
GARLBOG’S BACKCOUNTRY
RESERVE
GEMMED BRACELET
GOLD EARRINGS
GOLDEN AMULET
GOLDEN DEMON PENDENT
Oghren
Randomly found by your dog.
Misc
Morrigan
Morrigan
Morrigan
GOLDEN MIRROR
GOLDEN ROPE NECKLACE
Morrigan
Morrigan
GOLDEN SCYTHE 4:90 BLACK
Oghren
GOLDEN SYMBOL OF ANDRASTE
JOINING CHALICE
Leliana
Alistair
MEDIUM GOLD BAR
Zervan
MEDIUM SILVER BAR
Zervan
LAMB BONE
Dog
LARGE BONE
LEGACY OF WHITE SHEAR
Dog
Oghren
LOCKET
Misc
MAP OF ANDEFELS
Loghain
MAP OF OCCUPIED FERELDEN
Loghain
ONXY DEMON STATUETTE
Alistair
OX BONE
Dog
PAINTED SKY BALL
Misc
PAINTING OF REBEL QUEEN
Sten
PIECE OF WOOD
PORTRAIT OF A GOOSE GIRL
Misc
Sten
REMARKABLE
REMARKABLE
REMARKABLE
REMARKABLE
REMARKABLE
Shale
Shale
Shale
Shale
Shale
Garin inside Orzammar commons.
Legnar inside Orzammar dust town.
Garin inside Orzammar commons.
Dead adventurer inside the Temple in
Haven.
Garin inside Orzammar commons.
Bodahn and Sandal in your Party
Camp
Crate near the villagers house in
Lothering.
Legnar inside Orzammar dust town.
At the far end side of the war
council in Ostagar, Return to Ostagar
DLC
Treasure pile inside Arl of Denerim’s
estate.
Chest inside the anvil of the void in
the deep roads.
Inside the mabari war hounds room in
Redcliffe castle.
Inside the general store in Haven.
Sarcophagus inside the ruined
fortress in the Brecelian Forest.
Chest inside the general store in
Haven.
Inside the Grey Wardens’ cache in
Denerim’s warehouse. After
completing ‘Rescue the Queen’ quest
during the landsmeet. Go to the
warehouse near gnawed noble tavern
and examine the bookshelves to
reveal the hidden cache.
Chest inside Arl Eamon’s estate in
Denerim.
Bones near the gravestone in the
Brecelian Forest.
Rubble pile near the fallen tree in
the Brecelian Forest.
Rubble near the fallen tree inside the
Brecelian Forest.
Ox merchant randomly encountered
in the world map.
Randomly found by your dog.
Faryn in front of Orzammar’s
fortress.
Somewhere in Orzammar dust town
Garlin inside Orzammar commons.
Figor inside Orzammar commons.
Wonder of thedas in Denerim.
Loot it from the dead wraith inside
Wilhelm’s basement, The Stone
Prisoner DLC.
Owen inside the Circle of Magi.
Alariths inside the elven alienage in
Denerim.
Legnar inside Orzammar commons.
Faryn in front of Orzammar fortress.
Barlin inside Lothering tavern.
Inside the tower of ishal in Ostagar.
AMETHYST
DIAMOND
EMERALD
GARNET
GREENSTONE
REMARKABLE MALACHITE
REMARKABLE RUBY
Shale
Shale
REMARKABLE SAPPHIRE
REMARKABLE TOPZA
SHINY GOLD RING
SILVER BRACELET
Shale
Shale
Misc
Misc
24
DRAGON AGE: ORIGINS
SILVER BROOCH
Misc
SILVER CHAIN
Misc
SILVER DEMON HEAD
SILVER MEDALLION
Misc
Misc
SILVER SWORD OF MERCY
Leliana
SMALL CRAVED STATUETTE
Alistair
SMALL FRAMED STILL LIFE
Sten
SMALL GOLD BAR
Zervan
SMALL SILVER BAR
STEEL SYMBOL OF ANDRASTE
Zervan
Leliana
STONE DRAGON STATUETTE
Alistair
STONE WARRIOR STATUETTE
Alistair
SUN BLONDE VINT-1
Oghren
SWORD OF BERESAAD
Sten
TANGLED BALL OF YARN
TATTERED NOTEBOOK
Misc
Wynne
THE GUERINS OF FERELDEN: A
GENEALOGICAL HISTORY
THE ROSE ORLAIS
TH SEARCH FOR THE TRUE
PROPHET
TOTEM
TRIBAL NECKLACE
VEAL BONE
Wynne
WATER STAINED PORTRAIT
Sten
WHITE RUNESTONE
Alistair
WILHELM’S SPECIAL BREW
Oghren
WINE
Wynne
Wynne
Wynne
Sten
Morrigan
Dog
Varathon inside the dalish camp in
the Brecelian Outskirts.
Vanity inside the senior mages
quarters in the Circle of Magi.
Legnar inside Orzammar dust town.
Dragon hoard inside the elven ruins in
the Brecelian Forest.
Ox merchant randomly encountered
in the world map.
Crate near the merchant in
Lothering.
Chest inside the second floor in
Redcliffe castle.
Charmed templar inside the Circle of
Magi.
Chest inside the chantry in Haven.
Chest inside Brother Genitivi’s house
in Denerim.
Chest inside the second floor in
Redcliffe castle.
Dragon filth inside the Temple’s
caverns in Haven.
Vanity inside the fourth floor in the
Circle of Magi.
Complete ‘The sword of Beresaad’
quest.
Randomly found by your dog.
Randomly found by your dog in the
Circle o Magi.
Bookshelves in the second floor of
Redcliffe castle.
Library in the Circle of Magi.
Chest inside Orzammar shaperate.
Chest inside Caridin’s cross.
Barrel inside the tower of ishal.
Chest inside the apartment in elven
alienage.
Ox merchant randomly encountered
in the world map.
Abominations in the third floor of
Circle of Magi.
Examine the brew maker in Wilhelm’s
house, The Stone Prisoner DLC.
Lloyd in Redcliffe tavern.
LEGENDARY WEAPONS AND ARMORS
AGELESS SWORD: In Orzammar, before choosing the king, go to the throne room and place your party members on
the pressure plates, one is outside the door and two is to the right side of the room. Have your fourth one examine the
throne again to free to the dragon, kill it and loot its body to find the sword.
BLOOD DRAGON: The armor can be obtained by purchasing the DLC, the remaining can be purchased by Bodhan and
Sandal in the Party Camp.
JUGGERNAUT: Collect all the armor pieces scattered in the Brecelian Forest and complete ‘The Mages’ Treasure’ side
quest to get the armor.
KEENING BLADE: Kill Gaxkang in ‘Unbound’ side quest and loot his body to get the sword.
25
DRAGON AGE: ORIGINS
LEGION OF DEAD: Collect the pieces scattered in the deep roads and complete the ‘Dead Castes’ side quest to get the
armor.
MARJORLANESES RECURVE: Kill Marjorlane in Leliana’s side quest ‘Leliana’s Past’ and loot her house to find the bow.
REAPERS VESTMENT: Purchase it from the Wonders of Thedas.
STAFF OF MAGISTER LORDS: Purchase it at Wonders of Thedas in Denerim market district.
STAR FANG: Collect the starmetal from the random encounter in the crater and take to Levi’s brother in Soldier’s Peak
to have it forged into a long sword or twin blade.
SUMMER SWORD: Kill Cautherin in ‘Rescue the Queen’ or ‘The Landsmeet’ in Denerim and loot her body to get the
sword.
THE ROSE’S THRONE: Purchase it from Legnar/Garlin in Orzammar commons.
TOPSIDER’S HONOR: Find all the pieces in the deep roads and take it to master’s grave in ortan thaig to complete the
‘Topsider’s Honor’ side quest and get the sword.
WADE’S DRAKE SCALE: Collect the drake scales from the Haven temple and give them to Wade in Denerim to get the
armor.
WADE’S SUPERIOR DRAGON SCALE: Collect the dragon scale from the High Dragon and give them to Wade to have
them forged into a armor.
WADE’E SUPERIOR DRAKE SCALE: Collect the drake scales from Haven temple and give them to Wade to get the
armor, remember you need to collect the first armor set before you can order the second one.
WINTERS BREATH: Purchase it in Wonders of Thedas or loot it during ‘The Warden’s Keep’ DLC.
YUSARIS GREATSWORD: Kill Shah Wyrd in the Circle of Magi and complete the ‘Watchguard of the Reaching’ side
quest to get the sword.
SPECIALIZATIONS
WARRIORS
BERSERKER
CHAMPION
REAVER
TEMPLAR
The first berserkers were
dwarves. They would
sacrifice finesse for a dark
rage that increased their
strength and resilience.
Eventually, dwarves taught
these skills to others, and
now berserkers can be
found amongst all races.
They are renowned as
terrifying adversaries.
The champion is a veteran
warrior and a confident
leader in battle. Possessing
skills at arms impressive
enough to inspire allies, the
champion can also
intimidate and demoralize
foes. These are heroes you
find commanding an army,
or plunging headlong into
danger, somehow making it
look easy.
Demonic spirits teaches
more than blood magic.
Reavers terrorize their
enemies, feast upon the
souls of their slain
opponents to heal their own
flesh, and can unleash a
bloody frenzy that makes
them more powerful as they
come to nearer to their own
death.
Mages who refuses Circle’s
control becomes apostate
and live in a fear of
templar’s powers – the
ability to dispel and resist
magic. As servants of the
chantry, the templars have
been the most effective
means of controlling the
spread and use of arcane
power for centuries.
+2 willpower, +1 cunning
+1 constitution, +5 physical
resistance
+2 magic, +3 magic
resistance
SOURCE: By Arl Eamon
after healing him using the
Urn of the Sacred Ashes.
SOURCE: By Korgrim after
poisoning the Urn of the
Sacred Ashes.
SOURCE: By Alistair or a
manual available from
Bodahn and Sandal in the
Party Camp.
+2 strength. +10 health
SOURCE: By Oghren or a
manual available from Gorim
in Denerim market district.
MAGES
26
DRAGON AGE: ORIGINS
ARCANE WARRIOR
BLOOD MAGE
SHAPESHFTER
SPIRIT HEALER
Among the ancient elves,
there were mages who
trained their magical arts
to augment their martial
prowess. They channeled
their magical power
through their weapons and
bodies, becoming terrors on
the battlefield. Most
considered these skills lost
forever, but they may still
linger in the forgotten
corner of the world. Arcane
warriors may learn to use
their magic power score to
satisfy the strength
requirement to equip
higher-level weapons and
armor.
Every mage can feel the
dark lure of blood magic.
Originally learned by
demons, these dark rites
tap into the power of blood,
coverting life into mana
giving the mage command
over the minds of others.
Usch power comes with a
price, though, a blood mage
must sacrifice his own
health, or the health of
allies, to fuel these
abilities.
Rumors speak of barbarians
that hold the secrets of
transferring the body into
the form of animals. The
Circle of Magi denies such
rumors, but this rare art
survives in the forgotten
corners of Thedas. Mastery
of their bodis allows
shapeshifters some
protection, even in human
form, making them durable
opponent and staunch allies.
Not all enties of the fade
are demonic. Many are
benevolent entits consisting
of life energy, which can be
called upon to mend flesh
and heal disease. Spirit
healers focus on channeling
the energies granted by
these spirits, making them
dispensable members of a
party of adventurers.
+1 dexterity, +5 attack
SOURCE: By freeing the
soul trapped inside the
phylactery in the Brecelian
Forest.
+2 constitution, +0.2
combat health regeneration
+2 constitution, +1 armor
+2 constitution, +2 spell
power
SOURCE: By going through
Jowan’s ritual to free
Connor or demanding the
desire demon to grant the
power while the Circle of
Magi performs the ritual.
SOURCE: By Morrigan or a
manual available from
Varathorn in the Dalish
Camp.
SOURCE: A manual
available from the wonders
of thedas or Levi Dryden in
the Soldier’s Peak.
ROGUE
ASSASSIN
The assassin finds any
notion of fairness a quaint
ideal that has no place in
combat. Poisons are their
weapon of choice, as are
crippling strikes that inflict
persistent wounds on their
foes. As killers, as
assassins are a marvel of
stealth and efficiency.
+2 dexterity, +2.5 critical
chance
SOURCE: By Zervan or a
manual available from
Alarith in Denerim elven
alienage.
BARD
Bards follow an Orlesian
tradition, acting as
assassins, spies, saboteurs
and following other
secretive pursuits in the
constant, and sometimes
petty, struggles between
nobles. Having taking the
minstrel’s art to new level,
bards are skilled
performers and mastered
manipulators, bards can
inspire their allies or
dishearten their foes
through song and tale.
+2 willpower, +1 cunning
SOURCE: By Leliana or a
manual available from
Alimar in Orzammar dust
town.
WALKTHROUGH
ORIGINS
DUELIST
RANGER
Duelists are deadly
combatant who prefer to
fight in light armour and
strike with light, but
precise attacks.
Experienced duelists have
preternatural reflexes that
allow them to evade their
opponents’ clumsy blows, as
well as strike with
remarkable precision.
Rangers have affinity for
open country and
wilderness, but as
independent scout and
militia, they are
opportunities, nit stewards
of nature. They exploit
every advantage of their
environment, and can lure
wild beats to attack their
foes.
+2 dexterity, +1 damage
+1 constitution, +5 nature
resistance
SOURCE: By Isabela in
Denerim pearl after
beating her in a cards game.
SOURCE: A manual
available from Bodahn and
Sandal in the Party Camp.
27
DRAGON AGE: ORIGINS
MALE
FEMALE
HUMAN
ELF
DWARF
WARRIOR
MAGE
ROGUE
DALISH
ELF
DWARF
COMMONER
CITY ELF
MAGI
NOBLE
HUMAN
DWARF
NOBLE
GENDER
MALE
FEMALE
Men and women in Ferelden are generally regarded as
equal. Both genders are evenly represented in most
organizations, noble houses, and military forces.
HUMAN
The most numerous, yet the most
divided of all the races. Only four
times have they ever united under a
single cause, the last being the
centuries ago. Religion and the
Chantry play a large part in human
society. It distinguishes them
culturally from elves and dwarves
more than anything else. Humans can
be warriors, rogues, or mages.
Men and women in Ferelden are generally regarded as
equal. Both genders are evenly represented in most
organizations, noble houses, and military forces.
RACE
ELF
DWARF
Once enslaved by humans, most have
all lost their culture, scourging an
impoverished living in the slums of the
human cities. Only the nomadic Dalish
tribes still cling to their traditions,
living by the bow and the rule of their
gods as they roam the ancient
forests, welcome nowhere else. Elves
can warriors, rogues, or mages.
Rigidly bound by caste and tradition,
the dwarves have been waging a losing
war for generations, trying to protect
the last stronghold of their once vast
underground empire from the
Darkspawns. Dwarves are very tough
and have highly resistance to all
forms of magic, thus preventing them
from becoming mages.
Racial benefits: +2 willpower, +2 magic
Racial benefits: +1 strength, +1
dexterity, +2 constitution, 10%
chance to resist hostile magic
Racial benefits: +1 strength, +1
dexterity, +1 magic, +1 cunning
WARRIOR
Warriors are powerful fighters,
focusing on melee and ranged weapons
to deal with their foes. They can and
deliver a great deal of punishment,
and have strong understanding of
tactics and strategy. Specialization
for warriors includes berserker,
templar, champion and reaver.
Class benefits: +4 strength, +3
dexterity, +3 constitution
DALISH ELF
DWARF
COMMONER
CLASS
MAGE
ROGUE
As dangerous as it potent, magic is a
curse for those lacking the will to
wield it. Malevolent spirits that wish
to enter the world of living are drawn
to mages like beacons, putting the
mage and everyone nearby in constant
danger. Because of this, mages lead
the lives of isolation, locked away
from the world they threaten.
Specialization includes spirit healer,
arcane warrior, and blood mage.
Rogues are skilled adventurers who
come from all walks of life. All rogues
possess some skill in picking locks and
spotting traps, making them valuable
assets to any party. Tactically, they
are not ideal for front-line fighters,
but if rogues can circle around behind
their target, they can backstab to
devastating effect. Rogue
specializations are ranger, bard,
duelist, and assassin.
Class benefits: +5 magic, +4 willpower,
+4 cunning
Class benefits: +4 dexterity, +2
willpower, +4 cunning
BACKGROUND
CITY ELF
MAGI
NOBLE HUMAN
DWARF NOBLE
28
DRAGON AGE: ORIGINS
Proud of your
role as one of the
few ‘true elves’,
you always
assumed you
spend your life
with your tribe…
until a chance
encounter with a
relic of your
people past’s
threatens to tear
you away from
everything you
ever known.
Born casteless in
a land where rank
is everything,
bound as the
lackey and thug
of a local crime
lord, you have
spent your life
invisible… until
chance thrusts
you into the
spotlight, where
you can finally
prove whether
you will be
defined by the
actions or your
birth.
You have always
lived under the
heavy thumbs of
your human
overlords, but
when a local lord
claiming his
“privilege” with
the bride
shatters your
wedding day, the
simmering racial
tensions explodes
in a rain of
vengeance.
Wielding a power
as dangerous as
it is potent, you
know the magic is
curse for those
lacking the will to
control it. You
anxiously await
your Harrowing,
the one chance
to prove yourself
against the
demons lurking
without and
withing. Succeed,
or slaughter by
the knights who
ward against your
kind.
Born to wealth
and power second
only to royalty,
you find your
training in both
diplomacy and
battle put to the
test as your
brother leads the
bulk of your
family’s forces to
the war in the
south.
As the favored
child of the
dwarven king, you
proudly take up
your forst
military
command… only
to learn that the
deadly intrigues
of family and
sycophants may
pose a greater
danger than even
the battlefield.
DALISH ELF – A CHILD OF THE DALISH
The story start when you friend, Tamlin captures two humans in the forest, ask them what they are doing here and let
them go. Follow the path and you’ll reach an old ruin in the middle of the forest, kill the spiders at the entrance and
proceed east. Kill the creatures outside the room and enter the mirror room to trigger a cut scene. You’ll wake up in
your camp, the elder says a human named, Duncan brought you back from the cave and his currently looking for Tamlin.
Approach Fenarel and he’ll asks you to take him with you to look for Tamlin, talk to the elder and persuade her to let him
come with you. Then meet up with Merril and head to the forest, this time there’ll be Darkspawn instead of wild animals
so be very careful. Enter the ruins and head to the mirror room to trigger another cut scene, where Duncan destroys
the mirror and takes you all back to the camp.
Speak to Hahren and tell him to prepare for Tamlin’s ceremony for the dead, then return to the elder and she’ll tell you
some shocking news. You have been tainted by the Darkspawns and there’s no real cure, Duncan offers a cure to your
infection if you agree to become a Grey Warden and go with him, agree to join the Grey Wardens and the elder tells you
to say farewell to everyone. Talk to the weapon maker [I FORGOT TO WRITE DOWN HIS NAME] and persuade him to
give you a bow then talk to the story teller and agree to tell the children a story to get some codex. Talk to other NPCs
and visit the merchant if you need something, then return to the elder and tell her you ready to leave the forest.
29
DRAGON AGE: ORIGINS
DWARF COMMONER – ON THE STREETS OF DUST TOWN
Watch the cut scene and exit the house to meet your buddy, Leske, make way to the tapster tavern in the commons and
talk to the Oskias. You can either kill him and take the goods back to Berath or negotiate and sell the lyrium for some
gold. Go back to the shop in dust town and talk to Berath, he tells you to go to the proving grounds and make sure his
man wins the fight.
Return to the commons and talk to the guards to enter the proving grounds, go to Everd’s room to find his in no
condition to fight in the competition. Open the chest and grab his armors and weapon, enter the battle ground and win
all five rounds to trigger a cut scene. When you wake up you’ll find yourself in the prison, lure the guard inside and knock
him out. Take the keys and escape the prison, reclaim your weapons from the chest and head across the carta to exit
the building. At the end you’ll find Berath chatting with his buddies, kill them and exit the carta to trigger another cut
scene.
CITY ELF – LIFE IN THE ALIENAGE
Shianni, your cousin wakes you up and tells you to get ready. Pick up the wedding clothes from the chest and talk to your
father to receive the boots. Exit the house and talk to the old couple near the house, they’ll give you 10 silvers, which
they have been saving to give you. Talk Nessa’s and his family and they’ll tell they are leaving because they don’t have
money to live in the alienage, try to leave them and his daughter asks you to help her so that she can live here or go
somewhere else, give some money or convince her father stay here. Then meet up with Soris near the large tree and
he’ll take to the wedding celebration but things gets roughed up when Arl’s son, Vaughn kidnaps your brides and escapes.
Talk to Duncan and he’ll give a long sword and bow so that you can protect yourself in Arl’s estate. Travel to the estate
and meet up with your friend outside the castle, follow him to the backdoor and enter the estate. Sneak into the
northern side of the estate and kill the guards inside, examine the body to find out she’s dead. Continue north and you’ll
30
DRAGON AGE: ORIGINS
eventually reach the Vaughn and his men, kill them and watch the cut scene. Return to the alienage and talk to everyone
you want, go back to Duncan and tell him you are ready to leave.
MAGI – IN THE HIGH TOWER OF THE MAGES
You’ll start inside the fade, follow down the path killing spirits until you reach a talking rat, talk to him and agree to
follow him. Continue the path and you’ll reach the Spirit Valor, who asks you to fight him if you want him to help you,
defeat him and he’ll give you a staff along with some information about your exam. Follow the rat to the plot helper and
you’ll see a huge bear, which asks you to solve its riddles in exchange for the information:
Map
Tongue and
Dream
Follow the plot helper back where you started and you’ll see your final exam waiting for you, kill the demon and watch
the cut scene. When you come back to the Circle, you friend, Jowan tells you to meet the First Enchanter Irving in his
office. Go to the office in the second floor and Irving will introduce you to Duncan and tells you to escort him to the
guest wings. Take Duncan to the guest wing in the same floor and talk to him inside the room, head back to your quarters
and Jowan asks you to follow him to the chantry, where he’ll ask you to help him escape the Circle. You can either be a
good friend and agree to help him or agree to help and then complain to Irving, either way you need to go through the
entire process so it doesn’t matter what you choose.
Head to the exclamatory mark and talk to the First Enchater, she’ll ask you to help her kill the spiders in the store
room, agree to help and kill the spiders inside the cavern. Then head to the Quartermaster Owen and ask him for a fire
rod, for which he’ll ask you to get a signature from a First Enchanter. Take the paper to Leorah and she’ll gladly sign the
paper if you have her helped kill the spider, take the signed paper back to Owen and get the rod. Return to Jowan and
follow him to the repository, kill the sentinels and approach the door to trigger a cut scene. Go through the other door
and make your way to the plot helper killing the sentinels on the way. Examine the bookcase to find out there’s a room
behind the wall, move the bookcase and use the statue to destroy the wall. Kill the sentinels inside and approach the
phylactery to trigger a cut scene.
31
DRAGON AGE: ORIGINS
NOBEL HUMAN – THE COUSLAND OF HIGHEVER
Your father, Teyrn Cousland of Highever introduces you to Arl Howe and tells you to speak to your brother before he
leave the castle. The scene continues when Duncan, Leader of the Grey Wardens arrives in the court. He tells his here
to recruit new members and offers you to join but your [DUMB OLD] father refuses it. Talk to your father, Arl Howe
and Duncan and try to get as much as information about the Darkspawns.
Exit the room through the left door and head north, you’ll meet Sir Gilmore, who’s been sent by your mother to inform
about your natty dog. Before going to the kitchen, talk to Gilmore about himself and the Grey Wardens. Then head
north and turn right when you reach the alley, enter the kitchen and talk to Nan. Enter the larder and you’ll see your dog
goofing around, pick a name for your hound and watch the cut scene. Kill the [NOT SO] giant rats and exit the room,
talk to Nan again and she’ll tell you a story about a mabari war hound. Roam around the castle talking to NPCs, then visit
your mother in the atrium and watch the scene, where you’ll meet Howe’s wife and son. Head straight from the atrium
and turn left, enter the room and talk to your brother. Return to your room and watch the cut scene.
Open the inventory and put on your weapons and armors, kill the soldiers outside the door and exit the room. Talk to
your mother and enter your brother’s room to find your sister-in-law and nephew dead. Exit the room and kill the
soldiers, visit all the places including the chapel, library, kitchen and pantry. Proceed to the main hall and kill the
soldiers. If you are running low on health then use the potions from the inventory to your restore your health, if you or
your allies dies in the battle then you can’t use them until the battle is over sp be careful. Talk to Gilmore and he’ll tell
you he saw your father in the kitchen.
Head to the treasury room and your mother will give you the key to the armory, open the door and grab the things
inside. Proceed to the kitchen and you’ll see a large group of soldiers, be careful and keep an eye on your health. Enter
the kitchen and watch the cut scene, your father and mother decides to stay and fight while Duncan escorts you to
Ostagar.
32
DRAGON AGE: ORIGINS
DWARF NOBLE – THE PRIDE OF AEDUCAN
After the cut scene, head to the proving grounds in the commons and you’ll meet your brothers on the way, talk to them
and head to the proving grounds. Speak to the Proving Master and tell him you wish to participate, win all five rounds and
return to the royal palace for a cut scene, where you’ll be assigned to first task as commander. You need to travel to the
deep roads and retrieve your family shield.
Travel to the north side and meet up with the scout at the centre of the thiag, continue the path and make your way to
the Aeducan Thiag. At the entrance, you’ll be ambushed by a large group of Trian’s men, kill them and loot their bodies
to find your brother’s signet ring. Enter the room and you’ll find a locked sarcophagus, place your three members on the
pressure plates and press the signet ring into the lock to open the door. Retrieve the shield and exit the chamber to
trigger a cut scene.
After the cut scene, you’ll find yourself at the entrance of the deep roads. Continue down the path killing all the
creatures you encounter, head to the far north tunnel and turn to east to find Duncan and remaining Grey Wardens, who
have been exploring the deep roads in search of the Darkspawn to complete the your origins story.
MAIN QUESTS
NOTE: I PLAYED THE GAME AS NOBLE HUMAN SO I DON’T WHAT HAPPENS IN THE OTHER ORIGINS AFTER
GETTING RECRUITED TO THE GREY WARDENS, AS FAR AS KNOW THERE’S NO DIFFERENCE BETWEEN ORIGINS
EXCEPT FOR FEW DIALOGUES AND CUT SCENES.
JOINING THE GREY WARDENS
In war, victory. In peace, vigilance. In death, sacrifice. - Grey Wardens Motto.
33
DRAGON AGE: ORIGINS
You will arrive in Ostagar, where warriors from all races have summoned to fight against the Darkspawns. Duncan tells
you to find another Grey Warden named, Alistair before commencing the joining ceremony. Run around talking to NPCs
and collecting codex, if you are having trouble finding places then talk to the guard near the bridge, he’ll explain whose
where. To the right you’ll find the Circle of Magi, Wynne and a Tranquiller and Daveth in front of Wynne’s tent. In left,
you’ll find dogs kennel, Grey Wardens, King Cailan and Teyrn Loghain’s tents. Across the bridge is the infirmly, where you
can find Jory. If you are looking for supplies then talk to the Quartermaster near Daveth.
Once you are done, head across the bridge in the west and talk to the Grey Warden, Alistair, tell him you are ready to
begin the ceremony and follow him to the camp. Watch the cut scene where Duncan explains the joining ritual, you need
to travel to the Korcari Wilds and find three vials of Darkspawn blood and some old scrolls lost deep in the forest.
When you are ready, pick up any equipment you want and talk to the guard to enter the wilds.
TAINTED BLOOD
As soon as you enter the forest, you’ll get attacked by a pack of wolves, kill them and approach the wounded soldiers to
trigger a cut scene. Your first objective is to find three vials of Darkspawn blood. There dozens of Darkspawns dwelling
in the forest, kill the ones in the entrance and examine their bodies to collect the blood.
THE GREY WARDENS’ CACHE
Once you get the blood, feel free to roam around and explore the area. Then pass the ruins and head north until you
reach a large group of Darkspawns, put everyone in defense and take control of all your characters. Lure the Genlocks to
the other side and kill them, then cross the bridge and take out the mage and archers. Continue north until you reach
the outpost, approach the broken chest and examine it to trigger a cut scene.
AFTER THE JOINING
Return to Duncan to begin the joining the ceremony and watch the cut scene. Every recruit must undergo a ritual called,
Joining Ritual, where they need to drink Darkspawns blood and survive. There is no guaranty that they’ll survive but once
the ceremony has began, there is no turning back. It’s either do or die. When you get control, head to the meeting and
watch the scene. According to Loghain’s strategy, Cailan and Duncan will take the front line while you and Alistair go to
the Tower of Ishal and light the beacon signalling his army to attack from the back [PRETTY NASTY PLAN IF YOU ASK
ME].
34
DRAGON AGE: ORIGINS
THE TOWER OF ISHAL
If you have got the key from the prisoner then go to Tranquiller’s tent and open the chest. Talk to the merchant if you
need any equipments and head to the tower, talk to the mage at the entrance to find out the tower is under attack. Kill
the Darkspawns attacking the soldiers near the doors and send one character to take out the archers in the lookout.
Enter the tower and slowly move towards centre, there’ll be a large group of Darkspawns in the first floor. Take control
of your entire team and slowly move to the left side of the tower, wait for the fire blast and release your party
members. Command two members on the emissary and take him out first, then pick up the remaining Darkspawns and
loot their bodies.
Proceed to the second floor and search all the rooms killing every Darkspawns you find. Enter third floor and you’ll see
some Darkspawns torturing the Hounds, use the same strategy we used before and kill them. If you are having trouble
then release the Mabari Hounds out of the cage, they’ll take care of them for you. Proceed to the fourth floor and
watch the cut scene, which isn’t very pleasant to watch.
The room is empty with only you, your friends and…………… an Ogre [RUN!!!!!!!!!], switch to mage and let loose of your
remaining characters, use spells like paralyze, fire ball and lighting to stun the ogre and create an opening for your
warriors to strike. Once the Ogre is down, light the beacon and watch the cut scene. Loghain retreats from the
battlefield and both Cailon and Duncan dies fighting the Darkspawns [LOGHAIN……… I’LL GET FOR THIS].
You’ll wake up in Flemeth’s hut, thanks to her you are still alive and breathing, she carried you back from the tower and
treated your wounds. Talk to Morrigan and approach Alistair to trigger a cut scene. Alistair suggests using the Grey
Wardens treaties to demand alliance from other races to fight against the Darkspawns, but entire Ferelden is now
under Loghain’s control and he has labelled you two for murdering the king. The only man capable of saving you is Arl
Eamon, the Arl of Redcliffe and King Cailon’s uncle. Talk to Flemeth, Morrigan and Alistair and pick up your stuffs from
the chest inside, then gather your team and head north to enter the world map.
LOTHERING AND THE IMPERIAL HIGHWAY
When you are travelling to Lothering, you get a cut scene where Queen Anora nominates her father, Teyrn Loghain as
the regent to the throne. Your goal is to secure a safe passage in the Imperial Highway, which’ll take you around
Ferelden. Travel to Lothering and you’ll see some bandits collecting tolls from the travelers. You can either pay them 10
silver or intimidate them to leave or kill them and loot their bodied, I say kill them. Head down to the village and watch
the scene. According to Alistair, the Grey Wardens can call for aid from four races namely Dwarves of Orzammar in the
Frostback Mountains, Dalish Elves of the Brecelian Forest, Circle of Magi from Lake Calenhad and Arl Eamon of the
Redcliffe.
35
DRAGON AGE: ORIGINS
Enter the village and find a merchant to dump off your goods, then talk to NPCs collecting codex and information. Head
to the chantry and talk to the brother in the entrance, he’ll give a reward for killing the bandits i.e., if you have the
killed the bandits. Enter the chantry and talk to brothers and sisters to collect some info about the Chant of the Light,
talk to the Revered Mother in her studies to get some information about Loghain’s whereabouts.
Head to the tavern and you’ll see some bounty hunters harassing the villagers, interfere the conversation and scare
them out of the tavern. Having Sten and Morrigan will help a lot, use attacks like sunder arms, winter grips, pummel
strike and shield bash and try to freeze or paralyze them. If you are having trouble dealing with all of them then
concentrate on the commander and take him out first, if you take out the commander then they’ll surrender and leave
the tavern. After the fighting, you’ll meet a priestess, who wishes to join your campaign against the Darkspawns. Even if
you disagree to recruit her to your team she’ll come with you when you leave the village. Having Leliana in the party will
allow you to pick locks and spot traps so why say NO, right?
Head to the northwest of the village and you’ll see man inside the cage, talk to him and persuade him to join your cause.
Then use Leilana and pick the lock to let him out. Once you are done, head back to the Highway and you’ll see some
Darkspawns attacking two dwarves [I’M GETTING TIRED OF SAVING OTHERS ASS], kill them and talk to the
dwarves. If you don’t have Leliana then she’ll join you at this point, continue north and leave the village to trigger a cut
scene, where you’ll see the Archdemon commanding the Darkspawns. When you wake up you’ll see Alistair sitting next to
you, he says it’s normal for Grey Wardens to have dreams about Archdemon and Darkspawns. Talk to Bodahn and Sandal
and they’ll offer to trade items and enchant your weapons using rune stone, use the runes you found and enchant any one
of your weapon to add extra effects.
A VILLAGE UNDER SIEGE
When you arrive in Redcliffe, you’ll get a cut scene regarding Alistair’s past. This bastard is half-brother of King Cailan,
now that Cailan is dead he is the heir to the throne. But the only person who knows this is Arl Eamon, Teyrn Loghain and
King Maric. Now that Maric’s dead and Eamon’s sick, there’s no one who’ll help you regain the throne from Loghain and
Loghain will do everything in his power to stop you and Alistair from reaching Denerim.
36
DRAGON AGE: ORIGINS
Head to the village and you’ll see a Militia near the bridge, talk to him and agree to meet Teagan. The village is under
attack by undead, they are attacking at nights killing and kidnapping villagers. Many has died fighting and Arl is deadly
sick to call for aid, Teagen offers to arrange an audience with the Arl if you help them defend the village [*SIGH* AS
IF WE HAVE A CHOICE]. Talk to the Revered Mother and others and collect more information about the siege. Talk to
General Murdock outside the Chantry and he’ll asks you to speak with the blacksmith, who has locked himself in the
smithy. Break open the door to the smithy and talk to him. Pursue him to help the villagers and he’ll ask you to find his
daughter, promise to look for his daughter and leave the house.
Next head to the east side of the village and break into Dwyn’s house, pursue him to help in the siege and agree to pay
100 silvers [WHAT?! I’VE WORKED HARD TO EARN THIS MONEY]. Then head to the tavern and you’ll see an elf
spying on the villagers, intimidate him and he’ll admit the truth, get the letter and tell him to fight with the militia. Talk
to the militia inside the tavern and they’ll complain about the owner charging for the ale, talk to Lloyd and pursue him to
give free ale to the soldiers, if you don’t have good persuasion skill then pay 100 silvers for the ale. Speak to Murdock
and tell him the militias are ready for the attack, then head to Ser Perth’s outpost and inform him you are ready to wait
for the nightfall.
THE ATTACK AT NIGHTFALL
There’ll be two waves of attack in the hilltop each with around 20-25 undead, luckily Ser Perth and his knights will held
you a hand. Kill the undead and follow the messenger to the village, there’ll be around five waves, first two will come in
groups whereas the remaining comes one after another. If you manage to hold on the first two attacks then you can pick
up the remaining easily, loot their bodies and watch the scene.
THE ARL OF REDCLIFFE
Talk to Teagen and he tell you to him and Ser Perth in the windmill, do as he says and speak to him at the windmill to
trigger a cut scene. You’ll see the Arlessa rushing towards the windmill, the castle is under attack and Connor, Arl’s son
is acting very strange. They fear he has become an abomination. Teagen tells you to use the secret passage to enter the
castle and see what’s exactly happening. Talk to Ser Perth and he’ll promise to help you if you open the main gates for
his men, enter the windmill and use the secret passage to travel to the castle.
When you arrive, you’ll see some walking corpse torturing the prisoners, kill them and talk to the mage inside the cell
[YES HIS YOUR BUDDY FROM THE CIRCLE OF MAGI]. Choose whether to let him go or kill him and watch the scene,
be careful though Alistair will disapprove if you let him go. Search all the rooms and kill each and every undead you see,
you’ll find Velena, blacksmith’s daughter inside one if the rooms in the north.
Clear the troops in the basement and head to the courtyard for one of the most annoying fights in the game. Take
control of your entire team and move them behind the tree, lure the archers in the stairs and kill them. Once the
archers are dead, equip all your characters with bow and attack the revenant from distance, this’ll deplete most of his
health before he reaches you. Switch weapons and let your warriors distract the revenant while your mage or rogue
sneak behind him and open the gates for Ser Perth and his soldiers, take out the revenant first then kill the remaining
to trigger a cut scene.
37
DRAGON AGE: ORIGINS
Just like Jowan predicated Connor has became an abomination, the only way to solve this problem is by either killing him
or agree to go through Jowan’s ritual and sacrifice Isolde or get some help from the Circle of Magi. If you want to kill
Connor then go to the second through the main halls and you’ll find Connor near Eamon’s room, intimidate the demon to
show its true form and kill it, it’s an easy fight as long as maintain your health stable.
Jowan’s or the Circle of Magi’s ritual are both the same, you have to send Morrigan or Wynne into the fade and kill the
demon saving Connor. If you are planning to acquire blood magic specialty then you have to go through the ritual. In
Jowan’s ritual you’ll get the specialty as soon as you enter the fade through blood magic. Whereas in CoM’s ritual you
have to persuade the demon to give you the power then kill it. Once the demon is dead, the village will be back to its old
state but Arl is still sick with no signs of improvement. Talk to Teagen and he’ll tell you about the Urn of the Sacred
Ashes, offer to help him look for it and leave Redcliffe [FOR NOW].
THE URN OF THE SACRED ASHES
Teagen tells you to meet a brother named, Genitivi, who’s currently doing research on the sacred ashes. Though his
current whereabouts is unknown his house is located in the Denerim so start your search there, talk to Weylon and use
persuasion to get as much as information as possible. Then try to enter the room behind him and he’ll stop you, insist on
entering and he’ll change in a malefic and attacks. Kill him and enter the room to find real Weylon’s body and Genitivi’s
journal. Travel to Lake Calenhad and talk to the inn owner, he clearly states there’s no one by the name of Genitivi. Exit
the inn and you’ll get attacked by a group of cultists, kill them and loot their bodies.
Travel to Haven, it is located in the western part of Ferelden and talk to the guard in the entrance [THAT’S A WARM
WELCOME]. After some questioning, he’ll let you enter the village. Enter the house in the left and you’ll see an altar
with fresh blood, examine the altar to find its human blood. Exit the house and you’ll get attacked by another, kill them.
Enter the store and talk to the owner, try to question about the situation and he’ll attack, kill him and enter the
storeroom in the backside to find one of Eamon’s knights dead body [I’M BEGINNING TO LOVE THIS VILLAGE].
38
DRAGON AGE: ORIGINS
Talk to boy outside the shop and he’ll tell you all the villagers in the chantry, that’s all the info you can get from him so
leave the boy and head to the mountains. You’ll get attacked by more villagers on the road, kill them and enter the
chantry. Talk to the Revered Father Eirik and ask him about Brother Genitivi, instead of answering he’ll turn into a mage
and attacks you [THIS IS WHY I HATE TO BE POLITE]. Have your mage or archer and a melee fighter take care of
him while the others clear the remaining guards in the room. Examine the wall near the bookcase and you’ll find a secret
door behind [JUST LIKE OLD MOVIES], enter the room and talk to Genitivi. According to him, the sacred ashes are
kept inside a ruined temple in Haven. Pick up the medallion from Eirik’s body and talk to Genitivi, agree to take him to
the temple and watch the cut scene.
Leave Genitivi to his work and search the temple, clear all the cultists inside the rooms and explore the temple. The
main hall in the upstairs is locked, the key is hidden inside the chest in the western wings. Take the key and enter the
main hall, which leads to the caverns, where the ashes are kept. There will be couple of dragonling, a younger version of
dragons, drakes and dozens of cultists inside, kill them and make sure you pick up the scales from the dragons you slew,
they’ll help you complete two quests. Take your time to clear all the cultists inside [WHY LEAVE THEM WAITING
RIGHT?], then turn left and head deep into the caves. At the end you’ll find Father Kolgrim, who welcomes you much
better than villagers.
Anyway this dickhead thinks Andraste has returned as the high dragon but she is very weak to return to her true form.
SO… he asks you to help him revive her to full power by pouring the dragon’s blood on the ashes. You can either choose
to help him and take the blood or promise to help and then betray him or say NO and kill him here, I say kill him. Search
the bodies [ASSUMING YOU KILLED THEM] and pick up flute. Exit the cave and you’ll see a dragon flying to the
mountain top [FINALLY A DRAGON, I WAS STARTING TO WONDER WHY THEY NAMED DRAGON AGE IF THERE’S
NO DRAGON IN THE GAME]. Look around the area and head to the Gauntlet on the other side of the bridge. Talk to
the Guardian and he’ll ask you to state your purpose for being here, admit you are looking for the ashes to heal your
friend and he’ll let you take a single pinch from the urn. Ask him about the High Dragon and he’ll clarify you with a big
NO.
A TEST OF FAITH
Before taking the ashes you need to go through several tests to prove yourself to The Maker and Andraste. Enter the
room behind the Guardian and you’ll see eight disciples of Andratse, if you have seriously gone throw all the codex
regarding Andraste and her teaching then you should be able to guess the answer:
Ealisay – A Tune
Vasilia – Vengeance
Havard – The Mountains
Catherin – Hunger
Brona – Dreams
Thane Shartan – Home
General Maferath – Jealousy
39
DRAGON AGE: ORIGINS
Archon Hessarian – Mercy
If you answered all the questions correctly then the door to the next room will open. In the next room, you’ll meet
someone from your origins. For me [NOBLE HUMAN] I saw my father, Teyrn Bryce Cousland, who gave me an amulet [I
DON’T KNOW WHAT’LL HAPPEN IN THE OTHER ORIGINS. SORRY]. Enter the next room and you’ll see four images
of you and your friends, who attack you for no reason. They are not hard just annoying, if you have Morrigan then have
her shape shift into a spider or bear.
Next room is a bit tricky, you need to make your way to the other side of the room by stepping on the right set of tiles.
For this you need all four characters so suspend their free movements and command your characters to hold position,
then find the two tiles which’ll make the floor solid. For the sake of not to get confused I’ll name the characters as
NO.1, NO.2, NO.3 AND NO.4, this way you’ll know which one to move. Here’s how it’s done:
First move NO.1 to the second tile in the right side, then move NO.2 to the third tile left side and NO.3 to
the sixth tile in the left side. This’ll make two tiles solid enough to walk, move the NO.4 to the second tile in
the centre.
Move NO.1 to the first tile in the left side and NO.2 to the fourth tile in the right side. Then move NO.3 to
the sixth tile in the left side to create the next set of tiles, move your NO.4 to the next tile in centre.
Move NO.1 to the first tile in the left side and NO.2 to the second tile, move NO.3 to the fifth tile in the
right side to create the final set of tiles. Finally move your NO.4 to the other side to make all four tiles
appear.
Proceed to the next room and examine the altar, remove your equipments and cross the holy fire to trigger a cut scene.
You have successfully completed all the tests and proved yourself faithful, the Guardian lets you take a single pinch of
ash from the pot. If you have agreed to help Kolgrim then you can pour the blood to the pot, but by doing so will trigger
a boss fight against the Guardian, Alistair, Leliana and Wynne. You can intimidate your companions and convince them to
stay but dealing with the Guardian is not an easy task, his hard nut to crack.
If you don’t want to fight the Guardian and the others then simply take a pinch of ashes and leave the urn. This’ll
trigger a fight with Kolgrim and his men, which is a whole lot easier than the Guardian’s. your choice determines what
specialization you’ll get from the quest, if you kill the Cultists and protect the Urn then Eamon will reward you with the
champion specialization. On the other hand, helping Kolgrim will net you reaver specialization.
Either way take the ashes and leave the Gauntlet, head back to the mountains top and you’ll see the High Dragon at the
peak. If you have killed Kolgrim and pick up his flute, then go to the inventory and blow it to call down the dragon. But do
it only if you are above level 15 or else it’ll be like suicide attempt. The fight will be similar to Flemeth’s fight, she have
crazy defense and uses variety of attacks. Her flames aren’t like dragonling’s fire, it hurts A LOT. I suggest having
three meele fighters with Wynne, this way you can keep healing and reviving members while fighting.
When she’s going to die, she’ll pick up one of your character and chews them until they are dead [YAK!]. Have Wynne
revive them as soon as she let goes, keep up the melee attacks and deplete her bit by bit until it reaches 0. Make sure
40
DRAGON AGE: ORIGINS
you loot her body before leaving, she have enough equipments for your entire team. Once you are done, head back to
Genitivi and tell him about your success, here you can either kill him to keep the ashes safe and secret or persuade or
intimate not to tell anyone or have him research on the ashes which’ll cause the entire world to come and take the ash.
Then rush back to Redcliffe and use the ashes to get the old man back on his feet.
You’ll have another nightmare of the Archdemon and collapse on the way, Alistair takes you back to the camp and lets
you rest for awhile. When you wake up, you’ll see your dog barking then suddenly a group of Darkspawns attacks your
camp. It’s not a hard fight, you’ll have your entire team at your disposal [YOU CAN’T CONTROL THEM THAT’S ALL.
LOL] so don’t worry about strategies and all, just kill them and talk to your fellow Grey Warden.
GATHER AN ARMY
Thanks to the healing power of the ashes Eamon is back on his feet. After a long conversation Arl promises to call a
landsmeet against Loghain and prove his disloyalty to the nobles. But the problem is who’ll take the throne after Loghain,
Alistair clearly states his not willing to take over the throne and leaves but it’s a problem to deal later. Now you need to
gather an army large enough to defeat the Darkspawns and slay the Archdemon. After all the cut scenes, you have to
decide whether to kill Jowan or let him live, there’s no benefit in killing him so convince the Arl to let him live. If you
haven’t recovered Alistair’s amulet then pick it up now, it’s inside the drawer in Arl’s study. Giving it to Alistair will give
you a huge load of approval.
Once everything’s set and done, let’s move onto the biggest part of the game ‘Gather an Army’, for this you need to
travel to the Circle of Magi in Lake Calenhad, Brecelian Forest and Orzammar in the Frostback Mountains. If someone
asks me to comment on these three then I’ll say they are boring, annoying and irritating. Anyway I’m sure I’m ruining
your curiosity by saying all these things so let’s just get on with it. We’ll do it in the same order Alistair explained in
Lothering: Templars/Mages from the Circle of Magi, Dalish Elves of the Brecelian Forest and Dwarves of Orzammar.
BROKEN CIRCLE
Head to Lake Calenden and talk to the Templar near the boat, he says the Circle is currently closed. Talk to Kester and
hop onto the boat, talk to Sir Griegor at the entrance and he’ll fill you in with the remaining details. The mages have
turned into the abomination and attacked the Circle, the templars are now trying to trap the abomination inside by
sealing the doors. Griegor clearly states they can’t help in their current situation and tells you to look for aid somewhere
else, try to persuade him and he’ll let you enter the circle.
Dump off your equipments in the quartermaster and head through the doors, once you go through the doors there’s no
turning back until the tower is back to normal with no abomination so pack yourself with some powerful equipments and
potions. Proceed to the centre hall and you’ll see Wynne from Ostagar fighting the abominations, kill them and talk to
41
DRAGON AGE: ORIGINS
her. Here you can convince the mages to leave and help the templars seal the doors or help the mages clean the Circle, if
you are looking for help to deal with Connor then you need to help the mages by killing the abominations.
Proceed to the second floor and talk to Owen, he says he saw some blood mages looking for lyruim. Enter the room and
you’ll see some blood mages he mentioned, they are actually weak in hand-to-hand combat so you shouldn’t have any
trouble dealing with them. Once done, a woman will beg for mercy, you can either let her go or kill her there it doesn’t
matter. Proceed to the First Enchanter’s room and search the room, especially for the Black Grimore.
Giving it to Morrigan will trigger her side quest, I suggest you give it to her right away [ASSUMING SHE’S IN YOUR
TEAM] so that she’ll give you the quest the next time you go to your camp. If you give it her in your camp then you have
to wait until you go back to the camp next time. There’s nothing special in the third floor, more abominations and some
side quests. So deal with them and head to the fourth floor. In the centre room, you’ll encounter a sloth demon, who’ll
send you and your companions to the fade.
LOST IN THE DREAMS
[*EVIL TONE* WELCOME TO THE BIGGEST PAIN IN THE ASS PART OF THE GAME] If you fail to resist his
temptation then he’ll send you to the fade. Like I said the fade is a complete pain, it’s divided into ten parts and the
sloth is the centre. You’ll start in Weisshaupt Fortress, from here you need to travel to four other places viz., The
Burning Tower, The Mage of Asunder, The Templar’s Nightmare and The Darkspawns Invansion.
Proceed to the entrance of the fortress and you’ll see Duncan, who tries to lure you into dreams, kill him along with the
remaining Grey Wardens and access the fade pedestal. Travel to raw fade and you’ll see mage at the entrance, who’ll
explain how to travel from pedestal to pedestal and escape the fade. Go through the fade portal and kill the rage demon,
killing it will trigger a conversation with a rat, which has been trapped inside the fade, after few questioning and
answering it’ll give its shape shifting ability, which’ll allow you to become a rat and travel through mouse holes. Use the
pedestal next to you and travel to the burning tower, head east and go through the mouse hole. Kill the demon and the
templar will give you burning man form, which’ll allow you to cross fire without getting hurt, this form is strong against
melee fighters but when it comes to mages its best to avoid it.
Travel to mage of asunder and go through the mouse hole, follow the hall way killing whatever you find and at the end
you’ll see a dreamer being attacked by golems, kill them and he’ll give you the golem form, most powerful form in the
game. Head to the next pedestal and enter the darkspawns invansion, kill the arcane horrors and head north through the
mouse hole. Kill the darkspawns attacking the dreamer and he’ll give you the spirit form for saving his life. Once you got
all four forms in hand, head back to all the pedestals and kill its masters to unlock the remaining pedestals.
42
DRAGON AGE: ORIGINS
Head back to the raw fade and talk to Niall then go through the spirit next to him and you’ll see a desire demon,
Zevenya, she isn’t very hard but the problem is her shades. Lure the shades away from her and kill them, then change
into the golem and pummel her until she’s dead. Next head to the burning tower and cross the fire, inside you’ll find
Rhagos. Turn into a golem if you have the form, if not then use the burning man form and kill him. Travel to mages of
asunder and go through the blocked door where you got your golem form, head straight and at the end you’ll find
Slavren. Get rid of him however you want and use the pedestal to the templar’s nightmare.
Pass the massive door at the far side of the fade and kill arcane horrors and darkspawns, enter the room and you’ll see
another desire demon called, Vereveel, who’ll run away as soon as she sees you. Chase after her through the mouse hole
and kill her. Finally head to the darkspawns invasion and destroy the massive door in the entrance, kill the Genlock
Emissary and the remaining darkspawn and bust open the next door to find Uthkiel, kill him to unlock the nightmare
pedestals.
Once all five bosses are dead, you need to travel to the nightmares and rescue your companions, they’ll be trapped
believing what they are seeing is real, you need to free them by killing their dreams or nightmare. For example: the
elven student for Wynne and Goldanna for Alistair. Once you complete all three nightmares, the centre fade pedestal
leading to the Inner Sanctum, where Sloth is located will be unlocked. His not that tough to beat just annoying, every
time you defeat him he’ll come back in another form. Take control of Wynne and leave your warriors engage in melee
combat. Use Wynne’s healing and reviving powers and don’t let your characters health to drop less than half. Once you
defeated him, you’ll have a long conversation with Niall, who tells you to pick up the Litany of Adralla from his body and
use it against Uldred to prevent him from turning into abomination.
You’ll be back in reality with all your companions safely back at your side, pick up the Litany of Adralla from Niall’s body
and clear out the remaining abominations in the rooms. Then head to the last room and you’ll find a templar who has
imprisoned himself inside a barrier to protect from the abominations. Talk to him and he’ll tell you to kill all the mages in
the tower, agreeing to this will cause a lot of disapproval in your team including Morrigan and Alistair. Just leave him
there and head to the harrowing chamber to find Uldred, the man responsible for all the mess created in the Circle.
After the conversation you’ll be forced to fight him, take out the abomination around him and have all your melee
characters distract him while Wynne heals your wounds. Wait for Wynne to tell you to use the Litany and throw the
Litany at him to stop him from turning into abomination. Deplete all his health and watch the cut scene, where you need
to decide what to do with the mages. You can either kill them as templars told you to or spare them, if you are looking
for help to solve Connor’s problem then you need to side with the mages and spare them. Return to the Griegor to
complete the quest, you can now head back to Redcliffe and deal with Connor.
43
DRAGON AGE: ORIGINS
After you complete the Circle of Magi, you’ll get a cut scene of Loghain hiring an assassin to kill you and Alistair. When
you try travel to your next destination, you’ll be stopped by a girl who asks you to help her save her caravan from
Darkspawns, you need to follow her as there’s no other way which will lead to an ambush by the same assassin. I suggest
you don’t bring Alistair, Morrigan and Sten, you’ll know why after the battle. Have your melee fighters take care of the
assassins while your mage freeze the archers preventing them firing shattering shots. If you have Leilana then have her
back stab Zervan, gang up and dispose Zervan as quickly as you can. After the battle, you can either kill him or wake him
up and convince him to join your team, if decide to take him into the team then Alistair, Morrigan and Sten will
disapproval so it’s best if you avoid bringing them.
NATURE OF THE BEAST
Travel to the Brecelian Outskirts and you’ll meet some elven hunters, who ask you at least hundred questions before
taking you to the elder. Sooner or later you’ll realize just like Haven these guys don’t like outsiders poking their nose
into their business. Talk to the Clan Leader, Zathrian and he’ll tell you they are under attack by the werewolves and
can’t help you in the blight. Ask him more about the werewolves and agree to help them fight against the werewolves,
he’ll tell you to travel to the Brecelian Forest and kill the werewolves’ leader, Witherfang [HEY! YOU CAN’T JUST
ORDER ME TO DO YOUR DIRTY THINGS OLD MAN]. Roam around the camp talking to NPCs, especially to Sarel, the
story teller.
Once you are ready, head to the forest. The forest is a tricky one to navigate, just roam around killing the werewolves
and Darkspawns until you reveal the entire area. Somewhere in the northwest you’ll run into a werewolf called, Swift
Runner [WOW! I DIDN’T WEREWOLVES HAVE NAMES]. He’ll run away if you kill his buddies so take out the other
werewolves and scare him off, head to the next part of the forest, which is a complete pain in the ass. Every time you
try to go through the mist you’ll get back to the starting point so instead of getting annoyed about the forest, try to
take out as many as werewolves as you can. Then head to the northwest part of the forest and you’ll see a crazy hermit
[EXACTLY WHERE I’M STANDING IN THE MAP] who keeps babbling all the time, according to him a huge oak tree is
trying to kill him because he stole its acorn.
44
DRAGON AGE: ORIGINS
Head to the northeast part, directly opposite to the hermit and you’ll see the great oak tree he mentioned, talk to it and
it’ll agree to help you pass the mist if you bring back its acorn from the hermit. Head back to the hermit and talk to him
about the acorn, if you have met Danlya back in the forest and picked up her scarf or helped Cammen and received the
book then exchange it for the acorn, if not then go back and talk to her/him or just kill him and loot his camp. Either
way go back to the oak tree and return the acorn, in exchange it’ll give a piece of its enchanted wood, which’ll let you
pass the barrier and reach the werewolves liar.
Go through the barrier and you’ll encounter your old friend, Swift Runner again and as usual he run away as soon as he
see you. Proceed towards the ruins and enter the so called fortress, kill everyone you see and look around the area.
When you are done, head to the far west corner of the fortress and enter the lair. At the entrance you’ll see a
werewolves called, Gate Keeper, talk to him and he’ll take you to the Lady of the Forest, who is none other than
Witherfang and the White Wolf you encountered outside the fortress.
According to Witherfang, centuries ago when the Dalish Elves first came to the Brecelian Forest, it was occupied by
humans. The elves and humans had a crash for the place and the humans kidnapped Zathrian’s son and daughter and
killed them. Enraged Zathrian summoned a werewolf demon and imprisoned it inside a human body, who is now
Witherfang. Witherfang promises to leave the villagers if Zathrian release them from the curse.
Go through the newly opened door and you’ll see Zathrian examining the ruins outside. Talk to him and convince him to
talk to the Lady of the Forest, now keep in mind that you only need to take him to the Lady so keep that tongue of yours
at control and don’t do anything stupid to ruin the plan. Take him to Witherfang and they’ll have a long [REALLY LONG]
conversation. Here you can either side with the werewolves and kill Zathrian or side with him and kill Witherfang or
stick to the plan and convince him what he has done is wrong and end the curse without killing anyone.
If you are playing as neutral to both the sides and trying to end the curse then your teammates will support or at least
Alistair will. By doing this Zathrian will be enraged and attacks you, but nothing to worry Witherfang and his men will
help you. Once you inflict certain amount of damage, Zathrian admits what he has done is wrong and ends the curse by
scarifying himself [WHAT?! I SAID YOU DON’T NEED TO KILL ANYONE, THAT DOESN’T MEAN THEY CAN’T KILL
THEMSELVES OR COMMIT SUICIDE]. Watch the cut scene and return to the camp to complete the task, the clan will
pledge to help you fight against the Darkspawns [YIPPIE].
A PARAGON OF HER KIND
Before travelling to Orzammar rearrange your current army and have at least two melee fighters and a rogue to pick
locks, then travel to the Frostback Mountains and watch the cut scene. Head to the fortress entrance and you’ll see
some Loghain’s men pestering the guards to let them in, talk to the guards and they’ll ask you to get rid the soldiers. Do
as they say and enter the fortress to see a warm welcoming scene, talk to the soldier in the entrance and he’ll fill in with
details. Orzammar is in turmoil, the king is dead and the throne is empty. Both Prince Bhelen and Lord Harrowmont are
45
DRAGON AGE: ORIGINS
trying to take over the crown and the citizens are unable to choose between them. Without the King they can’t help you
against the blight so it’s up to you to settle the despite and bring peace back to the land.
Do some shopping if you want and explore the area collecting codex. When you are done exploring, head to the diamond
quarters and enter the assembly to trigger a cut scene. You can either side with Bhelen or Horrowmont and make them
the King, either way they’ll promise to fight against the Darkspawns in the Blight. If you are have played/are playing as
Dwarf Noble then you know who to choose, both Bhelen and Harrowmont’s men will try to lure you to their side.
A PRINCE’S FAVOR: THE FIRST TASK
Talk to Vartag in the assembly chambers and he’ll ask you to deliver two letters to nobles, who have changed their votes
to Harrowmont. Go to the tavern in the commons and you’ll see two dwarves fighting each others, show the letter to
Lord Helmi and leave the tavern. Go back to the diamond quarters and give the other letter to Dace, she’ll agree to help
Bhelen if you look for her father in the deep roads. Go to the entrance of the deep roads and talk to the commander,
enter the deep roads and continue down the path until you reach a fork. Turn left and follow down the path killing
darkspawns and you’ll eventually reach Dace’s father, talk to him and return to the palace to complete the first task.
A LORD’S TRUST: THE FIRST TASK
If you choose to side with Harrowmont then talk to Dulin in Harrowmont’s estate and he’ll tell you to go to the proving
grounds and get some information on Bhelen [HE MEANS GO TO THE PROVING AND WIN IT DUMBO]. Head to the
proving grounds in the commons and look for the Proving Master, tell him you want to participate and he’ll enroll you into
the competition. Win all five rounds and return to Dulin, ask him for an audience with Harrowmont and watch the scene.
A PRINCE’S FAVOR: THE SECOND TASK/A LORD’S TRUST: THE SECOND TASK
Bhelen/Harrowmont asks you to deal with the local crime lord, Jarvia, who is residing in the dust town. Head to the dust
town and speak to the people about Jarvia and collect information about her current whereabouts. Especially to the
woman sitting near the fire pit, if give her 10 silvers then she’ll tell you how you to enter Jarvia’s hideout. Then
intimidate the shop keeper and leave the shop. Examine the wall behind the fire pit and you’ll find an old locked door,
enter the house next to it and you’ll see couple of Jarvia’s guards hanging out, kill them and search the bodies to find
the key.
Enter the locked room and kill everyone in the entrance, head to the far north part of the carta and you’ll find Jarvia in
the last left room. She’s the most annoying boss in the entire game, she disappears and reappears every time you try to
hit her. Cast grease + fire + blizzard and burn the guards inside the room. then use cone of cold or blizzard and freeze
Jarvia creating an opening for your warriors to strike. Repeat the same technique two or three times and kill her. Loot
the bodies and use the hidden passage to exit the carta.
46
DRAGON AGE: ORIGINS
Talk to Harrowmont/Bhelen and they’ll asks you to find a Paragon named, Branka, who has left to the deep roads years
ago looking for Anvil of the Void. IF you succeed in this task then they’ll promise to convince the assembly to help you in
the war. Head to the deep roads and you’ll meet a drunken named, Oghren, who wants to come with you to look for his
wife. He’ll tag along even if you say no so just welcome him into the team.
Deep roads is a complete pain, you need at least one day to complete it so pick up whatever you want and fill your bag
with loads of health poultices. Like I mentioned before you need at least two warriors for this part. Once you entered
the thaigs, you’ll find all sorts of creature so if are planning to play with your charmy mages and archers then forget it.
Your [REAL] destination in the deep roads is the Anvil of the Void, which is located at the edge of the deep raods, for
this you need to travel through Aeducan Thiag, Caridan’s Cross, Ortan Thiag and Dead Trenches.
There’s nothing much to do in Aeducan Thiag, Caridin’s Cross and Ortan Thiag, you’ll get attacked by couple of dozens of
Darkspawns and other creatures who tries to stop you from reaching the Anvil, kill them and clear all the tunnels. Once
you are done, head to the far northwest of Ortan Thiag and you’ll find Branka’s journal, it is located right next to the
spider queen [EXACTLY WHERE I’M STANDING IN THE MAP]. Get rid of the spider queen and read the journal,
Branka continued her search for the Anvil and traveled to the Dead Trenches, the home of Darkspawns.
When you first arrive in the Dead Trenches, you’ll see a dragon flying around the thaig [HOPE ITS NOT THE
ARCHDEMON]. Talk to the Dwarves near the bridge and you’ll get attacked by couple of Darkspawns, kill them and head
to the northwest until you hear some strange voices. Clear the Darkspawns outside and enter the hall to find an infected
Dwarven woman, talk to her about Branka and she’ll run away [I SUGGEST YOU SAVE THE GAME BEFORE TALKING
TO HER]. The room next to this is locked so enter the room at the other side and you’ll see spirits wandering around the
room, examine the Altar and you’ll find the key to the big door.
Use the key to enter the room and you’ll see a huge big large monster called, Broodmother, who is none other than
Hespith. She’ll spawn couple of Darkspawns everytime you hit her, have your warriors deal with the minions while your
mage take care of Hespith. You can’t kill her with your melee fighters so mages are your only choice, cast spell might and
follow it by tempest, inferno and blizzard. You can also use sleep + horror to knock her down then use drain her life or
cast crushing prison and follow it by other spells.
Defeat the monster however you want and talk to her, then loot her body and proceed to the next area. At the entrance
of the tunnel, you’ll find Branka, who orders you to help her pass the traps. Follow her and enter the first room, which is
covered with poison gas and four stone golems. Have someone turn off the valves while the others take care of the
golems, this way you can save at least half of your health. Next room is filled with traps, lots of them, have your rogue
disarm them while your remaining three take care of the Darkspawns.
47
DRAGON AGE: ORIGINS
Proceed to the next room and you’ll see a stone face, which’ll start turning firing lightning and fireballs. There four
stones at each end of the platform, you need to kill the Dwarf guarding the stone and use the stone to destroy the
faces. Once all four faces are destroyed, head to the next room and watch the cut scene. Here you need to choose
between Branka or Caridin and help them kill the others, if you have Shale they she’ll leave if you chose to kill Caridin so
be careful.
If you decide to kill Branka then you need to deal with three of her golems and then with Branka. On the other hand, if
you choose to help Branka then you need destroy four Caridin’s stone golems and then Caridin himself, dealing with him
is no easy task. Once you dealt with them you need to decide what to do with the Anvil of the Void, as far I know if you
are siding with Caridin then you need to destroy the Anvil. If you wish to return it to the Orzammar then Caridin will
attack you even if you helped him kill Branka. Anyway after the fight, the Paragon, whom you chose to help will make a
crown to give it to the new king.
Return to Orzammar and head to the assembly chamber, here you can choose who you want to be the next king. It
doesn’t matter for whom you are working for, you can easily double-cross them and give the crown to the other. If you
choose Harrowmont then Bhelen will attack right in the assembly chambers but nothing to worry, the nobles will aid you
kick his ass. Watch the cut scene and say bye-bye to Orzammar.
THE LANDSMEET
Once you completed ‘Gather an Army’ it’s time to head back to Redcliffe and begin the landsmeet, this is the last but
one quest of the game. You’ll travel to Denerim where you’ll have a face-to-face conversation with KING Loghain, piss
him off as much as you want and watch the cut scene. Talk to Eamon in his estate and he’ll introduce to you Erlina, one of
Queen Anora’s maiden, who believes that the Queen has been kidnapped by Howe [REVENGE TIME].
RESCUE THE QUEEN
Head to Arl’s estate and meet up with Erlina outside the castle, she tells you to sneak inside through the back door
while she distracts the guards. This is the same castle you sneak in city elf origins, follow Erlina to the backdoor and kill
the guards patrolling near the walls. Wait for her to distract the guards and sneak inside through the door, once you are
inside the castle don’t try to talk to anyone. Sneak into the northern part of the castle and you’ll find the Queen inside a
locked room [WHERE I’M STANDING IN THE MAP], she’ll tell you to kill the mage who put the barrier in order to
remove the spell.
48
DRAGON AGE: ORIGINS
The mage is currently with Howe, you know what this means right? Sneak inside the Howe’s bedroom and open the chest
to find some Grey Wardens documents, enter the prisons you’ll see a prisoner who kills the guard and take his clothes.
He introduces himself as a Grey Warden from another country, who came to aid in the Blight in Ostagar, ask him about
the Grey Wardens and give him the documents you found in Howe’s bedroom. Once you are done, follow the plot helper
and you will eventually reach the dungeons where Howe is stationed with his men [WAITING FOR YOU TO COME AND
KILL HIM]. Have your mages or archer concentrate on Howe while your melee take out the men around him, once
everyone’s dead go for the Arl and take him out. Loot their bodies and head back to Anora, open the door and follow her
to the next room to trigger a cut scene, where Miss Cauthrien tries to become all goody-goody and attacks you with her
men.
Here you can either fight them or surrender and create a chance for the Queen to escape, if you wish to fight then
Anora will double-cross you and goes with Cauthrien. On the other hand, if you surrender then they’ll take you and
Alistair to prison, from where you need to escape. If you want to fight then use the same strategy we used for Howe
and take out the soldiers around her, then go all out on Cauthrien and cut her into pieces. If you wish to surrender then
she’ll take you and Alistair and let the others escape.
CAPTURED!
They’ll take off all your equipments and puts you and Alistair in the dungeons, here you can either break out of the
prison yourself or wait for your teammates to come and rescue your ass. Act like you are sick and lure the guard inside
the cell, kill him and pick up the keys. Grab your belonging from the chest and exit the dungeons. Take out the soldiers
outside and bust out of the castle through the front door.
If you choose to wait for your companions to come and save your sorry ass then choose any two characters with good
fighting and persuasion skills, talk to the soldiers in the entrance and they’ll let you enter the castle. Talk to the captain
and he’ll agree to let you enter the basement, sneak inside and look for your teammates’ cell. If you have Leliana or
Zervan then have them open the door, if not then kill the patrolling guards and pick up the keys. Either way kill the
remaining guards near the door and escape the castle.
49
DRAGON AGE: ORIGINS
Return to Eamon and tell him mission accomplished, he then tells you to visit the elven alienage and see what’s happening
there. He believes you can find proof to show Howe’s treachery to the nobles, which’ll give a lot of support in the
landsmeet.
UNREST IN THE ALIENAGE
Head north from the entrance and you’ll see a large crowd in front of the local healing centre [OR WHATEVER IT IS],
talk to Shianni and get some info on what’s happening. Go to the backside of the building and bribe the guard to let you
in, clear out guards inside and pick up the note. Return to Shianni and give her the note you found, head to the far east
side of the alienage and enter the apartment.
Kill the guards in the entrance and keep moving south until you reach the warehouse. At the entrance, you’ll meet
Devera, you can wither persuade or intimidate her to leave you or kill her and loot her to find a codex item. She’s
basically an archer and weak at hand-to-hand combat, have one of your fighters engage in fight while the remaining clear
the room. Head to the next room and speak to Caladruis, who offers a deal. You can either take the documents and leave
the elves to die or kill him and take everything, fighting him isn’t very hard so throw the offer back at his face and draw
out your sword.
Take control of your mage and use earthquake to reduce the enemies’ movements then cast inferno directly on Caladruis
to burn him down. Once his dead, kill the remaining and free the hostages, talk to Valerdrian and he asks you to meet
him at his house. Loot the bodies and return to Shianni, then talk to Valerdrain and he’ll give you Duncan’s dagger, made
out of pure grey iron.
Return to Eamon and inform about the alienage, he tells you to get ready for the landsmeet and meet him in the hall with
Alistair. If you are planning to put Alistair or yourself [POSSIBLE ONLY IF YOU ARE MALE NOBLE HUMAN] on the
throne then there are few things you need to do before going to the landsmeet. First, speak to Anora and she’ll ask you
to support her in the landsmeet, if you are planning to marry her and become king then propose to her and persuade her
until she agrees. If you wish to put Alistair in the throne then agree to support in the landsmeet and promise not to kill
Loghain. Talk to Alistair and convince him he can become a good king, if everything’s goes well then you’ll get +3 or +4
approval from him, this means his ready to become the king. Return to Arl and tell him you are ready.
50
DRAGON AGE: ORIGINS
If you haven’t killed Cauthrien in the estate then she’ll try to stop you in the entrance, you can either persuade or
intimidate her to let you in or kill her and enter the palace. In the landsmeet, there are few things you need to borne in
mind. First speaking stupid things will make you lose support, second never try to intimidate or pursue anyone and thirdly
don’t try to break out a fight until its necessary. Use the following dialogues and the landsmeet will go smoothly:
[Persuade] I’m not the one who betrayed Ferelden!
You allowed Rendon Howe to imprison and torture innocents.
Why did you try to steal the throne from your own daughter?
What have I done? I’ve protected her from you.
The queen speaks the truth.
This’ll cause a group fight against Loghain and his men, let the nobles surround Loghain while you and your companions
take care of the soldiers. If you have followed all the steps correctly then the Revered Mother, who raised Alistair will
stop the fight, the nobles suggest to settle the dispute in a duel. You can have any of your friend fight Loghain but I
suggest you don’t choose Alistair because he’ll automatically give the deathblow and kills him. This is bad if you are
planning on recruiting him to the team.
After the fight, you’ll get an option whether to recruit Loghain to the Grey Wardens or kill him. If you chose to recruit
him then Alistair will leave your team. But killing him means you or Alistair have to die in the end [SPOILERS], so I
suggest you let him live. Then you need to choose who will be the next King and Queen, here you can either chose
Alistair or Anora or Alistair and Anora or You and Anora or Alistair or you. if you chose to kill Loghain then Alistair will
continue as a Grey Warden even after becoming the king so don’t worry about losing him.
THE FINAL ONSLAUGHT
I suggest you finish off your pending side quests before going to Redcliffe. When you are ready, head to Redcliffe
village and talk to the guard near the bridge, who has been sent to inform you about the Darkspawns attack. Clear the
Darkspawns near the bridge and head down to the village, take out the ones near the chantry and Ser Perth’s outpost
and head to the castle.
The front door will be surrounded by Darkspawns, lots of them but don’t worry as they are all one hit kill. Once you are
done, talk to the guard and tell him you wish to see the Arl. After the cut scene, Riordan tells you to meet him in his
room to discuss some Grey Wardens business, do as he says and speak to him. According to the ancients’ records, the
Grey Wardens who gives the deathblow to the Archdemon will receive the taint and DIE. Dang.
51
DRAGON AGE: ORIGINS
Restock your supplies and head to Denerim to start the final battle, clear the Darkspawns in the entrance and head to
the gates. Riordan tells to take three members and go to the palace while the others defend the gates, though he tells
you to take Alistair or Loghain there’s no need to take them if you don’t want to. Here if you are playing as female
Human Noble then I suggest you don’t take Alistair with you because he’ll automatically give the deathblow and die, if
you are playing as male then it’s OK. One more thing, take either Leliana or Zervan with you, you’ll need them in the final
battle.
Head to the market district and you’ll see a large group of ogres attacking the civilians, split into two teams and take
out the ogres one by one. If you are having trouble then use any one of the race from the army selection slot to help you
kill them, clear out the troops in the entrance and head towards the open market to find the Hurlock General. Kill the
ogres beside his and pommel his head to the ground. Then head to the elven alienage and speak with Shainni, wait for the
Darkspawns to break the gates and cast blizzard. Pick out one by one and hold your position until everyone’s dead.
Travel to your next destination and you’ll be stopped by another random encounter where you’ll take control of the other
team which you left to defend the gates. If you are not using these characters then have everyone’s skills maxed out
and equipped with good equipments, talk to the general and tell him you are ready. Rally your troops and block the gates
killing everyone as soon as they enter, this’ll reduce the number of foes pouring into the area at a time. If you have
Wynne then you shouldn’t have any problems dealing with them, have her heal the injuries time to time while the others
take care of the battle. Once done, send the messenger back to the palace.
You’ll be back in control of your main team, there’ll be a large group waiting near the stairs preventing you from entering
Fort Drakon. You need to deal with them as there’s no other way. Let me see there are ten generals like emissaries and
alphas, three dragons and dozens of Darkspawns grunts, I prefer you summon one of the melee fighters from the slot
unless you are freak who thinks you can take on all of them by yourself. Once done, enter the fortress, where the stage
has been set for the final battle. Enter the main hall and you’ll find couple of shades and a Genlock Conjurer, he can
switch place with the shades so you need to kill the shades before dealing with him.
Make your way to the left side of the fortress. You’ll be constantly attacked by emissaries, powerful ones, dealing with
them is no easy task. On the western wing, you’ll find Genlock Shapeshifter, he’s basically a shape shifter like Morrigan.
He usually change into a spider or a bear, you can easily fry him with fire spells. Once done, continue down the hall and
you’ll find Sandal near the stairs to the second floor. Purchase anything and everything you can think of and enter the
second floor.
More emissaries, kill them and clear the remaining minions. Open the doors to the armory and cast inferno before
entering, there’ll be three groups of archers with five men each, they’ll bring death upon you before you can reach them.
Proceed to the next room and you’ll get attacked by a Genlock Assassin, another Genlock with Zervan’s ability. Kill him
and anyone else you can possibly find. Make your north most part of the fortress and enter the balcony for the final
showdown, save the game before the entering.
52
DRAGON AGE: ORIGINS
Yes, its dragon slaying time. The fight is divided into four pieces, the dragon will change its attacking pace every time
you deplete 25% of its health. Of course this battle is similar to Flemeth and High Dragon but a bit easier, mainly
because you are stronger, powerful, have an entire army to back up and you know how to fight in tight situation. First
and foremost you need a massive damage dealer, a good tank, a rogue and a kick-ass mage, preferably a blood mage.
When you enter, the dragon will be fighting in the centre of the balcony. Take control of all your characters and move
them to nearest turret. Give hold position and have your mage cast the most powerful AoE spells combination while your
rogue use the ballista to inflict some critical damage, make sure your melee characters are near your mage and rogue so
that they can protect them from the attacking troops, this’ll also save a lot of health.
Once you deplete 25% of its health, it’ll fly to the turret in the others side of the balcony and starts firing fire balls
and vortex, you can’t reach it for melee combat so move to the nearest ballista turret and repeat the same technique we
used previously. There’ll be a large of Darkspawns attacking at this pace, if you are having trouble then call one of the
melee fighters to aid you. Make sure your mage and rogue is alive, you can win the battle as long as your mage or rogue
lives.
The dragon will fly back to the centre and starts rampaging the floor, get ready for some serious action. If your melee
fighters are dead then call for archers, they’ll inflict maximum damage without getting hurt. Restore your party’s health
and cast storm of the century directly at the dragon, once the dragon is freezed have your melee fighters engage in
combat. Ignore the Darkspawns interfering the combat and concentrate on finishing the dragon as soon as possible. Just
keep up the freezing and pummeling for awhile and the dragon will fall before your party members die.
Once you deplete all its health, it’s time to make the final decision, who will give the final blow? The game has four
possible endings, you give the death blow and die or Alsitair gives the deathblow and die or Loghain gives the death blow
and die or you go through that witch’s idiotic ritual and save everyone’s ass. If you die then Alistair will be the Grey
Wardens’ fortress in your name and your tomb will be built in Weisshpaut Fortress, besides the four others who have
given their lives to defeat the Archdemon. If you live then you can stay with Alistair and become the queen or the
chancellor of Ferelden, second only to king, and build Grey Wardens’ fortress in Amarathine [C’MON WHO WILL TAKE
CARE OF YOUR DOGGY IF YOU DIE?]. Every one of your companions has their own endings depending on their side
quests, decisions and approval. I don’t want to tell more and spoil your curiosity, look for yourself.
Well that’s it guys. You can still download and play the DLC if you want, there are around three of them viz., The
Wardens Keep, The Stone Prisoner and Return to Ostagar. The expansion pack is coming out on March, it’s the
continuation of same story with new enemies and companions. You can continue your same character from the DAO or
create a new Grey Warden from Orel so don’t delete your games after you beat the game. It’s coming out on March 16
and I’ll be back as soon as it’s out so until then BYE!
SIDE QUESTS
OSTAGAR
LAST WILL AND TESTAMENTS by examining the dead
PINCH OF ASHES by picking up the pouch from the dead
53
DRAGON AGE: ORIGINS
body near the cliff in Korcari Wilds
emissary in the bridge
Head west and you’ll see a dead body on the left side of
the ruins, examine the body and pick up the letter, which
is the last will of this dead guy asking to deliver the chest
to his wife in Redcliffe.
Head north and you’ll find a large group of Darkspawns
near the bridge, kill them and pick up the pouch from the
emissary which’ll trigger the mission. Head west from the
bridge and sprinkle the ashes on the rocks to call the
spirit, kill it and pick up the equipments to complete the
quest.
Head all the way to the north and you’ll find a camp near
the first trails of the chasinds. Kill the Darkspawns if
there are any and examine the fire pit/camp fire to find
the chest, when you to Redcliffe seeking alliance with the
Arl, go to the chantry and deliver to his wife, Jetta.
THE HUNGRY DESERTER from the Prisoner inside the
cage in Ostagar
Talk to the prisoner and he’ll ask you to bring some food in
exchange for the key to the tranquiller chest. Talk to the
guard and use persuasion to get the food, if you don’t have
good persuasion skill then agree to pay 10 silvers and buy
the key. But remember he’ll only give the food if you have
10 silvers, take the food back to the prisoner and receive
the key.
THE MISSIONARY by examining the dead body near the
river in the entrance of the Korcari Wilds
At the entrance of the wilds, you’ll find a dead body near
the river, which contains a letter directing the location
where the guy is supposed to meet his family. Follow the
direction given in the letter to find the chest:
Look for tree leaning on a ruined building.
Pass under the fallen tree.
Pass a submerged tower on the right.
Look between a high arch and a mossy standing
stone.
Walk along a path of roots and stones,
Look for two statues with a chest between them.
To put it simple, this place is located where you’ll find
Rigby’s hidden loot. Look around for a pack of wolves with
an alpha wolf, kill them and open the chest behind them to
complete the quest with some equipments.
THE MABARI HOUND from the Kennel Master or by
picking up the plants in the Wilds
If you have survival skills then talk to the kennel master
and agree to examine the dogs to receive the quest. If you
don’t then travel to the western part of the Korcari Wilds
and you’ll find some white flowers with red center, pick
them and give it to the kennel master. If you don’t have a
mabari hound then completing this quest will get you one,
but remember you need to do it before going to the
meeting with Duncan Loghain.
SIGNS OF CHASINDS by locating all the trails of
chasinds in the wilds
After you trigger ‘Last will and testaments’ side quest,
you’ll find marked spots called, trails of Chasinds in your
map. The first one is located to the east of Wardens’
outpost, examining it will unlock another one or two. This
goes on until you find all six or seven. Once you are done,
head to the final/last marked place in the far end side of
the map and you’ll find a camp filled with Darkspawns
unless you already killed them while exploring the wilds.
Kill the Darkspawns and loot the camp to find hidden loots.
LOTHERING
A FALLEN TEMPLAR by examining the dead Templar in
A LAST KEEPSAKE from the Chanter’s Board
the Imperial Highway
According to the Chanter’s Board, the boy’s mother got
After dealing with the toll collectors, search the dead
separated in the nearby forest, they fear she has killed by
Templar’s body in the highway and pick up the items. Go to
the wild animals. Head to the east of the village and you’ll
the chantry inside the village and you’ll find a knight from
find some wolves feeding on a dead body, kill the wolves
Redcliffe, talk to him and give the items to complete the
and collect the remains from the body. Return it to the
mission.
chantry to complete the quest.
BANDITS ON THE ROAD from the Chanter’s Board
A POISONOUS PROPOSITION from Barlin inside the
tavern
When you arrive in Lothering, you’ll meet some bandits
Barlin wants some poison to use in his traps, agree to get
collecting tolls from travelers, kill them and report it to
some poison and leave the tavern. Buy 3 flasks from the
brother outside the chantry to collect the reward.
merchant and head to the east side of the village, kill the
giant spiders near the river and collect the venom. Use the
flask and venom and make 3 flasks for poison, take it back
to Barlin for some coins. Remember only Leliana can mix
the extracted venom so if don’t have her then you can’t
54
DRAGON AGE: ORIGINS
make the poison.
DERELICTION OF DUTY from the Blackstone Liaison
You need to find three people who have deserted their
duties and teach them a lesson:
1.
Layson inside the rundown alley in Denerim.
2. Sammeal in front of the inn in Lake Calenhad.
3. Tornas near the entrance of Orzammar’s
fortress.
SCARPING THE BARRELS from the Blackstone Liaison
MORE THAN JUST PLANTS from the Village Elder
Miriam
The village elder asks you to bring some poultices so that
she can tend to the wounded travelers. You need to 3 little
poultices, you can either give her the ones you found or
make new ones using Leliana.
THE QUANRI PRISONER from the prisoner inside cage
Find the people who promised to help Blackstone in times
of need and send them to the Blackstone:
1.
Patter Gritch inside the chantry in Lothering.
2. Dernal Garrison inside the house near the
windmill in Redcliffe village.
3. Varel Baern inside the Eleven Alienage in
Denerim.
WEED OUT THE BANDITS from the Chanter’s Board
Talk to the prisoner and persuade him to join your cause,
if you have Leliana then have her open the locks or talk to
Revered Mother in the chantry and intimidate her release
him.
Travel to the north side of the highway and you’ll see some
bandit blocking the way and collecting tolls from the
villagers, kill them and return to the Chantry to complete
the quest.
Some of the bears are dwelling in the forest near the
village and villagers fear they might attack in night times,
so they asks you to kill them so that they sleep peacefully.
Head to the far east of the village and you’ll see some
bears near the river, kill them and return to the chantry.
A MISSING CHILD from Kaitlyn
WHEN BEARS ATTACK from the Chanter’s Board
REDCLIFFE
BROTHERS AND SONS from the Chanter’s Board
Talk to Kaitlyn in the entrance of the chantry and she’ll
ask to you look for her brother, Bevin. Head to the east
side of the village and enter Kaitlyn’s house, approach the
dresser to find Bevin. If you have good persuasion skill
then ask him what he was doing and he’ll tell you he was
looking for his grandfather’s sword, persuade him to give
the key and send him back to the chantry. Pick up the
sword from the chest and return to the chantry.
CARAVAN DOWN from the Chanter’s Board
DESPERATE HAVEN from the Chanter’s Board
There has been no report from the caravan from few days
and according to the messenger it has been attacked by
Darkspawns on its way back. Travel to the Caravan in your
world map and kill the Darkspawns surrounding the
Caravan, then take the news back to the chantry for your
reward.
GREASING THE WHEELS from the Blackstone Liaison
Some of the refugees have traveled to Haven and never
returned, you need to go to the spot and see what
happened to them. Travel to the spot in the world map and
you’ll see a group of Darkspawns attacking the refugees,
kill them and safely escort the remaining refugees back to
the village.
LOST IN THE CASTLE from Owen
You need to find five hooded mages in Denerim and tell
them to return to their masters:
1.
Near the open market.
2. Inside the dark alley.
3. Inside the rundown alley.
4. Inside the inn in the pearl.
5. Inside the elven alienage.
SKIN DEEP from the Chanter’s Board
Talk to Owen in his house and he’ll ask you to look for his
daughter, Velena. Use the secret passage in the windmill
and head to Redcliffe castle, search the right side of the
castle and you’ll find her in one of the room. Tell her to
return her father and head back to the village to complete
the quest.
The Chantry asks you to bring some demonic galls from
the walking corpses so that they can research on them.
This can only be collected by killing any living corpses, if
you don’t get enough of them then wait until you travel to
Haven and Werewolves liar, where you can find couple
Some of the men, who left Redcliffe has not returned
from their journey, the chantry wishes someone to look
for them. Travel to the Battlefield in the world map and
you’ll see a pack of wolves feeding on dead bodies, kill
them and collect the belongings of the victims, especially
the diary in the entrance of the area. Return them to the
chantry to complete the quest.
55
DRAGON AGE: ORIGINS
more of them. Bring 20-25 of them to get a huge reward.
CIRCLE OF MAGI
CARLESS ACCUSATION from the Mages Collectives
FIVE PAGES, FOUR MAGES by collecting all the torn
papers in the third floor
This poor guy has been accused for living with a couple of
blood mages in a village. You need to find the witness and
Has the name suggests you need to find five notes of the
silent them before they complain to the Circle, they can
mages scattered in the third and fourth floor. These
be find when traveling around Lothering, persuade or
papers are actually torn papers stacked to reading stands.
intimidate or kill them and return to the collectives to
The best way to find these papers is by visiting each room
complete the quest.
and hold Tab to highlight usable objects, this’ll highlight
the papers making it easier for you to find them.
FRIENDS OF RED JENNY by picking up the painted box
from the First Enchanter Irving’s study
Somewhere inside the Irving’s study, you’ll find a small
painted box, taking it will trigger a random encounter in
the world map. Kill the thugs or whatever they are and loot
their body to trigger the quest, which is as easy taking a
candy from the baby. Take the box to the house near
gnawed noble tavern in Denerim and pass it through the
hole [MAN WHAT THE HECK WAS THAT SOUND I
JUST HEARD!? CREEPY!]. That’s all J.
NOTICE OF TERMINATION from the Mages Collectives
Some of the students proven useless and has been
terminated from the Circle, they need you to take the
letter to the students and give them the happy news:
1.
Near the open market in Denerim.
2. Inside wonders of thedas in Denerim.
3. In front of the fortress in Orzammar.
SUMMONING SCIENCE by collecting all the textbooks
in the library
This quest can’t be activated until you complete ‘Broken
Circle’. Search the textbooks in the first floor library and
find all the text books, go to every room in the first floor
and press Tab to highlight the text books. Then go t the
library and activate the items in the following order to call
the summonings:
1.
Spirit Hog
a.
Summoning font
b. Tome of spirit personages
c.
First summoning flame
2. Trickster Spirit
a.
Summoning font
b. Rodercoms uncommon calling
c.
Silver coin at the bottom of the statue
d. Second summoning flame
3. Fade Rifter
Once you find all five, you’ll get a warning to been on
lookout for the guy who scammed the mages. The fight
takes place when you are traveling in the world map. He’ll
attack you with two melee fighters and a mage, try getting
rid of the mage first, use advances drain technique then
shower him fireballs and chain lightning. Once his down,
picking the remaining is fairly easy.
HERBAL MAGIC from the Mages Collectives
Some of the mages wants you to bring some deep
mushrooms to create potions. These things can be found
all most anywhere, collect 10 of them and hand them over
to the mages.
PLACES OF POWER from the Mages Collectives
The Collective needs you to activate four power
generators which are scattered throughout Ferelden:
1.
Tree of Life in the Elven Alienage.
2. Behind Irving’s chair in the Circle of Magi.
3. Gravestone near the Ook Tree in the Western
Brecelian Forest.
4. Altar inside Ortan thaig in Orzammar, its same
altar where you’ll call the fade beast in ‘Asunder’
side quest.
THY BROTHER’S KILLER from the Mages Collectives
Some blood mages has killed a Circle mage and now the
Collective needs you to take revenge for them, according
to the journal they are located inside the Brecelian
Forest. Head north in the Eastern Brecelian Forest and
you’ll find a group of mages performing a ritual near the
ancient tombstone. Kill them, they aren’t tough so you
shouldn’t have any trouble dealing with them, and return to
the collectives.
56
DRAGON AGE: ORIGINS
a.
Summoning font
b. Elvorn’s grenade beastiary
c.
Trace sigil
d. Spiritorum etherialis
e. Statue of magus gorvish
f.
Novice phylactery
g. Third summoning flame
Kill the demon and loot its body to find some equipments
and to complete the quest. Remember if you don’t have all
the text books then the spirits will die when you summon
them.
WATCH GUARD OF THE REACHING by finding all notes
in the tower
This quest is easier if you play it after cleaning the tower
out of abomination, search the rooms in the first three
floors and collect all the notes, written by students. Try
pressing Tab to highlight the objects, this’ll make it easier
for you to find them.
Once you found all the notes required to begin the quest,
head to the third floor and activate the statues in left,
right and middle order. Then go to the centre room and
activate the statue in the middle, the one with three
shields and a sword. Once you are done, go to the first
floor and examine the door to the basement to trigger a
fight with a rage demon, Shah something [DON’T
REMEMBER], kill it and loot its body to complete the
quest.
CAMMEN’S LAMENT from Cammen
BRECELIAN FOREST
ELORA’S HALLA from Elora
Ghenya has refused to marry Cammen because he’s not
fully pledged hunter. The completion of the quest depends
on your persuasion, if you have high level persuasion with
all box checked or at least three then you can talk to
Ghenya and persuade her to marry Cammen. If you have
medium or OK persuasion then talk to Cammen and
persuade him to take a wolf pelt from you, for this you
need a wolf pelt or you need to kill a wolf and take its pelt
back to Cammen.
LOST TO THE CURSE from Athras
Athras thinks his wife has become a werewolf and needs
you to look for her in the forest. When you travel to the
forest, head to the east side and you’ll find a lone
werewolf called, Danyla, who asks you to kill her and give a
scarf to her husband.
If you refuse to merci kill her then she’ll lose control and
attacks you so it’s best to take the scarf and release her
from her pain. One more thing, when you are doing the
main quest the hermit asks you to give something in return
of the acorn, you can convince Athras that his wife his
dead without the scarf so giving it to the hermit will not
stop you from completing the quest.
THE ELVEN RITUAL by collecting the tablet from the
sarcophagus inside the ruins
To the south of the ruins you’ll find a sarcophagus, which’ll
Talk to Elora near Halla’s stable and she’ll tell you one of
the Halla is acting very strange and refusing to take fool.
You need medium or high survival skill for this, if you
examine the halla and tell her a lie then the halla will die.
It’s best you don’t take this quest until you get at least
two to three survival box checked.
RARE IRONBARK from Varathorn
Talk to Varathorn and he’ll mention something about
ironbark wood in middle of the conversation. When you
travel to the Brecelian Forest, go to the west of the
forest and you’ll find a large timber of ironbark, take it to
back to Varathorn to complete the quest. When you take
it back to Varathorn he’ll offer to make you something out
of it, you can either get a bow or an armor. If you refuse
to take any gift then he’ll give an amulet, which is fairly
decent than the bow and armor.
THE MAGE’S TREASURE by collecting all four pieces of
the Juggernaut armor in the Brecelian Forest
You need to find four pieces of armor in the forest to
57
DRAGON AGE: ORIGINS
explain how to perform elven ritual. Head to the far north
side of the building and you’ll find a pool and an altar, open
your journal and go through the steps mentioned in it:
Examine the pool.
Take the earthen pot.
Fill the jug with water.
Take the jug and leave the pool.
Examine the altar to the right side of the pool.
Place the jug on the altar.
Kneel down and pray to the altar.
Take a single sip from the jug.
Take the jug and leave the altar.
Pool the remaining water into the pool.
Return the jug back to its place.
Leave the pool.
Completing the ritual will open the door to the next area,
go through the newly opened door and you’ll see a ghostly
woman, kill her to get the last piece of Juggernaut armor.
A MOTHER’S HOPE from Filda
complete the quest:
1.
Examine the gravestone behind the great oak
tree.
2. Examine the gravestone near the Mad Hermit.
3. Pass the magical barrier and examine the
gravestone at the far end side of map.
4. Complete ‘The Elven Ritual’ side quest and kill the
ghost woman to get the final piece of the armor.
ORZAMMAR
AN ADMIRABLE TOPSIDER by collecting all three
pieces of the Topsider sword in the deep raods
Filda’s son, Ruck went to the deep roads and never
returned. Since you are going there for the main quest,
agree to look for him. When you arrive in the centre of
ortan thiag, you’ll find Ruck eating a dead Darkspawn,
speak to him and he’ll run away, follow him to his camp and
you’ll get an option to either kill him or let him live. When
you return to his mother, you can either lie to her and tell
her son died as a hero or tell her the truth, either way
she’ll give you a shield which she was keeping for her son.
AN UNLIKELY SCHOLAR from Dagna
Dagan wants to join the Circle of Magi and study magic but
due to the rules in Orzammar she can’t contact the Circle
so she asks you to do it for her. Travel to the Circle of
Magi and talk to Irving, tell him about the Dagna and he’ll
agree to admit her to the Circle. Take the good news back
to Dagna to complete the quest.
CAGED IN STONE by activating the throne in the Royal
Palace
You need to do this before choosing a king, go to the
throne room in the Royal Palace and examine the throne,
you’ll notice nothing’s happening. There are three pressure
plates which’ll activate the throne. One outside the room
and two in the right side of the room, suspend free walk
and place your companions in each plates. Then examine
the throne to free the dragon, kill it and loot its body to
find the best two-handed sword in the game.
JAMMER’S STASH by picking up the journal inside the
You need to collect all three pieces of the blade and take
them to its master’s grave in ortan thiag to complete the
quest [AND TO RECEIVE THE BEST LONG SWORD IN
THE GAME]:
1.
Kill the Genlock Emissary inside the tunnel in
ortan thiag to find the hilt.
2. Search the vase inside Ruck’s camp in ortan thiag
to find the pommel.
3. Kill the Ancient Darkspawn in the dead trenches
to find the blade.
ASUNDER by collecting all three bloody sacks in the deep
roads
First you need to collect all three sacks which contains
pieces of a creature:
1.
Inside the tunnels in aeducan thiag.
2. At the entrance of caridin’s cross.
3. At the edge of ortan thiag.
Once you got all three, take them to the altar in ortan
thiag, its same altar you use in ‘Places of Power’ side quest,
and place them on the top to summon the fade beast, you
can either let go for few gold or kill it.
DEAD CASTES by collecting all the pieces of the armor in
the deep roads
First you need collect all four pieces of the armor
scattered in the dead trenches, basically these thinds are
hidden in sarcophagus inside the houses in dead trenches.
Once you found the gloves, boots and armor, go to the
room, where the spirits are roaming, and examine the altar
to find the helmet. Picking up the helmet will cause the
spirits to attack you, kill them and enter the room in the
centre, which’ll lead to Broodmother. Have someone wear
the armor, best if it’s main character and examine the
sarcophagus to trigger a fight with a shade, kill it and pick
up the insignia from the sarcophagus. When you return to
the city, give it to the shaperate to complete the quest.
LOST TO THE MEMORIES from Orta
58
DRAGON AGE: ORIGINS
carta
When you travel to the dust town to kill Jarvia, search the
carta and find the journal, its hooked to a reading stand in
one of the rooms. Then look for the chests scattered in
the carta and take the cheapest items:
1.
Sliver custom ring.
2. Iron latter opener.
3. Garnet trinket.
Once you find all three chests, go through the tunnel near
Jarvia’s room and you’ll find the chest behind the tamed
animals, unlock it to complete the quest.
PROVING AFTER DARK from the Proving Master
In the proving grounds, you’ll find a guy who looks after
arms and armors, talk to him and he’ll tell you to take place
in one of illegal fights. Agree to participate and win all
rounds to receive a reward along with some EXP and gold.
THE GOLEM REGISTRY from the Shapers
Orta believes she is a descendant of the Ortan family but
she needs proof to prove it to the assembly. When you
travel to the deep roads, head to the ortan thaig and you’ll
find a chest containing documents at the far end of the
tunnel, somewhere near Branka’s journal or the altar you
use in ‘Asunder’ side quest. Take it back to Orta and she’ll
ask you to meet her in the assembly hall, do as she says
and meet her outside the assembly to complete the quest.
THE CHANT IN THE DEEP from Brother Burkel
Brother Burkel wishes to build a chantry in Orzammar but
the Shapers are not allowing him to build a chantry. Head
to the shaperate in the diamond quarters and talk to the
master, convince him to allow Burkel to build a chantry and
return to Burkel to complete the quest. You need a very
high level of persuasion for this task, the shaper’s not an
easy guy to convince.
THE LOST NUG from the Nug Dealer
Talk to the shaper and he’ll ask you to bring something
valuable from the deep roads. After receiving the crown
from Branka or Caridin, head to the Anvil of the Void’s
room and examine the tablet in the entrance, it’s a list of
all the dwarves who gave up their lives to become golems.
Make a trace and take it back to the shaper to complete
the quest.
THIEF IN THE HOUSE OF LEARNING from the Shaper
His business is running low so he asks you to find some lost
nugs so that he can sell them and make some money. There
are around 10 nugs scattered all around dust town but you
only need one to complete the quest, if you manage to find
all 10 then he’ll give a big bonus.
The shaper believes some of the thugs have stolen their
belonging and needs you to find them. Head to the dust
town and you’ll see some thugs at the entrance, kill them
and loot their bodies to find their leader’s address. Go to
the proving grounds and look for their leader, kill him and
loot his body to find the stolen items. Return it to the
shapers to complete the quest.
When you first enter the dust town, you’ll see a woman
asking for money. She’s been declared as casteless for
giving birth to a baby and now has nowhere to go, you can
either pursue her to go to the surface or convince her
father to take her back to the family or tell her to go to
the chantry [POSSIBLE ONLY IF YOU HAVE
COMPLETED ‘THE CHANT IN THE DEEP’ SIDE QUEST].
ZERLINDA’S WOE from Zerlinda
DENERIM
AN AUDIENCE WITH THE AMBASSADOR from Master A GIFT OF SILENCE from the Mages Collectives
Ignacio
The Mages Collectives wants you to give some lyrium to
The crows needs you to kill an ambassador, who is
the templar in Redcliffe. Collect 10 lyrium and take them
currently residing in the royal palace of Orzammar and
to the knight-commander Harrith in Redcliffe, he’s
make it look like an accident. His well protected by a
stationed in front of the windmill in the village.
handful of soldiers so pick some of your best fighters and
plan your strategies before attacking him. He is located in
one of the rooms in the royal palace, kill him and return to
the crows to complete the quest.
BLOOD OF WARNING from the Mages Collectives
BACK ALLEY JUSTICE from the Chanter’s Board
The chantry needs someone to clean up the back alleys of
Denerim and that someone is none other than ourselves.
Travel to the alleys and kill the thugs hiding inside, then
return to Kylon to complete the quest [PRETTY SIMPLE
HUH?].
CHANGE OF LEADERSHIP from Renold Hawkwind in the
The Mages Collectives wants you to mark some blood
mages house with blood so that they can find them before
the chantry does:
1.
One near the chantry.
2. Neighboring house of Goldanna in open market.
3. Inside the dirty back alley.
4. Inside the dark alley.
CORRESPONDENCE INTERRUPTS from the gnawed
59
DRAGON AGE: ORIGINS
entrance of market district after completing all the side
quests given by the Blackstone Irregulars
You need to complete all the side quests given by the
Blackstone Irregulars in order to trigger this quest.
Travel to Denerim and you’ll see a guy named, Renold
Hawkwind in the entrance of the marker district. Talk to
him and he’ll ask you to kill his son, Tornas, who has gone
obsessed with his powers and riches.
Travel anywhere from Denerim and you’ll ran into a gang of
Blackstone Irregulars camping in the woods. Talk to
Tornas and you’ll get an option to either to let him leave or
kill him and complete the quest. If you choose to kill him
then you have to deal with bodyguards, which might be a
bit tough if you are playing this very early.
Have your mage use AoE spells and freeze the group so
that your warriors can shatter them, then stun Tornas
using spells like crushing prison so that your melee
fighters get enough time to deal with him. Once you are
done, report back to any Irregulars to complete the quest.
DEAD DROP from the gnawed noble tavern owner
K needs you to deliver some rewards for his
workers/clients:
1.
Near docks in Redcliffe.
2. Near the open market in Denerim.
3. Inside Spoiled Princess in Lake Calenhad.
4. Near the merchant stand outside the fortress in
Orzammar.
The last one actually explodes when you try to place it, you
can either fix it with your rogue or simply return to your
contact. Either way you’ll get the reward and complete the
quest.
DEFYING THE COLLECTIVES from the Mages
Collectives after completing all the side quests given by
them
Some of the mages have turned against Collectives and are
planning to complain to the chantry about the usage of
blood magic. The Collectives asks you to deliver some
documents to the Knight-Commander Harrith so that he
silent them before they reach the chantry. If you don’t
want to handover the records to Harrith and help the
Collectives silent the witnesses then you can give them to
Knight-Commander Tavish near the Elven Alienage in
Denerim.
DRAKE SCALE ARMOR by picking up the drake scales in
Haven
Kill the drakes inside the cave and collect their scales, you
need two of them. Take them to Wade’s Emporium in
Denerim and give it to the man in the collector, Wade asks
you to give him some time so that he can make the armor.
Visit after some time and collect your armor, which he
complains isn’t very artistic. Give him the other set of
scale and return after some time to get a superior or
better one than the previous one.
PS: There’s no need for you to pay him any money.
noble tavern owner
You need find 12 love letters and hand them over to the
thugs so that they can demand some ransom on them.
These things are usually found inside locked chests, you
need a rogue, a skilled one, below is a list of all the chests
where you can find the love letters:
1.
Inside the windmill in Redcliffe Village.
2. Inside the basement in Redcliffe Castle.
3. Inside Wade’s Emporium in Denerim.
4. Inside the inn in the pearls.
5. Inside Arl of Denerim’s estate.
6. Inside the villager’s house in Haven.
7. Inside the inn in Lake Calenhad.
8. Inside the senior mages study in the Circle of
Magi.
9. Near the weapon shop in the Brecelian Outskirts.
10. Inside the secret room in the entrance of the
ruins in the Brecelian forest.
11. Inside the carta in the dust town.
12. Inside the royal palace in Orzammar.
DEFENDING THE COLLECTIVES from the Mages
Collectives after completing all the side quests given by
them
Some of the mages have turned against the Collectives and
are planning to complain to the chantry. The Collectives
asks you to handover some documents to the KnightCommander Harrith in Redcliffe so that he can track down
and silent the traitors. Travel to Redcliffe and deliver the
records to Harrith, then return to the Collectives to
complete the quest.
DRAGON SCALE ARMOR by picking up the dragon scale
from the High Dragon in Haven
If you are mad enough to attack the High Dragon and slew
it then pick up its scale and give it Wade, he’ll ask you to
return after sometime to collect your armor. Do as he says
and return after awhile to collect one of legendary armor
set in the game.
PS: There’s no need for you to pay him any money.
FALSE WITNESS from the gnawed noble tavern owner
Some of the thugs are abandoning the their allies and
surrendering to the chantry, you need to find them and kill
them before they surrender:
1.
Cam inside the Wonders of Thedas.
2. Frank near the inn in Lake Calenhad.
3. Brain inside Orzammar.
60
DRAGON AGE: ORIGINS
FIZZIL’S REQUEST from the Chanter’s Board
A foreigner has lost his sextant and needs you to find it.
It is located inside the chest in the elven alienage
orphange, collect it and return it to the chantry to
complete the quest.
HARSH DECISION from the gnawed noble tavern owner
after completing ‘False Witness’ side quest
Enough of working for K, it time to do jobs for D, who
needs you to kill K and his men. Lol. Deliver the notes to
Gorim near the open market, sister in front of the chantry
and the mage inside the wonders of thedas. Then you’ll be
instructed to talk to the guards about K. Go the entrance
of market district and talk to the guards, give them
witness you have against K and they’ll warn you about his
henchmen might/will attack you trying to get revenge.
Try leaving the market district and you’ll get attacked by
a group henchmen, kill them and pick up the directions
from the lieutenant. Go to the hideout in Denerim map and
you’ll find K protected by a group of melee fighters and
two archers, have your mage occupy the melee fighters
while your warriors kill the archers. Once everyone’s dead,
gang up and kill K, who isn’t much of a boss. Loot his body
and return to the bartender to complete the quest.
HEARING VOICES from the Deranged Beggar in the
elven alienage
Talk to the deranged beggar near the orphanage and she’ll
mention something about an amulet lost in the orphanage,
pick up the amulet for the back side of the building, inside
the same chest where you’ll find the sextant, and give it
her to complete the task.
JUSTICE MUST BE SERVED by accepting ‘A Gift of
Silence’ side quest
The mages asks you to [COLLECT AND] deliver 10 lyrium
potions to the knight-commander in Redcliffe. If you think
bribing a templar is wrong then you can complain to the
knight-commander Tavish near the elven alienage. You can
actually complete both the quests if you have enough
lyrium to give.
LOST TEMPLAR from Irminic inside the Howe’s estate
When you travel to Howe’s estate, sneak into the dungeons
and you’ll find a wounded templar, talk to him and he’ll ask
to deliver a ring to his sister, Bann Alfstanna. She is
located inside gnawed noble tavern in Denerim’s market
district, talk to her and give her the ring to gain her
support in the landsmeet [VERY IMPORTANT IF YOU
ARE PLANNING TO MAKE ALISTAIR KING].
MISSING IN ACTION from the Chanter’s Board
When you sneak inside Howe’s estate to rescue the queen,
you’ll find a guard named, Rexel with other nobles in the
dungeons. Kill the patrol units and use the key to let them
out. Return to the chantry and inform the situation to get
your reward.
FORGOTTEN VERSES by picking up the old scroll in
Haven
To the west of the Temple you’ll find an old scroll in the
library, take it to the chantry in Denerim and give it to
Sister Justine so that she can research on it.
HAVE YOU SEEN ME? From the Chanter’s Board
Renold went to the Brecelian Forest with his apprentice
and never returned. When you traveled to the forest,
head to the east side of the forest and you’ll find an
abandoned camp. Examine the camp and you’ll get attacked
by an abomination, kill it and return it to the mages to
collect your reward.
HONOR BOUND from Ser Landry
To the left of the market you’ll find a punk named, Ser
Landry, who believes the Grey Wardens are the ones who
killed the king, talk to him and he’ll challenge you for a
duel. Meet him near gnawed noble tavern and defeat him
to complete the quest, his damn too strong for a one-onone duel so go for team battle when he asks you to state
the conditions.
LOGHAIN’S PUSH from the Chanter’s Board
I know I shouldn’t be using this word here but when I first
saw this quest it really made me say “WTF!?” they want
US to fight against that good for nothing guy in a civil war
and help Bannorn win. Yuppie! Travel to the civil war in the
world map and you’ll see both charging towards each other,
rush to the field and kill all Loghain’s soldiers attacking
the Bannorns. Once you are done, return to the chantry
and thank them for giving such a WONDERFUL quest.
MERCENARY HUNT from Master Ignacio
The crows need you to get rid of some qunari mercenaries
who are causing troubles to their operations. Travel to
Kadan-Fe in the world map and you’ll see a bunch qunaris
hanging out in the forest, kill them and return to the
tavern.
NEGOTIATION AIDS from the gnawed noble tavern
owner
You need to collect 15 toxin extracts and give them to the
owner on behalf of ‘K’. These are very hard to find, I tried
collecting from the spiders but it didn’t work. So the best
suggestion is to travel to the Brecelian Outskirts and buy
61
DRAGON AGE: ORIGINS
NEW GROUNDS from the Blackstone Liaison after
completing ‘Dead Drops’ side quest
Deliver the notes to Gorim near the open market, sister in
front of the chantry and the mage inside the wonders of
thedas. Then you’ll be instructed to talk to the guards
about D. Go the entrance of market district and talk to
the guards, give them witness you have against D and
they’ll warn you about his henchmen might/will attack you
trying to get revenge.
Try leaving the market district and you’ll get attacked by
a group henchmen, kill them and pick up the directions
from the lieutenant. Go to the hideout in Denerim map and
you’ll find D protected by a group of melee fighters and
two archers, have your mage occupy the melee fighters
while your warriors kill the archers. Once everyone’s dead,
gang up and kill K, who isn’t much of a boss. Loot his body
and return to the bartender to complete the quest.
PEARLS BEFORE THE SWINE from Sergent Kylon
them from Varathron.
NOTICES OF DEATH from the Blackstone Liaison
Some of the soldiers have died in a battle and they need
to take the bad news to their family:
1.
Irenia inside the chantry in Redcliffe.
2. Sara near the entrance of market district.
3. Tania inside the dirty back alley in Denerim.
4. Larana inside the inn in Lake Calenhad.
RESTOCKING THE GUILD from the Blackstone Liaison
Kylon is having trouble dealing with local mercenaries and
needs some help to deal with them. Head to the pearls in
the Denerim’s map and talk to the White Falcon’s leader,
persuade or intimidate him and scare them out of the inn.
Remember Kylon asks you to scare them out of the tavern
and not kill them, take the news back Kylon to complete
the quest.
SIGN OF SAFE PASSAGE from the gnawed noble tavern
owner
The Blackstone needs you to bring them 20 health
poultices in exchange for some gold. Just give them the
ones you picked up or have your mages make some and give
it to the Liaison.
When you travel to the Brecelian Forest seeking help from
the Dalish Elves, you’ll be made to travel to the wilds to
kill the werewolves. At the first quarter of the entrance
you’ll find the marked place where you are supposed to
fire an arrow signaling passengers.
Some of the clients have committed murders and need
help dealing with the bodies, collect the bodies and dump
them into the well inside the chantry:
1.
Alley next to the chantry.
2. Inside the warehouse near gnawed noble tavern.
3. Inside the pearls in Denerim.
Equip a bow and enter the marker to fire an arrow, doing
this will trigger a fight with couple of thugs, kill them and
return to the owner to complete the quest. One more
thing, only your main character i.e., you, The Warden, can
fire the arrow, if you try to do it with your campaigns then
it won’t work.
SOMETHING WICKED from Ser Otto inside the elven
alienage
Ser Otto asks you to find out what causing the diseases in
the alienage. Talk to the deranged woman near the
orphanage and examine the blood and the poster near the
dogs, then head north and examine the dead rabid dog to
get all the clues.
Report back to Ser Otto and he asks you to accompany him
to the orphanage. Enter the orphanage and you’ll see a
young boy running around the place, follow him killing all
the spirits and demons until you reach a rage demon at the
back side of the building. Remember you need keep Otto
alive throughout the quest, if he dies you’ll lose the
mission.
SOLVING THE PROBLEMS from the gnawed noble tavern
owner
THE CRIMSON OARS from Sergent Kylon
Some mercenaries are causing trouble to the nobles
resting in the tavern and needs to be dealt with. Head to
the gnawed noble tavern and talk to the Crimson Oars
leader in the left room, scare them out off the building
and return to the Sergent to complete the quest.
Remember not to kill them when they ask you to spare
their life, Kylon only asks you to get rid off them out of
the tavern.
62
DRAGON AGE: ORIGINS
Once you kill the demon, he asks you to follow him to the
next building, where more demons are waiting for you. Use
AoE spells and stun or freeze them, this’ll reduce the
damage inflicted on Otto. At the end of the second
building, Otto dies leaving you to deal with the last rage
demon, kill it and exit the orphanage to complete the
quest.
THE FIRST TEST from Master Ignacio
You need to recruit Zervan to trigger these side quests.
When you first arrive in Denerim, a kid brings you a letter
from the Antiva Crows, they wish to see in gnawed noble
tavern. Speak with Master Ignacio and he asks you to do
some work for the crows, if you have Zervan in your team
then he’ll try to interfere the conversation but it doesn’t
stop you from doing the quests.
A guy named, Paedan is gathering all the Grey Wardens
supporters and killing them. Head to the Elven Alienage
and you’ll find poster at the entrance, examine it to locate
their hideout. Head to the pearls and talk to the owner,
she’ll sign towards a room, where target is hiding. Knock
the door and tell the password ‘The Griffons will raise
again’, kill the mercenaries inside and return to the crows
to complete the quest.
THE RANSOM from Master Ignacio
Some of Howe’s men have kidnapped their client’s son
demanding a ransom, the crows have already set up an
ambush in the rendezvous place and needs you to be there
just in case if things gets out of hand. Head to the
rendezvous place and wait for the crows to signal, kill the
guards and return to the tavern to receive your reward.
THE TORTURED NOBLE from Oswyn inside Howe’s
estate
When you travel to Howe’s estate to rescue the queen,
you’ll find couple of nobles imprisoned in the dungeons, kill
the patrolling guards and release them from the cells.
Then talk to Bann Siggurd inside the gnawed noble tavern
to complete the mission.
UNTRACEABLE from the gnawed noble tavern owner
K needs you to get 10 garnets so that he can bribe some of
his clients. To be honest I don’t know where to get these
things. Try the temple tunnels in Haven and deep roads in
Orzammar, I’m sure you’ll find couple of them there. If
you have already sold them then buy them back from the
merchant, there’s really no other way to this.
THE LAST REQUEST by collecting the journal from Ser
Friden’s body in the rundown alley
Enter the rundown alley and you’ll find a dead knight in the
entrance, search the body and pick up the journal to find
out his has been murdered by a blood mage. Travel to the
deserted building and kill the blood mage to complete the
quest.
THE SCROLLS OF BANASTOR from the Mage
Collectives
You need five of them to complete the quest, they can be
found inside the ancients texts/books in the following
libraries:
1.
Two inside the libraries/study rooms in the
Circle of Magi.
2. Two inside the libraries in the Sacred Ashes
Temple.
3. One inside the werewolves liar in the Brecelian
Forest.
UNBOUND by collecting all three journals from
adventurers
You need to find three pieces of information before
unlocking this quest:
1.
Pick up the journal from the dead adventurer
inside the temple in Haven.
2. Pick up the journal from the dead adventurer
inside the werewolves lair in the Brecelian
Forest.
3. Talk to the scared adventurer inside the
tapster’s tavern in Orzammar.
Once you collect all three journals, head to the dirty back
alley in Denerim and knock on the door, tell him you wish to
hear tales about Gazkang and he’ll open the door. Enter
the hovel and kill the revenant to complete the quest.
63
DRAGON AGE: ORIGINS
By the time you reach ‘The Landsmeet’ you should have 12
garnets if you have collected them from every foe you
killed, I don’t think any of the merchants sells them so the
only way is to collect them manually.
ENCHANTING from Bodahn and Sandal
PARTY CAMP AND COMPANIONS
A GOLEM’S MEMORY from Shale
After you save Bodahn and Sandal in Lothering, they’ll set
up a shop in your camp and sells you/enchants your arms
and armors. Use a rune stone and enchant a weapon to
complete the quest.
ALISTAIR’S FAMILY from Alistair
Alistair thinks he have a half-sister who lives in Denerim
and wants you to accompany you to her house to meet her.
Her house is located in front of the open market, approach
the market and Alistair will point out the house. Enter the
house and watch the cut scene, there’s nothing for you to
do except to say some words to Alistair [POOR GUY].
LELIANA’S PAST from Leliana
Leliana believes she been followed when she’s traveling
with you so she needs to check on them. When you next
travel, you’ll get attacked by some guards, who tries to kill
Leliana, beat them and persuade them to get some
information about their boss.
In order to trigger this quest, you need to take Shale to
Caridin before he dies. When you return to the camp,
Shale asks you to accompany her to her birth place,
Chadas Thaig in the deep roads. Put Shale in the party and
travel to Chadas Thaig, make your way to the other side of
the thaig killing the Darkspawns and you’ll find a statue
bearing the names of all the dwarves born in the thaig,
examine it to trigger a cut scene and to complete the
quest.
FLEMETH’S GRIMORE by giving the black grimore to
Morrigan
When you are doing the ‘Broken Cirle’ quest, pick up the
black grimore from Irving’s study. Give it Morrigan and
she’ll tell some shocking news after studying it. According
to the grimore, Flemeth is using her children bodies to
stay alive from centuries and Morrigan is next in the line,
she asks you to travel to the Korcari Wilds and put an end
to this.
Head to Flemeth’s Hut and talk to her, you can either take
the grimore and lie to Morrigan or kill Flemeth and take
the grimore back to Morrigan. If you decide to kill her
then she’ll change into a dragon and attacks you, this is not
an easy fight to win so I suggest you just take the grimore
and let her live [C’MON IT’S THE LEAST YOU CAN DO
FOR HER FOR SAVING YOUR ASS IN THE TOWER].
OGHREN’S FLAME from Oghren
Talk to Oghren in the camp and he asks you to find
someone for him. Travel to Lake Calenhad and enter the
inn to trigger a cut scene, talk to Felsi and return to
Oghren to activate a conversation between Oghren and
Felsi. Support Oghren and lie to her about how he has
changed to complete the quest.
Travel to market district and enter the house with
‘Assassination Contracts for Leliana’. At the entrance,
you’ll find two quenry mercenaries, dispatch them. Enter
the second room and you’ll Marjolaine, here you can either
threaten her and make her leave Leliana or kill her. If you
choose to kill then you need to deal with two melee
fighters, a mage and Marjolaine. Have Morrigan or Wynne
take care of the mercenaries while your warriors rush to
mage. Once the guards and mage’s dead, you can deal with
Marjolaine however you want.
THE SWORD OF BERESAAD from Sten
WYNNE’S REGRET from Wynne
Sten asks you to look for his sword, which got lost while
traveling. Travel to the Lake Calenhad and you’ll see some
scavenger, ask them about the sword and he’ll tell you to
meet a guy named, Faryn. Travel to Orzammar and talk to
Faryn at the entrance to find he sold it to a dwarf named,
After you raised Wynne’s approval level, she’ll mention
about one of her students who went to the Brecelian
Forest and died. Put Wynne in your team and travel to the
Dalish Camp, talk to Sarel and he’ll tell you they know a
boy named, Aneirin. Bingo. Head to the Eastern Brecelian
64
DRAGON AGE: ORIGINS
Dwyn. Travel to Redcliffe and ask Dwyn about the sword,
persuade him to give the sword or buy it and give it Sten
to get huge amount of approval.
Forest and you’ll find him behind Mad Hermit’s camp, talk
to complete the quest.
DLC
THE WARDENS’ KEEP
Talk to Levi Dryden in the Party Camp and agree to help him clean the fortress/keep. Open your world map and travel to
Soldier’s Peak, upon arrival you’ll get a cut scene and meets up with Levi, who’ll guide you around the keep. Enter the
compound and kill the skeletons in the entrance, then examine the statue in the left side of the gate to trigger ‘Ancient
History’ side quest. Enter the keep and watch the cut scene, then clear the left and right room and enter the barracks,
where you’ll meet Commander Athalr with few of his companions. Have your mage take care of Athlar while your warriors
rush to the archers, the difficulty of the battle depends on your level so if you are playing this on the early stage of the
game then you might have some problem dealing with him/them.
Once done, head to the library and kill the demons dwelling inside along with Archivist. Then examine the book for
another clue about the history of the Soldier’s Peak, you can also examine Archivist’s book for a cut scene, but doing so
calls upon more demons in the room which is best to avoid if you can’t handle them.
Proceed to the second floor and you’ll get another cut scene, which’ll end triggering a fight with a rage demon. Use AoE
spells like cone of cold or blizzard and fix them in a place so that your warriors can shatter them with ease. Then
proceed to the next room and examine to raspberry jam bottle for another update on the side quest. Follow the plot
helper and enter the commanders’ quarters where you’ll meet Sophia [… A DEMON KINDA THING WHICH IS KEEPING
HER BODY MOVING TO PUT IT PROPERLY]. After the conversation you can either let her go or kill her, killing her net
you a nice pair of armor whereas letting her go save your ass from getting killed. The choice is up to you and it doesn’t
have anything to do with the DLC.
Once you are done, exit the building and go to the bridge. On the other side, you’ll find Avernus’s laboratory, deal with
the skeletons and examine the book on the table to find out more about Avernus’s research. Then examine the
alchemical concoction on the table to gain two new abilities depending on your class. For example: warriors will get
bloody thirst and blood fury, drinking the potion will also get an achievement so don’t miss it. Then proceed to the next
room and you’ll see some demons attacking Avernus, kill them and talk to Avernus to trigger a conversation, which’ll end
in either killing him or helping him fix the portals and stop the demons from entering the keep.
Here you need to choose between Sophia or Avernus, choosing one ends up killing the other one, which is really a pain in
the rear problem. Killing Sophia will get you Warden Commander armor whereas killing Avernus gets you a robe, one of
the best robe for blood mage. Once you are done with choosing and killing, you need to help the other fix the portal.
Follow him/her back to the main hall and protect them while they fix the portals, there’ll be four waves of attacks most
65
DRAGON AGE: ORIGINS
consisting low level rage demons, you can easily deal with them even if you are below level 10. After closing the portals,
you need to decide what to do to your new ally, you can either killing them or prison them inside the keep forever.
After the fighting, go back to Avernus lab and examine the dead body to get the final clue to Wardens cache, which is
located behind the painting in the main hall, collecting the cache will complete the ‘Ancient Histroy’ side quest. Leave the
keep and talk to Levi to complete the DLC. Once you complete the quest, Levi and his family will setup a shop in front of
the keep and you’ll get a chest where you can store unlimited items. If you have found the strange metal in the random
encounter, you can give it Levi’s brother and have it forged into a fine sword or twin blade.
THE STONE PRISONER
Travel to the Sulcher’s Pass and you’ll meet a merchant named, Felix, who ask you to buy a control rod, which’ll awakens a
golem in the nearby village. Buy the rod and travel to the village of Honnleath, kill the Darkspawns in the entrance and
make your way to the centre of the village, where you’ll find the golem petrified into stone. Enter the house in front of
the golem and killing the Darkspawns attacking the villagers, talk to Wilhelm, the owner of the golem and agree to look
for his daughter. Enter the basement and make your way to the other side, you won’t find much creatures so don’t
worry. On the end, you’ll find the girl and a cat possessed by a desire demon. Here you can either kill the demon along
with the girl or persuade the demon to help and then kill it saving the girl. Either way talk to Wilhelm and exit the
house, approach the golem again to complete the DLC.
A golem’s memories side quest can be unlocked by either taking Shale to Caridin or by completing ‘A Paragon of Her Kind’
in the deep roads. When you return to the camp, Shale asks you to accompany her to her birth place, Chadas Thaig in
the deep roads. Put Shale in the party and travel to Chadas Thaig, make your way to the other side of the thaig killing
the Darkspawns and you’ll find a statue bearing the names of all the dwarves born in the thaig, examine it to trigger a
cut scene and to complete the quest.
RETURN TO OSTAGAR
Travel to Bann Loren’s land near Lake Calenhad and you’ll see an unarmed man being attacked by Bann Loren’s men. You
can either jump into the fight and kill them or wait for them to leave, either way the man will die giving you the map to
King Cailon’s royal arms and secret documents. You know what this is right? Yes, revenge time for Grey Wardens. Put
Alistair in the team and travel back to Ostagar in the Korcari Wilds.
66
DRAGON AGE: ORIGINS
You’ll encounter a group of Darkspawns as soon as you arrive, dispatch them and another group with Hurlock Strider will
attack. Kill them and loot his body to find Calian’s boots. Go to the opposite side of the war council to find the joining
chalice, a gift to Alistair. Then head downstairs and collect the royal chest key from the marked place, near the statue.
Picking it will cause a large group of Darkspawns to attack, kill them and loot the Vanguard to find Cailon’s shield.
Go near the Wardens camp and open the chest [IT IS LOCATED EXACTLY WHERE I’M STANDING IN THE MAP] to
find Maric’s sword and correspondences sent to Cailon. Leave the chest and continue down the path to find a big
[REALLY BIG] group of Darkspawns, best if you use inferno or blizzard. Have someone deal with the genlock using the
ballista, your mage can hold off the troops with AoE spells. I used flame-quencher [GREASE + FIRE + BLIZZARD],
storm of the century [SPELL MIGHT + BLIZZARD + TEMPEST] will also work. Once you are done, head to the other side
of the bridge to trigger a cut scene, which is really senti and makes you feel sad, you might as well as need some tissues.
Kill the Darkspawns and chase after the necromancer, he’ll lead you into another ambush and escape, kill the Darkspawns
and look up to find a familiar scene, the tower of ishal, where you and Alistair almost got killed. Kill the Darkspawns led
by Hunlock Strategist and loot their body to find Cailon’s armor. Enter the tower and get ready for another fight
[FEELING A BIT DEJA VU?], it’s very similar to the fight you played when you first came to the towe of ishal after
getting recruited to The Grey Wardens. Anyway, kill the Darkspawns and enter the room which leads to the second
floor, examine the door and you’ll find it’s blocked from the other side.
Go through the large hole in the floor and enter the Darkspawns tunnel. Kill the spiders and enter the next room to find
more of them, get rid of them and chase after the necromancer to the surface, where he’ll resurrect the Ogre that
killed Cailon. Its same as any other ogre, use cone of cold followed by advanced drain, this’ll deplete most of his health.
Your warriors can deplete the remaining in no time, loot its body to find Duncan’s sword and dagger. Once done, go after
the necromancer and kill him for all the trouble he caused, loot his body to find Cailon’s helmet and enter the tunnel to
trigger another cut scene. Perform the last rites to King Cailon and leave Ostagar to complete the DLC.
67
DRAGON AGE: ORIGINS
COPYRIGHTS
This document is copyrighted to me and it is only intended to help a lazy gamer beat his/her game. In other words, it
cannot be copied and used in any commercial business. Any illegal distribution of this document without my permission
will be direct violation of copyrights law, so if you want to use any of the content found in this document then please
contact me before doing so or else you will be screwed.
WEBSITES WITH PERMISSION: Chapter Cheats – Gaming Dragon and IGN – GamingDragon91
CONTACT: [email protected]
http://gamingdragons.blospot.com/
THE END


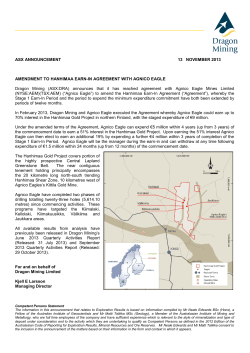


© Copyright 2026