
available here - Roomie Remote
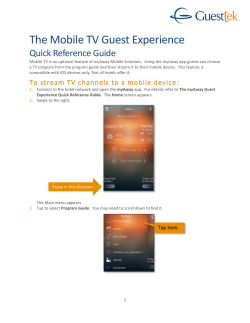
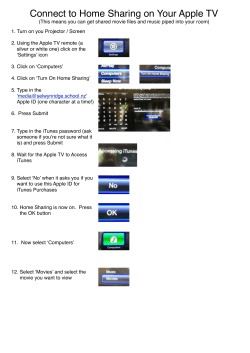
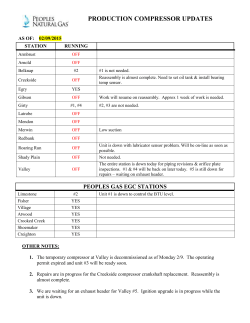
Roomie Remote 3
New Features in Roomie Remote 3.1
This document describes how to use some of the new features in Roomie Remote 3.1.
It does not describe features from Roomie Remote 3.0 and earlier, so use this document in
conjunction with the existing Roomie Remote 3 documentation.
OVERVIEW
The Version 3.1 release of Roomie Remote includes some exciting new features. This
document describes how to use many of those new features.
Note: All of the new features and improvements in Roomie Remote 3.1 are described online.
AMAZON FIRE TV AND FIRE TV STICK
Both Amazon Fire TV and Amazon Fire TV Stick are auto-discovered by Roomie Remote and
controllable via direct IP, including keyboard support.
Note: The following procedure applies to both Amazon Fire TV and Amazon Fire TV stick.
To control an Amazon Fire TV with Roomie Remote:
1. Configure your Amazon Fire TV according to the manufacturer’s instructions, including
connecting it to your Wi-Fi network.
Keep your Amazon Fire TV remote handy; you will need to use it again soon.
2. Using your Roomie Remote app, navigate to the appropriate room, make sure you are in
Edit mode, and then tap Add Device.
The Add Device screen appears.
Copyright © 2015 Roomie Remote, Inc.
1
roomieremote.com
Roomie Remote 3
New Features in Roomie Remote 3.1
3. Tap Amazon Fire TV or Amazon Fire TV Stick Media Player in the list of local network
devices.
The Fire TV Help screen appears.
Important: This screen and the next three show you the process of enabling an Amazon Fire
TV feature called the ADB option, which must be enabled. These screens are for reference
purposes; you enable the ADB option in your Amazon Fire TV Settings.
4. Using your Amazon Fire TV remote, go to the main menu, then navigate to Settings >
System > Developer Options.
5. Set ADB debugging to ON.
6. Press the Home button on your Fire TV remote.
7. Returning to your Roomie Remote app, tap Next to view all of the screens that show the
process of enabling the ADB option if you haven’t already done so, then tap Done on the
final screen.
Copyright © 2015 Roomie Remote, Inc.
2
roomieremote.com
Roomie Remote 3
New Features in Roomie Remote 3.1
The Add Device screen appears, showing the settings for your Amazon Fire TV Media
Player.
8. Make any other desired settings changes, then tap Save.
The Create Activity popup appears.
9. As your Amazon Fire TV is a source of content, tap Create Activity.
The room screen appears in Edit mode.
Note: If you are using a television to display Amazon Fire TV content and content from
another source (Apple TV or a set top box, for example), be sure to set up Input Switching
appropriately for the shared television.
Copyright © 2015 Roomie Remote, Inc.
3
roomieremote.com
Roomie Remote 3
New Features in Roomie Remote 3.1
LG SMART TVS AND LG WEBOS TVS
Roomie Remote 3.1 supports both LG Smart TVs and LG Web OS TVs on models from 2011
and forward. These televisions are auto-discovered and controlled via direct IP, including
mouse and keyboard control.
Note: LG televisions cannot be powered on via IP, so most scenarios require additional control
such as provided by a Roomie Blaster Complete. Refer to the Roomie Remote Store for more
information.
If you will be accessing content via an LG Smart TV or an LG Web OS TV, create an activity
for it after adding the device. Enter the appropriate pairing code when prompted during the
creation of the activity.
SMARTTHINGS AUTOMATION
Roomie Remote 3.1 lets you send commands to devices controlled by a SmartThings hub; for
example, turning lights on or telling your Sonos speakers to speak text.
To control a SmartThings environment, configure it according to the manufacturer’s
instructions, then add your SmartThings hub as a device (in the Cloud Services section of the
Add Device screen) in Roomie Remote. Log in to your SmartThings account when prompted.
Note: Roomie Agent 2.1 for OS X and above accepts commands from a SmartThings hub,
letting you send Roomie Remote commands to any device based on SmartThings events
(information about Roomie Agent is available here). For example, you can turn on lights or a
TV in Roomie Remote based on a SmartThings motion detector. Refer to the Roomie
Agent/SmartThings Integration Setup Guide for more information.
INSTEON WEB SERVICES
Roomie Remote 3.1 supports the new Insteon Hub 2245. You can use Roomie Remote to send
commands to devices controlled by the Insteon Hub 2245, including turning on lights,
switches, and more.
Note: The new Insteon Hub 2245 is a new generation hub with an updated design. If you are
planning on using an Insteon Hub, Roomie Remote recommends the 2245. The previous
generation of the Insteon Hub, 2242, is not supported by Insteon web services.
To control an Insteon Hub 2245, configure it according to the manufacturer’s instructions,
then add it as a device (in the Cloud Services section of the Add Device screen) in Roomie
Remote. Log in to your Insteon account when prompted.
Note: When creating remote designs with multiple lights to display feedback, Roomie Remote
recommends no more than one or two lights. Upcoming improvements from Insteon in this
area should make lights feedback more efficient; when these improvements become available,
they will be supported in a maintenance release of Roomie Remote.
Copyright © 2015 Roomie Remote, Inc.
4
roomieremote.com
Roomie Remote 3
New Features in Roomie Remote 3.1
TIMER- AND TIME-BASED TRIGGERS
Roomie Remote 3.1 adds support for both timer-based and time-based triggers:
•
Timer-based trigger: You can create an activity in Roomie Remote that performs an action
based on a certain amount of time passing. For example, you could create an activity to
turn off the system in a room after 30 minutes have passed.
•
Time-based trigger: You can configure a trigger in Roomie Remote that runs an activity
based on the day (or days) and time. For example, you could create a trigger that runs an
activity every weekday evening at 11 p.m.
All timer-based and time-based triggers require a Roomie Service Subscription.
Important: Make sure to create the activity you want to run before you create the trigger.
To create a timer-based trigger:
1. Open Roomie Remote and navigate to the main page for the desired room, in Edit mode.
2. Tap Add Activity.
The Add Activity screen appears.
3. Enter a descriptive name in the Title field and select an image, if desired.
4. Tap Done.
5. Tap Add Command.
Copyright © 2015 Roomie Remote, Inc.
5
roomieremote.com
Roomie Remote 3
New Features in Roomie Remote 3.1
The Choose Target screen appears.
6. Tap Activity.
The Choose Activity screen appears.
7. Tap the activity you want to trigger.
The Add Command screen appears.
8. Enable Delay Activity.
Copyright © 2015 Roomie Remote, Inc.
6
roomieremote.com
Roomie Remote 3
New Features in Roomie Remote 3.1
The timer appears below the Delay Activity field.
9. Select the desired amount of time, then tap Save.
The Add Activity screen appears, now showing the command you just added.
10. Make any desired changes to the settings for the activity, then tap Save.
Copyright © 2015 Roomie Remote, Inc.
7
roomieremote.com
Roomie Remote 3
New Features in Roomie Remote 3.1
The main page for the room appears, showing the timer-based trigger activity.
11. To implement the trigger, tap the activity.
To create a time-based trigger:
1. Open Roomie Remote, then tap the Settings icon.
The Settings screen appears.
2. Tap Triggers (you may have to scroll down.)
Copyright © 2015 Roomie Remote, Inc.
8
roomieremote.com
Roomie Remote 3
New Features in Roomie Remote 3.1
The Triggers screen appears.
3. Tap Trigger Agent.
Devices on your network that can act as a trigger agent appear.
A trigger agent monitors your network for a trigger command and executes it. You can
select an iOS device running Roomie Remote as a trigger agent, but if you do then that
device must always be turned on with Roomie Remote as the foreground app for it to work
as a trigger agent. Roomie Remote recommends selecting Roomie Agent for OS X as a
trigger agent, as it does not have the same issue as an iOS device.
4. Select the desired trigger agent.
5. Tap Add Time Trigger.
Copyright © 2015 Roomie Remote, Inc.
9
roomieremote.com
Roomie Remote 3
New Features in Roomie Remote 3.1
The Time Trigger screen appears.
6. Tap Time of Day.
The timer appears.
7. Select the desired time.
8. Tap Repeats.
The days of the week appear.
Copyright © 2015 Roomie Remote, Inc.
10
roomieremote.com
Roomie Remote 3
New Features in Roomie Remote 3.1
9. Select the desired days; a checkmark appears for those you select.
10. Tap Activity.
Configured activities appear.
11. Tap the activity you want the trigger to implement.
12. Tap Save.
The Triggers screen appears, now showing the time-based trigger you just defined.
13. Tap Settings, then tap Done.
Copyright © 2015 Roomie Remote, Inc.
11
roomieremote.com
Roomie Remote 3
New Features in Roomie Remote 3.1
DENON HEOS MEDIA PLAYER
Roomie Remote 3.1 supports the Denon HEOS media player, including all music services
provided by Denon.
To control a Denon HEOS media player, configure it according to the manufacturer’s
instructions, then add it as a device with an activity in Roomie Remote.
When adding a Denon HEOS media player as a device, you will be prompted for a username
and password on the Add/Edit Device screen; use the same credentials that you use for the
Denon HEOS app.
Note: Support for grouping HEOS speakers in Roomie Remote is scheduled for an upcoming
release; it is not available in this release of Roomie Remote.
APPLE TV MEDIA GUIDE
Roomie Remote 3.1 includes the new Apple TV Media Guide, which allows you to directly
play content associated with your iTunes account via Apple TV.
The Apple TV Media Guide requires a Roomie Service Subscription.
Note: The content shown in the Apple TV Media Guide is streamed from Apple if you select it.
To play content using the Apple TV Media Guide:
1. Open Roomie Remote.
2. If you have not done so already, add Apple TV as a device and create an activity for it.
3. Open the Apple TV activity.
The virtual remote for Apple TV appears.
Copyright © 2015 Roomie Remote, Inc.
12
roomieremote.com
Roomie Remote 3
New Features in Roomie Remote 3.1
4. Tap the three horizontal bars in the upper right corner to access the Apple TV Media
Guide.
The Apple TV Media Guide appears.
5. Tap the appropriate category to locate the content you want to play.
6. To start a movie or television show playing, tap the blue play icon on the far right of the
screen. To see information about the movie or show, tap its name.
7. To start a song playing, navigate to the song you want, then tap its name.
8. Once the content is playing, you can return to the virtual remote to control it.
Copyright © 2015 Roomie Remote, Inc.
13
roomieremote.com
Roomie Remote 3
New Features in Roomie Remote 3.1
APPLE TV ITUNES GUIDE
Roomie Remote 3.1 includes the new Apple TV iTunes Guide, which allows you to play
content from a local iTunes via Apple TV.
The Apple TV iTunes Guide requires a Roomie Service Subscription.
Note: The content shown in the Apple TV iTunes Guide is local iTunes content.
To configure the Apple TV iTunes Guide:
1. Open Roomie Remote.
2. If you have not done so already, add Apple TV as a device and create an activity for it.
3. If you have not done so already, add iTunes as a device and create an activity for it.
4. In Edit mode, tap the Add Activity button.
The Add Activity screen appears.
5. Enter a descriptive title in the Title field and select an image, if desired.
We will call the new activity iTunes on Apple TV for this procedure.
6. Tap None in the Opens Remote for Device field.
The Activity Remote screen appears.
7. Tap Apple TV Media Player.
Copyright © 2015 Roomie Remote, Inc.
14
roomieremote.com
Roomie Remote 3
New Features in Roomie Remote 3.1
The Add Activity screen appears, now showing the Apple TV Media Player in the Opens
Remote for Device field.
8. Tap iTunes Device.
The iTunes Guide screen appears.
9. Tap Apple iTunes Media Player in the Home field.
The Add Activity screen appears, now showing Apple Media Player iTunes in the iTunes
Device field.
10. Tap Save.
Copyright © 2015 Roomie Remote, Inc.
15
roomieremote.com
Roomie Remote 3
New Features in Roomie Remote 3.1
The main room screen appears, now showing the new iTunes on Apple TV activity.
11. Tap the Edit mode icon to switch to User mode, then tap the button for the iTunes on
Apple TV activity.
The virtual remote appears.
12. Tap the three horizontal bars in the upper right corner to access the Apple TV iTunes
Guide.
The Apple TV iTunes Guide appears.
13. Tap the appropriate category to locate the content you want to play.
14. Once the content is playing, you can return to the virtual remote to control it.
Copyright © 2015 Roomie Remote, Inc.
16
roomieremote.com
Roomie Remote 3
New Features in Roomie Remote 3.1
DENON HEOS MEDIA GUIDE
Roomie Remote 3.1 includes the new Denon HEOS Media Guide, which lets you directly
control HEOS services such as Pandora and Rhapsody.
The Denon HEOS Media Guide requires a Roomie Service Subscription.
Denon also supports Spotify. As recommended by Denon, to access Spotify content, you will
need to select it using the Spotify app.
To access the Denon HEOS Media Guide, open the Denon HEOS activity and tap the three
horizontal lines in the upper right corner of the Denon HEOS virtual remote.
This image shows the Denon HEOS activity on the far left, the Denon HEOS virtual remote in
the middle, and the available HEOS services on the far right.
Copyright © 2015 Roomie Remote, Inc.
17
roomieremote.com
Roomie Remote 3
New Features in Roomie Remote 3.1
DISH DVR RECORDING AND TIMERS
Roomie Remote 3.1 supports recording Dish DVR programs from the TV guide and
creating/editing timer recordings of programs.
To record a Dish DVR program from the TV guide:
1. On the Dish DVR TV guide, select the program you want to record.
This screen shot shows the movie Gladiator selected.
2. Tap the word Record or the red circle next to it.
The program is now set to record.
To schedule a Dish DVR program for recording from the TV guide:
1. On the Dish DVR TV guide, specify the show you wish to schedule.
This screen shot shows the program District 9 specified.
Copyright © 2015 Roomie Remote, Inc.
18
roomieremote.com
Roomie Remote 3
New Features in Roomie Remote 3.1
2. Tap the alarm clock icon; it’s next to the moon icon.
The scheduling controls appear.
This screen shot shows the scheduling controls for an episode of Shark Tank.
3. Configure the scheduled recording appropriately.
Copyright © 2015 Roomie Remote, Inc.
19
roomieremote.com
Roomie Remote 3
New Features in Roomie Remote 3.1
DUNE HD AND MEDE8ER PLUS KODI MEDIA GUIDE
Roomie Remote 3.1 includes support for Dune HD and Mede8er media players in conjunction
with a Kodi (formerly XBMC) player. Once configured, Roomie Remote can direct the content
from the network attached storage (NAS) the Kodi system is using to either Dune or Mede8er.
The Dune HD and Mede8er Media Guides require a Roomie Service Subscription.
Roomie Remote gets the appropriate filenames from the Kodi system and relays it to the Dune
or Mede8er device. Because the pathnames are slightly different, the configuration process
includes setting the appropriate mount point.
Note: Both Dune HD and Mede8er media players must be added as devices in Roomie
Remote using Manual IP, which means you must lock their IP addresses once they are
configured. This can be done using a feature of your router generally called “static IP” or
“DHCP reservation”. Refer to your router documentation for more information.
Because different NAS store their files at different locations in the file system, you must specify
a mount point so that Kodi can find and deliver the appropriate files.
As an example, let’s say that a NAS uses this pathname to get to a particular movie:
/Volumes/video/movies/movietitle.mkv
Roomie Remote is going to remove the “/Volumes” portion of that path and replace it with the
mount point you specify, thus giving the correct full path to the desired files.
An example mount point for Dune HD: nfs-tcp://192.168.1.10:/volume1
An example mount point for Mede8er X3D: smb://192.168.1.10
Note: If you need more information, refer to the documentation for your media player.
To set a mount point for a Dune HD or a Mede8er X3D media player:
1. Open Roomie Remote.
2. Add the Dune HD or Mede8er X3D media player as a device.
3. When you get to the Add Device screen, navigate to the Path field in the XBMC Mount
Point section.
4. Tap Path.
Copyright © 2015 Roomie Remote, Inc.
20
roomieremote.com
Roomie Remote 3
New Features in Roomie Remote 3.1
5. Use the keyboard to enter the appropriate mount point. See above for examples.
6. Tap Done.
7. Finish configuring the device.
LAYOUT SIZING OPTIONS FOR ACTIVITY LISTS
Roomie Remote 3.1 includes a new feature that lets you choose a layout size for activity lists.
The default is Size to Fit. Smaller sizes let you see more content on the screen at one time,
while the larger sizes make it easier to make selections.
To select a layout size for activity lists:
1. Open Roomie Remote to the Rooms list in Edit mode.
2. Tap the room whose layout size you want to change.
The Edit Room screen appears.
3. Tap Activity Layout.
Copyright © 2015 Roomie Remote, Inc.
21
roomieremote.com
Roomie Remote 3
New Features in Roomie Remote 3.1
The available layout sizes appear.
4. Tap the desired layout size (Size to Fit, Small, Medium, Large, and XL), then tap Save.
The Rooms list appears, in Edit mode.
5. Tap the Mode icon to switch to User mode.
6. Tap the room whose layout size you changed.
The content on the Activity list appears in the new size. This image shows the XL size.
Copyright © 2015 Roomie Remote, Inc.
22
roomieremote.com
Roomie Remote 3
New Features in Roomie Remote 3.1
ADDITIONAL RESOURCES
Other Roomie Remote resources for devices include:
•
The Roomie Remote 3 Quick Start Guide: This document takes you through the process of
using Roomie Remote to create a virtual remote for three devices: an Apple TV, a set top
box, and a television.
•
The Roomie Remote 3 Setup Tutorial: This video (hosted on YouTube) describes how to
set up multiple devices using Roomie Remote.
•
Roomie Remote FAQ page: This page includes answers to many commonly asked
questions about Roomie Remote.
•
Roomie Remote Support Request: To get support from Roomie Remote, submit a support
request.
•
Roomie Remote User Forums: A forum for Roomie Remote users to discuss topics with
each other. Note that posting in the forums does not guarantee a response from Roomie
Remote Support; for that, contact Support directly.
Roomie and the Roomie logo are trademarks of Roomie Remote, Inc. All other company, product, and service names are for
identification only. All trademarks and registered trademarks are the property of their respective owners.
Copyright © 2015 Roomie Remote, Inc.
23
roomieremote.com


© Copyright 2026