
AdventNet ManageEngine PasswordManager Pro :: Help
AdventNet ManageEngine PasswordManager Pro :: Help Documentation
Table Of Contents
MANAGEENGINE PASSWORDMANAGER PRO .................................................... 3
INSTALLATION & GETTING STARTED................................................................... 6
IMPORTANT TERMINOLOGIES ............................................................................. 20
WORK FLOW IN PMP ............................................................................................. 21
CHECK IF YOU ARE MAKING FULL USE OF PMP... ........................................... 23
USER MANAGEMENT ............................................................................................ 25
User Management ............................................................................................................. 25
Adding Users Manually...................................................................................................... 27
Integrating Active Directory & Importing Users.................................................................. 28
Integrating LDAP & Importing Users.................................................................................. 32
Importing Users from a CSV file ........................................................................................ 35
Editing Users ..................................................................................................................... 36
Deleting Users ................................................................................................................... 36
User Groups ...................................................................................................................... 38
RESOURCE MANAGEMENT .................................................................................. 40
Adding Resources ............................................................................................................. 40
Password Synchronization using PMP Agents.................................................................. 50
Importing Resources.......................................................................................................... 52
Editing Resources.............................................................................................................. 55
Viewing Account Details .................................................................................................... 56
Resource Groups............................................................................................................... 58
Sharing Resources / Resource Groups Among Users ...................................................... 60
Transferring Ownership of Resources / Resource Group.................................................. 62
Passwords View ................................................................................................................ 63
Managing Resource Types................................................................................................ 64
Exporting Resources ......................................................................................................... 66
SCHEDULED PASSWORD ROTATION ................................................................. 67
WINDOWS SERVICE ACCOUNT PASSWORD RESET......................................... 69
PASSWORD ACTION NOTIFICATION ................................................................... 73
AUTO LOGON HELPER ......................................................................................... 77
PASSWORD RESET LISTENER............................................................................. 83
AdventNet, Inc.
1
AdventNet ManageEngine PasswordManager Pro :: Help Documentation
HIGH AVAILABILITY............................................................................................... 85
DATABASE BACKUP ............................................................................................. 89
DISASTER RECOVERY .......................................................................................... 93
PASSWORD MANAGEMENT API .......................................................................... 94
REBRANDING PMP ................................................................................................ 98
CHANGING THE PMP LOGIN PASSWORD .......................................................... 99
PASSWORD POLICIES ........................................................................................ 100
AUDIT & NOTIFICATIONS.................................................................................... 101
REPORTS.............................................................................................................. 105
OPTIONAL GENERAL SETTINGS ....................................................................... 116
PROVISION FOR STORING PERSONAL INFORMATION .................................. 120
PASSWORDMANAGER PRO - FAQ .................................................................... 124
AdventNet, Inc.
2
AdventNet ManageEngine PasswordManager Pro :: Help Documentation
ManageEngine PasswordManager Pro
- Privileged Password Management Solution for Enterprises
Contents
•
•
•
•
Overview
PasswordManager Pro - where passwords reside in safe custody
How secure are your passwords in PasswordManager Pro?
Documentation Structure
Overview
In this age of IT revolution, most business applications deal with sensitive intellectual
property and strategic information that are critical to the success and even survival of
the enterprise. User access control systems are in place almost everywhere to protect
the intellectual property.
Over a period of time at work, even a normal user acquires an amazing number of user
accounts. Still more complex is the work of Network Administrators and System
Administrators who deal with hundreds of passwords at various levels. Consequently, it
becomes a daunting task for anyone to keep track of all the passwords. Users tend to
store the user name and password information somewhere in their system locally or in a
central location when multiple administrators need to use the information.
As System and Network Administrators mostly deal with sensitive administrative
passwords, also known as privileged passwords, which provide complete access to all
sensitive applications and data, any mismanagement of such passwords would result in a
huge security risk exposing the applications to misuse and attacks by identity thieves.
The way out is the use of a secure password management solution that enables secure
storage of administrative passwords offering the flexibility to share them among multiple
users based on fine-grained user authorization.
PasswordManager Pro - where passwords reside in safe custody
ManageEngine PasswordManager Pro (PMP) is a Password Management Solution for
Enterprises to manage the administrative/privileged passwords. It serves as a
centralized repository for storing user names and passwords of any 'network resource'
such as a network device, a desktop server, an application et al.
PMP serves not just as a secure password repository, but offers a complete Password
Management solution. Using PMP, one can store all passwords in encrypted form in the
database and achieve role-based access control for users. That is, administrators can
centrally create users, assign them with specific roles and define access levels. Only
authorized users will get access to view, edit or manage the permitted 'resources' (the
resources assigned to them) based on their role. Thus, PMP facilitates encrypted storage
and secure sharing of passwords in enterprises where multiple users will have access to
multiple resources. The user account information and passwords can be accessed from a
central web interface.
AdventNet, Inc.
3
AdventNet ManageEngine PasswordManager Pro :: Help Documentation
PMP helps in achieving Password Synchronization too. Existing passwords of remote
resources can be changed from PMP itself and the changed passwords are stored in the
repository. The comprehensive auditing mechanism of PMP helps in tracking who
changed what and when, thereby ensuring accountability in multi-member environment.
Highlights
•
•
•
•
•
•
•
•
•
•
•
•
•
•
•
•
•
•
•
•
Centralized, administrative password management
Manage Shared Administrative Passwords
A-to-A, A-to-DB Password Management
Password encryption using AES algorithm
Provision for importing users from AD, LDAP
Role-based access control for users
Super Admin Support
Remote Password Synchronization
Windows Service Account Reset
Post Password Reset Script Execution
Automatically connecting to servers and applications from PMP GUI
Setting password expiry dates
Real-time notifications for password events
High Availability
Password Generator that helps in generating hard-to-guess passwords
Password policy definition and enforcement
Comprehensive audit mechanism recording all user operations for all resources
Tools for scheduled backup of database and disaster recovery
Provision for storing the passwords for personal use such as Email account
information, Credit Card Numbers, PIN etc.
Access from anywhere through web browser
How secure are your passwords in PasswordManager Pro?
Ensuring the secure storage of passwords and offering high defense against intrusion are
the mandatory requirements of PMP. The following measures ensure the high level
security for the passwords:
•
Passwords entered are encrypted using the Advanced Encryption Standard (AES)
and stored in the Database. So, hacking of passwords from the database, is highly
improbable. AES has been adopted as an encryption standard by the U.S.
Government
•
Role-based, fine-grained user authentication mechanism ensures that the users are
allowed to view the passwords based on the authorization provided
•
All transactions through the PMP browser take place through HTTPS
Refer to Security Specifications document for more details.
Documentation Structure
This Help Documentation contains two parts:
•
Installation & Getting Started provides information on how to install PMP, how to
connect Web Interface and start working with the solution
AdventNet, Inc.
4
AdventNet ManageEngine PasswordManager Pro :: Help Documentation
•
Working with PasswordManager Pro provides information about the workflow in
PMP. The subsequent topics provide information on the arrangement of the various
tabs in PMP Web Interface through which various Password Management operations
could be performed. This also deals with the pre-requisite browser settings and
important terminologies used in the product.
AdventNet, Inc.
5
AdventNet ManageEngine PasswordManager Pro :: Help Documentation
Installation & Getting Started
Contents
•
•
•
•
•
•
•
•
•
•
Overview
Prerequisites
System Requirements
Installing PasswordManager Pro
o In Windows
o In Linux
Starting and Shutting Down
o In Windows
o In Linux
Connecting Web Interface
Quick Start Guide
Managing PMP Encryption Key
Ports Used by PasswordManager Pro
Licensing
Overview
Welcome to AdventNet ManageEngine PasswordManager Pro!
This section provides information on how to install PasswordManager Pro (PMP) in your
system. This section also deals with the system requirements for PMP, how to install the
solution, how to start and shutdown and how to connect web interface after successfully
starting the server.
Prerequisite Software
There is no prerequisite software installation required to use PMP. The standard system
(hardware and software) requirements as mentioned below plus an external mail server
(SMTP server) are essential for the functioning of PMP server and to send various
notifications to users.
System Requirements
Following table provides the minimum hardware and software configuration required by
PMP:
Hardware
Processor
•
RAM
•
Operating systems
Windows
1.8 GHz
Pentium®
processor
•
512 MB
•
•
Windows 2000
Server /
Professional
Windows Server
2003
Windows XP
Professional
AdventNet, Inc.
Web-Client
HTML client requires one
of the following
browsers** to be
installed in the system:
•
•
IE 7 and above
(on Windows)
Firefox 2.0 and
above (on
6
AdventNet ManageEngine PasswordManager Pro :: Help Documentation
Hardware
Hard Disk
•
•
200 MB for
product
10 GB for
database
Operating systems
• Windows Vista
Linux
•
•
•
•
•
Red Hat Linux 8.0
Red Hat Linux 9.0
CentOS 4.4
Suse Linux 10.1
Mandrake Linux
10.0
Web-Client
Windows and
Linux)
** PMP is optimized for
1024 x 768 resolution
and above.
Components of PMP
PMP consists of the following components:
•
•
•
The PMP server
PMP agent that helps in connecting to remote resources
MySQL 5.0.36 bundled with PMP. MySQL runs as a separate process (mysqldnt.exe in Windows/ mysqld in Linux). It accepts connections only from the host in
which it is running and is not visible externally
Installing PMP
In Windows
•
•
•
•
•
•
Download and execute ManageEngine_PMP.exe
The installation wizard will guide you through the installation process
Choose an installation directory - by default, it will be installed in C:/Program
Files/PMP; Henceforth, this installation directory path shall be referred as
"PMP_Home"
In the final step, you will see two check-boxes - one for viewing ReadMe file and
the other one for starting the server immediately after installation; if you choose
to start the server immediately, it will get started in the background.
If you choose to start the server later, after installation, you can start it from the
Start >> Programs >> ManageEngine PasswordManager Pro menu
From the Start Menu, you can perform other actions such as stopping the server
and uninstalling the product
In Linux
•
•
•
•
•
Download ManageEngine_PMP.bin for linux
Assign executable permission using command chmod a+x <file-name>
Execute the following command: ./<file_name>
Follow the instructions as they appear on the screen
PMP is installed in your machine in the desired location. Henceforth, this
installation directory path shall be referred as "PMP_Home".
AdventNet, Inc.
7
AdventNet ManageEngine PasswordManager Pro :: Help Documentation
Starting & Shutting Down PMP
In Windows
Using Start Menu
Using Tray Icon
Using Batch file
From Start >>
Programs >>
PasswordManager
Pro menu, you can do
the following:
Once you installed
PMP, in the windows
tray area on the far
right end of your task
bar, you will find the
for PMP.
icon
Open a console and navigate
to <PMP_Home>/bin directory
•
•
•
•
•
Start PMP
service
Stop PMP
service
Launch Tray
Icon
View Help
Documentation
Uninstall the
product
Right click the tray
icon and click the
desired operation
•
•
•
•
To Start the server Execute "pmp.bat
start"
•
To Stop the server Execute "pmp.bat
stop"
Start PMP
Service
Stop PMP
Service
PMP web
console
In Linux
Installing as
Startup Service
•
•
•
•
Login as root
user
Open a
console and
navigate to
<PMP_Home
>/bin
directory
Execute "sh
pmp.sh
install"
To uninstall,
execute the
script "sh
pmp.sh
remove"
Starting & Stopping
the Server as
Service
Starting & Stopping
the Server using
Script
To Start PMP as a service
in Linux
Open a console and
navigate to
<PMP_Home>/bin
directory
•
•
•
Login as root user
Execute
/etc/rc.d/init.d/pmpservice start
PMP server runs in
the background as
service
To Stop PMP Server
started as service in
Linux
•
•
To Start the
server -Execute the
script "sh pmp.sh
start"
•
To Stop the server
- Execute the script
"sh pmp.sh stop"
Execute
/etc/rc.d/init.d/pmpservice stop (as root
user)
AdventNet, Inc.
8
AdventNet ManageEngine PasswordManager Pro :: Help Documentation
Connecting Web Interface
Automatic Browser Launch
Once the server is started successfully, a browser is automatically launched with the PMP
login screen. As the connection is through HTTPS, you will be prompted to accept
security certificate. Hit 'Yes' and then type the user name and password in the login
screen and press Enter. For an unconfigured setup, the default user name and password
will be admin and admin respectively. Every time you start the server, the browser will
be automatically launched.
Launching the Web Client Manually
In the case of windows, you can also launch the web client manually from the Windows
Tray. Right-click the PMP tray icon and click "PMP Web Console". A browser would be
launched with the PMP login screen. As the connection is through HTTPS, you will be
prompted to accept security certificate. Hit 'Yes' and then type the user name and
password in the login screen and press Enter. For an unconfigured setup, the default
user name and password will be admin and admin respectively. Every time you start the
server, the browser will be automatically launched.
In the case of Linux, open a browser and connect to the URL
https://<hostname>:portnumber/
where hostname - host where PasswordManager Pro Server is running; Default
port - 7272
Example: https://localhost:7272
Connecting the Web Client in Remote Hosts
If you want to connect web clients in a different machine than the one in which PMP is
running, open a browser and connect to the URL
https://<hostname>:port
As the connection is through HTTPS, you will be prompted to accept security certificate.
Hit 'Yes' and then type the user name and password in the login screen and press Enter.
For an unconfigured setup, the default user name and password will be admin and admin
respectively. Every time you start the server, the browser will be automatically launched.
Quick Start Guide
Refer to the "Work flow in PMP" section of help documentation.
For any assistance, please contact [email protected] / Toll Free: + 1
925 924 9500
AdventNet, Inc.
9
AdventNet ManageEngine PasswordManager Pro :: Help Documentation
Managing PMP Encryption Key
PMP is secured using AES 128 encryption and all sensitive information are encrypted and
stored in the database. AES is the strongest known encryption and has been approved
by the US Government. During PMP installation, a unique encryption key is autogenerated using SHA1 hashing algorithm. The following options are provided to protect
the encryption key:
1. Leaving PMP to store and manage the key securely by itself (OR)
2. Securely storing it outside PMP and instructing the application to read the key from
the location that you specify. PMP will not store this key anywhere
To specify your option,
•
•
Go to "Admin" >> "General" >> "Manage Encryption Key" in PMP web GUI
In the GUI that opens up, select one of the radio buttons - "Let PMP manage the
encryption key" or "I will manage the encryption key"
Leaving it to PMP
•
If you choose to leave it to PMP, it will securely store the key and manage it and
takes care of backing up the key for disaster recovery purposes. You can click
"Save" and exit.
Storing it by yourself
•
•
•
•
If you choose to manage it by yourself, you need to store the key somewhere
securely and instruct the location of the file to PMP. The key is nowhere stored by
PMP and hence it cannot be backed up. You need to take care of secure storage,
secure backup and secure retrieval.
Click "Save"
The Encryption Key for the installation will be available under <PMP Installation
Folder>/conf/pmp_key.key
You can move this key to a secure location, which can be a local directory or a
mapped network drive accessible to the PMP server. When you do so, you need to
specify the location to PMP through the file manage_key.conf present under
<PMP Installation Folder>/conf directory.
Note: If you misplace the key or lose it, PMP will not start. So, take care to save
it in a secure location.
Managing PMP Database Key
•
•
•
Apart from the AES encryption, the PMP database is secured through a separate
key, which is auto-generated and unique for every installation
The key for the database can be stored securely in the PMP itself
There is also option to store it at some other secure location accessible to the
PMP server
AdventNet, Inc.
10
AdventNet ManageEngine PasswordManager Pro :: Help Documentation
Leaving it to PMP
•
If you choose to leave it to PMP, you need not do anything. PMP will take care of
it automatically
Storing it by yourself
•
•
•
By default, the database password is present in the file <PMP Installation
Folder>/conf/database_params.conf file
If you choose to manage the database key by yourself, you need to store this
configuration file somewhere securely and instruct the location of the file to PMP
If you are starting PMP as service, go to <<PMP Installation
Folder>/conf/wrapper.conf (in Windows) / <PMP Installation
Folder>/conf/wrapper_lin.conf (in Linux) and edit the following entry under
"Java Additional Parameters"
wrapper.java.additional.9=-Ddatabaseparams.file=<full path of the
database_params.conf file location>
•
If you are starting PMP from command line or through Start >>
Programs, you need to edit the file system_properties.conf present in <PMP
Installation Folder>/conf directory. In this file, edit the following entry under
"Splash Screen default Properties"
databaseparams.file=<full path of database_params.conf file>
Note: If you misplace the conf file or lose it, PMP will not start. So, take care to
save it in a secure location.
Ports Used by PMP
PMP uses the following two ports:
•
•
MySQL port : 2345
Web client port : 7272
Licensing
There are three license types:
•
•
•
Evaluation download valid for 30 days capable of supporting a maximum of 2
administrators
Free Edition licensed software allows you to have 1 administrator and manage
up to 10 resources. Valid forever.
Registered Version - need to buy license based on the number of
administrators required and the type of edition Standard/Premium:
• Standard - If your requirement is to have a secure, password repository
to store your passwords and selectively share them among enterprise
users, Standard Edition would be ideal.
• Premium - Apart from storing and sharing your passwords, if you wish to
have enterprise-class password management features such as remote
password synchronization, password alerts and notifications, applicationto-application password management, reports, high-availability and
others, Premium edition would be the best choice.
AdventNet, Inc.
11
AdventNet ManageEngine PasswordManager Pro :: Help Documentation
Features Matrix
Standard Edition
Premium Edition
•
•
•
•
•
•
•
•
•
•
•
•
User / User group Management
Password Repository
Password Policies
Password Sharing and Management
Audit / Audit Notifications
AD / LDAP integration
Auto Logon Helper
Password change listener
Backup and Disaster Recovery
•
•
•
•
All Features of Standard Edition
Password Alerts and Notifications
Remote Password Reset (on
demand, scheduled and rule
based)
o for Windows, Windows
Domain, Windows Service
Accounts, Windows
Scheduled Accounts,
Flavours of UNIX and
Linux, MS SQL, MySQL,
Oracle DB Server, Sybase
ASE, Cisco Devices, HP
Procurve and other
Network Devices
Reports (including PCI DSS
compliance reports)
Password Management API
High Availability
For more information and to get license, contact [email protected]
AdventNet, Inc.
12
AdventNet ManageEngine PasswordManager Pro :: Help Documentation
Installation & Getting Started
Contents
•
•
•
•
•
•
•
•
•
•
Overview
Prerequisites
System Requirements
Installing PasswordManager Pro
o In Windows
o In Linux
Starting and Shutting Down
o In Windows
o In Linux
Connecting Web Interface
Quick Start Guide
Managing PMP Encryption Key
Ports Used by PasswordManager Pro
Licensing
Overview
Welcome to AdventNet ManageEngine PasswordManager Pro!
This section provides information on how to install PasswordManager Pro (PMP) in your
system. This section also deals with the system requirements for PMP, how to install the
solution, how to start and shutdown and how to connect web interface after successfully
starting the server.
Prerequisite Software
There is no prerequisite software installation required to use PMP. The standard system
(hardware and software) requirements as mentioned below plus an external mail server
(SMTP server) are essential for the functioning of PMP server and to send various
notifications to users.
System Requirements
Following table provides the minimum hardware and software configuration required by
PMP:
Hardware
Processor
•
RAM
•
Operating systems
Windows
1.8 GHz
Pentium®
processor
•
512 MB
•
Hard Disk
•
•
Windows 2000
Server /
Professional
Windows Server
2003
Windows XP
Professional
Windows Vista
AdventNet, Inc.
Web-Client
HTML client requires one
of the following
browsers** to be
installed in the system:
•
•
IE 7 and above
(on Windows)
Firefox 2.0 and
above (on
Windows and
13
AdventNet ManageEngine PasswordManager Pro :: Help Documentation
Hardware
•
•
200 MB for
product
10 GB for
database
Operating systems
Linux
•
•
•
•
•
Red Hat Linux 8.0
Red Hat Linux 9.0
CentOS 4.4
Suse Linux 10.1
Mandrake Linux
10.0
Web-Client
Linux)
** PMP is optimized for
1024 x 768 resolution
and above.
Components of PMP
PMP consists of the following components:
•
•
•
The PMP server
PMP agent that helps in connecting to remote resources
MySQL 5.0.36 bundled with PMP. MySQL runs as a separate process (mysqldnt.exe in Windows/ mysqld in Linux). It accepts connections only from the host in
which it is running and is not visible externally
Installing PMP
In Windows
•
•
•
•
•
•
Download and execute ManageEngine_PMP.exe
The installation wizard will guide you through the installation process
Choose an installation directory - by default, it will be installed in C:/Program
Files/PMP; Henceforth, this installation directory path shall be referred as
"PMP_Home"
In the final step, you will see two check-boxes - one for viewing ReadMe file and
the other one for starting the server immediately after installation; if you choose
to start the server immediately, it will get started in the background.
If you choose to start the server later, after installation, you can start it from the
Start >> Programs >> ManageEngine PasswordManager Pro menu
From the Start Menu, you can perform other actions such as stopping the server
and uninstalling the product
In Linux
•
•
•
•
•
Download ManageEngine_PMP.bin for linux
Assign executable permission using command chmod a+x <file-name>
Execute the following command: ./<file_name>
Follow the instructions as they appear on the screen
PMP is installed in your machine in the desired location. Henceforth, this
installation directory path shall be referred as "PMP_Home".
AdventNet, Inc.
14
AdventNet ManageEngine PasswordManager Pro :: Help Documentation
Starting & Shutting Down PMP
In Windows
Using Start
Menu
Using Tray Icon
Using Batch file
From Start >>
Programs >>
PasswordManager
Pro menu, you can
do the following:
Once you installed PMP,
in the windows tray
area on the far right
end of your task bar,
you will find the icon
for PMP.
Open a console and navigate
to <PMP_Home>/bin directory
•
•
•
•
•
Start PMP
service
Stop PMP
service
Launch Tray
Icon
View Help
Documentatio
n
Uninstall the
product
Right click the tray icon
and click the desired
operation
•
•
•
•
To Start the server Execute "pmp.bat
start"
•
To Stop the server Execute "pmp.bat
stop"
Start PMP
Service
Stop PMP
Service
PMP web
console
In Linux
Installing as
Startup Service
•
•
•
•
Login as root
user
Open a
console and
navigate to
<PMP_Home
>/bin
directory
Execute "sh
pmp.sh
install"
To uninstall,
execute the
script "sh
pmp.sh
remove"
Starting & Stopping
the Server as
Service
Starting & Stopping
the Server using
Script
To Start PMP as a service
in Linux
Open a console and
navigate to
<PMP_Home>/bin
directory
•
•
•
Login as root user
Execute
/etc/rc.d/init.d/pmpservice start
PMP server runs in
the background as
service
To Stop PMP Server
started as service in
Linux
•
•
To Start the
server -Execute the
script "sh pmp.sh
start"
•
To Stop the server
- Execute the script
"sh pmp.sh stop"
Execute
/etc/rc.d/init.d/pmpservice stop (as root
user)
AdventNet, Inc.
15
AdventNet ManageEngine PasswordManager Pro :: Help Documentation
Connecting Web Interface
Automatic Browser Launch
Once the server is started successfully, a browser is automatically launched with the PMP
login screen. As the connection is through HTTPS, you will be prompted to accept
security certificate. Hit 'Yes' and then type the user name and password in the login
screen and press Enter. For an unconfigured setup, the default user name and password
will be admin and admin respectively. Every time you start the server, the browser will
be automatically launched.
Launching the Web Client Manually
In the case of windows, you can also launch the web client manually from the Windows
Tray. Right-click the PMP tray icon and click "PMP Web Console". A browser would be
launched with the PMP login screen. As the connection is through HTTPS, you will be
prompted to accept security certificate. Hit 'Yes' and then type the user name and
password in the login screen and press Enter. For an unconfigured setup, the default
user name and password will be admin and admin respectively. Every time you start the
server, the browser will be automatically launched.
In the case of Linux, open a browser and connect to the URL
https://<hostname>:portnumber/
where hostname - host where PasswordManager Pro Server is running; Default
port - 7272
Example: https://localhost:7272
Connecting the Web Client in Remote Hosts
If you want to connect web clients in a different machine than the one in which PMP is
running, open a browser and connect to the URL
https://<hostname>:port
As the connection is through HTTPS, you will be prompted to accept security certificate.
Hit 'Yes' and then type the user name and password in the login screen and press Enter.
For an unconfigured setup, the default user name and password will be admin and admin
respectively. Every time you start the server, the browser will be automatically launched.
Quick Start Guide
Refer to the "Work flow in PMP" section of help documentation.
For any assistance, please contact [email protected] / Toll Free: + 1
925 924 9500
AdventNet, Inc.
16
AdventNet ManageEngine PasswordManager Pro :: Help Documentation
Managing PMP Encryption Key
PMP is secured using AES 128 encryption and all sensitive information are encrypted and
stored in the database. AES is the strongest known encryption and has been approved
by the US Government. During PMP installation, a unique encryption key is autogenerated using SHA1 hashing algorithm. The following options are provided to protect
the encryption key:
1. Leaving PMP to store and manage the key securely by itself (OR)
2. Securely storing it outside PMP and instructing the application to read the key from
the location that you specify. PMP will not store this key anywhere
To specify your option,
•
•
Go to "Admin" >> "General" >> "Manage Encryption Key" in PMP web GUI
In the GUI that opens up, select one of the radio buttons - "Let PMP manage the
encryption key" or "I will manage the encryption key"
Leaving it to PMP
•
If you choose to leave it to PMP, it will securely store the key and manage it and
takes care of backing up the key for disaster recovery purposes. You can click
"Save" and exit.
Storing it by yourself
•
•
•
•
If you choose to manage it by yourself, you need to store the key somewhere
securely and instruct the location of the file to PMP. The key is nowhere stored by
PMP and hence it cannot be backed up. You need to take care of secure storage,
secure backup and secure retrieval.
Click "Save"
The Encryption Key for the installation will be available under <PMP Installation
Folder>/conf/pmp_key.key
You can move this key to a secure location, which can be a local directory or a
mapped network drive accessible to the PMP server. When you do so, you need to
specify the location to PMP through the file manage_key.conf present under
<PMP Installation Folder>/conf directory.
Note: If you misplace the key or lose it, PMP will not start. So, take care to save
it in a secure location.
Managing PMP Database Key
•
•
•
Apart from the AES encryption, the PMP database is secured through a separate
key, which is auto-generated and unique for every installation
The key for the database can be stored securely in the PMP itself
There is also option to store it at some other secure location accessible to the
PMP server
AdventNet, Inc.
17
AdventNet ManageEngine PasswordManager Pro :: Help Documentation
Leaving it to PMP
•
If you choose to leave it to PMP, you need not do anything. PMP will take care of
it automatically
Storing it by yourself
•
•
•
By default, the database password is present in the file <PMP Installation
Folder>/conf/database_params.conf file
If you choose to manage the database key by yourself, you need to store this
configuration file somewhere securely and instruct the location of the file to PMP
If you are starting PMP as service, go to <<PMP Installation
Folder>/conf/wrapper.conf (in Windows) / <PMP Installation
Folder>/conf/wrapper_lin.conf (in Linux) and edit the following entry under
"Java Additional Parameters"
wrapper.java.additional.9=-Ddatabaseparams.file=<full path of the
database_params.conf file location>
•
If you are starting PMP from command line or through Start >>
Programs, you need to edit the file system_properties.conf present in <PMP
Installation Folder>/conf directory. In this file, edit the following entry under
"Splash Screen default Properties"
databaseparams.file=<full path of database_params.conf file>
Note: If you misplace the conf file or lose it, PMP will not start. So, take care to
save it in a secure location.
Ports Used by PMP
PMP uses the following two ports:
•
•
MySQL port : 2345
Web client port : 7272
Licensing
There are three license types:
•
•
•
Evaluation download valid for 30 days capable of supporting a maximum of 2
administrators
Free Edition licensed software allows you to have 1 administrator and manage
up to 10 resources. Valid forever.
Registered Version - need to buy license based on the number of
administrators required and the type of edition Standard/Premium:
• Standard - If your requirement is to have a secure, password repository
to store your passwords and selectively share them among enterprise
users, Standard Edition would be ideal.
• Premium - Apart from storing and sharing your passwords, if you wish to
have enterprise-class password management features such as remote
password synchronization, password alerts and notifications, applicationto-application password management, reports, high-availability and
others, Premium edition would be the best choice.
AdventNet, Inc.
18
AdventNet ManageEngine PasswordManager Pro :: Help Documentation
Features Matrix
Standard Edition
Premium Edition
•
•
•
•
•
•
•
•
•
•
•
•
User / User group Management
Password Repository
Password Policies
Password Sharing and Management
Audit / Audit Notifications
AD / LDAP integration
Auto Logon Helper
Password change listener
Backup and Disaster Recovery
•
•
•
•
All Features of Standard Edition
Password Alerts and Notifications
Remote Password Reset (on
demand, scheduled and rule
based)
o for Windows, Windows
Domain, Windows Service
Accounts, Windows
Scheduled Accounts,
Flavours of UNIX and
Linux, MS SQL, MySQL,
Oracle DB Server, Sybase
ASE, Cisco Devices, HP
Procurve and other
Network Devices
Reports (including PCI DSS
compliance reports)
Password Management API
High Availability
For more information and to get license, contact [email protected]
AdventNet, Inc.
19
AdventNet ManageEngine PasswordManager Pro :: Help Documentation
Important Terminologies
While working with PasswordManager Pro, you will come across some terminologies
having unique meanings. It is worthwhile to take a note of those terminologies before
proceeding further:
Term
Definition
Resource
Denotes the server/application/device whose user accounts and
passwords are to be managed by PasswordManager Pro
Resource
Group
Denotes the group to which a particular resource belongs. For
example, if you have some Windows XP servers among a number
of other windows servers, you can group all the XP servers as one
resource group
Denotes the 'User Account' & 'Password' that are to be managed
by PasswordManager Pro
Denotes the PasswordManager Pro user accounts created as part
of PasswordManager Pro User Management.
Group of PasswordManager Pro Users
User
Account
User
User
Group
Password
Policy
PMP
Refer to the explanation
Abbreviation for PasswordManager Pro
AdventNet, Inc.
20
AdventNet ManageEngine PasswordManager Pro :: Help Documentation
Work flow in PMP
If you are an Administrator ...
If you are an administrator engaged in the job of setting up PMP in your environment
and managing passwords, following is the ideal work flow:
1.
2.
3.
4.
Setup Mail Server
Add users who will use PMP
Add resources whose passwords you want to manage
Setup disaster recovery
User Addition work flow
•
•
•
•
•
•
Prior to adding users, the important step to be done is configuring your mail
server. Users will be notified of their PMP access details through email only, so
ensure the mail server is setup properly. Click the link "Mail Server Setting"
available in "Admin >> General" section. Enter your mail server name, its port
and authentication credentials, the url that is to be displayed on the mail
intimation to users to access PMP (access url). While providing authentication
details, you have the option to specify the required username and password
manually or you can make use of an user account already stored in PMP. When
you choose the second option "Use an user account already stored in PMP", the
resources and the accounts that appear on your resources tab, will be listed in
the drop-down. You can choose the required details. After providing the
authentication details, click "Save"
Change the password of the default 'admin' user or delete the account after
adding another administrator user
Add users either manually or import user information from ActiveDirectory, LDAP
or CSV file
Specify appropriate access roles and password policies for the PMP users
Group users together for the convenience of performing operations in bulk
Enable authentication to any one of AD, LDAP or Local
Resource Addition work flow
The first step to actual Password Management in PMP starts with adding your "resource"
to the PMP database. Here, resource denotes the server/application/device whose user
accounts and passwords are to be managed by PMP.
AdventNet, Inc.
21
AdventNet ManageEngine PasswordManager Pro :: Help Documentation
•
•
•
•
•
Add resources either manually or import from a CSV file along with their user
account and password information
Setup the password synchronization method to one of remote or agent-based, if
you need
Group resources together for the convenience of performing operations in bulk
By default, the passwords added by you could be viewed and edited only by you.
If required, share resource passwords with other PMP users or user groups
Access and modify passwords that are owned by you and that are shared to you
Setup Disaster Recovery
•
•
Configure the database backup schedule to backup the entire contents of the
PasswordManager Pro database
Export resource information in the format of your choice to have readable copies
of resource information only
If you are a Password User ...
If you are a Password user engaged in the job of viewing the passwords allotted to you,
there is no need to carry out any configuration. You may directly view the passwords of
resources/accounts and edit passwords if you have that permission.
AdventNet, Inc.
22
AdventNet ManageEngine PasswordManager Pro :: Help Documentation
Check if you are making full use of PMP...
PMP offers a lot of enterprise class features, which could significantly simplify the job of
administrators improving efficiency and productivity. This section provides the list of all
features available in PMP. You can keep this as a checklist to ensure if you have explored
the full potential and making the most of your investment.
Category
Feature
Explanation
User
Management
AD / LDAP
support
Integration with external directory
server for user management,
authentication
Four different user roles providing finegrained access control
Enabling an administrator to see all the
resources in the system unconditionally
User Roles
Super
Administrator
Resource
Management
Password
Management
User Groups
Create groups of users for carrying out
operations in bulk
Domain Single
SignOn
Pass through authentication for PMP
server, when integrated with AD
Resource types
Categorise resources based on their
types (for e.g Windows Servers).
Create and manage your own resource
types, in addition to the default types
Resource Groups
Create groups of resources / passwords
and manage the groups. Carry out
password management operations in
bulk
Share
Resources/Groups
Share resources /resource groups with
desired users/user groups
Resource
Customization
Add attributes to resources and
accounts according to your needs
Password Policies
Create and manage your own password
policies for enforcing their adoption
through PMP
Password Resets
Perform password resets to resources
from PMP (Windows, Windows Domain,
Linux, IBM AIX, HP UNIX, Solaris, Mac
OS, MS SQL server, MySQL server,
Oracle DB Server, Sybase ASE, HP
ProCurve and Cisco Devices (IOS,
CatOS, PIX)).
Password Reset
Schedules
Automate password resets
AdventNet, Inc.
23
AdventNet ManageEngine PasswordManager Pro :: Help Documentation
Category
Audit and
Reports
Non-functional
Features
Feature
Explanation
Password Actions
/ Notifications
Generate alerts for various password
events and specify action to be taken
on password events
Password Reset
Listener
Invoke a custom script to initiate
desired action on password changes
Windows Service
Account
Management
Keep your windows service account and
scheduled task passwords synchronized
with the corresponding domain account
Auto Logon Helper
Connect to target systems with a single
click from PMP console without having
to actually see the passwords
Password
Management API
Setup your applications to query PMP
for A-to-A and A-to-DB passwords
Audit
Comprehensive audit of all operations
done on resources, passwords and
users. Export to pdf and email
Audit Filters
Create Filters to view only those audit
records that are of interest
Audit Notification
Choose to send/receive notification on
the occurrence of desired audit events
Reports
Intuitive reports on password inventory,
compliance, expiry, resource and user
activity. Print reports, export to pdf and
email
Dashboard
Password and user dashboard providing
a snapshot on password management
activities
Backup for
Disaster Recovery
Setup backup of the PMP database for
disaster recovery purposes
High Availability
setup redundant PMP servers to provide
high availability of PMP application
Re-brand
Use your own logo in the PMP user
interface
General Settings
Switch on and off various features on
need basis
Manage
Encryption Key
Store PMP's encryption key in a desired
location for additional security
AdventNet, Inc.
24
AdventNet ManageEngine PasswordManager Pro :: Help Documentation
User Management
User Management
As PMP serves as a repository for the sensitive passwords, fine-grained access
restrictions are critical for the secure usage of the product. PMP provides role-based
access control to achieve this.
In practical applications, information stored in PMP will have to be shared among
multiple users. By default, PMP comes with four pre-defined roles •
Administrators set up, configure and manage the PMP application and can
perform all the resource and password related operations. However, they can
view only those resources and passwords that were created by them and the ones
shared to them by other users.
•
Password Administrators can perform all resource and password related
operations. However, they can view only those resources and passwords that
were created by them and the ones shared to them by other users
•
An administrator/Password Administrator can be made as a 'Super
Administrator' by other administrators (and not by himself). Super
Administrator will have the privilege to manage all the resources added in the
system by all. (To know how to make an administrator or a password
administrator as super administrator, click here)
•
Password Users can only view passwords that are shared to them by the
Administrators or Password Administrators. They can modify passwords if the
sharing permission allows them to do so
•
Password Auditors have the same privileges as Password Users and in addition
they have access to audit records and reports
Role
Operations
Manage
Users
Manage
Resources
Manage
Passwords
View
Passwords
Managing
Personal
Passwords
View
Audit &
Reports
Administrator
Password
Administrator
Password
User
Password
Auditor
Irrespective of the role, the personal passwords remain exclusive to the individual user and other
users have no control over them.
AdventNet, Inc.
25
AdventNet ManageEngine PasswordManager Pro :: Help Documentation
You can create as many users as you desire and define appropriate roles for the user.
This section explains how to create users and assign roles for them.
Adding New Users
Note: User Addition can be done only by the Administrators.
From the Users tab, administrators can
View all the existing PMP users
Create new users
Edit the access role of the user
New users can be added in four ways
•
•
•
•
Adding users manually
Importing users from Active Directory
Importing users from LDAP
Importing users list from a CSV file
By default, PMP stores all user data in the MySQL database and performs authentication
using database lookups. When you integrate AD/LDAP as the authentication system, the
default authentication of PMP would be replaced by AD or LDAP to authenticate a user's
identity. At any point of time, only one mode of authentication could be employed in
PMP.
AdventNet, Inc.
26
AdventNet ManageEngine PasswordManager Pro :: Help Documentation
Adding Users Manually
•
•
•
•
•
•
•
•
•
•
Click "Add User" button in "Admin >> Users" tab
In the "Add User" UI that opens up, enter the 'First Name' and 'Last Name' of
the user to be added against the respective text fields. These entries are
mandatory
Enter the desired login name against the text filed "User Name". This entry is also
mandatory and it should be unique
Enter the E-Mail id of the user. It is to this id, the login password for that user will
be mailed
Select an appropriate access level - Administrator/Password
Administrator/Password User
If you are adding a user as "Administrator" or "Password Administrator", you can
specify the 'Access Scope'. If you select the option, "Passwords Owned and
Shared", the administrator/password administrator will be able to view the
passwords owned by them and those shared to them by others. You can choose
to make the administrator/password administrator a super administrator, you
need to select the option "All Passwords in the System". When you do so, the
administrator or the password administrator will be able to access all passwords
in PMP without any restriction.
Select the required password policy. Based on this policy, login password will be
generated and sent to the user
Enter the department to which the user belongs (optional)
Enter the location of the user. This would be helpful for future reference
(optional)
Click "Save". The required user with desired access restriction has been created
AdventNet, Inc.
27
AdventNet ManageEngine PasswordManager Pro :: Help Documentation
Integrating Active Directory & Importing Users
PMP provides the option to integrate with Active Directory in your environment and
import users from there. Users who have logged into the Windows system using their
domain account can be allowed to login to PMP directly (without separate PMP login).
There are four steps involved in completing the process of importing users from AD and
assigning them necessary roles and permissions in PMP. Follow the three steps detailed
below:
Step 1 - Importing Users
The first step is to provide credential details and importing users from AD. PMP
automatically gets the list of the domains present under the "Microsoft Windows
Network" folder of the server of which the running PMP is part of. You need to select the
required domain and provide domain controller credentials.
To do this,
•
•
•
Go to "Admin" tab and click "Active Directory"
Go to Step 1 and click the button "Import Now"
Alternatively, you can also access this from "Admin >> Users >> Import from
AD" button
In the UI that pops-up,
1. Select the required Domain Name, which forms part of the AD from the dropdown
2. Specify the DNS name of the domain controller. This domain controller will be the
primary domain controller
3. In case, the primary domain controller is down, secondary domain
controllers can be used. If you have secondary domain controllers, specify their
DNS names in comma separated form. One of the available secondary domain
controllers will be used. When you use SSL mode make sure the DNS name
specified here matches the CN (common name) specified in the SSL certificate for
the domain controller
4. Enter a valid user credential (user name and password) having read permission in
the domain controller
5. For each domain, you can configure if the connection should be over an encrypted
channel for all communication. To enable the SSL mode, the domain controller
should be serving over SSL in port 636 and you will have to import the domain
controller's root certificate into the PMP server machine's certificate.
As mentioned above, to enable SSL mode, the domain controller should be
serving over SSL in port 636. If the certificate of the domain controller is
not signed by a certified CA, you will have to manually import the
certificate into the PMP server machine's certificate store. You need to
import all the certificates that are present in the respective root certificate
chain - that is the certificate of the PMP server machine and intermediate
certificates, if any.
AdventNet, Inc.
28
AdventNet ManageEngine PasswordManager Pro :: Help Documentation
To import domain controller's certificate into PMP machine's
certificate store: (you can use any procedure that you
normally use to import the SSL certificates to the machine's
certificate store. One example is given below)
•
•
•
•
•
•
•
•
•
In the machine where PMP is installed, launch Internet
Explorer and navigate to Tools >> Internet Options >>
Content >> Certificates
Click "Import"
Browse and locate the root certificate issue by your CA
Click "Next" and choose the option "Automatically select
the certificate store based on the type of certificate"
and install
Again click "Import"
Browse and locate the domain controller certificate
Click "Next" and choose the option "Automatically select
the certificate store based on the type of certificate"
and install
Apply the changes and close the wizard
Repeat the procedure to install other certificates in the root
chain
PMP server can now communicate with this particular domain
controller over SSL. Repeat these steps for all domain controllers to
which you want PMP to communicate over SSL. Note that the DNS
name you specify for the domain controller should match the CN
(common name) specified in the SSL certificate for the domain
controller.
5. By default, PMP imports all the users from AD. If you want to import only a
particular user, enter the required user name(s) in comma separated form
6. Similarly, you can choose to import only specific user groups or OUs from the
domain. You can specify the names in the respective text fields in comma
separated form
7. Whenever new users get added to the AD, there is provision to automatically add
them to PMP and keep the user database in sync. Enter the time interval at which
PMP has to query the AD to keep the user database in sync. The time interval
could be as low as a minute or it can be in the range of hours/days.
8. Click "Save". Soon after hitting this "Save" button, PMP will start adding all users
from the selected domain. During subsequent imports, only the new users entries
in AD are added to the local database
9. In the case of importing organizational units (OUs) and AD groups, user groups
are automatically created with the name of the corresponding OU / AD group.
10. During import, every user will be notified through email about their account,
along with a password that will be used to login to PMP when AD authentication is
disabled. If you want to disable email notification, you can do so from General
Settings.
•
What will be role of the users imported from AD, in PMP?
The users added to the PMP database will have the role as "Password
Users". If you want to assign specific roles to specific users, proceed
with Step 2 below.
AdventNet, Inc.
29
AdventNet ManageEngine PasswordManager Pro :: Help Documentation
•
Can I handle both AD and non-AD permissions to login to
PMP?
Yes. You can use both your AD and local (non-AD) passwords to login
to the application. The choice can be made in the GUI login screen
itself.
•
How to verify if user/user group synchronization had taken
place in AD?
The synchronization happens as a scheduled task. You can check
Audit >> Task Audit for details. You can also choose to receive
notifications whenever the synchronization happens. Refer to 'Task
Audit' section for details. Alternatively, you can also click the button
"View Synchronization Schedules" present in Step 1. The status of
synchronization will be displayed there.
Step 2 - Assigning Roles
All the users imported from AD will be assigned the 'Password User' role by default. To
assign specific roles to specific users,
•
•
•
•
Go to Step 2 in the UI (Admin >> Active Directory) and click the button "Assign
Roles Now"
In the UI that opens, all the Users imported from AD are shown in the LHS under
the column "Password Users"
Select the users for whom you wish to change the role and use the appropriate
arrow button to assign them the role of "Pocassword Administrator" or "Password
User"
Click "Save" and the required roles are set for the users
Step 3
- Enabling Authentication
The third step is to enable AD authentication. This will allow your users to use their AD
domain password to login to PMP. Note that this scheme will work only for users who
have been already imported to the local database from AD.
Note: Make sure you have at least one user with the 'Administrator' role, among
the users imported from AD.
Step 4 - Enabling Single SignOn
Users who have logged into the Windows system using their domain account need not
separately sign in to PasswordManager Pro, if this setting is enabled. For this to work,
AD authentication should be enabled and the corresponding domain user account should
have been imported into PMP.
The IE browser supports this by default and follow the instructions below to get this
working in Firefox:
AdventNet, Inc.
30
AdventNet ManageEngine PasswordManager Pro :: Help Documentation
•
•
•
•
•
Open a Firefox browser and enter the URL about:config and hit "Enter".
You will see a big list of settings
In the filter, type "ntlm" to look for the setting "network.automatic-ntlmauth.trusted-uris". Double click that entry and enter PMP server url in the text
field (https://<PMP Server Host Name>:<port>)
Then look for the setting "network.ntlm.send-lm-response"
Double click the entry to change it from its default setting of "False" to "True"
AdventNet, Inc.
31
AdventNet ManageEngine PasswordManager Pro :: Help Documentation
Integrating LDAP & Importing Users
You can make PMP to work with a LDAP compliant directory (like Active Directory) in
your environment, by following the steps explained below. Note that these steps can be
performed in any order, but on the first time it is recommended to follow them in the
sequence as given below.
Step 1 - Import Users
The first step is to provide credential details and importing users from LDAP.
To do this,
•
•
•
•
Go to "Admin" tab
Click "LDAP"
Go to Step 1 in the UI and click the button "Import Now"
Alternatively, you can also access this from "Admin >> Users >> Import from
LDAP" button
In the UI that pops-up,
1. You can configure the connection between LDAP Server and PMP to be over an
encrypted channel (SSL) or Non-SSL. If you choose, SSL mode, do the following.
Otherwise, proceed to Step 2.
To enable the SSL mode, the LDAP server should be serving over SSL in port 636
and you will have to import the LDAP server's root certificate, LDAP server's
certificate and all other certificates that are present in the respective root
certificate chain into the PMP server machine's certificate store.
To import certificates, open a command prompt and navigate to
<PMP_SERVER_HOME>\bin directory and execute the following command:
For Windows
importLDAPCert.bat <Absolute Path of certificate>
For Linux
importLDAPCert.sh <Absolute Path of certificate>
Restart PMP server. Then continue with the following steps.
2. Enter the url of the LDAP provider in the format attribute://ldap server host:port
(Example ldap://192.168.4.83:389/)
3. Enter the credentials of any one of the user already present in LDAP for
authentication. It should be in the format exactly how the user would have
submitted their username when authenticating to your application. For example,
a typical entry would look something like: cn=Eric,o=adventnet,c=com
4. Enter the password of the user
AdventNet, Inc.
32
AdventNet ManageEngine PasswordManager Pro :: Help Documentation
5. This is the 'base' or 'root' from where directory lookups should take place. Enter
the LDAP base (top level of the LDAP directory tree). Enter it exactly in the
format used in your LDAP. No spaces are allowed between the commas or the '='
equal symbol and that entries are case sensitive
6. If you want to add only specific users from your LDAP directory, just perform a
search using the appropriate search filter. For example, for adding only those
users who belong to the category "Managers", a typical search filter would be
like: ou=Managers,ou=Groups,o=adventnet,c=com
7. Select your LDAP server type
Microsoft Active Directory (or)
Novell eDirectory (or)
OpenLDAP (or)
Others
8. If your LDAP server belongs to the type Microsoft Active Directory/Novell
eDirectory/OpenLDAP, you can select that type and click "Save".
If your LDAP server belongs to types other than Microsoft Active
Directory/Novell eDirectory/OpenLDAP
If your LDAP server belongs to types other than Microsoft Active Directory/Novell
eDirectory/OpenLDAP, yon need to enter three more details to authenticate the users:
•
Enter the user login attribute in your LDAP structure in the text field for "Login
Attribute". For instance, for LDAP making use of AD, the entry would be
"sAMAccountName" and for OpenLDAP, the entry would be "uid". If you are using
any other LDAP, make this entry in accordance with your LDAP structure.
•
Enter the e-mail attribute for the users in your LDAP structure in the text field for
"Mail Attribute". For instance, for LDAP making use of AD, the entry would be
"mail". If you are using any other LDAP, make this entry in accordance with your
LDAP structure.
•
Enter the distinguished name attribute - that is the LDAP attribute that uniquely
defines this object. For instance, for LDAP making use of AD, the entry would be
"distinguishedName" and for OpenLDAP, the entry would be "dn". If you are using
any other LDAP, make this entry in accordance with your LDAP structure.
•
Click "Import". Soon after hitting this "Save" button, PMP will start adding all
users from LDAP. During subsequent imports only the new users entries in LDAP
are added to the local database. During import, every user will be notified
through email about their account, along with a password that will be used to
login to PMP when LDAP authentication is disabled.
•
What will be role of the users imported from LDAP, in PMP?
The users added to the PMP database will have the role as "Password
Users". If you want to assign specific roles to specific users, proceed with
Step 2 below.
AdventNet, Inc.
33
AdventNet ManageEngine PasswordManager Pro :: Help Documentation
Step 2 - Assign Roles
All the users imported from LDAP will be assigned the 'Password User' role by default. To
assign specific roles to specific users,
•
•
•
•
Go to Step 2 in the UI (Admin >> LDAP) and click the button "Assign Roles Now"
In the UI that opens, all the Users imported from LDAP are shown in the LHS
under the column "Password Users"
Select the users for whom you wish to change the role and use the appropriate
arrow button to assign them the role of "Password Administrator" or "Password
User"
Click "Save" and the required roles are set for the users
Step 3 - Enable Authentication
The final step is to enable LDAP authentication. This will allow your users to use their
LDAP directory password to login to PMP. Note that this scheme will work only for users
who have been already imported to the local database from AD.
Note: Make sure you have at least one user with the 'Administrator' role, among
the users imported from LDAP.
AdventNet, Inc.
34
AdventNet ManageEngine PasswordManager Pro :: Help Documentation
Importing Users from a CSV file
If you have the list of users in a text file, you can import the same to PMP database. All
the lines in the CSV file should be consistent and have the same number of fields. CSV
files having extensions .txt and .csv are allowed.
To import users from a CSV file,
•
•
•
•
•
Go to "Admin" >> "Users" >> "Import from CSV"
Browse and select the file and click "Next"
The user inventory of PMP contains six fields by default - First Name, Last Name,
User Name, Email Address, Department and Location. Of these six, the first four
fields are mandatory. In your CSV file, the entries could be present in any order.
You can choose which field in the CSV file maps to the corresponding attribute of
the PMP user account
Click "Finish"
The result of every line imported will be logged as an audit record. For
troubleshooting errors during import, refer to the log file in the location
<PMP_Home>\logs\user_import_errors.txt
AdventNet, Inc.
35
AdventNet ManageEngine PasswordManager Pro :: Help Documentation
Editing Users
You can edit the details pertaining to existing list of users to change details such as
email id, access level, password policy, department and location.
To edit users,
Go to "Admin" tab and click "Users"
The list of users will be displayed
•
•
•
Click the "Edit" button present against the user. In the UI that pops-up, you can
edit the first name, last name, mail id, access level, password policy, department
and location of the user
You can change 'Access Scope' to make an administrator/password administrator,
a super administrator by choosing the option "All Passwords in the system".
Conversely, a super administrator can be changed to his earlier role of
administrator/password administrator by choosing the option "Passwords owned
and shared".
Click "Save" to give effect to the changes
Important Note: While changing the access levels/ access scope, the following
rule would be applied:
If you are an Administrator, you will not be allowed to change your access level or
scope (that means, the currently logged in administrator's access level cannot be
changed). You will have to request another administrator to do the change.
Deleting Users
Administrators can delete those users who are no longer required. The delete operation
is a permanent one and cannot be reverted.
Important Note:
(1) PMP will allow to delete users only if the user/users do not own any resource.
If the user(s) own any resource, you need to first transfer the ownership of all the
resources to some other Password Administrator.
(2) Currently logged-in user will not be permitted to delete himself/herself
To delete a user or users,
•
•
•
Go to "Admin >> Users" tab
Select the user/Users and click "Delete Users". The user will be deleted from the
database once and for all
Since the resources owned by the user have been transferred to other users prior
to deletion, there will not be any loss of enterprise data. However, all the
personal data stored by the user will be deleted once and for all. The audit trails
will clearly capture all these changes and deletion. The audit trails depicting the
activities of the user will remain unaffected in the database even after deleting
the user. Audit trails will not be deleted.
AdventNet, Inc.
36
AdventNet ManageEngine PasswordManager Pro :: Help Documentation
How to delete the in-built 'admin' user?
Before proceeding to delete the admin user, check if the admin user owns any resources.
If so, the resources should be transferred to another administrator/password
administrator.
•
•
•
•
•
Go to "Admin >> Users" tab
Transfer all the resources owned by 'admin' to another administrator/password
administrator
If you have logged-in as the 'admin' user who has to be deleted, you will not be
permitted to delete (currently logged-in user cannot be deleted)
Place a request to some other administrator (other than the one to be deleted) to
delete the 'admin' user.
The above procedure holds good for deleting any user with the role
administrator/password administrator
AdventNet, Inc.
37
AdventNet ManageEngine PasswordManager Pro :: Help Documentation
User Groups
Users can be grouped together for easier management. User grouping helps in carrying
out operations in bulk on all the resources of the group. The resources added to PMP can
be assigned to a user group.
To add user groups,
•
•
Go to "Admin >> Users" tab in the web interface
Click "User Groups" tab (alternatively, you can launch this page directly through
the "User Groups" link in the "Links" tab)
In the Add User Group UI that opens,
•
•
•
•
Enter a name for the user group
Provide a description about the group being created. This would be helpful for
future reference.
From the list of users, search & select the ones to be added to the group. Click
to search for specific users
the icon
Click "Save". The required group is created
What happens for a new user who gets added to an already existing
group?
The new user will become part of that group and automatically inherit all the
properties and permission levels of the group.
Importing User Groups from AD
You can import specific user groups and OUs from the active directory and retain the
same user group structure in PMP. You can even choose to synchronize the user group
structure in PMP with that of AD at periodic intervals. Refer to the section integrating
active directory for more details.
Settings for User Groups
In order to achieve high level of security, PMP provides the option to configure the
following settings for user groups:
Include passwords when resource details are exported to CSV format
When one exports PMP resources to a CSV file, by default, password of the accounts are
included in plain text. In case, for security reasons, you wish not to allow the members
of a user group to export passwords during resource import, you can do so from the
group level setting:
•
•
•
•
Go to Links >> Groups >> User Groups tab
Click the icon "Settings" present against the required group
Uncheck the checkbox against the field "Include passwords when resource
details are exported to CSV format"
Click "Save"
AdventNet, Inc.
38
AdventNet ManageEngine PasswordManager Pro :: Help Documentation
Allow to manage personal passwords
PMP provides personal password management feature as a value addition to individual
users to manage their personal passwords such as credit card PIN numbers, bank
accounts etc while using the software for enterprise password management. The
personal password management belongs exclusively to the individual users. For security
reasons, if you do not wish to allow personal password management for a group of PMP
users, you can do so from the setting as explained below. Once you do this, the
'Personal' tab will not appear in the PMP GUI for all the members of that particular
group.
•
•
•
•
Go to "Links >> Groups >> User Groups" tab
Click the icon "Settings" present against the required group
Uncheck the checkbox against the field "Allow to manage personal passwords"
Click "Save"
Allow to export personal passwords
PMP provides the option for users to export their personal passwords. For security
reasons, if you do not wish to allow export of personal passwords for a group of PMP
users, you can do so from the setting as explained below.
•
•
•
•
Go to Links >> Groups >> User Groups tab
Click the icon "Settings" present against the required group
Uncheck the checkbox against the field "Allow to export personal passwords"
Click "Save"
Managing User Groups
Editing a User Group - Adding new users to the group, deleting existing users
from the group
You can edit an existing user group to add more users to the group or remove existing
users. To edit a user group,
•
•
•
•
Go to Links >> Groups >> User Groups tab
Click the icon "Edit" present against the required group
All the users present in the system are listed in the GUI. The users who are
already part of the group are shown selected (checkbox). If you want to add
new users to the group, select the user. On the other hand, if you want to
delete an existing user, uncheck the checkbox.
Click "Save"
Deleting User Group
You can delete an existing user group in PMP. When you do so, the group will no longer
exist. The group level settings done for that group will no longer apply for the users who
were members of that group. Deletion of user group will not have any impact on the
resources stored in PMP. The resource shares done for the group will vanish.
To delete a user group,
•
•
Go to Links >> Groups >> User Groups tab
Click the icon "Delete" present against the required group
AdventNet, Inc.
39
AdventNet ManageEngine PasswordManager Pro :: Help Documentation
Resource Management
Adding Resources
The first step to get started with Password Management in PMP is adding your "resource"
to the PMP database.
To add your resource,
Addition of resources to be managed in your setup falls under three steps. The first steps
involves entering details about the resource such as its name, its DNS Name/IP, type,
location etc. The second step
Step 1: Adding Resource Details
•
•
•
•
•
Go to "Resources" tab in the web interface
Click the "Add Resource" link
In the UI that opens, enter the name of the resource in the text field against
"Resource Name". The resource name is the one that uniquely identifies the
resource in the PMP database. This field is mandatory
Enter the DNS Name/IP Address of the resource against "DNS Name/IP Address".
The DNS name or the IP address is used during password changes made to the
resource. This field is optional. However, if you want to enable remote password
synchronization, this is mandatory.
Enter the type of the resource against the text field "Resource Type". For
example, if you are adding a server, you can specify its type - Windows/Windows
Domain/Linux/Mac/Soalris/HP UNIX/IBM AIX/MS SQL Server/ MySQL server/
Oracle DB Server/ Sybase ASE/ HP ProCurve/ Cisco IOS/ Cisco CatOS/ Cisco PIX/
File Store/ Key Store/ License Store. Based on your requirements and the nature
of your resource, you can add any custom type by clicking the link "Add New".
PMP provides the option to store digital files, certificates, images and documents
too. In that case, you need to choose the Resource Type as explained below:
Storing Digital Certificates, Licence Keys, Files, Documents, Images etc.
Different file types could be securely stored in the PMP repository along with
the passwords. To store a license key or a certificate or a document etc. you
need to select the 'Resource Type' as explained below:
By default, PMP supports the following file stores:
Certificate store: to store any private / public keys, digital certificates and
digital signature files
License key store: to store any software license keys
File store: to store any digital content (documents, pictures, executables
etc)
You can create any new resource type as pert your requirements.
Resources of the above types are managed and shared the same way as
other resources. During retrieval, a link to the file is provided for it to be
saved locally to the disc.
AdventNet, Inc.
40
AdventNet ManageEngine PasswordManager Pro :: Help Documentation
•
•
•
•
•
If you already have resource groups and if you wish to make the resource you are
adding as part of a group, select the "Group Name". Otherwise, leave this column
with default value
Provide a description for the resource addition. This will be helpful for reference at
a future point of time
In case, the resource belongs to type 'Windows Domain', enter the domain name.
This is needed if you wish to use Windows Service Account Reset feature
Fill-in details such as "Department" and "Location" of the resource (if applicable)
If you want to access the resource being added over the web, you can specify the
URL for the same. You can even specify the user name and password in the URL
to directly login to the resource. For security reasons, PMP provides the option for
using place holders to avoid the usage of user name, password etc in plain text in
the URL. At the time of URL invocation, PMP replaces the respective data for the
placeholders and submits the data by 'POST' method. Nowhere during the URL
invocation, the password will be visible to the users. The following four place
holders are allowed: %RESOURCE_NAME%, %DNS_NAME%,
%ACCOUNT_NAME% and %PASSWORD%
Examples for using the place holders in the URL:
(1) Assume that you have a resource named 'abc' and on typing the resource
name in the browser as http://abc you can access an application. In this case,
you can enter the resource url with placeholder as shown below:
http://%RESOURCE_NAME%
(2) Assume you have an application running on port 7272 and you can access it
through the DNS name of the host where it runs. You can make use of the
placeholder and construct the URL as below:
https://%DNS_NAME%:7272
In case, you wish to supply the username and password for the application and
directly login to the resource, you can construct the URL as below:
https://%DNS_NAME%:7272/j_security_check?j_username=%ACCOUNT_NAME
%&j_password=%PASSWORD%&domainName=LOCAL
•
Select the required 'Password Policy' - Strong, Medium or Low. Apart from the
default policies, you can create more custom policies based on your needs.
Selection of the required policy is crucial because, when administrators try to
change the passwords of the accounts that are part of this resource, this policy
would be enforced. The chosen password policy is applied to passwords of all the
accounts of this resource by the password generator.
•
What is the need for Password Policy field here?
This question naturally arises when you are in the process of adding a
resource. The following example would provide the answer: If your intention
is to have accounts with strong passwords, others with admin privileges
should not disturb this intention while changing the password. So, this step
is crucial though it does not have a direct bearing on resource addition.
AdventNet, Inc.
41
AdventNet ManageEngine PasswordManager Pro :: Help Documentation
•
Can I add my own custom fields for resources?
Yes, you can. You can have up to 20 additional custom fields to resources.
To add a custom field, go to "Resources" tab and click the button
"Customize Resource" in the drop-down under "More Actions"
1. Character/list - for text inputs
2. Numeric - to store numeric inputs
3. Password - to store password inputs. The values entered here, will
not be echoed in the GUI. Additionally, Password Generator icon will
be present beside it to help generate
4. Date & Time - to store date and time inputs
•
Can others see the resources added by me?
Except super administrators (if configured in your PMP set up), no one,
including admin users will be able to see the resources added by you. Apart
from this, if you decide to share your resources with other administrators,
they will be able to see tham.
Step 2: Adding Account Details - (User Account & Password to be
Managed)
The second step is to add the user accounts and their passwords of this resource that
are to be shared between multiple users. Notes can be added to each account.
Important Note:
If you want to enable password reset in remote systems, make sure that the
passwords you enter in this step and the ones in the actual target systems are the
same. PMP uses these credentials to login to the target systems and do the
password reset and if the passwords are wrong, the password reset will not
happen.
•
•
•
•
•
•
•
In the text field for "User Account", enter the user name of the particular account
being added. This field is mandatory
In the text field for "Password", enter the password of the account. This field is
mandatory. If you have set a 'Password Policy' during the previous step, you need
to enter your password only in accordance with the specified policy. For example,
if you have set 'Strong' as the policy, the password entered here should comply
to that. If you do not want to enforce the policy here, change the setting through
"General Settings"
Confirm the password
Enter description about the account being added in the "Notes" column. This
would help in properly identifying a particular account in future
In case, the resource belongs to type 'Windows Domain', you can choose to use
Windows Service Account Reset feature (refer to this link for more details on this)
The account added until now are listed in the table below
Within one resource, one might have many accounts - for example, consider
managing the passwords of a linux server. There will be many user accounts for
the server such as root, guest and so on. For a single resource, you can add as
many accounts and passwords as present in the resource. If you have multiple
accounts for the resource, repeat the above procedure
AdventNet, Inc.
42
AdventNet ManageEngine PasswordManager Pro :: Help Documentation
•
•
If your resource type belongs to Windows, Linux, Windows Domain, IBM AIX, HP
UNIX, Solaris, Mac OS, MS SQL Server, MySQL server, Oracle DB Server/ Sybase
ASE/ HP ProCurve, Cisco IOS, Cisco CatOS, Cisco PIX and if you require remote
password synchronization, click "Next";
Otherwise, click "Finish" to complete the resource addition process
•
Can I add my own custom fields for accounts?
Yes, you can. You can have up to 20 additional custom fields to accounts.
To add a custom field, traverse to "Admin >> Customize >> Accounts Additional Fields". Your additional fields can be in any of the following four
formats 1. Character/list - for text inputs
2. Numeric - to store numeric inputs
3. Password - to store password inputs. The values entered here, will
not be echoed in the GUI. Additionally, Password Generator icon will
be present beside it to help generate
4. Date & Time - to store date and time inputs
The required user name and password have now been added to the PMP repository.
Users who are authorized to access the resource, will be able to view the information.
Step 3: Remote Password Synchronization
(Feature available only in Premium Edition)
PMP provides the option to remotely change the password of select resources. As of now,
this facility is available for changing the password of only those resources that belong to
the type Windows, Windows Domain, Linux, IBM AIX, HP UNIX, Solaris, Mac OS, MS SQL
server, MySQL server, Oracle DB Server, Sybase ASE, HP ProCurve and Cisco Devices
(IOS, CatOS, PIX). Using this utility, you can change the password of a server present in
a remote location, from the PMP web interface itself.
You can avail this facility in two ways:
•
•
By deploying PMP agents in the remote location
Without deploying agents
If the remote resource has restrictions such as a firewall, you would require deployment
of agents. Otherwise, you can do password synchronization without deploying agents.
You may proceed with Step 3 only if you intend to do password synchronization without
deploying agents. You need to specify the credentials to be used to login to the resource
and effect the changes. For Windows domain controller, Linux, IBM AIX, HP UNIX,
Solaris, Mac OS, MS SQL server, MySQL server, Oracle DB Server, Sybase ASE, HP
ProCurve and Cisco Devices (IOS, CatOS, PIX) specify the accounts that will be used to
login from remote to perform password reset. For other type of resources this step is not
applicable.
AdventNet, Inc.
43
AdventNet ManageEngine PasswordManager Pro :: Help Documentation
Specifying credentials & enabling remote synchronization for
different resource types
Resource
Type
Reset Credentials Requirement
Windows
(applies to
Windows 2000,
Windows 2003,
Windows XP
and Windows
Vista servers
and desktops)
& Windows
Domain
•
Linux / IBM
AIX, HP UNIX,
Solaris, Mac OS
For remote password reset of Unix resources, PMP first uses the
remote login account to login to the target system. Then, to carry
out password reset, privilege elevation is needed. PMP can either 'su'
as root or use 'sudo' to execute the remote password reset
commands (if the target system supports execution of password
reset commands through 'sudo)'.
•
•
•
For resetting the passwords of the local user accounts, choosing
the administrator account in this step is not mandatory.
If you want to reset service account passwords of services
running in this Windows resource, specify the local
Administrator account, which will be used to login into the
machine and perform the password reset
If the PMP service is run with domain administrator privilege,
PMP will be able to change the passwords of all the local
accounts in the computer (present in the domain) without the
need for supplying the old password
Click "Finish"
In this process, the following steps are involved:
1. Selecting the protocol
2. Selecting the authentication method for remote login based
on the protocol chosen and specifying the remote login
account
3. Specifying the root account if PMP has to use 'su' / selecting
'sudo'
Step 1 - Selecting the Protocol
•
Select the protocol for remote login - ssh or telnet and then
select the remote login account and root account. If you have
chosen telnet, you can go to step 3.
Step 2 - If you opt for SSH, specify the authentication method
•
If you opt for SSH, you have the option to use either
"Password Authentication" or "Public Key Infrastructure"
(PKI) Authentication.
If you choose PKI authentication, you need to select the
remote login account as explained below:
The public key would be present under the remote system
under a specific remote login account. Typically, it would be
available under $Home/.ssh folder. Select the remote login
account for which the public key is present. Also, PMP
supports SSH2 and above only.
Then browse and supply the corresponding Private Key.
AdventNet, Inc.
44
AdventNet ManageEngine PasswordManager Pro :: Help Documentation
Resource
Type
Reset Credentials Requirement
Step 3 - Specifying the root account / selecting 'sudo'
•
•
•
•
MySQL Server
Resource Type
As mentioned above, for executing remote password reset
commands, PMP can either 'su' as root or use 'sudo', which
allows the user to run the command with root privileges
without having to switch to the root account.
If you use the option, 'su' as root, you need to select the root
account
If the target system allows execution of password reset
commands through 'sudo', you can select that option
Click "Finish"
Password reset for MySQL server is done over JDBC. So, the MySQL
Administrator credentials are required. You can enable remote reset
of the password of MySQL server as below:
1. Specify the port where the MySQL server is running. By
default, MySQL occupies the port 3306
2. Specify the connection mode - you can configure the
connection between MySQL Server and PMP to be over an
encrypted channel (SSL) or Non-SSL. If you choose SSL
mode, do the following. Otherwise, proceed to Step 3.
To enable the SSL mode, the MySQL server should be serving
over SSL and you will have to import the MySQL server's root
certificate into the PMP server machine's certificate store. You
need to import all the certificates that are present in the
respective root certificate chain - that is the certificate of the
PMP server machine and intermediate certificates, if any.
To import root certificate, open a command prompt and
navigate to <PMP_SERVER_HOME>\bin directory and execute
the following command:
For Windows
importCert.bat <Absolute Path of certificate>
For Linux
importCert.sh <Absolute Path of certificate>
Restart PMP server. Then continue with the following steps.
3. To enable PMP access the MySQL server, provide MySQL
Root Account Name
4. Click "Finish"
AdventNet, Inc.
45
AdventNet ManageEngine PasswordManager Pro :: Help Documentation
Resource
Type
Reset Credentials Requirement
MS SQL Server
Resource Type
Password reset for MS SQL server is done over JDBC. So, either a
domain account credential having enough privileges to modify SQL
server passwords or the MS SQL Administrator credential are
required. You can enable remote reset of the password of MS SQL
server as below:
1. Specify the port where the MS SQL server is running. By
default, MS SQL occupies the port 1433
2. Specify the connection mode - you can configure the
connection between MS SQL Server and PMP to be over an
encrypted channel (SSL) or Non-SSL. If you choose SSL
mode, do the following. Otherwise, proceed to Step 3.
To enable the SSL mode, the MS SQL server should be
serving over SSL and you will have to import the MS SQL
server's root certificate into the PMP server machine's
certificate store. You need to import all the certificates that
are present in the respective root certificate chain - that is
the certificate of the PMP server machine and intermediate
certificates, if any.
To import root certificate, open a command prompt and
navigate to <PMP_SERVER_HOME>\bin directory and execute
the following command:
For Windows
importCert.bat <Absolute Path of certificate>
For Linux
importCert.sh <Absolute Path of certificate>
Restart PMP server. Then continue with the following steps.
3. To enable PMP access the MS SQL server, provide any one of
the following details 1. Windows Authentication details - that is specifying
the domain name of which the MS SQL server is a part
and then selecting any one user username present in
the domain (OR)
2. MS SQL Administrator Account
4. Click "Finish"
For Oracle DB
Server
To carry out password reset for Oracle DB server, administrative
privileges are required. So, an administrator account has to be
specified. You can enable remote reset of the password of Oracle DB
server as below:
1. Specify the Oracle DB Listener Port. By default, the Oracle DB
server listens to the port 1521
2. Specify the connection mode - you can configure the
connection between Oracle DB Server and PMP to be over an
encrypted channel (AES 256). If you choose the option 'YES'
(encrypted mode), do the following. Otherwise, proceed to
AdventNet, Inc.
46
AdventNet ManageEngine PasswordManager Pro :: Help Documentation
Resource
Type
Reset Credentials Requirement
Step 3.
• Start Oracle Net Manager
• In the Navigator window, select "Oracle Net
Configuration".
• Expand the option Local > Profile
• From the list in the right side pane, select the option
"Oracle Advanced Security"
• In the tabbed window that appears thereafter, click
the tab "Encryption"
• In the drop-down list for Encryption, select the option
"Server"
• For "Encryption Type" list, select the option
"Accepted"
• In the text-filed for 'Encryption Seed', enter random
characters numbering between 10 and 70. Or, it can
even be left blank
• Select the algorithm "AES 256"
• Specify an Oracle administrator account
3. Specify the Oracle Service Name. By default, the service
name is taken as ORCL
4. Click "Finish"
For Sybase ASE
Prerequisite:
•
•
jConnect 6.0 JDBC driver is required for the password reset.
The driver is a file named "jconn3.jar" will be available
under
<Sybase_Install_Directory>\jConnect_6_0\classes
folder (in Sybase ASE 15.0)
Copy the jconn3.jar and save it under
<PMP_Install_Directory>\lib folder (in the machine
running PMP server)
To carry out password reset for Sybase ASE, administrative
privileges are required. So, an administrator account has to be
specified. Steps for enabling remote password reset for Sybase ASE
are explained below:
1. Specify the Sybase ASE Port. By default, it occupies the port
5000 (in SSL mode, default port is 2748)
2. Specify the connection mode - you can configure the
connection between Sybase ASE and PMP to be over an
encrypted channel (SSL) or Non-SSL. If you choose SSL
mode, do the following. Otherwise, proceed to Step 3.
o If you want to enable SSL communication from PMP to
Sybase ASE
Copy and save the trust root certificate of the
Sybase server present under trust root
certificate will be present in
<SYBASE_HOME>\ASE-15_0\certificates
(in sybase ASE 15.0) to
<PMP_Install_Directoty>\conf\ folder
AdventNet, Inc.
47
AdventNet ManageEngine PasswordManager Pro :: Help Documentation
Resource
Type
Reset Credentials Requirement
Run this command to import the certificate in
PMP: '<PMP_HOME>\jre\bin\keytool.exe import -v -alias sybase -file <rootcert.txt>
-keystore server.keystore -keypass
passtrix -storepass passtrix -noprompt'
<rootcert.txt> is the root certificate of the
Sybase ASE and usually named as
<hostname>.txt
o Restart PMP server
3. Specify an administrator account of Sybase ASE
4. Click "Finish"
For HP
ProCurve
Devices
PMP requires Telnet or SSH service to be running in the resource.
Manager Account and Prompts of Manager Mode and Configuration
Mode are required for PMP to login to the resource. PMP will use the
configuration mode to reset the passwords. You can enable remote
reset of passwords of your Hp Pro Curve devices by providing the
following credentials:
Credential
Description
Remote
Login
Method
PMP supports SSH and TELNET protocols by which
connection could be established with the device for
password reset. Select the required protocol
Manager
Account
Login account for establishing connection with the
device. If the device is configured to prompt for
the user name, then check on the option 'Account
name required for login'. The account name
associated will then be used with the user name
prompt. If this option is unchecked, PMP will
expect only the password prompt.
Manger
Mode
Prompt
The prompt that appears after successful login
Configurat
ion Mode
Prompt
This is for entering into privileged mode to perform
password reset.
Copy
Password
Changes
to Startup
If you want the password changes made to the
running configuration from PMP to be applied to
the startup configuration, select this checkbox.
Exercise caution while enabling the option to copy
the running configuration to the startup
configuration, as it will cause the current
configuration content, including those made
outside of PMP, to be copied immediately.
AdventNet, Inc.
48
AdventNet ManageEngine PasswordManager Pro :: Help Documentation
Resource
Type
Reset Credentials Requirement
For Cisco
Devices
(IOS/CatOS/PI
X)
PMP requires Telnet or SSH service to be running in the resource.
Passwords of the enable mode and a user account are required for
PMP to login to the resource. PMP will use the configuration terminal
mode to reset the passwords. You can enable remote reset of
passwords of your cisco devices by providing the following
credentials:
Credential
Description
Remote
Login
Method
PMP supports SSH and TELNET protocols by which
connection could be established with the device for
password reset. Select the required protocol
Remote
Login
Account
Login account for establishing connection with the
device
User Mode
Prompt
The prompt that appears after successful login
Enable
Secret
This is for entering into privileged mode to perform
password reset. If the remote login account has
enough privileges to modify passwords, it is not
necessary to specify enable secret
Enable
Password
This is for entering into privileged mode to perform
password reset. If the remote login account has
enough privileges to modify passwords, it is not
necessary to specify enable password
Enable
Mode
Prompt
This is the prompt that will appear after going into
enable mode. For example, #
Account
name
required
for login
For the user and enable modes, if the device is
configured to prompt for the user name, then check
on the option 'Account name required for login'. The
account name associated will then be used with the
user name prompt. If this option is unchecked, PMP
will expect only the password prompt.
Configurati
on Mode
Prompt
To carry out any change to any feature/configuration
of the device, you need to enter configuration mode.
The prompt that will appear while going into
configuration mode has to be entered here. For
example, #Primary Credentials
Copy
Password
Changes to
Startup
If you want the password changes made to the
running configuration from PMP to be applied to the
startup configuration, select this checkbox. Exercise
caution while enabling the option to copy the running
configuration to the startup configuration, as it will
cause the current configuration content, including
those made outside of PMP, to be copied immediately.
AdventNet, Inc.
49
AdventNet ManageEngine PasswordManager Pro :: Help Documentation
Password Synchronization using PMP Agents
(Feature available only in Premium Edition)
PMP provides the option to remotely change the password of select resources by
deploying PMP agents. As of now, this facility is available for changing the password of
servers - Windows, Windows Domain and Linux alone. Using this utility, you can change
the password of a server present in a remote location, from the PMP web interface itself.
The agent could be used in target machines to which the PMP server can connect and
effect password changes. All password related communication is over HTTPS and is
secure. The agent is useful in cases when,
•
•
•
the PMP server runs in a Linux system and has to make password changes to
Windows resources
the required administrative credentials are not available in the PMP server to
make the password changes from remote
to change the password of domain accounts without the administrator credentials
of the domain controller
Downloading the PMP Agent
The PMP agent package is dynamically created by the PMP server to include the SSL
certificate of the PMP server, that is used for the HTTPS communication between the
server and the agent. So, the only place to download the agent is from the 'Admin' tab
of the PMP web GUI. The agent package is a zip file containing the necessary
executables, configuration files and the SSL certificate. Download the agent based on the
OS of the target and just unzip the package.
Installing the PMP Agent in Windows
The package has all the necessary configuration already created by the server.
Make sure the account in the system in which the agent is installed has sufficient
privileges required to modify passwords.
To install the PMP Agent as a Windows service,
o
o
Open a command prompt and navigate to the PMP agent installation
directory
Execute the command 'AgentInstaller.exe start'
To stop the agent and uninstall the Windows service,
o
o
Open a command prompt and navigate to the PMP agent installation
directory
Execute the command 'AgentInstaller.exe stop'
Configuring the port
The default port in which the agent listens to the triggers from the server for
password reset is 5768. To change this to a different value,
o
o
o
o
Go to the PMP agent installation directory
Open the file Agent.txt
Modify the parameter AgentPort to the value you require
Restart the agent service
AdventNet, Inc.
50
AdventNet ManageEngine PasswordManager Pro :: Help Documentation
Installing the PMP Agent in Linux
The package has all the necessary configuration already created by the server.
Make sure the account in the system in which the agent is installed has sufficient
privileges required to modify passwords.
To install the agent as service
Execute the command "sh installAgent-service.sh install" to install the
agent as service
To start the agent
Execute the command "sh installAgent-service.sh start"
To stop the agent
Execute the command "sh installAgent-service.sh stop"
To uninstall the agent as service
Use the command "sh installAgent-service.sh remove", in case you wish to
remove PMP Agent as service
Configuring the port
The default port in which the agent listens to the triggers from the server for
password reset is 5768. To change this to a different value,
o
o
o
o
Go to the PMP agent installation directory
Open the file Agent.txt
Modify the parameter AgentPort to the value you require
Restart the agent service
To remotely change the password,
•
•
•
Go to 'Resources' Tab
Click the name of the resource whose password has to be changed remotely
Click the "Change Password" icon
Troubleshooting
If the password changes do not take effect in the target systems, check
•
•
if the agent port is reachable from the server through a TCP connection (using
telnet)
if the account in which the agent is installed has sufficient privileges to make
password changes
AdventNet, Inc.
51
AdventNet ManageEngine PasswordManager Pro :: Help Documentation
Importing Resources
Importing Resources from Text File
You can import resource details from a CSV file using the import wizard. All the lines in
the CSV file should be consistent and have the same number of fields. CSV files having
extensions .txt and .csv are allowed.
To import users from a CSV file,
•
•
•
•
•
•
•
•
Go to "Resources" >> "More Actions" >> "Import Resources"
Browse and select the file and click "Next"
In your CSV file, the entries could be present in any order. You can choose which
field in the CSV file maps to the corresponding attribute of the PMP resource &
account. Both the default and the user defined attributes will be listed in the
wizard and the user defined attributes have been defined before the import
operation. If a resource contains multiple user accounts, then the resource fields
will have to be repeated for each user account in the CSV file
If you have resources with attributes that can not be placed in the CSV file (like
files for the File Store resource type), you can leave those entries blank in the
CSV file and later edit the resource and update the attribute value
Click "Finish"
The result of every line imported will be logged as an audit record. For
troubleshooting errors during import, refer to the log file in the location
<PMP_Home>\logs\pmp0.txt
Important Note: After importing resources, if you to configure password
synchronization with the target systems, you need to do it by editing resources.
Importing Resources takes time ...
When you try to import a large number of resources, it would take a while
to import all of them to PMP inventory. When the importing process is in
progress, you will notice the rotating gif at the RHS end. Once, it is done,
you will notice the message "Resources Imported Successfully".
•
My resources have additional fields ..
You can import the additional fields too. But, prior to importing the
resources, you need to add those custom fields to PMP.
•
I do not have some of the fields that are listed mandatory for PMP
in my CSV file..
That is not a problem. Only 'Resource Name' and 'Account Name' fields are
mandatory. So, you can import whatever you have.
Importing Resources from Active Directory
You can import the computers in your domain and the user accounts part of those
computers as resources in PMP.
AdventNet, Inc.
52
AdventNet ManageEngine PasswordManager Pro :: Help Documentation
To import resources from domain,
•
•
•
Go to "Resources" tab in the web interface
Click the link "Import from Domain" present in the drop-down of "More
Actions" button
'Import Resources from Active Directory' UI will open
The first step is to provide credential details and importing resources from AD. PMP
automatically discovers and lists all the Windows domains from the Windows domain
controller of which the running PMP is part of. You need to select the required domain
and provide domain controller credentials.
In the UI,
•
•
•
•
•
Select the required Domain Name from which the resources (computers) are to
be imported
Specify the DNS name of the domain controller. This domain controller will be the
primary domain controller.
In case, the primary domain controller is down, a secondary domain
controllers can be used. If you have secondary domain controllers, specify their
DNS names in comma separated form. One of the listed secondary domain
controllers will be used. When you use SSL mode make sure the DNS name
specified here matches the CN (common name) specified in the SSL certificate for
the domain controller
Enter a valid user credential (user name and password) having admin privilege or
the name of the user present in Domain Admins group
For each domain, you can configure if the connection should be over an encrypted
channel for all communication. To enable the SSL mode, the domain controller
should be serving over SSL in port 636 and you will have to import the domain
controller's root certificate into the PMP server machine's certificate.
As mentioned above, to enable SSL mode, the domain controller should be
serving over SSL in port 636. If the certificate of the domain controller is
not signed by a certified CA, you will have to manually import the
certificate into the PMP server machine's certificate store. You need to
import all the certificates that are present in the respective root certificate
chain - that is the certificate of the PMP server machine and intermediate
certificates, if any.
To import domain controller's certificate into PMP machine's
certificate store: (you can use any procedure that you
normally use to import the SSL certificates to the machine's
certificate store. One example is given below)
•
•
•
•
•
•
In the machine where PMP is installed, launch Internet
Explorer and navigate to Tools >> Internet Options >>
Content >> Certificates
Click "Import"
Browse and locate the root certificate issue by your CA
Click "Next" and choose the option "Automatically select
the certificate store based on the type of certificate"
and install
Again click "Import"
Browse and locate the domain controller certificate
AdventNet, Inc.
53
AdventNet ManageEngine PasswordManager Pro :: Help Documentation
•
•
•
Click "Next" and choose the option "Automatically select
the certificate store based on the type of certificate"
and install
Apply the changes and close the wizard
Repeat the procedure to install other certificates in the root
chain
PMP server can now communicate with this particular domain
controller over SSL. Repeat these steps for all domain controllers to
which you want PMP to communicate over SSL. Note that the DNS
name you specify for the domain controller should match the CN
(common name) specified in the SSL certificate for the domain
controller.
•
•
•
•
•
By default, PMP imports all the computers from AD. If you want to import only a
particular computer, enter the required user name(s) in comma separated form
Similarly, you can choose to import only specific resource groups (i.e. computer
groups) or OUs from the domain. You can specify the names in the respective
text fields in comma separated form. PMP resource groups will be created with
the name of the corresponding AD computer groups, prefixed by the domain
name.
Whenever new computers get added to the AD, there is provision to automatically
add them to PMP and keep the resource database in sync. Enter the time interval
at which PMP has to query the AD to keep the resource database in sync. The
time interval could be as low as minutes or it can be in the range of hours and
days
Click "Import". Soon after hitting this "Import" button, PMP will start adding all
computers
Important Note: After importing resources, if you to configure password
synchronization with the target systems, you need to do it by editing resources.
AdventNet, Inc.
54
AdventNet ManageEngine PasswordManager Pro :: Help Documentation
Editing Resources
At any point of time, you can edit any of properties of the resource added by you. To
edit a resource, go to the "Resources" tab and click the "Edit" icon present against the
resource name. In the UI that pops-up, edit the required property and click "Save". The
required change will get reflected in the view.
Note: When you edit a resource, the account details that are part of the resource
will remain unaffected.
Adding a new account to an existing Resource
You can add any number of user accounts to an already existing resource. To add an
account,
•
•
•
•
•
•
Go to "Resources" tab in the web interface
Click the particular resource to which you wish to add another account
Click the button "Add"
In the GUI that opens, enter details about the account to be added
Click "Add". If you want to add more accounts, add them too
Click "Save"
Deleting Resources
You can delete those resources that are no longer required from the PMP's resources list.
If you delete a resource, all the accounts and passwords that were part of that resource
would also be deleted permanently. The entries would be removed from the database
once and for all.
To delete a resource,
•
•
•
Go to "Resources" tab in the web interface
Select the particular resource(s) that is to be deleted
Click the button "Delete Resources"
AdventNet, Inc.
55
AdventNet ManageEngine PasswordManager Pro :: Help Documentation
Viewing Account Details
To view the accounts that are part of a resource, go to the "Resources" tab and click the
particular resource name. The accounts would be displayed.
Viewing Passwords
By default, passwords are shown in hidden form behind asterisks. Just click the asterisks
to view the password in plain text. The passwords are shown for 10 seconds only. After
that, they will be automatically hidden. If you want to view, you need to click again. If
you want to modify the default 10 seconds, you can do so from General Settings.
Enforcing Users to Provide a Reason for Viewing Passwords
By default, when a user tries to retrieve the password of a resource, on clicking the
asterisks, the passwords appear in plain text. If you want to force your users to provide
a reason why access to the password was needed, you can enable the option "Force
users to provide reason while retrieving the passwords" in General Settings.
Allowing password users and auditors to retrieve passwords for
which auto logon is configured
Through the auto logon feature, PMP provides the option to establish direct connection to
the resource eliminating the need for copy-paste of passwords. By default, password
users and auditors will be able to retrieve the passwords that are shared with them. If
auto logon is configured, they might not need access to the passwords. In such cases,
you can take a decision on allowing/restricting access to passwords and implement the
same through the option "Allow password users and auditors to retrieve passwords for
which auto logon is configured" in General Settings.
Copying Passwords
PMP leverages clipboard utility of browsers to copy passwords when you intend to copy
and paste passwords. Click the copy icon present by the side of the passwords to copy
them. The copied passwords will be available for pasting for 30 seconds.
Changing Passwords
To change the passwords of user accounts, click the "Change Password" icon against the
account name. In the UI that pops-up, enter the new password and confirm the same
and then click "Save". Here, password policy set by the administrator for this resource
would get enforced. For example, if the administrator has set "Strong" as the password
policy, you would be allowed to change the password only if you enter a password which
is strong enough in accordance with the PMP settings.
If your account belongs to any of the types - Windows, Windows Domain, Linux, IBM
AIX, HP UNIX, Solaris, Mac OS, MS SQL server and Cisco Devices (IOS, CatOS, PIX), you
have the option to synchronize the new password in the remote resource too. In this
case, if there is a failure in updating the password in the resource, password changes will
not be saved locally also.
AdventNet, Inc.
56
AdventNet ManageEngine PasswordManager Pro :: Help Documentation
Verifying the Integrity of Passwords with actual Resource
(Feature available only in Premium Edition)
Passwords of resources such as servers, databases, network devices and other
applications are stored in PMP. It is quite possible that someone who have administrative
access to these resources could access the resource directly and change the password of
the administrative account. In such cases, the password stored in PMP would be
outdated and will not be of use to the users who access PMP for the password. PMP
provides option for checking the validity of passwords at any point of time on demand
and also at periodic intervals.
On demand verification for password validity could be performed for a single account or
for all the resources/accounts stored in the PMP application.
To verify the integrity of the password of a single account,
•
•
•
•
Go to "Resources" or "Home" tab
Select the account whose password has to be verified for synchronization
Click the verify password icon
present next the 'change password' icon
PMP will try to establish connection with the target system. Once the connection
is established, it tries to login with the credentials stores in PMP. If login does not
succeed, PMP concludes that the password is out of sync. In case, PMP is not
even able to establish connection with the system due to some network problem,
it will not be taken as password out of sync.
Note: Password Verification will work only for the accounts for which 'Remote Password
Synchronization' has been enabled.
To verify all the passwords stored in PMP,
•
•
•
Go to "Reports" tab >> "Password Integrity" report
Click the link "Run Integrity Check"
PMP will try to establish connection with the target systems for all the accounts
for which remote password synchronization has been enabled. Once the
connection is established, it tries to login with the credentials stores in PMP. If
login does not succeed, PMP concludes that the password is out of sync. In case,
PMP is not even able to establish connection with the system due to some
network problem, it will not be taken as password out of sync. A consolidated
notification would be emailed to all the administrators and auditors.
Editing Account Details
At any point of time, you can edit the details of any of the accounts. To edit an account,
go to the "Resources" tab, click the resource of which the account is a part and the click
the "Edit" icon present against the account name. In the UI that pops-up, edit the
required property and click "Save". The required change will get reflected in the view.
Viewing Password History
The history of changes done to the passwords are captured in the form of password
history. Information such as the old password, modified by whom, from which machine
and the time at which it was modified are all captured in history. To view password
history of an account, go to the "Resources" tab, click the resource of which the account
present beside the "Last Modified" column. In the UI
is a part and the click the icon
that pops-up, password history would be displayed.
AdventNet, Inc.
57
AdventNet ManageEngine PasswordManager Pro :: Help Documentation
Resource Groups
Resources can be grouped together for easier management. The grouping can be done
either by specifying a set of criteria or by specifying individual resources. When you
provide a criteria, whenever a new resource is added that matches the criteria, it also
becomes part of that group.
Resource groups created by the administrator users can be shared with other users or
user groups. Whenever resources get added or deleted from a group, it affects the
password access shared through the group. That is, users who are shared with the group
can see passwords of only the resources that are part of the group at that point in time.
Password policy can be specified for the resource groups, which will be used for
password generation for resources of that group. Note that a password policy specified
for a resource will override the group-level setting.
The resource grouping helps in carrying out operations in bulk on all the resources of the
group.
To add resource groups,
•
•
Go to "Resources" tab in the web interface
Click "Resource Groups" tab (alternatively, you can launch this page directly
through the "Add Resource Group" link under the "Links" tab)
In the Add Resource Group UI that opens,
•
Choose your option for creating a resource group. Either you can create a group
based on certain matching criteria or you can pick resources from the list of
resources and assign them to the group.
Creating groups based on matching criteria,
•
•
•
•
•
•
•
Select the option "Based on Criteria"
Enter the name for the group against the text field "Group Name"
Provide a "Description" for the group. It will be helpful for future reference
Select a "Password Policy" for the group
Specify the exact criteria based on which you want to create the group. Here, you
have many options to choose from - you can search for resources based on
resource name, resource type, resource description and user accounts and filter
the search in fine-grained manner based on the criteria such as "contains", "does
not contain", "equals" "not equal", "starts with" and "ends with".
Once you specify the criteria, click "Search" if you want to view the list of
resources that will become part of this group
Click "Add" to add your resource group
Creating groups based on resources,
•
•
•
Select the option "Based on Resources"
Enter the name for the group against the text field "Group Name"
Provide a "Description" for the group. It will be helpful for future reference
AdventNet, Inc.
58
AdventNet ManageEngine PasswordManager Pro :: Help Documentation
•
•
•
•
Select a "Password Policy" for the group. If you select "Strong" (say), it would be
applicable to all the members of this resource group
Select the required resources to be added to this group
Click "Save" to add your resource group
How do I view the resources belonging to a particular Resource
Group?
To view the resources belonging to a particular Resource Group,
•
•
•
go to "Resources" tab
select the required Resource Group (whose resources you want see)
from the drop-down "Show Resources of"
all the resources belonging to that group will be displayed
AdventNet, Inc.
59
AdventNet ManageEngine PasswordManager Pro :: Help Documentation
Sharing Resources / Resource Groups Among
Users
You can share your resources and passwords / resource groups with other users and
user groups. When you share a resource, all the passwords of that resource are shared.
Similarly, when a resource group is shared, all the resources part of that group will be
shared. While sharing the resources / resource groups, you can set privileges for the
user(s) who get the share:
View only
privilege
User can only
access the
password
Modify Privilege
Manage privilege
User can both access and
modify the password(s) that
are shared. The Modify
privilege does not allow the
other users to change any
other attribute of the resource.
You can delegate complete
management of a resource
group and the associated
resources. This includes
providing share permissions
to other users also.
You can share
•
•
•
an individual account within a resource to a user or a user group
a resource to a user or a user group
a resource group to a user or user group
Note: Manage privilege can be assigned only at resource & resource group levels.
Not available for individual accounts.
You can perform the sharing operation in any combination from the above list.
Case 1: Share a particular account(s) to a User or User Group
•
•
•
•
Go to "Resources" Tab
Search/select the particular user account to be shared
present under
If you want to share the account with a user/users, click the icon
the column "Share" against the particular account. In the UI that opens
search/select the user(s) to whom the account is to be shared. Decide about the
permissions "View" or "Edit" and then move the user to the respective box (i.e
view or edit). Click "Save". The account is shared.
present
If you want to share the account with a usergroup(s), click the icon
under the column "Share" against the particular account. In the UI that opens
search/select the user group(s) to which the account is to be shared. Decide
about the permissions "View" or "Edit" and then move the user group(s) to the
respective box (i.e view or edit). Click "Save". The account is shared.
Note: When you share a particular account to a user group, the account will be
visible to all the members of the group. Also, the permissions granted to the user
group (view/edit) will be applicable for all the members.
AdventNet, Inc.
60
AdventNet ManageEngine PasswordManager Pro :: Help Documentation
Case 2: Share a resource to a User or User Group
•
•
•
•
Go to "Resources" Tab
Search/select the particular resource to be shared
If you want to share the resource with a user/users, click the arrow mark against
the particular resource present under the column "Share". Select the option
"Share with Users" and in the UI that opens search/select the user(s) to whom
the resource is to be shared. Decide about the permissions "View" or "Edit" or
"Manage" and then move the user to the respective box (i.e view or edit or
manage). Click "Save". The resource is shared.
If you want to share the resource with a usergroup(s), click the arrow mark
against the particular resource present under the column "Share". Select the
option "Share with User Groups" and in the UI that opens search/select the user
group(s) to which the resource is to be shared. Decide about the permissions
"View" or "Edit" or "Manage" and then move the user group to the respective box
(i.e view or edit or manage). Click "Save". The resource is shared.
Note: When you share a particular resource to a user group, the resource and all
its accounts will be visible to all the members of the group. Also, the permissions
granted to the user group (view/edit) will be applicable for all the members.
Case 3: Share a Resource Group to a User or User Group
•
•
•
•
Go to "Resources >> Resource Group" Tab
Search/select the particular Resource Group to be shared
If you want to share the Resource Group with a user/users, click the icon
present under the column "Share" against the particular Resource Group. In
the UI that opens search/select the user(s) to whom the Resource Group is to be
shared. Decide about the permissions "View" or "Edit" or "Manage" and then
move the user to the respective box (i.e view or edit or manage). Click "Save".
The Resource Group is shared.
If you want to share the Resource Group with a usergroup(s), click the icon
present under the column "Share" against the particular Resource Group. In the
UI that opens search/select the user group(s) to which the account is to be
shared. Decide about the permissions "View" or "Edit" or "Manage" and then
move the user group to the respective box (i.e view or edit or manage). Click
"Save". The Resource Group is shared.
Note:
(1) When you share a particular Resource Group to a user group, the Resource
Group will be visible to all the members of the user group. That means, all the
resources with their respective accounts would be visible to all the members of
the user group. Also, the permissions granted to the user group (view/edit) will be
applicable for all the members.
(2) Precedence for Share Permissions: The share permission ('view' or 'view &
modify') set for a password overrides that of its resource, which in turn overrides
that of the resource groups which the resource is part of. (Lowest level takes
highest precedence). Similarly, the share permission provided to an user
overrides that of a user group the user is part of.
AdventNet, Inc.
61
AdventNet ManageEngine PasswordManager Pro :: Help Documentation
Transferring Ownership of Resources / Resource
Group
You can transfer the resources that you own to other administrator users. With a
'transfer' you no longer have any access to that resource unless the new owner shares
the password access to you. The shares that you enabled before to other users will
remain intact.
To Transfer the ownership of Resources
•
•
•
Go to "Resources" Tab
Search/select the particular resource whose ownership has to be transferred to
someone else with admin privileges
Click the arrow mark against the particular resource present under the column
"Share". Select the option "Transfer Ownership" and in the pop-up that opens
select the user to whom the ownership has to be transferred. Click "Save". The
ownership will be transferred
To Transfer the ownership of Resource Groups
•
•
•
Go to "Resources >> Resource Group" Tab
Search/select the particular resource group whose ownership has to be
transferred to someone else with admin privileges
Click the arrow mark against the particular resource present under the column
"Share". Select the option "Transfer Ownership" and in the pop-up that opens
select the user to whom the ownership has to be transferred. Click "Save". The
ownership will be transferred
Note: The ownership of default resource group and the criteria-based resource
groups (the resource groups that were created based on some criteria) cannot be
transferred.
AdventNet, Inc.
62
AdventNet ManageEngine PasswordManager Pro :: Help Documentation
Passwords View
You can view all the passwords that are owned by you and the ones that are shared to
you from the "Home" tab.
To view the passwords,
•
•
•
•
Go to the "Home" tab
In the drop-down "Show Passwords of" you select the option "All" to view all the
passwords; select "Resource Group" to view the passwords that are owned by
you; select "Shared Groups" to view the passwords that are shared to you
Once you select your option, all the passwords falling under your selection will be
listed in the table below
Each entry in the table is a link and when you click that, you can view the
corresponding resource details
Enforcing Users to Provide a Reason for Viewing Passwords
By default, when a user tries to retrieve the password of a resource, on clicking the
asterisks, the passwords appear in plain text. If you want to force your users to provide
a reason why access to the password was needed, you can enable the option "Force
users to provide reason while retrieving the passwords" in General Settings.
AdventNet, Inc.
63
AdventNet ManageEngine PasswordManager Pro :: Help Documentation
Managing Resource Types
You can add as many resource types as you require and manage such resource types
from the "Admin" tab. Apart from adding custom resource types, you can provide your
own icons for the types, edit the existing types and delete resource types from the
database.
PMP provides the option to store digital files, certificates, images and documents too. By
default, PMP comes with the following resource types:
Operating Systems
1.
2.
3.
4.
5.
6.
7.
Windows
Windows Domain
Linux
Mac
Solaris
HP UNIX
IBM AIX
Cisco Devices
1. Cisco IOS
2. Cisco CatOS
3. Cisco PIX
Other Network Devices
1. HP Procurve
Database Servers
1.
2.
3.
4.
MS SQL Server
MYSQL Server
Oracle DB Server
Sybase ASE
Digital Files/Keys/Licences
1. File Store
2. Key Store
3. License Store
You cannot delete/edit the above ten default resource types.
To add a new resource type,
•
•
•
Go to "Admin >> Customize" section and click the icon "Resource Types"
Click "Add Type"
Provide a name for the new resource type
AdventNet, Inc.
64
AdventNet ManageEngine PasswordManager Pro :: Help Documentation
•
•
•
•
If you have a custom icon for the new resource type, click 'Browse' and choose
will be
the image. If you do not have a custom image, the default icon
displayed
If you wish to enable "Remote Password Reset" for this resource type, select the
checkbox "Remote Password Reset Required". Then select a reset type that is
similar to the one being added. For example, if you are adding a new resource
type that is similar in behaviour to Linux, select accordingly
For new resource types, you have the option to customize the attributes
appearing in the 'Resource Addition' and 'Edit Resource' forms. You can choose
not to have certain attributes - for example, if your new resource type does not
require the attributes 'Department' and 'Location', just leave the checkboxes for
the two entries blank. After doing this, when you invoke "Add Resource" or "Edit
Resource" form of a resource belonging to this type, the two fields "Department"
and "Location" will not appear
Click "Save" to add the new resource type
To edit a resource type,
•
•
•
•
•
Go to "Admin >> Customize" section and click the icon "Resource Types"
Click the "Edit" icon present against the resource to be edited
You can change the resource name and/or the icon
Click "Save" to give effect to the changes
The changed name and/or icons will get displayed wherever the particular
resource type had been referred
AdventNet, Inc.
65
AdventNet ManageEngine PasswordManager Pro :: Help Documentation
Exporting Resources
You can export the available resources, their account names and passwords to a flat file.
To export resources,
•
•
•
•
•
Go to "Resources" tab in the web interface
Click the link "Export Resources" present in the drop-down of "More Actions"
button
The resources are exported to a file and it is shown as a pop-up
Save the file in a secure location (in .csv format). The default file name will be
PasswordView.csv
The passwords are shown in plain text. So, exercise care to store the file in a
secure location
Note:
(1) In the exported file, the account details and passwords are shown in plain
text. So, exercise care to store the file in a secure location. In case, you wish to
mask passwords while exporting the file, you can do so from General Settings.
(2) If the resources/accounts/passwords contain non-English characters, the
application in which you open the exported resources, should support UTF-8
encoding.
AdventNet, Inc.
66
AdventNet ManageEngine PasswordManager Pro :: Help Documentation
Scheduled Password Rotation
(Feature available only in Premium Edition)
Shared administrative passwords are prone to misuse even in a very secure environment
and periodic rotation of passwords is very much needed. Manually changing the
passwords one-by-one would prove to be laborious. PMP helps in automating the process
of changing the passwords periodically for which remote password reset is supported in
PMP. Scheduled Password Rotation can be done only at the resource group level.
The prerequisite for using this feature is the proper configuration of password
synchronization either by agentless mode or by deploying agents in the remote resource.
Multiple options are available to set the periodicity of password rotation. Notifications are
generated both before and after the password reset task is run, with a consolidated
report of the results for each password.
To add a schedule for rotating passwords of the resources of a
group,
•
•
•
•
Go to "Resources" tab in the web interface
Click "Resource Groups" tab (alternatively, you can launch this page directly
through the "Add Resource Group" link under the "Links" drop-down)
present against the resource group for whose resources
Click the icon
password rotation is to be enabled
In the UI that opens up, the required schedule can be created through the
following four-step process
Step 1 Settings for sending notification prior to password
rotation,
When a password is scheduled to be rotated at a specified time, the users who
have access to the present password(s) are to be informed about the rotation
operation beforehand - say for example, a day prior to the rotation. Apart from the
users directly connected with the passwords to be rotated, any other user could
also be informed of the scheduled rotation on need basis.
Pre-Notification Timing
•
You can choose to send the notification anytime a week prior to the actual
rotation schedule. The notification could be sent even a minute prior to the
rotation. Select the number of days and/or hours and/or minutes prior to
which the notification is to be sent.
•
Specify the recipients of the notification •
•
•
•
Users having access to the passwords - users who possess any
one of the share permissions (read only, read and write, manage)
for the password, at the time when notification is generated
Other Users/ User Groups - any other specific user(s) (to be
selected from the list)
Email ids - to generate notifications to specified list of email aliases
or email addresses
Click "Next"
AdventNet, Inc.
67
AdventNet ManageEngine PasswordManager Pro :: Help Documentation
Step 2 Specify the new password to be used
You have the option to specify the new password(s) to be used for resources after
rotation. You can either choose to allot randomly generated, unique passwords to
the accounts based on the password policy set for the group or you can allot a
new, common password to all the resources (in accordance with the password
policy already specified for the group).
Select the required choice and click "Next"
Step 3 Specify the rotation schedule
Actual creation of the schedule for password rotation is done in this step. The
schedule can be for one-time rotation or it could be for a recurring one at periodic
intervals. Depending on your requirements, choose any one among the options Once / Days / Monthly / Never. After selecting the option, specify other details as
required and click "Next"
Step 4 Settings for sending notification after password rotation
Immediately after the completion of password rotation process, notification could
be sent to all those who have access to the passwords regarding the completion of
the rotation. Apart from the users directly connected with the passwords to be
rotated, any other user could also be informed of the rotation on need basis.
•
Specify the recipients of the notification •
•
•
•
•
Users having access to the passwords - users who possess any
one of the share permission (read only, read and write, manage) for
the password, at the time when notification is generated
Other Users/ User Groups - any other specific user(s) as selected
from the list
Email ids - to generate notifications to specified list of email aliases
or email addresses
Click "Finish"
The required password rotation schedule has been created. The
setting could be saved as a template for use with configuring
password reset schedule for another resource group.
Note: Password reset tasks scheduled for a password belonging to different
groups do not affect each other.
AdventNet, Inc.
68
AdventNet ManageEngine PasswordManager Pro :: Help Documentation
Windows Service Account Password Reset
(Feature available only in Premium Edition)
Typically, specific windows domain accounts are used as service accounts in services
running in Windows servers, that need network access. While resetting the passwords of
the domain accounts managed in PMP, it is essential that the passwords of the
associated service accounts also be changed. In certain cases, you will require to restart
the services for the service account password reset to take effect. The windows service
account password reset feature of PMP helps achieve this precisely, fully automated.
How does windows service account reset work?
For every Windows domain account for which the service account reset is enabled, PMP
will find out the services which use that particular domain account as service account,
and automatically reset the service account password if this domain password is
changed.
How to setup Windows Service Account Password Reset?
Prerequisite: Before enabling windows service account reset, ensure if the
following services are enabled in the servers where the dependent services are
running:
(1) Windows RPC service should have been enabled
(2) Windows Management Instrumentation (WMI) service should have been
enabled
Work flow Summary: Setting up Windows Service Account
Password & Scheduled Task Password Reset
Consider that
•
•
•
•
You have a Service Account SA1
You have four servers Win1, Win2, Win3 & Win4 that make use of SA1
Your domain name is MyDomain and the SA1 is present in this domain
Your domain administrator account is DomainAdmin
For enabling Windows Service Account Reset, you need to do the following:
•
•
•
•
Create Windows resources for each of the servers that use service
accounts. In the above example, you need to create Win1, Win2, Win3 &
Win4 as four separate resources (with resource type 'Windows'). (In the
case of service accounts spread across multiple domains, PMP uses the
local administrator account to login. So, if you wish to have service
account password reset for multiple domains, ensure that you have
entered local administrator account while creating the resource).
Create a resource group consisting of these resources - say RG1
Create a Windows Domain resource. In the above example, it will be
MyDomain with resource type Windows Domain
Inside the domain account, add the individual domain account. In the
above example, add SA1 as domain account
AdventNet, Inc.
69
AdventNet ManageEngine PasswordManager Pro :: Help Documentation
•
•
Specify the Resource Group (the group that contains the resources that
use the domain account as the service account) that are associated with
the domain account. In the above example, associate SA1 with RG1
Specify the domain administrator account. In this example, it is
DomainAdmin. This is required for resetting the service account
Now, when the domain account password is reset
•
•
•
It is modified immediately in the domain
PMP iterates through the associated resource group and for each resource
find the list of services and scheduled tasks which use this domain account
as their service account
PMP uses the domain administrator credentials to login to the servers and
forcefully modify the service account password and schedules task
passwords too and restart the services.
Windows service account reset can be configured right at the stage of resource addition
or afterwards by editing the resource. Both the scenarios have been explained below:
While adding the resource
Step 1: Providing Resource Details
•
•
•
•
•
•
•
•
•
Go to "Resources" tab in the web interface and click the "Add Resource" link
In the UI that opens, enter the name of the resource in the text field against
"Resource Name". The resource name is the one that uniquely identifies the
resource in the PMP database. This field is mandatory
Enter the DNS Name/IP Address of the resource against "DNS Name/IP
Address". The DNS name or the IP address is used during password changes
made to the resource. This field is optional. However, if you want to enable
remote password synchronization, this is mandatory
Select "Windows Domain" from the drop-down against field "Resource Type"
If the resource belongs to an already existing resource group, select that group
name. If you want to create a new group, click "Add New"
Provide a description for the resource addition. This will be helpful for reference at
a future point of time.
Enter the domain name of which the resource is part of. This step is very
important and mandatory for Windows service account reset. If it is is
not filled-in, PMP will not be able to find out the service accounts
associated with the domain account
Fill-in details such as "Department" and "Location" of the resource (if
applicable)
Select the required 'Password Policy' - Strong, Medium or Low
Step 2: Providing Domain Account Details - (Domain Account whose associated
service accounts are to be reset)
The second step is to add the domain accounts whose associated Windows service
accounts are to be reset when the password of the domain account is modified.
•
•
In the text field for "User Account", enter the name of the domain account. This
field is mandatory
In the text field for "Password", enter the password of the account. This field is
mandatory. If you have set a 'Password Policy' during the previous step, you need
to enter your password only in accordance with the specified policy. For example,
AdventNet, Inc.
70
AdventNet ManageEngine PasswordManager Pro :: Help Documentation
•
•
•
•
•
•
•
•
•
if you have set 'Strong' as the policy, the password entered here should comply
to that. If you do not want to enforce the policy here, change the setting through
"General Settings"
Confirm the password
Enter description about the account being added in the "Notes" column. This
would help in properly identifying a particular account in future
Select the checkbox "Configure password reset for associated service
accounts"
As mentioned above, the service account reset happens on the basis of the
'Resource Groups'. All the available resource groups are shown in the table in the
GUI. Select the required resource groups from the list. For every Windows system
present in the selected groups, PMP will find out the services which use this
domain account as service account, and automatically reset the service account
password if this domain password is changed.
You have the option, to restart the service after the service account password
reset. If you need this option, select the checkbox "Restart services after
service account reset"
If you want to add more accounts, repeat the above procedure
The account added until now are listed in the table below
If you require remote password synchronization, click "Next";
Otherwise, click "Finish" to complete the resource addition process
Important Note
In certain cases, there would be requirements for stopping and starting the
services during domain account reset. In such cases, through "General Settings"
you can configure PMP to wait for a specified time period (in seconds) between
stopping and starting the services. By default, PMP waits for 60 seconds. You may
configure it in accordance with your needs.
Enabling Windows Service Account Reset for the already added
resources
For the already added resources of resource type "Windows Domain", you can enable
Windows service account reset by editing the resource and the respective domain
account.
To enable service account reset for the already added resources,
•
•
•
•
•
•
Go to "Resources" tab click the name of the resource
Click the edit icon present against the resource and provide the 'Domain Name'
and click "Save"
Select the domain account of the resource for which you wish to enable service
account reset
As mentioned above, the service account reset happens on the basis of the
'Resource Groups'. All the available resource groups are shown in the table in
the GUI. Select the required resource groups from the list. For every Windows
system present in the selected groups, PMP will find out the services which use
this domain account as service account, and automatically reset the service
account password if this domain password is changed
You have the option, to restart the service after the service account password
reset. If you need this option, select the checkbox "Restart services"
Click "Save"
AdventNet, Inc.
71
AdventNet ManageEngine PasswordManager Pro :: Help Documentation
Viewing Service Account Status
For any windows domain account (for which you have enabled Windows service account
reset), you can view the list of associated service accounts, scheduled tasks and
information on whether the service accounts and scheduled tasks were reset upon the
corresponding domain account reset.
To view this information,
•
•
•
Go to "Resources" tab click the name of the resource
Select the domain account of the resource for which you wish to know the status
of service account reset
Click "Service Account Status"
Important Note:
(1) Whenever the password of the domain account is changed, the windows
service account associated with it will also be changed. In case, you have created
schedules for rotating domain accounts, the service account reset will also follow
the schedule.
(2) Once you create Windows Service Account Reset, the passwords of the
Windows scheduled tasks associated with the service accounts will also be reset.
AdventNet, Inc.
72
AdventNet ManageEngine PasswordManager Pro :: Help Documentation
Password Action Notification
(Feature available only in Premium Edition)
Any action performed on a password, be it just a password access or modification or
changing the share permission or when the password expires or when password policy is
violated, notifications are to be sent to the password owners and/or to those who have
access to the passwords or to any other users as desired by the administrators. The
'Password Action Notification' feature helps in achieving this.
You can configure E-mail notification on the occurrence of specific events as mentioned
above. When password shares are changed and when passwords expire, in addition to
notifications, there is option for password reset action to be performed by the PMP
server. When a password belongs to multiple groups and each group has different
actions configured, every distinct action will be performed once.
To add a schedule for rotating passwords of the resources of a
group
•
•
•
•
Go to "Resources" tab in the web interface
Click "Resource Groups" tab (alternatively, you can launch this page directly
through the "Add Resource Group" link under the "Links" tab)
present against the resource group for which password action
Click the icon
notification is to be enabled
In the UI that opens up, select the condition upon which you wish to send
notifications and click the button at the end
When passwords are accessed
As mentioned earlier, when a user views a password, notification (informing the access)
could be sent to desired recipients.
If you want to make use of this action,
•
Specify the recipients of the notification •
•
•
•
•
Owner - the owner of the password
Users having access to the passwords - users who possess any
one of the share permission (read only, read and write, manage) for
the password, at the time when notification is generated
Other Users/ User Groups - any other specific user(s) as selected
from the list
Email ids - to generate notifications to specified list of email aliases
or email addresses. If you want to enter multiple ids, you may do so
by separating each address with a comma
Click "Save"
When passwords are changed
As mentioned above, when a password is changed, notification (informing the change)
could be sent to desired recipients.
AdventNet, Inc.
73
AdventNet ManageEngine PasswordManager Pro :: Help Documentation
If you want to make use of this action,
•
Specify the recipients of the notification •
•
•
•
•
Owner - the owner of the password
Users having access to the passwords - users who possess any
one of the share permission (read only, read and write, manage) for
the password, at the time when notification is generated
Other Users/ User Groups - any other specific user(s) as selected
from the list
Email ids - to generate notifications to specified list of email aliases
or email addresses. If you want to enter multiple ids, you may do so
by separating each address with a comma
Click "Save"
When password share is changed
In multi-user environments, passwords are shared among multiple persons. In such a
scenario, when a password permission of a password is changed, notification (informing
the change) could be sent to desired recipients.
If you want to make use of this action,
•
Specify the recipients of the notification •
•
•
•
•
•
Owner - the owner of the password
Users having access to the passwords - users who possess any
one of the share permission (read only, read and write, manage) for
the password, at the time when notification is generated
Other Users/ User Groups - any other specific user(s) as selected
from the list
Email ids - to generate notifications to specified list of email aliases
or email addresses. If you want to enter multiple ids, you may do so
by separating each address with a comma
You have the option to reset passwords in addition to sending
notifications. For example, when the share for a password is
removed, if you wish to automatically reset the password, you may
do so by selecting the checkbox 'Reset the password when a share is
removed'. Password reset action is applicable and performed only for
passwords for which it is currently supported and correctly
configured, using one of remote or agent modes
Click "Save"
When passwords expire
To enhance password security, passwords of sensitive accounts would be rotated
periodically. In such a scenario, validity period is set for a password. When the validity
ends, the password expires and a notification (informing the expiry) could be sent to
desired recipients.
How do I set Password Expiry for a resource?
Password Validity Period could be set through password policies. After the validity
period, the password would expire and it has to be reset.
AdventNet, Inc.
74
AdventNet ManageEngine PasswordManager Pro :: Help Documentation
If you want to make use of this action,
•
Specify the recipients of the notification •
•
•
•
•
•
Owner - the owner of the password
Users having access to the passwords - users who possess any
one of the share permission (read only, read and write, manage) for
the password, at the time when notification is generated
Other Users/ User Groups - any other specific user(s) as selected
from the list
Email ids - to generate notifications to specified list of email aliases
or email addresses. If you want to enter multiple ids, you may do so
by separating each address with a comma
You have the option to reset passwords in addition to sending
notifications. For example, when a password expires, if you want to
automatically reset the password, you need to select the checkbox
'Reset passwords upon expiry'. Password reset action is applicable
and performed only for passwords for which it is currently supported
and correctly configured, using one of remote or agent modes
Click "Save"
When password policy is violated
If you have defined a password policy and if the passwords are in violation to the policy
defined, notifications (informing the violation) could be sent to desired recipients. The
notification would be sent everyday.
If you want to make use of this action,
•
Specify the recipients of the notification •
•
•
•
•
•
Owner - the owner of the password
Users having access to the passwords - users who possess any
one of the share permission (read only, read and write, manage) for
the password, at the time when notification is generated
Other Users/ User Groups - any other specific user(s) as selected
from the list
Email ids - to generate notifications to specified list of email aliases
or email addresses. If you want to enter multiple ids, you may do so
by separating each address with a comma
You have the option to reset passwords in addition to sending
notifications. For example, when a password policy violation is
identified, if you wish to automatically reset the password, you may
do so by selecting the checkbox 'Reset the password upon violation'.
Password reset action is applicable and performed only for
passwords for which it is currently supported and correctly
configured, using one of remote or agent modes
Click "Save"
When passwords in PMP go out of sync with those in the resource
When the passwords stored in PMP differ with those in the resource, notifications
(informing the out of sync) could be sent to desired recipients. Every night at 1 AM, PMP
tries to establish connection with the target systems for which remote password sync
has been enabled. Once the connection is established, it tries to login with the
AdventNet, Inc.
75
AdventNet ManageEngine PasswordManager Pro :: Help Documentation
credentials stores in PMP. If login does not succeed, PMP concludes that the password is
out of sync. In case, PMP is not even able to establish connection with the system due to
some network problem, it will not be taken as password out of sync.
The out of sync notification would be sent everyday.
If you want to make use of this action,
•
Specify the recipients of the notification •
•
•
•
•
Owner - the owner of the password
Users having access to the passwords - users who possess any
one of the share permission (read only, read and write, manage) for
the password, at the time when notification is generated
Other Users/ User Groups - any other specific user(s) as selected
from the list
Email ids - to generate notifications to specified list of email aliases
or email addresses. If you want to enter multiple ids, you may do so
by separating each address with a comma
Click "Save"
See also "Running Integrity Check on demand".
AdventNet, Inc.
76
AdventNet ManageEngine PasswordManager Pro :: Help Documentation
Auto Logon Helper
Automatically Logging in to Remote Systems &
Applications
Passwords of remote systems and applications are stored in PMP. Normally, to login to
the systems and applications, you need to copy the password from PMP and paste it in
the target system. PMP provides an option for automatically logging in to the target
systems and applications directly from the PMP web interface eliminating the need for
copying and pasting of passwords.
How does this auto logon feature work?
You need to configure 'helper scripts' by providing the remote login commands (specific
to the operating system from which the PMP web interface would be connected).
Example 1
Assume you have 10 resources - Windows servers. You have stored the login accounts
and passwords of these 10 resources in PMP. You want to directly login to these
resources from PMP web-interface. You will connect the PMP web-interface from both
Windows and Linux systems. For auto logon, you need to do the following:
Create a 'helper script' by providing the command to establish connection to the target
system. The command has to be written specific to the operating system from where the
PMP web-interface will be connected. That is, if you would connect the PMP web-interface
in Windows, the command has to be Windows specific - enter the command that would
normally use to invoke a MSTSC session in Windows. If you would connect the web
interface from Linux, enter the command to invoke Remote Desktop (RDP) connection.
By doing so, whether you connect the PMP web-interface from Windows or Linux, you
will be able to establish the connection automatically.
Example 2
Assume you have 10 resources - Cisco devices and Unix servers. You have stored the
login accounts and passwords of these 10 resources in PMP. You want to directly login to
these resources from PMP web-interface. You will connect the PMP web-interface from
Windows. For auto logon, you need to do the following:
Create a 'helper script' by providing the command to establish connection to the target
system. The command has to be written specific to the operating system from where the
PMP web-interface will be connected. That is, if you would connect the PMP web-interface
in Windows, the command has to be Windows specific - enter the command that would
normally use to invoke a PuTTY session in Windows. Instead of PuTTY, you can also
enter the command for TELNET.
PMP will have no control over the command other than invoking it and also does not
process the result of the command. The helper script supplied will be stored in the same
database as the other information, which provides security as well as backup, if it is
configured for the PMP database. The command is invoked with the same privileges as
the user account running the browser that is accessing the PMP application.
AdventNet, Inc.
77
AdventNet ManageEngine PasswordManager Pro :: Help Documentation
How to set up auto logon?
Step 1: Add 'Helper' Script
•
•
Go to "Admin" >> "Customize" >> and click "Auto Logon Helper"
In the UI that opens, click the button "Add Helper"
In the UI that pops-up, provide the details as detailed in the steps below.
Step 2: Enter a 'Name' for the Helper Script
The name that you enter here will be used as the display name for the script and will be
shown in the web-interface to automatically log in to the remote systems or applications.
Step 3: Enter the command to be used for carrying out the auto
logon action
Entering the command for the helper script is the most important step in creating the
script. PMP has no control on the commands entered by you. It will execute the
commands as they are. So, exercise care while entering the command.
The following example will make you understand this step with ease:
Assume that your requirement is to connect to a remote system automatically
from PMP by establishing a telnet connection, you need to do the following:
You need to write the command for establishing telnet connection to the target
system. The command has to be written specific to the operating system from
where the PMP web-interface will be connected. That is, if you would connect the
AdventNet, Inc.
78
AdventNet ManageEngine PasswordManager Pro :: Help Documentation
PMP web-interface in Windows, the command has to be Windows specific - enter
the command that would normally use to invoke a telnet session in Windows.
However, it is advisable to enter the commands for establishing the connection
from both Windows and from Linux separately. By doing so, whether you connect
the PMP web-interface from Windows or Linux, you will be able to establish the
connection automatically.
It is pertinent to take note of the following before creating your commands:
You can use the following place holders in your command string:
%RESOURCE_NAME%
%DNS_NAME%
%ACCOUNT_NAME%
%PASSWORD%
These place holders will be replaced with respective values at the time of invoking of the
commands.
Also, the command configured will be invoked as is on the user machines and hence it is
recommended to ensure that the PATH environment variable is properly set or the command
be located in the same execution path in all the user machines.
Invoking Direct Connection to URLs
If you want to open connection to a URL automatically in a browser window, you can specify
the URL for the same through 'Resource URL' field while adding the resource or by editing a
resource. You can even specify the user name and password in the URL to directly login to
the resource. For security reasons, PMP provides the option for using place holders to avoid
the usage of user name, password etc in plain text in the URL. At the time of URL invocation,
PMP replaces the respective data for the placeholders and submits the data by 'POST'
method. Nowhere during the URL invocation, the password will be visible to the users.
The following four place holders are allowed: %RESOURCE_NAME%, %DNS_NAME%,
%ACCOUNT_NAME% and %PASSWORD%
Examples for using the place holders in the URL:
(1) Assume that you have a resource named 'abc' and on typing the resource name in the
browser as http://abc you can access an application. In this case, you can enter the resource
url with placeholder as shown below:
http://%RESOURCE_NAME%
(2) Assume you have an application running on port 7272 and you can access it through the
DNS name of the host where it runs. You can make use of the placeholder and construct the
URL as below:
https://%DNS_NAME%:7272
In case, you wish to supply the username and password for the application and directly login
to the resource, you can construct the URL as below:
https://%DNS_NAME%:7272/j_security_check?j_username=%ACCOUNT_NAME%&j_password=
%PASSWORD%&domainName=LOCAL
AdventNet, Inc.
79
AdventNet ManageEngine PasswordManager Pro :: Help Documentation
In the text field against "Command to invoke in Windows", enter the command for
invoking auto logon from PMP web interface connected in Windows. For example, to
establish telnet connection to a remote system automatically from the PMP web interface
connected in Windows, enter the command as follows:
telnet %DNS_NAME% -l %ACCOUNT_NAME%
PMP will take care of replacing the values of the respective place holders.
Similarly, in the text field against "Command to invoke in Linux", enter the command for
invoking auto logon from PMP web interface connected in Linux. For example, to
establish telnet connection to a remote system automatically from the PMP web interface
connected in Linux, enter the command as follows:
konsole -e telnet %DNS_NAME% -l %ACCOUNT_NAME%
Step 4: Map Commands with the Resource Types
After creating the required commands as detailed above, you need to select the
'Resource Types' for which you wish to map the helper commands.
For example, assume you have created helper script for connecting to remote systems
via PuTTY (from PMP web-interface), you can map the command to the following
resource types: All UNIX resources and Cisco devices. If you do so, the auto logon to
remote systems via PuTTY will be enabled for all the resources belonging to the above
three resource types. When you view those resources, you will find "Connect To" icon
as shown below. The command names associated by you to that resource type will be
visible in the list. (Complete Step 6 below before trying to check this step in your setup,
otherwise the data entered in this UI till now will not be saved).
For a particular target system, there can be more than one method to connect (telnet,
PuTTY, RDP etc.,) and hence you can map any number of commands to a single target
system type. All the command names associated with the resource type will be displayed
on "Connect To" icon.
AdventNet, Inc.
80
AdventNet ManageEngine PasswordManager Pro :: Help Documentation
Step 5: Request for Approval
As explained above, the helper script is invoked with the same privileges as the user
account running the PMP server. To guard against potential risks associated with
invoking arbitrary scripts/commands, a dual control mechanism is implemented, which
will ensure two administrators see and approve the script before it is invoked by PMP.
The helper scripts can be added only by PMP administrators. The scripts thus added have
to be approved by some other administrator. So, the helper script created will remain
pending for approval. Select an administrator from the drop-down to send approval
request. A mail will be sent to that administrator intimating the approval request.
If you are an administrator and requested by another admin to approve a script, you
need to navigate to "Admin" >> "Customize" >> and click "Password Auto
Logon" and click the link present under "Approval Status". Once it is approved, the
helper script will take effect.
Click "Save". The required auto logon helper has been created. The helper script
creation and approval events are all audited in PMP.
Invoking Auto-Logon
To automatically connect to a particular resource, navigate to the 'Resources' tab and
click the required resource. Click the "Connect To" icon present against the required
user account. A list containing the list of commands supported for that resource will be
displayed. Click the required command.
For the first time of invocation alone, you will have to install browser plug-ins
as explained below:
Due to the inherent security restrictions in the browsers, as a one-time activity, you
need to download and install browser specific plug-ins to invoke operating system
commands.
To install plug-in for Internet Explorer
When you click the 'Connect To' icon of a resource, you will get a security warning popup. The pop-up will ask if you want to install that plug-in with publisher name as
AdventNet Inc.. Click 'Install'. The plug-in would be installed.
To install plug-in for Firefox
•
•
•
•
•
•
Go to Admin >>> General and click the icon "Plug-in for Firefox"
You will see an yellow band on top of the browser with the following wordings:
"Firefox prevented this site (<your hostname>) from asking you to install a
software in your computer". At the end of that you will find "Edit Options". Click
that.
Click Admin >>> General >> "Plug-in for Firefox" again
Click "Download Software"
Click "Install"
Click the option "Restart Firefox"
AdventNet, Inc.
81
AdventNet ManageEngine PasswordManager Pro :: Help Documentation
Once you do this, you will be able to login automatically.
AdventNet, Inc.
82
AdventNet ManageEngine PasswordManager Pro :: Help Documentation
Password Reset Listener
Password Reset is one of the important operations performed by the PMP. After resetting
the password of resources/accounts in PMP, there might be requirements to carry out
some follow-up action automatically. This could be done using the Password Reset
Listeners.
For Example:
•
•
•
•
restarting the dependent services immediately after password reset
if there is a windows service that makes use of the account whose password is
being changed in PMP. You can use the listener mechanism to change the 'stored
credentials' (i.e the credentials specified in the 'Logon' property) of the windows
service
if you have added the accounts of network devices as resources/accounts in PMP,
you can first reset the passwords of such accounts locally and then invoke a
custom script to connect to the device and carry out the change in the device too
reset the passwords of windows scheduled tasks and other associated processes
How does Password Reset Listener work?
Whenever the password of an account is modified in the PMP repository, you can
configure PMP to invoke a script or executable supplied by you. The script or the
executable is called the Password Reset Listener. The listener will be invoked even for
local password changes and for resources for which remote password reset is not
supported. It can be configured for each resource type, including the user defined
resource types. Thus, the password reset listener mechanism is very helpful for resource
types for which PMP does not support remote password reset by default.
•
•
•
•
The password reset listener script will be invoked in a similar fashion as it will be
from the command prompt of the operating system from which it is invoked
In case, the script needs another program to invoke it from the command
prompt, it could be provided as the 'Pre-Command' for that script (for example
'cscript c:\scripts\changepassword.vbs old_password new_password)
PMP will pass these arguments, in this order, when the script is invoked: resource
name, dns name, account name, old password, new password.
You can add additional arguments that will also be supplied at the time of
invoking the script, in the order specified
The script runs with the same privileges as the user account running the PMP server. To
guard against potential risks associated with invoking arbitrary scripts, a dual control
mechanism is implemented, which will ensure two administrators see and approve the
script before it is invoked by PMP. When an administrator adds a password reset listener,
PMP does not invoke it unless it has been approved by another administrator. The same
process if followed when the password reset listener details are edited by an
administrator. These operations can be performed by any two administrators and are
audited.
The password reset listener is invoked from a separate thread so that it does not impact
the password reset process of PMP. The password reset listener script supplied will be
stored in the same database as the other information, which provides security as well as
backup, if it is configured for the PMP database.
AdventNet, Inc.
83
AdventNet ManageEngine PasswordManager Pro :: Help Documentation
How to setup Password Reset Listener?
Prerequisite
Before setting up the password, keep your custom script/executable ready. PMP
has no control over the script other than invoking it and also does not process the
result of the script. So, take care of all your requirements while creating the
script.
To set up Password Reset Listener,
•
•
•
•
Go to "Admin" >> "Customize" >> and click "Password Reset Listener"
In the UI that opens, click the button "Add Listener"
As mentioned above, the password reset listener script will be invoked in a similar
fashion as it will be from the command prompt of the operating system from
which it is invoked. In case, the script needs another program to invoke it from
the command prompt, it could be provided as the 'Pre-Command' for that script
(for example 'cscript c:\scripts\changepassword.vbs old_password
new_password)
Provide a name for the listener to be created. This would uniquely identify the
listener
Browse and locate the listener script
By default, the parameters resource name, dns name, account name, old
password, new password are passed as arguments to the script. In case, you
require to pass additional arguments, specify them against the text field
"Additional Parameters". The additional parameters supplied here will be
passed to the script as they are
Specify the Resource Types for which the changes are to be applied
•
Approval for Listeners
•
•
•
As explained above, the listener script runs with the same privileges as the user
account running the PMP server. To guard against potential risks associated with
invoking arbitrary scripts, a dual control mechanism is implemented, which will
ensure two administrators see and approve the script before it is invoked by PMP.
The listeners can be added only by PMP administrators. The listeners thus added
have to be approved by some other administrator. So, the listener created will
remain pending for approval. Select an administrator from the drop-down to send
approval request. A mail will be sent to that administrator intimating the approval
request.
If you are an administrator and requested by another admin to approve a listener,
you need to navigate to "Admin" >> "Customize" >> and click "Password
Reset Listener" and click the link present under "Approval Status". Once it is
approved, the listener will take effect.
•
Click "Save". The required listener has been created
The listener creation and approval events are all audited in PMP.
AdventNet, Inc.
84
AdventNet ManageEngine PasswordManager Pro :: Help Documentation
High Availability
(Feature available only in Premium Edition)
In mission-critical environments, one of the crucial requirements is to provide uninterrupted access to passwords. PMP provides the 'High Availability' feature just to
ensure this.
How does High Availability work?
•
•
•
•
•
There will be redundant PMP server and database instances
One instance will be the Primary providing read/write access to the users. All
users will be connected with primary only
The other instance will act as Secondary
At any point of time data in both Primary and Secondary will be in sync with each
other. PMP leverages MySQL's database replication technique for data
synchronization. The data replication happens through a secure, encrypted
channel
When Primary server goes down, the Secondary will offer 'Read Only' access to
the users, until the fully-functional primary server is brought back to service. The
changes made in the database in the intervening period will be automatically
synchronized upon connection restoration
Example Scenarios
Scenario 1 - Primary & Secondary in different geographical locations and WAN
Link failure happens between the locations
Assume that the Primary Server is in one geographical location 'A' and Secondary
is deployed in another location 'B'. The users in both the locations will be
connected to the Primary and will be carrying out password management activities.
At any point of time data in both Primary and Secondary will be sync with each
other. Assume there happens loss of network connectivity between the two
locations. In such a scenario, users in location 'A' will continue to remain
connected with the primary and will be doing all operations. Users in location 'B'
will be able to get emergency read-only access to the passwords from Secondary.
Once the network between the two locations is up again, data in both the locations
will be synchronized.
Scenario 2 - Primary & Secondary within the same network & Primary goes
down
In case, the Primary crashes or goes down, the users in location 'A' & 'B' can rely
upon the emergency read-only access to the passwords from the Secondary.
What happens to Audit Trails?
In the high availability scenarios mentioned above, audit trails will be recorded as
usual. In scenario 1, as long as there is network connectivity between the two
locations, the audit trails will be printed by the primary. When users connect to the
Secondary, it will print operations such as 'password retrieval', 'login' and 'logout'.
When the two locations get back network connectivity, the audit data will be
synchronized. In scenario 2, when the primary crashes, the 'password retrieval',
'login' and 'logout' done by the users in secondary will be audited. Other audit
records will already be in sync at the Standby.
AdventNet, Inc.
85
AdventNet ManageEngine PasswordManager Pro :: Help Documentation
How to set up High Availability?
Setting up high availability in PMP consists of the following four steps:
1. Installing Primary & Secondary instances (you can use your existing installation
as Primary and install another PMP instance as standby in a separate work station)
2. Configurations to be done in Primary Installation
3. Configurations to be done in Secondary Installation
4. Enabling database replication
Carry out the steps on-by-one as detailed below.
Step 1 Primary & Secondary Setup
•
Before trying High Availability, you should have both Primary and Standby
installations of PMP in place. You can either install one instance as
'Primary' or you can use your current PMP installation as primary server.
You can install another instance of PMP as secondary server in a separate
workstation. To install PMP as secondary, during installation, you need to
choose the option "Configure this server as High availability
secondary server (Read Only)".
Important Note:
•
•
After installation, the PMP Primary & Secondary servers should have been
started and stopped at least once
It is recommended to delete all files except passtrix folder, mysql folder
and ibdata1 present under <PMP_Home>/mysql/data folder in both
Primary and Secondary before commencing the High Availability step. Take
care not to delete 'passtrix' folder, 'mysql' folder and 'ibdata1' file. If you
delete them, you will lose all your data.
Step 2 - Configurations to be done in Primary Installation
1. Stop PMP Primary server, if already running
2. Open a command prompt and navigate to <PMP_Installation_Folder>/bin
directory and run the script replicationPack.bat (Windows)/
replicationPack.sh (Linux)
3. This will create a new directory named 'replication' under
<PMP_Installation_Folder> and a replication package named
'Replication.zip' under <PMP_Home>/replication folder. This zip contains the
database package for standby
4. Go to <PMP_Installation_Folder>/mysql/bin directory. You will find a file named
HAPrimary.conf, rename that file as HASecondary.conf
5. Edit the HASecondary.conf and enter the name of the host where the secondary
server is running.
master_host=<hostname of Secondary>
For example, 'test_workstation' is the machine where the secondary PMP server is
running, you need to enter the information as below:
master_host=test_workstation
AdventNet, Inc.
86
AdventNet ManageEngine PasswordManager Pro :: Help Documentation
6. Open a command prompt and navigate to <PMP_Installation_Folder>/bin and run
the script startDB.bat <MySQL Port> (Windows) / startDB.sh <MySQL Port>
(Linux). You need to provide the MySQL port of PMP while executing the above
script as shown below. By default, the MySQL port in PMP is 2345.
startDB.bat <MySQL Port> (For Windows)
startDB.sh <MySQL Port> (For Linux)
For example, with the default the MySQL port 2345, you need to execute this as:
startDB.bat 2345 (For Windows)
startDB.sh 2345 (For Linux)
This will start the Primary Database (Default MySQL port is 2345)
7. Copy the Replication.zip file present under <PMP_Installation_Folder>/replication
directory. This has to be put in the PMP Secondary installation machine as
detailed in Step 3 below.
Step 3 - Changes in Secondary Installation
1. Put the Replication.zip file copied from the PRIMARY Installation (as detailed in
the previous step) in to the <PMP_Installation_Folder> of Secondary and
unzip it
2. Copy the <PMP_Installation_Folder>/mysql/bin/database_params.conf file of
secondary installation and put it over <PMP_Installation_Folder>/conf directory of
secondary installation
3. Go to <PMP_Installation_Folder>/bin of secondary installation and execute
startDB.bat <MySQL Port> (in Windows) / startDB.sh <MySQL Port> (in Linux) to
start Secondary database (Default MySQL port is 2345)
For example, with the default the MySQL port 2345, you need to execute this as:
startDB.bat 2345 (For Windows)
startDB.sh 2345 (For Linux)
4. This will start the Secondary Database (Default MySQL port is 2345)
Step 4 - Enabling Database Replication – This is to be done in both Primary and
Secondary Installations
•
Run enableReplication.bat (in Windows) / enableReplication.sh (in Linux)
present in <PMP_Installation_Folder>/mysql/bin of both Primary and Secondary
installations
Step 4 - Start Primary and Secondary
•
•
Start Primary and Secondary Servers
High Availability setup is now ready
AdventNet, Inc.
87
AdventNet ManageEngine PasswordManager Pro :: Help Documentation
Verify High Availability setup
After carrying out the above steps, you can verify if the High Availability setup is working
properly by looking at the message in "Admin >> General >> High Availability" page of
Primary server. If the setup is proper, you will see the following:
Connection Status: Alive and High Availability Live is in progress now
Secondary server is running in host: <Host Name>
AdventNet, Inc.
88
AdventNet ManageEngine PasswordManager Pro :: Help Documentation
Database Backup
Data stored in PMP database are of critical importance and in any production
environment, there would be constant requirements for backing up the data for
reference purposes or for disaster recovery. To achieve this, PMP provides two features:
•
•
Live Backup of PMP database
Scheduled Backup
Live Backup
Whenever there happens an addition or modification of the entries in the PMP database,
the data gets immediately backedup. PMP achieves this live backup by leveraging the
database replication feature offered by MySQL.
A live 'slave' database could be configured in a remote location and it will get
instantaneously updated whenever the 'master' database running with PMP undergoes a
change. At any point of time, the data in both the databases will be in synchronization
with each other. In the unlikely event of any disaster to the primary database, you can
rely on the slave database and recover the data.
To enable Live Backup,
Prerequisite
•
•
After installation, the PMP server should have been started and stopped at least
once
If PMP server is already running, stop it before proceeding further
Step 1: Setup master and slave databases
•
•
•
•
•
•
Go to <PMP_Home>/bin directory and run the script replicationPack.bat (in
Windows) / replicationPack.sh (in Linux)
This will create a new directory named 'replication' under <PMP_Home> and a
replication package in the form a zip file will be created under
<PMP_Home>/replication folder. This zip with the name "Replication.zip" contains
the slave database package
Move the zip file from <PMP_Home>/replication folder to the remote location
where you wish to keep the slave database for live backup
Unzip the zip file in the remote machine
The slave database is now setup
The database that is bundled with PMP acts as the master database. No separate
setup is required for that
Step 2: Start master and slave databases
•
Now, come back to the machine where PMP is running. Navigate to
<PMP_Home>/bin directory and run the script startDB.bat <MySQL Port>
(Windows) / startDB.sh <MySQL Port> (Linux)
AdventNet, Inc.
89
AdventNet ManageEngine PasswordManager Pro :: Help Documentation
•
For example, with the default the MySQL port 2345, you need to execute this as:
startDB.bat 2345 (For Windows)
startDB.sh 2345 (For Linux)
•
Again go to the remote machine and navigate to the <MySQL>/bin folder and run
the script startSlaveDB.bat (Windows) / startSlaveDB.sh (Linux)
Step 3: Start PMP server
•
•
Start the PMP server
Live Backup setup is ready now. Whenever there happens a change in the master
database, which runs with PMP, the same will be immediately updated to the
slave database
Verify Live Backup Setup
After carrying out the above steps, you can verify if the Live Backup setup is working
properly by looking at the message in "Admin >> General >> Database Backup" page. If
the setup is proper, you will see the following:
Connection Status: Alive and Live Backup is in progress now
Slave database is running in host: <Host Name>
Recovering data from slave when master database crashes
In the rare event of master database crash, you can recover data from the slave
database.
To recover the data,
•
In the remote machine where slave DB is running, navigate to <MySQL>/data
folder and create a zip of the following:
•
•
"passtrix" directory
"ibdata1" file
•
Copy the zip created as above
•
Go to the machine where PMP was running
•
Get a fresh PMP installation in the machine where the master database was
running
•
Navigate to <PMP_Home>/mysql/data folder and unzip the zip created from the
slave database. Once you do this, the data is safely recovered in the new PMP
version
•
Now, start the PMP server
Note: Once you recover the data from the slave and give life to the master
database, the slave database will no longer be valid. Just delete the mysql folder
in the remote machine. If you want to have the Live Backup enabled again, you
need to follow the steps once again.
AdventNet, Inc.
90
AdventNet ManageEngine PasswordManager Pro :: Help Documentation
Scheduled Backup
You can schedule database backup to be executed at any specific point of time.
To schedule database backup,
•
•
Go to "Admin" tab
Click "Database Backup" icon under "General" section
In the UI that opens up,
•
Select the schedule option - day, weekly or monthly.
To schedule backup in specific day(s) interval,
1. If your requirement is to backup the database contents in specific day intervals say, once in three days, this option would come in handy. You can choose any
interval between 1 and 28 and also specify the time at which backup has to be
taken.
2. To enable this option, click the radio button "Day"
3. Select the day interval
4. Select the time at which backup has to be taken
5. Backed up data are stored as a .zip file under <PMP_Home>/backUp directory by
default. If you want, you can specify the destination directory where you wish to
store the backedup contents.
6. Every time backup is executed, one backup file will be created. You can specify
the maximum number of such backup files to be kept in this directory. For
example, if you choose "10" in the drop-down against the field "Maintain latest --backups only", only the latest 10 backup files would be kept under this directory
7. Click "Save". The required backup schedule is created
•
Where does the backup data get stored? Is it encrypted?
All sensitive data in the backup file are stored in encrypted form in a .zip file
under <PMP_Home/backUp> directory or under the directory specified by
you. It is recommended that you backup this file in your secure, secondary
storage for disaster recovery.
•
What is the best option for database backup schedule?
Database backup operation is both time and resource consuming. Hence, it
is recommended to schedule it to run during off-peak traffic timings. While
the operation is in progress, no configuration change could be performed in
PMP.
•
Can I replicate the data to another server and have the
permissions stay intact?
Yes. PMP application is stateless and all the data are stored in the database
and just replicating the database against a fresh installation of the
application gets you all the data intact.
AdventNet, Inc.
91
AdventNet ManageEngine PasswordManager Pro :: Help Documentation
To schedule backup on a specific day every week,
1. If your requirement is to backup the database contents on a specific day every
week - say, on Mondays, this option would come in handy. You can choose any
day from Sunday to Saturday and also specify the time at which backup has to be
taken. To enable this option,
2. click the radio button "Weekly"
3. select the day of the week
4. select the time at which backup has to be taken
5. Backed up data are stored as a .zip file under <PMP_Home>/backUp directory by
default. If you want, you can specify the destination directory where you wish to
store the backedup contents.
6. Every time backup is executed, one backup file will be created. You can specify
the maximum number of such backup files to be kept in this directory. For
example, if you choose "10" in the drop-down against the field "Maintain latest --backups only", only the latest 10 backup files would be kept under this directory
7. Click "Save". The required backup schedule is created
To schedule backup on a specific day every month,
1. If your requirement is to backup the database contents on a specific date every
month - say, on 13th, this option would come in handy. You can choose any date
from 1st to 31st and also specify the time at which backup has to be taken. To
enable this option,
2. Click the radio button "Monthly"
3. Select the date of the month
4. Select the time at which backup has to be taken
5. Backed up data are stored as a .zip file under <PMP_Home>/backUp directory by
default. If you want, you can specify the destination directory where you wish to
store the backedup contents.
6. Everytime backup is executed, one backup file will be created. You can specify
the maximum number of such backup files to be kept in this directory. For
example, if you choose "10" in the drop-down against the field "Maintain latest --backups only", only the latest 10 backup files would be kept under this directory
7. Click "Save". The required backup schedule is created
AdventNet, Inc.
92
AdventNet ManageEngine PasswordManager Pro :: Help Documentation
Disaster Recovery
In the event of a disaster or data loss, you can restore the backed up data to the PMP
database. To restore the data, PMP provides scripts.
Restoring the data
Important Note:
1. Stop PMP server before trying to restore data. If restoration is done while
the server is running, it may lead to data corruption
2. Data backed up from PMP running on Windows can be restored only in
Windows
For Windows
•
•
•
Navigate to <PMP_Installation_Directory>/bin folder
Execute the script "restoreDB.bat <backup file name>" (enter your backup file
name in .zip format)
The backed up contents would be restored to the PMP DB
For Linux
•
•
•
Navigate to <PMP_Installation_Directory>/bin folder
Execute the script "sh restoreDB.sh <backup file name>" (enter your backup file
name in .zip format)
The backed up contents would be restored to the PMP DB
AdventNet, Inc.
93
AdventNet ManageEngine PasswordManager Pro :: Help Documentation
Password Management API for Application-toApplication Password Management
(Feature available only in Premium Edition)
If you have applications in your infrastructure that require connecting to other
applications using a password, they can query PMP to retrieve the password. This way,
the application-to-application (A-to-A) passwords can also follow good password
management practices like periodic rotation, without the trouble of manually making the
updates at many places. Same procedure can be used for Application-to-Database
password management (A-to-DB).
How does A-to-A / A-to-DB Password Retrieval & Management
Work?
The web API exposed by PMP forms the basis for A-to-A Password Management in PMP.
The applications connect and interact with PMP through HTTPS. The application's identity
is verified by forcing it to issue a valid SSL certificate, matching the details already
provided to PMP corresponding to that application. PMP makes it easier for applications
by providing a command line script that abstracts the complexities of using the web API.
The command line scripts invoke libraries that use the web API.
How to setup Password Management API?
When you want an application to use the PMP web API, first you should register the
application with PMP, providing specific details on the application. PMP will then create an
integration toolkit containing the libraries and the command line scripts. The application
can then use the toolkit to perform password operations on the PMP repository. Follow
the procedure detailed below to do this:
Step 1 - Downloading API Toolkit
•
•
Go to "Admin" >> "General" and click "Password Management API"
In the GUI that opens, click "Add Application" and provide details about your
application. Fill-in the following details
Term
Definition
Application
Name
DNS Name/IP
Address
Name of the application in which you wish to deploy A-to-A
password management using PMP
This is required to establish communication between the
application and PMP
Resource Type
Select the operating system in which the application runs. Only
those operating systems that are listed in the drop-down are
supported by PMP (at present Windows & Linux are supported)
Select the password management operations you wish to allow for
the application - Creating Passwords / Resetting Passwords /
Retrieving Passwords.
Operations
Allowed
AdventNet, Inc.
94
AdventNet ManageEngine PasswordManager Pro :: Help Documentation
Term
Definition
Inherit the
permissions of
You need to set the password access permissions for the
application. The application cannot be allowed to manage all
passwords. It has to be allotted specific passwords accessible to it.
PMP already has a comprehensive, well-defined access permissions
for users. The application may be permitted to inherit the same
access levels of one of the users of PMP. Select the name of the
user from the drop-down.
•
•
Click "Save". Now, using the details provided by you, PMP will create a toolkit for
the application
Click "Download Toolkit" and save the toolkit in the server where the
application is running
Step 2 - Setting up PMP API in the application
As mentioned above, the application's identity is verified by forcing it to issue a valid SSL
certificate, matching the details already provided to PMP corresponding to that
application. To make these settings,
Create SSL client certificate & private key
•
Generate the certificate signing request and generate the certificate as
explained in the openssl cookbook. Put the certificate and key directory
where you installed the PMP API in the application
Configurations for PMP API
•
•
Open a command prompt and navigate to the directory where you have
installed the PMP API
Edit PMP_API.conf and set the absolute path of client certificate and its
private key (that you created and stored as explained above) for the
parameters ClientCertPath and ClientKeyPath
Step 3 - Creating truststore in PasswordManager Pro Installation
•
This step is to create truststore in PMP for A-to-A / A-to-DB authentication. Open
a command prompt and navigate to <PMP_SERVER_HOME>\bin directory and
execute the following command:
For Windows
importCert.bat <Absolute Path of client certificate created by you>
For Linux
importCert.sh <Absolute Path of client certificate created by you>
•
Restart PMP server
Important Note: The client certificate & private should be compulsorily present
in the application server in which you want to use A-to-A / A-to-DB password
management.
AdventNet, Inc.
95
AdventNet ManageEngine PasswordManager Pro :: Help Documentation
Commands to be included in your application for automatic A-to-A
/ A-to-DB password management
The above steps represent the completion of PMP API installation in the application. For
automatic A-to-A password management, you need to use the following commands in
your application invoking the API.
For Password Retrieval
Open a command prompt and navigate to <PMP_SERVER_HOME>\bin directory
and execute the following command:
For Windows
PMP_API.bat RETRIEVE <Resource Name as present in PMP> <Account
Name as present in PMP>
For Linux
PMP_API.sh RETRIEVE <Resource Name as present in PMP> <Account
Name as present in PMP>
Executing the above command will return the password alone.
For Resetting Password Locally
Open a command prompt and navigate to <PMP_SERVER_HOME>\bin directory
and execute the following command:
For Windows
PMP_API.bat RESET_LOCAL <Resource Name as present in PMP>
<Account Name as present in PMP> <New Password>
For Linux
PMP_API.sh RESET_LOCAL <Resource Name as present in PMP> <Account
Name as present in PMP> <New Password>
For Remote Password Reset
Open a command prompt and navigate to <PMP_SERVER_HOME>\bin directory
and execute the following command:
For Windows
PMP_API.bat RESET_REMOTE <Resource Name as present in PMP>
<Account Name as present in PMP> <New Password>
AdventNet, Inc.
96
AdventNet ManageEngine PasswordManager Pro :: Help Documentation
For Linux
PMP_API.sh RESET_REMOTE <Resource Name as present in PMP>
<Account Name as present in PMP> <New Password>
Executing the above command will try to do remote password reset. If the
operation succeeds, it will change the password in PMP too and will return the
message "Password changed successfully". In case, remote password reset fails, it
will not change the password in PMP and will return the message "Password reset
failed".
For Creating a New Resource & an User Account
Open a command prompt and navigate to <PMP_SERVER_HOME>\bin directory
and execute the following command:
For Windows
PMP_API.bat CREATE <Resource Name> <Account Name> <Password>
For Linux
PMP_API.sh CREATE <Resource Name> <Account Name> <Password>
Executing the above command will create a new resource and an account in PMP.
If you do not give a password for the account, PMP will automatically generate
one.
AdventNet, Inc.
97
AdventNet ManageEngine PasswordManager Pro :: Help Documentation
Rebranding PMP
If you want to replace the PMP logo appearing on the login screen and on the webinterface with that of yours, you can do so from the web-interface itself. It is preferable
to have your logo of the size 210 * 50 pixels.
To rebrand the logo,
•
•
•
•
•
Go to the "Admin" tab
Click "Customize >> Rebrand"
Browse and choose the required image
Click "Save"
The PMP will appear with rebranded look
AdventNet, Inc.
98
AdventNet ManageEngine PasswordManager Pro :: Help Documentation
Changing the PMP login password
Users having an account with the PMP, can change their own password and email ID.
The "Edit Account settings" tab facilitates changing of password and email ID. Using this
tab, the currently logged in user can change his/her password and email ID alone.
To Change Login Password,
Go to "Admin" tab
Go to "Change Password" in the "General" tab
Enter the old password
Enter new password. The new password you provide will have to be compliant to
the password policy assigned to your account by your administrator. The
password generator will generate passwords according to the assigned policy. The
new password will NOT be emailed. Take care to remember your new password.
If you forget your password, use the 'Forgot password' link available in the login
page of PMP to reset your password.
Confirm the new password
Click "Save"
Password is now reset
Note: If you do not want to display the 'Forgot Password' option, you can very
well turn it off. See the section "General Optional Settings" for details.
AdventNet, Inc.
99
AdventNet ManageEngine PasswordManager Pro :: Help Documentation
Password Policies
Password policies help you define the characteristics of passwords of various strengths,
which can then be used to enforce strong passwords on resources. Apart from the
default policies, you can create your own based on your requirements. The built-in
password generator can generate passwords compliant to the defined policies.
Password Generator randomly generates password based on the rule set by the
administrator - for example, minimum number of characters, alphanumeric characters,
mixed case, special characters etc. Every password input field in PMP has the password
generator along-side and the policy that is set as system default will be used to generate
passwords, unless directed otherwise.
Password policy for PMP can be centrally managed from the "Admin" tab:
•
•
•
Go to "Admin >> Customize >> Password Policies"
By default, three policies - Low, Medium and Strong are available in PMP
indicating the relative strength of the passwords. Low represents the passwords
with less strict constraints, medium with a few strict conditions and strong with
very strict conditions. The three default policies cannot be edited or deleted
You can set any one of the policy as the default policy -that is, when the user
tries to change the password of a resource/account, the default policy would be
enforced and the user would be forced to enter a password as per the policy. To
set a policy as the default policy, just click the "set as default" icon present
against the policy
You can create you own password policy based on your requirements. To create a
password policy,
•
•
•
Click "Add Policy"
In the form that pops-up, provide a name for your policy, enter a description,
specify the minimum and maximum password lengths, specify if mixed-cases,
special characters are to be enforced and how many such special characters,
specify if the password has to start with an alphabet, if login name could be used
as password, how many old passwords are to kept in archives and the Password
Age - i.e. the time limit (in days) up to which the password is valid. After the
validity period, the password would expire and it would require reset. (The three
default policies - low, medium and strong have password age values of 15, 10
and 5 days respectively)
Click "Save"
•
How does a Password Policy get enforced in PMP?
This question naturally arises when you are in the process of adding a
resource. The following example would provide the answer: If your intention
is to have accounts with strong passwords, others with admin privileges
should not disturb this intention while changing the password. So, this step
is crucial. If you want to enforce policy at time of resource addition itself,
see "General Optional Settings" for details.
AdventNet, Inc.
100
AdventNet ManageEngine PasswordManager Pro :: Help Documentation
Audit & Notifications
As PMP deals with sensitive passwords, it comes with an effective auditing mechanism to
record who accessed what resource and when along with trails about every single action
performed by the user. All operations performed by users on the GUI are audited with
the timestamp and the IP address from where they accessed the application.
Audit in PMP has been classified into three types:
•
•
•
Resource Audit - all operations pertaining to resources, resource groups,
accounts, passwords, shares and policies
User Audit - all operations performed in PMP by a 'PMP user' are captured under
'User Audit'
Task Audit - records of various scheduled tasks created
PMP audit is quite comprehensive and almost all actions are audited. There may be
requirements to audit only the specific operations. To facilitate that, within each audit
type, PMP provides the flexibility to audit only the required operations. There is also
option to send notifications to required recipients whenever a chosen event (audit trail of
your choice) occurs in PMP.
Resource Audit
All operations pertaining to 'resources' are captured under 'Resource Audit'.
To view resource audit
•
Navigate to Audit >> Resource Audit
To record only specific trails in resource audit
•
•
Click the icon "Configure Audit" present in the Resource Audit page
In the UI that opens, select the operations for which you want audit records to be
generated. Leave the checkbox against all other operations blank
To receive notifications on generation of audit records
•
•
•
•
If you want to receive notifications on the occurrence of a particular event, you
can select the respective check-boxes against the required operation
PMP provides the flexibility of sending separate notifications to each and every
occurrence of the desired event. If you do not wish to be flooded with emails, you
can choose to receive a single notification every day (containing information
about all the events generated on the day) in the form a daily digest
You can also specify the list of recipients list for notifications
Click "Save"
Purging Resource Audit Trails
•
•
•
Almost all operations pertaining to resources performed in PMP are audited and
the trails are stored in the database. Naturally, the resource audit records grow at
a faster rate. If you do not need the audit records that are older than a specified
number of days, you can purge them
To purge the records that are older than a specified number of days, specify the
number in the text-box against the field "Purge Audit Records".
Click "Save". The Resource Audit records that are older than the number of days
specified by you, will be purged
AdventNet, Inc.
101
AdventNet ManageEngine PasswordManager Pro :: Help Documentation
Exporting Resource Audit Trails as PDF/CSV Report
•
The Audit Trails could be exported as a PDF/CSV file. You can store it in a secure
location for reference purpose. Click the button "Export to PDF" or "Export to
CSV" as required
Resource Audit Filters
You can create customized views for filtering and viewing only those audit records that
are of interest to you. For example, in Resource Audit, if you want to filter and view the
audit trails for the accounts added for specific resources, you can create a custom filter
by specifying your criteria.
To create an audit filter,
•
•
•
•
Click the link "Add" present beside 'Manage Custom Filters'
Select the required column names from the drop-down
Enter your criteria (If you want to enter operation type as criteria, click the link
'View Operation Types', refer to the list and enter the required name as it is)
Click "Save"
User Audit
All operations performed in PMP by a 'PMP user' are captured under 'User Audit'.
To view user audit
•
Navigate to Audit >> User Audit
To record only specific trails in user audit
•
•
Click the icon "Configure Audit" present in the User Audit page
In the UI that opens, select the operations for which you want audit records to be
generated. Leave the checkbox against all other operations blank
To receive notifications on generation of audit records
•
•
•
•
If you want to receive notifications on the occurrence of a particular event, you
can select the respective check-boxes against the required operation
PMP provides the flexibility of sending separate notifications to each and every
occurrence of the desired event. If you do not wish to be flooded with emails, you
can choose to receive a single notification every day (containing information
about all the events generated on the day) in the form a daily digest
You can also specify the list of recipients list for notifications
Click "Save"
Purging User Audit Trails
•
•
•
Almost all operations performed by a user are audited and the trails are stored in
the database. Naturally, the user audit records grow at a faster rate. If you do
not need the audit records that are older than a specified number of days, you
can purge them
To purge the records that are older than a specified number of days, specify the
number in the text-box against the field "Purge Audit Records".
Click "Save". The Resource Audit records that are older than the number of days
specified by you, will be deleted from the database once and for all
AdventNet, Inc.
102
AdventNet ManageEngine PasswordManager Pro :: Help Documentation
Exporting User Audit Trails as PDF/CSV Report
•
The Audit Trails could be exported as a PDF/CSV file. You can store it in a secure
location for reference purpose. Click the button "Export to PDF" or "Export to
CSV" as required
User Audit Filters
You can create customized views for filtering and viewing only those audit records that
are of interest to you. For example, in User Audit, if you want to filter and view the audit
trails for the accounts added for specific resources, you can create a custom filter by
specifying your criteria.
To create an audit filter,
•
•
•
•
Click the link "Add" present beside 'Manage Custom Filters'
Select the required column names from the drop-down
Enter your criteria (If you want to enter operation type as criteria, click the link
'View Operation Types', refer to the list and enter the required name as it is)
Click "Save"
Task Audit
Records of various scheduled tasks created and executed in PMP are captured as part of
task audit.
To view user audit
•
Navigate to Audit >> Task Audit
To record only specific trails in resource audit
•
•
Click the icon "Configure Audit" present in the Task Audit page
In the UI that opens, select the operations for which you want audit records to be
generated. Leave the checkbox against all other operations blank
To receive notifications on generation of audit records
•
•
•
•
If you want to receive notifications on the occurrence of a particular event, you
can select the respective check-boxes against the required operation
PMP provides the flexibility of sending separate notifications to each and every
occurrence of the desired event. If you do not wish to be flooded with emails, you
can choose to receive a single notification every day (containing information
about all the events generated on the day) in the form a daily digest
You can also specify the list of recipients list for notifications
Click "Save"
Purging Task Audit Trails
•
•
•
Almost all operations performed by a user are audited and the trails are stored in
the database. Naturally, the user audit records grow at a faster rate. If you do
not need the audit records that are older than a specified number of days, you
can purge them
To purge the records that are older than a specified number of days, specify the
number in the text-box against the field "Purge Audit Records".
Click "Save". The Task Audit records that are older than the number of days
specified by you, will be deleted from the database once and for all
AdventNet, Inc.
103
AdventNet ManageEngine PasswordManager Pro :: Help Documentation
Exporting Task Audit Trails as PDF/CSV Report
•
The Audit Trails could be exported as a PDF/CSV file. You can store it in a secure
location for reference purpose. Click the button "Export to PDF" or "Export to
CSV" as required
Task Audit Filters
You can create customized views for filtering and viewing only those audit records that
are of interest to you. For example, in Task Audit, if you want to filter and view the audit
trails for the database backup schedules created by specific users, you can create a
custom filter by specifying your criteria.
To create an audit filter,
•
•
•
•
•
Click the link "Add" present beside 'Manage Custom Filters'
Select the required column names from the drop-down
Enter your criteria (If you want to enter operation type as criteria, click the link
'View Operation Types', refer to the list and enter the required name as it is)
Click "Save"
Does PMP record Password viewing attempts and retrievals by
users?
Yes, PMP records all operations performed by the user including the
password viewing and copying operations. From audit trails, you can get a
comprehensive list of all the actions and attempts by the users with
password retrieval. The list of operations that are audited (with the
timestamp and the IP address) includes:
o
o
o
•
User accounts created, deleted and modified
Users logging in and logging off the application
Resources and passwords created, accessed, modified and deleted
How are the audit logs protected against modification?
All the audit records are stored in the MySQL database. To ensure security,
the MySQL server has been configured not to accept connections from
remote hosts. In addition, the password to access the MySQL server is
randomly generated for every PMP installation. So, unless people gain entry
into the database, the audit records cannot be modified.
AdventNet, Inc.
104
AdventNet ManageEngine PasswordManager Pro :: Help Documentation
Reports
(Feature available only in Premium Edition)
The information on the entire password management process in your enterprise is
presented in the form of comprehensive reports in PMP. The status and summaries of the
different activities such as password inventory, policy compliance, password expiry, user
activity etc are provided in the form of tables and graphs, which assist the IT
administrators to make a well-informed decisions on password management.
Types of Reports
PMP provides four types of reports •
•
•
•
Password Reports
User Reports
General Reports
Compliance Reports
Password Reports
All details pertaining to the device properties, hardware properties, firmware
details, audit details pertaining to the devices etc have been presented under
Network Reports.
To access the Network Reports, just go to the "Reports" tab.
Report Name
Password
Inventory
Report
What does it Convey
Additional
Information
This report provides a snapshot of
details about the total number of
resources, passwords, resource
types and users present in PMP.
Besides, it provides details about
the ownership of each
password/resource and details
about the time at which the
passwords were accessed.
This report can be
generated in the form
of PDF and can be
emailed to required
recipients. Click the
links "Export to PDF"
and "Email this
Report" to do the
required operation.
There are three sections in this
report:
Schedule Report
Password Inventory
Summary
This section lists down the
details in summary about
the total number of
resources, passwords,
resource types and users
present in PMP.
AdventNet, Inc.
105
AdventNet ManageEngine PasswordManager Pro :: Help Documentation
Report Name
What does it Convey
Additional
Information
Password Inventory by
Resource Type
This section provides a piechart showing the
distribution of passwords in
accordance with the
resource type.
Password Ownership &
Access Details
This section lists down the
ownership details of
resources and passwords in
tabular form. You can make
a search in this report by
present
clicking the icon
at the top-right hand corner
of the table.
Password
Compliance
Report
This report provides a snapshot of
details about the passwords that
comply to the password policy set
by the administrator and the ones
that do not comply. Besides, it
provides details about the
ownership of each password.
Also, in the case of the passwords
which are found to be noncompliant, details about noncompliance are also provided. This
helps in taking the required
corrective action immediately to
make them compliant.
This report can be
generated in the form
of PDF and can be
emailed to required
recipients. Click the
links "Export to PDF"
and "Email this
Report" to do the
required operation.
There are three sections in this
report:
Password Policy
Compliance - Summary
Report
This section lists down the
details in summary about
the total number of
passwords, total number of
passwords that comply to
the policy and total number
of passwords that are noncompliant.
AdventNet, Inc.
106
AdventNet ManageEngine PasswordManager Pro :: Help Documentation
Report Name
What does it Convey
Additional
Information
Policy Violation by
Resource Type
This section provides a piechart showing the number
of passwords that are noncompliant to the defined
policy based on the
resource type.
Password Compliance Detailed Report
This section lists down the
compliance details of all the
resources (whether they are
compliant with the defined
policy or not). It also
depicts the number of
violations in each resource
and the ownership details of
resources and passwords in
tabular form. You can make
a search in this report by
present
clicking the icon
at the top-right hand corner
of the table.
Password
Expiry Report
This report provides information
about the validity details of
passwords. In other words, it
provides details about the
passwords that have expired and
the passwords that are valid.
There are three sections in this
report:
This report can be
generated in the form
of PDF and can be
emailed to required
recipients. Click the
links "Export to PDF"
and "Email this
Report" to do the
required operation.
Password Expiry Summary Report
This section lists down the
details in summary about
the total number of
passwords, total number of
expired passwords and total
number of valid passwords.
Password Expiry by
Resource Type
This section provides a piechart showing the number
of expired passwords in
each resource type.
AdventNet, Inc.
107
AdventNet ManageEngine PasswordManager Pro :: Help Documentation
Report Name
What does it Convey
Additional
Information
Password Expiry Detailed Report
Password
Activity
Report
This section lists down the
expiry/validity details of all
the resources. It also
depicts the number of
expired/valid passwords in
each resource and the
ownership details of
resources and passwords in
tabular form. You can make
a search in this report by
present
clicking the icon
at the top-right hand corner
of the table.
This report provides information
about the usage details of all
passwords in the system. It
provides details about the
passwords that were most
accessed during a specific time
period, the ones that were least
accessed, average access per day,
per week, passwords that were
frequently reset etc.
This report can be
generated in the form
of PDF and can be
emailed to required
recipients. Click the
links "Export to PDF"
and "Email this
Report" to do the
required operation.
There are six sections in this
report:
Activity Statistics Summary Report
This section lists down the
details in summary about
the total number of
passwords, average access
per day/ per week, average
password age, the number
of passwords for which reset
is supported, number of
passwords that were reset
using agents, number of
passwords that were reset
without agents, number of
failures in password reset
etc.
Top 10 Passwords Access
Count
This section provides a
graph showing the top 10
passwords that were
accessed most.
AdventNet, Inc.
108
AdventNet ManageEngine PasswordManager Pro :: Help Documentation
Report Name
What does it Convey
Additional
Information
Top 10 Passwords Reset
Count
This section provides a
graph showing the top 10
passwords that were reset
most.
Bottom 10 Passwords
Access Count
This section provides a
graph showing the least
accessed 10 passwords.
Bottom 10 Passwords
Reset Count
This section provides a
graph showing the least
reset 10 passwords.
Password Activity Details
This section provides the
following details about the
passwords that are in sync
with the target systems:
Password
Integrity
Report
Date of creation of the
password, number of times
the password had been
accessed from the date of
creation,
number of time the
password underwent
changes, the time at which
the password was
accessed/changed last, the
frequency at which the
password is being accessed
every day, the frequency at
which the password is being
changed every week etc.
Passwords of resources such as
servers, databases, network
devices and other applications are
stored in PMP. It is quite possible
that someone who have
administrative access to these
resources could access the
resource directly and change the
password of the administrative
AdventNet, Inc.
This report can be
generated in the form
of PDF and can be
emailed to required
recipients. Click the
links "Export to PDF"
and "Email this
Report" to do the
required operation.
109
AdventNet ManageEngine PasswordManager Pro :: Help Documentation
Report Name
What does it Convey
Additional
Information
account. In such cases, the
password stored in PMP would be
outdated and will not be of use to
the users who access PMP for the
password. PMP provides option for
checking the integrity of
passwords at any point of time on
demand and also at periodic
intervals.
You can create a scheduled task
for carrying out the integrity
check at periodic intervals. Click
"Schedule Report" and fill-in the
details.
You can also generate the
integrity report at any point of
time by clicking the link
"Generate Report". When you
do so, you will get the results of
the automatic integrity check
done by PMP at 1 AM every day
for all the accounts for which
remote synchronization has been
enabled. The results of the
current day's check done at 1 AM
will be depicted in the report.
In case, you want to carry
out integrity check at any moment
on demand to get latest details,
you need to click the option "Run
Integrity Check". PMP will try to
establish connection with the
target systems for all the
accounts for which remote
password synchronization has
been enabled. Once the
connection is established, it tries
to login with the credentials stores
in PMP. If login does not succeed,
PMP concludes that the password
is out of sync. In case, PMP is not
even able to establish connection
with the system due to some
network problem, it will not be
taken as password out of sync. A
consolidated notification would be
emailed to all the administrators
and auditors.
AdventNet, Inc.
110
AdventNet ManageEngine PasswordManager Pro :: Help Documentation
Report Name
What does it Convey
Additional
Information
The Password Integrity report
provides information if the
passwords in the system are in
sync with the corresponding
passwords in the target systems.
There are two sections in this
report:
Password Integrity Summary Report
This section lists down the
details in summary about
the total number of
passwords for which reset is
supported, passwords for
which reset is done using
agents, number of
passwords that were reset
using agents, number of
passwords in the system
are in sync with the
corresponding passwords in
the target systems, number
of passwords that are out of
sync etc.
Password Integrity Details
This section provides details
about the integrity status,
who carried out password
reset, the time at which the
reset was done etc.
User Reports
Report Name
User Access
Report
What does it Convey
Additional
Information
This report provides details about
all users in the system with
reference to password and
resource access.
This report can be
generated in the form
of PDF and can be
emailed to required
recipients. Click the
links "Export to PDF"
and "Email this
Report" to do the
required operation.
This report has three sections:
User Statistics - Summary
Report
Details such as the number of
new users added during the last
five days, users deleted, role
AdventNet, Inc.
111
AdventNet ManageEngine PasswordManager Pro :: Help Documentation
Report Name
What does it Convey
Additional
Information
change, number of invalid login
attempts, users who carried out
password reset during the past
five days, users who did not login
during the last five days, total
number of users/user groups in
the system, user roles etc are
presented as part of this report.
User Activity Summary Report
The actions performed by users
on passwords such as password
retrieval, password reset etc
captured as part of this summary
report. This report provides the
number of such actions done by
each user. Similarly, the number
of password actions performed by
members of each user group are
also depicted.
User Access Details
The resources and resource
groups that are owned by/shared
to each user are depicted as part
of this report. The privileges
allowed for the user are also
listed.
User Group Access Details
The list of users who are members
of the group, resource groups that
are owned by/shared to the user
group are depicted as part of this
report.
User Activity
Report
This report provides details about
the password usage of all the
users in the system.
This report has four sections:
Activity Statistics - Summary
Report
This report can be
generated in the form
of PDF and can be
emailed to required
recipients. Click the
links "Export to PDF"
and "Email this
Report" to do the
required operation.
The total number of passwords
accessed by users and user
groups during a specified time
period are depicted in the form of
graphs.
AdventNet, Inc.
112
AdventNet ManageEngine PasswordManager Pro :: Help Documentation
Report Name
What does it Convey
Additional
Information
Top 10 Users Login/Access/Reset
The list of the top 10 users who
performed most login attempts,
most password access and most
password resets.
Bottom 10 Users Login/Access/Reset
The list of 10 users who
performed least login attempts,
least password access and least
password resets.
User Activity Details
All details about users, including
the total number of login attempts
made, number of invalid
attempts, number of passwords
accessed, number of passwords
reset are depicted.
General Reports
Report Name
Executive
Report
What does it Convey
Additional
Information
This report provides a snapshot of
all password access and user
activities in the system.
This report can be
generated in the form
of PDF and can be
emailed to required
recipients. Click the
links "Export to PDF"
and "Email this
Report" to do the
required operation.
It is a combined report of
Password and User reports. It
provides details, in summary,
about the following:
Password Statistics, Password
Activity, Password Policy,
Password Expiry, Password Out of
Sync, User Statistics and User
Activity.
AdventNet, Inc.
113
AdventNet ManageEngine PasswordManager Pro :: Help Documentation
Compliance Report
Report Name
What does it
Convey
Additional
Information
PCI DSS Compliance Report
This reports the
violations in your
network from the
requirements of
Payment Card
Industry (PCI) Data
Security Standard
(DSS), relevant to
the use and
management
practices of shared
administrative,
software and service
account passwords of
various systems.
You have the
option to
generate
separate
compliance
reports for each
PCI DSS
requirement
2,3,7,8,10 &
12. You can
also generate a
consolidated
PCI DSS report
too.
The PCI DSS stands for Payment Card
Industry Data Security Standard. It is
a multifaceted security standard that
includes requirements for security
management, policies, procedures,
network architecture, software design
and other critical protective measures.
It represents a set of rules that need
to be adhered to by businesses that
process credit cardholder information,
to ensure data is protected. The PCI
Data Security Standard is comprised
of 12 general requirements designed
to:
•
Build and maintain a secure
network
•
Protect cardholder data
•
Ensure the maintenance of
Note: In order to
adhere to "all" the
requirements of the
PCI DSS standard
completely, you will
need other tools and
security procedures
to be implemented.
vulnerability management
programs
•
Implement strong access
control measures
•
PCI DSS
requirements
2,3,7,8,10 & 12 are
covered in this
report.
Regularly monitor and test
This report can
be generated in
the form of PDF
and can be
emailed to
required
recipients. Click
the links
"Export to PDF"
and "Email this
Report" to do
the required
operation.
networks
•
Ensure the maintenance of
information security policies
This standard is governed by PCI
Security Standards Council
https://www.pcisecuritystandards.org/
Scheduling Report Generation
All reports can be scheduled to be generated at periodic intervals. The reports thus
generated can be sent via email to required recipients. To create a schedule for any
report,
•
•
go to "Reports" tab
click the link "Schedule Report" available under the name of each report
AdventNet, Inc.
114
AdventNet ManageEngine PasswordManager Pro :: Help Documentation
•
•
•
•
in the GUI that opens, select the required schedule - every day / every month /
only once
provide the date / time at which the schedule has to commence
enter the list of email ids to which the report has to be emailed
click "Schedule".
The result of the scheduled task created here are audited and can be viewed from the
"Task Audit" section.
To terminate an already created schedule,
•
•
•
•
Click the link "Schedule Report" available under the name of report (for which
the schedule has to be terminated)
In the GUI that opens, select the option "Never"
Click "Schedule"
The schedule will be terminated
AdventNet, Inc.
115
AdventNet ManageEngine PasswordManager Pro :: Help Documentation
Optional General Settings
In PMP, there are certain important features such as enforcement of password policy,
'Forgot Password' option to reset PMP user passwords, email notification on PMP user
creation or role modification, provision for managing personal passwords, exporting
resources, remote password synchronization etc.
While these features are very much needed for certain organizations, some others find
them a hindrance. To cater to the needs of these two sets of user, PMP strikes balance
through the general optional settings.
To access the settings page,
•
•
•
Go to "Admin" tab
Click "General Settings" under the section "General"
In the UI that opens, following options are listed
For ease of use, the general settings have been classified into the following categories:
•
•
•
•
•
Password Retrieval
Password Reset
Resource/ Password Creation
User Management
Personal Passwords
Password Retrieval
Allow password users and auditors to retrieve passwords for which auto logon
is configured
Through the auto logon feature, PMP provides the option to establish direct
connection to the resource eliminating the need for copy-paste of passwords. By
default, password users and auditors will be able to retrieve the passwords that
are shared with them. If auto logon is configured, they might not need access to
the passwords. In such cases, you can take a decision on allowing/restricting
access to passwords. Select the checkbox to allow access and uncheck it to
restrict.
Automatically hide passwords after X seconds (specify '0' to never hide
passwords automatically)
By default, passwords are shown in hidden form behind asterisks. On clicking the
asterisks, the passwords appear in plain text. By default, the passwords are shown
for 10 seconds only. After that, they will be automatically hidden. If you want to
increase or decrease this time period, specify the desired value in seconds. If you
specify 0, passwords will continue to remain in plain text until you click the
password to hide.
Automatically clear clipboard data after seconds (specify '0' to never clear
clipboard automatically)
PMP leverages clipboard utility of browsers to copy passwords when you intend to
copy and paste passwords. By default, the copied passwords will be available for
AdventNet, Inc.
116
AdventNet ManageEngine PasswordManager Pro :: Help Documentation
pasting for 30 seconds. If you want to increase or decrease this time period,
specify the desired value in seconds. If you specify 0, clipboard will not be cleared
automatically.
Include passwords when resource details are exported to CSV format
When you export PMP resources to a CSV file, by default, password of the accounts
are included in plain text. In case, for security reasons, you wish to mask the
password in the report, you can do so by unchecking this checkbox. Once you
uncheck this option, the passwords would be masked in the exported CSV file.
Force users to provide reason while retrieving the passwords
By default, when a user tries to retrieve the password of a resource, on clicking
the asterisks, the passwords appear in plain text. If you want to force your users
to provide a reason why access to the password was needed, you can enable this
option by selecting the checkbox.
Password Reset
Enforce users to provide a reason when changing the resource password
When resource passwords are changed by a user, by default, it is not mandatory
to add a comment providing the reason for the change. However, enforcing the
users to enter a comment would be a good practice and aid in auditing user
actions. If you want to enforce this, select this checkbox. Once you do this, users
will be prompted to enter a comment as reason when attempting change
password.
Default selection for user initiated remote password change action
One of the important capabilities of PMP is Remote Password Synchronization,
which enables users to change password of a resource in PMP console and apply
the change in the remote resource instantaneously. This remote synchronization of
passwords can be done for resources of the type Windows, Windows Domain and
Linux. By default, when you try to change the password of an account belonging to
the above three types, the remote synchronization option is enabled. If you want
to disable this option, click the radio button "Do not apply changes to the
resource". At any point of time, you can override this option while invoking the
change password option.
Wait for X seconds between stopping and starting the services after service
account password reset
For every Windows domain account for which the service account reset is enabled,
PMP will find out the services which use that particular domain account as service
account, and automatically reset the service account password if this domain
password is changed. In certain cases, there would be requirements for stopping
and starting the services. In such cases, you can configure PMP to wait for a
specified time period (in seconds) between stopping and starting the services. By
default, PMP waits for 60 seconds. You may configure it in accordance with your
needs.
AdventNet, Inc.
117
AdventNet ManageEngine PasswordManager Pro :: Help Documentation
Enforce users to provide two different accounts for use with remote password
reset for UNIX / Linux resources
To enable remote password synchronization for UNIX/Linux resource types, you
can enforce users to provide two different accounts for password reset. If you do
not opt this, users will be allowed to enable remote synchronization with just one
account.
Resource/Password Creation
Enforce password policy during resource or password creation
By default, when you are adding your resource to PMP, it does not check for
compliance to the password policy already defined by the IT administrator. It is
enforced only at the time of doing change password. In case, you wish to check
policy compliance at the time of resource / account addition itself, just click this
checkbox. Once you click this, you will be permitted to add your resource / account
only if the password is in accordance with the policy defined.
User Management
Show 'Forgot Password' option in the login screen
If a PMP user forgets his/her login password, they can rely on the 'Forgot
Password' option, which sends a new login password to that user via email. By
default, this option remains enabled. If you do want to display this option, uncheck
the checkbox. Once you do this, from the login onwards, this option would not be
visible to all the users.
Allow 'Local Authentication' when AD/LDAP authentication is enabled
As explained earlier, PMP provides three types of authentication - LDAP
authentication, AD authentication and PMP's local authentication. By default, PMP
allows local authentication along with LDAP or AD authentication. If you want to
strictly the restrict to LDAP or AD authentication alone, uncheck the checkbox.
Once you do this, the PMP users would be allowed to login using their workstation
password alone.
Notify users through email during account creation or modification
By default, whenever a new user account is added in PMP or an existing account is
modified, an email is triggered to the respective user with information about the
login password in the case of new user addition and details of changes (in the case
of account modification) are sent. If you want to disable this option, uncheck this
checkbox. Once you do this, emails will not be sent on user addition or
modification.
Automatically log off users after X minutes of inactivity
As PMP users are dealing with sensitive passwords, from the information security
point of view, it would be hazardous to allow the web-interface session to remain
alive if users leave their workstation unattended. Inactivity timeout could be
configured by specifying the time limit in minutes. If a user is inactive with the
GUI for the specified time limit, the user will be automatically logged out of the
session. By default, if PMP remains unattended for 30 minutes, user will be
automatically logged out. If you specify '0' as the value, the users will not be
logged out for inactivity.
AdventNet, Inc.
118
AdventNet ManageEngine PasswordManager Pro :: Help Documentation
Enable 'Support Link' for Password Administrators
By default, PMP users with the role 'Password Administrator' will not be able to
view the 'Support' tab in the GUI. If you want Password Administrators to view the
support tab, select the checkbox.
Personal Passwords
Allow users to manage their personal passwords
PMP provides personal password management feature as a value addition to
individual users to manage their personal passwords such as credit card PIN
numbers, bank accounts etc while using the software for enterprise password
management. The personal password management belongs exclusively to the
individual users. If you do not want to allow personal password management for
your PMP users, uncheck this checkbox. Once you do this, the 'Personal' tab will
not appear in the PMP GUI.
Allow users to choose their own encryption key for managing personal
passwords
By default, when you allow users to manage their personal passwords, PMP
provides three options to secure the personal passwords - using the encryption key
provided by the customers and storing it / using the encryption key provided by
the customers and not storing it / using PMP's encryption key. When you allow the
users to manage personal passwords, you can either allow the users to define their
own encryption key or force them to use PMP's encryption key itself. If you want to
allow them to choose their own personal passwords, select the checkbox. This
option will take effect only for those users who are added after setting this.
AdventNet, Inc.
119
AdventNet ManageEngine PasswordManager Pro :: Help Documentation
Provision for storing personal information
There is provision for storing passwords of personal applications in the PMP web
interface. For example, you can store personal email account information, credit card
numbers, banking accounts, contact addresses, phone numbers, email ids etc. These
information can be accessed only by the respective user. Secure storage, retrieval and
viewing of details are assured.
Deciding the encryption key, the first step
Before you start adding your personal details, choose how secure you want PMP Pro to
maintain your personal passwords. All your personal passwords will be encrypted and
stored in the database. Tell PasswordManager Pro about the encryption key to be used
by choosing one of the options given below. This is a one time configuration which
cannot be changed later, so make your choice carefully.
Option 1: Use my encryption key and do not store it (recommended)
All your passwords will be encrypted using the key supplied by you and the key will not
be stored in the PMP database. To access your personal passwords you will have to
supply this key every time and if you forget this key you will lose all your passwords.
This is useful in cases where you store sensitive personal data.
If you want to choose this option, go to "Personal Tab" and click the option and enter the
encryption key in the text field.
Option 2: Use my encryption key and store it
All your passwords will be encrypted using the key supplied by you. The key will be
stored securely in the PMP database. During the subsequent password retrievals, you
need not specify the key and it is also not necessary that you remember this key.
If you want to choose this option, go to "Personal Tab" and click the option and enter the
encryption key in the text field.
Option 3: Use PMP's Encryption Key
All your passwords will be encrypted with the same key as the enterprise passwords. You
do not have to supply or remember any encryption keys.
If you want to choose this option, go to "Personal Tab" and click the option and enter the
encryption key in the text field.
Storing Personal Accounts
After choosing the encryption key, you can proceed with adding your personal accounts
such as web accounts, bank accounts, credit card accounts and personal contacts list.
You can also add your own categories depending on your needs.
For all the above, there is provision to add custom fields in accordance to your
requirements.
AdventNet, Inc.
120
AdventNet ManageEngine PasswordManager Pro :: Help Documentation
Note: There are four default categories - Web Accounts, Banking, Credit Cards
and Contacts. These categories cannot be deleted. However, the custom
categories created by you can be deleted at your will.
Web Accounts
To add a New Web Account,
•
•
•
•
•
Go to "Personal" Tab
Click "Web Accounts" in the drop-down "Show entries of" present at the RHS
In the GUI that comes up, click the button "Add Accounts"
Fill in the required details
Click "Save"
Can I add Custom Fields?
Yes, you can have any number of additional custom fields. To add a custom field,
click the button "Customize Fields". Your additional fields can be in any of the
following four formats - Character/list, Numeric, Password, Date&Time. A
maximum of nine character/list fields could be added. Four numeric fields, three
password fields and four date&time fields could be added. Once you click "Save",
the custom fields get added to the web accounts column. Custom fields, once
added, cannot be deleted.
To Delete Accounts,
•
•
•
•
Go to "Personal" Tab
Click "Web Accounts" in the drop-down "Show entries of" present at the RHS
Click the button "Delete Accounts"
Click "Save"
Note: Once you delete accounts, they will be deleted from the database once and
for all. So, exercise care before deleting accounts.
Banking Accounts
To add a New Account,
•
•
•
•
•
Go to "Personal" Tab
Click "Banking Accounts" in the drop-down "Show entries of" present at the
RHS
Click the button "Add Accounts"
Fill in the required details such as Bank Name, Account Number, Branch etc.
Leave unwanted fields blank.
Click "Save"
Can I add Custom Fields?
Yes, you can have any number of additional custom fields. To add a custom field,
click the button "Customize Fields". Your additional fields can be in any of the
following four formats - Character/list, Numeric, Password, Date & Time. A
maximum of nine character/list fields could be added. Four numeric fields, three
password fields and four date&time fields could be added. Once you click "Save",
the custom fields get added to the web accounts column. Custom fields, once
added, cannot be deleted.
AdventNet, Inc.
121
AdventNet ManageEngine PasswordManager Pro :: Help Documentation
To Delete Accounts,
•
•
•
•
Go to "Personal" Tab
Click "Banking Accounts" in the drop-down "Show entries of" present at the
RHS
Click the button "Delete Accounts"
Click "Save"
Note: Once you delete accounts, they will be deleted from the database once and
for all. So, exercise care before deleting accounts.
Credit Card Accounts
To add a New Account,
•
•
•
•
•
Go to "Personal" Tab
Click "Credit Card" in the drop-down "Show entries of" present at the RHS
Click the button "Add Accounts"
Fill in the required details such as Card Name, Card Number, PIN, Phone Number
etc. Leave unwanted fields blank.
Click "Save"
Can I add Custom Fields?
Yes, you can have any number of additional custom fields. To add a custom field,
click the button "Customize Fields". Your additional fields can be in any of the
following four formats - Character/list, Numeric, Password, Date & Time. A
maximum of nine character/list fields could be added. Four numeric fields, three
password fields and four date & time fields could be added. Once you click "Save",
the custom fields get added to the web accounts column. Custom fields, once
added, cannot be deleted.
To Delete Accounts,
•
•
•
•
Go to "Personal" Tab
Click "Credit Card" in the drop-down "Show entries of" present at the RHS
Click the button "Delete Accounts"
Click "Save"
Note: Once you delete accounts, they will be deleted from the database once and
for all. So, exercise care before deleting accounts.
Personal Contacts
To add a New Web Account,
•
•
•
•
•
Go to "Personal" Tab
Click "Contacts" in the drop-down "Show entries of" present at the RHS
Click the button "Add Accounts"
Fill in the required details
Click "Save"
AdventNet, Inc.
122
AdventNet ManageEngine PasswordManager Pro :: Help Documentation
Can I add Custom Fields?
Yes, you can have any number of additional custom fields. To add a custom field,
click the button "Customize Fields". Your additional fields can be in any of the
following four formats - Character/list, Numeric, Password, Date & Time. A
maximum of nine character/list fields could be added. Four numeric fields, three
password fields and four date & time fields could be added. Once you click "Save",
the custom fields get added to the web accounts column. Custom fields, once
added, cannot be deleted.
To Delete Accounts,
•
•
•
•
Go to "Personal" Tab
Click "Contacts" in the drop-down "Show entries of" present at the RHS
Click the button "Delete Accounts"
Click "Save"
Note: Once you delete accounts, they will be deleted from the database once and
for all. So, exercise care before deleting accounts.
Creating Custom Categories
Apart from the four default categories explained above, you can create any number of
additional categories to store other information. For instance, if you wish to store details
about the properties owned by you, just one more category could be added. You can
have your own names for the columns.
To create a custom category,
•
•
•
•
•
Go to "Personal" Tab
Click the link "Add New Category" available at the top right hand corner of the
GUI
In the UI that opens, provide a name for the new category
Enter column names for the category. You can add column names containing
characters, numbers, passwords and date & time.
Click "Save"
Note: If any of the custom categories are no longer required, you can delete
them by clicking the "X" mark against their name in the "Manage Categories"
page. Once you delete the categories, they will be deleted from the database once
and for all. So, exercise care before deleting.
AdventNet, Inc.
123
AdventNet ManageEngine PasswordManager Pro :: Help Documentation
PasswordManager Pro - FAQ
Contents
•
•
•
•
•
•
Web Interface, Authentication
Security
Password Synchronization
Backup & Disaster Recovery
General
Licensing
Web Interface, Authentication
1. Why are my users not notified of their PMP accounts?
Users are notified of their PMP accounts only through email. If they do not get the
notification email, check
•
•
•
if you have configured the mail server settings properly with the details of the
SMTP server in your environment
if you have provided valid credentials as part of mail server settings, as some
mail servers require them for mails to be sent
if the 'Sender E-Mail ID' is properly configured as some mail servers reject emails
sent without the from address or mails originating from unknown domains
2. What are the authentication schemes available in PMP?
You can use one of the following three mechanisms:
•
Active Directory: When enabled, the authentication request is forwarded to the
configured domain controller and based on the result, the user is allowed or
denied access into PMP. The user name, password and the domain are supplied in
the PMP login screen. This scheme works only for users whose details have been
imported previously from AD. Available only when PMP server is installed on
Windows system.
•
LDAP Directory: When enabled, the authentication request is forwarded to the
configured LDAP directory server and based on the result, the user is allowed or
denied access into PMP. The user name and password and the option to use LDAP
authentication are supplied in the PMP login screen. This scheme works only for
users whose details have been imported previously from the LDAP directory
•
PMP Local Authentication : The authentication is done locally by the PMP
server. Irrespective of AD or LDAP authentication being enabled, this scheme is
always available for the users to choose in the login page. This scheme has a
separate password for users and the AD or LDAP passwords are never stored in
the PMP database.
AdventNet, Inc.
124
AdventNet ManageEngine PasswordManager Pro :: Help Documentation
3. What are the user roles available in PMP? What are their access
levels?
PMP comes with three pre-defined roles.
1. Administrators
2. Password Administrators
3. Password Users
Any administrator can be made as "Super Administrator" with the privilege to view
and manage all resources. Refer help documentation for details on access levels.
4. What if I forget my PMP login password?
If you were already given a valid PMP account, you can use the 'Forgot Password?' link
available in the login page to reset the password. The user name/e-mail id pair supplied
should match the one already configured for the user and in that case, the password will
be reset for that user and the new password will be emailed to that email id.
5. Why does Internet Explorer 7 (and other browsers) complain
while accessing PMP console?
The PMP web console always uses HTTPS to communicate with the PMP server. The PMP
server comes with a default self-signed SSL certificate, which the standard web browsers
will not recognize and issue a warning. Particularly IE 7's warning message appears
serious. Ignoring this warning still guarantees encrypted communication between the
PMP console and the server but if you want your users to be particularly sure that they
are connecting only to the PMP server, you will need to install a SSL certificate that you
have bought from a certificate authority, that is recognised by all standard web
browsers.
6. Can I change the default port 7272 occupied by PMP?
Yes, you can change the default port as explained below:
•
•
Go to <PMP_Installation_Folder>\conf directory and open the server.xml file
Replace the entry '7272' with the port number of your choice. Note that there will
be 7272 entries within comments too and all should be replaced.
Security
1. How secure are my passwords in PMP?
Ensuring the secure storage of passwords and offering high defence against intrusion are
the mandatory requirements of PMP. The following measures ensure the high level
security for the passwords:
AdventNet, Inc.
125
AdventNet ManageEngine PasswordManager Pro :: Help Documentation
•
•
•
•
•
Passwords are encrypted using the Advanced Encryption Standard (AES), which is
currently the strongest encryption algorithm, and stored in the database. (AES
has been adopted as an encryption standard by the U.S. Government)
The database which stores all the passwords accepts connections only from the
host that it is running on and is not visible externally
Role-based, fine-grained user access control mechanism ensures that the users
are allowed to view the passwords based on the authorization provided
All transactions between the PMP console and the server take place through
HTTPS
In-built Password Generator can help you generate strong passwords
For detailed information, refer to Product Security Specifications document.
2. Can we install our own SSL certificate? How?
Refer to the FAQ section in website.
3. How secure are the A-to-A, A-to-DB password management
done through Password Management APIs?
The web API exposed by PMP forms the basis for Application-to-Application/Database
Password Management in PMP. The applications connect and interact with PMP through
HTTPS. The application's identity is verified by forcing it to issue a valid SSL certificate,
matching the details already provided to PMP corresponding to that application.
Password Synchronization
1. Can I also change resource passwords from the PMP console?
Yes, of course. PMP can change the passwords currently for Windows, Windows domain
and Linux systems. Capability to change passwords of other types of resources like
databases, routers, switches etc will be gradually added. PMP supports both agent-based
and agent-less modes of changing passwords.
2. When to use the agent and agent-less modes for password
synchronization?
Let us first look at the requisites for both the modes:
The agent mode requires the agent to be installed as a service and run with
administrative privileges to perform password changes. The communication between the
PMP server and agent takes place through TCP for normal information and HTTPS for
password transfer and hence communication paths must exist (ports to be kept open)
between the server and agent.
AdventNet, Inc.
126
AdventNet ManageEngine PasswordManager Pro :: Help Documentation
For the agentless mode, you must supply administrative credentials to perform the
password changes. For Linux you must specify two accounts, one with root privileges
and one with normal user privileges that can be used to login from remote. Telnet or
SSH service must be running on the resources. For Windows domain, you must supply
the domain administrator credentials. For Windows and Windows domain, PMP uses
remote calls and relevant ports must be open on the resource.
Based on this you can choose which mode you want for your environment, indicated by
the following tips:
Choose agent mode when,
•
•
•
you do not have administrative credentials stored for a particular resource in PMP
you do not have the required services running on the resource (Telnet / SSH for
Linux, RPC for Windows)
you run PMP in Linux and want to make password changes to a Windows resource
Choose agentless mode in all other cases as it is a more convenient and reliable way of
doing password changes.
3. Can I enable agentless password synchronization if I add my
own resource type for other distributions of Linux / other versions
of Windows?
Yes, you can. As long as your resource type label contains the string 'Linux' or
'Windows', you can still configure agentless password synchronization for those
resources.
Example of valid resource type labels to enable password synchronization:
Debian Linux, Linux - Cent OS, SuSE Linux, Windows XP Workstation, Windows 2003
Server
4. Is there a way to do remote password synchronization for
resource types other than the ones for which remote reset is
supported now?
Yes, you can make use of Password Reset Listeners, which enable invoking a custom
script or executable as a follow-up action to Password Reset action in PMP. Refer to
Password Reset Listener for more details.
5. How to troubleshoot when password synchronization does not
happen?
In the agent mode,
•
Check if the agent is running by looking at the Windows active process list for the
entry 'PMPAgent.exe' or the presence of a process named PMPAgent in Linux
AdventNet, Inc.
127
AdventNet ManageEngine PasswordManager Pro :: Help Documentation
•
•
Check if the agent port (default 5768) is reachable from the server through a TCP
connection (using telnet)
Check if the account in which the agent is installed has sufficient privileges to
make password changes
In the agentless mode,
•
•
•
Check if the right set of administrative credentials have been provided and the
remote synchronization option is enabled
Check if the necessary services are running on the resource (Telnet / SSH for
Linux, RPC for Windows)
Check if the resource is reachable from the PMP server using the DNS name
provided
6. Windows domain password reset fails with the error message:
"The authentication mechanism is unknown"
This happens when PMP is run as a Windows service and the 'Log on as" property of the
service is set to the local system account. Change it to any domain user account to be
able to reset domain passwords. Follow the instructions below to effect that setting:
•
•
•
•
Go to the Windows Services applet (from Control Panel --> Administrative Tools -> Services)
Select the 'ManageEngine PMP' service, right-click --> choose Properties
Click the Log On tab and choose the 'This Account' radio button and provide the
username and password of any domain user - in the format
<domainname>\<username>
Save the configuration and restart the server
7. What are the prerequisites for enabling Windows Service
Account Reset?
Before enabling windows service account reset, ensure if the following services are
enabled in the servers where the dependent services are running:
•
•
Windows RPC service should have been enabled
Windows Management Instrumentation (WMI) service should have been enabled
8. Does domain SSO work across firewalls / VPNs?
The domain Single Sign On (windows integrated authentication) is achieved in the
Windows environment by setting non-standard parameters in the HTTP header, which
are usually stripped off by devices like firewalls / VPNs. PMP is designed for use within
the network. So, if you have users connecting from outside the network, you cannot
have SSO this enabled.
AdventNet, Inc.
128
AdventNet ManageEngine PasswordManager Pro :: Help Documentation
Backup & Disaster Recovery
1. Can I setup disaster recovery for the PMP database?
Yes, you can. PMP can periodically backup the entire contents of the database, which can
be configured through the PMP console. Refer help documentation for more details.
2. Where does the backup data get stored? Is it encrypted?
All sensitive data in the backup file are stored in encrypted form in a .zip file under
<PMP_Install_Directory/backUp> directory. It is recommended that you backup this file
in your secure, secondary storage for disaster recovery.
General
1. Do I need any prerequisite software to be installed before using
PMP?
There is no prerequisite software installation required to use PMP.
2. Can others see the resources added by me?
Except super administrators (if configured in your PMP set up), no one, including admin
users will be able to see the resources added by you. Apart from this, decide to share
your resources with other administrators, they will be able to see tham.
3. Can I add my own attributes to PMP resources?
Yes, you can extend the attributes of the PMP resource and user account to include
details that are specific to your needs. Refer the help documentation for more details.
4. What if a user who has not shared his sensitive passwords,
leaves the enterprise?
This can very well happen in any enterprise, but with PMP you need not worry about
passwords getting orphaned. Administrators can 'transfer' resources owned by users to
other administrator users and in the process they have no access to those resources
themselves, unless they do the transfer to their name. Refer the help documentation for
more details.
AdventNet, Inc.
129
AdventNet ManageEngine PasswordManager Pro :: Help Documentation
5. Can I run custom queries to generate results for integration
with other reporting systems?
Yes, you can. Please contact us at [email protected] with your specific
request and we will help you with the relevant SQL query to generate XML output.
6. Can I rebrand PMP with our logo?
Yes. If you want to replace the PMP logo appearing on the login screen and on the webinterface with that of yours, you can do so from the web-interface itself. It is preferable
to have your logo of the size 210 * 50 pixels.
To rebrand the logo,
•
•
•
•
•
Go to the "Admin" tab
Click "Customize >> Rebrand"
Browse and choose the required image
Click "Save"
The PMP will appear with rebranded look
7. Does PMP record Password viewing attempts and retrievals by
users?
Yes, PMP records all operations performed by the user including the password viewing
and copying operations. From audit trails, you can get a comprehensive list of all the
actions and attempts by the users with password retrieval. The list of operations that are
audited (with the timestamp and the IP address) includes:
•
•
•
User accounts created, deleted and modified
Users logging in and logging off the application
Resources and passwords created, accessed, modified and deleted
8. Does PMP provide high availability support?
Yes, refer to High Availability section in the Help Documentation for more details
Licensing
1. What is the Licensing Policy for PMP?
There are three license types:
•
Evaluation download valid for 30 days capable of supporting a maximum of 2
administrators
AdventNet, Inc.
130
AdventNet ManageEngine PasswordManager Pro :: Help Documentation
•
•
Free Edition licensed software allows you to have 1 administrator and manage
up to 10 resources. Valid forever.
Registered Version - need to buy license based on the number of
administrators required and the type of edition Standard/Premium:
•
•
Standard - If your requirement is to have a secure, password repository
to store your passwords and selectively share them among enterprise
users, Standard Edition would be ideal.
Premium - Apart from storing and sharing your passwords, if you wish to
have enterprise-class password management features such as remote
password synchronization, password alerts and notifications, applicationto-application password management, reports, high-availability and
others, Premium edition would be the best choice.
Features Matrix
Standard Edition
Premium Edition
•
•
•
•
•
•
•
•
•
•
User / User group Management
Password Repository
Password Policies
Password Sharing and
Management
Audit / Audit Notifications
AD / LDAP integration
Auto Logon Helper
Password change listener
Backup and Disaster Recovery
•
•
•
•
•
All Features of Standard
Edition
Password Alerts and
Notifications
Remote Password Reset (on
demand, scheduled and rule
based)
• for Windows, Windows
Domain, Windows
Service Accounts,
Windows Scheduled
Accounts, Flavours of
UNIX and Linux, Cisco
Devices, MS SQL,
MySQL, Other Network
Devices
Reports
Password Management API
High Availability
2. Can I buy a permanent license for PMP? What are the options
available?
Though PMP follows an annual subscription model for pricing, we also provide perpetual
licensing option. The perpetual license will cost three times the annual subscription price,
with 20% AMS from the second year. Contact [email protected] and
[email protected] for more details.
AdventNet, Inc.
131
AdventNet ManageEngine PasswordManager Pro :: Help Documentation
3. Can PMP support more than 100 administrators?
Yes, very much. If you want a license with more than 100 administrator users, please
contact [email protected] and [email protected] for more details.
4. Can I extend my evaluation to include more administrator users
or for more number of days?
Yes. Fill in the required details in the website and we will send you the license keys.
5. Do I have to reinstall PMP when moving to the
Standard/Premium Edition?
No. You need not have to reinstall or shut down the server. You just need to enter the
new license file in the "License" link present in the top right corner of the PMP web
interface.
FAQ Section in our website is updated frequently. Refer to that for more
information.
AdventNet, Inc.
132

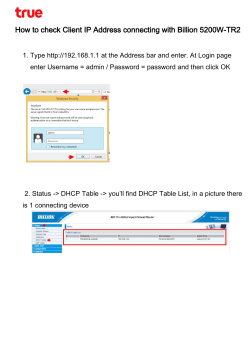


© Copyright 2026