
Getting FileMaker Server 11 and IIS 7.x to Work
Getting FileMaker Server 11 and IIS 7.x to Work with SSL
Enable FileMaker Server to communicate with IIS Server using an SSL certificate.
By Todd Duell
FileMaker Server 11 installs cleanly with
IIS Server 7 and 7.5 on Windows 2008
Server R2. However, if you want to bind
your PHP enabled web site to use a SSL
certificate everything goes to hell in a handbasket very quickly. IIS crashes, the web
publishing engine crashes, uninstalling,
reinstalling, and restarting the server do nothing to solve the
problem. There’s no good procedural documentation
available anywhere to really solve the problem. Therefore,
this article will provide you with the complete process and
answer all your questions, included the extra little gotcha’s
that will drive you crazy on the Windows platform.
Before I start, I will assume that you at least have
Windows 2008 Server R2 installed with IIS Server and the
default web site running. Next, I will also assume that you
installed FileMaker Server 11 with the PHP web publishing
engine enabled and the sample database. Once these are
installed the rest of this article will provide you with the
procedure to get your SSL certificate installed, bound to your
web site, FileMaker web publishing engine communicating
with IIS Server, and finally some configuration and tuning tips
for PHP and IIS that will make your web site run more efficiently.
Binding the SSL Certificate
The first issue you may run into is actually binding your
certificate to your web site. The way the process works is the
following:
1.
2.
3.
4.
Open IIS Server.
Click on the sever in the Connections window.
Click Server Certificates in the Security section.
Click the link to Create Certificate Request in the Actions
window (Figure 1).
5. Follow the Wizard to create the certificate file, also known as
Certificate Signing Request (CSR). The certificate creates
your public/private key pair that will be used to encrypt and
decrypt the secure transactions.
a. Organization: Use the business name legally
registered for the domain.
b. Organizational Unit: Enter the department in your
company that will be using the certificate.
Todd Duell is the Vice President & CIO of Formulations Pro, Inc and has been creating powerful commercial and custom solutions using FileMaker Pro since 1989. He holds an
MBA in Technology Management, is a Certified FileMaker Pro Developer, and has been a member of the FileMaker Business Alliance since 1998. Todd may be reached at
[email protected]
© 2010 Formulations Pro, Inc. All rights reserved. www.formulationspro.com
Figure 1 Prepare the Certificate Request — Create a CSR.
c. Common Name: enter the fully qualified domain or
URL for which you plan to use for your certificate,
such as secure.formulationspro.com. You can also
request
wildcard
domains
such
as
*.formulationspro.com, which will secure all subdomains. However these typically cost more
money. Check with your certificate provider for
more details.
d. Country: Use the 2-letter ISO country code for
your country, US for United States of America.
e. State/Province: Enter the full name of your state,
such as California.
f. City/Locality: Enter the full name of the city where
you are located, such as San Diego.
6. Click the Next button.
7. In the Cryptographic Service Provider window, select
Microsoft RSA Channel Cryptographic Provider with 2048 bit
length.
8. Enter the path where you want to save the file (i.e. your
desktop or documents folder) and click finish.
9. Send the certificate file to your Certificate Authority (CA).
This is the company that will supply you with your SSL
Certificate (i.e. VeriSign, Go Daddy, etc). Some providers
want you to open the certificate request file and copy/paste
the contents into their web form for submission.
10. They will typically send you a file back by email. Download
the file to your server. Then click the Complete Certificate
Request link in the Actions window and follow the wizard to
install the certificate.
11. Choose your web site in the Connections window.
12. Click Bindings in the Actions window. Your regular HTTP
(Port 80) binding should already be active (Figure 2).
13. Edit the Port 80 binding and change the host name to your
actual web site (i.e. formulationspro.com). That will tell IIS to
listen to any request using that domain for the web site
folder.
14. Now click Add to install the SSL binding. Choose https for
the Type and Port 443. You should be able to choose your
newly installed certificate from the pop up menu for the
binding.
15. Click save when you are done and your web site should now
be enabled to use SSL (i.e. https).
Page 2
2. Uncomment the following line of code (Figure 3):
$__FM_CONFIG['curlOptions'] =
array(CURLOPT_SSL_VERIFYPEER => false)
You’re not quite done yet. You now have to edit your server
deployment for the web publishing engine.
3.
Open
the
FileMaker
Server
Admin
console
(http://localhost:16000). Click the link to edit the server
deployment. Follow the wizard to install PHP using IIS Server. It
will eventually stop when it can’t communicate with IIS Server
and display the Web Server Test Failed screen (Figure 4).
4. Choose HTTPS for the protocol.
Figure 2 Bindings — Bind port 80 and 443 to your web site to
enable http and https connections.
Re-Configuring FileMaker Server
At this point IIS is running like a champ on both http
and https if you open the iisstart.htm page in your browser.
However, you’ll quickly notice that if you try to access your
dynamic PHP pages from the database that nothing works
and the web publishing engine crashes. Bummer! There is
some obscure documentation at FileMaker (Tech Article
#7619) to use cURL with SSL certificates. Don’t worry; you
don’t really need to know anything about cURL for this to
work. Perform the following task to enable the cURL library:
5. Enter the IP address of the host. Don’t use “localhost”. If you
are running a single machine, it will run much faster if you use
127.0.0.1. Why? Nobody seems to have a definitive answer why
Windows Server 2008 can’t differentiate between localhost and
127.0.0.1 considering they are the same thing. Therefore, just
do what I tell you to do and not what you want to do!
1. Open the FileMaker-api file located at:
/FileMaker Server/Web Publishing/publishingengine/php/FileMaker/conf/filemaker-api
Page 3
Figure 4 Web Server — Manually configure the web server
connection settings on FileMaker Server.
Figure 3 cURL— Uncomment the cURL option.
6. Enter Port 443.
7. Click the Retry button to re-establish the communication.
It should pass at this point.
8. Click the finish button.
9. Restart the server to make sure everything is working
together.
After restating the server you can use the test page on
the FileMaker Server Admin Console to make sure the web
publishing engine is working with the sample database installed
with FileMaker Server. Otherwise, you can open your browser
and test your own web page with your own database.
If the connection still does not work you can try
uninstalling the web publishing engine from the edit server
deployment options. Then re-install it again following the same
procedure above. That solves the problem most of the time. If
not, your next option is to uninstall IIS Server, uninstall
FileMaker Server, re-install everything, and then try again. If
THAT still doesn’t work, then I’m afraid there’s something very
wrong with your installation and your best bet is to wipe the hard
drive and reinstall the OS. That will be a lot faster than trying to
Page 4
troubleshoot the problem for the next week. I hate to tell you
I told you so, but Windows isn’t cheaper… you should have
bought a Mac Server because you would have been up and
running by the time you got to this point in the article!
The only other issue I’ve seen where it was still a
problem getting FileMaker Web Publishing Engine to
communicate with IIS Server is when an IT person thought it
would be a great idea to mix the server environment with
Small Business Server and Server 2008 R2. So he put the
SBS components on the FileMaker Server so it could
communicate with the other servers on the network. This is a
super bad idea! SBS steps all over the ports and registry
settings that FileMaker Server needs to communicate with
IIS Server. Uninstalling SBS doesn’t solve the problem either
because the registry settings are permanently changed.
Uninstalling SBS does not set the registry settings back
default, so FileMaker Server is permanently crashed! Word
to the wise, DO NOT INSTALL ANY SMALL BUSINESS
SERVER COMPONENTS or your server will never work.
The only way to fix it is to wipe the hard drive and re-install
the operating system. Therefore, it’s best to have your server
as a stand alone server with just the stock Windows 2008
Server R2 installation. Nothing more. Nothing less.
Windows Server 2008 R2 Specific Issues
Windows Server 2008 is kind of a pain in the ass (to
say it politely) to get running correctly. Pretty much
everything is now turned off by default, so it takes a lot of
extra configuration with no documentation to really tell you
what to do when things don’t work. Here’s what I’ve found
that works reasonably well from a FileMaker Server
perspective:
1. The operating system firewall blocks every single port by
default. That means that you’ll need to add exceptions to the
firewall and/or turn the firewall completely off, which isn’t such a
bad idea. It will only be used as a server with limited access by
administrators, so your risk of having a problem is fairly small.
FileMaker Server needs the following ports open (FileMaker
Tech Article # 6427).
80, 5003, 16000, 16001, 16016, 16018, 2399, 16006, 16008,
16010, 16012, 16014, 16004, 50003, 50006, 5013
2. If you are running a single server set up you don’t need to
specify a “hostspec” setting in your PHP connection file. If you
do, you should use https with the exact IP address of the server
followed by port 443. This is the same value that is used in the
web server deployment screen that I discussed earlier. For
example:
https://192.168.1.5:443
Actually, a little known fact is that FileMaker Server assumes
the correct localhost connection (http://127.0.0.1 or
https://127.0.0.1:443) if no hostspec is defined. Therefore, it’s
just as well to just leave it out of your connection file in a single
machine deployment.
3. PHP uses the C:/Windows/Temp/ folder to store temporary
files, session information, etc. However, by default IIS Server no
longer has access to this folder – thank you Microsoft (no pun
intended)! Therefore, you’ll have to add the IIS_IUSRS Group
with Full Control to the Temp folder (Figure 5).
Page 5
Figure 5 Temp Folder— Add the IIS_IUSRS Group with full
control.
Honestly, the Temp folder is now locked down? This
folder should have the Everyone Group assigned to it with
full control. Where does Microsoft expect applications to be
able to read with write temporary data if it’s locked down?
4. IIS Server doesn’t necessarily like PHP, PHP sessions,
nor the code for displaying FileMaker field content. So it
throws a lot of errors along the way onto your web page with
the wonderful generic error “Undefined index…”. The only
way that I’ve found to stop that is to change the php.ini file
by changing the setting for display_errors to off (Figure 6).
5. IIS and PHP performance is tuned to pretty much the
minimum performance settings right out of the box. How
much RAM you have on your server will dictate how much
you can allocate to IIS and PHP. That means that you don’t
want to set FileMaker Server to hog 100% of the remaining
RAM. You want to have additional RAM available for your
web server.
Figure 6 dsiplay_errors — turn to off in the php.ini file.
You can improve the performance of PHP by changing a
few settings in the php.ini file. I might recommend you at least
double the stock settings for the following items:
max_execution_time = 30 to 120 (seconds)
max_input_time = 60 to 120 (seconds)
memory_limit = 8M to 16M (MB)
POST_MAX_SIZE = 8M to 16M (MB)
Page 6
I’ve seen significant improvement in overall server
response time by changing these settings. You will have to
evaluate this in your own environment based on your web
site, database design, and user load.
the user to the correct https URL. Or make sure all your web
page and marketing links to your secure pages use https. Then
hope that the users don’t type in http on their own or bookmark
the wrong URL.
On IIS Manager you might also want to consider
changing the following settings:
Summary
For those of you that are struggling with SSL, IIS, and
FileMaker Server with your PHP solution I hope that this article
brings you welcomed relief. I certainly like the IIS user interface
over the manual configuration of Apache. However, you will
have some technical challenges to overcome before your
secure solution is finally up and running.
Output Caching to at least 16 MB
Cached Response Size bytes 262144 to 2621440
bytes
6. The last item that may be of concern for you is how do
you redirect users that try to access your site with http when
you need them to use https? PHP has some very simple
code to redirect the users:
<? php
if($_SERVER['HTTPS'] != "on")
{
header("Location:https//" . $_SERVER['HTTP_HOST']
$_SERVER["REQUEST_URI"]);
exit();
}
?>
.
However, IIS does not like header redirects via PHP, so it
throws an error. Apparently this is a known issue on the
Microsoft support site with no known date of resolution.
Therefore, you have exactly two ways to resolve this. First is
to enable the setting in IIS Server that requires access to the
site only by SSL and change the 500 error page to redirect
Page 7

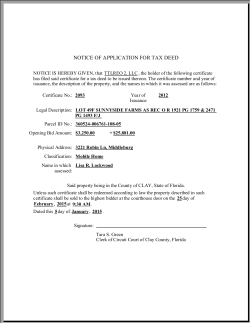


© Copyright 2026