
Lesson Plan: Samosa Making
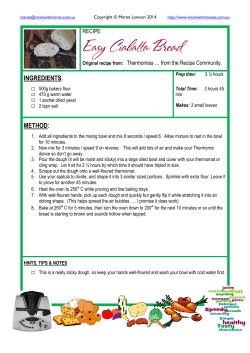
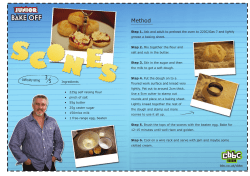
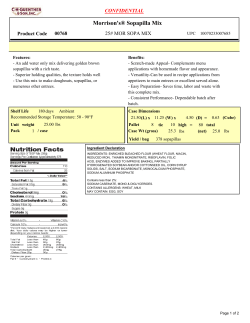
Lesson Plan: Samosa Making Goals: Class participants will gain a better understanding of the process of making a samosa. This authentic Indian snack will help broaden an individual’s understanding of the basic Indian spices, and the three step process of making a samosa. This class will focuses on two ways of folding a samosa, allowing a person to find the folding technique that is best for them. The class is suited for teens and older individuals. Objective: After participating in the demonstrations, class participants will able to: Explain the three components of a Samosa Identify and describe the favors of two spices used in Indian cuisine Show friends and family one of the techniques uses to fold a Samosa Supplies: See attached list for detailed recipe and materials. Time: Introduction (10 minutes) Lesson on Indian spices and potato filling (20 minutes) Samosa Folding (20 minutes) Conclusion (10-15 minutes) Introduction: Ask the class “What are samosas?” (pre-assessment) Based on their responses, go into the lecture below. Some classes may know a lot about samosas, and some may not. This portion of the demo can be tailored to the group’s knowledge of samosas. In India samosas are a crispy snack, which is used as an appetizer to entertain guests. The Samosa itself is a made with a pastry dough made with all purpose flour, some oil and cold water. The stuffing of the Samosa can vary but the most popular and traditional mixture is a potato mixture with peas and traditional spices. In certain parts of South India, meat samosas are more common. The traditional pyramid/triangle shape is what samosas are associated with. A samosa is traditionally fried but can easily be baked for a healthier alternative. What are we going to do be doing today? Today I will be showing you the three step process of making samosas. Making a samosa requires three different components. The dough, the potato filing and the actual folding of the samosas. These three components do not take a lot of time, but the actual process of folding is more complex. A samosa does not always need to be Lesson Plan: Samosa Making in a pyramid form, but again that is the traditional shape. I hope my demonstration and tips help you fold your perfect samosa. Lesson Plan: Part 1: Making the Dough The process of making the dough is also referred to as “atta”. This dough is primary composed of 2 cups all purpose flour, 1 tablespoon of canola oil, 1 tsp of salt and about one cup of cold water. The dough can be made by hand, or even in a mixer. The dry ingredients are first mixed together, and then oil is added to the dough. It is important to blend the fat and flour thoroughly before adding any liquid. This process ensures that the flour granules are adequately coated with fat and less likely to develop gluten. Gluten itself will create a dense pastry, and that is not what we want. We would want our dough to be flakey and tender after being fried. After mixing all of the dry ingredients it is time to add the cold water. In my demostration I will discuss using clean hands to knead the dough. The process of kneading the dough involves manipulation of the water and the dough. Water should be added about 2 tablespoons at a time to prevent forming wet dough. The dough should be stiff, and not very sticky when working with it in your hands. Once the water and dough have combined, the kneading process begins. When you first combine the dough and water, you will observe that the dough is not smooth. The dough will have air pockets and some areas of dry flour still present. The kneading will create softer dough that is more pliable when it comes to folding. Part 2: Potato Filling Another important aspect of the samosa is the potato filling. I will be showing you how to make a vegetarian filling made with potatoes, peas and spices. Other variations can be made using a meat filling. The potato filling is quite simple and involves two boiled potatoes, half an onion, ¼ of a cup of frozen peas, and some Indian spices including dry mango powder, black salt, paprika, and a hint of turmeric. The onions are sweated in about 1 tablespoon of oil and than all the dry spices are added to it. Once the onion starts to wilt and your house is filled with the aromatic spices, it is time to add the peas and the diced boiled potatoes. Lesson Plan: Samosa Making Once the mixture is in the pan, mixes for about 2-3 minutes just until all the ingredients are combined. The potatoes have already been boiled so cooking them is not our goal and you don’t want to create a mushy filling by overcooking the potatoes. At this point extra veggies, like finely chopped carrots or even green onions can be added to this mixture. The filling now must be cooled, it is best to cool the filling down either in the pan off the heat, and then place in the refrigerator. Trying to make a samosa with a hot filling will result in a messy samosa that will fall apart. The filling and dough can be made a couple days before you actually begin folding your samosa. This time will allow the filling to cool and the dough to come together. Part 3: Indian Spices The Indian spices used in the filling add unique flavors to the fish. Most people assume Indian food is just spice, and while it can be spicy there are many other ingredients that add to the flavor of Indian cuisine. Ask the participants what is black salt? Is the salt really black in color? (preassessment) Black salt is not actually black, in Hindi it is referred to as “kala namak”. This salt is usually mined in northern parts of Indian especially in certain areas near the Himalayas. The salt crystals are actually black on the outside and purple on the inside. While the outside of the salt crystals will turn black, the inside will stay a light purple of grey color. Sodium chloride provides kala namak with its salty taste, iron sulfide provides its dark violet hue, and all the sulfur compounds give kala namak its slight bitter taste as well as a highly distinctive smell, with hydrogen sulfide being the most prominent contributor to the smell. The salt itself smells like rotten eggs, but when used in Indian cooking gives a tangy flavor to the final product. Ask the participants what is turmeric? (Pre-assessment). Curcuma longa also known as turmeric is a plant of the ginger family. Turmeric originated from Southeast Asian but later moved along to other Arabic countries and to Africa. Turmeric is a domesticated plant not found in the wild, and the roots of the plant are dried and hand ground into that yellow hue we know as turmeric. Turmeric has been used heavily in ayurvedic medicine to cure diarrhea, headaches and had anti-inflammatory affects. Turmeric has also been used as alternative nutrition Lesson Plan: Samosa Making therapy in alleviating anti-inflammatory affects that can potentially reduce symptoms of rheumatoid arthritis, tenderness after surgery, and reduce cancer. What does this look like, hold up dry mango powder (pre-assessment)? Dry mango powder also known as “amchoor” in Hindi is the powder form of unripe green mangos. Amchoor is a fruity spice that has a tart, but a sweet flavor to it. It doesn’t really smell like anything, but can smell sour to some people. Amchoor is used in Indian cooking in order to add a hint of acidity without having to add in moisture. It is basically a substitute for lemon juice. The spice is heavily used in Indian cuisine, and is mostly found in samosas. Part 4: Folding the Samosa – Traditional Method After all this work, now it is time to fold the samosa. Folding the samosa is not a daunting task; it requires quick movements in order to get that perfect pyramid shape. There are two methods that I will show which will give you more flexibility in making a samosa. Step 1: The first step in making the samosa involves rolling out a piece of dough. Take about 2 oz of dough, and begin to roll it out. The size of your circle will dictate the size of your samosa. An average diameter of about 6-8 inches will produce a medium size samosa. Your goal is to roll out a circular piece of dough that is about as thick as a dime. Making your dough too thick or thin will result in a difficult time in folding the samosa. Step 2: you will cut the circle in half; each half will be used to make one samosa. Step 3: pick up one half and hold it flat in your hands, using just slightly warm water brush it alone the outer edges of that half piece of dough. Lift one edge of the dough, and fold inwards basically forming a cone shape, with the point of the cone facing down wards. Using your fingers pinch the two pieces of dough to seal the cone. Do not pinch to hard, if you have to put a lot of pressure it joining the two edges it is best to use more water as a glue instead Step 4: Fill your cone up gently with the potato filling, leaving about ½ of an inch from the top of the cone. Step 5: using warm water again, seal the top of the cone crimping it to make sure you have a tight seal. Refer to Figure A. 1-8 below for visual instructions. Lesson Plan: Samosa Making Part 5: Samosa Folding – Table Top Method Step 1: The first step in making the samosa involves taking about 2 oz of dough, and rolling it out. The size of your circle will dictate the size of your samosa. An average diameter of about 6-8 inches will produce a medium size samosa. Your goal is to roll out a circular piece of dough that is about as thick as a dime. Step 2: You will cut the circle in half; each half will be used to make one samosa. Step 3: In this method, the piece of dough will not leave your cutting board. Take some of your, filling about 2 tbsp depending on the side of your half circle, and place it in the middle. Gently press the filling down, so that it is even and smooth. Step 4: Next fold over one side of the half dough covering the filling completely, than take the other side and meet the two ends together. Step 5: Add warm water to seal the two end pieces together, and to seal the top of the samosa. Refer to Figure B. 1-7 Part 6: Cooking the Samosa Frying – Traditionally samosa are fried. Frying a samosa can vary in time from 36 minutes depending on the size of the samosa, temperature of the oil and also the filling used for the samosa. In a large deep pan or a wok, heat about four to five inches of canola oil to about 300°F. Canola oil is used to fry these samosas because of its high smoke point. This allows for multiple batches of samosas to be cooked without having to change the oil. Lesson Plan: Samosa Making Place 2-3 samosa’s at a time in the wok and fry until they are golden brown. It is best to drain the samosas on a paper towel in order to absorb any excess oil. Baking – Baking is another method to cook samosas, one that is healthier than and not as tedious as frying. In order to bake a samosa, preheat oven to 350° F and place samosa’s on a baking sheet. Samosa’s can be baked for about 25-30minutes, turning them about 15 minutes into cooking to prevent burning on the edges. Conclusion Thank You very much for allowing me to bring a little bit of spice into your cooking. I hope this demonstration has increased your confidence to introduce more Indian spices into your meals, and most importantly fold perfect samosas. Post-Assessment questions = Ask participants which method they think they are more likely to try in folding the samosa? What spices are they willing to try? If time is left over, let participants come up and feel the samosas and the dough. Lesson Plan: Samosa Making Recipe and Material List (presentation of this is not necessary) List of Materials for cooking 1. Cutting Board 2. Rolling Pin 3. 1 small spoon for stuffing 4. 1-2 Large Mixing Spoons 5. Small bowels to hold ingredients 6. A small knife 7. Baking Sheet (if you plan on baking) 8. Oven (if you plan on baking) 9. Wok or deep pan (if you plan on frying) 10. Paper towels 11. Plates Recipe (12-15 Samosa’s) For the Dough 1. 2 Cups All Purpose Flour 2. 2 tbsp Canola Oil 3. 1 tsp Salt 4. 1 cup of cold water For the Potato Filling 1. 2 Large potatoes 2. ¼ of a cup of frozen or fresh peas 3. 1 tsp of Black Salt 4. 1 tsp of Turmeric 5. 1 tsp of Dry Mango Powder 6. 2 Tsp of paprika 7. A couple of sprigs of cilantro if available Directions 1. In a bowl, mix the flower and oil until you get a crumbly mixture. Add enough water and make stiff yet smooth dough (no cracks). Knead for 5-7 minutes and make the dough elastic. Keep it covered to avoid drying. 2. Chop the potatoes, and peel them. Once chopped and peal boil the potatoes in water for about 5-15 minutes depending on the side of your potatoes. Once cooked drain the potatoes and add back to the pot. 3. In the hot potatoes add the drained peas, and all the spices. Combine all the ingredients in order to coat the potatoes with all the spices. Let the mixture cool. Lesson Plan: Samosa Making 4. Now begin rolling out your dough, take about 2oz of the dough and roll it out into a circle with a 6-8 inch diameter. Cut the circle in half. Each half of the circle is used to make the samosa. 5. Take one half of the dough and fold into a cone. Seal the cones edges and add in about 12 tablespoons of the filling, finally sealing the top of the samosa. 6. In a large deep pan or a wok, heat about four to give inches of canola oil to about 300°F. Canola oil is used to fry these samosas because of its high smoke point. This allows for multiple batches of samosas to be cooked without having to change the oil. 7. Place 2-3 samosa’s into the frying oil, and dries until they are a golden brown. Place them after on a paper towel in order to let the oil soak off.


© Copyright 2026