
Little Dresses for Africa
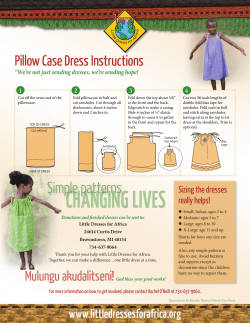
sewing inspiration
•
education • tools & more
800.833.0690nancysnotions.com
Little Dresses for Africa
Follow the simple directions below to make a dress that will be a prized possession for a grateful little girl in Africa. Use fabric
yardage, or modify a purchased or gently used pillowcase. Mail completed dresses to Little Dresses for Africa, c/o Nancy’s Notions®,
333 Beichl Ave., Beaver Dam WI 53916-0683, and we’ll ship the dresses to their destination. If you would like confirmation that your
dresses have been received at Nancy’s Notions®, please enclose a self-addressed stamped postcard.
For additional information, go to littledressesforafrica.org/blog/.
Dress with Elasticized Top
Materials required:
•
•
•
•
⅝ yd.–1⅛ yd. cotton fabric, depending on size
2½ yd. double fold bias tape
12"–18" elastic, ¼" wide, depending on size
Coordinating all-purpose thread
Note new sizing!
Making the Dress 1. Cut a fabric rectangle the width of the fabric and the length indicated.
Finished dress length is measured from the shoulder to the hem.
Size
Small (2–4)
Medium (5–7)
Large (8–10)
X-Large (11 and above)
Size of cut rectangle
19"–26" L x 42" W
27"–32" L x 42" W
33"–37" L x 42" W
38" L or more x 42" W
Finished dress length
16"–23" long
24"–29" long
30"–34" long
35" or more long
Armhole Template
Pattern
2. Fold fabric in half, meeting selvage edges. Stitch or serge the seam. Press seam
open or to one side. Center seam on the stitched tube. (This will be the center
back of the dress.)
4. Fold under casings at the front and back top edges (the edges containing the armholes). Fold edge under ¼", then ½" to make each casing. Edgestitch casings.
Place on fold
3. Cut out armholes on upper side edges using the appropriate Armhole Template
Pattern at right.
5. Cut elastic into two equal lengths (6" for size small, 7" for size medium, 8" for size
large, and 9" for size X-large). Insert one length into each casing. Thread elastic
through the casing; stitch elastic ends to the outer edges of the casing to prevent
them from pulling out. This gathers the front and back edges.
6. Cut two 38" lengths of double fold bias tape. Open tape and turn under ¼" on
each end to finish the ends of the tape. Refold tape and encase armhole, allowing
equal tape extensions at each end of the armhole so the dress can be tied at the
shoulders. Edgestitch tape.
7. Hem the lower edge by turning under ¼", then 2". Edgestitch.
You’re finished! Wasn’t that easy?
Optional trim ideas:
• Add one or two pockets.
• Add a band of a contrasting or coordinating fabric to the dress.
• Add lace or other trims.
• Add an appliqué.
• Add machine embroidery.
• Use your imagination! This is a great way to use bits and pieces of leftover
trims and fabrics.
Form 524 (Rev. 3/12)
nancysnotions.com800.833.0690
Small
2–4
Medium
5–7
Large
8–10
X-Large
11 and above
Dress with Bias Tape Ties
Materials required:
• ⅝ yd.–1⅛ yd. cotton fabric, depending on size
• 3 yd. double fold bias tape
• Coordinating all-purpose thread
Making the Dress
1. Cut a fabric rectangle the width of the fabric and the length indicated.
Finished dress length is measured from the shoulder to the hem.
Size
Small (2–4)
Medium (5–7)
Large (8–10)
X-Large (11 and above)
Size of cut rectangle
19"–25" L x 42" W
26"–31" L x 42" W
32"–37" L x 42" W
38" L or more x 42" W
Finished dress length
16"–22" long
23"–28" long
29"–34" long
more than 35" long
2. Fold fabric in half, meeting selvage edges. Stitch or serge the seam. Press seam open or to one side. Center seam on the stitched
tube. (This will be the center back of the dress.)
3. Cut out armholes on upper side edges using the appropriate Armhole Template Pattern on p. 1.
4. Cut two lengths of bias tape long enough to bind the armholes. Bind cut edges of armhole and edgestitch tape.
5. Fold under casings at the front and back top edges (the edges containing the armholes). Fold edge under ¼", then ¾" to make each
casing. Edgestitch casings.
6. Cut remaining bias tape into two equal pieces. Stitch folds and cut ends of tape together with a narrow zigzag to prevent stitches
from breaking. Insert one piece through each of the casings, allowing equal extensions at each end. Machine stitch at center front
and center back to prevent tape from pulling out of the casing.
7. Hem the lower edge, turning under ¼" and then 2". Edgestitch hem.
To wear the dress, pull up tape ties to gather the top of the dress to fit. Tie bias tape at the shoulders.
Optional: Trim dress as desired. Several possibilities are listed on p. 1.
Modifying a Pillowcase to Make the Dress
Materials required:
•
•
•
•
One new or gently used cotton pillowcase
2½ yd. double fold bias tape
12"–18" elastic, ¼" wide, depending on size
Coordinating all-purpose thread
Making the Dress
1. Trim off the seamed end of the pillowcase. Do not cut off the hemmed edge; it will be the hem of the dress.
2. Cut out armholes on the cut edge, using the Armhole Template Pattern as a guide.
3. Fold under casings at the front and back top edges (the edges containing the armholes). Fold edge under ¼", then ½" to make each
casing. Edgestitch casings.
4. Cut elastic into two equal lengths (6" for size small, 7" for size medium, 8" for size large, 9" for size X-large). Insert one length into
each casing. Thread elastic through the casing; stitch elastic ends to the outer edges of the casing to prevent them from pulling out.
This gathers the front and back edges.
5. Cut two 38" lengths of double fold bias tape. Open tape and turn under ¼" on each end to finish the ends of the tape. Refold tape
and encase armhole, allowing equal tape extensions at each end of the armhole so the dress can be tied at the shoulders. Edgestitch
tape.
Optional: Trim dress as desired. Several possibilities are listed on p. 1.
©2010 (Rev. 3/12), Nancy’s Notions®; 333 Beichl Ave., POBox 683; Beaver Dam WI 53916-0683


© Copyright 2026