
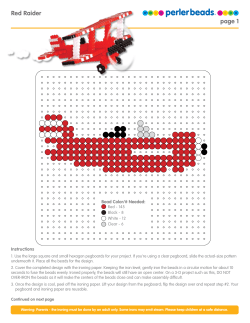
Holiday Train YOU WILL NEED:
Holiday Train
YOU WILL NEED:
Pegboards:
Large square (2)
Instructions
1. Place your beads on the pegboards as shown. If you are using a clear
pegboard, slide the actual-size pattern underneath it.
2. Ask an adult to fuse your designs—see page 2 for further instructions.
3. Assembly: see page 8.
Bead Colors:
White
Black
Dark Grey
Grey
Cheddar
Orange
Cranapple
Hot Coral
Red
Kiwi Lime
C
E
Brown - 6
Dark Green - 906
Green - 218
Kiwi Lime - 426
Pastel Green - 8
Light Blue - 273
Pastel Blue - 112
Toothpaste - 188
Red/White Stripe* - 30
Green/White Stripe* - 18
Turquoise/White
Stripe* - 24
Steam Engine
Front Piece
B
A
Bead Colors:
Black - 138
Dark Grey - 143
Grey - 269
White - 23
Hot Coral - 256
Cranapple - 631
Red - 458
Orange - 57
Cheddar - 863
Yellow - 48
Pastel Yellow - 4
F
D
*The Red/White Stripe
beads and the Green/
White Stripe beads come
in the #80-19137 Mistletoe
Mix.
The Turquoise/White Stripe
beads come in the #8019138 Winter Frost Mix.
1
Holiday Train
Train Floor
Bead Colors:
Red
Cranapple
Cheddar
Yellow
Green
Dark Green
Grey
Black
Fusing Instructions—Only Adults Iron
1. Place your pegboard on a flat, heat-safe surface.
2. Set a household iron to the medium setting. Place ironing paper over the
pegboard. In a circular motion, begin to iron the project. Do not press down with
the iron. As the beads begin to fuse, you will see circles of the beads start to show
through the paper. When ironed properly, the beads will still have an open center.
Let the design cool.
3. Remove the paper and bead design from the peg board. Flip the design over to
expose the non-fused side. Repeat step two. Let cool completely.
NOTE: Beads need heat for about 10-20 seconds per side to fuse evenly. Lift the paper occasionally to see how the beads are fusing.
Depending on the size of the project, additional heating time may be required. DO NOT OVER-IRON the beads as it will make the centers
of the beads close and can make any assembly you do with your project more challenging.
2
Holiday Train
Interlock two square pegboards for remaining patterns.
Steam Engine
Body
Create this piece last and Iron this just before assembly:
Iron the entire piece on ONE SIDE ONLY. Then, turn the piece
over and IRON LIGHTLY only the areas outlined in blue. Allow
to cool slightly, then curve piece while beads are still warm.
Bead Colors:
Hot Coral
Red
Cranapple
Orange
Cheddar
Pastel Yellow
Yellow
Pastel Green
Kiwi Lime
Green
Dark Green
Grey
Dark Grey
Black
White
Boiler
Sides
Boiler
Front/
Back
Rail
3
Holiday Train
Conductor
Booth:
Sides
Bead Colors:
X2
Hot Coral
Red
Cranapple
Cheddar
Yellow
Kiwi Green
Green
Dark Green
Grey
Dark Grey
Black
Conductor
Booth:
Front and
Back
Train
Couplings
4
Holiday Train
X2
Sides
1st Car
Bead Colors:
Red/White Stripe
Cheddar
Kiwi Lime
Green
Dark Green
Grey
Black
Floor
Front
Back
5
Holiday Train
X2
Sides
2nd Car
Bead Colors:
Hot Coral
Red
Cranapple
Cheddar
Kiwi Lime
Green/White Stripe
Dark Green
Brown
Grey
Black
Floor
Front
Back
6
Holiday Train
X2
Sides
3rd Car
Bead Colors:
Cheddar
Dark Green
Toothpaste
Turquoise/White Stripe
Pastel Blue
Light Blue
Grey
Black
Floor
Front
Back
7
Holiday Train
ASSEMBLY
Slide the train floor into the slot of the steam engine front piece A. Then insert the stem
piece E through parts A, B, C, and D as shown.
1
A
C
D
B
oor
Train fl
E
2
While the beads are still warm from
ironing, gently curve the steam engine
body with the unfused side out, and
insert tabs on the assembled front
piece into the slots on the body. Hold
or brace in position until beads cool.
3
Slide the rail into
position at the
front of the engine.
It should be at a
slant.
8
Holiday Train
4
Attach the front and sides of the conductor's booth to the engine as shown, aligning
tabs and slots.
5 Attach the the back window to the conductor's booth. Insert one of the couplings into
the opening in the rear.
9
Holiday Train
6
8
Connect the boiler pieces
making sure the light grey
pieces face forward. This
creates the illusion of sunlight
and shadow.
7
Insert the boiler
and the lights
(parts F) in their
slots. The engine
is now complete!
For each car, connect the pieces as shown, again
making sure the lighter pieces face forward.
Insert a loop coupling in the
9 front of each car, and a hook
coupling in the rear of the first
two cars.
Connect the couplers for each car to complete the Holiday Train!
www.eksuccessbrands.com
Perler Beads and EKSuccess Brands are either registered trademarks or trademarks of Dimensions Crafts LLC and
EK Success Ltd. respectively in the United States and/or other countries. © 2013 Dimensions Crafts LLC. All rights reserved.
10


© Copyright 2026