
Castaway Paper Bead Choker by Noelle Faulkner
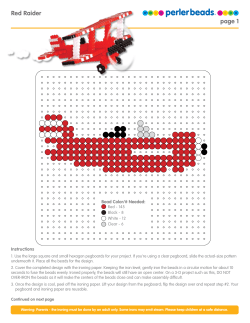
Castaway Paper Bead
Choker by Noelle Faulkner
Go a little ‘Retro’ with these fun-funky beads
made of paper stamped with Castaway strung to
create a neat little tie-on choker.
Materials:
• Jacquard Castaway stamp pad
• Jacquard Pearl Ex stamp pad—Gold
• Jacquard Pearl Ex Varnish
• cardstock 1-2 sheets 12X12”
• glue (I used Aleene’s Thick Designer
Tacky Glue)
• ribbon-two 36” pieces and two 30”
pieces
• 2 needles
• glass beads with large holes
• rubber stamps
Directions:
1. Stamp Cardstock.
Experiment with different papers and stamps to discover the
effect that pleases you most. I used a stamp from ToyBox—Lg
Mayan Glyph Stone, it has nice shapes and thicker lines. The
stamp is roughly 4”X4”, a good size for my larger beads and
conveniently has 6 rows of 6 images that are easy to divide up into
rectangles for the first step in making the bead. Stamp the image
five times on the cardstock. When dry, iron the paper to bring
out the stamped image. (Use a dry iron only!) Cut into rectangles
about 1 3/8” X 4”. The stamp I used made this part very easy -I just used two rows for each bead.
2. Cut the beads
The size and proportions of the triangles you cut will determine the shape of your finished bead--long, narrow triangles make
shorter, rounder beads; short, wide triangles make longer, skinnier
beads. (As always, I recommend experimenting with different
shapes to see what happens and find out what you like the best.) I
used both kinds for this project.
Trim the Castaway stamped rectangles into triangles. You
will need a total of 14 beads to complete the project. Cut some
extra pieces to allow for goofing up. My triangles are 1 1/4” at
the base, 4” from the base to the point, your dimensions may be a
Jacquard Products/Rupert, Gibbon & Spider, Inc.
(800) 442-0455
www.jacquardproducts.com
little different depending on the stamp you used. Accent the edges
of the triangle by rubbing onto the Gold Pearl Ex stamp pad. Set
aside.
Use plain cardstock to cut triangles for the smaller beads.
You will need a total of 6 for this project. Start by cutting a 5”
x 6” rectangle. Mark the long edges every 5/8” then use those
marks as guides for cutting the triangles. Accent the edges by rubbing onto the Castaway stamp pad. Let dry and iron.
3. Roll the beads
Start at the wide end of the triangle, wrap the cardstock around
the end of a paint brush, a skewer or some small round thing—make
sure it has an even diameter for the size of your bead. Roll tightly
with the printed side out. Apply glue as you go—I like the super tacky
stuff, it really holds! Keep the pointed end of the triangle centered as
you go so that your bead doesn’t come out lopsided. Gently remove
from the skewer and replace part way (just to make sure you can take
it off easily). Coat with Pearl Ex Varnish to finish. Carefully remove
from skewer. To dry, string the beads on thread, pinning the ends to a cork board so the beads hang below.
4. String the choker.
Thread two 36” pieces of ribbon with a needle each. String one long bead on each ribbon (leave about a 10”
ribbon ‘tail’ to finish the choker with later). String one short bead using both needles, one from each end as shown in
photo, pull snug.
Jacquard Products/Rupert, Gibbon & Spider, Inc.
(800) 442-0455
www.jacquardproducts.com
String one long bead on each ribbon then
one short bead using both needles, as before. Continue this pattern until you have 6 small beads and
7 pairs of long beads.
Remove needles from ribbons and thread both
ribbons through one needle. Add a glass bead to
bring the two paper beads together. Repeat for other
end.
Thread one piece of 30” ribbon and string it
through the glass bead you just added and one long
bead. Add one glass bead and string through next
long bead. Continue to other end then repeat for
other side.
Trim the ribbons to an even length if you like or leave them varied—it’s up to you!! Jacquard Products/Rupert, Gibbon & Spider, Inc.
(800) 442-0455
www.jacquardproducts.com


© Copyright 2026