
Pirate Ship page 1 Instructions
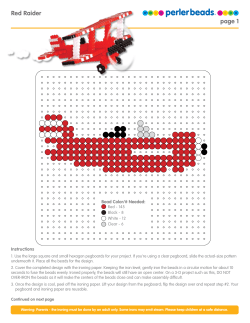
Pirate
Ship
page 1
Instructions
1. Use the large square pegboard for your project. If you’re using a clear pegboard,
slide the actual-size pattern underneath it. Place all the beads for the design.
2. Cover the completed design with the ironing paper. Keeping the iron level, gently
iron the beads in a circular motion for about 10 seconds to fuse the beads evenly.
Ironed properly, the beads will still have an open center. On a 3-D project such as
this, DO NOT OVER-IRON the beads as it will make the centers of the beads close
and can make assembly difficult.
3. Once the design is cool, peel off the ironing paper. Lift your design from the
pegboard; flip the design over and repeat step #2. Your pegboard and ironing paper
are reusable.
Optional items needed to display your pirate ship with
rigging and flags: embroidery thread and a needle, a
cotton ball or cotton swabs, and glue.
Bead Color/# Needed:
Creme - 14
Cheddar - 4
Brown - 65
Grey - 10
Black - 306
Continued on next page
Warning: Parents - the ironing must be done by an adult only. Some irons may emit steam. Please keep children at a safe distance.
Pirate Ship
page 2
Bead Color/# Needed:
Creme - 55
Cheddar - 8
Gold Metallic - 45
Brown - 97
Grey - 141
Black - 108
Assembly
The diagram at right shows where
each lettered piece is inserted into the
base.
Continued on next page
Warning: Parents - the ironing must be done by an adult only. Some irons may emit steam. Please keep children at a safe distance.
Pirate Ship
This 3-D diagram shows
the right side (starboard)
of the ship assembly.
The left side (port)
assembles in the same
manner.
page 3
Jolly Roger and Pennant
PRINT ONE
Hint: To make the pegs
easier to fit into their
slots, insert them while
the part is still slightly
warm (NOT HOT!) from
the ironing.
For extra detail, use a needle and embroidery
thread to add some rigging lines.
Fold the Jolly Roger in half, wrap it around the
rear piece of rigging, and glue in place. Glue the
pennant to the top of the mast and add some
bends to it so it looks like it’s blowing in the wind.
Lastly, use some cotton from a ball or swabs to
create cannon smoke. Very fierce—ARRHH!
Warning: Parents - the ironing must be done by an adult only. Some irons may emit steam. Please keep children at a safe distance.


© Copyright 2026