
InDesign: Basic Page Layout 110 Pages InDesign: Basic Page Layout v2.0.0
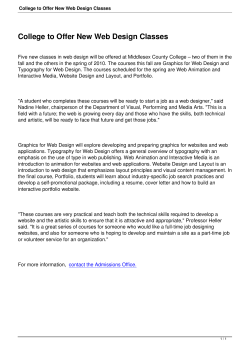
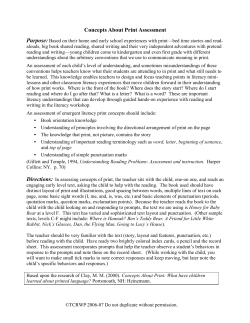
InDesign: Basic Page Layout
Windows & MacOS
InDesign: Basic Page Layout v2.0.0
©2005
110 Pages
About IT Training & Education
The University Information Technology Services (UITS) IT Training & Education program at Indiana University
offers instructor-led computing workshops and self-study training resources to the Indiana University community and
beyond. We deliver training to more than 30,000 participants annually across all Indiana University campuses. Our
staff is comprised of enthusiastic professionals who enjoy developing and teaching computing workshops. We
appreciate your feedback and use it to improve our workshops and expand our offerings. We have received several
national awards for our materials and they are being used at universities across the country. Please keep your questions, comments and suggestions coming!
In Bloomington, contact us at [email protected] or call us at (812) 855-7383.
In Indianapolis, contact us at [email protected] or call us at (317) 274-7383.
For the most up-to-date information about workshops and schedules, visit us at:
http://ittraining.iu.edu/
Copyright 2007 - The Trustees of Indiana University
These materials are for personal use only and may not be copied or distributed. If you would like to use our materials
for self-study or to teach others, please contact us at: IT Training & Education, 2711 East 10th Street, Bloomington,
IN 47408-2671, phone: (812) 855-7383. All rights reserved.
The names of software products referred to in these materials are claimed as trademarks of their respective companies
or trademark holders.
Contents
Welcome and Introduction . . . . . . . . . . . . . . .
What You Should Already Know . . . . . . . . .
What You Will Learn . . . . . . . . . . . . . . .
What You Will Need to Use These Materials . . .
Getting Started . . . . . . . . . . . . . . . . . . . . .
Today’s Project . . . . . . . . . . . . . . . . . . . . .
Introducing Page Layout in Adobe InDesign . . . . .
Understanding Page Design vs. Word Processing .
Understanding the Workspace . . . . . . . . . . . . .
Creating a New Publication . . . . . . . . . . . .
Understanding the Publication Window . . . .
Selecting Tools . . . . . . . . . . . . . . . . .
Changing the Document’s Position and View Size
Viewing and Configuring Rulers. . . . . . . . . .
Planning the Document . . . . . . . . . . . . . . . .
Understanding Master Pages . . . . . . . . . . . .
About the Pages Palette . . . . . . . . . . . . . .
Creating a Cover Page Master . . . . . . . . . . .
Using the Grid . . . . . . . . . . . . . . . . .
Snapping to the Grid . . . . . . . . . . . . . .
Working with Text . . . . . . . . . . . . . . . . . . .
Making Typographic Decisions . . . . . . . . . .
Working with Frames . . . . . . . . . . . . . . .
Creating a Text Frame with the Type Tool. . .
Understanding the Control Palette . . . . . . . . .
Formatting Characters . . . . . . . . . . . . .
Understanding Tracking and Kerning . . . . .
Formatting a Paragraph. . . . . . . . . . . . .
Modifying a Frame with the Selection Tool . . . .
Changing Alignment Within a Frame . . . . .
Stacking Frames Together . . . . . . . . . . . . .
Creating a Frame with the Frame Tool. . . . . . .
Creating the Inside Pages Master . . . . . . . . . . .
Changing Master Page Options . . . . . . . . . .
Creating Headers and Footers . . . . . . . . . . .
Copying and Pasting in Place . . . . . . . . .
Working with Document Pages . . . . . . . . . . . .
Inserting New Pages . . . . . . . . . . . . . . . .
Applying Master Pages. . . . . . . . . . . . . . .
Placing Text . . . . . . . . . . . . . . . . . . . .
About Importing Text . . . . . . . . . . . . .
Finding the File. . . . . . . . . . . . . . . . .
Using Flow Options . . . . . . . . . . . . . .
Resizing a Text Frame . . . . . . . . . . . . . . .
Creating Independent Text Frames. . . . . . . . . . .
Creating a New Text Frame . . . . . . . . . . . .
Working with Text Wrap. . . . . . . . . . . . . .
Understanding Text Wrap Options . . . . . . .
Applying a Bounding Box Wrap . . . . . . . .
.
.
.
.
.
.
.
.
.
.
.
.
.
.
.
.
.
.
.
.
.
.
.
.
.
.
.
.
.
.
.
.
.
.
.
.
.
.
.
.
.
.
.
.
.
.
.
.
.
.
.
.
.
.
.
.
.
.
.
.
.
.
.
.
.
.
.
.
.
.
.
.
.
.
.
.
.
.
.
.
.
.
.
.
.
.
.
.
.
.
.
.
.
.
.
.
.
.
. 1
. 1
. 1
. 1
. 2
. 3
. 3
. 3
. 4
. 5
. 9
. 10
. 11
. 12
. 14
. 14
. 15
. 16
. 17
. 19
. 19
. 20
. 20
. 20
. 22
. 22
. 23
. 24
. 25
. 25
. 26
. 26
. 28
. 29
. 30
. 32
. 35
. 35
. 36
. 37
. 37
. 37
. 38
. 39
. 40
. 40
. 40
. 41
. 42
Defining and Using an Object as a Text Frame . . . 43
Formatting Headline Text with the Control Palette . 44
Adding More Text Frames . . . . . . . . . . . . . . 45
Specifying Text Wrap . . . . . . . . . . . . . . . . 46
Placing Text in an Existing Text Frame . . . . . . . . . 47
Hiding Guides, Grids, and Frames . . . . . . . . . . . . 48
Modifying Frame Properties . . . . . . . . . . . . . . . 48
Working with Stroke and Fill . . . . . . . . . . . . 48
Applying a Stroke . . . . . . . . . . . . . . . . . . 49
Applying Stroke Weight . . . . . . . . . . . . . . . 49
Applying a Fill Color. . . . . . . . . . . . . . . . . 50
Choosing a Default Color from the Swatches Palette 51
Modifying Columns Inside Text Frames . . . . . . . 52
Modifying the Inset Within a Frame . . . . . . . . . 54
Applying Color to Type . . . . . . . . . . . . . . . . . 55
Formatting Type with Styles . . . . . . . . . . . . . . . . . 57
Understanding Styles. . . . . . . . . . . . . . . . . . . 57
Working with Text Styles . . . . . . . . . . . . . . . . 57
Formatting Body Text with the Control Palette . . . 57
Working with Font Size and Leading . . . . . . . . 58
Applying First Indents and Paragraph Spacing . . . 59
Creating a Paragraph Style Based on Existing
Formatting . . . . . . . . . . . . . . . . . . . . 60
Applying the Body Style . . . . . . . . . . . . . . . 61
Formatting a Subheading Style. . . . . . . . . . . . 62
Creating a New Style Based on an Existing Style . . . . 64
Applying Subhead Styles. . . . . . . . . . . . . . . 65
Making Horizontal Justification Choices . . . . . . 66
Working with Graphics in a Publication . . . . . . . . . . . 67
Using Graphics for Communication . . . . . . . . . . . 67
Understanding Graphic Formats . . . . . . . . . . . . . 68
Working with TIFF. . . . . . . . . . . . . . . . . . 68
Working with EPS . . . . . . . . . . . . . . . . . . 68
Working with GIF and JPEG. . . . . . . . . . . . . 68
Understanding Image Resolution . . . . . . . . . . . . 68
Placing a Graphic . . . . . . . . . . . . . . . . . . . . 69
Resizing a Graphic . . . . . . . . . . . . . . . . . . . . 70
Wrapping Text Around a Graphic . . . . . . . . . . 71
Placing a Larger Graphic . . . . . . . . . . . . . . . 72
Repositioning a Graphic . . . . . . . . . . . . . . . 73
Working with Text Flow . . . . . . . . . . . . . . . . . . . 75
Deleting a Text Frame from Text Flow . . . . . . . . . 75
Creating Jump Lines . . . . . . . . . . . . . . . . . . . 76
Creating a “Continued On” Jump Line. . . . . . . . 76
Threading a Story with the In Port and Out Ports . . . . 79
Using Manual Flow to Redirect Text . . . . . . . . . . 80
Creating a “Continued From” Jump Line . . . . . . 81
Copying Pages Between Documents. . . . . . . . . . . . . 82
Using the Swipe File . . . . . . . . . . . . . . . . . . . 82
Pressing and Dragging Pages Across Documents . . 83
Contents, continued
Using Manual Text Flow to Place More Text .
Copying and Pasting an Object . . . . . . . .
Rotating an Object . . . . . . . . . . . . . . .
Integrating More Objects . . . . . . . . . . .
Finishing Copying and Pasting . . . . . . . .
Refining the Publication . . . . . . . . . . . . . . . .
Inserting a Soft Return . . . . . . . . . . . . . . .
Using the Story Editor . . . . . . . . . . . . . . .
Deleting Pages from a Layout . . . . . . . . . . .
.
.
.
.
.
.
.
.
.
.
.
.
.
.
.
.
.
.
.
.
.
.
.
.
.
.
.
84
86
88
89
90
91
91
92
94
Wrapping Up . . . . . . . . . . . . . . . . . . . . . .
Contributions to These Materials . . . . . . . . . . . .
Appendix 1: Resolving Missing Fonts . . . . . . . . .
Appendix 2: Using Spell Check . . . . . . . . . . . . .
Appendix 3: Creating a Portable Document File (PDF).
Appendix 4: Printing Resources . . . . . . . . . . . . .
IUB Resources . . . . . . . . . . . . . . . . . . . .
IUPUI Resource . . . . . . . . . . . . . . . . . . .
Appendix 5: The Completed Project . . . . . . . . . .
.
.
.
.
.
.
.
.
.
. 94
. 96
. 97
100
102
105
105
105
106
© 2005 The Trustees of Indiana Univeristy
For review use only
Welcome and Introduction
Welcome to InDesign: Basic Page Layout.
What You Should Already Know
This workshop assumes that you have already taken the prerequisite work shops, Word: The Essentials, and either Photoshop: The Basics, or Illustrator:
The Basics, or that you have equivalent skills. Specifically, you should be able
to:
•
•
•
•
Use word processing features
Apply text styles
Use and be familiar with Adobe tools and palettes
Be proficient with refined mousing tasks
e
s
What You Will Learn
y
l
n
o
u
This workshop introduces manipulation of text and graphic objects using a
broad range of InDesign tools. It provides hands-on practice with how to:
•
•
•
•
•
•
w
e
i
v
e
Apply basic principles of layout and design
Set up a publication
Configure Master pages
Create, edit, and apply styles to format text
Work with text and graphic frames
Import and place external graphics
r
r
e
l
p
fo
What You Will Need to Use These Materials
To complete this workshop successfully, you will be provided with:
m
a
• The use of Adobe InDesign CS2
• The folder InDesign_Basics, and its contents, the exercise files: classroom.tif, classroom_narrow.tif, main.txt, online approaches.doc, and
swipe.indd.
S
InDesign: Basic Page Layout v2.0.0
1
For review use only
© 2005 The Trustees of Indiana University
Getting Started
These materials presume you will begin work from the desktop, and have any
required exercise files located in an epclass folder there. For instructions on
obtaining the exercise files, see below.
If you need assistance logging on or starting an application, please consult
your instructor.
Finding Help
y
l
n
If you have computer-related questions not answered in these materials, you
can look for the answers in the UITS Knowledge Base, located at:
http://kb.iu.edu/
e
s
Self-Study Training
Want to learn more on your own?
w
e
o
u
IT Training Online makes self-study computer-based courses available on a
wide range of IT topics. You may also purchase STEPS workshop materials
to use in learning on your own. To find out more, go to:
i
v
e
r
r
http://ittraining.iu.edu/online/
fo
Getting the Exercise Files
e
l
p
Most of our workshops use exercise files, listed at the bottom of page 1 of the
materials. In our computer-equipped classrooms, these files are located in the
epclass folder, which should already be on the computer desktop. If you are
using our materials in a different location, you may obtain the exercise files
from our Web site at:
m
a
S
http://ittraining.iu.edu/workshops/files/
Once you are logged on and have the needed files in an epclass folder on your
desktop, you are ready to proceed with the rest of the workshop.
Today’s Project
For today’s project, we will use the Adobe InDesign page layout application to
create a four-page, printable newsletter entitled “Classroom Technology
Today.” The newsletter is to be aimed at educators, and as such it will address
issues related to teaching with technology. The publication will incorporate
2
InDesign: Basic Page Layout vv2.0.0
© 2005 The Trustees of Indiana Univeristy
For review use only
text, graphics, and some common publishing techniques. As we work with the
newsletter project, we will learn to use Adobe InDesign; in addition, we will
learn general methods of structuring a document and various approaches to
important design choices. Along the way, we will also acquire some layout
terminology.
In the beginning, we’ll spend some time getting acquainted with the InDesign
workspace.
Introducing Page Layout in Adobe InDesign
y
l
n
Adobe InDesign is a professional page layout software application that is used
to design sophisticated publications. Like others of its type (e.g., PageMaker,
QuarkXPress, and Microsoft Publisher), InDesign is especially useful when
we want to:
•
•
•
•
•
•
e
s
o
u
Combine text and graphics on a page
Control many advanced formatting characteristics of text
Create templates to make our publications consistent and easier to work with
Print to a laser or color desktop printer
Create an Acrobat PDF file for draft or Web distribution
Save and send work to a printing service provider
w
e
i
v
e
r
r
Before deciding to use InDesign with its many complex graphical features, it
is important to know if InDesign is best suited to the needs of our publication
or whether a word processing application such as MS Word would be more
appropriate.
e
l
p
fo
Understanding Page Design vs. Word Processing
m
a
Although layout applications readily accept text that is directly entered into
documents, the main function of these programs is not of typing but of positioning imported text and graphics in appealing ways. Accordingly, when a
document that contains significant amounts of text requires a detailed layout,
it may be most effective to handle it in a two-phase workflow. First, the textual content may be generated in a word processing application like MS Word;
then, after the writing is done, the text can be imported into a layout application such as InDesign to be skillfully arranged.
S
It is important to understand that these two types of applications offer complementary features. Because layout applications are complex design tools, they
present sophisticated layout options, but they lack many of the intricate text
manipulation tools used in word processors. In contrast, although most
InDesign: Basic Page Layout v2.0.0
3
For review use only
© 2005 The Trustees of Indiana University
advanced word processing programs include layout options, their handling of
graphical features is not nearly as efficient or powerful as the layout applications like InDesign.
Keeping this in mind, the following section outlines some projects that are
appropriate for page layout software such as InDesign and then specifies
others that are best completed with word processing software such as
Microsoft Word.
Page layout software is better suited for:
• Documents that require precise layout of text and graphics, such as brochures,
newsletters, and professional-looking flyers
• Advanced typographic (text) adjustments
• Accurate color management within publications
• Templates used for consistent layout
y
l
n
e
s
Word processing software is better suited for:
o
u
• Medium to long documents
• Documents that include endnotes or footnotes
• Text documents that require few or no graphics, such as reports, dissertations,
theses, or letters
• Documents that require very light layout of text and graphics together, such
as basic flyers
w
e
i
v
e
r
r
For information about printing resources at IU, see “Appendix 4: Printing
Resources” on page 103.
e
l
p
fo
Understanding the Workspace
m
a
The InDesign workspace exhibits many familiar features common to other
Adobe applications such as Photoshop or Illustrator. As such, the workspace
presents a visual representation of the document in progress, displayed with
color-coded cues that indicate frames and objects. Around the document is a
complex array of tools, palettes, and menus.
S
We will become acquainted with the interface after we have specified some
fundamental characteristics of our new document.
Creating a New Publication
When we begin creating a new document, InDesign does not automatically
open a blank page. Instead, when we start a document, we are first required to
specify some information about our publication such as the document’s paper
size, orientation, margins, and number of columns.
4
InDesign: Basic Page Layout vv2.0.0
© 2005 The Trustees of Indiana Univeristy
For review use only
Let’s begin to create our publication and explore these new document specifications.
1. Launch InDesign.
We see a blank window with a menu bar and several panels of buttons. In
order to examine the workspace more thoroughly, we will first create a new
document.
2. To begin creating a new document, on the menu bar,
™ File, § New, ™ Document...
y
l
n
The New Document dialog box opens:
e
s
w
e
o
u
i
v
e
r
r
e
l
p
fo
m
a
S
This dialog box requires us to specify the following settings:
Option
Description
Document Preset
To name and save document settings that include page
size, columns, margins, and others, and later invoke them
when creating similar documents.
Number of Pages
To set the number of pages in the initial document. More
pages can be added or subtracted later in Document view.
InDesign: Basic Page Layout v2.0.0
5
For review use only
© 2005 The Trustees of Indiana University
Option
Description
Facing Pages
To indicate that the document is to open up in a book fashion, with right and left pages facing each other (as opposed
to attached together in a single stack). When this option is
checked, the Right and Left Margins below are transformed to Inside and Outside Margins.
Master Text
Frame
To configure the initial set of frames to allow text to be entered directly into it, as opposed to imported. (When it is
checked, however, importable text is still an option.)
Page Size
Offers several familiar paper size and layout options.
Width, Height,
Orientation
To type or choose our own values in Width and Height. Orientation offers portrait or landscape.
Columns
To set the automatic number of columns appearing on all
new pages. The setting may be overridden with manual
text frames.
y
l
n
e
s
w
e
o
u
Gutter
To set the space between columns.
Margins
To set page margins. A number may be typed directly or
the selector buttons may be clicked to select these set-
i
v
e
r
r
tings. If the link icon
is checked, the four fields stay
equal as they are resized. If Facing Pages, above, has
been checked, Right and Left are displayed as Inside and
Outside (when the document opens like a book, the edges
that meet at the fold or binding will be considered the inside
margins).
Save Preset
m
a
e
l
p
More Options
S
fo
To allow us to save and name these settings to use later.
To set some options regarding Bleed and Slug, which are
non-printable areas of the document.
Our “Classroom Technology Today” newsletter project will span four pages
with a groundwork layout of three columns throughout. However, to add interest to the layout, in certain areas we will be manually overriding this threecolumn setting. We will begin with one document page and add others as we
incorporate content.
Because we want the newsletter to open in a book fashion, we will design the
document so it will include facing pages with equal margins on all sides.
Because our articles are ready-made for us in separate text documents, we will
choose to import text into the layout instead of typing the text directly into the
underpinning frames.
6
InDesign: Basic Page Layout vv2.0.0
© 2005 The Trustees of Indiana Univeristy
For review use only
Many of these settings are already provided to us by default. We’re going to
change several to customize our document. Let’s make these settings.
1. To specify three columns, in the Columns Number field,
¢ the value; type: 3
NOTE: If necessary, make sure that the Number of Pages setting is still 1, the
Facing Pages checkbox is checked, the Page Size is Letter, and make
sure the Portrait button
is selected in the Orientation section.
y
l
n
2. To set the gutter width at .15 inch, in the Gutter field,
o
¢ the value; type: .15in ø
e
s
The Gutter measurement turns to 0p10.8. At this point, all of the settings
are listed in a graphic designers’ measurement system of picas and points
(with 6 picas or 72 points per inch.) These setting will be adjusted to inches
later in the workshop. For now, rest assured that as long as we specify
which measurement we are using, InDesign will make the conversions automatically.
w
e
u
i
v
e
3. To make all margins equal, on the Margins section,
r
r
fo
™
NOTE: If the margin settings do not read “3p0,” ¢ the value after clicking
the
button, and type: “.5in.”
e
l
p
4. To accept the new document settings,
m
a
S
™
A new, blank document appears. Let’s save it now.
5. To save the new document, on the menu bar,
™ File, ™ Save
You see the Save As dialog box.
We need to specify where to save the file and what to call it.
InDesign: Basic Page Layout v2.0.0
7
For review use only
© 2005 The Trustees of Indiana University
Setting the Location and Filename
When the dialog box opens, it lists a default location for saving the file. On a
PC, this location is displayed in the Save in field at the top-left corner of the
dialog box.
We want to move to the epclass folder, which is where we will save our file.
1. To move to the epclass folder, on the Save in drop-down list,
™
,™
y
l
n
The epclass folder is now listed as the Save in location. You see its contents.
o
Note for Macintosh Users - On a Macintosh, the Save in field is above the
list of visible folders and files, and is labeled “Where:”. To move to the
desktop, press the key combination † + D. From there, you can move
into the epclass folder.
e
s
u
We want to save this document in the InDesign_Basics subfolder of the epclass folder.
w
e
i
v
e
2. To open the correct subfolder,
r
r
£ the InDesign_Basics folder
fo
Now that we have specified the Save in location, we need to specify the filename.
e
l
p
Let’s make sure that the filename is highlighted first.
3. If the filename is not highlighted,
m
a
S
¢ across the default filename
4. To name the document, in the Name field, type:
Classroom Technology.indd ©
The blank document is set on top of a white background that is bounded by
a ruler on the top and left side. It is surrounded by groupings of control buttons and menus. We’ll explore the components of the publication window.
8
InDesign: Basic Page Layout vv2.0.0
© 2005 The Trustees of Indiana Univeristy
For review use only
Understanding the Publication Window
The components of the publication window are summarized in the following
diagram and table:
Control palette
Pages/Layers/Info
Palette group
y
l
n
Toolbox
e
s
Page
Pasteboard
Rulers
w
e
fo
Component
le
Pages/Layers/
Info Palette group
p
m
a
S
Pasteboard
u
i
v
e
r
r
Page buttons
o
Description
Used to work with Master pages, to navigate from page to page, to work with layers, and view locations and dimensions
of objects in the document.
Palette Bar
Contains collapsed palettes that are
used to modify type and object characteristics such as sizes and styles, colors,
and borders.
Toolbox
Palette that contains tools used to create
and modify objects.
Rulers
Visual guides to page dimensions; can
be used to create workspace guides to
align objects.
InDesign: Basic Page Layout v2.0.0
9
For review use only
© 2005 The Trustees of Indiana University
Component
Description
Pasteboard
White area surrounding workspace,
used to store objects; pasteboard items
are not printed; remains constant no
matter which page you’re working on
Page
Used to lay out text and graphics.
Control palette
Displays options for selected tool; context sensitive.
Page buttons
Used to move between pages.
y
l
n
Selecting Tools
o
The Toolbox on the left of the screen displays many tools for selecting objects,
working with type, drawing, and viewing, as well as controls for applying and
changing color fills, strokes, and gradients. Its tools are grouped into sections
by function. Many of these tools are hidden.
e
s
w
e
u
These sections are outlined in the following diagram:
i
v
e
Go to Adobe online
r
r
Pixel Selection tools
Drawing
tools
e
l
p
fo
Object manipulation
tools
m
a
Utility tools
S
Screen View tools
Foreground and Background
Color Selection tools
Mode tools
A tool can be activated or selected by clicking it in the Toolbox or by using its
keyboard shortcut. Positioning the cursor over a tool displays a tool tip with
the tool's name and keyboard shortcut.
10
InDesign: Basic Page Layout vv2.0.0
© 2005 The Trustees of Indiana Univeristy
For review use only
If you have used Adobe Photoshop before, these features should be familiar to
you.
Changing the Document’s Position and View Size
When working with a crowded workspace, we may want to change the view
size or move the document around on screen. InDesign allows us to control
both view size and the position of the document.
Let’s see how this works.
1. To increase the view size, in the bottom-left corner of the window,
y
l
n
™
, ™ 100%
e
s
The document appears larger.
o
u
2. To move the position of the document on the screen with the Hand tool,
™
w
e
, § to the document,
i
v
e
¢
r
r
We see a different section of the document.
fo
3. To reduce the view to fit in the window, with the Hand tool, in the Toolbox,
e
l
p
£
m
a
S
4. To zoom in, in the Toolbox,
™
, ™ the document
5. To zoom out, with the Zoom tool active, press:
«™ the artboard
Note for Macintosh Users - To zoom out, with the Zoom tool active, press:
¥ and ™ the artboard.
InDesign: Basic Page Layout v2.0.0
11
For review use only
© 2005 The Trustees of Indiana University
6. To reduce the view to fit in the window, in the Toolbox,
£
We are now positioned on the first page.
Viewing and Configuring Rulers
Because we’ll be intricately positioning objects on our page, we will make
some ruler adjustments. InDesign has a variety of options for units of measurement. The default values are in picas. A pica is a standard publishing unit,
which equals 1/6 of an inch. Picas are subdivided into 12 points per pica, thus
making 72 points per inch. Since we may be new to these terms, we will
change the default values so that we can work in inches.
y
l
n
e
s
o
NOTE: Rulers are often on by default, but if you cannot see them, from the
menu bar ™ View, ™ Show Rulers.
u
1. To change the default units of measurement, on the Menu bar,
w
e
i
v
e
™ Edit, § Preferences,
r
r
™ Units & Increments
Note for Macintosh Users - To change the default units of measurement,
on the Menu bar,™ InDesign, § Preferences, ™ Units & Increments.
e
l
p
fo
The Units & Increments category of the Preferences dialog box appears.
m
a
2. To change the horizontal unit of measurement, in the Horizontal field,
S
™
, ™ Inches
Because font sizes are expressed in points, designers occasionally prefer to
work with points instead of inches along the vertical axis. InDesign allows
us to choose the units of both rules independently from each other. However, for this newsletter project, we will keep them the same.
3. To change the vertical unit of measurement, in the Vertical field,
™
12
, ™ Inches
InDesign: Basic Page Layout vv2.0.0
© 2005 The Trustees of Indiana Univeristy
For review use only
4. To accept the choices,
™
Notice that the rulers surrounding the document now use inches.
NOTE: Because of our screen size and resolution, the rulers may display the
numeric values only every 2 inches. More units may be displayed
with magnification of the view size.
We are now ready to begin designing the basic layout of our “Classroom
Technology Today” newsletter. Before we lay out some more features of
the document, we need to make sure we have a plan for our design.
y
l
n
e
s
Planning the Document
o
u
When creating a complex document, layout and organization should be
planned before adding text, graphics, or formatting.
w
e
i
v
e
Before designing any publication, keep in mind some of the following basic
design principles:
r
r
• Consistency: Consistency helps to orient the readers to where they are and
where they can find specific information. A simple example of this would be
our expectation that page numbers appear in the same place on every page.
Other aspects such as color and borders should also continue throughout the
document. This technique is referred to as applying repeating elements. The
number of fonts and formats should be kept to a minimum. As a rule, professional graphic designers typically use no more than three fonts in a layout.
• Legibility: Text should be easy to distinguish and read. When text is legible,
the reader is able to distinguish individual letters from each other. Standard
use of upper and lowercase letters makes a document easier to read, causing
less eye strain. Imagine having to read a long document typed in all capital
letters. This would cause more eyestrain than reading a combination of upper
and lowercase letters.
• Clarity and Meaningfulness of Graphics: Graphics should be clear. Clarity
can be achieved by adjusting image contrast, sharpness, and brightness, just
like on a television. Aside from technical considerations, graphics should
support the communicative purpose of the document; they should not be used
simply to decorate a page.
• White space: White space is the blank space around the edges and between
the lines of a document. Use white space to indicate separate parts of the document and to make the document more readable. Tightly compressed text is
very hard to read.
e
l
p
fo
m
a
S
InDesign: Basic Page Layout v2.0.0
13
For review use only
© 2005 The Trustees of Indiana University
We will explore each of these principles as we work through today’s project.
These items are just a few of many important considerations in page design. In
addition to this quick overview, there are many useful books and Web sites
that provide information about design principles.
Since we know some basic specifications of the publication, we’ll create some
underlying structural pages with basic elements such as the title of the publication, headers, and footers.
Understanding Master Pages
Every publication automatically comes with a blank set of Master Pages. A
Master Page is a template that we can apply to individual pages in our document. All objects we put on a given Master Page will appear on any document
pages to which we apply that Master. Usually, basic page design elements,
such as a header, footer, and page number, are placed on a Master Page. Nonprinting items, such as column and margin guides, can also be placed on a
Master Page. Every Master Page object is protected from being modified on
the document pages.
y
l
n
e
s
w
e
o
u
In InDesign, we may create many Master Pages. This would make it easier to
create long documents such as books. Using this method, a separate Master
Page could be created for each of the following: main body text pages, chapter
title pages, tables of contents, and indexes. If we need to add pages to the document, we could apply the appropriate Master page. In this way, Master Pages
provide publications consistent elements throughout documents without
having to redo all the elements on each page.
i
v
e
r
r
fo
In addition to applications within a single document, Master document settings
can be used for other editions of a publication. Hence, once the Master pages
have been created, the document can easily be saved as a template for subsequent issues.
e
l
p
m
a
About the Pages Palette
S
The Pages palette is docked on the bar of palettes at the upper right of our
screen. It is divided into two scrollable sections: the Master section at the top
and the Document section at the bottom. Each section contains thumbnails that
represent pages.
In a document such as ours with facing pages, we see a few things:
• The top section for Master pages automatically contains two thumbnails: a
single page named “[None]” and two facing pages named “A-Master.” As we
create our own Master pages, we’ll be adding some new thumbnails to this
section.
• The bottom section of the palette contains a tiny layout of each of the Document, or content-containing, pages we have specified for our document.
14
InDesign: Basic Page Layout vv2.0.0
© 2005 The Trustees of Indiana Univeristy
For review use only
If—like our newsletter—the layout specifies facing pages, the thumbnails will
be aligned along a central bar that indicates the binding or central fold of the
document. Page 1 will be on the right side, and the final page will be on the
left.
Following is a diagram of the Pages palette and the icons:
Palette options
Master pages
Page 1 icon
(active is highlighted)
Separation
line
Page number
y
l
n
Document pages
Create New Page
Open/Close
tab
Delete page
e
s
o
New Master Pages may be created from the Palette Options button located on
the upper left side of the docked palette. For our newsletter project, we will be
creating several custom Master pages.
w
e
u
NOTE: To restore the InDesign palettes to default settings, ™ Window,
™ Workspace, ™ Default. The entire InDesign default workspace—including tool settings—can be restored to default settings
when it is restarted. To restore settings on a PC, exit the application
and press ƒ «º while re-launching InDesign. To restore
default settings on a Mac, exit the application and press ƒ
¥º † while re-launching InDesign.
i
v
e
r
r
fo
Creating a Cover Page Master
e
l
p
We will be creating three Master Pages for the “Classroom Technology
Today” newsletter project: one for the cover page and two linked inside pages
(left and right). The back page containing a mailing panel will inherit the
Master for the inside pages. Using these three Master pages, if we need to add
more pages, we don’t need to re-do the header and footer on each of the inside
pages. Moreover, once created, we could use our Master Pages for future documents.
m
a
S
The cover page Master must contain special items such as a title, a date, and
information about the issue and volume number. In addition, some elements
that give it an identity should be present in consistent locations. These might
include a logo, a table of contents, and perhaps some other text or graphic
objects that would be unique to the publication.
First, let’s begin creating the cover page Master.
InDesign: Basic Page Layout v2.0.0
15
For review use only
© 2005 The Trustees of Indiana University
1. To start making a new Master page, in the Pages palette,
™
, ™ New Master
The New Master dialog box appears. It contains the following fields:
• Prefix code: The Prefix allows us to label our Master pages with a letter so
we can quickly tell from the thumbnails which Master is applied.
• Name: The text here will be the displayed name of the Master page.
• Based on Master: This field allows us to use Master pages already available.
• Number of Pages: Since pages are frequently linked together in twos (as in
right-left pages) or threes (foldout pages) or even more, in this field we type
the number of pages we want to put in the set.
y
l
n
o
We will give our first Master a prefix of “A” and name it “Cover Page.” It
will only have one page because the first page of facing pages is always
considered a right page and stands alone; at the top of a volume, a cover
page is naturally always viewed by itself.
e
s
u
2. To assign the Master page a Prefix of A, in the Prefix field, type:
w
e
vi
A
e
r
r
3. To assign a name, in the Name field,
fo
¢ the value; type: Cover Page
e
l
p
Since we don’t have other appropriate Masters at this point, we will leave
the Based on field set at [None].
4. To specify a single page, in the Number of Pages field,
m
a
S
¢ the value; type: 1
5. To accept the new Master page specifications,
™
The new Master Page thumbnail appears in the Master Pages section of the
Pages palette.
At this point, we will add a publication name and some other information
to our Cover Page Master. In order to precisely position objects, we will use
a grid.
16
InDesign: Basic Page Layout vv2.0.0
© 2005 The Trustees of Indiana Univeristy
For review use only
Using the Grid
When we’re working with any graphic design application, it helps to know
exactly at what point on the page we are working. The Grid is a device we can
use to locate objects precisely where we want them. It works like traditional
graph paper in that it contains evenly spaced horizontal and vertical lines.
We will use the Grid lines to roughly size our text and graphic objects and
place them in approximate locations. Since we want to start positioning
objects, we will activate the Grid.
1. To show the Grid, on the Menu bar,
y
l
n
™ View, ™ Grids and Guides,
e
s
o
™ Show Document Grid
u
A light gray grid appears in the background. These lines are visual aids
only; they won’t print in the final version.
w
e
Since our objects will be fairly large in this document, we’ll want to make
our grid units larger.
i
v
e
2. To change our Grid sectors divisions to inches, on the Menu bar,
r
r
™ Edit, § Preferences, ™ Grids...
fo
Note for Macintosh Users - To change the grid sector divisions to inches,
on the Menu bar,™ InDesign, § Preferences, ™ Grids...
e
l
p
The Grids portion of the Preferences settings dialog appears. It displays two
sections with several options:
m
a
S
The Baseline Grid deals with alignment of text. Here we can specify grid
color, distance between and origin of gridlines, and at what magnification
they are viewable.
The Document Grid is used to align frames with text, pictures, and drawing
objects. Here we can specify the distance between major gridlines, how
many subdivisions each major section contains, and the color of the gridlines.
We would like to leave the major sections at 1” but make the subdivisions
1/4” squares.
InDesign: Basic Page Layout v2.0.0
17
For review use only
© 2005 The Trustees of Indiana University
3. To specify 4 subdivisions per inch along both axes, in the Horizontal Subdivisions field,
¢ the value; type: 4øø4
Make sure all the subdivisions are set at 4.
4. To accept the settings,
™
y
l
n
The document now displays more sparsely spaced gridlines. We’ll use
these to position our objects. Because we want exact positioning of our objects, we will force their boundaries to align with the grid.
e
s
Snapping to the Grid
o
u
Misaligned objects can adversely affect the look of a publication. Even though
readers may not immediately notice that objects are slightly out of alignment,
inaccurate positioning makes a publication look unprofessional overall. The
Grid in InDesign offers a feature that compels us to align shapes only along
the grid lines, thus simplifying the task of perfectly positioning objects on a
page. To help control our design, we can choose to snap our shapes to the
Grid.
w
e
i
v
e
r
r
fo
Let’s see how the Snap feature works.
1. To snap our objects to the Grid, on the Menu bar,
e
l
p
™ View, ™ Grids and Guides,
m
a
S
™ Snap to Document Grid
From now on, our objects will be precisely located on our pages.
At this point, we can begin to enter some text in the form of a title for the
newsletter.
18
InDesign: Basic Page Layout vv2.0.0
© 2005 The Trustees of Indiana Univeristy
For review use only
Working with Text
In most cases, the use of text is a primary mode of communication. Before we
start adding text to our newsletter, we need to consider some important aspects
about typography, which is the art and science of type. It is important to
understand some fundamentals of good typography and point out a few issues
about text in a publication.
Making Typographic Decisions
y
l
n
A publication needs to convey a message to a target audience. In our case, we
are trying to present to educators of all classroom levels interesting articles
about the use of technology in the classroom. The design of our newsletter
should communicate this message as clearly as possible. If our publication’s
type is difficult to read or doesn’t esthetically fit the tone of the publication,
the intended message is not adequately conveyed. In our publication, we will
be working with Times New Roman and Arial.
e
s
o
u
Most people do not specifically notice good typography; however, bad typography is easy to spot. In using InDesign’s typographic controls, our primary
goal is to maximize the impact of the publication while minimizing the
reader’s distraction when reading it.
w
e
i
v
e
r
r
Working with Frames
fo
All text that appears in documents created with InDesign must be located
within text boxes, or frames. A frame is simply a container for text or graphic
objects. Although we have already divided our page into a three-column substructure, our design is not limited to the three columns; we can simply add
some frames if we want to place our objects in custom spaces and shapes.
e
l
p
m
a
Since we can create a custom space for our text, we want to add one large
frame for the publication’s name, which will extend across the columns. This
feature of a publication is the Nameplate.
S
The nameplate is the most important visual object of any publication. The
nameplate can be otherwise called a title. As such, it uniquely identifies a publication and should span a large area across the cover page. It should include
the name of the publication and issue number information. Often, the nameplate also contains a logo and the date of publication. A nameplate may appear
anywhere on a cover page, but most designs incorporate the nameplate across
the top.
InDesign: Basic Page Layout v2.0.0
19
For review use only
© 2005 The Trustees of Indiana University
Creating a Text Frame with the Type Tool
Our newsletter’s nameplate will span the top of the cover page, and include the
date and some issue information. The items that make up the nameplate will be
contained within several grouped text frames.
There are several ways to create a frame. The most straightforward way to
create a text frame is to draw it with the Type tool.
Let’s create the nameplate’s title frame with the Type tool.
1. To activate the Type tool, in the Toolbox,
y
l
n
™
e
s
o
The cursor turns to a text insertion icon . As we move the cursor, our location is shown by dotted lines that move on the ruler:
2. To correctly position the cursor,
w
e
u
§ the cursor’s crosshatch to the upper left corner of the
left column
i
v
e
r
r
3. To draw the frame with the Type tool,
fo
¢ diagonally downward across all columns, to the 1 3/4”
marker
e
l
p
NOTE: In this view, the 1” label may not be visible.
m
a
S
A blue, horizontal line appears 1 3/4 inches from the top margin, and we see
a blinking text cursor in the upper right corner. The horizontal line indicates
the bottom part of the text frame, but we cannot see the remaining text
frame borders because the Snap to Grid feature has caused our frame to
align exactly with the gridlines.
We’ll get a better view of this text frame.
20
InDesign: Basic Page Layout vv2.0.0
© 2005 The Trustees of Indiana Univeristy
For review use only
4. To view at 100%, on the Menu bar,
™ View, ™ Actual Size
We can see the document more closely.
At this point, we want to add and format text—in the form of the publication’s name, “Classroom Technology Today.”
5. To add the publication name, type:
y
l
n
Classroom Technology Today
o
The text appears in the upper left corner, but it is in the tiny default font.
We need to format it.
Understanding the Control Palette
e
s
u
The Control palette across the top of the page is context-sensitive; it offers
only the options that are available to the active tool. Hence, since we are using
the Type tool, the Control palette looks much like the formatting button bar of
a word processing application, except it displays more features. The functions
of these buttons may not be intuitive by their icons. However, we can tell what
they do by simply hovering the cursor over them and reading the pop-up tool
tips.
w
e
i
v
e
r
r
fo
Surprisingly, the Control palette for text actually contains two sets of buttons
that we can toggle back and forth: the Character set and the Paragraph set. The
set of character buttons contains information relating to specific characters
such as font name, size, and spacing. The set of paragraph options allows us to
control features of blocks of text, including alignment and indentation. In the
next section, we will see how to utilize these tools to format our text.
e
l
p
m
a
Formatting Characters
S
Since “Classroom Technology Today” is aimed at an academic audience, we
want the name of our newsletter to be large, executed in a serious typeface.
We will keep the font face as Times New Roman, but we will enlarge the
characters and fit the publication’s name into the frame.
1. If necessary, to select the Character options, in the Control palette,
™
InDesign: Basic Page Layout v2.0.0
21
For review use only
© 2005 The Trustees of Indiana University
2. To select the name of the title,
¢ to highlight the text
3. To change the font size on the Control palette, in the Font field,
™
, ™ 48
4. To fit the document in the window, in the Toolbox,
y
l
n
£
e
s
o
The type size looks fine, but we can’t see it all because much of it falls outside of the frame. We can squeeze characters together with techniques
called tracking and kerning.
u
Understanding Tracking and Kerning
w
e
Tracking and kerning are typographic terms having to do with the space
between characters. When designers of specific type faces create a given type
face, they build in a default amount of space around each character. This spacing is intended by the artist to be the most effective distance. In layout applications like InDesign, we can override these defaults; each term is used to make
these adjustments described below.
i
v
e
r
r
fo
Tracking controls the white space between characters in an entire block of
text. Generally, tighter tracking is appropriate for larger text, and looser tracking is better for smaller text. The default tracking settings for body text are
usually adequate, but larger display text may need to have a tighter tracking
setting.
e
l
p
m
a
Kerning controls the white space between individual characters. Each character takes up a different amount of space, depending on the font face. Normally,
kerning is used to reduce the space between a pair of characters. Usually, body
text is small enough that kerning is not needed. However, headlines sometimes
look better with tighter kerning. This helps remove unnecessary white space
between two characters.
S
Since this title text is too large to fit in the frame, in order to squeeze together
the entire grouping of characters, we will change the overall tracking; then we
will adjust the kerning between a few characters.
22
InDesign: Basic Page Layout vv2.0.0
© 2005 The Trustees of Indiana Univeristy
For review use only
Changing the Tracking
Tracking refers to the spacing between characters in a block of text. We
already have this group of characters highlighted, so we can adjust the tracking without having to change the selection.
1. To begin adjusting the tracking, locate the Tracking (in thousandths of an
em) icon,
in the center of the control pallet.
2. To change the tracking, in the Tracking field,
™
y
l
n
, ™ -50
The text now fits within the frame. That accomplished, we can see that the
spacing between some of the letters is different. At this point, we can make
some of the individual character spacing more even.
e
s
Changing the Kerning
o
u
Kerning is the spacing between a pair of characters, and is appropriate where
open spaces of letters—like the area directly under the horizontal stroke of a
capital T—make character spacing look awkward. We will alter the kerning
between some pairs of characters. Specifically, we can see that the letters to
the right of both of the capital Ts could be nudged closer.
w
e
i
v
e
r
r
1. To activate the Type tool, in the Toolbox,
e
l
p
fo
™
2. To begin moving the letters T and e in “Technology” closer together,
m
a
S
™ between the T and E
The blinking cursor appears between the letters.
3. To begin adjusting the kerning, locate the Kerning (in thousandths of an
em) button,
just above the Tracking icon.
4. To change the kerning, in the Kerning field,
¢ the value, type: -90©
NOTE: To change the kerning in increments, the up or down arrow controls
can also be clicked.
InDesign: Basic Page Layout v2.0.0
23
For review use only
© 2005 The Trustees of Indiana University
5. To make adjustments between other pairs of characters, repeat steps 1-3,
adjusting the value accordingly.
Now the text fits horizontally in the frame, but it is still aligned at the left.
We need to make some more adjustments.
Formatting a Paragraph
The name of the publication appears to be the right size, but it still needs to be
centered horizontally within the frame. We can do this with the Paragraph
Control palette. When we make an adjustment in the Paragraph Control palette, our changes are applied to the entire paragraph.
y
l
n
First, we need to activate the Paragraph Control palette and then make the
alignment change.
o
1. To activate the Paragraph Control palette, on the Control palette,
™
w
e
e
s
u
The Character Control palette changes to the Paragraph Control palette.
i
v
e
2. To center the paragraph in the text frame, in the Paragraph Control palette,
r
r
™
fo
The text is centered within the frame.
e
l
p
To effectively display this newsletter title, we still need to make adjustments to the location of the text relative to its frame. We can determine
where it should be located from the top or bottom borders of the frame, and
also where it is aligned vertically in the frame. We will make the alignment
adjustments from the Control palette to start. This operation requires manipulation of the frame itself, not the text. When we adjust frame specifications, we use the Selection tools.
m
a
S
Modifying a Frame with the Selection Tool
At the top of the Toolbox there are two selection tools, represented by arrows:
one black and one white. These tools select frames and objects so we can
manipulate them.
24
InDesign: Basic Page Layout vv2.0.0
© 2005 The Trustees of Indiana Univeristy
For review use only
• The black arrow
is the Selection tool. It selects an entire frame so it can
be smoothly moved, resized, or rotated.
• The white arrow
is the Direct Selection tool. It selects parts or segments
of a frame to apply various effects, such as distorting or skewing, to each
piece.
Changing Alignment Within a Frame
To work with alignment of text within a frame, we need to work with options
that pertain to the frame as a whole, so we must use the Selection tool.
1. To activate the Selection Tool,
y
l
n
™
e
s
The Frame control palette appears.
o
u
We can tell the frame is selected because the text is now bordered by a light
blue box with tiny squares known as handles which could be used to resize the frame. Now that we have activated the frame, we can check some
of its options.
w
e
i
v
e
2. To center the text vertically in the frame, in the Control palette,
r
r
™
fo
The text is now in the middle of the text frame.
e
l
p
Stacking Frames Together
We have created an attractively rendered name for our classroom technology
newsletter, but as part of a publication nameplate, it should contain information about the issue number and the date. Since we will want to locate this
information underneath the name and then apply some separate formatting
characteristics, the task would be easiest to accomplish in an independent, but
overlapping, frame.
m
a
S
The text frame containing the publication is already in place, and now we
want to add a frame on top of it. Since this frame is already functioning as a
text frame, the Type tool can only be used inside it to highlight existing text;
hence, we cannot successfully use the Type tool to press and drag a new frame
over it. Because of this, we will need to use another tool: the Rectangle Frame
tool.
InDesign: Basic Page Layout v2.0.0
25
For review use only
© 2005 The Trustees of Indiana University
Creating a Frame with the Frame Tool
The Rectangle Frame tool is used to create rectangular frames with unspecified content. Once a frame has been created, it can be used as a placeholder to
import a file containing text or graphics. Additionally, we can make it a text
frame by simply clicking inside the frame after it has been created.
Let’s use the Rectangular Frame tool to draw a new frame.
1. To activate the Rectangular Frame tool, in the Toolbox,
y
l
n
™
The tool is highlighted and the cursor becomes a crosshair with a tiny arrow. Notice as we move the cursor, our position is indicated in the ruler
with a dotted line. We will use this feature to precisely draw the frame.
e
s
2. To position the cursor,
w
e
o
u
§ left document margin, at 1 1/2” on the vertical ruler
i
v
e
3. To draw the new frame,
r
r
¢ a 1/4” high frame that spans all columns
fo
A new 1/4” frame appears, extending across all three columns and overlapping the bottom of the nameplate frame. It has a large “X” inside it, spanning from corner to corner. The frames should look like the following:
e
l
p
m
a
S
Because we still have Snap to Grid active, the frame is aligned exactly
along the bottom of the previous frame.
Now we will make it a text frame by clicking inside it with the Type tool.
4. To activate the Type tool,
™
, ™ the new frame
The “X” inside the frame disappears, and a blinking cursor is activated.
Now we can type the volume number inside.
26
InDesign: Basic Page Layout vv2.0.0
Where to Go From Here
The rest of this document has been intentionally deleted.
To find out how you may use the full version of this document and many other
of our award-winning materials in your own training classroom, visit:
http://ittraining.iu.edu/ematerials/


© Copyright 2026