
INSTRUCTION GUIDE
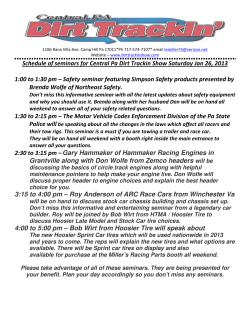
INSTRUCTION GUIDE 2BLISS READY / GRID UST TIRES THIS BRIEF INSTALLATION GUIDE CONTAINS IMPORTANT INFORMATION. PLEASE READ CAREFULLY AND STORE IN A SAFE PLACE. This instruction guide demonstrates the proper installation of Specialized 2Bliss Ready tires, and GRID UST tires. Refer to the GRID UST section for GRID UST tire- and rim-specific information. With the use of sealant, 2Bliss Ready tires can be installed on tubeless-ready rims, as well as rims that require rim sealing tape. All tire and rim combinations require the use of sealant—the only exception is GRID UST tires on UST rims. Additionally, 2Bliss Ready tires require the installation of a 2Bliss Ready valve. Since there are a limitless number of tire and rim combinations, some setups might not have a tight seal on initial installation. It is important to check for leaks before going on an extended ride. Keep in mind that 2Bliss Ready tires are not GRID UST tires, and always require the use of tire sealant, unless a standard inner tube is being used. If you are installing GRID UST tires and/or using UST rims, refer to the UST section (P.6) before continuing. WARNING! When using an air compressor to inflate a 2Bliss Ready tire, check that the regulator pressure is set below 65psi (4.5 BAR). Exceeding this pressure might blow the tire off the rim, resulting in injury. Tires are prone to blow-offs when improperly installed, which can result in injury. To protect the eyes from injury, wear safety glasses. INSTALLATION 1 2 START X2 FINISH Valve Hole Skip steps 1, 2 & 3 if you are using a UST system, tubeless-specific rims, or already have tubeless tape installed. 1. To help with inflation of the tire, install two layers of rim tape, starting before the spoke hole next to the valve, going over the spoke hole, and ending after the spoke hole after the valve. 2. Once the tape installation is complete, heat up the tip of a Phillips screwdriver (use a screwdriver with a diameter close to the diameter of the valve hole) and press against the rim tape to create a uniform hole. This minimizes the chance of a valve hole leak. Once the hole is created, install the valve stem. NOTE: Proper installation and the subsequent ability to inflate the tire benefits from practice. It doesn’t always happen on the first try, and sometimes requires repositioning the tire in the gutter of the rim. If there is any doubt about installing 2Bliss Ready tires, please refer to your Specialized authorized dealer. NOTE: Depending on the manufacturer, some rims may require more layers of tape to build up the seal against the bead of the tire. Specialized recommends performing a test installation and inflation of the tire before including sealant, to confirm that the number of layers of tape are adequate to easily inflate the tire. NOTE : Carefully inspect the rim tape to ensure that the spoke holes are fully sealed. Any leaks discovered after the sealant is added will require cleaning off the sealant from the rim and re-taping the rim. 3 3. Install the 2Bliss Ready Valve Stem for tubeless tires into the rim. Be sure to position the valve stem in the correct direction so that it can seat into the gutter of the rim. Once positioned, thread the valve stem nut onto the valve stem and finger-tighten the nut. 4 4. Check the tire to determine if it’s direction-specific, and mount accordingly. Mount one side of the tire on the rim. Partially mount the second bead, leaving enough of a gap to pour the recommended amount of tire sealant into the tire. Page 2 of 7 5 Skip this step if you are installing a GRID UST tire onto a UST rim. 5. Install sealant. Reference sealant manufacturer for recommended amounts. 6 6. Finish mounting the second bead of the tire at the valve stem; this makes it easier to mount by hand. Make sure the beads are seated in the center gutter of the rim, this will help ease the installation of the tire by hand. NOTE: If installation is too difficult by hand, use plastic tire levers to help roll the last section of the 2nd bead over the rim hook. Page 3 of 7 7 Skip this step if you are installing a GRID UST tire onto a UST rim. 7. With the tire flat, rotate the tire while it is resting on the ground. This helps spread the sealant around the inside of the tire, and also helps wet the bead area, which helps the bead slip into place and seal the bead. NOTE: Roll the tire on a surface that won’t be damaged by leaking sealant. Garage, good. Carpet, bad. 8 SA MAX PSI F ET Y FIRST 8. Inflate the tire to 65 PSI (4.5 BAR), then deflate to your desired pressure. If you use a compressor to inflate, check that the regulator is set below 65psi (4.5 BAR) to eliminate the chance of blowing the tire off the rim. WARNING! Tires are prone to blow-offs when improperly installed, which can result in injury. To protect the eyes from injury, wear safety glasses when using tire sealant. Page 4 of 7 9 9. Inspect the entire circumference of both beads to ensure a proper bead seat. The bead may produce a distinctive popping sound when it’s fully seated. If you find part of the bead is not seated all the way, you may need to add more air. If you reach 65psi (4.5 BAR) and the bead is still not seated, deflate the tire, reposition it, and re-inflate. You can also wet the bead with the sealant (or soap if you are using a GRID UST tire on a UST rim). This will help the bead to slip into place, as well as help seal the bead. 10 Skip this step if you are installing a GRID UST tire onto a UST rim. 10.With the tire inflated, angle the tire at 45 degrees and then shake the tire in a small circular motion, working the tire sealant around inside the tire. This helps the sealant work itself into the casing and the bead/rim interface to help pre-seal the tire. Page 5 of 7 11 PSI / BAR RECOMMENDED MTB TIRE PRESSURE 45 / 3.1 PRESSURE 40 / 2.8 35 / 2.4 30 / 2.1 ” 2.0 x 9er 2.3” 2 / ” 26 er x 9 ”/2 26 25 / 1.7 20 / 1.4 110 120 130 140 150 160 170 180 190 200 210 220 LB 50 55 59 64 68 73 77 82 86 91 95 100 KG RIDER WEIGHT 11. Inflate the tire higher than what would be the desired pressure, then go on a short ride to work the sealant into the casing. Carry a pump in case it loses air while you are riding. It’s a good idea to complete your first “setup” ride near home, or on a short trail where you have easy access to your vehicle in case you have any issues. Once the tire is fully seated, sealed and holding air consistently, adjust the tire pressure to the desired setting. NOTE: Skip the sealant step if you are installing a GRID UST tire onto a UST rim. Page 6 of 7 12 TROUBLESHOOTING Sealant leaking out of sidewall (Fig. 12, left-side magnification): This is a natural occurrence. 2Bliss Ready tires are not GRID UST tires; the sidewalls are permeable and the sealant seeps out of the sidewall as it seals the natural permeability of the lightweight 2Bliss Ready casing. Allow the sealant to seal the tire, then wipe the excess with a rag. If you continue to see leaks, rotate to the affected area and shake the sealant around. This can take a few minutes but will eventually seal up. Sealant leaking out of spoke holes and/or valve stem (Fig. 12, right-side magnification): If you see sealant leaking out or feel air flow around the spoke holes, this typically means the rim strip is leaking. Re-taping the rim usually solves this issue (Fig. 1 & 2). If the leaking occurs at the valve stem, inspect the 2Bliss Ready Valve Stem to ensure that it’s tight and functioning properly (Fig. 3). GRID UST TIRE- AND/OR RIM-SPECIFIC INFORMATION GRID UST tires are only compatible with UST rims. UST rims are compatible with either GRID UST or 2Bliss Ready tires. UST tires and rims do not require sealant for proper installation. Apply soapy water to the tire bead to ease installation. This will also help achieve a proper seal. UST tires from Specialized carry the GRID UST name mark. They should be treated like any UST-compliant tire when used on UST rims, as noted in this instruction guide. RIM-SPECIFIC INFORMATION DT SWISS RIMS - When installing 2Bliss Ready tires on DT Swiss Rims, it is recommended to use the DT Swiss 2Bliss Ready kit. If this is not available, the rims may need to be taped with 3-4 revolutions of Roval 2Bliss Ready tape to build up the rim inner diameter, in order to create a better seal for tire inflation. NON-ROVAL RIMS - When installing 2Bliss Ready tires on non-Roval rims, be sure to install enough layers of tape (minimum of two) to create a proper seal between the rim and the tire bead. Fine-tune the number of layers depending on the tire/rim combination. SPECIALIZED RH26 / RH29 RIMS - These rims are not recommended to be set up as a tubeless system. PINNED-SEAM RIMS - Rims with pinned seams (rims with a clearly visible seam at the joint, compared to welded rims that have no visible seam) are not recommended to be set up as a tubeless system, as they are more prone to leaking at the seam. WARRANTY For the complete warranty provisions, please refer to the Specialized Owner’s Manual or www.specialized.com. SPECIALIZED BICYCLE COMPONENTS 15130 Concord Circle, Morgan Hill, CA 95037 (408) 779-6229 IG0290 Rev.A, December 2010 Page 7 of 7 Please note all instructions are subject to change for improvement without notice. Please visit www.specialized.com for periodic tech updates. Feedback: [email protected]


© Copyright 2026