
INTRODUCTION TO MICROSOFT WORD
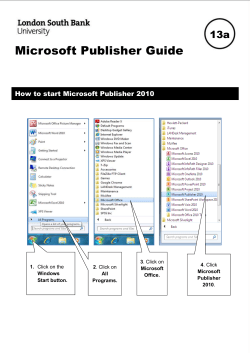
INTRODUCTION TO MICROSOFT WORD GETTING STARTED PAGE 02 Class Overview What You Will Learn USING MICROSOFT WORD PAGE 03 Opening Microsoft Word Microsoft Word Features Keyboard Review MICROSOFT WORD BASICS PAGE 08 Typing Text Deleting Text Undoing and Redoing Formatting Text Cutting, Copying and Pasting Text DOING MORE WITH MICROSOFT WORD PAGE 11 Inserting Images and Clip Art Modifying Line Spacing Creating Bulleted and Numbered Lists Changing Views and Overall Look Spelling and Grammar Check CLOSING MICROSOFT WORD Saving Documents Printing Documents Getting More Help Exiting the Program PAGE 15 Class Overview This is a class for beginning computer users. You are only expected to know how to use the mouse and keyboard, open a program, and turn the computer on and off. You should also be familiar with the Microsoft Windows operating system. Tonight, we will be going over the basics of using Microsoft Word. We will be using PC laptop computers running the Windows 7 operating system. Microsoft Word is part of the suite of programs called “Microsoft Office,” which also includes Excel, PowerPoint, and more. Please let the instructor know if you have questions or concerns before the class, or as we go along. You Will Learn How To: Find and open Microsoft Word in Windows Type text Format text and change fonts Change the spacing on your document Use the spelling and grammar check tool Close Microsoft Word Use Microsoft Word’s menu and toolbar Delete text to the left and right Copy, paste, and cut text Review the keyboard functions Undo and redo Create bulleted and numbered lists Save documents Insert images and clip art into a document Change the display of Microsoft Office Print documents Open saved documents Find more help! USING MICROSOFT WORD Microsoft Word is an example of a program called a “word processor.” Word processors are used to create and print text documents in much the same way that you would use a typewriter. The key benefit to using a word processor is that you can make changes easily, including correcting spelling; adding, deleting, formatting, and relocating text; and inserting images. Once you create a document, you can effortlessly print it (as many copies as you want!), save it for later modifications, or send it to a friend via e-mail. Microsoft Word is a very powerful word processor—This handout was created using just a small number of its features! Microsoft Word is available on both PCs and Macs, so what you learn in class today should be applicable to any computer you use. The program may look slightly different depending on the version and computer that you’re using, but Microsoft Word will function in the same basic ways. There are other word processors out there, including OpenOffice.org Writer, WordPerfect, Apple Pages, and WordPad. They have many features in common with Microsoft Word, and you should feel free to choose any program you prefer. Opening Microsoft Word To get started with Microsoft Word (sometimes called “MS Word”), you will need to locate and open the program on your computer. To open the program, point to Word’s icon on the desktop with your mouse and double-click on it with the left mouse button. If you don’t see the MS Word icon on your desktop, you’ll have to access the program from the Start Menu. Click on the button in the bottom left corner to pull up the Start Menu. You should see the MS Word icon here, so click on it once with your left button. If you still don’t see it, click on “All Programs” and scroll through the list of programs until you find it. Click once with your left button to open the program. **Occasionally, Microsoft Word will be in a folder called “Microsoft Office” or something similar—this will make one more step between “All Programs” and “Microsoft Word.” MS Word will then open a blank page called “Document 1.” This is an image of the upper-left corner of MS Word. This box features two important pieces of information: the name of the file that you are currently working on (in this case, “Document 1” since we have not yet renamed it) and which program you are using (“Microsoft Word”). There should now be a blinking line in the top left corner of the part of the screen that looks like a sheet of paper. This means you will be able to type in this space! Microsoft Word Features The Title Bar This is a close-up view of the Title Bar, where file information is located. It shows the name of the file (here, “Microsoft_Word”) and the name of the program (“Microsoft Word”). Notice the three buttons on the right side, controlling the size and closing of the program. Minimize: Leftclick this button to shrink the window down to a small button that will appear in the task bar (see below). Maximize: Leftclick this button to make the window as large as it can be—it should take up your entire screen. Close: Left-click this button to close the window. The program will close and stop running. Make sure you save your work first! Restore Down: Left-click this button to make the window smaller without minimizing it. The Ribbon Menu System The tabbed Ribbon menu system is how you navigate through Word and access various Word commands. If you have used previous versions of Word, the Ribbon system replaces the traditional menus. Quick Access Tool Bar Ribbon Menu Page View Zoom Tool The File Menu In Microsoft Office 2007, there was something called the Microsoft Office Button ( ) in the top left-hand corner. In Microsoft Office 2010, this has been replaced with a tab in the Ribbon called “File.” When you left-click on this tab, a drop-down menu appears. From this menu, you can perform the same functions as were found under the Microsoft Office Button menu, such as: Create a new document, open existing files, save files in a variety of ways, and print. Quick Access Toolbar On the top left-hand side of the Title Bar, you will see several little icons above the File menu. These let you perform common tasks, such as saving and undoing, without having to find them in a menu. We’ll go over the meanings of the icons a little later. 5 The Home Tab The most commonly used commands in MS Word are also the most accessible. Some of these commands available in the Home Tab are: The Home Tab Toolbar offers options that can change the font, size, color, alignment, organization and style of the text in the document. For example, the “Times New Roman” indicates the FONT of your text, the “12” indicates the SIZE of your text; etc. We will go over how to use all of these options to format your text in a little while. Each of these options expands into a menu if you left-click on the tiny down-arrow in the bottom right corner of the window. The Ruler The ruler is found below the Ribbon. The ruler tells you where you are on the page, along with the dimensions of the overall document. Just like a real piece of paper, the default setting is 8.5 x 11 inches, and the margins have been incorporated for you. Similar to most options in MS Word, this is entirely customizable and the user can create a document of any dimensions. 6 Keyboard Review In order to use MS Word effectively, you must input commands using both the mouse and the keyboard. The above image of a keyboard should look similar to the keyboard in front of you; learning just a few certain keys will help to improve your efficiency in typing, as well as present you with more options within the program. The following is a list of commonly used keys that have special functions in MS Word (key functions can change depending on which program you are using): 1. Backspace: This key deletes letters backward. 2. Delete: This key deletes letters forward. 3. Shift: This key, when pressed WITH another key, will perform a secondary function. 4. Spacebar: This key enters a space between words or letters. 5. Tab: This key will indent what you type, or move the text to the right. The default indent distance is usually ½ inch. 6. Caps Lock: Pressing this key will make every letter you type capitalized. 7. Control (Ctrl): This key, when pressed WITH another key, performs a shortcut. 8. Enter: This key either gives you a new line, or executes a command (pressed in MS Word, it begins a new line). 9. Number Keypad: These are exactly the same as the numbers at the top of the keyboard; some people just find them easier to use in this position. 10. Arrow Keys: Like the mouse, these keys are used to navigate through a document or page. 7 MICROSOFT WORD BASICS Typing Text To enter text, type just as you would if you were using a typewriter. To capitalize a letter, hold down the SHIFT key while typing the letter. Or, press the CAPS LOCK key on the left-hand side of your keyboard. You will have to press the CAPS LOCK key again—once you are done capitalizing—to remove the lock. You do not need to press ENTER to start a new line—Microsoft Word will automatically wrap your sentence at the end of the line. To move the cursor from its position at the end of your sentence to anywhere else on the page, use the mouse or the arrow keys to move the cursor where you want the letters or spaces to be (left-click the mouse to place the cursor) and then type what you want to add—the text will automatically adjust to include it. Press ENTER to start a new paragraph (this is sometimes called a “carriage return”). Deleting Text While typing a document, sometimes you will make a mistake. Unlike a typewriter, MS Word can delete text on the screen and leave no trace—it is as if you never typed on the page in the first place. There are two different buttons on the keyboard that will allow you to erase text. They are the “Delete” key and the “Backspace” key (#s 1 and 2 on the keyboard map on page 7). The “Backspace” key deletes words to the LEFT of the cursor, and the “Delete” key deletes words to the RIGHT of the cursor. This is my crea | tive sentence. BACKSPACE ↔ DELETE Let’s assume that the vertical line dissecting the word “creative” in the example above is our cursor. Pressing the “Backspace” key will erase “a,” “e,” “r,” “c,” and so on, moving LEFT. The “Delete” key will erase “t,” “i,” “v,” “e,” and so on, moving RIGHT. To delete a whole chunk of text at once, left-click with your mouse and drag to highlight a section of text. Then simply press “Backspace” or “Delete” and all of the highlighted text will disappear! 8 Undoing and Redoing The UNDO and REDO features of Microsoft Windows applications are great tools to rely on (especially in MS Word). The program will keep a list of the last 25 commands that you have performed, and it allows for taking “one step” backwards in order to erase what you have just done. Click on the UNDO button in the Quick Access Toolbar to go back one step (up to 25). Click on the REDO button in the Quick Access Toolbar to go forward one step (up to 25). Formatting Text Changing the look of what you’ve written is called “formatting.” This can include changing the text style, size, color, and more. This is a sentence that features many different fonts. This is a sentence that features many different sizes. From the Home Tab, the “B” will make your text BOLD, the “I” will put it in italics, and the “U” will add an underline to your text. These features do not have to be used independently of each other—in other words, you can bold, underline, and italicize a single piece of text. The alignment of the text can be altered using the buttons with the horizontal lines on them. You can align text To the LEFT, To the CENTER, And to the RIGHT. In order to apply certain stylistic or formatting changes to text, you must first HIGHLIGHT the text. This is a common procedure in Microsoft Windows applications, and, because it is so useful, it is a skill worth practicing. 9 You can also change the font color by clicking on the appropriate buttons in the Formatting Toolbar. Experiment and remember—you can always start over with a fresh, new document, so don’t worry about making mistakes! If you do, however, there is always the incredible “UNDO” tool. Cutting, Copying, and Pasting Text In MS Word, you can CUT or COPY text from one area of the document and save that text to be PASTED elsewhere (these commands are found on the Home Tab). When you CUT text, you actually delete it from where you took it, as opposed to COPYING it, which makes a copy of your selection. When you CUT or COPY text, it is stored on the CLIPBOARD. The Clipboard is a tool in MS Word that stores cuts and copies of your work, to be pasted in other places in the document. Once your selection is on the CLIPBOARD, you can PASTE it as many times as you want! CUTTING a selection will place it on the clipboard, just in case you want to PASTE it elsewhere. To CUT a selection, first highlight it. Then, click on the CUT icon from the Home Tab. The highlighted text will disappear, as you have just cut it out, but a copy is now on your clipboard, and MS Word is waiting for you to paste it somewhere else. To PASTE this cut selection, place your cursor where you want the selection to go. Click on the PASTE icon from the Home Tab toolbar, and it will pop the text into place, right where you have your cursor. To COPY, simply follow those same steps, replacing the CUT command with COPY. The COPY command will not alter your original selection at all, as it simply makes a copy of the selection without changing or deleting it in any way. 10 DOING MORE WITH MICROSOFT WORD Inserting Images and Clip Art With Microsoft Word, you can insert pictures in your document using the Insert Tab toolbar. You can insert pictures from the “Clip Art” album that comes with the program, or you can insert pictures from a file that you have previously saved on a disk or elsewhere on the computer (e.g., the My Pictures folder). Clip Art is a collection of cartoon and computer-generated images that cover a broad array of commonly needed icons and pictures. These include business, holiday, nature, entertainment, academic and other themes, along with standard bullets and symbols. To insert a clip art picture into a Microsoft Word document, you will first need to place your cursor (left-click) where you wish to insert you picture in your document. Then, from the Insert tab on the Ribbon, click on “Clip Art.” A Clip Art search box will appear on the right side of your screen. From here, you can enter a search word for the picture you would like to find. Then click “Go.” This will show all the options of pictures you can insert. When you see a piece of clip art that you like, click on it, and it will automatically insert into your document, in the exact place where you left the cursor. To resize your image, grab one of the corners of the image by left-clicking and holding—drag it to your desired size and fine-tune the placement. The cursor will change from a typing icon to a doublearrow when it can be used to resize an image. Drag the corner toward the upper-left corner of the screen, and the image will grow. Drag toward the bottom-right, and it will shrink. You can move the image to another place in the document by left-clicking and holding on the center of it; drag it to its desired location. More options, such as aligning the image with text (or special effects like wrapping text around or through an image) can be found by clicking on the picture, and then choosing the Picture Tools Tab. You can also insert a photograph or other images from your files using this same process. On the Insert Tab, click on Picture and locate the files that you want to include. 11 Modifying Line Spacing Line spacing in Word refers to the amount of space between lines of text. The default in Word 2010 is 1.15 spacing, which leaves a little bit more space than single-spacing, or what you would find in a normal book. Single spacing is generally easy for the eye to read. There may be times, however, when you want to change this spacing. One common option is to double-space text: This text is double-spaced. Double-spacing is especially useful if someone else is proofreading your document. It allows for more room to write comments on the page. To change the line spacing: 1. Select text you want to format by highlighting it. 2. On the Home Tab, click on the Line Spacing button in the Paragraph group. 3. Choose the spacing you want from the menu that appears. For more options, select Line Spacing Options. In the dialog box that appears, you can choose other spacing options, including spacing between paragraphs. This can be done by changing the values in the Before and After boxes. 12 Creating Bulleted and Numbered Lists Word allows you to create lists within your document that can be organized with bullets or numbers. Lists are useful for presenting text that wouldn’t make the most sense in paragraph form (for example, step-by-step instructions) or for emphasizing key points. Bullets are usually small circles at the beginning of item in a list, and numbers are used for lists that are arranged in sequential order. Here’s an example of a bulleted list: Bananas Milk Eggs Ice Cream To create a list: 1. On the Home tab, select either the Bullets or Numbering buttons from the Paragraph group. If you want to choose a particular style for your bullets or numbers, click on the triangle next to the button and choose a style from the menu that appears. 2. You will see the first bullet or number appear on your document. Type your first line of text and then hit Enter. 3. Another bullet or number will appear automatically. Type your next line of text and hit Enter. 4. When you have finished your list, hit Enter twice to end the bullets or numbering. Changing Views and Overall Look There will be times when you need to create documents that don’t fit on a standard piece of paper (8.5” by 11”). Click on the Page Layout Tab. From this menu, you can alter the margins, width, height, and orientation (portrait = 11” 13 long; landscape = 11” wide) of the document, as well as choose from a variety of templates, different types of paper, and document styles that come with the program. To change the orientation of your page, click on the Orientation button. Click on Landscape from the drop-down box that appears. Your document should now be in landscape position. If you wish to return to portrait orientation, go through the same steps, clicking on the Landscape option instead of Portrait. If you would like to change the display of your document or zoom in and out without affecting the way your document will print, you can do that from the View Tab. Anything you change from the View Tab will not change the way your document prints out. So if you want your text to be bigger when you print out the document, make sure to change the size of the font instead of the zoom. Spelling and Grammar Check One benefit of using a computerized word processor is its ability to recognize, change, and give advice about your writing. MS Word has utilities that can check your spelling and grammar against a master database, and can offer advice on a variety of different grammatical styles. MS Word automatically underlines any words that it does not recognize in red, assuming that they are not spelled correctly, and underlines in green if it does not recognize the grammatical pattern, assuming that the sentence does not make sense. For example: In this case, “jumping” should read “jump” and “laziy” should be “lazy.” If you rightclick on the word, a menu with pop up with options, including “Ignore” if you do not want help on this specific phrase or agree with the suggestion. You can also choose to add words to the MS Word spelling database, if you are going to use them often and don’t want them to be flagged as misspelled every time—this is especially useful for names, as MS Word often interprets these as misspellings. The spelling and grammar tools can be found in the Review Tab. 14 CLOSING MICROSOFT WORD Saving Documents When you finish typing and want to leave the computer, it is important to save your work, even if you are printing a hard copy. To save your work in MS Word, it is essential to know WHAT you are trying to save and WHERE you are trying to save it. Click on the File Tab, then click Save to get started. You can change the file name that Word has automatically chosen just by typing a new one in the “File name” box at the bottom of the window that appears. 15 MS Word will automatically save your document with the suffix (“extension”) “.docx”— this simply lets your computer know that the file needs to be opened in Word 2010. You do not have to type this extension name—just highlight the words (the default is “Document1”) and write a new file name. As you can see in the picture above, there are many places where you can save a file, some of which are portable and some of which live on your computer. The My Documents folder on your computer’s hard drive is a good place to store your documents. A blank CD (compact disc) is a great portable storage device and can contain a LOT of data. Another good option is a USB key/thumb drive/flash drive. Due to differences between older versions of Word and the new 2010 version, older versions of Word cannot open documents saved in Word 2010 with the suffix “.docx”. If you think you might want to share your document with someone who has an older version of Word on their computer, you can save your document in a format that is compatible with the older versions, like “.doc”. To do this, click on the File Tab, then click “Save As,” then choose “Word 97-2003 Document” from the drop-down menu underneath the File Name text box. Follow the steps outlined above to name your document. It is important to note that every following command of SAVE will overwrite your original file, creating the most up-to-date version. To save multiple versions of your document, you will need to save copies with slightly different names. If you want to save the changed document without destroying the original one: Click on the File Tab and then click “Save As,” giving your document a new file name, different from the original. A common way to do this is to add a number to the end of the file name. If you want to open up a saved document in Word: Click on the File Tab, then click Open. Locate where the file is located on your computer and double-click on the file name of the document you want to open. 16 Printing Documents To print your MS Word document: Click on the File Tab, then click Print; a print preview and print options will appear. Click OK for your document to start printing. As with all commands in MS Word, you can make changes along the way. From the Print menu, you can alter how many copies will be made, the order that the pages will be printed in, and much more. Getting More Help You can get help with MS Word by clicking the Question Mark Button located in the top right corner of the window. Tutorials are also available on the Internet. Some of them come straight from Microsoft! You can find them using a search engine like Google and typing in “Microsoft Word tutorial.” Of course, you can also always come and ask quick questions at the library. Exiting the Program Click on the File Tab, then click Exit. OR Click on the X in the top right corner of the MS Word screen. It’s that easy! If you don’t save before attempting to close the program, Word will prompt you to save the file. Make sure you save if you don’t want to lose any changes!! NOTE: Images and screen captures may differ from those seen on another system. THIS DOCUMENT IS NOT PROTECTED BY COPYRIGHT. Special thanks to UNC’s Community Workshop Series (CWS), who developed much of this handout’s content. http://www.lib.unc.edu/cws/ 17


© Copyright 2026