
Microsoft Publisher Guide 13a How to start Microsoft Publisher 2010
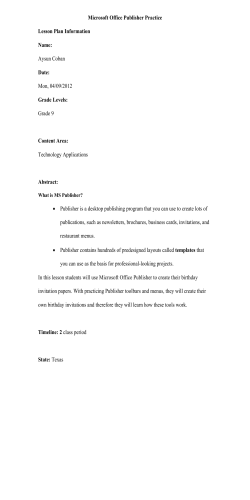
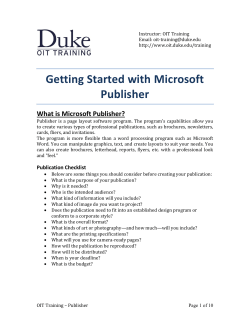
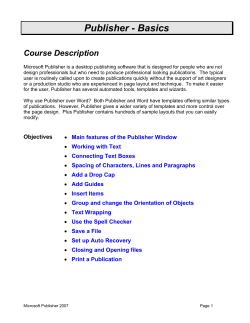
13a Microsoft Publisher Guide How to start Microsoft Publisher 2010 1. Click on the Windows Start button. 2. Click on All Programs. 3. Click on Microsoft Office. 4. Click Microsoft Publisher 2010. Microsoft Publisher Guide Using MS Publisher 2010 Microsoft Publisher 2010 allows you to create, print, and distribute professional-quality publications, sales and marketing materials (e.g. posters and flyers). The user interface has been updated from the 2007 version, providing new printing options, new picture placement and manipulation tools, building blocks of content and fine typography options such as true small caps, ligatures and stylistic alternates. Publisher 2010 is designed to provide enhanced desktop publishing options for users and to enable them to easily create a publication. After launching MS Publisher 2010, Backstage view is displayed: Various templates Here, you are able to choose from a number of templates in order to begin constructing your publication. Explore the many options available to you as MS Publisher allows you to create professional documents for different purposes. Page | 2 Microsoft Publisher Guide The Ribbon Various tabs on the ribbon The user interface for Publisher 2010 has changed so that menus and toolbars are displayed via the ribbon. This enables users to quickly find the commands that are needed to complete a task. Commands are organized in logical groups that are collected together under tabs. However all tabs and groups on the ribbon are fully customizable. You can therefore group your favourite commands on a personalised ribbon tab. Your Publication Navigation pane – use this area to switch between the various pages of your publication. Important: The blue box border around the preview page represents the maximum printable area. Anything you place outside this box will be cut off when you print. The preview of your chosen template – use this workspace to construct your publication by inserting various objects and designs from the commands on the ribbon. Page | 3 Microsoft Publisher Guide Inserting objects, text and illustrations Use the Home tab if you want to insert text, pictures, tables or various shapes. The Draw Text Box tool is used to insert a box into your document, into which you can type words. You can also use the commands on the Insert tab to add text or other objects to your document. Contextual Tabs Typography commands group When you insert a text box into your document, two new tabs appear. These are known as contextual tabs as they only appear when you insert text or other objects into your document. These tabs contain groups of commands relevant to these objects. For example providing you have selected a font that enables the Typography group of commands to be used (e.g. Calibri, Gabriola), you are able to transform ordinary text into fine typography. It is not currently possible to use this group of commands with all existing fonts. Page | 4 Microsoft Publisher Guide Building Blocks group Business information gallery in Text group On the Insert tab users are able to access the Building Blocks group of commands. Building Blocks are reusable pieces of content such as business information, headings, calendars, borders, and advertisements that are stored in galleries. These tools can help to increase your productivity. It is possible to create and save your own building blocks, categorize, write a description, and tag them with keywords to make them easy to find. These custom building blocks can be a combination of graphics, text, and even other building blocks. All of the building block galleries are found in the Building Blocks group on the Insert tab, except the Business Information gallery which is located in the Text group. The galleries available: 1. Page Parts: a collection of pre-formatted structural elements for your publication (e.g. headings, sidebars, and stories). 2. Calendars: a collection of pre-formatted monthly calendars (You can choose any dates). 3. Borders & Accents: a collection of graphic elements for adding borders, frames and emphasis. 4. Advertisements: a collection of pre-formatted advertisement elements, including coupons. 5. Business Information: a collection of Business Information sets. Creating your own building block: 1. First you will need to create an element or group of elements that you want to be able to reuse, such as an image or a border. 2. Right-click in the element and select Save as Building Block. 3. In the Create New Building Block dialog box, enter the information about the building block; i. Title / Description (optional). ii. Gallery (the location in the galleries where you want to save the building block). iii. Show in Gallery (this checkbox determines if the building block will be available in the gallery. If unchecked this building block will not appear in the gallery). iv. Category (select one of the gallery categories or type in a new category name). v. Keywords (enter your own keywords to make searching for building block easier). 4. Click OK to save your building block. Page | 5 Microsoft Publisher Guide Working with images Adjust picture group Picture Styles gallery When you insert an image into your publication, the Picture Tools tab appears on the ribbon with an array of useful tools. Crop tool (another contextual tab) For example, you can use the Crop tool to remove part of your image. You can also apply a picture style to the image from the Picture Styles gallery section on the ribbon, which gives you options for your picture’s shape, border, and captions. When you hover over one of the gallery options the selected pictures will preview the style. Additionally, you are able to modify and enhance your image by using commands in the Adjust group where you can alter the brightness, contrast, colour and quality of the image. Page | 6 Microsoft Publisher Guide Printing your publication The Print command is now located under the File tab on the ribbon in Backstage view: Print button Printer section – choose the printer that you want to print from. Preview pane Print Settings 1. Go to the File tab, and select Print. 2. You can enter the number of copies to print in Copies of print job box. 3. Select the correct printer name in the Printer section. Page | 7 Microsoft Publisher Guide 4. In the Settings section, do the following: Ensure the correct page range is selected. Select the format or paper size (A4/A3/etc). Set whether to print on one side of the sheet of paper or print double-sided - which edge to use in flipping the paper (long edge or short edge) Select if you want to print colour or grayscale. 5. Check the print preview in the preview pane on the right. Pleae note: Any changes you make to the settings will be displayed in the preview pane and reflected in the actual printout after clicking the Print button. 6. Click the Print button when you are ready to print. Please note: “In Office Publisher, page size refers to a working area of your publication. Paper, or sheet, size is the size of the paper that you use for printing. A sheet of paper may contain multiple pages, and a large page may be imposed across multiple sheets.” (Microsoft) Some of the controls are dependent on other settings. For example the colour control will only be available if you have selected a colour printer to print from. Similarly, the front/back transparency slider will only be available if you choose to print on both sides of the paper. For further information and support contact: Tel: 020 7815 6678 Email: [email protected] Visit: 1 South, Learning Resources Centre. Produced by LLR 14/01/2014 Page | 8


© Copyright 2026