
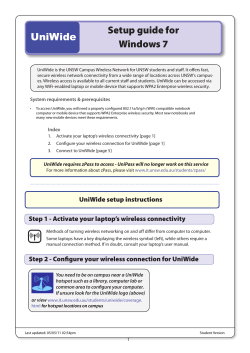
Wireless Setup Instructions for Windows 7
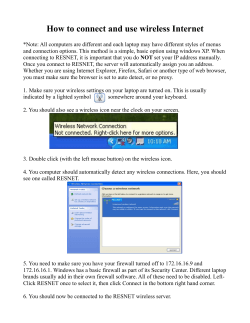
Wireless Setup Instructions for Windows 7
1. Make sure that your wireless feature is turned on. (You may need to flip a switch or press a
button on your laptop.) On most laptops you should see a light that indicates that your wireless
is turned on or off.
2. Click the Start button to get the screen below. (Note: Your color scheme may be different)
3. Click Control Panel on the right half of the screen to get the screen below. (The screen
below shows it in Category view. You can change to this by selecting “Category” in the upper
right portion of the screen. It will say “View By: “. Change it to Category.)
4. On the left column, choose Network and Internet to get the screen below.
5. Choose Network and Sharing Center to get the screen below.
6. On the left column, choose Manage wireless networks to get the screen below. (Your
computer may already have some wireless networks setup so your screen may be much busier
than the one pictured below. The order of these entries determines what will be connected
first, second, etc. Make sure you order them in the way you want them to be! )
7. On the menu bar, choose Add to create a new wireless network. You will see the screen
below.
8. Choose Manually create a network profile to get the screen below. (It will not be
filled out yet!)
9. Type the following into the textbox named Network name:
CU-Students
(It must be typed exactly as shown paying close attention to capitalization!)
Choose WPA2-Enterprise for the Security Type.
Choose AES for Encryption type.
Press the Next button to get the screen below.
10. At this point, your wireless is setup. However, we still have to change some of the default
settings for the wireless to work correctly.
Choose Change connection settings to get the screen below.
11. If not already checked, be sure the first two items are checked. These would be Connect
automatically when the network is in range and Connect to a more
preferred network if available. Click the Security tab to see the screen below.
12. Choose Microsoft Protected EAP (PEAP) under “choose a network authentication”
method.
Choose the Settings button to configure the options for PEAP properly. You should get the
screen below.
13. Uncheck Validate server certificate.
Select Secured password (EAP-MSCHAPv2) if not already selected.
Select Enable Fast Reconnect if not already checked.
Select Configure… button to get the screen below.
14. Uncheck Automatically use my Windows logon name and password (and
domain if any).
If not unchecked, the connection will use the local logon name and password which will not
match your Claflin Username and Password.
Click the OK button twice to return to the previous screen as shown below.
15. Click the Advanced settings button to get the screen below.
16. Ensure that the checkbox Specify authentication mode is checked.
Uncheck Enable single sign on for this network if it is checked.
Choose User authentication from the dropdown.
Click the Save credentials button to get the screen below.
17. Type your network username and password. (Do not type your email address or include
“Claflin” as the domain. Your user name is the first portion of your email address before the @
sign.). For example, if your email address is [email protected] then your username is fred.
Click the OK button to close the advanced settings screen. This should return you to the
Advanced Setting screen as shown below.
18. Click the OK button on the Advanced Security screen to close it and return to the Manage
Wireless Networks screen as shown below. (Note: You may have additional items in this list
which are not shown below.)
19. Click the red button with the white X in the upper right corner of the Manage Wireless Networks
window. Close any remaining windows which may be open in a similar fashion.
20. By this time, you should be getting a notification asking for additional information to logon to
the CU-Students wireless.
21. Clicking on the notification message will bring up the screen to allow you to enter your
username and password. You should see the screen below.
22. Assuming you entered your username and password correctly, the wireless indicator should
show the strength of the wireless signal as shown in the screen below. (Circled in red) Please
note that this is in the lower right corner of the screen.
23.
Your wireless is setup and ready to use.
Whenever the laptop is within range of the
CU-Students wireless network, it will automatically attempt to connect. The only time you will
have to worry about this connection is when your password changes, then you will be prompted
again as shown in step 20 through 22.
Tips and Troubleshooting
1.
To connect to the wireless network manually or to check which network your wireless is
connected to, follow these instructions:
a. In the lower right hand corner of the screen, next to the time, you may see the following
screenshot. This screenshot shows an “Excellent” strength connection but to which
network?
b. To determine which network you are connected to or to see additional wireless
networks which may be available to you, simply click on the signal strength indicator
which is inside the red circle above. It will bring up the following screen which shows
that the CU-Students wireless network is currently connected and the signal strength is
excellent.
c. If nothing is connected but you want to connect to CU-Students and you have previously
setup the manual connection, then click on the CU-Students line and a Connect (or
Disconnect if already connected) button will appear. Simply click on the Connect button
and it will attempt to connect to the CU-Students wireless network. The screen will look
similar to the one below.
d. You should now be connected to the CU-Students network.
2. If you encounter a problem connecting and you are presented with a dialog box shown below,
click on the “Troubleshoot problems” link and let the system attempt to fix the problem. Our
experience with this is that it fixes the problem as shown in the second screen below, assuming
you have set up everything else correct.
3. How do I change the settings if I need to?
a. Follow steps 1 through 6 above to arrive at the “Manage Wireless Networks” screen.
b. Locate the CU-Students wireless network setup and right click on it and select
“properties” to make changes as necessary. Refer to the appropriate steps above for
details.
4. As always, you may contact the Claflin University Helpdesk by sending an email to
[email protected] or by calling 803-535-5767 (5SOS).


© Copyright 2026