
EMC Smarts Service Assurance Manager Dashboard Configuration
EMC® Smarts®
Service Assurance Manager Dashboard
7.1
Configuration Guide
300-005-032
A01
EMC Corporation
Corporate Headquarters:
Hopkinton, MA 01748-9103
1-508-435-1000
www.EMC.com
Copyright © 1996–2007 EMC Corporation. All rights reserved.
EMC believes the information in this publication is accurate as of its publication date. The information is subject to
change without notice.
THE INFORMATION IN THIS PUBLICATION IS PROVIDED "AS IS." EMC CORPORATION MAKES NO
REPRESENTATIONS OR WARRANTIES OF ANY KIND WITH RESPECT TO THE INFORMATION IN THIS
PUBLICATION, AND SPECIFICALLY DISCLAIMS IMPLIED WARRANTIES OF MERCHANTABILITY OR
FITNESS FOR A PARTICULAR PURPOSE.
Use, copying, and distribution of any EMC software described in this publication requires an applicable software
license.
For the most up-to-date listing of EMC product names, see EMC Corporation Trademarks on EMC.com
All other trademarks used herein are the property of their respective owners.
ii
EMC Smarts Service Assurance Manager Dashboard Configuration Guide
Contents
Preface...................................................................................................................................................... v
Chapter 1
Overview
Overview................................................................................................................. 1-2
Architecture of EMC Smarts Service Assurance Manager with the dashboard 1-3
Software requirements .......................................................................................... 1-5
Client requirements......................................................................................... 1-5
Server requirements ........................................................................................ 1-5
Chapter 2
Configuring the EMC Smarts Business Dashboard
Overview................................................................................................................. 2-2
Serving Dashboard viewlets ................................................................................ 2-3
About the SMARTS Servlet Engine service ................................................. 2-3
Deploying viewlets.......................................................................................... 2-5
About user profiles and user accounts ............................................................. 2-14
About Dashboard viewlets................................................................................. 2-15
Global Console views that function as viewlets ....................................... 2-15
Saving views as viewlets .............................................................................. 2-15
Displaying maps ............................................................................................ 2-16
HTML syntax for viewlets.................................................................................. 2-18
HTML to display viewlets............................................................................ 2-18
Specifying additional viewlet properties ................................................... 2-19
Additional viewlet properties...................................................................... 2-21
URL-addressable viewlets .................................................................................. 2-28
About the Web Console ...................................................................................... 2-30
Attaching with the Web Console ................................................................ 2-30
Chapter 3
Examples of Dashboard viewlets
About the sample viewlets ...................................................................................
Sample 1 ............................................................................................................
Sample 2 ............................................................................................................
Sample 3 ............................................................................................................
Sample 4 ............................................................................................................
Sample 5 ............................................................................................................
Sample 6 ............................................................................................................
Example of URL-addressable viewlet ..........................................................
EMC Smarts Service Assurance Manager Dashboard Configuration Guide
3-2
3-3
3-4
3-5
3-6
3-7
3-8
3-9
iii
Contents
Index ....................................................................................................................................................... i-1
iv
EMC Smarts Service Assurance Manager Dashboard Configuration Guide
Preface
The EMC Smarts Business Dashboard is a Web-based interface that enables
customers, operators, and administrators to access information about the status of
their managed infrastructure from any standard browser, from any location. This
document describes how to configure the EMC Smarts Business Dashboard.
Configuration tasks include configuring Tomcat Servlet Engine, saving views in the
Global Console as viewlets, writing HTML, and configuring the interaction and
operation of dashboard viewlets.
Audience for this guide
This document is intended for system or network administrators and IT managers
responsible for the configuration and management of the EMC Smarts Business
Dashboard. Administrators responsible for deploying Web portals that incorporate
dashboard viewlets or the Web Console will also find this document useful.
EMC Smarts Service Assurance Management Suite installation directory
In this document, the term BASEDIR represents the location where EMC Smarts
software is installed.
For UNIX, this location is: /opt/InCharge<n>/<productsuite>.
For Windows, this location is: C:\InCharge<n>\<productsuite>.
The <n> represents the software platform version number. The <productsuite>
represents the EMC Smarts product suite to which the product belongs. For example,
on UNIX operating systems, EMC Smarts Service Assurance Management Suite is, by
default, installed to /opt/InCharge7/SAM/smarts. On Windows operating systems,
this product is, by default, installed to: C:\InCharge7\SAM\smarts. This location is
referred to as BASEDIR/smarts.
Optionally, you can specify the root of BASEDIR to be something other than
/opt/InCharge7 (on UNIX) or C:\InCharge7 (on Windows), but you cannot change
the <productsuite> location under the root directory.
For more information about the directory structure of EMC Smarts software, refer to
the EMC Smarts System Administration Guide.
EMC Smarts Service Assurance Management Suite
The EMC Smarts Service Assurance Management Suite includes the following
products:
EMC Smarts Service Assurance Manager Dashboard Configuration Guide
v
Preface
◆
Service Assurance Manager (Global Manager), includes Business Impact
Manager (BIM) and Failover System
◆
Global Console
◆
Business Dashboard
◆
SAM Native Adapters:
• Service Assurance Manager Notification Adapters (E-Mail Notifier Adapter,
Script Notifier Adapter, SNMP Trap Notifier Adapter, Log File Notifier
Adapter)
• Adapter Platform (Adapter Platform server, Syslog Adapter, SNMP Trap
Adapter, sm_ems command-line interface)
• XML Adapter
Related documentation
In addition to this document, EMC Corporation provides a Help system for
command line programs as well as product documentation.
Help for command line programs
Descriptions of command line programs are available as HTML pages. The
index.html file, which provides an index to the various commands, is located in the
BASEDIR/smarts/doc/html/usage directory.
EMC Smarts documentation
Readers of this guide may find the following related documentation helpful. It can be
found in the BASEDIR/smarts/doc/pdf directory.
Note: These documents are updated periodically. Electronic versions of the updated manuals
are available on the Powerlink website:
http://Powerlink.EMC.com.
◆
EMC Smarts Documentation Catalog
◆
EMC Smarts System Administration Guide
◆
EMC Smarts ICIM Reference
◆
EMC Smarts Common Information Model Infrastructure Models Chart
◆
EMC Smarts Common Information Model Application⁄Business Models Chart
◆
EMC Smarts ASL Reference Guide
◆
EMC Smarts Perl Reference Guide
◆
EMC Smarts Dynamic Modeling Tutorial
◆
EMC Smarts MODEL Reference Guide
EMC Smarts Service Assurance Management Suite documentation
The following documents are relevant to users of the EMC Smarts Service Assurance
Management Suite:
vi
◆
EMC Smarts Service Assurance Manager Introduction
◆
EMC Smarts Service Assurance Management Suite Deployment Guide
◆
EMC Smarts Service Assurance Management Suite Installation Guide
◆
EMC Smarts Service Assurance Manager Operator’s Guide
◆
EMC Smarts Service Assurance Manager Configuration Guide
EMC Smarts Service Assurance Manager Dashboard Configuration Guide
Preface
◆
EMC Smarts Service Assurance Manager Dashboard Configuration Guide
◆
EMC Smarts Business Impact Manager User’s Guide
◆
EMC Smarts Report Manager User’s Guide
◆
EMC Smarts Service Assurance Manager Failover System User’s Guide
Refer to the EMC Smarts Documentation Catalog for documentation resources provided
with other EMC Smarts product suites.
Suggestions for searching PDF files
You may search across multiple PDF files using the Adobe Acrobat Reader software.
1. If the documentation is not accessible to all users of the EMC Smarts product
suite, copy the contents of the BASEDIR/smarts/doc/pdf directory to a central
location, such as a shared drive on your LAN, that operators and others may
view.
2. To search throughout the documentation library, open the Acrobat Reader
software.
1. Choose Edit > Search, and enter a word or phrase.
2. In the Where would you like to search option, select All PDF Documents in
and type the pathname of the location where the PDF documents reside.
If you have more than one EMC Smarts product suite installed, you can set up
cross-product document searches by copying files from the
BASEDIR/smarts/doc/pdf directory for each product suite into this common
documentation directory path.
Conventions used in this guide
EMC uses the following conventions for notes and cautions.
Note: A note presents information that is important, but not hazard-related.
!
IMPORTANT
An important notice contains information essential to the operation of the
software.
!
CAUTION
A caution contains information essential to avoid data loss or damage to the system
or equipment. The caution may apply to hardware or software.
EMC Smarts Service Assurance Manager Dashboard Configuration Guide
vii
Preface
Typographical conventions
EMC uses the following conventions in this guide:
Normal font
In running text:
• Interface elements (for example, button names, dialog box names) outside of
procedures
• Items that the user selects outside of procedures
• Java classes and interface names
• Names of resources, attributes, pools, Boolean expressions, buttons, DQL
statements, keywords, clauses, environment variables, filenames, functions, menu
names, utilities
• Pathnames, URLs, filenames, directory names, computer names, links, groups,
service keys, file systems, environment variables (for example, command line and
text), notifications
Bold
In procedures:
• Names of dialog boxes, buttons, icons, menus, fields, and maps
• Selections from the user interface, including menu items, and field entries
• Key names
• Window names
• Code examples
• Commands
• User interface tabs
Italic
Used for:
• Full publications titles referenced in text
In procedures:
• Directory paths
• Filenames
• Scripts
• Important/unique words
• URLs
• Utilities
• Variables
Courier
Used for:
• System output
• User entry
<>
Angle brackets used to enclose parameter or variable values supplied by the user.
[]
Square brackets used to indicate optional values.
|
Vertical bar used to indicate alternate selections. The bar means “or”.
{}
Braces used to indicate content that you must specify (that is, x or y or z).
...
Ellipses used to indicate nonessential information omitted from the example.
%
Used to indicate a C shell prompt.
#
Used to indicate a C shell superuser prompt.
▼▲
Used to indicate a command is wrapped over one or more lines. The command must
be typed as one line.
Pathname conventions
Directory pathnames are shown with forward slashes (/). Users of the Windows
operating systems should substitute back slashes (\) for forward slashes.
Graphical conventions
If there are figures illustrating consoles in this document, they represent the consoles
as they appear in Windows. Under UNIX, the consoles appear with slight differences.
viii
EMC Smarts Service Assurance Manager Dashboard Configuration Guide
Preface
For example, in views that display items in a tree hierarchy such as the Topology
Browser, a plus sign displays for Windows and an open circle displays for UNIX.
Smarts Manager
Unless otherwise specified, the term Smarts Manager is used to refer to EMC Smarts
programs such as Domain Managers, Global Managers, and adapters.
Where to get help
EMC support, product, and licensing information can be obtained as follows.
Product information — For documentation, release notes, software updates, or for
information about EMC products, licensing, and service, go to the EMC Powerlink™
website (registration required) at:
http://Powerlink.EMC.com
Technical support — For technical support, go to EMC Customer Service on
Powerlink. To open a service request through Powerlink, you must have a valid
support agreement. Please contact your EMC sales representative for details about
obtaining a valid support agreement or to answer any questions about your account.
Sales and customer service contacts — For the list of EMC sales locations, please
access the EMC home page at:
http://EMC.com/contact
EMC Smarts Service Assurance Manager Dashboard Configuration Guide
ix
Preface
x
EMC Smarts Service Assurance Manager Dashboard Configuration Guide
1
Overview
This chapter contains the following information:
◆
◆
◆
Overview ........................................................................................................................ 1-2
Architecture of EMC Smarts Service Assurance Manager with the dashboard .. 1-3
Software requirements.................................................................................................. 1-5
Overview
1-1
Overview
Overview
The EMC® Smarts® Business Dashboard displays the results of EMC Smarts analysis
in a flexible, Web-based user interface. The EMC Smarts Business Dashboard
provides the views from the Global Console as individual components called
dashboard viewlets. A dashboard viewlet is implemented as a Java applet.
You can configure the display and contents of dashboard viewlets to customize the
presentation of EMC Smarts’ analysis, enabling you to deliver role-based views of the
managed topology across all layers of your IT environment.
◆
Business managers can view status summaries for systems and business
processes
◆
Operations staff can view real-time operational status of monitored elements and
services
◆
Users can drill down to see the health and status of related infrastructure,
applications, and business services
Installing the EMC Smarts Business Dashboard provides all of the components
necessary to create, configure, and display dashboard viewlets. Also included is a set
of ready-to-use viewlets, described in “Examples of Dashboard viewlets” on
page 3-1.
In addition, an installation of the EMC Smarts Business Dashboard includes the Web
Console, which displays the Global Console within a Web browser. The Web Console
provides the same functions and features as the Global Console.
1-2
EMC Smarts Service Assurance Manager Dashboard Configuration Guide
Overview
Architecture of EMC Smarts Service Assurance Manager with the
dashboard
While the Global Console is the primary user interface for EMC Smarts software, the
EMC Smarts Business Dashboard provides another means of viewing and
responding to the analysis provided by EMC Smarts Service Assurance Manager. The
EMC Smarts Business Dashboard provides additional features:
◆
Dashboard viewlets can be displayed in any supported Web browser from any
location. The Web clients do not require an installation of EMC Smarts software.
◆
Dashboard viewlets can be embedded into a Web Portal, combining EMC Smarts’
analysis with information from other sources.
Figure 1-1 illustrates how the EMC Smarts Business Dashboard integrates with
EMC Smarts Service Assurance Manager.
InCharge Business Dashboard
Global Consoles
Browser Clients
Host
Host
InCharge Broker
Web portal viewlets
Service Assurance
Manager
(Global Manager)
Host
Jakarta Tomcat
Servlet Engine
Host
InCharge Manager
InCharge Manager
Topology and Events
Legend
Communication with InCharge Broker
Flow of Topology and Events
Initial loading of Viewlets and HTML
Figure 1-1
Architecture of Service Assurance with Business Dashboard
Architecture of EMC Smarts Service Assurance Manager with the dashboard
1-3
Overview
The following components, illustrated in Figure 1-1, are related to the EMC Smarts
Business Dashboard.
1-4
◆
Global Manager consolidates topology and event information it receives from
data sources such as EMC Smarts Managers. The Global Manager provides this
data to clients such as the Global Console or dashboard viewlets.
◆
EMC Smarts Business Dashboard is a collection of dashboard viewlets that are
displayed in a Web page. A viewlet can also be embedded within a Web portal
page or loaded from a dynamically generated URL.
◆
Tomcat Servlet Engine serves the JAR files that compose dashboard viewlets and
the map layout servlet. The servlet engine is installed as a service with the EMC
Smarts Business Dashboard. If you are already running a Web server, you can use
it to serve the necessary files to display dashboard viewlets.
EMC Smarts Service Assurance Manager Dashboard Configuration Guide
Overview
Software requirements
EMC Smarts Business Dashboard includes the necessary files and software for
serving the files to display dashboard viewlets and the Web Console.
Client requirements
Users who display dashboard viewlets in a Web browser, or wish to use the Web
Console, require the following software.
◆
One of the following Web browsers:
• Internet Explorer 7.0 and 6.0 with Service Pack 1
• Netscape Navigator 8.0
• Firefox 1.5.x
• Browser that supports Java JRE 1.5.x
◆
Java™ 2 Platform Standard Edition 5.0 which includes the 1.5.x Web browser
plug-in
Server requirements
An installation of the EMC Smarts Business Dashboard includes the Tomcat Servlet
Engine, which is necessary to serve the JAR files and map layout servlet. The servlet
engine is installed as the EMC Smarts Servlet Engine service on the system where you
install the EMC Smarts Business Dashboard.
If you wish to serve dashboard viewlets from a different Web server, you must install
the EMC Smarts Business Dashboard to obtain the necessary files, which are
described in “Deploying viewlets” on page 2-5.
Software requirements
1-5
Overview
1-6
EMC Smarts Service Assurance Manager Dashboard Configuration Guide
2
Configuring the
EMC Smarts Business
Dashboard
This chapter contains the following information:
◆
◆
◆
◆
◆
◆
◆
Overview ........................................................................................................................ 2-2
Serving Dashboard viewlets........................................................................................ 2-3
About user profiles and user accounts..................................................................... 2-14
About Dashboard viewlets ........................................................................................ 2-15
HTML syntax for viewlets ......................................................................................... 2-18
URL-addressable viewlets ......................................................................................... 2-28
About the Web Console.............................................................................................. 2-30
Configuring the EMC Smarts Business Dashboard
2-1
Configuring the EMC Smarts Business Dashboard
Overview
The configuration tasks for EMC Smarts Business Dashboard depend on how you
intend to deploy it. A simple deployment could use the sample viewlets as an EMC
Smarts Business Dashboard to display information from a Global Manager. A more
complicated deployment could involve creating new HTML pages to display
Dashboard viewlets, configuring the display of viewlets, creating an on-demand URL
addressable viewlet, or integrating a viewlet with a portal.
The configuration steps necessary to provide these deployments are described in this
chapter and involve one or more of the following tasks:
2-2
◆
Configuring the Tomcat Servlet Engine or an alternative web server
◆
Configuring user accounts on the Global Manager
◆
Creating saved viewlets with the Global Console
◆
Writing HTML to display viewlets
◆
Creating a URL-addressable viewlet
EMC Smarts Service Assurance Manager Dashboard Configuration Guide
Configuring the EMC Smarts Business Dashboard
Serving Dashboard viewlets
The Servlet Tomcat Engine is installed into the BASEDIR/smarts/tomcat directory on
the host where the EMC Smarts Business Dashboard is installed. If you intend to use
Tomcat to serve Dashboard viewlets, you should install the EMC Smarts Business
Dashboard onto the system from which you want to serve the relevant files. This can
be a different host from where the Global Manager, or any other Service Assurance
component is installed.
The Servlet Tomcat Engine, its directory structure, and the Tomcat configuration files
are not developed by EMC Smarts. As such, the files under this directory, including
the files related to the EMC Smarts Business Dashboard, are not intended to be edited
using the sm_edit utility. Instead, open and edit any files under the
BASEDIR/smarts/tomcat directory with a text editor.
Table 2-1 lists relevant subdirectories under BASEDIR/smarts/tomcat related to the
configuration and running of EMC Smarts Business Dashboard.
Table 2-1
Tomcat Servlet Engine directories
Directory
Description
/conf
Contains Tomcat configuration files, including server.xml
/webapps
Contains directories and files served by Tomcat.
• /templates includes JAR files, viewlets, configuration files,
and HTML files related to the samples described in
“Examples of Dashboard viewlets” on page 3-1.
• /webconsole includes the files for the Web Console.
About the SMARTS Servlet Engine service
The Servlet Tomcat Engine is installed as a service named the Smarts Servlet Engine.
As a service, it starts automatically with the system and runs continuously until it is
manually stopped. The Smarts Servlet Engine serves the HTML, JAR, and map layout
servlet for both Dashboard viewlets and the Web Console.
Default service parameters
The SMARTS Servlet Engine service is installed with the following options:
▼C:/InCharge7/SAM/smarts/bin/sm_service install --force
--startmode=runonce --description=”SMARTS Servlet Engine”
--name=”ic-business-dashboard”
/C:/InCharge7/SAM/smarts/bin/sm_tomcat --output start ▲
Note: ▼▲ means the command must be typed as one line.
Note: The program used to invoke the Tomcat Servlet Engine is the sm_tomcat program. The
sm_tomcat program is used by EMC Smarts to set the proper environment for software
running from an EMC Smarts installation.
Serving Dashboard viewlets
2-3
Configuring the EMC Smarts Business Dashboard
Starting and stopping the SMARTS Servlet Engine
The sm_service utility is used to start and stop services. Invoke the following
commands from the BASEDIR/smarts/bin directory on the host where the service is
running:
To stop the SMARTS Servlet Engine service:
./sm_service stop ic-business-dashboard
To start the SMARTS Servlet Engine service:
./sm_service start ic-business-dashboard
For more information about services, see the EMC Smarts System Administration Guide.
Verify that Tomcat is running
After the SMARTS Servlet Engine service is installed and started, you can verify
whether Tomcat is running by opening the following URL in a web browser:
http://<tomcat_host>:<port>, where <tomcat_host> is the system where the EMC
Smarts Business Dashboard is installed and <port> is the TCP port the Tomcat Servlet
Engine is listening on.
You can also access the Tomcat Servlet Engine documentation from the following
URL: http://<tomcat_host>:<port>/tomcat-docs.
Changing the port number of Tomcat
For most installations, Tomcat should not require any additional configuration. In
some cases, however, it may be necessary to change the port number on which the
Tomcat Servlet Engine is running.
The configuration of Tomcat is determined by the server.xml file located in the
BASEDIR/smarts/tomcat/conf directory. By default, Tomcat is configured to use
TCP port 8080. If this port is already in use on the system where the EMC Smarts
Business Dashboard is installed, you can configure Tomcat to use another port.
To change the port number, find the following line in server.xml:
<Connector port="8080"
Change the port number to a suitable number. If Tomcat is currently running, you
will need to restart it.
For more information regarding Tomcat Servlet Engine, see
http://tomcat.apache.org.
Increasing the heap space for the Java Plug-in
If the Web Console or viewlets run out of memory, adjust the maximum amount of
heap space that the Java Plug-in uses for dynamic memory allocation. By specifying
-Xmx256M as a runtime parameter, for example, you can increase the heap space
allocation to 256 MB. The number can be set larger or smaller than 256 MB,
depending on the resources available on the client machine running the web browser.
To increase the heap space for the Java Plug-in:
1. Launch the Java Plugin Control Panel. The Sun website provides instructions
(http://java.sun.com)
2. In the Java Plug-in Control Panel, click the Advanced tab.
2-4
EMC Smarts Service Assurance Manager Dashboard Configuration Guide
Configuring the EMC Smarts Business Dashboard
3. In the Advanced tab page, below the line Java Runtime Parameters, type the
maximum heap-space runtime parameter (-Xmx) and a value for the parameter.
For example: -Xmx256M.
4. Save your entry and close the Java Plug-in Control Panel.
5. Terminate and restart any web browser running on the host machine.
Deploying viewlets
Directories under BASEDIR/smarts/tomcat/webapps contain the web applications
served by the Tomcat Servlet Engine. For example, the sample Dashboard viewlets
included with EMC Smarts Business Dashboard are installed to the
BASEDIR/smarts/tomcat/webapps/templates directory. Each directory under
/webapps must contain the JAR, HTML, and configuration files necessary for the
web application to run.
You can choose one of the following methods to deploy Dashboard viewlets:
Table 2-2
◆
Modify the template files under BASEDIR/smarts/tomcat/webapps/templates.
You can also add your own new viewlet files to this directory.
◆
Create your own viewlets directory under /webapps. You must ensure that the
new directory contains the files and directories listed in Table 2-2, which can be
copied from the templates directory. After you create the new directory and add
the necessary files, you need to restart the SMARTS Servlet Engine service.
Files used for viewlets
File or directory
Description
HTML files
HTML files that specify the layout of viewlets,
including the JAR files and configuration
parameters.
jcommon-0.7.0.jar
jfreechart-0.9.3.jar
masterpiece.jar
tsgdtj50.jar
tsgetj50.jar
tsglt50.jar
tsgltc50.jar
tsgmtj50.jar
JAR files necessary for displaying EMC Smarts
Business Dashboard viewlets. All JAR files are
required.
Serving Dashboard viewlets
2-5
Configuring the EMC Smarts Business Dashboard
Table 2-2
Files used for viewlets (continued)
File or directory
Description
dashboard.properties
[Optional] Properties file to specify parameters
that apply to all viewlets. This file must be
specified in the HTML using the
com.smarts.propertiesFile parameter. For more
information about the HTML parameters, see
“Specifying additional viewlet properties” on
page 2-19.
viewlet.properties
[Optional] Property file to specify parameters for
a specific viewlet. This file must be specified in
the HTML using the
com.smarts.viewletProperties parameter. For
more information about the HTML parameters,
see “Specifying additional viewlet properties” on
page 2-19.
WEB-INF
Directory indicates that Tomcat should serve the
files contained in this directory upon request.
This directory is required by Tomcat.
Deploying viewlets with a third-party web server
If you deploy viewlets using a different web server, the JAR files listed in Table 2-2 are
required. The properties files are optional, but recommended as they simplify
configuration of viewlets. Copy the necessary files listed in Table 2-2 to the host
where the web server is running.
Note: If you intend to display Map viewlets, the web server must be capable of
executing servlets.
2-6
EMC Smarts Service Assurance Manager Dashboard Configuration Guide
Configuring the EMC Smarts Business Dashboard
In addition, the files in Table 2-3 must be installed on the server.
Table 2-3
Additional files needed for third-party web server
Operating system
Files needed
Windows
mfc42.dll
tsj6ag50.dll
tsj6bl50.dll
tsj6cd50.dll
tsj6cl50.dll
tsj6dg50.dll
tsj6hl50.dll
tsj6ja50.dll
tsj6jx50.dll
tsj6mg50.dll
tsj6nl50.dll
tsj6ol50.dll
tsj6sl50.dll
tsj6tl50.dll
tsj6ut50.dll
tsjj6ag50.dll
tsjj6cl50.dll
tsjj6dg50.dll
tsjj6hl50.dll
tsjj6mg50.dll
tsjj6ol50.dll
tsjj6sl50.dll
tsjj6tl50.dll
tsjj6ut50.dll
Solaris/Linux
libagraphj.so
libblayj.so
libclayj.so
libclidemoj.so
libdgraphj.so
libhlayj.so
libjagraphj.so
libjclayj.so
libjdgraphj.so
libjhlayj.so
libjmgraphj.so
libjolayj.so
libjslayj.so
libjtlayj.so
libjutilsj.so
libmgraphj.so
libnlayj.so
libolayj.so
libslayj.so
libtlayj.so
libtsgltextj.so
libtsgltj.so
libutilsj.so
HP-UX
libagraphj.sl
libblayj.sl
libclayj.sl
libclidemoj.sl
libdgraphj.sl
libhlayj.sl
libjagraphj.sl
libjclayj.sl
libjdgraphj.sl
libjhlayj.sl
libjmgraphj.sl
libjolayj.sl
libjslayj.sl
libjtlayj.sl
libjutilsj.sl
libmgraphj.sl
libnlayj.sl
libolayj.sl
libslayj.sl
libtlayj.sl
libtsgltextj.sl
libtsgltj.sl
libutilsj.sl
Figure 2-1 illustrates the flow of information when using a web server other than the
SMARTS Servlet Engine to serve viewlets.
Serving Dashboard viewlets
2-7
Configuring the EMC Smarts Business Dashboard
InCharge Business Dashboard
Global Consoles
Browser Clients
Host
Host
InCharge Broker
Web portal viewlets
Service Assurance
Manager
(Global Manager)
Host
Web Server
Host
Legend
Communication with InCharge Broker
Flow of Topology and Events
Initial loading of Viewlets and HTML
Figure 2-1
Architecture when using a third-party web server
To deploy the Dashboard viewlets with another web server (for example, a future
version of Tomcat 5.5.x), perform the following steps. (Version numbers and directory
paths in these steps are for example only.)
1. Install Tomcat 5.5.x.
2. Set JAVA_HOME. For example, JAVA_HOME=C:\Program
Files\JAVA\j2sdk1.5_06. Add the line to the catalina.bat file in
C:\tomcat-5.5.x\bin.
3. Copy BASEDIR\smarts\tomcat\webapps\tss, \webapps\webconsole, and
\webapps\templates to the new directory. For example, to
C:\tomcat-5.5.x\webapps.
4. Create a "lib" folder under C:\tomcat-5.5.x\webapps\tss\WEB-INF and copy the
JAR files from BASEDIR\smarts\tomcat\webapps\webconsole to this new
folder. You need only copy the JAR files that begins with “tsg.”
5. Make sure that BASEDIR\smarts\lib is in the system path (used in the PATH
environment variable for Windows and in the library path for UNIX installs)
when Tomcat is started. This directory includes libraries that the servlet needs.
Note: This only works if the web server is on the same host as the Dashboard or
Global Console. If they are not, you must copy libraries from the
BASEDIR\smarts\lib of the Dashboard or Global Console to the machine where
the server is installed. These files are listed in Table 2-3.
2-8
EMC Smarts Service Assurance Manager Dashboard Configuration Guide
Configuring the EMC Smarts Business Dashboard
6. Start the Tomcat engine using your standard web server startup command:
..\tomcat-5.5.x\bin\startup.bat
7. Close and reopen all IE windows.
Configuring the Web Console, Business Dashboard, Dashboard viewlets, and Global Console to use a
proxy server
You can configure the Business Dashboard and Dashboard viewlets to use a proxy
server to communicate with EMC Smarts applications (for example, Availability
Manager and Global Manager) that reside behind a firewall. Using a proxy server, the
number of firewall ports that need to be opened is reduced to one.
Before you configure these EMC Smarts Java clients, ensure that the web server that
will act as the proxy satisfies the requirement as described in “Requirement for the
proxy server” on page 2-10.
To configure the EMC Smarts Java clients to use a proxy server, perform the following
steps:
1. Your firewall administrator needs to open Port 80 on the firewall to enable
communications between the client and a web server.
Through a series of requests, the client communicates with a web server and that
web server acts as the proxy to the EMC Smarts applications.
2. Use a text editor (not sm_edit) to edit the Proxy properties described in Table 2-4
on page 2-9 in the appropriate properties file (where BASEDIR is
/opt/InCharge7/SAM/smarts or C:\InCharge7\SAM\smarts\):
• If you are using the Web Console (or Java Web Start), modify the
webconsole.properties file in the
BASEDIR/tomcat/webapps/webconsole directory.
• If you are using the Business Dashboard and viewlets, modify the
dashboard.properties file in the
BASEDIR/tomcat/webapps/templates directory.
3. Use the sm_edit utility to modify the properties.conf file.
• If you are using the Global Console, modify the
BASEDIR/conf/console/properties.conf file on the machine where the Global
Console is running.
Table 2-4
Parameters for properties file
Parameter
Value
com.smarts.proxyHost
"<Host name where the web server is running>"
com.smarts.proxyPort
<Port number of the web server>
com.smarts.proxyAuthString
"<Authentication string if authentication is required>"
com.smarts.proxyAdditionalHeaders
"<Additional HTTP Requests if any >"
The parameters com.smarts.proxyAuthString and
com.smarts.proxyAdditionalHeaders are optional.
Serving Dashboard viewlets
2-9
Configuring the EMC Smarts Business Dashboard
For com.smarts.proxyAuthString, the value depends upon the type of authentication
scheme the web-server supports. For example, if it supports Basic Access
Authentication Scheme, and if the Username is “User” and Password is “Password”
then, the value would be:
"Proxy-Authorization: basic VXNlcjpQYXNzd29yZAo=\r\n"
Then string “VXNlcjpQYXNzd29yZAo=” would be the base64 encoding of,
“User:Password”.
For com.smarts.proxyAdditionalHeaders, the value could be any valid HTTP request
like this, for example:
"GET http://www.example.com HTTP/1.1 \r\nHost: example.domain.com
\r\n"
4. Modify the proxy connection settings in Internet Explorer. (This step is not
applicable for the Global Console.)
• Open Internet Explorer and select Tools > Internet Options.
• In the Internet Options dialog, select Connections.
• In the Connection tab, click the LAN Settings button.
• In the Local Area Network (LAN) Settings dialog, in the Proxy server section,
select the checkbox for “Use a proxy server for your LAN,” and specify an IP
address for the proxy server and port number. Click OK to save your changes.
• Click OK in the Internet Properties dialog.
Note: If you are using Java Web Start, it has a similar dialog in which you can specify the
address for the proxy server and the port number.
Requirement for the proxy server
The connection time-out mechanism implemented in EMC Smarts Service Assurance
Management Suite makes use of a standard TCP feature known as “urgent data” or
“out of band data.”
The HTTP proxy used with this code must pass the “out of band data” as is.
The RFCs that define the correct operation of HTTP proxies require that the proxies
provide a transparent network connection. However, they do not explicitly mention
support of out of band data.
Because of the large number of HTTP proxy implementations in use, EMC
Corporation is not in a position to indicate which, if any, fail to correctly pass out of
band data.
Please check if the proxy server you are considering passes out of band data. Contact
EMC Smarts Global Services if the proxy server does not pass TCP urgent data.
Encrypted connections
Encrypted connections between Dashboard viewlets and the Global Manager are
configured using two environment variables:
2-10
◆
SM_OUTGOING_PROTOCOL— controls the connections that an EMC Smarts
program acting as a client is allowed to initiate.
◆
SM_INCOMING_PROTOCOL— controls the connections that an EMC Smarts
program acting as a server is allowed to accept.
EMC Smarts Service Assurance Manager Dashboard Configuration Guide
Configuring the EMC Smarts Business Dashboard
The variables are set in the runcmd_env.sh file, which is located in the
BASEDIR/smarts/local/conf directory. The variables may be set to “0” (unencrypted
connection), “1” (encrypted connection), or “1,0” (both encrypted and unencrypted
connections).
The default setting is to use both encrypted and unencrypted connections which
means that the Dashboard viewlets and the Global Manager automatically negotiate
the connection to the highest level of encryption possible.
Encryption can be controlled by setting similar variables in the HTML code that
displays the Dashboard viewlet, see “Specifying viewlet parameters in HTML” on
page 2-19, or in a properties file as described in “Using a properties file to specify
viewlet parameters” on page 2-20.
For these two methods, the following variables are used:
◆
com.smarts.incoming_protocol — controls the connections that an EMC Smarts
program acting as a server is allowed to accept.
◆
com.smarts.outgoing_protocol — controls the connections that an EMC Smarts
program acting as a client is allowed to initiate.
See the EMC Smarts System Administration Guide for detailed information about
encrypted connections.
Using SSL (https://)
If your deployment requires the use of SSL (Secure Socket Layer), you need to
perform the following steps before you launch the Dashboard with the https protocol.
(See the ssl-howto.html document in the BASEDIR/smarts/tomcat/webapps
directory on your system for detailed information. Or, access the document from the
web site: http://tomcat.apache.org/tomcat-5.5-doc/ssl-howto.html.
1. Prepare a "self-signed" certificate.
If you do not purchase a Certificate from a Certificate Authority, you can generate
a Certificate.
For example:
java1.5_HOME> /bin/keytool.exe -genkey -alias tomcat -keyalg RSA keystore testKeystore
Enter keystore password: changeit
What is your first and last name?
[Unknown]: User Name
What is the name of your organizational unit?
[Unknown]: Engineering
What is the name of your organization?
[Unknown]: Emc Smarts
What is the name of your City or Locality?
[Unknown]: White Plains
What is the name of your State or Province?
[Unknown]: NY
What is the two-letter country code for this unit?
[Unknown]: US
Is CN=User Name, OU=Engineering, O=Emc Smarts, L=White Plains,
ST=NY, C=US correct?
[no]: yes
Enter key password for <tomcat>
(RETURN if same as keystore password):<Return>
At this point you have a Certificate in a keystore file called testKeystore. Move the
file into the Tomcat home directory (for Business Dashboard 7.0 on Windows, for
example, it is: C:\InCharge7\SAM\smarts\tomcat\).
Serving Dashboard viewlets
2-11
Configuring the EMC Smarts Business Dashboard
2. Configure Tomcat.
a. In the Tomcat home directory, back up the conf/server.xml file. Then, edit the
file.
b. Find the SSL connector element which is commented out (<!-- commented out
text -->):
<-- Define an SSL HTTP/1.1 Connector on port 8443
-->
<!-<Connector port="8443"
maxThreads="150" minSpareThreads="25" maxSpareThreads="75"
enableLookups="false" disableUploadTimeout="true"
acceptCount="100" debug="0" scheme="https" secure="true"
clientAuth="false" sslProtocol="TLS" />
-->
c. Uncomment the lines and edit them to include the keystore file that you
created. The preceding will look like this:
<!-- Define an SSL HTTP/1.1 Connector on port 8443
-->
<Connector port="8443"
maxThreads="150" minSpareThreads="25" maxSpareThreads="75"
enableLookups="false" disableUploadTimeout="true"
keystoreFile="C:\InCharge7\SAM\smarts\tomcat\testKeystore"
keystorePass="changeit"
acceptCount="100" debug="0" scheme="https" secure="true"
clientAuth="false" sslProtocol="TLS" />
d. Then comment out the non-SSL connector used for http, to look like this:
<!-- Define a non-SSL HTTP/1.1 Connector on the
port specified during installation -->
<!-<Connector port="8080"
maxThreads="150" minSpareThreads="25" maxSpareThreads="75"
enableLookups="false" redirectPort="8443"
acceptCount="100"
debug="0" connectionTimeout="20000"
disableUploadTimeout="true" />
-->
e. If the com.smarts.layoutServlet property is defined, make sure that the
dashboard.properties and webconsole.properties point to the correct URL so
that the maps lay out properly:
com.smarts.layoutServlet="https://localhost:8443/tss/
LayoutServer"
3. Start the Tomcat engine using the following command:
./sm_service start ic-business-dashboard
4. In the URL that will launch the web application, replace
http://localhost:8080/
with
https://localhost:8443/
2-12
EMC Smarts Service Assurance Manager Dashboard Configuration Guide
Configuring the EMC Smarts Business Dashboard
5. Launch the Dashboard the following URL in the browser's Address field:
https://localhost:8443/templates
The system displays a Security Alert window that provides information about the
Certificate being used. On accepting it, a Directory Listing for templates is displayed,
as in the case of the non-SSL Dashboard.
Serving Dashboard viewlets
2-13
Configuring the EMC Smarts Business Dashboard
About user profiles and user accounts
Users who attach to a Global Manager, whether through the Global Console, the Web
Console, or a web browser, must have a user account. Each user account, in turn, is
associated with a user profile. A user profile defines the console operations a user can
perform, the tools the user can invoke, and the notifications displayed to the user.
Detailed information about user profiles is provided in the EMC Smarts Service
Assurance Manager Configuration Guide.
If a user attaches to a Global Manager using both the Global Console and a web
browser, the same user profile can apply for both connections.
When you save a viewlet, you can save it to a user’s directory or a user profile
directory. In both cases, the directory is located in the
BASEDIR/smarts/local/consoles directory on the host where the Global Manager is
running.
◆
Dashboard viewlets saved to a user’s directory are only accessible to that user.
The name of a user’s directory is the same as the user name.
◆
Dashboard viewlets saved to a user profile directory are accessible by any user
associated with that user profile. The name of the user profile directory is the
same as the user profile name.
You must create the user profiles and user accounts before you can save a viewlet to a
user’s directory or a user profile.
2-14
EMC Smarts Service Assurance Manager Dashboard Configuration Guide
Configuring the EMC Smarts Business Dashboard
About Dashboard viewlets
A Dashboard viewlet is a view from the Global Console that you can use as an applet.
As such, you can use viewlets in the following ways:
◆
Create an HTML page that includes one or more viewlets to provide a customized
display of EMC Smarts’ analysis. Because this view is displayed in a web browser,
it is accessible from any host with a web browser.
◆
Provide an application that dynamically generates a URL in response to a
notification that displays one or more viewlets in a web browser.
◆
Embed a viewlet within a web portal application to combine the information from
the Global Manager within an existing information view.
The configuration tasks that must be completed to provide any of the above
Dashboard viewlets are similar. After you create a viewlet for a web page, for
example, you could also embed that same viewlet within a portal. This enables you to
re-use viewlets, assigning them as necessary according the user’s role or
informational requirements.
You can also use the Dashboard viewlets located in the
BASEDIR/smarts/tomcat/webapps/templates directory. The HTML code for each
viewlet has been converted to HTML that displays properly in both Netscape and
Internet Explorer. For more information about the sample viewlets, see “Examples of
Dashboard viewlets” on page 3-1. The HTML converter used to create
browser-specific HTML is installed as part of Java™ 2 Platform Standard Edition 5.0.
Global Console views that function as viewlets
The following views from the Global Console can also be displayed as viewlets.
◆
Notification Log
◆
Status Table
◆
Summary View
◆
Containment
◆
Notification Properties
You can display these console elements as viewlets by specifying their parameter
name and any configuration parameters in the HTML code. For more information
regarding the HTML syntax for viewlets, see “HTML syntax for viewlets” on
page 2-18.
Saving views as viewlets
You can configure the views listed below using the Global Console and save them as
viewlets. Unless noted otherwise, the configuration options provided through the
Global Console are retained in the viewlet file.
◆
Notification Log
◆
Status Tables
◆
Summary Views
About Dashboard viewlets
2-15
Configuring the EMC Smarts Business Dashboard
To save a view as a viewlet, perform the following steps.
1. Configure the view using the Global Console. For information about configuring
views, see the EMC Smarts Service Assurance Manager Operator’s Guide.
2. Select View > Save View As Viewlet to open the Save View As Viewlet dialog.
You need to provide the following information to save the viewlet:
• Global Manager where the Dashboard viewlet is to be saved
• Location where the Dashboard viewlet is to be saved
• Dashboard viewlet name
3. Select the Global Manager where the viewlet is to be saved. You can save the
viewlet to any attached Global Manager.
4. Select the location on the Global Manager where the viewlet is to be saved.
• Save for User saves the viewlet into a user’s directory on the selected Global
Manager under BASEDIR/smarts/local/consoles. The drop-down menu lists
users for the selected Global Manager. If the user directory under
BASEDIR/smarts/local/consoles does not exist, it is created. A viewlet saved
to a user’s directory is only accessible to that user.
• Save for User Profile saves the viewlet into a user profile directory on the
selected Global Manager under BASEDIR/smarts/local/consoles. The
drop-down menu lists available user profiles. If the user profile directory does
not exist, it is created.
Any user associated with this user profile can load the viewlet, provided the
viewlet is specified by name in the web page loaded by the user.
Note: If a viewlet in the user’s directory has the same name as a viewlet in the user profile
directory, the viewlet in the user’s directory takes precedence.
5. Specify a name for the viewlet. The file naming convention for saved viewlets is
as follows:
<user_specifed_name><viewlet_type>.icsvm
where <viewlet_type> is one of the following:
• NLviewlet for a Notification Log viewlet
• STviewlet for a Status Table viewlet
• SVviewlet for a Summary View viewlet
For example, if you saved a Notification Log as a viewlet with the name
CoreRouters, the resulting file would be named CoreRoutersNLviewlet.icsvm.
6. Click OK.
Displaying maps
Map viewlets are not the same as the Maps displayed in a Global Console. Map
viewlets do not display a topology tree from which an element can be selected. Use
one of the following methods to display elements in a Map viewlet:
2-16
◆
Select Show Map from a menu in another viewlet
◆
Enable context sharing for the Map viewlet, as described in “Context sharing for
viewlets” on page 2-21
◆
Save a map, as described below, and display the map by specifying its focus.
EMC Smarts Service Assurance Manager Dashboard Configuration Guide
Configuring the EMC Smarts Business Dashboard
Saving maps
The purpose of saving a map is to customize the default map that is displayed for a
specific element. A saved map is associated with the element that is the focus of the
map. When the focus element is selected to display in a map, the saved map is
displayed for users with access to the saved map.
A saved map can include the following information:
◆
Adjusted scope (for example, expanded nodes)
◆
Node positions
◆
Layout type (circular, hierarchical, or manual)
◆
Filtered classes
◆
User-defined backgrounds
To save a map, in the Map Console, select Map > Save Map. Click OK to acknowledge
the pop-up message which displays the location of the saved map. The map is saved
to the user’s directory under BASEDIR/smarts/local/consoles/ on the host where
the Global Manager is running. The file extension for a saved map is “.icsvm”.
To make a saved map available to other users, you must copy the map file to the
shared location BASEDIR/smarts/local/consoles.
For information about saved maps, see the EMC Smarts Service Assurance Manager
Operator’s Guide.
Displaying a saved map
To display a saved map, you must specify the topological instance that was the focus
when the map was saved. Unlike a saved viewlet, it is not necessary to specify the
name of the saved map. The parameters for specifying the instance to display in a
Map viewlet are described in “Properties for map viewlets” on page 2-25.
About Dashboard viewlets
2-17
Configuring the EMC Smarts Business Dashboard
HTML syntax for viewlets
This section describes the HTML parameters for loading and configuring Dashboard
viewlets. Because the viewlets are Java applets, you must use the HTML tags for
displaying applets. The tags vary with the version of HTML.
When you create an HTML page that displays several viewlets, using HTML frames
provides control over the layout of the viewlets. In addition, if you want to load two
viewlets of the same type, two Notification Logs for example, each viewlet must be
specified in a separate HTML page. Then apply Frame tags to display both
Notification Log viewlets on the same page.
You can examine and copy the HTML of the samples in the
BASEDIR/smarts/tomcat/webapps/templates directory. The viewlets and their
associated HTML files are described in “Examples of Dashboard viewlets” on
page 3-1.
The HTML code in this section uses elements from the HTML 4.0 Specification.
HTML to display viewlets
Table 2-5 lists the HTML tags and attributes necessary to display a Dashboard viewlet
in a web page. Subsequent sections describe attributes that enable you to further
configure the viewlet.
An attribute’s name and its value must be enclosed by double quotes. When an
attribute includes a set of values, the set of values is enclosed by double quotes, as
shown in the following example:
<APPLET TYPE="applet"
CODE="com.smarts.webapps.SmWebNotificationsApp.class"
WIDTH=”100%” HEIGHT=”100%”
ARCHIVE="masterpiece.jar,jcommon-0.7.0.jar,\
jfreechart-0.9.3.jar,tsgdtj50.jar,tsgetj50.jar,\
tsglt50.jar,tsgltc50.jar,tsgmtj50.jar">
</APPLET>
2-18
EMC Smarts Service Assurance Manager Dashboard Configuration Guide
Configuring the EMC Smarts Business Dashboard
Table 2-5
HTML elements required to display a Dashboard viewlet
HTML element and
parameters
Description
<APPLET> ...
... </APPLET>
Element used to embed a Dashboard viewlet within a web page.
code
Parameter that specifies the type of viewlet.
• com.smarts.webapps.SmWebNotificationsApp (Notification Log)
• com.smarts.webapps.SmWebGridApp
(Status Table)
• com.smarts.webapps.SmWebMapApp
(Maps)
• com.smarts.webapps.SmWebSummaryApp
(Summary View)
• com.smarts.webapps.SmWebNotificationPropertiesApp
(Notification Properties)
• com.smarts.webapps.SmWebContainmentApp (Containment)
archive
Parameter that lists the JAR files necessary to display the viewlet. All
of the JAR files are necessary for each viewlet.
• jcommon-0.7.0.jar
• jfreechart-0.9.3.jar
• masterpiece.jar
• tsgdtj50.jar
• tsgetj50.jar
• tsglt50.jar
• tsgltc50.jar
• tsgmtj50.jar
Specifying additional viewlet properties
You can specify additional properties in the HTML code that displays a viewlet, or in
a properties file. These properties include parameters for the following features:
◆
Opening a saved view
◆
Enabling context sharing
◆
Setting the focus of a view
◆
Specifying connection properties
Each of these is described in “Additional viewlet properties” on page 2-21.
Specifying viewlet parameters in HTML
Parameters included in the HTML code that displays a viewlet are nested inside the
<APPLET> tags and have the following syntax:
<param name=”name” value=”value”>
In the following example, the com.smarts.context.collectionEntity parameter is set to
true to enable context listening for a Notification Log viewlet.
<APPLET TYPE="applet"
CODE="com.smarts.webapps.SmWebNotificationsApp.class"
WIDTH=”100%” HEIGHT=”100%”
HTML syntax for viewlets
2-19
Configuring the EMC Smarts Business Dashboard
ARCHIVE="masterpiece.jar,jcommon-0.7.0.jar,\
jfreechart-0.9.3.jar,tsgdtj50.jar,tsgetj50.jar,\
tsglt50.jar,tsgltc50.jar,tsgmtj50.jar">
<PARAM NAME="com.smarts.context.collectionEntity"\
VALUE="true">
</APPLET>
Using a properties file to specify viewlet parameters
You can use a properties file to specify parameters for a Dashboard viewlet. One or
more viewlets can reference the properties file. This simplifies configuration because
you can change the parameters within the properties file instead of editing each
HTML file.
Two parameters may be used to specify a properties file:
◆
com.smarts.propertiesFile specifies properties common to all viewlets. Such
properties might include the location of the EMC Smarts Broker and the name of
the Global Manager.
◆
com.smarts.viewletProperties specifies properties for a single viewlet. Such
properties might enable context sharing or set the focus of a map viewlet.
The parameters to specify a properties file for the viewlet are nested inside the
<APPLET> tags and have the following syntax:
<param name=”name” value=”value”>
"value" indicates the name of the file containing the properties. You can use any name
for a properties file.
In the following example, the HTML for a Notification Log viewlet references a
properties file named dashboard.properties.
<APPLET TYPE="applet"
CODE="com.smarts.webapps.SmWebNotificationsApp.class"
WIDTH=”100%” HEIGHT=”100%”
ARCHIVE="masterpiece.jar,jcommon-0.7.0.jar,\
jfreechart-0.9.3.jar,tsgdtj50.jar,tsgetj50.jar,\
tsglt50.jar,tsgltc50.jar,tsgmtj50.jar">
<PARAM NAME="com.smarts.propertiesFile" \
VALUE ="dashboard.properties">
</APPLET>
The dashboard properties file may specify any of the properties described in
“Additional viewlet properties” on page 2-21 or in “Encrypted connections” on
page 2-10. The properties are assigned using the following syntax:
parameter_name=”value”
Quotes around the value are optional unless you need to have leading or trailing
spaces as part of the value.
The following properties file example sets the location of the EMC Smarts Broker and
the name of the Global Manager:
smarts.remote.broker=host1.smarts.com:426
com.smarts.autoAttachDM=INCHARGE-SA
2-20
EMC Smarts Service Assurance Manager Dashboard Configuration Guide
Configuring the EMC Smarts Business Dashboard
As a result, when a user opens the web page that displays the viewlet, the Attach
dialog includes the information about the Broker and Global Manager. The user
simply provides a user name and password to connect.
Additional viewlet properties
The following sections describe Dashboard viewlet properties that can be specified
either in the HTML displaying the viewlet or in a properties file. Similar properties
are grouped together.
Displaying a saved viewlet
Table 2-6 describes the parameter used to specify the name of a saved viewlet.
Table 2-6
Parameter for displaying a saved viewlet
Parameter
Description
com.smarts.savedView
Name of the saved view that is displayed as a viewlet. Note that it
is not necessary to include the file extension, “.icsvm”, of the
viewlet file.
For information about saving a viewlet, see “Saving views as
viewlets” on page 2-15.
Context sharing for viewlets
Context sharing is when the focus of one viewlet determines the content that is
displayed in one or more viewlets on the same HTML page. A simple example
illustrates how this might work. When instance context sharing is enabled for a
Notification Log viewlet, a user can select a failed node in a Map viewlet and the
Notification Log displays the notifications related to the selected map node. For more
information about context sharing, see the EMC Smarts Service Assurance Manager
Operator’s Guide.
Table 2-7 lists the parameters related to context sharing for viewlets and indicates
which viewlets the parameters apply to. Setting the value to “true” enables context
sharing.
Table 2-7
Parameters for context sharing with viewlets
Parameter
Description
com.smarts.context.notification
When true, causes the viewlet to listen for
notification context changes. You can set this
parameter for the following viewlets:
• Map
com.smarts.context.instance
When true, causes the viewlet to listen for instance
context changes. You can set this parameter for the
following viewlets:
• Map
• Notification Log
HTML syntax for viewlets
2-21
Configuring the EMC Smarts Business Dashboard
Table 2-7
Parameters for context sharing with viewlets (continued)
Parameter
Description
com.smarts.context.summary
When true, causes a Notification Log viewlet to
display the notifications graphed in the Summary
viewlet.
• Notification Log
com.smarts.context.collectionEntity
When true, causes the viewlet to display information
related to the collection entity class. Collection entity
classes include the following classes and their
subclasses:
• ServiceOffering
• ServiceSubscriber
• HierarchicalGroup
• SelectiveGroup
• ApplicationGroup
You can set this parameter for the following viewlets:
• Notification Log
• Map
• Summary
com.smarts.launch.globalMgr
Name of the Global Manager for context when the
viewlet is attached to more than one Global
Manager.
Note: Notification Properties viewlets always listen for notification context and Containment
viewlets always listen for notification and instance context.
Automatic attach for viewlets
Automatic attach (autoAttach) enables you to configure a viewlet so that a user does
not need to provide a user name or password to view information provided by the
Global Manager. To make the connection to a Global Manager transparent, you must
do the following:
◆
Edit two parameters in the dashboard.properties file
◆
Configure the Dashboard credentials identifier (ID). This ID specifies the location
of the EMC Smarts Broker, the name of the Global Manager, a user name, and a
password.
WARNING
The EMC Office of Product Security deems the use of this feature (Automatic attach
by storing credentials on disk) as an unsecure mode of operation. Storing credentials
on disk amounts to no user authentication. As such, EMC Corporation discourages
the use of this feature.
2-22
EMC Smarts Service Assurance Manager Dashboard Configuration Guide
Configuring the EMC Smarts Business Dashboard
Configure Dashboard viewlets to automatically attach to the Global Manager
The configuration of a Dashboard viewlet to automatically attach to a server involves
defining two properties in the dashboard.properties file. These properties are
described in Table 2-8.
Table 2-8
Parameters for automatic attach with viewlets
Parameter
Description
com.smarts.viewlet.authhttp
The value of com.smarts.viewlet.authhttp specifies the URL of the servlet that
will perform the lookup and retrieval of the stored userid and password
credentials.
The syntax of this parameter is
http://<tomcat_host>:8080/SMViewletAuth/Viewlet
Auth.do?MASK=0
If web server is configured to run over https, then the syntax to be used is:
https://<tomcat_host>:8443/SMViewletAuth/Viewle
tAuth.do?MASK=0, where port 8443 is the secure port (the port may
differ depending on how the web server is configured. See “Using SSL
(https://)” on page 2-11 for more information.
com.smarts.attach.alias
The value of com.smarts.attach.alias is a unique identifier that labels the
credentials to be used by the auto attach mechanism. This unique identifier will
have to be defined in a small server database using the administrator
Dashboard credentials tool provided in the distribution.
Example of modified dashboard.properties file
Here is an example of a modified dashboard.properties file that uses the parameters
described in Table 2-8.
# This is a Java Properties file, for the GUI running as an Applet.
# Leading and trailing blanks are stripped from parameter values.
# If you have a property which you want to have leading or trailing
blanks, enclose that parameter in double quotes,
# e.g.: some.parameter=" I am a value with leading and trailing
blanks "
com.smarts.viewer.hideToolbarText=true
com.smarts.OemCustomization=NONE
com.smarts.securityEnabled=true
com.smarts.viewlet.authhttp=http://<tomcat_host>:8080/SMViewletAut
h/ViewletAuth.do?MASK=0
com.smarts.attach.alias=GUI_ID
In this example, the parameter, com.smarts.viewlet.authhttp, refers to the URL of the
servlet that will retrieve the credentials (user name, password, broker, and Global
Manager) from Tomcat.
The parameter, com.smarts.attach.alias, is set to the Dashboard credentials identifier
named, GUI_ID. To configure GUI_ID, use the Dashboard credentials administrator’s
tool.
Configuring the Dashboard credentials identifier
The administrator must define the credentials ID using the Dashboard credentials
tool. Follow these steps:
1. Start a web browser specifying the following URL:
http://<tomcat_host>:8080/SMViewletAuth
HTML syntax for viewlets
2-23
Configuring the EMC Smarts Business Dashboard
2. The Dashboard viewlet authenticator login screen displays. Enter a user name
and password that will be used in the future to access the Dashboard credential
tool (for example, admin, 12345). Click Submit. A message indicating a successful
login appears.
Note: This step assigns values to two parameters that control access to the tool:
configuration.admin.user and configuration.admin.password. Use this user name and
password whenever you need to access this tool to edit Dashboard credential IDs.
3. Choose Edit Configuration. The following text appears:
# Automatically generated configuration file
# admin credential: DO NOT EDIT 2 fields below
configuration.admin.user=admin
configuration.admin.password=12345
#[connection_alias1]
#
com.smarts.userid=admin
#
com.smarts.password=changeit
#
smarts.remote.broker=10.239.3.92:426
#
com.smarts.autoAttachDM=INCHARGE-SAM
#
com.smarts.clientips=10.239.*;10.7.2.[1-9];10.7.2.11
## end of entry connection_alias1
The parameters used in this screen are explained in Table 2-9.
Table 2-9
Parameters for automatic attach with viewlets
Parameter
Description
connection_alias1
Replace this string of text with the credentials ID (for example,
GUI_ID). You must replace this at both the beginning and end of the
list.
com.smarts.userid
User name. This name must match a record in the
serverConnect.conf file used by the Global Manager. In addition,
this user must have an account with the Global Manager.
com.smarts.password
Password.
smarts.remote.broker
Location of the Broker in <host>:<port> format. For example,
smarts-broker:426.
com.smarts.autoAttachDM
Name of the Global Manager, for example INCHARGE-SA.
com.smarts.clientips
Your IP for running the Dashboard applet should be inserted to the
"com.smarts.clientips" list of the alias you are using for the
Dashboard. For localhost, it might be 127.0.0.1.
"com.smarts.clientips" controls which host can run the Dashboard
without the need of knowing the connection credentials.
4. Copy the text beginning with the line, #[connection_alias1], and paste it at the end
of the file. Uncomment and edit the parameters in these lines in order to create the
credentials ID for the autoAttach feature. For example,
[GUI_ID]
com.smarts.userid=oper
com.smarts.password=oper
smarts.remote.broker=qa-fancy:426
com.smarts.autoAttachDM=INCHARGE-SA
com.smarts.clientips=10.239.*;10.7.2.[1-9];10.7.2.11;127.0.0.1
# end of entry GUI_ID
2-24
EMC Smarts Service Assurance Manager Dashboard Configuration Guide
Configuring the EMC Smarts Business Dashboard
!
CAUTION
Observe the data entry syntax shown above. You must uncomment the lines
(remove the # character) needed to support each credentials ID. The ID must
appear in braces on the first line followed by each parameter on subsequent lines.
The userid and password must be associated with a valid user profile. And the last
line requires that one of the comment (#) characters be removed leaving a single #
character preceding the "end of entry <ID>" string of text.
5. Click Save. The Show Configuration screen displays and the user name and
password are scrambled (see example below).
# start of entry GUI_ID
[GUI_ID]
# The following fields CAN NOT be modified manually
com.smarts.userid=5f2c442449242f41
com.smarts.password=5f2c642e4d392041
# end of fields CAN NOT be modified manually
smarts.remote.broker=qa-fancy:426
com.smarts.autoAttachDM=INCHARGE-SA
com.smarts.clientips=10.239.*;10.7.2.[1-9];10.7.2.11;127.0.0.1
# end of entry GUI_ID
6. To return to the Edit Configuration screen, click Edit.
7. To exit, click Logout.
By default, the configuration file with all the obfuscated credentials is stored in
the directory where tomcat was started. The default file name is
viewletauth.conf. The administrator can change this behavior and specify a
different location. This can be done by specifying the following property:
<init-param>
<param-name>com.smarts.viewletauth.conf</param-name>
<param-value>file_path</param-value>
</init-param>
This property should be added to the web.xml file located in folder:
<install_path>\SMViewletAuth\WEB-INF
where <install_path> refers to the path used to install the ViewAuth.war file. By
default this location is <tomcat_installation>\webapps.
8. Start the viewlet. If properly configured, the viewlet should bypass the login
dialog and attach directly to the Global Manager (INCHARGE-SA). (Note, this
assumes that the Global Manager is already running.) When values for one or
more of the parameters in Table 2-9 are not provided, the viewlet displays the
login dialog box requesting credentials.
Properties for map viewlets
The parameters described in Table 2-10 enable you to specify an element as the focus
of a map viewlet and to determine what type of map is displayed. The map type must
be relevant to the specified element.
HTML syntax for viewlets
2-25
Configuring the EMC Smarts Business Dashboard
Note: When launching a map viewlet, you must specify the class of the element and instance
name of the element for the map, otherwise the map will be empty. (The map viewlet does not
include the topology browser so you cannot select an instance.) However, when the map is
used in conjunction with other viewlets, such as the Notification Log viewlet, you can context
share to display elements in the map. When you specify the instance in the URL without a map
type, the console chooses a default map type for that instance.
Table 2-10
Parameters for map viewlets
Parameter
Description
com.smarts.launch.class
Name of the ICIM class of which the element is an
instance.
com.smarts.launch.instance
Display name of the elements.
com.smarts.launch.mapType
Type of map that is displayed.
• Physical for Physical Connectivity
• IP for IP Connectivity
• VLAN for VLAN Connectivity
• Membership for Membership
• Business for Business Services Maps
• Application for Applications Maps
com.smarts.map.passive
When true, prevents console operations such as
Show Map from displaying in the Map viewlet.
Instead, actions such as Show Map display in a new
Map viewlet.
com.smarts.launch.mapHops
Optional parameter that specifies how many hops
the map should display. If a value is not specified,
one hop is displayed. (Part of Launching in Context.)
com.smarts.fitInWindow
Value is boolean. When true, this optional parameter
forces the Map to fit inside the window no matter
how large the map.
com.smarts.map.showAllBusiness
Value is boolean. When true, this optional parameter
allows all business topology to be seen in the map
and not just the topology that has a direct path to the
central map node.
Note: You can also use the com.smarts.launch.class and com.smarts.launch.instance
parameters for Notification Properties and Containment viewlets.
Enabling client tools
Client tools are programs that can be invoked by an operator using the Global
Console, Web Console, or Business Dashboard. Access to client tools can be
controlled by associating or not associating tools to user profiles. Available client
tools are displayed in a pop-up menu when an operator right-clicks on a notification
or a device. For more information about creating client tools, see the EMC Smarts
Service Assurance Manager Configuration Guide.
Note: Client tools that require the user to input values are not supported in either the Web
Console or Business Dashboard.
In order for client tools to be invoked, the tool scripts must be placed in a directory
accessible from the client machine (where the web browser is running). In an
2-26
EMC Smarts Service Assurance Manager Dashboard Configuration Guide
Configuring the EMC Smarts Business Dashboard
environment where Dashboard users share a network drive, the client tools can be
placed in a directory on the network drive, thus avoiding the need to copy the tools
onto each client machine.
To enable access to the client tools from the Business Dashboard, add the parameters
described in Table 2-11 to the appropriate properties file, for example,
dashboard.properties..
Table 2-11
Parameter to enable client tools
Parameter
Description
com.smarts.clientToolsInApplet=true
When set to true, client tools are enabled in the Web Console or
Business Dashboard.
If this parameter is specified, and the
com.smarts.webconsole.sitemod parameter (see below) is not
specified, the Dashboard client tool function gets the client tools
from the /actions/client directory in the web browser’s default
directory. (For IE, this may be Documents and Settings\Desktop.
For Firefox, the Firefox installation base directory.) You must put a
copy of the tool in this /actions/client path.
com.smarts.webconsole.sitemod
When this parameter is configured in the dashboard.properties
file, the Business Dashboard searches for client tools in the
directory path(s) specified. For example,
com.smarts.webconsole.sitemod=F:/webconsoleSitemod;C:webc
onsoleSitemod/locl.
If this parameter is specified, then
com.smarts.clientToolsInApplet=true must also be specified to
enable client tools in the Web Console or Business Dashboard.
If this parameter is not specified, but
com.smarts.clientToolsInApplet=true is specified, then client tools
will be accessed from a default directory (see above).
Example
Here is an example showing how to configure a tool named myClientTool.cmd where
com.smarts.webconsole.sitemod=Z:/toolsdir. The two parameters would be set as
follows:
com.smarts.clientToolsInapplet=true
com.smarts.webconsole.sitemod=Z:/toolsdir
The client tool must be placed in the /actions/client folder under Z:/toolsdir as
shown below.
Z:/toolsdir/actions/client/myClientTool.cmd
The parameter, com.smarts.webconsole.sitemod does not directly specify where the
tool file is stored. Instead, it specifies where the /actions/client directory containing
the tool file is stored.
If com.smarts.webconsole.sitemod is not specified, the /client/actions folder with the
tool must be placed under the web browser’s default directory. (For IE, this may be
Documents and Settings\Desktop. For Firefox, it is the Firefox installation base
directory.)
HTML syntax for viewlets
2-27
Configuring the EMC Smarts Business Dashboard
URL-addressable viewlets
A URL-addressable viewlet is a viewlet that is displayed when a web client loads a
particular URL. This enables you to dynamically generate a URL to display Map,
Notification Properties, and Containment viewlets from within the context of another
application. Using the viewlet parameters described in “Additional viewlet
properties” on page 2-21, you can configure a URL-addressable viewlet.
To specify viewlet parameters directly in a URL, use the following syntax:
http://URL?class=viewlet¶meter_name=value[&...]
Note: The [&...] indicates you can add as many parameters and values as needed. Each
parameter and value must be separated with an ampersand.
Table 2-12 lists values used with the class parameter typically used with
URL-addressable viewlets and Table 2-13 describes the separators used.
Table 2-12
Table 2-13
Class parameter values for URL-addressable viewlets
Parameter
Dashboard viewlets
class
Determines the Dashboard viewlet that is displayed.
• com.smarts.webapps.SmWebMapApp
(Maps)
• com.smarts.webapps.SmWebNotificationPropertiesApp
(Notification Properties)
• com.smarts.webapps.SmWebContainmentApp
(Containment)
Separators used in URL-addressable viewlets
Separator
Description
?
Separates the file name of the HTML page specifying the JAR files from
the parameter/value pairs.
&
Separates parameter/value pairs in the URL.
The following URL is an example of a URL-addressable viewlet that loads a Map
viewlet with a specific element class and instance as the focus. It does not specify a
map type. The example uses an HTML page included with the viewlet samples,
described in “Example of URL-addressable viewlet” on page 3-9, to load the
necessary JAR files.
▼ http://<tomcat_host>:8080/templates/context.html?
class=com.smarts.webapps.SmWebMapApp&
com.smarts.propertiesFile=dashboard.properties&
com.smarts.launch.class=Router&
com.smarts.launch.instance=lab-gw.example.com ▲
Note: The URL has been formatted to make it readable. The symbols ▼ and ▲ indicate the URL
should appear on one line.
2-28
EMC Smarts Service Assurance Manager Dashboard Configuration Guide
Configuring the EMC Smarts Business Dashboard
The following URL, which is similar to the preceding, is an example of a
URL-addressable viewlet that loads a Map viewlet with a specific element class and
instance as the focus, and specifies a map type.
▼ http://<tomcat host>:8080/templates/context.html?
class=com.smarts.webapps.SmWebMapApp&
com.smarts.launch.mapType=IP&
com.smarts.launch.class=Host&
com.smarts.launch.instance=qa-fancy ▲
When necessary, use the dmctl utility to list the notifications in the Global Manager
and select the one that you want to use for the viewlet:
./dmctl -s INCHARGE-SA getInstances ICS_Notification
URL-addressable viewlets
2-29
Configuring the EMC Smarts Business Dashboard
About the Web Console
The Web Console provides the same functionality as the Global Console, including
the Topology Browser view that is not available as a viewlet. Client systems must
meet the requirements specified in “Client requirements” on page 1-5.
Users can open the EMC Smarts Web Console after you complete the following tasks:
◆
Start the EMC Smarts Business Dashboard service
◆
Create user profiles and user accounts
The Web Console is installed to the BASEDIR/smarts/tomcat/webapps/webconsole
directory.
Attaching with the Web Console
Two versions of the Web Console are available. With both versions, the JAR files are
loaded over the network during the initial connection but then saved to the user’s
local system. Subsequent connections use the cached files to optimize the use of
network resources.
The first version functions as a typical Java applet. The HTML and JAR files are
located on the host where the EMC Smarts Business Dashboard is installed. When a
user opens the Web Console, the JAR files are loaded over the network to the user’s
web browser.
A second version of the Web Console uses Java Web Start. Java Web Start integrates
the Web Console with the user’s desktop. This enables users to start the Web Console
directly from their desktop without using a web browser.
Note: When opening the Web Console or a Dashboard viewlet, the JRE on the user’s system
displays a security warning. Users must select Yes or Always to allow the applet to run.
Using the Web Console
To display the Web Console, open the following URL:
http://<tomcat_host>:8080/webconsole/InChargeApplet.html
When attached, the Web Console displays inside the web browser window. If the user
opens additional consoles using the File > Open menu options, each new console is
displayed in its own window. When the user exits the web browser, all Web Console
windows are closed, as is the connection to the Global Manager.
Using Java Web Start
You can also use Java Web Start for caching the applet locally for improved
performance; the necessary applet files are not reloaded each time the applet is
launched. To do so, point your browser at the following URL:
http://<tomcat_host>:8080/webconsole/globalConsoleCached.html
When you launch the cached applet, you are prompted to optionally add a Java Web
Start icon on your desktop and a link in your Start menu.
If Java Web Start is not installed, you are prompted to use an automatic installer or
directed to a Sun Microsystems web page, depending upon your operating system or
browser.
2-30
EMC Smarts Service Assurance Manager Dashboard Configuration Guide
3
Examples of
Dashboard viewlets
This chapter describes the Dashboard viewlet and HTML code samples included
with the EMC Smarts Business Dashboard and contains the following information:
◆
About the sample viewlets .......................................................................................... 3-2
Note: The sample viewlets and their Web pages are installed to the
BASEDIR/smarts/tomcat/webapps/templates directory. Online information regarding the
sample viewlets is available from
http://<tomcat_host>:<port>/templates/DashboardIndex.html
Examples of Dashboard viewlets
3-1
Examples of Dashboard viewlets
About the sample viewlets
Each viewlet type is specified in an HTML page, with slight variations specified in
separate HTML pages. Each sample combines several viewlets, which are displayed
in a single HTML page through the use of HTML frames.
To ensure that the HTML pages that specify a viewlet display properly on all
supported platforms and Web browsers, EMC Corporation has processed the HTML
pages using Java Plug-in HTML Converter. The Java Plug-in Converter converts an
HTML page that specifies Java applet to a form that can be processed by a Web
browser using the Java Plug-in.
Because the converted HTML files are not easily read, both the original HTML file
and the converted files are included. For example, the original file for the Notification
Log viewlets is named NotificationsAppOrig.html. The converted files, which are
used to display the viewlet, have names such as NotificationsApp1.html.
To view the samples in a Web browser, the SMARTS Servlet Engine must be installed
and running. You can open the following URL in your Web browser, appending the
file name specified for each sample. For example, if the SMARTS Servlet Engine is
running on host1, you can view sample 1, by opening the following URL:
http://<tomcat_host>:<port>/templates/sample1.html
In addition, you also can find all the sample viewlets in
BASEDIR\smarts\tomcat\webapps\templates\
Index to the sample Dashboard viewlets
The best way to view the samples and more is to open the following HTML page in
your web browser:
BASEDIR\smarts\tomcat\webapps\templates\DashboardIndex.html
This page provides an index listing of all the sample viewlets and a ReadMe.html
with hyperlinks to each.
3-2
EMC Smarts Service Assurance Manager Dashboard Configuration Guide
Examples of Dashboard viewlets
Sample 1
You can view the first sample by opening sample1.html in your Web browser. This
sample includes the viewlets described in Table 3-1. The layout of this sample
includes a Notification Log in the top frame row and a Summary and Status Table in
the bottom frame row.
Table 3-1
Viewlets of Sample1.html
Frame page
Viewlet pages
Viewlet
Additional parameters
sample1.html
NotificationsApp1.html
Notification Log
• com.smarts.propertiesFile includes the parameters
specified in the dashboard.properties file. For more
information regarding a properties file, see “Using a
properties file to specify viewlet parameters” on
page 2-20.
• com.smarts.context.collectionEntity has a a value of
true. This indicates that the Notification Log viewlet
will display notifications related to elements selected
in the Status Table. For more information about
context sharing, see “Context sharing for viewlets”
on page 2-21.
SummaryApp1.html
Summary View
• com.smarts.propertiesFile includes the parameters
specified in the dashboard.properties file. For more
information regarding a properties file, see “Using a
properties file to specify viewlet parameters” on
page 2-20.
StatusTableAppAll.html
Status Table
• com.smarts.propertiesFile includes the parameters
specified in the dashboard.properties file. For more
information regarding a properties file, see “Using a
properties file to specify viewlet parameters” on
page 2-20.
About the sample viewlets
3-3
Examples of Dashboard viewlets
Sample 2
You can view the second sample by opening sample2.html in your Web browser. This
sample includes the viewlets described in Table 3-2. The layout of this sample
includes a Status Table and Map in the top frame row and a Notification Log in the
bottom frame row.
Table 3-2
3-4
Viewlets of Sample2.html
Frame page
Viewlet pages
Viewlet
Additional parameters
sample2.html
StatusTableAppAll.html
Status Table
• com.smarts.propertiesFile includes the parameters
specified in the dashboard.properties file. For more
information regarding a properties file, see “Using a
properties file to specify viewlet parameters” on
page 2-20.
MapApp2a.html
Map
• com.smarts.propertiesFile includes the parameters
specified in the dashboard.properties file. For more
information regarding a properties file, see “Using a
properties file to specify viewlet parameters” on
page 2-20.
• com.smarts.context.collectionEntity has a a value of
true. This indicates that the Map viewlet will display
the elements selected in the Status Table. For more
information about context sharing, see “Context
sharing for viewlets” on page 2-21.
NotificationsApp2a.html
Notification Log
• com.smarts.propertiesFile includes the parameters
specified in the dashboard.properties file. For more
information regarding a properties file, see “Using a
properties file to specify viewlet parameters” on
page 2-20.
• com.smarts.context.collectionEntity has a a value of
true. This indicates that the Notification Log viewlet
will display notifications for elements selected in the
Status Table. For more information about context
sharing, see “Context sharing for viewlets” on
page 2-21.
• com.smarts.context.instance has a a value of true.
This indicates that the Notification Log viewlet will
display notifications for elements selected from the
Map. For more information about context sharing,
see “Context sharing for viewlets” on page 2-21.
EMC Smarts Service Assurance Manager Dashboard Configuration Guide
Examples of Dashboard viewlets
Sample 3
You can view the third sample by opening sample3.html in your Web browser. This
sample includes the viewlets described in Table 3-3. The layout of this sample
includes a Map in the top frame row and a Notifications Log and Containment
viewlet in the bottom frame row.
Table 3-3
Viewlets of Sample3.html
Frame page
Viewlet pages
Viewlet
Additional parameters
sample3.html
MapApp3a.html
Map
• com.smarts.propertiesFile includes the parameters
specified in the dashboard.properties file. For more
information regarding a properties file, see “Using a
properties file to specify viewlet parameters” on
page 2-20.
• com.smarts.context.notification has a a value of
true. This indicates that the Map viewlet will display
the elements related to notifications selected in the
Notification Log. For more information about context
sharing, see “Context sharing for viewlets” on
page 2-21.
NotificationsAppAll.html
Notification Log
• com.smarts.propertiesFile includes the parameters
specified in the dashboard.properties file. For more
information regarding a properties file, see “Using a
properties file to specify viewlet parameters” on
page 2-20.
ContainmentAppAll.html
Containment
• com.smarts.propertiesFile includes the parameters
specified in the dashboard.properties file. For more
information regarding a properties file, see “Using a
properties file to specify viewlet parameters” on
page 2-20.
About the sample viewlets
3-5
Examples of Dashboard viewlets
Sample 4
You can view the fourth sample by opening sample4.html in your Web browser. This
sample includes the viewlets described in Table 3-4. The layout of this sample
includes a Notifications Log in the top frame row, a Summary and Notification
Properties viewlets in the middle frame row, and a Map in the bottom frame row.
Table 3-4
3-6
Viewlets in sample4.html
Frame page
Viewlet pages
Viewlet
Additional parameters
sample4.html
NotifcationsApp4.html
Notification Log
• com.smarts.propertiesFile includes the parameters
specified in the dashboard.properties file. For more
information regarding a properties file, see “Using a
properties file to specify viewlet parameters” on
page 2-20.
• com.smarts.context.summary has a a value of true.
This indicates that the Notification Log viewlet will
display the notifications graphed by the selected
Summary. For more information about context
sharing, see “Context sharing for viewlets” on
page 2-21.
SummaryAppAll.html
Summary
• com.smarts.propertiesFile includes the parameters
specified in the dashboard.properties file. For more
information regarding a properties file, see “Using a
properties file to specify viewlet parameters” on
page 2-20.
NotificationPropertiesAppAll.html
Notification
Properties
• com.smarts.propertiesFile includes the parameters
specified in the dashboard.properties file. For more
information regarding a properties file, see “Using a
properties file to specify viewlet parameters” on
page 2-20.
MapApp4a.html
Map
• com.smarts.propertiesFile includes the parameters
specified in the dashboard.properties file. For more
information regarding a properties file, see “Using a
properties file to specify viewlet parameters” on
page 2-20.
• com.smarts.context.notification has a a value of
true. This indicates that the Map viewlet will display
the elements related to notifications selected in the
Notification Log. For more information about context
sharing, see “Context sharing for viewlets” on
page 2-21.
EMC Smarts Service Assurance Manager Dashboard Configuration Guide
Examples of Dashboard viewlets
Sample 5
You can view the fifth sample by opening sample5.html in your Web browser. This
sample includes the viewlets described in Table 3-5. The layout of this sample
includes a Notification Log in the top frame row, a Summary and a Map in the middle
frame row, and a second Notification Log in the bottom frame row.
Table 3-5
Viewlets in Sample5.html
Frame page
Viewlet pages
Viewlet
Additional parameters
sample5.html
NotificationsAppAll.html
Notification Log
• com.smarts.propertiesFile includes the parameters
specified in the dashboard.properties file. For more
information regarding a properties file, see “Using a
properties file to specify viewlet parameters” on
page 2-20.
SummaryAppAll.html
Summary
• com.smarts.propertiesFile includes the parameters
specified in the dashboard.properties file. For more
information regarding a properties file, see “Using a
properties file to specify viewlet parameters” on
page 2-20.
MapApp5a.html
Map
• com.smarts.propertiesFile includes the parameters
specified in the dashboard.properties file. For more
information regarding a properties file, see “Using a
properties file to specify viewlet parameters” on
page 2-20.
• com.smarts.context.notification has a a value of
true. This indicates that the Map viewlet will display
the elements related to notifications selected in the
Notification Log. For more information about context
sharing, see “Context sharing for viewlets” on
page 2-21.
NotificationsApp5.html
Notification Log
• com.smarts.propertiesFile includes the parameters
specified in the dashboard.properties file. For more
information regarding a properties file, see “Using a
properties file to specify viewlet parameters” on
page 2-20.
• com.smarts.context.summary has a a value of true.
This indicates that the Notification Log viewlet will
display the notifications graphed by the selected
Summary. For more information about context
sharing, see “Context sharing for viewlets” on
page 2-21.
About the sample viewlets
3-7
Examples of Dashboard viewlets
Sample 6
You can view the sixth sample by opening sample6.html in your Web browser. This
sample includes the viewlets described in Table 3-6. The layout of this sample
includes a Status Table and Summary in the first row, a Notification Log in the second
row, and a second Summary in the bottom row.
One notable difference between this sample and the previous samples is that
sample6.html uses HTML TABLE tags in conjunction with IFRAME tags to position
viewlets. An advantage of IFRAME tags is that the viewlets within the tags remain at
their specified size. As the Web browser window is resized, the viewlets within the
table do not resize. When the browser window is made smaller than the specified size
of a viewlet, scroll bars are displayed within the IFRAME.
Table 3-6
3-8
Viewlets of Sample6.html
IFrame page
Viewlet pages
Viewlet
Additional parameters
sample6.html
StatusTableAppAll.html
Status Table
• com.smarts.propertiesFile includes the parameters
specified in the dashboard.properties file. For more
information regarding a properties file, see “Using a
properties file to specify viewlet parameters” on
page 2-20.
SummaryApp6.html
Summary
• com.smarts.propertiesFile includes the parameters
specified in the dashboard.properties file. For more
information regarding a properties file, see “Using a
properties file to specify viewlet parameters” on
page 2-20.
• com.smarts.context.collectionEntity has a a value of
true. This indicates that the Summary viewlet will
display a summary based on selections in the Status
Table. For more information about context sharing,
see “Context sharing for viewlets” on page 2-21.
NotificationsApp6.html
Notification Log
• com.smarts.propertiesFile includes the parameters
specified in the dashboard.properties file. For more
information regarding a properties file, see “Using a
properties file to specify viewlet parameters” on
page 2-20.
• com.smarts.context.collectionEntity has a a value of
true. This indicates that the Notification Log viewlet
will display notifications for elements selected in the
Status Table. For more information about context
sharing, see “Context sharing for viewlets” on
page 2-21.
SummaryAppAll.html
Summary Log
• com.smarts.propertiesFile includes the parameters
specified in the dashboard.properties file. For more
information regarding a properties file, see “Using a
properties file to specify viewlet parameters” on
page 2-20.
EMC Smarts Service Assurance Manager Dashboard Configuration Guide
Examples of Dashboard viewlets
Example of URL-addressable viewlet
A URL-addressable viewlet is a viewlet that is displayed when a Web client loads a
particular URL. This enables you to dynamically generate a URL that displays a the
Map, Notification Properties, or Containment viewlets.
The base URL for displaying a viewlet is:
http://<tomcat_host>:<port>/templates/context.html
This sample uses context.html as the base URL to load the JAR files necessary to
display one of these three viewlets. At a minimum you must specify the type of
viewlet to display. (Opening this page without specifying a viewlet displays a blank
page.) Parameters and separators you can add to the base URL are shown in
“Additional viewlet properties” on page 2-21. For more information on the syntax of
URL-addressable viewlets, see “URL-addressable viewlets” on page 2-28.
The following URL is an example of a URL-addressable viewlet that loads a Map
viewlet with a specific element class and instance as the focus. It does not specify a
map type.
▼http://<tomcat_host>:8080/templates/context.html?
class=com.smarts.webapps.SmWebMapApp&
com.smarts.propertiesFile=dashboard.properties&
com.smarts.launch.class=Router&
com.smarts.launch.instance=lab-gw.example.com ▲
Note: As with all examples in the section, this URL has been formatted to make it readable. The
symbols ▼ and ▲ indicate the URL should appear on one line.
The following URL, which is similar to the preceding, provides an example of a
URL-addressable viewlet that loads a Map viewlet with a specific element class and
instance as the focus, and specifies a map type.
▼http://<tomcat host>:8080/templates/context.html?
class=com.smarts.webapps.SmWebMapApp&
com.smarts.launch.mapType=IP&
com.smarts.launch.class=Host&
com.smarts.launch.instance=qa-fancy ▲
The following URL provides an example of a URL-addressable viewlet that loads a
Notification Properties viewlet. In the example, the class (optional) is
ICS_Notification, and the instance is the name of the notification.
▼http://<tomcat host>:8080/templates/context.html?
class=com.smarts.webapps.SmWebNotificationPropertiesApp&
com.smarts.launch.class=ICS_Notification&
com.smarts.launch.instance=NOTIFICATION-Router_qa-mplspe4.example.com
_Unresponsive ▲
The following URL provides an example of a URL-addressable viewlet that loads a
Containment viewlet. The parameters for the Containment viewlet are the same as
for a map: the class of the element and the instance name of the element.
▼http://<tomcat host>:8080/templates/context.html?
class=com.smarts.webapps.SmWebContainmentApp&
com.smarts.launch.class=Router&
com.smarts.launch.instance=qa-mplspe4.example.com ▲
About the sample viewlets
3-9
Examples of Dashboard viewlets
3-10
EMC Smarts Service Assurance Manager Dashboard Configuration Guide
Index
A
D
Applications Map viewlet 2-26
Automatic attach, viewlets 2-22
Dashboard Viewlets
JAR files 2-5
dashboard.properties
com.smarts.propertiesFile 2-20
dmctl utility 2-29
B
Business Services Map viewlet 2-26
E
C
Client tools 2-26
Collection entities
Context sharing 2-22
com.smarts.autoAttachDM 2-23
com.smarts.context.collectionEntity 2-22
com.smarts.context.instance 2-21
com.smarts.context.notification 2-21
com.smarts.context.summary 2-22
com.smarts.launch.class 2-26
com.smarts.launch.globalMgr 2-22
com.smarts.launch.instance 2-26
com.smarts.launch.mapType 2-26
com.smarts.map.passive 2-26
com.smarts.propertiesFile 2-20
com.smarts.savedView 2-21, 2-27
com.smarts.viewletProperties 2-20
com.smarts.webapps.SmWebContainmentApp 2-19
com.smarts.webapps.SmWebGridApp 2-19
com.smarts.webapps.SmWebMapApp 2-19
com.smarts.webapps.SmWebNotificationPropertiesApp
2-19
com.smarts.webapps.SmWebNotificationsApp 2-19
com.smarts.webapps.SmWebSummaryApp 2-19
Containment viewlet 2-15
com.smarts.webapps.SmWebContainmentApp 2-19
Context sharing 2-22
Context sharing
Collection entities 2-22
Containment viewlet 2-22
Instance 2-21
Notification Properties viewlet 2-22
Notifications 2-21
Summary View viewlet 2-22
EMC Smarts Business Dashboard
Definition 1-4
Integration with Service Assurance 1-3
Encrypted Connections 2-10
F
Firewall 2-9
G
Global Console
Saving maps 2-17
Saving view as viewlet 2-15
Global Manager 1-4, 2-22
H
HTML code
Viewlet 2-19
I
Instance context sharing 2-21
IP Connectivity map viewlet 2-26
J
JAR files
jcommon-0.7.0.jar 2-5
jfreechart-0.9.3.jar 2-5
masterpiece.jar 2-5
tsgdtj50.jar 2-5
tsgetj50.jar 2-5
tsglt50.jar 2-5
tsgltc50.jar 2-5
tsgmtj50.jar 2-5
EMC Smarts Service Assurance Manager Dashboard Configuration Guide
i-1
Index
jcommon-0.7.0.jar 2-5
jfreechart-0.9.3.jar 2-5
JRE requirements 1-5
M
Map
com.smarts.webapps.SmWebMapApp 2-19
Layout servlet 2-3
Saving 2-17
Viewlet 2-16
Map viewlet
Applications 2-26
Business Services Map 2-26
IP Connectivity 2-26
Membership 2-26
Physical Connectivity 2-26
VLAN Connectivity 2-26
masterpiece.jar 2-5
Membership map viewlet 2-26
T
N
Naming convention for saved viewlets 2-16
Notification Log viewlet 2-15
com.smarts.webapps.SmWebNotificationsApp 2-19
Notification Properties viewlet 2-15
com.smarts.webapps.SmWebNotificationPropertiesA
pp 2-19
Context sharing 2-22
Notifications
Context sharing 2-21
P
Parameter
com.smarts.autoAttachDM 2-23
com.smarts.context.collectionEntity 2-22
com.smarts.context.instance 2-21
com.smarts.context.notification 2-21
com.smarts.context.summary 2-22
com.smarts.launch.class 2-26
com.smarts.launch.globalMgr 2-22
com.smarts.launch.instance 2-26
com.smarts.launch.mapType 2-26
com.smarts.map.passive 2-26
com.smarts.propertiesFile 2-20
com.smarts.savedView 2-21, 2-27
com.smarts.viewletProperties 2-20
Password,scramble in viewlet 2-22
Physical Connectivity map viewlet 2-26
Properties file
com.smarts.propertiesFile 2-20
com.smarts.viewletProperties 2-20
dashboard.properties 2-6
viewlet.properties 2-6
Proxy server 2-9
S
Saving map 2-17
Server, proxy 2-9
i-2
Service
see SMARTS Servlet Engine
Service Assurance
Global Manager 1-4
Servlet
Engine 1-4
Map layout 2-3
sm_service 2-4
sm_tomcat 2-3
SMARTS Servlet Engine
Service 1-5, 2-3
sm_tomcat 2-3
Starting and stopping 2-4
Status Table viewlet 2-15
com.smarts.webapps.SmWebGridApp 2-19
Summary View viewlet 2-15
com.smarts.webapps.SmWebSummaryApp 2-19
Context sharing 2-22
Syntax of viewlet properties 2-19
Tomcat Servlet Engine 1-4
Configuration 2-3
Installation 2-3
TCP port 2-4
Tools, client 2-26
tsgdtj50.jar 2-5
tsgetj50.jar 2-5
tsglt50.jar 2-5
tsgltc50.jar 2-5
tsgmtj50.jar 2-5
U
URL-addressable viewlet 3-9
User profile 2-14
V
View
Saving as viewlet 2-15
Viewlet
com.smarts.savedView 2-21, 2-27
com.smarts.webapps.SmWebContainmentApp 2-19
com.smarts.webapps.SmWebGridApp 2-19
com.smarts.webapps.SmWebMapApp 2-19
com.smarts.webapps.SmWebNotificationPropertiesA
pp 2-19
com.smarts.webapps.SmWebNotificationsApp 2-19
com.smarts.webapps.SmWebSummaryApp 2-19
Containment 2-15
HTML code 2-19
JAR files 2-19
Maps 2-16
Naming convention 2-16
Notification Log 2-15
Notification Properties 2-15
Properties file 2-20
Samples 3-2
Saved to user 2-14
Saved to user profile 2-14
EMC Smarts Service Assurance Manager Dashboard Configuration Guide
Index
Status Table 2-15
Summary View 2-15
URL addressable 3-9
Viewlet properties
Syntax 2-19
viewlet.properties 2-6
com.smarts.viewletProperties 2-20
Viewlets
Automatic attach 2-22
Viewlets, automatic attach 2-22
VLAN Connectivity Map viewlet 2-26
W
WEB-INF 2-6
EMC Smarts Service Assurance Manager Dashboard Configuration Guide
i-3
Index
i-4
EMC Smarts Service Assurance Manager Dashboard Configuration Guide


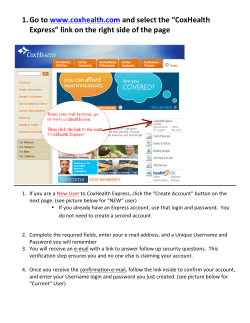


© Copyright 2026