
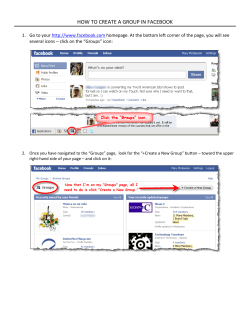
Facebook Facebook is a social networking site that may be used by individuals or businesses and organizations. Before you can use Facebook, you first must sign up, so let's see how to create an account. Start by navigating to www.facebook.com in your web browser. 1. How to create an account on Facebook Enter your first and last name... Then enter your email address. Type the password you want to use to log in. Choose your gender. Select your birthday... Then click Sign Up. Type the text from the captcha in this box, then click Sign Up. This page lets you search for your friends that are already on Facebook. Here you can fill out your profile information or click Skip. Uploading a profile photo will help your friends recognize you on Facebook. To complete the sign up process, you will need to go to the e-mail you used when you created the account. Click Go to your e-mail. Open the e-mail from Facebook... Then click the link to confirm your e-mail address. 2. How to edit your profile on Facebook You can edit your profile at any time to keep your information up to date. After you have logged in, click Update My Info. On the Basic Information page, you can edit your current and hometown cities, languages you speak, and more. In the About Me box, type up any information about yourself that you want to share with everyone... then click Save Changes. Now let's click the Profile Picture link. This is where you can upload a new profile image. Now go to Friends and Family. Here you can update your relationship status and add your family members if they have an account on Facebook. Go to Education and Work. This is where you enter your current and past employers and your high school and college information. Go to Philosophy. It's optional, but you can enter your political and religious views here. Go to Arts and Entertainment. Enter any music, books, movies, television or games you like, then click Save Changes. Go to Sports. If you enjoy sports, you can enter any you play and your favourite teams and athletes. Go to Activities and Interests. On this page, type any activities, hobbies or interests you may have in these boxes. Finally, go to Contact Information. Here, be sure to only enter the information you want to share. When finished, click Save Changes. Click View My Profile. 3. How to edit your account settings on Facebook Your account settings in Facebook include your real name, username, e-mail address, password, security question and much more. After you have logged in, go to Account... then click Account Settings. To make setting you must select one of the item and will appear in the right side what we can change. Then, click Edit next to the item you want to edit. General Account Settings You can change: Name Username Email Password Networks Language When editing your real name, you can choose how your name should appear or enter alternate names such as nicknames or your maiden name. When finished entering your name, click Save Changes. Take care when editing your real name as name changes are limited. Using anything but your real name can cause you to be blocked from making more changes in the future. Click Confirm Change. To join a high school or college network, you must be a current student and have a school e-mail address. To join a work network, you must have a work e-mail address from a supported company. Security Settings Set Login notification whether you want to receive notifications via e-mail or SMS for each action on Facebook. Privacy settings The privacy settings on Facebook let you limit the access to your content, like photos and posts. For example, if you didn't want everyone to be able to view your photos, you could limit access to your friends only. Choose who can search for you, send you messages, and more. Blocking The Block Lists link allows you to block people and apps. If, for any reason, you need to block a user, enter his name or e-mail address on this screen. If you continue to receive invites for apps from your friends, you can block the invites by entering the name of a friend. How to change your profile picture on Facebook Uploading a profile picture will help your friends find and recognize you on Facebook. Go the your name link in the upper right. Click Add Profile Picture and Upload Photo. Find your photo on your computer and click Open. After the photo has been uploaded, you can edit the thumbnail image. Click Photo and Upload Photo/Video . Drag the image to adjust the preview, then click Save. Return to your profile. We can see our profile picture has been changed to the new one. 4. How to find, confirm and invite friends on Facebook To get the most out of Facebook, you will want to connect with your friends and family. One of the easiest ways to find Friends is to allow Facebook to access and import contacts from your email and various other social accounts. Facebook uses this information to connect you with Friends from real life, making suggestions based on your contact list. If you are uncomfortable giving Facebook access to your accounts and contact lists, you can search for Friends individually or through networks, like location, employer, or school. Facebook allows you to search for people you know and add them to your friends list. Click Find Friends to see more options to manage your friends. At the top of the page, you can view friend requests. Click Confirm to confirm your friend and add them to your list. Now let's see how to import contacts from your e-mail. Click Find Friends next to the e-mail service you want to import. Type your full e-mail address, then enter your password if prompted, and click Find Friends. Now, enter your ID or username and password to authorize Facebook to connect to your e-mail. By clicking Agree, you are authorizing Facebook to access your e-mail contacts and profiles. Select the friends you want to sent friend requests to and click Add Friends.These contacts don't have accounts on Facebook, so you can choose to invite them via e-mail. Make sure they're selected, then click Send Invites. If you don't want to search for friends by connecting to your e-mail through Facebook, you can search for names. Type your friend's name into this search box. Results will appear as you type. Click See more results to view more results if your friend doesn't show up. As you can see, there are many results for this name. In cases like this, you can search for your friend's e-mail address, if you know it. Enter the e-mail address, then click Search. Click Add Friend to send a request. Then click Send Request. This person will now receive a friend request. You will not be able to access any of their content marked as Friends Only until your friend has confirmed the request. How to fiind new groups Type keywords into the search box on the left side. It's the same search box used for finding friends. If you press Groups at the top after you hit the search button, it will only show groups. 5. How to remove friends you've added Click Manage Friend List. If you don't see the friend you want to remove, select Recently Interacted, then All Friends. Click the X next to the name of a person you want to remove. Confirm you want to remove this friend. 6. How to navigate your freinds' pages on Facebook First, go to Friends, then click Manage Friend List. In the drop-down box, select All Friends. Click the friend you wish to manage. You will be taken to your friend's wall where you can see some of their latest posts and other activity. To post on their wall, click in the Write something... box and type your message. When finished, click Post. You can share photos, links and videos using this same method. Now let's view info about this person. On this page, we can view any information this person has decided to share, which may include employers and work experience, education, entertainment interests and more. Click Photos. This page shows all the albums this user has created and the photos he has uploaded. Click an album to view the photos. Click on any photo to view a larger version. At the bottom, you can view comments, if any, or leave your own comment. 7. Sharing and Your Timeline There are many things that you can share with your Facebook Friends: personal updates, photos, links, and more. The things you share will appear on yourTimeline and on your Friends' News Feeds. Sharing with the Facebook Publisher The Facebook Publisher is a tool you can use to share with your Friends. You can access your Publisher in two places: On the Timeline section of your Profile page At the top of the News Feed on your Home Page One of the most common things people share are status updates—short, textbased posts that your Friends can read and comment on. Your Friends will be able to see your status updates and other important shares on theirNews Feeds. The things you share will also be posted to the Timeline on your Profile page. To Post a Status Update: 1. Locate the Publisher on your Timeline or News Feed, then type your update. 2. Locate the Publisher on your Timeline or News Feed, then type your update. 3. Click the Audience Selector, then select the post's privacy level from the dropdown menu. Remember that this will also change the default privacy settings for all future posts. 4. Click Post. The post will be published to your Timeline and your Friends' News Feeds. Sharing on a Friend's Timeline To share something on a Friend's Timeline, simply use the Publisher located on that Friend's Profile page. Note that you cannot control privacy settings for the posts you create on your Friends' Timelines. For this reason, you should think carefully before posting anything that might be considered inappropriate or embarrassing. If you don't want other people to see your post, just send it as a message. To share something on a Friend's Timeline, navigate to the desired Profile page, type your message in thePublisher, then click Post. More Types of Sharing The status update is only one example of something you can share. You can also: Post a photo or video Share a link by typing or pasting the link into the Publisher Tag a Friend, which shares the post to that Friend's Timeline, as well Add your location The Timeline Your Timeline is the part of your Profile where you and your friends can post messages, photos, links, and more. It's also a place where Facebook shares brief updates about your recent activity on the site, such as the Friends you've added, the photo you've uploaded, the things you've Liked, and much more. The Timeline was previously known as the Wall. The biggest difference between the Wall and Timeline is that your Timeline makes it easy to look at all of your past posts. With Timeline, you can easily view your Facebook activity from any year since you joined Facebook. Click the buttons in the interactive below to learn more about sharing on your Timeline. Posting Past Events to Your Timeline Your Timeline isn't just for recent activity and posts. You can also post past events and milestones, like a new job or an important achievement. Facebook calls these Life Events. Some Life Events are automatically posted to your Timeline when you change your Profile information. For instance, if you change your relationship status to "Married," Facebook would add the Life Event "got married" to your Timeline. You can add past events to any point in your Timeline. This lets you use Facebook like an online scrapbook or autobiography. Keep in mind that Life Events are completely optional—you don't have to post any of your personal history to your Timeline if you're uncomfortable sharing this much information online. To Add a Past Event to Your Timeline: The Facebook Publisher on your Timeline includes two options for posting to a past point in time: When you post a status update, photo, or video, click the clock icon and select a date in the past. Click Life Event, then select the desired type of event and enter additional details. 8. Uploading Pictures and Videos Facebook is a great tool for sharing pictures and videos with your Friends. Sharing pictures is quick and easy, and there's no limit to the number of photo albums or videos you can upload. In this lesson, you will learn how to upload and share photos and videos on Facebook. We'll also talk about how to set privacy levels for the photos you upload and how to delete photos and videos. Tips for Sharing Photos and Videos Before you start sharing photos and videos, keep these things in mind: Only upload photos and videos you havepermission to upload. For example, don't upload YouTube videos or copyrighted photos. Instead, sharelinks to those things on your Timeline. Think carefully about the photos and videos you upload. Before sharing images of your Friends, think about whether the material is inappropriate, embarrassing, or overly personal. If you think your Friends would be uncomfortable or upset with other people seeing a photo or video, don’t post it on Facebook. Use the audience selector to limit the people who can view your photos. While your Friends might be excited to see pictures from a recent party, you might not want your boss to see them. Sharing Photos on Facebook If you want to share a lot of photos on Facebook, it's easy to upload them from your computer to an album. Each photo album can contain up to 1000 pictures and there's no limit to the number of albums you can create. To Create a New Photo Album: 1. From the Facebook Home page, locate and select Photos in the Navigation pane. 2. The Photos page will appear. Locate and select the Add Photos button. 3. A dialog box will appear. Locate and select the desired photos on your computer, then click Open. 4. As your photos are uploaded, you'll be able to enter information about your album, including the album titleand description, along with photo descriptions. You'll also be able to set your privacy level for the album with the audience selector. 5. You'll also be able to add tags to photos of yourself and your Friends. 6. Before posting your photos, double-check the audience selector to make sure you're sharing your photos only with the people you want to see them—we recommend selecting Friends or Custom for a higher level of privacy. Click Post Photos. 7. The album will be created and posted to your Timeline. To Edit an Album: Once you've created an album, it's easy to edit and modify its details. To edit an album, navigate to the Photos page and then select the desired album. The selected album will appear. From here, you can: Reorder pictures by clicking and dragging to the desired location Highlight photos to emphasize your favorite pictures in an album Add descriptions to your photos Comment on the photos and read your Friends' comments haring Videos You can also use Facebook to upload and share videos. If you have a video saved on your computer, you can upload it just as you would a photo. Remember, only upload your own personal videos to Facebook. You should never upload copyrighted videos that belong to someone else. Like photos, it's also easy to share videos using the Publisher or your mobile device. To upload a video, navigate to the Photos page and then select Add video. Follow the procedure above to post the video to your Timeline. If you ever decide that you'd like to remove any of your photos or videos from Facebook, you can always delete them. You can delete an entire album or delete photos and videos individually. To Delete an Album: 1. From the Facebook Home page, locate and select Photos in the Navigation pane. 2. The Photos page will appear. Locate and select the desired album. 3. Click the Advanced Settings Gear and then choose Delete Album from the drop-down menu. The album will be deleted. To Delete a Photo: 1. From the Facebook Home page, locate and select Photos in the Navigation pane. 2. Locate and select the album with the desired photo(s). 3. Hover the mouse over each photo you wish to delete, click the Edit Pencil and then select Delete This Photo from the drop-down menu. The photo will be deleted. To Delete a Video: 1. From the Facebook Home the Navigation pane. page, locate and select Photos in 2. Locate and select the Videos album. 3. Select the desired video. 4. Click Delete Video in the bottom-right corner of the screen. The video will be deleted. 9. How to Create a New Group 1. From the Facebook Home page, locate and select Create Group... in the Navigation pane. 2. The Create Group dialog box will appear. Enter a name for your Group in the Group Name box. 3. Add Group members by typing the names of the people you wish to include in the Group Members box. You can only add people who are already your Facebook Friends. 4. Choose the privacy settings for your Group, then click Create. There are three privacy options: o Open: Anyone can view the Group, its members, and their posts. o Closed: Anyone can view the Group and its members, but only members can see Group posts. o Secret: Only members can see the Group or any of its information. People who are not members won't even be able to see that the Group exists. Finally, you'll be asked to choose an icon for the Group, which will appear in the Navigation pane. Choose an icon and then click Okay, or you can choose to skip this step.


© Copyright 2026