
Editing your movie on YouTube Editor Adding scenes to your movie
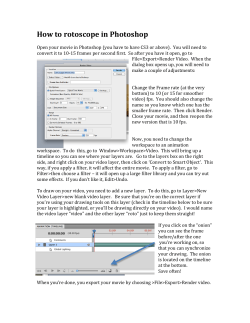
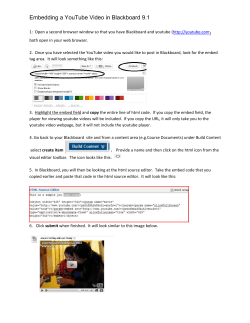
Editing your movie on YouTube Editor
1. In your team’s Gmail account, click on the Apps button.
2. Click on YouTube.
3. On the top right side of the page, click on Upload.
4. On the bottom right side of the page, click on the pair of
scissors for Video Editor.
5. Familiarize yourself with the YouTube Editor interface.
Type your movie’s
title here.
Customization panel
The movie timeline. Order
and edit your scenes here.
Your scenes and takes.
Adding scenes to your movie
All of your uploads are added automatically to the Video Editor and can be used
as a scene in your movie.
1. In the video panel, find the scene you want to add to your
movie.
2. Drag the scene to the timeline at the bottom of the editor,
where it says “Drag videos here” to begin editing.
3. Once you’ve added your take to the timeline, this screen will
replace the video panel.
Click here to return
to the video panel.
Auto-fix: Performs a
one click-fix to
enhance the video's
lighting and color.
Pan & Zoom – Steadies
the shot and focuses
on the subject(s) in
the scene.
Stabilize Video Adjusts the video
to correct any
shakiness
4. Drag the best takes from each scene to the timeline. Make
sure your takes are in the correct order. Click and drag the
takes to your desired spot on the timeline.
5. To watch individual clips, click on the specific clip you
want to watch. To watch the whole timeline, click on the video
camera button.
6. Remember, there is no undo button. To undo a change, click
the x in the top right corner of the scene. Your video will save
your edits automatically. There is no save button.
Trimming clips in YouTube Editor
The YouTube editor lets you easily trim your video clips, so you
can cut off frames at the beginning and end.
Cut the length of your clip by moving your cursor over the edges
of your video in the timeline. Drag the handles towards the
center of the video to shorten.
Lengthening clips in YouTube Editor
Drag the handles outwards from the center of the video to
lengthen. Lengthening past the original length of the video will
result in the video repeating.
Cutting clips in YouTube Editor
Clips can be cut into portions. Click the video camera button to
play the entire timeline. Notice the scissors icon along the
blue time marker line. Click on the scissors button to cut the
scene where you would like.
Adding Transitions in YouTube Editor
You can add a transition to smooth out the shift between two
video clips.
1. In the YouTube editor, click on the Transitions icon.
2. To add a transition to your movie, drag it into the timeline.
3. The default transition length is 2 seconds. You can shorten
or lengthen this time by dragging the blue bars of your
transition inward or outward.
Adding Titles and Credits in YouTube Editor
Add title cards to your movie to display the title of your
movie, to explain the steps of solving your movie’s issue, and
for cast credits at the end of your movie.
1. In YouTube editor, click on the Text icon.
2. To add a title card to your movie, drag it into the timeline.
(Centered title is best to use for credits. Make your credits
the last slide.)
3. Once you add your title card to the timeline, the editing
panel will appear. Type your text in the Text box. You can also
edit the font style, size, color, and background color of the
card.
4. The default title card length is 4 seconds. You can shorten
or lengthen this time by dragging the blue bars of your
transition inward or outward.
This is an example of what a title card looks like. Add the
title of your movie, the cast names and roles, and any internet
links you used in your research.
Adding Creative Commons videos to your movie
You can add these clips as transitions to your movie. YouTube
allows you to use these clips without asking permission.


© Copyright 2026