
Please follow these steps prior to attending so that I... accordingly: HOW TO USE MICROSOFT OUTLOOK WEB ACCESS E-MAIL
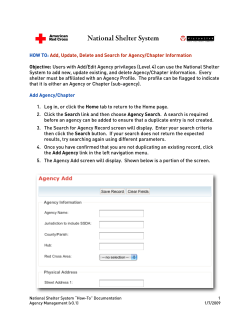
HOW TO USE MICROSOFT OUTLOOK WEB ACCESS E-MAIL Please follow these steps prior to attending so that I can address your questions and concerns accordingly: Go to http://www.gboe.org (save to your favorites) Click on “Staff E-Mail” User Name “gboe\first initial last name no spaces all lowercase” For example: gboe\rlasalle Type in your Password Click on “Ok” Click on the first e-mail title in your “Inbox” If you wish to delete it, click on the “X” at the top toolbar while the e-mail is selected blue Scroll through e-mails using your arrow keys to review them, delete as needed Viewing Your E-mail Messages: Your Inbox displays the e-mail messages sent to your account. All messages, both read and unread, are listed in chronological order in the middle of your screen, in the “Preview Pane.” Unread messages show the sender's name in bold type. Once you have read the e-mail message, you have several options: To reply to the sender of the e-mail message: 1. Click the “Reply” button 2. Type your reply in the message box. 3. Click the Send button To reply to the sender and all recipients of the e-mail message: 1. Click the “Reply to all” button 2. Type your reply in the message box. 3. Click the Send button To forward the e-mail message: 1. Click the “Forward” button 2. In the “To” box type the e-mail address of the recipient of the forwarded e-mail message. Separate multiple e-mail addresses with a semicolon (;). 3. If necessary, type an additional message in the message field. 4. Click the Send button To delete the e-mail message: Click the “Delete” button To print the e-mail message: Double-click the message to open it in a separate window, and then click on the Printer button located on the button bar at the top of the window. HOW TO MICROSOFT OUTLOOK WEB ACCESS Changing Pages: The Inbox view displays only one page (25 messages at a time in your Inbox.) To view additional messages, you must switch to another page. The box shown below, located in the upper-right corner of your Inbox, lists the total number of messages in your Inbox, and indicates which range of items is currently displayed. The simplest way to display another page of messages is to use the arrow buttons located in the upper-right corner of your Inbox. Creating and Sending E-mail: 1. To create a new e-mail message, click the “New” message button . 2. The New Message box will appear: In the “To” box type the e-mail address(es) of the recipient(s) of your message. 3. Separate multiple e-mail addresses with a semicolon (;). 4. In the “Subject” box type a brief subject to provide a summary of your message. Type your message in the message field. (place cursor in big white square, start typing) 5. To send your e-mail message, click the “Send” button. 6. The New Message box will disappear TO: SUBJECT: TYPE YOUR E-MAIL MESSAGE HERE HOW TO MICROSOFT OUTLOOK WEB ACCESS Sending and e-mail with Attachments: To send an e-mail message with an attachment (such as a Word document, Excel spreadsheet, image file, etc.), follow the instructions under Creating and Sending E-mail. Before you send your e-mail message, do the following: 1. Click on the “Attachments” button. 2. Under Choose a file to attach, click the “Browse” button. 3. Click on the down-arrow of the Look in box and choose the appropriate drive. 4. Locate the file you wish to attach to your message, click on the name of the file, then click “Open.” 5. Click the “Attach” button. The name of the attached file now appears in the box under Current file attachments. To add another attachment, repeat steps 2 through 5. To remove an attachment, check the box in front the name of the file to be removed, and then click “Remove.” 6. Click the “Close” button to return to the New Message box. 7. To send your e-mail message, click the “Send” button. Deleting E-mail Messages: There are two ways to delete messages: 1. To delete a selected message, either click the Delete button or press the Delete key on your keyboard. To delete entire Inbox: 1. Go to “Options” on the bottom left hand side. 2. Change your “Messaging Options” to display 100 e-mails from 25. 3. Click “Save and Close” located at the top. 4. To delete multiple messages from your “Inbox”, hold down the “Shift” key on your keyboard then click the last e-mail in that “page.” (Scroll to bottom while holding shift.) 5. Then click the Delete button or press the Delete key on your keyboard. (still holding Shift) 6. Repeat steps 1-5 on all of the pages in your in box. NOTE: Deleted messages are not removed permanently until they are deleted from the “Deleted Items folder.” To delete all e-mail messages from the Deleted Items folder: Do one of two things: Open the Deleted Items folder by clicking on the link on the left side of your screen, and then click the Empty Deleted Items button. Use your mouse to right-click on the link and then choose Empty Deleted Items. Tips for E-mail Users: • Check your e-mail on a regular basis. (daily) • Delete unwanted e-mail and empty your Deleted Items folder on a regular basis. (daily) • Never open an e-mail attachment from an unknown sender; it could contain a virus. • Do not forward Spam, virus hoaxes, urban legends, "chain letters," etc. • Always include a meaningful subject line. • Use UPPER CASE type only as emphasis – otherwise it can be interpreted as “yelling.” • Do not overuse the “Reply to all” option. HOW TO MICROSOFT OUTLOOK WEB ACCESS • Read it over before you press the send button. Create a new contact 1. In Contacts, on the toolbar, click New. 2. In the new contact window, on the General tab, type the information you want to include for the contact. Tip Use the drop-down lists to record multiple entries in some boxes. For example, the drop-down list next to the E-mail icon allows you to store up to three different e-mail addresses for a contact (E-mail, E-mail 2, and E-mail 3). You can also store multiple addresses and phone numbers. 3. If you have multiple addresses stored for a contact, you can designate one as the contact's mailing address. Select the address in the list, and then select the Mailing address check box. 4. On the Details tab, you can fill in additional information about a contact. 5. Click Save and Close, and then refresh your browser window to see the new contact. Note Use the File As list on the General tab to determine how the contact will appear in Contacts. You can display each person by first and last name, by last name first, or by company name. Open a contact: To view all the information you have stored for a contact, you'll need to open the contact. In Contacts, double-click the contact you want to open. Create a distribution list If you regularly send e-mail messages to a group of people, you can create a distribution list to simplify addressing messages and meeting requests. After a distribution list is created, you can send a message or meeting request to multiple recipients at the same time. Distribution lists can include anyone with a valid e-mail address. 1. On the main toolbar, click the arrow next to New, and then click Distribution List. 2. In the new distribution list window, in the List Name text box, type the name of your new distribution list. 3. To add a member of your organization to your distribution list, click Find Names. Use the Find Names dialog box to locate the person in your organization's global address list or your contacts, and then click Add recipient to...Distribution List. Repeat this step for each person you want to add. Note You can also type the e-mail addresses or aliases for the people you want to add in the Add to Distribution List text box. 4. To add a personal contact or person outside of your organization to your distribution list, type the contact's name or the person's e-mail address in the Add to Distribution List text box, and then click Add. Repeat this step for each person you want to add. HOW TO MICROSOFT OUTLOOK WEB ACCESS Tip To delete the distribution list from your address book in the new distribution list window, click Delete on the toolbar. To send a message to all the members of the distribution list, click Send mail to list Delete a message To delete a message or multiple messages from a folder in the main Outlook Web Access window, select the messages and then click Delete on the main toolbar. Tip To select consecutive messages, click the first and last messages in the series while holding down the SHIFT key. To select non-consecutive messages, hold down the CTRL key as you click each message you want to delete. To delete an opened message, click Delete on the toolbar. Note All deleted messages are sent to the Deleted Items folder. They aren't permanently removed until you delete them from the Deleted Items folder. HOW TO MICROSOFT OUTLOOK WEB ACCESS


© Copyright 2026