
DOC-029: How to set up InfoSys#
DOC-029: How to set up InfoSys#
Kantar Media Spain
07/03/2013
INDEX
1
ABSTRACT ............................................................................................................................................. 5
1.1
PACKAGE CONTENTS ................................................................................................................... 5
1.2
SYSTEM REQUIREMENTS ............................................................................................................ 5
1.2.1
For hosting the application ..................................................................................................... 5
1.2.2
For generating the data .......................................................................................................... 5
2
WHAT IS INFOSYS#?.............................................................................................................................. 6
3
DATA GENERATION .............................................................................................................................. 7
4
3.1
CREATE A NEW INFOSYS+ USER .................................................................................................. 7
3.2
CREATE THE TEMPLATES ............................................................................................................. 7
3.3
EXPORTS AND BATCH ................................................................................................................ 13
INSTALLATION .................................................................................................................................... 14
4.1
WEB INTERFACE ........................................................................................................................ 14
4.2
SERVER ...................................................................................................................................... 15
4.3
BINDINGS .................................................................................................................................. 16
4.3.1
Server .................................................................................................................................... 16
4.3.2
Web Interface ....................................................................................................................... 16
5
AUTOMATIC PROCESS ........................................................................................................................ 18
6
OUTPUT EXPORTS REGENERATION .................................................................................................... 20
7
6.1
CREATE A PARALLEL UNOFFICIAL INFOSYS+ INSTALLATION ..................................................... 20
6.2
ALTER THE TEMPLATES ............................................................................................................. 20
6.3
ALTER THE DATERANGECFG.XML.............................................................................................. 20
6.4
DATE EVALUATION FEATURE .................................................................................................... 22
CUSTOMIZATION ................................................................................................................................ 23
7.1
CUSTOMIZING THE INTERFACE ................................................................................................. 23
7.1.1
Literals .................................................................................................................................. 23
7.1.2
Images .................................................................................................................................. 23
7.2
CUSTOMIZING THE TEMPLATES ................................................................................................ 24
8
7.3
CUSTOMIZING THE UNITS DECIMALS ....................................................................................... 24
7.4
EXAMPLE ................................................................................................................................... 25
MANAGING I# ..................................................................................................................................... 27
8.1
8.1.1
User Groups and Templates ................................................................................................. 27
8.1.2
Users ..................................................................................................................................... 28
8.2
9
MANAGE USERS ........................................................................................................................ 27
MANAGE ACCESS ...................................................................................................................... 28
NEW FEATURES WITHIN IWS_CONFIG.XML ....................................................................................... 29
9.1
Ranking (from v1.3.0.529_20130529)....................................................................................... 29
9.2
Duration (from v1.3.0.529_20130326) ..................................................................................... 29
9.3
Simple vs Complete Audience Curves (from v1.3.0.620_20130531) ........................................ 29
9.4
History unit (from v1.4.0.207)................................................................................................... 30
9.5
Persistent Connections (from v1.4.0.108) ................................................................................ 30
10 MONITORING I#.................................................................................................................................. 31
10.1
WEB SERVER.............................................................................................................................. 31
10.2
DATA SERVER ............................................................................................................................ 31
10.2.1
Alive.log ............................................................................................................................ 31
10.2.2
Activity.log ........................................................................................................................ 32
11 MOUNTING AN INFOSYS# TEST ENVIRONMENT ................................................................................ 33
12 TROUBLESHOOTING ........................................................................................................................... 34
12.1
INSTALLATION ........................................................................................................................... 34
12.1.1
Web Interface................................................................................................................... 34
12.1.2
iSharpServer ..................................................................................................................... 36
12.1.3
Bindings ............................................................................................................................ 37
12.2
CUSTOMIZATION ....................................................................................................................... 40
12.2.1
Interface customization ................................................................................................... 40
12.2.2
Templates customization ................................................................................................. 41
12.2.3
Units Decimals customization .......................................................................................... 41
12.3
DAILY USAGE ............................................................................................................................. 41
12.3.1
I# web page fails to load .................................................................................................. 41
12.3.2
Some templates fail to load ............................................................................................. 42
12.3.3
latencies between the request and the display of the output ......................................... 46
12.3.4
One last word ................................................................................................................... 47
13 HISTORY .............................................................................................................................................. 48
ANNEX A: HCB (HYPERCUBE) FORMAT ....................................................................................................... 49
A.1 INTRODUCTION ................................................................................................................................ 49
A.2 FORMAT ........................................................................................................................................... 49
A.3 EXAMPLE .......................................................................................................................................... 49
1
ABSTRACT
This guide aims to explain how to create a new installation of InfoSys# based on an existing version of
InfoSys+, as a step by step guide. It will also cover the most frequent issues and how to troubleshoot
them.
1.1
PACKAGE CONTENTS
The installer package you’ve received contains an InfoSys# folder containing the whole web interface
and within it, a server folder containing the engine of the application, isharpserver.exe.
You’ve also received a Tools folder and probably a Data folder too, containing the data produced by
InfoSys Support Team to create your demo version of i#.
The following documentation will describe their use and functions in details.
1.2
SYSTEM REQUIREMENTS
1.2.1 FOR HOSTING THE APPLICATION
Windows Server with IIS installed and .NET Framework 4.0 (coming with InfoSys+ installer and
client).
1.2.2 FOR GENERATING THE DATA
InfoSys+ v1.9 or higher with PDF Creator installed (coming with InfoSys+ installer and client).
OR
Any application able to generate data in hcb and pdf format compatible with iSharp. Please
contact InfoSys Support Team if you’re interested in using iSharp without InfoSys+ as data
source.
2
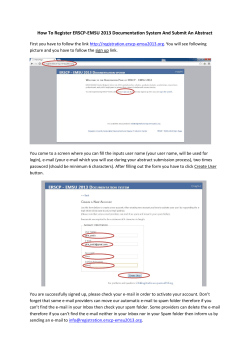
WHAT IS INFOSYS#?
InfoSys# is a web application that allows you to view and interact with several precalculated generic
templates from any device connected to internet. It is composed of two main parts: a web server that
attends to the requests that the user sends via the interactive interface, and a data server that provides
the web server with the requested templates, based on the hypercube data it’s fed from InfoSys+ XML
exports.
server side
Aggregated
XML data
daily batch
client side
WebService
3
DATA GENERATION
Before setting up InfoSys# itself, we advise to create a user dedicated to I# operations into your InfoSys+
configuration. This user will serve to create the templates that are used in I# and to run the automatic
batch that will generate the necessary exports.
3.1
CREATE A NEW INFOSYS+ USER
Open the InfoSys+ configuration that will provide the data for your InfoSys# web app, logging in as
sofres.
Create a new user (i.e.: isharp) with simple user privileges and check that Calculation option Export to
XML is set to Yes for the Country, Client and User groups restrictions defining this user, as shown below:
3.2
CREATE THE TEMPLATES
If you plan to use the provided templates, you can skip this section.
Please note, for an overview of the templates outputs in InfoSys#, please check their details in the
companion iSharp User Manual.pdf.
We’ll create all following templates with said user, strictly using the naming convention described
below. The units default to Rtg%, Rtg(000) and Share, unless specified otherwise. All templates must
only use Last Day as date ingredient unless specified otherwise.
The templates names follow this general structure: CAL(C).REG.ist, where CAL(C) are the first 3 (or 4)
letters of the type of calculation in the template and REG are the first 3 letters of the region prefix, all in
CAPs.
All templates with a name in CAL(C).* must be generated as one per region, using the prefix of the
region, i.e.: Summaries of Turkey and Istanbul are : SUM.TUR.ist and SUM.IST.ist, the ones in CAL(C).XXX
are generated only once, using the identifier of the main region, i.e.: UNIV.TUR.ist.
SUM.*: Summary = Periods report that contains all targets, channels, timebands and units:
ACC.*: Accumulated = Periods report that contains all channels and units. We strongly recommend
keeping only the main individuals target and the whole day timeband as this can become a costly
calculation. We choose 3 different dates in the Dates ingredient in this order: Last Day, Month to Date
and Year to Date:
MIN.*: Minute by minute = Periods report that contains all channels and units, but only the main target.
Only Total Day timeband is selected and is divided by minutes:
CUR.*: Curves = Audience curve report that contains all channels. Main units are present and we add
AvRch(000) too.
SCUR.*: Simple Curves = Same as CUR, but only the main channels are selected (chosen at your
discretion, but we recommend a maximum of 8 curves). SCUR is the first audience curve that opens in
i#, and clicking on the Simple/Detail button allows you to switch between SCUR and CUR display.
PRG.*: Programs = Programs report that contains all targets and channels. Main units are present and
we add AvRch(000) too. We activate the following mandatory attributes in the output: Title (or
Title/Description), Channel, Start Time and Duration. We also advise to filter Programs by Program type
if available in your configuration or by duration if not, to avoid overcrowding the output with too short,
irrelevant, events:
PRH.*: Programs History= same template as Programs report, but only with the main channel. Last day
is replaced by the last 28 days (the duration is at your discretion) and we strongly recommend a
duration filter of minimum 15 minutes. Attribute Date must be added to the output. This report allows
you to comparatively study the performance of a program over the repetitions during the selected
range (typically last 28 days).
SPT.*: Spots = Spots report that contains all targets and channels. Only GRP and Cont(000) units are
used. We activate the following mandatory attributes in the output: Campaign, Brand, Channel, Start
Time and Duration:
UNIV.XXX: Universe = Periods report that contains all targets and timebands. Only Main region, Total
TV channel and Universe and Sample units are selected:
CHN.XXX: Channels = Periods report that contains all targets, regions, channels, timebands and units:
3.3
EXPORTS AND BATCH
Once those templates have been created, we’ll need to have them exported, renamed, and moved to
the data folder that will keep all XML exports. You can keep this folder wherever you like, as long as the
host machine is always accessible from the iSharpServer.exe (see section 4.2) and the InfoSys+ host
during the batch process, and it needs quite a big storage space (depending on your I+ configuration,
the data for a single day can take from 1MB up to several hundreds of MB!!!)
All templates must be exported as XML, and will automatically be generated with the extension .hcb (as
they contain the hypercube information). The CUR.* templates are the unique exception as they must
be exported as PDF (depending on your bandwidth, we recommend using High compression).
Those exports will then need to be renamed one by one, by including in their name the date in
YYYYMMDD format. I.e.: Main Turkish summary export of 07/07/12 will have to be renamed:
SUM.TUR.20120707.hcb. The same rule applies for the PDF exports.
The hcb exports will then need to be moved to the data folder, where they’ll be stored in a subfolder
named as the date in use YYYYMMDD, within the month in use YYYYMM, within the year in use YYYY.
Following our previous example: \data_folder\2012\201207\20120707\SUM.TUR.20120707.hcb.
The pdf exports will instead be moved to the web server directly in a folder named Curves (this default
setting can be customized should you want the PDFs stored in another place, see 4.3.1).
I.e.:\\webserver\Curves\CUR.TUR.20120707.pdf
To automate this process, we’ll use an InfoSys+ batch to proceed to those exports every day and a MSDOS command line batch .bat to execute the rest of the necessary tasks (detailed in chapter 5).
So first of all, let’s create a batch in InfoSys+, called web.ibt, that will execute al the templates and
export them to .hcb or .pdf accordingly, like this:
After we made sure the batch is working correctly, we can close InfoSys+ as we won’t need it for the rest
of the steps.
4
4.1
INSTALLATION
WEB INTERFACE
Step 1: We need a web server at our disposition to make our web application. Any always on-line PC
can do the trick, as long as IIS service is running on it, along with IIS manager. If you don’t have IIS
service installed and don’t know how to do so, please check this page (http://www.iis.net/learn/install)
or ask your IT department.
Step 2: When IIS is installed on the web server, the first thing we’ll do is to create a folder in the
following path: \\webserver\inetpub\wwwroot\, which we’ll name as we want, let’s say iSharp for our
example. We’ll copy the whole content of the InfoSys# packet in this folder:
Step 3: Let’s now run IIS manager and create a new website by right-clicking in the left hand column on
Sites, and choose New web site…
The dialog pops up and you’ll need to fill it up with appropriate data (see screenshot on next page):
- For the site name, feel free to use whatever name you want.
- In physical path, you must point to the folder we created in step 2.
- You can modify the Bindings if it is purposeful to you, but we advise not to edit anything, except the
application Port. The selected port will be the TCP one that will be used by your users to connect to the
interface, so it must be opened for inbound and outbound traffic at all times in your firewall. If your
server will be entirely dedicated to I#, we recommend you to use the reserved http port 80.
- Finally, in the host name part, you’ll have to enter one of your registered domains’ name or the
network name of your server (if you don’t plan to access the application from outside your network or if
you use a redirection)
4.2
SERVER
The server folder that came within the InfoSys# packet can be installed wherever you want: though we
recommend keeping it in the web server structure, as provided in InfoSys# folder, it can be installed on
another machine. Just keep in mind that the hosting PC will have to be always online, accessible from
the web server and the machine that hosts the I+ in use during the batch process, and with
iSharpServer.exe running in foreground (it can be minimized, but not closed).
4.3
BINDINGS
Last but not least, we’ll finish the installation process by binding the different pieces that form InfoSys#:
the data server, the web interface and the storage folders: data, images and curves.
There are three files where you can configure different paths of the application, we’ll review which files
in both servers are here relevant.
You also can configure the TCP port used for internal communication between the web interface and i#
server (this port must be different than the one defined in section 4.1 to access the web server). By
default, we set it to 8080 as it is generally opened in all networks, but you may want to change it for
several reasons. The process to do so is explained below. Please make sure, in case you edit it, to allow
the new port in your firewall for inbound and outbound traffic.
4.3.1 SERVER
Only one file is important here: iws_config.xml, its first string defines the port used by I# for internal
communication with the web server. If you want to edit it, this is the first place where you have to
change the port number (its counterpart within the web server is the IWS.asmx as explained below).
The second important string in the iws_config.xml is the Data path definition: this is where you’ll specify
to I# the path to find the stored data (see data_folder in section 3.3). This folder may be in the web
server, data server or any other place you’ll find suitable.
At the end of the string, you can also specify where the Curves PDFs are stored (CUR and SCUR PDF
outputs).
<?xml version="1.0" encoding="utf-8" ?>
<Config>
<Server desc="Country" port="####"/>
...
<Data path="Data_Path\Of_Your\Convenience"… curves_url="/curves/" />
...
</Config>
Example from the Turkish configuration:
<?xml version="1.0" encoding="utf-8" ?>
<Config>
<Server desc="Turkey" port="8028"/>
...
<Data path="D:\iSharpData\Turkey"… />
...
</Config>
4.3.2 WEB INTERFACE
The first file we find in the web server is the config.js. It allows you to define 3 variables that are used in
the application:
var sRootImg = "Common_prefix/path_for/the_images";
var urlWebService = "URL/IWS.asmx";
var idLanguage = "####";
.sRootImg: this value will complete the one defined in the string img=”” within iws_config.xml images
section (see 7.1.2).
.urlWebService: the URL of the web application followed by /IWS.asmx
.idLanguage: the language used in the application, identified by its code from the iws_config.xml
Example from the Turkish configuration:
var sRootImg = "/Turkey";
var urlWebService = "http://iws2.kantarmedia.es/Turkey/IWS.asmx";
var idLanguage = "1033";
As mentioned in the iws_config.XML edit description, the second location where the port used for
internal communication must match the one defined in the XML is within the IWS.asmx, precisely in the
string: protected const int nServerPort = ####. You’ll also have to define the i# server location in its
string: protected const string sServerAddr = "data/server/path";
Again from the Turkish configuration:
<%@ WebService language="C#" class="IWS" %>
...
[WebService(Namespace="http://localhost/InfosysWebServices/")]
public class IWS : WebService
{
protected const string sServerAddr = "localhost";
protected const int nServerPort = 8028;
...
5
AUTOMATIC PROCESS
We now have to configure the command line batch. It’s up to our client to modify it at will of course,
but we provide already a simple, working one in the Tools folder, called WEB.BAT. It needs manual
editing before starting to use it in your configuration, as explained below. This batch is designed to be
manually run from a command line specifying as attributes the day DD, month MM and year YY.
The CLI to call this batch would appear like this: X:\WEB DD MM YY, and the batch is edited as follow,
the strings in italic bold need to be edited manually according to your configuration:
del /q "Infosys+_Installation_folder\export\username\*.*"
Infosys+_Installation_folder\Infosys.exe /USER username /TEMPLATE
Infosys+_Installation_folder\Batch\username\web.ibt
md “data_folder\20%3”
md “data_folder\20%3\20%3%2”
md “data_folder\20%3\20%3%2\20%3%2%1”
copy "Infosys+_Installation_folder\export\username\*.hcb"
“data_folder\20%3\20%3%2\20%3%2%1\*.20%3%2%1.hcb"
copy "Infosys+_Installation_folder\export\username\*.pdf"
"\\webserver\Curves\*.20%3%2%1.pdf"
del /q "Infosys+_Installation_folder\export\username\*.*"
Let’s analyze this code line per line:
del /q "Infosys+_Installation_folder\export\username\*.*" This line cleans up I+ user’s export folder
to make sure it will generate the HCBs and PDFs of only relevant data.
Infosys+_Installation_folder\Infosys.exe /USER username /TEMPLATE
Infosys+_Installation_folder\Batch\username\web.ibt this first line simply launches InfoSys+ in
automatic mode to execute the web.ibt batch defined in section 3.3.
md “data_folder\20%3” this will create the year folder, if not present yet, on the server hosting the
rd
data, corresponding to the 3 parameter entered when calling WEB.BAT by CLI.
md “data_folder\20%3\20%3%2” this will create the month folder, if not present yet, on the server
nd
hosting the data, corresponding to the 2 parameter entered when calling WEB.BAT by CLI.
md “data_folder\20%3\20%3%2\20%3%2%1” this will create the day folder on the server hosting
st
the data, corresponding to the 1 parameter entered when calling WEB.BAT by CLI.
copy "Infosys+_Installation_folder\export\username\*.hcb"
"data_folder\20%3\20%3%2\20%3%2%1\*.20%3%2%1.hcb" this line copies and rename all .hcb
from I+ user’s export folder to the folder created by the precedent line.
copy "Infosys+_Installation_folder\export\username\*.pdf" "\\webserver\Curves\*.20%3%2%1.pdf"
this line copies and rename all .pdf from I+ user’s export folder to the Curves folder created
beforehand on the web server (or wherever you chose in 4.3.1).
del /q "Infosys+_Installation_folder\export\username\*.*" finally, this new iterance of the same line
cleans up I+ user’s export folder.
The following is a live example of WEB.BAT execution on the 07/07/12 for Turkish configuration:
When you’ve finished this process, please login into I# as an admin user to verify that the data has
been correctly loaded (more details regarding this process in the admin user description in 8.1.2).
Once verified, please manually edit dates.cfg in the web server to reflect the latest batch dates
(WARNING: if you use a MM DD YYYY locale on the server, use DATES:MM/DD/YY MM/DD/YY in
dates.cfg):
6
OUTPUT EXPORTS REGENERATION
You may need to regenerate the output exports for certain dates typically after a data reload or a
customization.
As all templates point to Last Day, you have three possibilities to regenerate the data of a specific day:
6.1
CREATE A PARALLEL UNOFFICIAL INFOSYS+ INSTALLATION
Should you regularly need to regenerate the output exports, the easiest solution is to install a parallel I+
installation, pointing to your regular data folders. You’ll need to create your I# dedicated user in that
configuration too, then copy the templates and batch, and of course, edit the templates to calculate the
desired date. Finally, you’ll need to edit the WEB.BAT to point towards this version of I+ instead of your
regular one.
6.2
ALTER THE TEMPLATES
If, for any reason, the previous solution is not feasible for you, but you still need a permanent solution
for regular data reload, the heaviest solution would be to generate a new set of templates, copying the
existing one but changing the dates within them to point to the desired date. You’d need to edit them
manually, then rename them by changing the region suffix (Calculation type prefix can’t be changed).
After that, you would need to create a new batch in InfoSys+ pointing towards those new templates and
edit your DOS CLI batch to execute this new batch instead of the usual one.
This means a lot of hassle but it is an alternative solution if you reload your data at specific dates and
you can manage to translate this in a logical date.
So this solution is reserved only if you plan to reuse several times those alternative templates.
6.3
ALTER THE DATERANGECFG.XML
This is by far the simplest way to proceed to an isolated regeneration of output exports. Should you
need to reload some dates and you won’t do that periodically or with a logical scheduling scheme, you
can fool InfoSys+ into believing that the last day is the day you need to regenerate the exports for.
To do, you just need to edit the DateRangeCfg.xml in the Config folder of your I+ installation. There are
three strings respectively for Audience, Programs and Spots with dates in YYYYMMDD format:
th
If I want to regenerate let’s say the data from the 28 of February 2013, I just need to change the “to”
date as follow:
Once this edit is saved, I simply launch my WEB.BAT using the specific day parameter, here: WEB 28 02
13, and it executes as if it was the last day, regenerating the exports I needed:
If you need to reload several dates, just keep changing the DateRangeCfg.XML and running the WEB.BAT
with according parameters until you’ve regenerated all the exports you needed.
WARNING: When you’ve finished with this operation, please don’t forget to set the dates’ ranges to
their original state in order not to create calculation errors in InfoSys+:
6.4
DATE EVALUATION FEATURE
From InfoSys+ v2.1, there’s a new feature in the batch options called date evaluation. This allows to
manually selecting the last day of the available date range during the time of the batch execution. It
does the same trick than explained in section 6.3, without the need to change the DateRangeCfg.XML:
The downside of this method, apart that it’s only available from v2.1, is that you can only modify
manually the evaluation date from within the batch options, so that means that you can’t use the
WEB.BAT, unless you modify it by deleting the first line, so not to launch the web.ibt.
Doing so, you would execute the batch manually, keeping I+ window open, then the modified WEB.BAT
with the matching date as parameters, then change the date evaluation in I+ before launching the
WEB.BAT for the second day… until you’ve reloaded all wanted dates. Don’t forget to change back your
WEB.BAT later on to have it launch web.ibt for your next normal data load.
The strong advantage of this method though is that the date range is not affected, because you won’t
fiddle with the DateRangeCfg.XML, so it doesn’t affect your production.
7
CUSTOMIZATION
You can customize different aspects of InfoSys#, namely the interface and the data templates.
You may also want to change the paths and the communication port between data and web servers in
the future. To do so, refer to section 4.3.
7.1
CUSTOMIZING THE INTERFACE
7.1.1 LITERALS
InfoSys# comes with a very practical tool called dictionary.XML that allows you to edit nearly any literal
you can see in the application. It will simply act as a sticker tool that will paste your translation over the
already present literal.
You’ll find this dictionary.XML at the root of data server, where lies iSharpServer.exe.
The strings it contains are constructed like this:
<?xml version="1.0" encoding="utf-8" ?>
<Dictionary>
<Str src="QWERTY" lang_1="QWERTZ" Lang_2="AZERTY" … Lang_n="…" />
</Dictionary>
I.e. following our Turkish example:
<?xml version="1.0" encoding="utf-8" ?>
<Dictionary>
<Str src="Start time" eng="Start" tur=" Başlangıç saati" />
</Dictionary>
The source (src) literal is straightforwardly the literal as you see it in the application. If you want to
change it, just edit the corresponding dictionary string in the language you use in I# (defined in the
config.js). If not yet present in the XML, just add an entry following the described rules.
7.1.2 IMAGES
You may want in the future to change a channel logo; you can easily do so by replacing the former one
in the images folder (defined in the config.js). Please remember that channels logos must be square
shaped between 100*100 and 200*200 pixels on a white background.
If you want to add a new logo or rename an existing one, please do so in the images folder, and then
edit the iws_config.XML accordingly, specifying the channel translation (name of the station to link it to
its programs) and the corresponding image as follow:
<Translations>
<Item id="I+_channel_code" base="Name"/>
</Translations>
<Images>
<Dimension id="102" desc="channels">
<Item id=" I+_channel_code " img="/img/Name.jpg" color="FFFFFF"/>
</Dimension>
</Images>
As mentioned in the explanation of config.js (4.3.2), the img string part described here, will be the suffix
of the path until the image itself, so following up with the generic structure example, the complete path
to the image is the Prefix from config.js + the suffix from iws_config.xml, or
Common_prefix/path_for/the_images/img/Name.jpg.
Example from Turkish configuration:
<Translations>
<Item id="1:11" base="ATV"/>
</Translations>
<Images>
<Dimension id="102" desc="channels">
<Item id="1:11" img="/img/atv.jpg" color="0000FF"/>
</Dimension>
</Images>
The complete image path will therefore be in our example: /Turkey/img/atv.jpg.
Please note the color html code. This has no importance per now, but in a near future the code will
allow you to associate the color with a channel, used for the columns background and stats filling.
7.2
CUSTOMIZING THE TEMPLATES
Before any change in the templates, please keep a backup copy of the original ones that we provided
you with the installation files.
You can edit the templates as suit you best for them to reflect the ingredients you’d need. It’s up to
you. Please remember to keep at least the required elements of each template as described in point
3.2.
When you add an ingredient to a template, that wasn’t present in I# yet, you have to manually populate
the iws_config.XML accordingly in the relevant section.
After any change in the iws_config.XML, you need to stop and restart the isharpserver.exe to reset the
data service and take the changes into account.
Remember that if you add an ingredient and want it available for past dates, you have to manually
launch the batch for each desired date, as explained in chapter 6.
Finally, don’t forget that the ingredients are displayed in the outputs in the same order that they’ve
been added to the template, which means that any later added ingredient will default as the last listed
one. Should you want to change this order, please drag and drop the ingredients in the Options column
of I+ until you get the desired display.
7.3
CUSTOMIZING THE UNITS DECIMALS
You may want to change the number of displayed decimals for your units.
To do so, you must first make the changes in the I+ templates themselves, as explained in the previous
chapter. The same restrictions and recommendations apply here too.
Once this is done, and your templates have been recalculated, you’ll have to edit the iws_config.xml in
the data server to reflect the change of displayed decimals, in the units’ part:
Please note that I+ and I# numbers don’t have to be equal, you can actually calculate I+ templates with
more decimals than you’re going to display in I# to allow for more flexibility afterwards, should you
decide to increment the number of displayed decimals, without having to rerun all the templates.
7.4
EXAMPLE
As a summary example, I will add a new channel, TRT1, to the Turkish configuration.
Actual state:
First of all, I’ve edited all templates, except UNIV.TUR.ist to add TRT1 in the list of calculated channels.
rd
As it’s the latest added channel, it goes at the end of the list, but I wanted it in 3 position, so I changed
the order in the template by a simple drag and drop. I repeated this change in all templates:
I then launched the batch for all desired dates and got my new exports showing the new channel.
Then I needed to edit the iws_config.xml to implement the new channel in I#, with its image. To do so, I
opened one of the newly generated xml exports (extension .hcb), containing the new channel to find its
Infosys+ code:
The channel code is 1:27, so I now could edit the iws_config.xml with relevant data (beware, XMLs are
case sensitive), respecting the string convention that already defines the other channels:
As you can see, I edited both the Translations and Images fields (images have already been explained in
7.2.2).
And that’s it; the channel has now been implemented as you can see in the screenshot below:
8
8.1
MANAGING I#
MANAGE USERS
InfoSys# comes by default with three created users and two groups. You will probably want to change
this from the start. There’s a file within the data server called users.xml that you’ll need to edit in order
to manage the users credentials and access level. A word of advice, please respect the exact structure
of the xml, being extra cautious with upper and lower case as XMLs are case-sensitive and not at all
fault-tolerant. Also, beware not to enter twice the same id or name for different users or groups,
which would cause I# authentication to simply not work for all users!
Please note that you don’t need to reset the isharpserver.exe when you edit the users.xml, as the file is
automatically scanned every 15 seconds for InfoSys# to acknowledge the changes seamlessly.
8.1.1 USER GROUPS AND TEMPLATES
You may modify the groups in order to restrict what templates are available to their users. If so, please
give the new group a proper id and name, different from the existing ones, and specify the templates
accessible to this group’s users. You’ll find a list below of the available templates and their associated
code.
Please not that some templates have two codes: one starting by 1000 to be displayed in PCs web
browsers, and the other starting by 2000 for handheld devices display. If a template has only one type
of code, it means that the same output is used for PC and device.
Summary: 1001, 2006
Regions: 1003
Programs: 1006, 2002
Spots: 1007, 2009
Curves: 1008, 2008
Channels: 2001
Programs Profile: 2003
Channels Profile: 2004
History: 2005
Programs Minutes by Minutes: 2010
Programs History: 2011
Ranking: 2012
You can easily define the templates accessible by group by editing templates in the group string with a
list of coma-separated template codes, or the keyword “all”.
8.1.2 USERS
The three users created beforehand are admin, demo and test; representing a mix of the user types.
We’ll analyze their specificities in order to explain the different options available for users’ creation.
They all use the default language of the application, and this can also be modified if another language is
available.
. admin user is password protected (default: admin123), belongs to Standard group 100 and is defined
by the hardcoded admin setting. Password protection is simply enabled by giving a password value
into the user string. The Standard group is defined by allowing access to all templates. The admin value
set to 1 provides to this user the possibility to view all possible dates until yesterday, even if data
server’s dates.cfg is not updated till that date. This feature allows the admin user to verify that the last
data has indeed be loaded correctly, before editing the dates.cfg, which range defines the available
dates for non admin users.
.demo user: like the admin is part of Standard group 100; unlike the admin is not password protected
and is defined by the hardcoded demo setting (demo=1): this setting simply restricts the available dates
for this user, while allowing him to view all templates like a regular admin. The dates range is defined in
the iws_config.XML by min_demo and max_demo values:
Please note that the min/max date range (between Data path and demo range) is a default range, set
when we send the installation packages, and is de facto overwritten by the dates.cfg data server file.
.test user is not password protected, not defined by admin nor demo hardcoded settings and belongs to
Restricted group 102. It’s a typical restricted user, as he only gets access to certain templates defined by
its group and, unlike the admin, can only see the templates of the dates comprised in the dates.cfg.
8.2
MANAGE ACCESS
If you have a static device, like a server with a fixed IP, that needs to access regularly I#, you may want
to bypass the authentication on I# login page. This could be really useful if you plan to have other
services hosted on servers you want to allow automatic access to I#.
In order to do so, we’ve developed a XML switch in the iws_config.xml, called TrustedClients. To
activate it, you just need to enter a string containing the IP and the description of the server in the
trusted clients section, following this nomenclature: <Client ip = “XXX.XXX.XXX.XXX” comment =”YYY” />:
9
NEW FEATURES WITHIN IWS_CONFIG.XML
This section will grow over time and reports the various additions to the iws_config.xml server file, with
instructions on how to set the new nodes up and their effect on InfoSys#. The version of the
isharpserver.exe from which the feature is implemented is specified in the section title.
Please note that some of these nodes require some updated files in the background. Should you
implement them and not obtain the desired effect on InfoSys#, then your version is surely outdated. If
such is the case, please liaise with InfoSys Support Team to receive an upgrade.
9.1
RANKING (FROM V1.3.0.529_20130529)
When template 2012 Ranking is enabled, the following nodes allow you to define the maximum number
of programs in the Ranking report as well the unit that will be used to extract said programs.
Here’s an example:
<Reports
max_ranking_items = "50"
static_ranking_unit = "1:1003" />
max_ranking_items is quite self-explanatory but the other node is a little harder to grab.
static_ranking_unit actually defines the unit that is used by InfoSys# to extract the 50 max ranking
items from the PRG output. That means here that the 50 max ranking programs will be the 50 ones with
the highest Share performance, and changing unit inside the InfoSys# interface will only reorder those
50 items according to their performance in the studied unit.
9.2
DURATION (FROM V1.3.0.529_20130326)
The following group of three XML nodes allows defining the minimum duration of a program to appear
in the simple or detailed view of the programs output, and in the ranking:
<Reports
min_duration_prg_simple = "0001:00"
min_duration_prg_detail = "0001:00"
min_duration_prg_ranking = "0001:00" />
Those nodes are defined in mmmm:ss.
9.3
SIMPLE VS COMPLETE AUDIENCE CURVES (FROM V1.3.0.620_20130531)
This node, when set to 1, allows the use of both SCUR and CUR templates to display audience curves of
respectively the main channels or of all channels. If set to 0, only CUR will be displayed and the button
to switch from one to another is not displayed in InfoSys#
<Reports
use_curve_alt = "1" />
9.4
HISTORY UNIT (FROM V1.4.0.207)
This node allows defining which unit will be displayed for the History output:
<Reports
history_unit="1:1004" />
9.5
PERSISTENT CONNECTIONS (FROM V1.4.0.108)
These new parameters that can be added in the server node allow establishing an inactivity timeout that
kicks the idle user out after the specified number of seconds without activity. The two parameters are
persistent_conns="" and timeout_conns="".
The first one, persistent_conns, must be set to 1 to enable this new feature, and defaults to 0 (persistent
connections disabled) when the parameter is not specified.
The second one, timeout_conns, allows specifying the number of seconds of inactivity after which the
persistent connection will be erased from the installation, forcing the user to login again when resuming
InfoSys# activity. The default length is 600 seconds, or 10 minutes.
Those parameters have to be set in the server node, first line of the XML file, just besides the server
description and port:
<Config>
<Server desc="Spain" port="8020" persistent_conns="1" timeout_conns="600"/>
When those parameters are defined in the node, and a user has successfully login into InfoSys#, the
established connection is saved in a Conn folder, automatically generated in the folder that contains the
isharpserver.exe.
The connection is updated after each request, resetting the inactivity timeout, and disappears if the
counter reaches the timeout_conns threshold, obliging thus the user to identify again when sending a
later request. The expiration of the connection is checked every minute.
Please note that the connections are saved even in a case of a server reset.
10 MONITORING I#
Once again, we can split the monitoring tools between the web and data servers.
10.1 WEB SERVER
In order to make sure that the web server is alive and working, we can call the IWS.asmx simply by
entering in our browser search bar the URL we already defined in the config.js (see 4.3.2) as
urlWebService value:
This will open a new window that offers 3 links to different functions that we’ll analyze further in the
troubleshooting section (chapter 11):
For the moment, our goal is reached: if we’ve reached that window, that means that the web server
part is indeed up and running.
10.2 DATA SERVER
10.2.1 ALIVE.LOG
There are two main monitoring tools that allow you to monitor the data server: the alive.log and the
Activity.log that both lie in the same folder than iSharpServer.exe (data server service).
The alive.log is a very basic .txt file that allows for remote monitoring. While the iSharpServer.exe is up
and running, the alive.log is implemented every three minutes with a new line with the date and
timestamp. This will automatically change the Date modified attribute of the file, which allows for
working with remote monitoring tools that use that info. And thanks to the static nature of the log, you
can keep track of when the service has failed, should this unlikely event happened.
The following screenshot shows an alive.log from an up and running service:
10.2.2 ACTIVITY.LOG
The Activity.log is a text file that keeps track of all the events that affected the data server: the requests
from the web server, the starts and exits of the server, the available dates, the errors... Everything is
there and it is generally where we’ll find the root problem while troubleshooting.
You can access it via any txt editor of course, but you can also check it from the iSharpServer.exe itself,
through the Log tab (click Refresh if no content is displayed yet), you can even search the logs using
CTRL+F. The other tabs will be explained in the troubleshooting section (chapter 11):
As the Activity.log can sum up to a heavy file, quite fast depending on the activity of InfoSys#, we
recommend you to regularly backup the file manually or automatically in order to free the log space, as
it may otherwise create latencies (see 12.3.3)
Finally the cache tab can provide you some details regarding the connections, with useful error
counters.
11 MOUNTING AN INFOSYS# TEST ENVIRONMENT
For testing purposes, you may want to mount a parallel test platform that uses the same data. To do so,
you’ll just need to create a new website, or to use a subfolder in your current website. The process of
installation is very similar to the one detailed in chapter 4, so, when in doubt, don’t hesitate to refer
back to this chapter.
In the subfolder or new web site folder, you’ll need to copy once again all contents of the web server
package. Then you’ll also need to copy the contents of the data server package in another destination
than the one you use in your regular I# installation.
You can define the data, img and curves paths to point to the same folders you already use or to other
ones, depending on your testing purposes.
Where the two installations need to really differ is in the ports that will be used. If you defined a new
website, you must use another port than the one you’re using to access your regular I# installation. If
you chose instead to work with a subfolder, don’t forget to add the subfolder suffix in the URLs that
you’ll define in the config.js (4.3.2) and that you’ll use to access the website itself.
The second port, the one used internally for communications between web and data servers, must also
be different than the one you use for your regular I# installation. Don’t forget to configure it properly in
the iws_config.xml (4.3.1) and IWS.asmx (4.3.2) and to open it for inbound and outbound traffic on your
network.
12 TROUBLESHOOTING
We’ll try to summarize here the most regular issues we’ve faced when installing, configuring and using
I# on a daily basis, and their solutions.
12.1 INSTALLATION
If you’ve thoroughly followed the installation instructions detailed in chapter 4, you shouldn’t face any
specific problem.
However, should your InfoSys# not work after the complete installation, we’ll revise the possible issues
in each step in the same order than chapter 4:
12.1.1 WEB INTERFACE
. Step 1: Launch the URL of InfoSys# as you defined it in the web site creation (section 4.1). If you
reach the login screen, skip to the next step:
- If you don’t reach the login screen, make sure that you use the right URL, with the right port (the one
you defined during the web site creation).
- If it still doesn’t work after you corrected it, please try to connect to IWS.asmx (see Step 3 below on
how to do so). If you indeed reach the IWS page, then please empty the web server folder and paste
again the whole content of the provided web server package. If it keeps failing nonetheless after this
operation, please contact your InfoSys support team.
- If you can’t see the login nor the IWS pages, please check with your IT department.
- If, after you successfully arrived on the login page, you enter your credentials but nothing happens, you
stay at the login page whatever the credentials combination you try, follow to Step 2.
- If you get the following error message at login, skip to Data Server section:
. Step 2: We have to verify whether the web service is running properly. As explained in section 9.1, to
do so, we’ll call the I# URL followed by /IWS.asmx. If we reach the IWS window, we can pass to the next
step:
If you don’t see this window when you call for the URL/IWS.asmx, check the following possible reasons:
- Verify that IWS.asmx is indeed installed in your web server folder (it is a file contained in the web
server package, see section 4.1)
- If so, please verify that the urlWebService variable is correctly configured with URL/IWS.asmx in
config.js (4.3.2)
- If the cause is not in those first two checks, please verify that the port you’re using to access the web
service is indeed open on your firewall and available in your network
- Should those 3 possibilities be unsuccessful in explaining the issue, please refer to your IT department
to have them help you set up the website.
. Step 3: The web service is up and running, but we need to make sure that it can connect to the data
server. To do so, we’ll use the third link on IWS homepage, UserLogin.
We’ll fill up name and password values, using the credentials of a user defined in users.xml (see section
8.1 for more details). The idApp must be filled with be 1000 or 2000, indifferently. Finally, the idLang is
the language code defined in the iws_config.xml (1033 stands for English)
- The following screenshot is the one we’re hoping for (with idUser and idSession that can of course be
different). If we get this message, communication between web and data services is correctly
established and we can skip to the next section:
- Here are some typical error messages that can come instead of the valid session message and their
possible cause and solution:
. The server is down:
Please verify that the Data server is indeed up and running. If not, simply launch
isharpserver.exe and your problem is solved.
If it is already running when you get the error, please make sure that the internal
communication port is indeed configured properly in web server’s IWS.asmx and matches exactly data
server’s iws_config.xml
If the isharpserver.exe is already running and the port is correctly configured, this is a
communication issue: make sure the internal communication port is not blocked by your firewall and
that indeed web and data servers can communicate from one to another on your network. If not,
please check this with your network admin.
. Wrong credentials:
Please make sure you use login and passwords as they’re entered in the case sensitive
users.xml.
. Insufficient privileges:
Make sure you used 1000 or 2000 as idApp.
12.1.2 ISHARPSERVER
. Step 1: If you get to the login page and the tests described in previous section with the IWS.asmx are
successful, but, despite entering correct credentials, InfoSys# stays blocked at the login page, it may be
due to an issue in the web.config file that comes with the web interface package.
Most recent installation packages have this issue fixed, but you may face the issue with previous
installer packages on certain OS like Windows 7.
First of all, make sure that you have indeed the web.config file in the web interface folder, if not please
copy the following XML code in an empty file, that you’ll rename web.config. If the file is indeed present
in the web interface folder, but the issue remains, make sure its content does match the XML content
below.
If you’re not sure about this process, please don’t hesitate to contact the InfoSys Support Team and
we’ll provide you with the correct file.
Web.config:
<?xml version="1.0" encoding="UTF-8"?>
<configuration>
<system.web>
<webServices>
<protocols>
<add name="HttpGet"/>
<add name="HttpPost"/>
</protocols>
</webServices>
</system.web>
<system.webServer>
<defaultDocument>
<files>
<add value="isharp.html" />
</files>
</defaultDocument>
</system.webServer>
</configuration>
. Step 2: If you get the following error after a login attempt:
The isharpserver.exe service is down. Please launch it from the data server.
. Step 3: If the service is running but you don’t see the data you’re expecting, please verify the activity
log from within the isharpserver.exe visor (see 9.2.2). There are too many error possibilities to report
here, so if the message you get is not clear to you or you don’t know how to solve the issue, please
contact your InfoSys# support team.
You can also check the config tab of the isharpserver.exe to confirm it corresponds to the information
you’ve configured in the iws_config.xml. If not, make sure you edited the right xml, not a backup copy…
Once you get the connection up and running between data and web servers, you’re done with the
installation part, and you now must see the summary page. If it’s not the case, after having followed
each step of those first two sections, please contact your InfoSys# support team.
12.1.3 BINDINGS
Several possibilities can happen now:
A) Best case scenario, you get the summary view correctly, as well as the other screens, with all the info
you want already displayed, then you’re good: the installation has been successful:
B) The selected date is not available:
. Step 1: Should the locale of your Windows server use the American style of date format MM DD YYYY,
instead of the DD MM YYYY, you should modify dates.cfg file accordingly in DATES:MM/DD/YY
MM/DD/YY.
. Step 2: check the date range specified in dates.cfg and make sure you have the template exports
corresponding to the dates you want to see. Make sure I# indeed intents to display the right date using
the parameters button and select the appropriate date as shown below:
. Step 3: If the date in I# matches the dates.cfg range, make sure that you indeed have the HCBs
corresponding to said date loaded in your data folder. If not, run the batch for said date and refresh I#
homepage and you’re out of trouble.
. Step 4: Should the date’s HCBs being properly loaded in the folder but I# is still failing to display it with
the same “Selected date is not available” error message, the problem is most certainly with the data
folder:
- Verify at first that the data in the data folder is organized in a subfolder structure strictly
respecting the convention detailed in section 3.3: YYYY\YYYYMM\YYYYMMDD\CAL.REG.YYYYMMDD.hcb.
- If you made sure the structure is correct, but I# is still failing, please verify that the data folder
is correctly configured in data server’s iws_config.xml.
- After all these checks, if you still got the same error message, contact your I# support team.
C) Issue with the images:
. Some channels logos are not displayed:
Make sure the channel logo image is indeed present in your img folder and that the file name is
correctly configured in the iws_config.xml (review 7.1.2 for more details). Double-check the channel id
and the image file name. Don’t forget that the XMLs are case-sensitive.
If this has been verified and you still have no image, it may be due to the IIS or your browser
caches. Next step is to restart your website from the IIS manager and empty your browser cache.
Finally, if you still experience the problem, it may be an encoding issue in the XML file, in the
translation part. Please check 11.2.1 for more details.
. No channel logo is displayed at all:
Though the root causes developed in previous point may still apply here, no image displayed at
all points most probably to an issue with the img folder itself. Please make sure that you correctly
configured the prefix path of the img folder in the config.js as explained in 4.3.2, and the suffix path in
front of each image in the iws_config.XML, as detailed in 7.1.2.
To verify whether the complete path is indeed pointing to your images, just copy/paste
config.js’ sRootImg value in a notepad then add one of iws_config.xml’s img string values at the end of
the path. The path that is now formed must be usable and open your image when pasted in windows
explorer. If not, please correct the prefix/suffix part as you see fit, as long as the total path indeed
reached the image itself.
. Some or all channels logos seem crushed or elongated: please remember that the expected picture
format is a 100*100 to 200*200 pixels image over a squared white background.
D) No PDFs:
Now everything should be working correctly, but you may see the following screenshot when you
launch an audience curve:
If so, this is an issue with the PDFs.
First of all, make sure that the Curve PDF export has indeed been generated for selected date,
and that its name follows the naming convention: CUR.REG.YYYYMMDD.pdf
If so, please make sure that the path to the Curves folder has been properly configured in the
iws_config.xml (see 4.3.1)
If those steps haven’t got you through the problem, please contact your I# support team.
12.2 CUSTOMIZATION
Like the previous chapter, dedicated to possible installation issues, we’ll now follow the customization
detailed in chapter 7, revising once again the possible issues in each step in the chapter’s order. Do not
hesitate to revise the whole chapter 7 before following up with this troubleshooting section.
12.2.1 INTERFACE CUSTOMIZATION
- Literals:
As per now, we haven’t faced any issue with the literals yet, but as we’ll probably find the
biggest diversity in alphabets within the Res and dictionary XMLs, we’ll give you this advice that will be a
guideline for this whole section: always make sure to edit your XMLs with an utf-8 encoding compatible
XML editor.
A second advise we can give you is not to fiddle too much with the Res XML files (at least make
sure to always have a backup copy of the original), especially with the length of the literals as they’re
been thought to fit exactly in the actual interface. And remember that this interface is designed to work
on a PC 21” screen as well as on the 3” screen of a mini Smartphone….
- Images:
Images have been largely covered in 11.1.3.C, but as this section in chapter 7 also covers the
Translations part of the iws_config.xml, we’ll nail the coffin on the XML editing issues by repeating once
and for all the three most important rules:
. XMLs are case-sensitive.
. Please respect the exact string building of the XML: a misplaced point, slash, space… can be
the root cause of an error.
. Always make sure to edit your XMLs with an utf-8 encoding compatible XML editor. If you
want to verify that your editing went well, you can try and open the XML with Internet Explorer. If you
see it correctly, the edition is good.
In case you added or modified a channel, you’ll have to edit the Translations part of the
iws_config.xml. If, after that, you face some issues with said channel, like programs not being listed, the
problem is most certainly related to the channel’s translation. Make sure it’s been properly edited in
the iws_config.xml. This is especially true if you use alphabets other than Romanic. If so, we
recommend you to open one of the HCBs that you have already produced with the UTF-8 encoding
compatible XML editor of your choice, and copy/paste the channel name from it into this channel’s
iws_config.xml translation string.
12.2.2 TEMPLATES CUSTOMIZATION
- Apart from the general rules for XMLs mentioned before, please follow next rule after any edition of
the templates: if you just added a new ingredient and it doesn’t appear properly, or some functions
don’t work with this specific ingredient, while the rest is working fine, make sure that you have
populated the iws_config.xml accordingly. After you edited the iws_config.xml, please remember to
restart the iSharpServer.exe for the changes to be accounted for in your interface.
- Also remember that you’ll have to reload all past dates you want your new ingredient to be part of
after editing your templates if you want its historical information.
12.2.3 UNITS DECIMALS CUSTOMIZATION
- If you don’t see the unit decimals that you want in your I#, please make sure that the templates have
been calculated with the required precision and that the number of decimals has been correctly set
within the iws_config.xml.
- If it keeps failing, make sure that you have indeed restarted the isharpserver.exe after the edition of
the iws_config.xml. If so, and you still don’t see it, restart the website from the IIS manager and empty
your browser’s cache. If it doesn’t do the trick, contact your I# support team.
12.3 DAILY USAGE
We’ll sum up in this section miscellaneous issues and advices that we gathered from our daily usage of
I#.
12.3.1 I# WEB PAGE FAILS TO LOAD
. Step 1: Make sure your internet connection is working by browsing on a known website
. Step 2: Check through IIS manager that the website is indeed up and running on the web server.
. Step 3: Verify that the web service is indeed working by calling the IWS.asmx page as explained in
section 9.1.
. Step 4: Verify that the isharpserver.exe is up and running.
. Step 5: verify that the communication passes between web and data services by using the GetLog
function of the IWS.asmx page, populating the credential fields by using the information found in data
server’s users.xml: name and passwords are obvious and idLevel is the user’s id in users.xml:
- If you receive the following error message, connection is failing between web and data services. If so,
check with your IT department:
- If you get a result similar to the following, then connection is indeed established:
If so and I# still fails to load, please contact your I# support team.
12.3.2 SOME TEMPLATES FAIL TO LOAD
. Step 1: Make sure the corresponding HCB is indeed loaded in the data folder and respecting the
subfolder and naming convention: YYYY\YYYYMM\YYYYMMDD\CAL.REG.YYYYMMDD.hcb
. Step 2: Verify that the hcb is not corrupted by opening it in Internet Explorer: if you view it correctly,
pass to the next step, otherwise, please try to recalculate the template and export it from InfoSys+. If it
still fails, this becomes an I+ issue, so follow the normal workflow for I+ problems reporting.
. Step 3: We’re now going to verify that I# web service query for the specific template is indeed does
rd
indeed get answered with the matched template by the data server. To do this, we’ll call the 3
function of the IWS.asmx: GetTemplate.
This function is really helpful as it allows you to specify all data and maybe pinpoint where the failure
happens. To fill up the form, we’ll need to have the iws_config.xml, one of the SUM.*.hcb output export
and eventually the dates.cfg opened in our editor.
A) But, first of all, we’ll call the UserLogin function, as detailed in 11.1.1, in order to receive the session
number we’ll need:
B) Let’s analyze the GetTemplate form:
- idUser and idSession have been provided by UserLogin function.
- The following data will be provided by the iws_config.xml:
idTemplate is the template ID you’ll find in the section Filters, the description guiding you in
choosing the matching code:
idSector is to be found in the corresponding Region:
idChannel is the Item id you’ll find in the Translations part:
idLanguage in the Languages section:
- As you’ll have noticed, I left out some fields as their filling info is not to be found in the iws_config.xml:
idDate must be set to 0.
idUnit must be left blank.
idTimeband must be left blank.
idTarget code will be found in the Targets dimension of the SUM.*.hcb:
C) Now that we have all necessary information, we can call our GetTemplate function. I.e: as admin,
we’ll call for summary template of all Turkey for Individuals 5+ for ATV channel in English:
The expected result is for us to see the XML file just as we would if we were to open the hcb with
Internet Explorer. In any other case, check the explicit error that will be provided and, if possible,
correct the GetFunction parameters. Otherwise, or if you don’t know how to interpret the error
message, please make a screenshot of it and report to your I# support team.
Following screenshot shows the expected result:
. Step 4: If the template is correctly loaded via GetTemplate function but still fails to display within I#,
restart the website through IIS manager and clear the cache of your browser.
. Step 5: If no luck then, please report the issue to your I# support team
12.3.3 LATENCIES BETWEEN THE REQUEST AND THE DISPLAY OF THE OUTPUT
If you experience latencies between a request and the displaying of its output, the most probable cause
lies outside of InfoSys# troubleshooting scope, due to some network or server issues. However, as
mentioned in point 10.2.2, there’s the possibility of experiencing latencies due to a too big activity.log.
This file, as explained, is displayed in the log tab of the always on isharpserver.exe and the latter displays
the log with a certain layout, using different colors to illustrate different events (see screenshot below).
The issue, when the log becomes huge, is that the layout refreshing starts using the server resources
heavily, creating latencies.
In order to avoid those possible latencies, the recommended best practice is to houseclean the
activity.log, keeping a regular backup (manually or with a scheduled task) of the file, by simply renaming
it. Doing so, you’ll force the isharpserver.exe to regenerate a fresh new Activity.log file. We
recommend you to back the activity log file up as soon as it reaches a size superior to 1MB. If it reaches
2 MB, isharpserver.exe will pop you a warning message to record this to you.
Finally, in order to avoid this layout refreshing issue, we’ve developed an auto-refresh checkbox, that we
recommend you to keep unchecked as long as you’re not specifically monitoring the InfoSys# activity
from the log view of isharpserver.exe. Even then, it is best practice to refresh manually the log thanks to
the relevant button.
In any case, should lags occur, keep in mind to verify whether the refresh box is checked, and if so, have
the reflex to deselect it.
12.3.4 ONE LAST WORD
Please understand that this section will regularly be updated in function of our knowledge base and the
I# incidents you’ll report to us.
To facilitate the process, we’ve created a new InfoSys# project in footprints, from which you can report
your issues and doubts, while new development queries will still need to be raised via InfoSys
Developments project.
If you don’t have access to InfoSys# project of footprint, please contact InfoSys# support team.
13 HISTORY
Version
1.0
1.1
1.2
Author
KMSpain
KMSpain
KMSpain
Date
23/11/2012
04/09/2013
21/02/2014
1.3
1.4
KMSpain
KMSpain
27/02/2014
10/03/2014
Comments
Creation
Added Annex A
Added Section 9, changed the
requirements, reviewed the templates
and added details about SCUR and PRH,
added date locale possible issue to the
troubleshooting section.
Changed step 1 of section 12.1.2
Added
point
9.5
(persistent
connections), and specified the
isharpserver.exe versions from which
features section 9 features are
available.
ANNEX A: HCB (HYPERCUBE) FORMAT
A.1 INTRODUCTION
A hypercube is a data structure which stores information of one n-dimensional array, where n is the
number of dimensions in the hypercube. Each dimension has a fixed numbers of items: an item is the
atomic element that references a value in a hypercube, which is usually a double. Each dimension has a
name, and all its items also have names and attributes
Hypercube values are referenced by the indexes of the dimensions of the hypercube (the index of each
dimension is required). Dimension attributes don’t depend on the other dimensions (it depends just on
the index of the item of one dimension).
A one-dimensional hypercube could be seen as a simple array of items (doubles). A two-dimensional
hypercube could be seen as a plane table: one dimension would be the rows, and the other dimension
would be the columns. A three-dimensional hypercube could be seen as a cube.
A.2 FORMAT
HCB files are codified in XML format. A main <Hypercube> section contains two sections: <Dimensions>
and <Data>. <Hypercube> section contains information on the data generation (InfoSys+ version,
calculation date, user, source report name).
<Dimensions> contains all the dimensions of the hypercube in <Dimension> nodes. Each <Dimension>
reports required attributes such as name and id. <Dimension> nodes contain <Item> nodes, which
report required attributes name and code.
<Data> contains all the data, traversed from the outer dimensions to the inner dimensions (in the same
order they are reported in the <Dimensions> section), traversing all the items (also in the same order
they are reported in the <Dimension> nodes). The first value always belongs to the first item of each
dimension, the second value belongs to the first item of each dimension but the last one (which will be
the second one), the third value belongs to the first item of each dimension but the last one (which will
be the third one), and so on until the last value that belongs to the last item of each dimension. Values
are separated using commas, and the decimal separator is the dot.
A.3 EXAMPLE


© Copyright 2026