
Document 196404
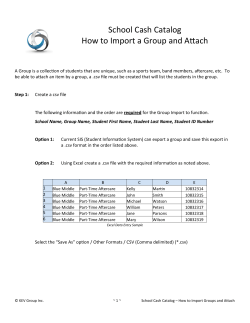
How to create a students.csv file from the
SEEMIS management system for use with
Eclipse2 or Junior Librarian
Purpose:
ID: 107H
Version Number: 1.0
Date: 28/08/2008
To describe the process of creating a students.csv file from the SEEMIS school management
system for importing student data into either Eclipse2 or Junior Librarian.
Librarian This document does
not describe the process of importing student data. Please see the appropriate knowledge base
article for guidance on how to import your student data.
PLEASE DO NOT OPEN YOUR CSV FILE IN EXCEL!
Note: This document applies to Eclipse2 and Junior Librarian ONLY. Please see Knowledge
Knowledge Base article
KB108 for guidance on how to create a file for use with Eclipse.Net.
Creating a students.csv file
Note: The steps in this guide can be quite technical. If you are not a confident computer user
we would recommend that you ask for assistance
assistance from your schools ICT contact.
1.0
Exporting information from SEEMIS is a slightly different process from other management
systems.. This is because you do not get the option to export information directly and instead
have to take additional steps over other management systems.
The process involves two stages:
•
•
ing and running a report
Creating
Copying the data into an Excel and then re-saving the data as a CSV File.
The following sections in this guide describe the two processes in greater detail.
Note: If you do not have a copy of Microsoft Excel available other spreadsheet applications also
provide the option to save files in CSV format.
1.1
Once you have completed the process of creating a student export file you will then need to
import the file
ile into Junior Librarian or Eclipse 2. Please see Knowledge Base article KB002H Importing Your Student Data into Junior3 Eclipse2 for further guidance on how to do this.
Page 1 of 5
http://www.microlib.co.uk/kb/011H
Micro Librarian Systems LTD
How to create a students.csv file from the
SEEMIS management system for use with
Eclipse2 or Junior Librarian
ID: 107H
Version Number: 1.0
Date: 28/08/2008
Creating and running the report on SEEMIS
2.0
Re
In SEEMIS go to Custom Reports
2.1
In the Order tab choose the following fields in order from the drop down menus:
SEEMIS Field Name
Surname
Known As
DOB
Date Last Joined
Registration Class
Pupil’s PIL
Year Group
Description
Student Surname
Student Forename
Student Date of Brith
Date added to the system
Students class or tutor group
Student Admission Number
Students Year Group – This is an
Optional Field
Please note: The Pupils PIL does not match the children’s old Roll Number.
2.3
Save this report and call it Junior Librarian Export.
2.4
Go to the View tab. You should now see the data.
2.5
Within the displayed grid, Click on any cell and then press the Ctrl key and A key at the same
time. The cells should now turn blue.
2.6
Press the Ctrl Key and C key at the same time. This will copy the data to the Windows Clipboard
where and can then be pasted into Excel. Please see section 3 of this document for further
guidance.
Page 2 of 5
http://www.microlib.co.uk/kb/011H
Micro Librarian Systems LTD
How to create a students.csv file from the
SEEMIS management system for use with
Eclipse2 or Junior Librarian
ID: 107H
Version Number: 1.0
Date: 28/08/2008
Editing your data using Microsoft Excel
3.0
Open a blank spreadsheet in Microsoft Excel.
3.1
Go to your Excel Spreadsheet and click on cell A2.. Press the Ctrl key and the V key at the same
time, this should paste the information from SEEMIS to the Excel Spreadsheet.
3.2
In order that the library software can match the data format and import the date certain
changes will need to be made. The first item that requires amendment is the format of the
dates.
3.3
To change the formatting click the letter C at the top of the third
ird column, the column will turn
blue. Go to the Format menu, click Cells and in the window that pops up choose Date from the
list on the left side. From the selection on the right make sure the date is in the DD/MM/YYYY
format e.g. 29/08/2007.
29/08/2007 Click OK. Do the same for column E.. If you can only find the
MM/DD/YYYY format, you may have to go to Custom on the list on the left hand side and then
select the appropriate format from the menu.
3.4
Once you’ve changed the date formats, you’ll need to rename the column headings to the ones
given in the screenshot below:
3.5
For column F (Class),, make sure the format is set to Text. Make sure the classes are in the
format 1A, 1B etc. and not P1A, P1B. A quick way to change this is to use the Find and Replace
function.
3.6
Press Crtl and F at the same time to open the find dialogue. Once it displays click on the Replace
tab,
Page 3 of 5
http://www.microlib.co.uk/kb/011H
Micro Librarian Systems LTD
How to create a students.csv file from the
SEEMIS management system for use with
Eclipse2 or Junior Librarian
ID: 107H
Version Number: 1.0
Date: 28/08/2008
3.7
For each class that you need to amend. Put in the class you want to change and then what you
want to change it to. Click Replace. You will need to work through each class changing any class
prefixed with a ‘P’ to remove it. i.e. P1A would need to become 1A.
3.8
Children who were in your Nursery last year may be on SEEMIS twice. This means you will need
to check for duplicates
es in your P1 classes and delete any – delete the line with the oldest date
e.g. 2005 and keep the 2007 entry.
3.9
Once you have completed all of the required edits you will need to save the worksheet as a CSV
document.
3.10
In the File Menu, click Save As… Remember to save it to your pen drive/data stick. Name the file
Students.csv and in save as type, choose CSV (Comma delimited)
3.11
When you click on save you
y will get this message:
Click on OK to close the message.
Page 4 of 5
http://www.microlib.co.uk/kb/011H
Micro Librarian Systems LTD
How to create a students.csv file from the
SEEMIS management system for use with
Eclipse2 or Junior Librarian
3.12
ID: 107H
Version Number: 1.0
Date: 28/08/2008
The following message will be displayed:
displayed
Click Yes to save in CSV format.
3.13
You can now close Microsoft Excel. When you are prompted to save changes to your work or to
save the file in a different format please ensure that you click NO. If you save at this time you
will change the format to Excel workbook which is not compatible with MLS products.
3.14
You should now have a students.csv file on your pendrive / usb stick ready to import into your
Library system. Please see KB002H - Importing Your Student Data into Junior3 Eclipse2 for
further guidance on how to do this.
Page 5 of 5
http://www.microlib.co.uk/kb/011H
Micro Librarian Systems LTD


© Copyright 2026