
GOOGLE MAPS The how-to guide
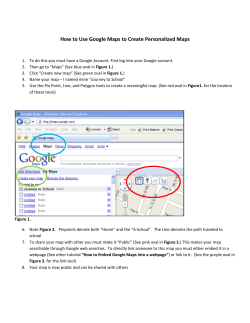
GOOGLE MAPS
The how-to guide
INDEX
Pages 4-18
Getting to know the MyMaps interface
Pages 19-21
Embedding the map onto your website
Pages 22-31
Converting a spreadsheet to KML and
importing it into Google Maps
Pages 32-39
Alternate way to create a Google Map
from a spreadsheet
Pages 40-41
Resource links
Overview
Collection of “Geo-oriented”
Data
* Street addresses
* Latitude / Longitude points
Insert Data into Google Map
* Using an online tool
* Using Google API
Publish It!
1. Collecting the data
Not going to get too much into this but just to say the data
you are mapping must have some reference to a geographical
location. Google maps will basically take anything you throw at
it, for example it will map “Los Angeles,CA”, “CA, USA” and
even ”fried chicken”. It may not be accurate or make sense but
Google will map it. So, the most efficient & accurate way is to
provide latitude and longitude points for each point you want
to map or at the very least a “Street Address” with a “Zip
Code”, “City”, or “State”.
Examples for the “Los Angeles Times building”:
Latitude and Longitude : (34.053972, -118.243447)
or
201 N Spring St., Los Angeles CA 90012
Also, if you are trying to map a lot of points then I would
suggest keeping all your data in a spreadsheet
2. Putting the data on the map
There are a few options to do this when it comes to Google Maps.
1. Using “My Maps” or other similar online Google Map tools
Advantages: Quick, easy, very minimal programming knowledge required
Disadvantages: Not as many options
2. Using the Google Maps API
Advantages:Very customizable
Disadvantages: requires moderate programming knowledge
This tutorial is mainly going to show you how to use My Maps to
make and embed the map in your website.
3. Using “My Maps”
INITIAL STEPS
* Note you must have a Google Account to proceed
1. Go to “http://maps.google.com/” & login in.
2. Select My Maps tab.
2. Click “create new map”. If you want to open an existing map,
check it in the left panel and click Edit.
4. Add a title and description for your map. Also, select whether to
make your map public or unlisted.
3. Using “My Maps”
5. Use the icons in the the top right corner of the map to interact
with the map.
Shape tool. Use this to draw shapes.
Line tool. Use this to draw lines.
Placemark tool. Use this to add placemarks.
Selection tool. Use this to drag the map and select placemarks, lines, and shapes.
3. Using “My Maps”
ADDING & EDITING PLACEMARKS
1. Click the placemark tool
2.Your cursor changes into a placemark icon with an "X"
crosshairs. The crosshairs indicate where the placemark will fall.
3. Move the cursor to the appropriate location. If you want to
dismiss this placemark, press the Escape key.
4. Click your mouse button to place your placemark. It should
bounce into place.
5. Add a title and description.
3. Using “My Maps”
ADDING & EDITING PLACEMARKS
6.You can also change the icon for your placemark by clicking the
icon in the top right corner of the info window. You can also add
your own icon.
7. Click OK to save your placemark.
TO EDIT PLACE PLACEMARK
1. To move it, drag the icon to it’s new place. Note that you can
only edit or move placemarks on your maps, not others.
3. To edit a placemark's title or description, click on it to open the
info window. Edit the title and description and click OK.
4. Click Done in the left panel when you are finished.
3. Using “My Maps”
ADDING LINES
1. Click the line tool
2. Move the cursor to the appropriate location and click to start
the line. If you want to dismiss this line, press the Escape key.
3. Click your mouse button at each point of your line.
4. To finish drawing your line, double click the last end point.
5. Add a title and description.
6.You can also change the color, opacity and width of your line by
clicking the color swatch in the top right corner of the info
window.
7. Click OK to save your line.
3. Using “My Maps”
EDITING LINES
1. Click the line on the map or in left panel.
2. To move a line on your map, mouse over the line to make the
end points appear. Click and drag the points to move them.
3. To delete a point from your line, right-click on the point and
choose Delete from the context menu.
4. To add a point to your line, you can either click on one of the
semi-transparent points, or right-click on the line and choose Add a
point from the context menu.
5. To edit a line's title or description, click on it to open the info
window. Edit the title and description and click OK.
3. Using “My Maps”
ADDING SHAPES
1. Click the Shape tool
2. Move the cursor to the appropriate location and click to start
the shape. If you want to dismiss this shape, press the Escape key.
3. Click your mouse button at each end point of your shape.
4. To finish drawing your shape, double click the last end point or
click on the starting point to complete the shape.
5. Add a title and description.
6.You can also change the color and opacity of your shape by
clicking the color swatch in the top right corner of the info
window.
7. Click OK to save your shape.
3. Using “My Maps”
EDITING SHAPES
1. Click the shape you want to edit in left panel or on the map.
2. To move a shape on your map, mouse over the shape to make
the end points appear. Click and drag the points to move them.
3. To delete a point from your shape, right-click on the point and
select Delete from the context menu.
4. To add a point to your shape, you can either click on one of the
semi-transparent points, or right-click on the shape and choose
Add a point from the context menu.
5. To edit a shape's title or description, click on it to open the info
window. Edit the title and description and click OK.
3. Using “My Maps”
SPICING UP THE DESCRIPTIONS, w/ RICH TEXT
By default the descriptions of your map items are in plain text.
However, you can use rich text or HTML to give them more life.
1. Click the appropriate placemark, line, or shape. The info window
appears.
3.You have 3 options on how to display the description text, for
now, select Rich Text.
4. To edit rich text descriptions, select the text and use the icons
above the description field:
5. Click OK to save your changes.
3. Using “My Maps”
SPICING UP THE DESCRIPTIONS, w/ HTML
Follow previous instructions but select “edit HTML”. In the text
area you can use HTML to style and also add more functionality to
your descriptions. Some common HTML tags are:
<b>...</b> -- creates Bold text
<i>...</i> -- creates Italic text
<br/> -- creates a line break
<a href=”URL”>Clickable text</a> -- creates a link
<img src=”URL”/> -- adds a image
For more tags you can visit a site like: HTML Dog --http://
htmldog.com/reference/htmltags/
3. Using “My Maps”
ADD PHOTOS
You can add any photo that you currently have hosted online
1. Click the appropriate placemark, line, shape. The info window
appears.
3. Choose Rich Text or Edit HTML.
4. If you chose Rich Text, select the little Picture Frame icon.
If you chose Edit HTML mode, use the <img> tag to add photos.
For example, <img src="http://www.mysite.com/myimage.jpg"
width=IMG_WIDTH height=IMG_HEIGHT> adds myimage to the
map
5. Once your done,click OK to save your changes.
3. Using “My Maps”
ADD VIDEO
Using MyMaps tool, you can embed Google / YouTube video
1. Again click edit and select the appropriate item.
3.You must choose Edit HTML.
4. Find the video you want on YouTube or Google Video. Copy the
snippet of code that lets you embed the video into a website or
blog.
* see next page
3. Using “My Maps”
ADD VIDEO, cont.
4. *For Google Video, the snippet looks like:
<embed style="width:400px; height:326px;" id="VideoPlayback" type="application/x-shockwaveflash" src="http://video.google.com/googleplayer.swf?docId=-274981837129821058&hl=en"
flashvars=""> </embed>
*For YouTube, the snippet looks like:
<object width="425" height="350"><param name="movie" value="http://www.youtube.com/v/
hKoB0MHVBvM"></param><param name="wmode" value="transparent"></param><embed
src="http://www.youtube.com/v/hKoB0MHVBvM" type="application/x-shockwave-flash"
wmode="transparent" width="425" height="350"></embed></object>
5. Paste the snippet of code into the description field.
6. Once your done, click OK to save your changes.
3. Using “My Maps”
OK YOUR DONE, NOW WHAT????
MyMaps gives you two options to show your map online. You can
either link to the map hosted at Google or you can put the map on
your site.
1. Either way you will have to click the link button at the top-right
corner of the map.
2. If you want to link back to Google for visitors to see your map
copy the “Paste link...” code. If you want to embed the map in your
site copy the “Paste HTML...” code.
3. Here’s where you become a programmer, paste code on your
site. * more on next page
3. Using “My Maps”
OK YOUR DONE, NOW WHAT????
3. Find the area on the site you want the link or map to appear and
paste your code there.
Example of link to map:
<a href=”http://maps.google.com/maps/ms?
ie=UTF8&hl=en&msa=0&msid=108613400318865166926.00045267b680cf31d3325&ll=34.071005,-118.2
60612&spn=0.08361,0.193291&z=13”> See my map </a>
Example of embedding map:
<div><iframe width="425" height="350" frameborder="0" scrolling="no" marginheight="0"
marginwidth="0" src="http://maps.google.com/maps/ms?
ie=UTF8&hl=en&msa=0&msid=108613400318865166926.00045267b680cf31d3325&ll=34.087283,-118.2
54905&spn=0.02957,0.048494&output=embed&s=AARTsJpCv7wNqnyxMqNHC6Y9yK_QQcurDw"></
iframe><br /><small><a href="http://maps.google.com/maps/ms?
ie=UTF8&hl=en&msa=0&msid=108613400318865166926.00045267b680cf31d3325&ll=34.087283,-118.2
54905&spn=0.02957,0.048494&source=embed" style="color:#0000FF;text-align:left">View Larger Map</
a></small></div>
4. Save your page and reload it to see if everything looks good.
3. Using “My Maps”
OK YOUR DONE, NOW WHAT????
4. If your are embedding the map, you can also customize the map
some more by clicking the “Customize and preview embedded
map” link. This will open up a new window with the option to
change the size of the map. Copy the code at the bottom when
your done and embed it like in the previous page.
THAT CONCLUDES ROUND ONE :-)
4. What if I have a lot of stuff!
Using a spreadsheet to get data on the map
When you have a large set of points that your trying to place on a
map, it can get get rather tedious to do them by hand. What your
going to need for this part is a spreadsheet of data. With that we’ll
help you take that spreadsheet and convert it into a format that
Google Maps can understand, KML (http://en.wikipedia.org/wiki/
Keyhole_Markup_Language). Here’s a quick breakdown of the steps.
1. Obtain a spreadsheet of locations to map
2. Check to see if it has latitude/longitude points or street addresses. If it doesn’t
then it’s not going to be of much use.
3. If it doesn’t have lat/long points then we need to geocode the street addresses.
4. After geocoding, we need to convert it to a KML format
5. And finally, import it into Google Maps to display
These instructions are also online: http://uscannenbergtimes.wordpress.com/
2008/08/04/grinding-out-a-google-map-in-15-minutes-or-less-illustrated-edition/
4. What if I have a lot of stuff!
Using a spreadsheet to get data on the map
1. Let’s get some data. For this exercise we are going to make it
simple and use a list of fast food addresses in Compton.You can
download the file here (http://www.palewire.com/steez/fastfood_raw.xls). You
could also use a service like http://cnngis.org to gather your list of
locations.
2. Once we have our raw data, we need to check if to see if has either
street addresses or latitude or longitude points. You’ll notice our data
only has street addresses so we need to geocode them into latitude &
longitude points. We’re going to use a free online service called
Batchgeocode (http://www.batchgeocode.com).
3. Select all your fields in your spreadsheet, then copy them, and go to
the batchgeocode website.
4. What if I have a lot of stuff!
Using a spreadsheet to get data on the map
4. Your going to paste your data into box below the words Step #2
on the website. Make sure to delete the example data from the
box before pasting. Tip: If you click inside the box, you can select-all
then delete it. Same holds true for pasting your data into the box.
4. What if I have a lot of stuff!
Using a spreadsheet to get data on the map
5. Click the Validate Source button
6. Hopefully, the website will tell you data is ok and can be geocoded.
If not double-check that you selected & copied all the data into the
box.
7. Then go down to Step 4 and
make sure that the geocoder is
pointed at the right fields for
your address, city and zip data.
4. What if I have a lot of stuff!
Using a spreadsheet to get data on the map
7 (cont) The critical fields to look out for are the Location Fields
and the Title & Description fields in the Map Fields section
8. Once you’ve check them over CLICK “RUN GEOCODER”
9. Depending on the size of spreadsheet, it could take some time to
process. If everything goes right, you should get your data back
with two new fields, containing longitude and latitude points! Copy
the data inside the box below Step #6
10. Go back to Excel and open a new worksheet.
4. What if I have a lot of stuff!
Using a spreadsheet to get data on the map
11.Select the very top left hand box in your new blank
spreadsheet, which will be A:1
12. Paste the newly geocoded data
13.Now you’ll need to convert your spreadsheet into a Googlefriendly KML file using Earthpoint’s service. Notice that they
require you to change your file’s field headers to match their style.
14. So find the field headers that say bg_lat & bg_long and rename
them to “latitude” & “longitude” respectively.
4. What if I have a lot of stuff!
Using a spreadsheet to get data on the map
14(cont). You may also need to rename a couple other headers so
you have a Name, Description, & Icon headers.
"Name" is the label that appears next to each icon on Google Earth.
"Description" is the text that appears in the Google Earth pop-up balloon. An Excel formula can be
used to combine data from several columns.
"Icon" designates the icon that is displayed for each point. An easy way to get an icon is to enter a
number from the table below. If the Icon column is left blank or if it is missing, icon number 166 is
displayed. You can also enter an icon's "www" web address. If you don't want an icon, enter the word
"none". You probably won’t have a ICON field so you will have to create one. You’ll also need to consult
Earthpoint’s site and select an icon for your data. Pick a numeric value…
I would recommend looking at the Quick Start area on the KML converter site for more information.
The site is at http://www.earthpoint.us/ExcelToKml.aspx
15. All the other fields are optional and it’s up to you on what you
want to do with them. They will not impact the final product!
4. What if I have a lot of stuff!
Using a spreadsheet to get data on the map
16. Check you spreadsheet over, to look for any mistakes or blank
fields. Also, make sure the headers are correct.
17. Once your done, save the spreadsheet to your Desktop. You
can name it whatever you feel like.
18. Almost there, go to the Earthpoint site (http://www.earthpoint.us/
ExcelToKml.aspx)
17. Upload your file by clicking the Browse button and then
selecting your file.
18. Check for errors by clicking the Check for Errors button.
19. If you get the green light, upload your file again and click the
“View on Google Earth Button”.
When you click the
4. What if I have a lot of stuff!
Using a spreadsheet to get data on the map
19(cont). the button. It will bring up a save window. Select the
“Save to Disk” option & save it to your desktop. If you got some
errors, go back to your spreadsheet & fix the problems. Save the
spreadsheet and try again at the Earthpoint site.
20. Now go to to http://maps.google.com and login in. Then click
the MyMaps link and select your map you want to put the KML
into. If you don’t have a map already create a new one. Now,
select the edit button on the left hand side. You should see a
import link appear. Click that.
21. Select your KML file that you just created. And within a few
seconds, you should see your map with markers on it. If not, go
back through the steps to find the problem, must likely it will be
from your cut & pasting or field headers were wrong.
4. What if I have a lot of stuff!
Using a spreadsheet to get data on the map
22. Wash rinse and repeat with other data sets (and different icons)
for more mashup fun.
NOTE: As we mentioned in the class, Google will eventually choke
when you put too many markers on the map, so narrow what you
want to display before beginning this process. I would recommend
no more than 200-250. But your mileage may vary.
Also, if you make changes to you data you will need to republish
your spreadsheet as a KML file and then re-import to to your map
before you see the changes.
4. What if I have a lot of stuff!
The next tutorial is actually another way we we’re going to show
you on how to plot a large set of locations onto Google Maps. But
we ended up going with the other method. So this is just bonus
material of an alternative method. :-)
4. What if I have a lot of stuff!
Create & publish spreadsheet
One of the easiest ways is to create a spreadsheet and add your
markers to it. In the end of this tutorial we will be using Google
Spreadsheets to add the points to the map, so you might want to
begin by creating a new Google spreadsheet but you can also
import a delimited file that you already created to a Google
spreadsheet later.
Important -- to use this method your spreadsheet must be made
public and you need a Google API key, which you can get at -http://code.google.com/apis/maps/signup.html
4. What if I have a lot of stuff!
Create & publish spreadsheet
1.Your spreadsheet must have a latitude & longitude fields. Other
fields that you most likely will want is a Description field, an
Address field, some sort of Title field & possibly a rank field.Your
description field can contain code to put photos, video or links into
the Description of your marker.
2. How to get latitude/longitude numbers? One way is to use a
geocoder service like http://geocoder.us/. You can also geocode
your whole spreadsheet by using a service like http://
www.batchgeocode.com/
3. Once you have all your locations done. Save it, re-open it and
then click Publish in the right corner.
4. What if I have a lot of stuff!
Create & publish spreadsheet
4. In the area that just appeared, click the “more publishing options”
link at the bottom. You might also want to select the Auto Publish
checkbox if you want the map to reflect any changes you made in
the data automatically.
5. Now in the new window that opened up. Select the ATOM file
format. Set the What Sheet and What Cells options if needed.
Then click Generate URL.
6. Copy the URL to some text editor for the time being.
7. Now let’s go to the map wizard at this link: http://gmapssamples.googlecode.com/svn/trunk/spreadsheetsmapwizard/
makecustommap.htm
4. What if I have a lot of stuff!
Create & publish spreadsheet
8. Next, grab some information from the URL we copied earlier.
Your URL should look like this -- http://spreadsheets.google.com/
feeds/list/[spreadsheet key]/[worksheet id]/public/values. The two
pieces of information we need are the spreadsheet key and the
workshop id.
9. Copy the spreadsheet key which will likely be a bunch of
numbers and letter characters and paste it into the Spreadsheet
Key field in the wizard.
10. Copy the worksheet id from our feed URL and paste it into
the Workshop Id field in the wizard.
4. What if I have a lot of stuff!
Create & publish spreadsheet
11. Click the Load Worksheet Data button. If all goes well, you
should see some result appear below it. If you don’t, make sure
your spreadsheet is public and you pasted everything correctly.
12. Scroll down to Step 2 in the Wizard. Here is where you will
link your spreadsheet fields to the map.
13. The two fields you must correctly match up are the latitude
and longitude. Proceed to match the other fields accordingly.
14. Set the width & height of the map you want
15. Check the Sidebar checkbox if you want to show a list of your
markers next to the map that will allow users to click to them.
16. Choose your marker color & highlight color
4. What if I have a lot of stuff!
Create & publish spreadsheet
17. Click Update Map
18. If the map is not what you wanted, make the changes and click
Update Map. Do this until you get it perfect.
19. Once everything is to your liking, scroll down to Step 3 & copy
the code in the box. Note: if the the map isn’t going into a preexisting HTML page you will need to click the Generate header/
footer checkbox. This will make it a valid HTML document.
20. Once you have copied the code, go to your HTML page and
paste it into the appropriate location between the <body> tags.
4. What if I have a lot of stuff!
Create & publish spreadsheet
21. You will need your Google API key, for this step. In the code
you just pasted, find “key=”
right after the equal sign
paste in your API key.
22. If you need to make more changes or add new locations, just go
back to your Google spreadsheet and change it.
5. RESOURCES
BASIC TUTORIALS:
Using MyMaps Tutorial:
http://local.google.com/support/bin/answer.py?hl=en&answer=68480
ADVANCED TUTORIALS:
Map Examples:
http://code.google.com/apis/maps/documentation/examples/
Map Demos:
http://code.google.com/apis/maps/documentation/demogallery.html
Tutorial on creating a map using the API
http://code.google.com/support/bin/answer.py?answer=74725&topic=11364
Misc. Google Map Tutorials
http://econym.googlepages.com/index.htm
EXAMPLES:
School Performance:
http://schoolperformancemaps.com/ca/
Fast Food Restuarants
http://www.fastfoodmaps.com/
HealthMap
http://www.healthmap.org/en
Who is Sick?
http://whoissick.org/sickness/
Misc. Examples
http://mapmash.googlepages.com/
5. RESOURCES
Online Tools
Geocoding tool
http://geocoder.us/
Geocoding tool
http://mapmash.googlepages.com/getcoord.html
Batch GeoCode a spreadsheet
http://www.batchgeocode.com/
Convert spreadsheet to KML
http://www.earthpoint.us/ExcelToKml.aspx
Google Map creator
http://www.mapbuilder.net/
Another Google Map creator
http://fmatlas.com/atlas2/jsp/login.jsp
Yet Another Google Map creator
http://www.communitywalk.com/
OTHER TOOLS
GMapCreator -- Windows program to create Thematic Google maps
http://www.casa.ucl.ac.uk/software/gmapcreator.asp


© Copyright 2026