
How to add new content to YourHub.com/NextGen 4
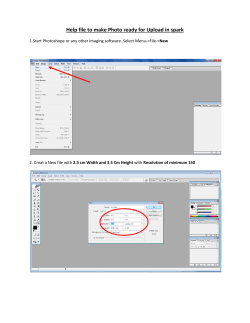
How to add new content to
YourHub.com/NextGen
4 You must be logged in to add new content.
4 When you are ready to add an article, blog, or
event, please click on the bright red “add content” button in the upper right corner above
the blue “search” button.
4 Click on article, blog or event on the next
page.
How to create a story or blog
1. Write an interesting title
2. Match your
“author bio” to
your article. Type
the first three or
four letters of
your name and it
should appear in a
drop menu along
with other similar
names. Click on
your name and it
should appear in
the box. Leave
“Show author
info” checked so
readers know who
wrote the story.
3. Create a teaser
for your story.
This can be as
simple as the first
sentence of your
story, or a short
description of
what’s interesting
about your story.
Type this into the
teaser box.
4. Type your story
1
2
3
4
(or paste it from
another word processing program)
into the “BODY”
box. You can format your story using a rich text editor similar to Microsoft Office. Make sure to divide your story into paragraphs to make it
easier to read. There is an automatic spellcheck feature, so always double-check any word that you see underlined in red.
BLOG ENTRIES DO NOT INCLUDE PHOTOGRAPHS, SO
SKIP STEPS 5 - 7
5
5. Next, upload a photograph (main
image) for the article. Click the
browse button to search your own
hard drive for content to upload.
Max image size = 16 MB. Photographs are optional, but highly
recommended. Once you upload
your photo, you will see a main
image credit box. Use this to type
in a caption for the photo and a
credit for who took the photo – your
name or the name of the original
photographer.
6
6. Next add a thumbnail image. If
you do not do this, the main photo
will be used for the thumbnail (a
small photo that appears next to
your story on the front page).
7
7 If you have more than one
photo, use the gallery to upload
the rest. The photos will turn into a
slide-show-like presentation below
your body text. After you upload
each photo, use the description
box to add a caption and a photo
credit. To add multiple images
click the “add another item” button
below the upload form.
8
8 Our final step is a very important one. NextGen stories are now
divided into story topics. You will
need to assign a topic to your article or story using the list of terms
provided under “Vocabularies”.
Please choose the most appropri9
ate term, otherwise anything you
publish will end up in the wrong
section of the NextGen site. If you
hold down the Control key, you can choose more than one topic. Each story topic has it’s own page. You will be able to
access these from the drop-down menu bar on the top of the page .
9. Before you hit the “save” button to publish, please review your story and any other information you may have entered
during the article creation process (especially if the referenced author is correct).
10
You can now either preview or save your content. If you need to edit your story after you
have saved it, click on the edit link on the bar
in the very top right corner.
Anything published must be approved
by the NextGen administrator. It will
not appear on the site until it is approved.
How to create an Event on YourHub.com/NextGen
1. Type in a title for your
event.
1
7
2
2. Choose the appropriate
category for your event.
This will help people find
your event.
3. Insert the date and time
for your event.
3
4. Next, please type a short
description for your event in
the Teaser box.
4
5
6
5. In the “BODY” box, write
a more complete description of your event, including
location and cost. If there
is no cost, make sure you
mention that. If you have a
contact name, include that
here as well. You can format
your story using a rich text
editor similar to Microsoft
Office.
6. Upload a photo (main
image) for the article. Click
the browse button to search
your own hard drive for
content to upload. Max
image size = 16 MB. Once
you upload your photo, you
will see a main image credit
box. Use this to type in a
caption for the photo and a
credit for who took the photo
– your name or the name of
the original photographer.
Images are optional.
7. Before you hit the “save” button to publish, please review all information you have entered.
You can now either preview or save your content. If you need to edit anything after saving your event, click on the edit link
on the bar in the very top right corner. Anything published must be approved by the NextGen administrator. It will not appear on the site until it is approved.
If you have any questions or corrections to these instructions, please e-mail NextGen administrator,
Jill Armstrong, [email protected] or call 303-954-3964.


© Copyright 2026