
12/15/2005
12/15/2005 BLANK PAGE Desktop Reference Document Writing Guide CONTENTS SECTION 1 - - INTRODUCTION .................................................. 1 SECTION 2 - - BASIC WRITING .................................................. 3 English Language and Navy Standards....................................................................... 3 Document Reviews...................................................................................................... 4 Rough Draft.............................................................................................................. 4 Smooth..................................................................................................................... 4 Electronic Files......................................................................................................... 4 Document Conversion to Adobe Acrobat ................................................................. 4 SECTION 3 - - DOCUMENT FORMATTING ................................ 5 General........................................................................................................................ 5 Navy Correspondence Manual .................................................................................... 5 Reference Blocks ..................................................................................................... 5 Referencing Guidelines for Text............................................................................... 6 References in the Enclosure .................................................................................... 7 Enclosure Lines........................................................................................................ 7 General................................................................................................................. 7 Sending Enclosures Separately............................................................................ 7 Copy to Lines ........................................................................................................... 7 Margins .................................................................................................................... 7 Fonts ........................................................................................................................ 8 Spelling .................................................................................................................... 8 Paragraph Format and Numbering........................................................................... 9 Format .................................................................................................................. 9 Blank Pages ......................................................................................................... 9 Numbering .......................................................................................................... 10 MS Word’s Autoformatting Feature (turn off) ............................................................. 10 ANSI/NISO Z39.18-1995, Scientific and Technical Reports - Elements, Organization, and Design ................................................................................................................ 12 Paragraph Formatting and Numbering................................................................... 12 Format ................................................................................................................ 12 Numbering .......................................................................................................... 13 Tables........................................................................................................................ 14 Titles, Headings, and Font ..................................................................................... 14 Numbering ............................................................................................................. 15 Figures....................................................................................................................... 15 Using Bullets.............................................................................................................. 15 SECTION 4 - - GENERAL USAGE AREAS ............................... 19 Acronyms and Abbreviations ..................................................................................... 19 Characters and Symbols ........................................................................................... 20 Capitalization ............................................................................................................. 20 First Word .............................................................................................................. 20 i Document Writing Guide Desktop Reference Nouns..................................................................................................................... 20 Adjectives............................................................................................................... 21 Panel Nomenclature............................................................................................... 21 Naval Ships ............................................................................................................ 21 Military Ranks......................................................................................................... 21 Billet/Organizational Titles...................................................................................... 21 Days, Months, Holidays, and Seasons.................................................................. 21 Compass Directions ............................................................................................... 22 General .................................................................................................................. 22 Prefixes...................................................................................................................... 22 Compound Words...................................................................................................... 22 Standard Hyphen Usage ........................................................................................... 23 Terms of Measurement.............................................................................................. 24 Compass Directions ............................................................................................... 24 Latitude and Longitude........................................................................................... 24 Temperature .......................................................................................................... 24 Spaces ................................................................................................................... 24 Percent................................................................................................................... 24 Abbreviated Terms of Measurement ...................................................................... 24 Numbers ................................................................................................................ 25 Punctuation................................................................................................................ 25 Comma .................................................................................................................. 25 Semicolon .............................................................................................................. 26 Colon...................................................................................................................... 26 Quotation Mark....................................................................................................... 26 Apostrophe............................................................................................................. 26 Table and Figure Titles .............................................................................................. 26 Classification Markings .............................................................................................. 27 Overall Classification.............................................................................................. 27 Title and Portion Markings (Paragraph and Subparagraph)................................... 27 Tables and Figures ................................................................................................ 28 Problem Areas of Word Usage .................................................................................. 28 Military Rank Abbreviations ....................................................................................... 29 SECTION 5 - - USING DOCUMENT TEMPLATE STYLES ....... 31 Report Cover ............................................................................................................. 31 Title Block .............................................................................................................. 31 Report Phase/SSIC/Serial Number ........................................................................ 32 Graphic .................................................................................................................. 33 Distribution Statement/Derivative Classification ..................................................... 33 Our Command Name and City ............................................................................... 33 Report Commander’s Letter ...................................................................................... 33 Report Enclosure ....................................................................................................... 33 Enclosure Cover Page ........................................................................................... 34 Title ........................................................................................................................ 34 Phase Designation Block ....................................................................................... 34 OT-XX Final Report Block ...................................................................................... 34 Distribution Statement/Derivative Classification ..................................................... 34 Contents................................................................................................................. 35 ii Desktop Reference Document Writing Guide Updating all Fields .............................................................................................. 36 Inserting Heading Styles............................................................................................ 36 Macro (not yet incorporated into our formats, but will be soon).............................. 36 Manual ................................................................................................................... 37 SECTION 6 - - A FEW MICROSOFT WORD TIPS .................... 39 Cross-Referencing..................................................................................................... 39 Page and Section Breaks .......................................................................................... 42 Page Break ............................................................................................................ 42 Next Page .............................................................................................................. 42 Continuous Page Break ......................................................................................... 42 Headers and Footers ................................................................................................. 42 Headers ................................................................................................................. 42 Footers................................................................................................................... 43 Document and Page Classification ........................................................................ 44 Page Numbering .................................................................................................... 44 Show/Hide Button ...................................................................................................... 45 Copying and Pasting Text.......................................................................................... 45 Widow and Orphan Control ....................................................................................... 46 Track Changes .......................................................................................................... 47 Going Smooth............................................................................................................ 50 Excessive Formatting ................................................................................................ 51 SECTION 7 - - UNDERSTANDING EDITORIAL MARKINGS.... 53 iii Document Writing Guide Desktop Reference BLANK PAGE iv Desktop Reference Document Writing Guide SECTION 1 - - INTRODUCTION This guide is intended to provide a quick and easy-to-use technical writing reference, tailored to the type of writing we do at OPTEVFOR. While not a complete manual of English style and grammar, Navy writing styles, or a substitute for a dictionary, this guide specifically addresses broad areas such as: • Basic writing • Formatting (navy and technical) • Correct use of numbers (paragraph, time/distance, quantities) • Acronyms and abbreviations • Table and figure headings • Classification markings • Document template styles ……and more (see Contents). The above are a compilation of editorial areas that are commonly misused while writing our OT&E outlines, test plans, OT&E framework documents, evaluation reports, and other OT&E documentation. Because of the nature of our business (scientific, research, technical information), we must write in a combination of standard Naval writing and technical writing. Therefore, this guide is designed to help you produce concisely written technical products. The source references we use are: • SECNAVINST 5216.5D, Department of the Navy Correspondence Manual • SECNAVINST 5510.36, Department of the Navy (DON) Information Security Program (ISP) Regulation • Government Printing Office (GPO) Style Manual (for technical styles) • ANSI/NISO Z39.18-1995, Scientific and Technical Reports - Elements, Organization, and Design • Warriner's English Grammar and Composition • Webster's Tenth New Collegiate Dictionary • Standard English books • Technical Editing, a Practical Guide • Standard American Style Manual Section 1 - Introduction 1 Document Writing Guide Desktop Reference BLANK PAGE 2 Section 1 - Introduction Desktop Reference Document Writing Guide SECTION 2 - - BASIC WRITING When writing an OPTEVFOR document, keep the applicable OTD Guide chapter open for guidance. Don’t use a previous report, OT&E framework document, test plan, part IV, MOA, etc., as your “positive gouge.” Formats change, policies change, words change. Just because the previous document has the Commander’s or Chief of Staff’s signature on it doesn’t mean it’s good forever. Start fresh with the most current document format/template on the command’s LAN/MIS/IFS. If you’re unsure of what you need, contact your editors. In writing OPTEVFOR documents, start early. Get as much done as early as possible or you may find yourself way behind the power curve at the end, when you can least afford problems and unnecessary delays. You, as an author, have to do your part in preparing the quality documents the Commander expects from us. Don't just throw some words on paper and hope the review process will take care of all the details for you. While no one is perfect, OTDs should strive to prepare documents in the proper format from the start. Go over the guidelines for whatever type of document you're writing before you start, and refer to that and any corresponding chapters often while you write. Pay close attention to editorial comments in material returned to you. Don't automatically incorporate the comments without considering their import. If you've pluralized all your F-14s and FA-18s by adding " 's" and the editor has removed all the apostrophes, don't fix the marked errors and then needlessly go on creating more F-14's and FA-18's (or for that matter, F-15's, B-52's, or MiG-29's). Although the editors can provide useful feedback to you by reviewing a document in bits and pieces, the value of that type of review rapidly diminishes as the document nears completion. In order to be of any real value, a review must include numerous comparisons between various parts of the document, acronym and reference checks, etc. This is not possible unless the document is complete. English Language and Navy Standards • • Keep sentences short (average under 20 words) Use Simple Words Not But Facilitate help Utilize use Promulgate issue, provide in addition also in accordance with by, per, following, under in order to to for the purpose of for, to • Avoid using "it is" in sentences Not But it is requested it is apparent that it is the recommendation of... we request, please clearly I (we) recommend Section 2 - Basic Writing 3 Document Writing Guide Desktop Reference Document Reviews These standard OT&E documents are reviewed twice (rough draft and smooth) by the Staff Editor's office (Code 01E) (see OTD Guide, chapter 3, table 3-3 for signature requirements for all documents): • • • • • • • • Operational requirements document (ORD) comment letters Test and evaluation master plan (TEMP) input, comment, and forwarding letters* All test plans All OT&E framework documents All evaluation reports Memorandums of agreement TEMP, test plan, and OT&E framework document change letters Modeling and simulation accreditation reports * TEMPs for signature which require no changes, and involve nothing more than a new cover letter, need not to be routed in the rough. Only a smooth route is required. Rough Draft This is an initial, double-spaced review for all technical and editorial issues. Double-spacing allows changes and corrections to be made neatly, without awkward writing in the margins. Technical issues are those areas that deal with building TEMPs, test plans, OT&E framework document, evaluation reports, and tactics guides as discussed in chapters 3 through 9 of the OTD Guide. Everything is examined during this review — from verifying correct thresholds and parameters, major and minor test limitations, test dates, complete COI lists, test results, conclusions, recommendations, and security classification markings — to overall format, an incorrect paragraph title, or a misplaced comma. All pertinent reference documentation is required to be submitted with the document to be reviewed. At the bottom of the routing form, include the path to the electronic file. Smooth This review is a final check for overall format, correct page numbering, and typos only. They are routed to the signer in a folder with a blue blazer on the left inside. Under the blue blazer should be the references and the rough route slip. The document is on letterhead paper, singlespaced, and ready for signature. The Staff Editor’s office will make all final corrections in this document and take it directly to the front office. When filling out the blue blazer for these, you must include the correct K-drive path to the latest (and, hopefully, only) version of your electronic file(s). Electronic Files Do not keep multiple versions of your document on the LAN! We have run into this problem time after time. It’s vital that you know exactly which version must be signed….and that is the version that the editors and front office must make last minute corrections to. Document Conversion to Adobe Acrobat Conversion of MS Word files to Adobe Acrobat files can be accomplished in the Editor’s office upon request. However, OTDs must bring signed signature pages to the editors for color scanning and insertion into their final document. 4 Section 2 - Basic Writing Desktop Reference Document Writing Guide SECTION 3 - - DOCUMENT FORMATTING General This section outlines the formatting shown in SECNAVINST 5216.5D, Department of the Navy Correspondence Manual (for use on TEMP input, comment, and forwarding letters, MOAs, and other selected Navy correspondence), and the ANSI/NISO Z39.18-1995, Scientific and Technical Reports — Elements, Organization, and Design (for use only on OPTEVFOR OT&E framework documents, and final reports). Navy Correspondence Manual Reference Blocks References will be shown the same in both types of document formatting we use. Dates are always first three letters of the month and last two numbers of the year (spell out fully in text). If correspondence was not dated, type “(undated).” Avoid commas and quotation marks in the reference block. Correspondence requires: • Standard Navy distribution list short titles or originator • Type of correspondence (ltr or memo) • SSIC • Originator's code by itself or in a serial number • Date • Ref: (a) COMOPTEVFOR ltr 3980 Ser 500/C231 of 17 Jun 01 • Ref: (a) CNO memo 5216 Ser 09B33/317731 of 11 Sep 01 Messages require: • Title of originator as shown in “from” line of message • Date-time group with month and year. • Ref: (a) NAS NORFOLK VA 101300Z Sep 01 • • • • • Telephone conversations require: PHONCON Individuals and their activities Date Ref: (a) PHONCON OPNAVSUPPACT (N09B15) Mrs. Smith/NAVSUP (Code 79) Mr. Henry of 21 Jan 02 Meetings require: • Mtg • Individuals and their activities Section 3 - Document Formatting 5 Document Writing Guide • • Desktop Reference Date Ref: (a) Mtg COMOPTEVFOR (Code 597) LCDR Smith/ COMNAVAIRSYSCOM (PMA-11) LCDR Jones of 2 Mar 02 Use a classification mark ((U)) only when using the full title of a classified reference. • Ref: (a) System Threat Assessment Report (STAR)/Office of Naval Intelligence (ONI) Threat Assessment (TA) 12345, Chevrolet Avalanche Converted Mobile Rocket Launcher of 11 Jul 02 (U) Electronic mail requires: • Standard Navy Distribution List (SNDL) short title of the originator • “E-Mail,” • Type of correspondence • SSIC • Originator’s code by itself or in a serial number as shown in the referenced correspondence • Date • Ref: (a) OPNAV E-Mail ltr 5216 Ser N20/11 of 21 Apr 02 • • • • • Navy instructions require: SNDL short title of issuer with “INST” SSIC with consecutive number and, if any, and revision letter Subject if not clear from the subject or text of your letter Chapter, section, or paragraph of a long instruction if only that part applies Ref: (a) NAVSUPINST 7510.1 Or SECNAVINST 5216.5C, Department of the Navy Correspondence Manual, Chapter 2, Section B, Paragraph 14 Referencing Guidelines for Text • OPTEVFOR’s policy for using references in text is to not cite the title of the reference, except for the threat assessment in the test plan (Section 1, Paragraph 4, Evaluation Criteria). Just use simple words, for example: "Reference (a) stated..." and "Refer to figure 1 for F-14 general arrangement and table 1 for configuration data." • In text, always spell out reference, enclosure, figure, and table (e.g., reference (a), not ref (a); enclosure (1), not encl (1); and figure 1, not fig. 1). 6 Section 3 - Document Formatting Desktop Reference • Document Writing Guide Lower case paragraph, appendix, page, figure, and table references (e.g., paragraph 407a(3)(d), appendix C, page 1-4, figure 2-1, and table 5-10. References in the Enclosure References listed on the enclosure reference page must first list the same references, in the same order (i.e., (a), (b), etc.,) as shown in the letter, then list additional references in the order they are mentioned in the enclosure text ((c), (d), (e), etc.). Enclosure Lines General List enclosures in an “enclosure” line by following the order they appear in the text. In the text, spell out the word “enclosure.” Sending Enclosures Separately When size, weight, or other factors prevent sending an enclosure with a letter, send it separately and type “(sep cover)” after the enclosure’s description. • Encl: (1) SECNAVINST 5216.5D (sep cover) Copy to Lines The “Copy to” list requires the SNDL plain language address (PLA), not the abbreviated address: Incorrect PEO(A) PEO(T) PEO(W) PEO(S) PEOMW Correct PEOASWASM PEOTACAIR PEOSTRKWPNSUAVN PEOSUB PEO LMW • Activities listed in “Copy to” don’t need a city or state unless a command has more than one location under the same title. • Activities listed in the “INFO” line in messages require the same treatment as the “Copy to” list, except that city and state are required for messages no matter what. Always check the current SNDL (below) if you’re not sure of a command’s PLA. http://neds.daps.dla.mil/sndl.htm • • • • • • • Enclosure (1): Foreword to SNDL Enclosure (2): Fleet Address Listings Enclosure (3): Shore Address Listings Enclosure (4): Fleet Chain of Command Enclosure (4): Shore Chain of Command Enclosure (5): Homeports and Permanent Duty Stations Enclosure (6): SNDL Serial Changes Margins Margins in OPTEVFOR documents are 1 inch all around for body text, tables, and illustrations. Headers and footers are placed at 0.5 inch from the page top and bottom edges. Click on File > Page Setup > Margins to set these up. Section 3 - Document Formatting 7 Document Writing Guide Desktop Reference Fonts OPTEVFOR documents are in Courier New font. • 12-point Courier New o Body text o Page numbers (in italics in test plans and reports) o Equations (not mandatory, see below) o Data sheets (not mandatory, see below) • 12-point Courier New Bold o Paragraph numbers/letters and associated classification markings (e.g., (U), (S-NF), etc.) o Paragraph heads (top level heads are all caps; all sub paragraph levels are initial caps) o Section/appendix titles (except new report and OT&E framework formats) • 14-POINT COURIER NEW, BOLD, BLUE, ITALICS, ALL CAPS O SECTION AND APPENDIX HEADS FOR COTF EVALUATION REPORTS AND OT&E FRAMEWORK DOCUMENTS • 16-POINT COURIER NEW BOLD - ALL CAPS O HEADER AND FOOTER PAGE CLASSIFICATION MARKINGS • 10-point Courier New Bold o • 9-point Courier New o • Table titles/table column headings, and figure titles Internal table text Part IV OT&E Outlines. Since these documents are constantly sent back to the program offices via e-mail and paper copy and inserted directly into TEMPs, we can put them into whatever font the actual TEMP is in; normally Times New Roman. This mostly eliminates the possibility of many errors due to having to retype our document for TEMP insertion. Spelling • • 8 The dictionary lists alternate spellings for many words, but that doesn't mean you should use them all. Stick with one spelling, preferably the first dictionary listing. Be consistent when using nomenclatures. For nomenclatured equipment, introduce an item using the full designation and nomenclature, then establish a short form for use throughout the rest of the document. For example, start out with AN/ALR-41 Countermeasures Receiving System, then use AN/ALR-41 System, ALR-41 System, or even ALR-41 thereafter. For Section 3 - Document Formatting Desktop Reference • Document Writing Guide simple items without formal designations, be sure to use the same name throughout. If you mention an adjustable wrench in one place, don't call it a monkey wrench somewhere else. Along the same lines, don't use Aircrew Mission Data Cards on one page, Aircrew Mission Cards on another, and Data Cards on a third. Capitalize consistently. Paragraph Format and Numbering For OT&E documents other than OPTEVFOR OT&E framework documents and evaluation reports, use the following: Format • • • • • • Major paragraphs (those introducing new thoughts; i.e., number 1, 2, 3, etc.) are numbered at the left margin. If subparagraphs are needed, use at least two (indented); no a. subparagraph without at least a b. subparagraph (also, no (1) without a (2), etc.). Double-space between all paragraphs and subparagraphs. When citing paragraphs or subparagraphs, write numbers without periods or spaces: "paragraph 1b(1)(a)." Use bold and all caps for major paragraph headings. Use bold and initial caps for subparagraph headings. If paragraph 1 has a heading, paragraph 2 should have one, although that is not possible in every case. Instead of using subparagraphs for short, incomplete thoughts, use hyphens or bullets (no periods after incomplete thoughts). Whichever you use, be consistent throughout the document (see example). 1. The system upgrade provides the following benefits: • • • • • • Systematized digital projection Compatible organizational flexibility Synchronized transitional contingency Paragraph and subparagraph headings are signposts which provide logical divisions in your written material and signal the reader what is to follow. When you change subjects, make sure to identify the new subject with a heading or subheading, as appropriate, or you will confuse your reader. Start a paragraph near the end of a page only if you have room for two or more lines. Continue a paragraph on a following page only if two or more lines can be carried over. A signature page must have at least two lines of text. Don’t place a paragraph or subparagraph heading at the bottom of a page unless you have room for at least two lines of text to follow. Blank Pages • • A section or a chapter of a document cannot end on an odd-numbered page. When preparing OT&E framework documents and evaluation reports where the notation is required that the reverse of a page (always the even-numbered page) is blank, include the page and place the notation "BLANK PAGE" in the center of the page. For OT&E documents other than OT&E framework documents and evaluation reports, the notation on blank pages is “THIS PAGE INTENTIONALLY LEFT BLANK.” Section 3 - Document Formatting 9 Document Writing Guide Desktop Reference Numbering Paragraph numbers (and any attached classification marking) are always bolded; i.e: 1. (U) The below examples are in Courier New font to provide an accurate depiction. Tabs (for 12-point Courier New) * In MS Word, start by going to Format > Tabs and clearing the existing tabs. Change the default tab stops setting from 0.5 to 0.4 inch. Set new tab stops based on the number of characters in the top level paragraph number (the tabs are always 0.4 inch, but the starting point will vary) as shown below: 1. Set .4, .8, 1.2, 1.6, 2.0, and 2.4 10. Set .5, .9, 1.3, 1.7, 2.1, and 2.5 101. Set .6, 1.0, 1.4, 1.8, 2.2, and 2.6 * Whether you use tabs or spaces, proper paragraph number/ letter indention looks like this: 1. Paragraph levels are single-spaced to better show alignment. a. Two spaces after a. (1) One space after (1) (a) One space after (a) 1. Two spaces after 1. a. Two spaces after a. Caution Using spaces only works with a monospaced font (Courier New). If you try to align a proportional font (Arial or Times New Roman) with spaces rather than tabs, you'll end up with an inconsistent mess. The following are common to both the format described above and the new format described below: • Start a paragraph near the end of a page only if you have room for two or more lines. Continue a paragraph on a following page only if two or more lines can be carried over. A signature page must have at least two lines of text. • Instead of using subparagraphs for short, incomplete thoughts, use bullets or hyphens (no periods after incomplete thoughts). Whichever you use, be consistent throughout the document. MS Word’s Autoformatting Feature (turn off) MS Word autoformatting is already set as your default. Unfortunately, this does not work well with our documents. We highly recommend you turn this function off before beginning your documents. 10 Section 3 - Document Formatting Desktop Reference Click on Format > AutoFormat on the Standard toolbar Document Writing Guide Click on the Options button at the lower left After clicking on Options, you will see another dialog box with numerous blocks checked. The ones you are concerned with are the top four, under Apply. If any are checked, then click on each to clear them. In the Replace section, uncheck the box for “Hyphens (-) with dash (—).” The remaining items can remain checked. Next, look at the bottom sections under Preserve and Always AutoFormat. Make sure they have also been cleared. Next, click on the AutoFormat As You Type tab. Under the Apply as you type and Automatically as you type sections, uncheck all boxes. Section 3 - Document Formatting 11 Document Writing Guide Desktop Reference Next, click on the AutoCorrect tab. In the section showing characters (see the lower arrow below) you will see the trademark symbol (™), the copyright symbol (©), and the registration symbol (®). You need to delete these three (they are deleted in this example, but may not be deleted on your computer). Click once on them one at a time, and click on the Delete button. What happens with these is, as you type in a reference (c) or subparagraph (c), the copyright symbol automatically replaces it. Everywhere in your document the (c) will change. The same for the trademark symbol when using the abbreviation for telemetry (TM). Likewise for using reference (r) or subparagraph (r) - - it will change to the registration symbol. ANSI/NISO Z39.18-1995, Scientific and Technical Reports - Elements, Organization, and Design OPTEVFOR OT&E framework documents and evaluation reports use the formatting from the above publication. This is completely different than the other OPTEVFOR OT&E documents just shown, in that the formatting is all flush left, the numbering is with decimals, and they are built on various styles. Below are the basics. Selecting (manipulating) these styles is discussed in detail in section 5. Paragraph Formatting and Numbering Format • • • • All paragraphs are numbered flush to the left margin (no indents). If subparagraphs are needed, number them as needed. The rule for no a. subparagraph without at least a b. subparagraph (also, no (1) without a (2), etc.) doesn’t apply in this format. You can have a single subparagraph whenever you need it. Double-space between all paragraphs. A period and one space follow a single-digit major paragraph. Periods will not follow any other level of numbering. For example: 1. TITLE FOR MAJOR PARAGRAPHS 1.1 Text for subparagraphs (portions) follow underneath the number. 12 Section 3 - Document Formatting Desktop Reference Document Writing Guide 1.1.1 Cccccccccccc etc. • Major and subparagraph headings are built into the templates provided for these documents. Additional (if needed) paragraphs are selected from the style box formatting tool bar in MS Word. • A section or a chapter of a document cannot end on an odd-numbered page. When preparing OT&E framework documents and evaluation reports where the notation is required that the reverse of a page (always the even-numbered page) is blank, include the page and place the notation "BLANK PAGE" in the center of the page. Numbering The numbering style follows approved government, scientific, and technical guidelines. Section/chapter headings will carry the Heading Style 1. This is on a single line, italic, colored blue, all capital letters, and larger than all other font in the document. 1. THIS IS HEADING STYLE 2 Style 2 is the major paragraph heading style in our OT&E framework documents and reports. This style will always have a heading on the same line as the numbering, be all capital letters, and no period after the heading. 1.1 This Is Heading Style 3 Style 3 is the first subordinate paragraph to the major paragraphs. The majority of time this style will have a heading on the same line as the numbering, with no period after the paragraph number or the heading. 1.1.1 Paragraphs numbered at this level will have heading style 4 assigned, so they will not appear in the contents page when the contents are updated. However, your deficiencies in your reports will usually have this level, and it’s recommended that cross-references be made from these paragraphs to each recommendation in section 4 of your report. For this level your text will begin below the paragraph number. 1.1.1.1 This paragraph is subordinate to the one above, and is heading style 5. For each subordinate level, add a period and one additional digit. 1.1.1.2 We don’t want to go below heading style 6. 1.2 1.3 2. Section 3 - Document Formatting 13 Document Writing Guide Desktop Reference Tables Titles, Headings, and Font OPTEVFOR tables will use Courier New 10 pt bold type for the table titles and column headings and 9 pt (can go to 8 pt if needed) plain type (normal) for all internal font. If your table extends to a following page, you must “turn on” the table heading repeat function. First, your table and column headings must be in table rows. Highlight (select) the rows containing your table title and column headings. Left Column Table 1. Table Titles and Heading Rows Middle Column Right Column Xxxxxxx Xxxxxxx Xxxxxxx On your menu bar, click on Table. Now click on Heading Rows Repeat. As your table flows from one page to another, your headings will automatically repeat themselves (see next page). Table 1. Left Column Xxxxxxx 14 Table Titles and Heading Rows Middle Column Right Column Xxxxxxx Xxxxxxx Section 3 - Document Formatting Desktop Reference Document Writing Guide Table 1. Left Column Table Titles and Heading Rows Middle Column Right Column If you don’t want your column headings to appear on a following page (e.g., a separate section of the table with different/no column headings), then don’t select that row when setting the Heading Row Repeat function. Numbering Table numbering in our OT&E framework documents and evaluation reports begins with the first table (table 1) in the enclosure. From that point, each table is numbered in sequence throughout the remainder of the document. Figures The term “figures” applies to graphs and charts, diagrams, photographs, and schematic drawings. • Graphs and charts show relationships among data. This is new information on 11-1-05. • Diagrams portray relationships among components. • Photographs realistically depict general appearance. • Drawings emphasize essential elements and omit unnecessary details. See page 26 for information concerning figure title placement and numbering. Using Bullets Bullets are vertical lists, normally used for highlighting important information. They are being used more frequently in our documents, due to changes in the EOA/OA report executive letters. Bullets now highlight high risk areas in the overall test results, identify major limitations, list significant risks to effectiveness and suitability, and state the recommendations for correction of the identified risks. Technical writing style manuals do not lay down specific rules for using bullets. Even within the same manual, you will see variations in their use; i.e., complete sentences vs. incomplete sentences (phrases, fragments), initial caps vs. lower case, ending punctuation (commas, semicolons, etc.) vs. no punctuation. These are all correct forms (styles) of bullet lists. For our purposes, however, we must develop a style and be consistent with it throughout our documents. We will undoubtedly see documents with variations of forms in the same list, or different types of lists on one page. We need to maintain consistency. OPTEVFOR’s guidelines are described below: • Bullet lists will be as parallel in style and form as we can possibly make them, knowing the type of writing we do. • We can have both complete and incomplete sentences in bullets in the same document, or even on the same page; however, not in the same list. • We will use initial caps in all bullet lists. Section 3 - Document Formatting 15 Document Writing Guide • Desktop Reference Ending punctuation will be used only with complete sentences. Examples of Consistent (Parallel) Lists (Example 1, incomplete sentences, initial capped, no ending punctuation.) Sight flow indicators feature: • Single-piece cast bodies • Flanged or threaded connections • Plain, flapper, drip-tube, or rotor connection styles (Example 2, complete sentences, initial capped, ending punctuation.) Our magnetic level indicators are widely recognized for these characteristics: • Externally mounted gauges offer visual level indication. • Glass does not come in contact with the process. • Indicators operate in harsh or extreme conditions. • Many mounting styles and options are available. Bullets and Sub-bullets Bullets used at the first level (left margin) in our evaluation reports aren’t normally indented, where bullets in the rest of our documents are, consistent with paragraph indentations. However, chances are good that you will come across bullets with sub-bullets (the same as paragraphs and subparagraphs). To show subordinate information, as with the subparagraphs in, for example, Part IVs, MOAs, etc., we need to indent these. MS Word has default bullet styles that change with each click of the “Increase Indent” button on the Formatting tool bar; or decrease with the “Decrease Indent” button. Increase indent Decrease indent Example 1 or Example 2 If you have neither of these two examples showing on your Formatting tool bar, you need to put them there. Click on Tools on the menu bar, then click on Customize. 16 Section 3 - Document Formatting Desktop Reference Click on the Commands tab. In the Categories section, click on Format Document Writing Guide In the Commands: section, scroll down until you see the two buttons with descriptive text. Left click and hold on one of them, and drag it to the Formatting tool bar. Your cursor will be similar to an “I.” Place your cursor anywhere you want the icon to appear and release the left mouse button. Go back and get the other button and drag it to the Formatting tool bar next to the first one. The default styles (different appearance of each bullet) are: 1st Level • Xxxxx 2nd Level o Xxxxxx 3rd Level Xxxxxx There are only three levels shown here, as you most likely will never go below the third level. We recommend against going past the second level if you can avoid it. If you have to go to three levels, consider eliminating the list, making them all complete sentences, and going with paragraph numbering (1.1, 1.1.1, 1.1.2, etc.; or using the standard paragraph numbering (depending on document type) that we’re used to). Section 3 - Document Formatting 17 Document Writing Guide Desktop Reference BLANK PAGE 18 Section 3 - Document Formatting Desktop Reference Document Writing Guide SECTION 4 - - GENERAL USAGE AREAS Acronyms and Abbreviations Always remember that acronyms, abbreviations, and symbols should be used for the benefit of the reader, not to make it easier for the author. Excessive use of these may reduce a document's readability or even confuse your reader. • Do not define an acronym or abbreviation which will only be used once -- use only the long form. If it will be used only a few times, consider spelling out the term throughout the document. Put clarity before economy. • When you use an acronym or abbreviation, be sure to define it the first time it's used (e.g., surface-to-air missile (SAM)). • When using acronyms and abbreviations in tables and figures (first usage in document) they must be defined in the table (bottom row) and in the figure (in a key). This change added 12-15-05 Suggestion: When writing an OPTEVFOR document, do not define any acronym or abbreviation in text until the document is complete, but make sure to keep a list of all you use. After the draft reviews are completed and you’re getting ready to finalize the document, pull out your list, search for the first occurrence of each item, and add the definition. If you do this too early, divisional or front office changes may put the definition with the next-to-last occurrence of an abbreviation instead of the first. • Not all definitions of acronyms or abbreviations are capitalized; in fact, most are not. A common misconception is that capital letters in an acronym or abbreviation reflect (or even govern) the capitalization of the definition. See the preface of the COMOPTEVFOR Acronym and Abbreviation List (CAAL) for additional information. The CAAL is on the command’s LANs in y/OT&E Reference Library/Acronym and Abbreviation List. It is also in the MIS/IFS in the OT&E Reference library. • Plurals of acronyms or abbreviations are designated by a lower case s, not an apostrophe (e.g., FFs, CVs, F-14s, and Su-27s). The apostrophe only shows possession (e.g., the FF's position). • Only use plural acronyms when they are used by themselves, not when first defined (e.g., captive air training missiles (CATM), but "four CATMs were uploaded"). • Acronyms or abbreviations may be defined in paragraph heads. • Stand-alone acronyms and abbreviations may be used as paragraph heads or table/figure titles. • Do not define abbreviations for terms of measurement, and don't put them in your acronym and abbreviation list. • Abbreviations for terms of measurement are never pluralized, e.g., 24 hr, 0.4 hr, not 24 hrs, etc. • Do not abbreviate foot as ', inch as ", or number as #; instead, use ft, in., and no., respectively. These abbreviations should only be used in figures or tables, not in text. • Abbreviations that spell English words end with periods. Ft, lb, km, nm, and dc, for example, do not spell English words, while in., gal., fig., and no. do. This is done to avoid confusion with the same words in text. • Don't use major commands found in the SNDL in the acronym and abbreviation list. Section 4 - General Use Areas 19 Document Writing Guide • Desktop Reference You don't need to define well known acronyms or abbreviations that have become almost common terms (e.g., NATOPS, OT&E, DT, DT&E, FOT&E, etc.). Characters and Symbols Access these (e.g., ±, °, µ, etc.) via the Insert menu in MS Word. Click on Insert, then Symbol to pop up a character map. Select the character you need and click the Insert button. Some symbols, such as ≤ and ≥ , are not available when "(normal text)" -- the default selection -- is visible in the Font window of this dialog box. To access these symbols, click the τ button to pop up the font list, select Symbol, then click on Insert for the character you need. Take the time to review the many selections in the Symbol lists. Capitalization Capitalization is an area widely open to interpretation, and is one of our largest problem areas. Showing an example of every problem in capitalization here is just not possible. The following are general rules and describe the most common uses of capitalization. Our guidance is from standard dictionaries and the Government Printing Office Style Manual. Your editors have copies of this manual if you need to see it. Or, you can go to the following link to use the on-line version (http://www.gpoaccess.gov/stylemanual/browse.html). First Word • Capitalize the first word of a sentence (standard usage). • Capitalize the first word of an independent clause following a colon (standard usage): • o The following limitation ...: Elements of ... were not available. o The test accomplished three objectives: First was completion of ...; next was...; and last was.... Don't capitalize the first word after a colon if it begins a simple list of items, or is not a complete sentence. Nouns • 20 Capitalize proper nouns (person, place, or thing) (standard usage). Section 4 - General Use Areas Desktop Reference • Document Writing Guide Do not capitalize common nouns when used as a substitute for proper nouns (standard usage): o Spy 1D Radar System; but, the radar system; the system o Naval War College; but, the college o Suez Canal; but, the canal Adjectives • Capitalize proper adjectives (standard usage): Proper Noun Proper Adjective England English Europe European Panel Nomenclature Capitalization of panel nomenclature (placards) should match that on the hardware; in most cases this means all caps. If a switch or control position is not marked (often "on" and "off" are not), use lower case. Capitalization of digital data from a HUD, MFD, DDI, or computer monitor should match that of the actual display. Naval Ships Capitalize (all caps) names of naval ships USS CALIFORNIA (CGN 36) (no hyphens used in hull numbers) USS NIMITZ (CVN 68) Military Ranks Capitalize military ranks when used as a proper noun. Don't capitalize military titles when they stand alone or when following the name: • Admiral Nimitz; but, the admiral. • Airman Jones; but, the airman. • Charles F. Hughes, rear admiral, U.S. Navy Billet/Organizational Titles Capitalize billet or organizational titles when used with a proper name or in place of a proper name. Don't capitalize generic job descriptions: • Administrative Officer; but, administrative officers • Department Head; but, department heads • Division Officer; but, division officers • Commanding Officer, USS ..., but, commanding officer Days, Months, Holidays, and Seasons • Capitalize (standard usage). • Don't capitalize seasons (spring, summer, etc.) (standard usage). Section 4 - General Use Areas 21 Document Writing Guide Desktop Reference Compass Directions • • Capitalize compass directions used to indicate geographical regions, or when part of names (standard usage): o the Midwest o the West Coast o Middle East Don't capitalize compass directions when used to denote mere direction or position (standard usage): o north, east, south, west o northerly, northern o southern California o eastern region General • Don't capitalize words like test plan, evaluation report, etc., in text unless you are citing a specific test plan, evaluation report, etc., by title. • Capitalize the second word of a hyphenated word when used as a title or heading. (ManHour). • Capitalize all principal words in paragraph heads and figure or table titles. This includes the second and subsequent word(s) in hyphenated compounds (e.g., Air-to-Air, not Air-to-air and Follow-On, not Follow-on). Prefixes (Standard dictionary usage) Words using the prefixes and combining forms shown below are generally one word, although each does have a few hyphenated forms. Each of the following can be found in a list of undefined words in your dictionary. Don't guess at these! If you're not sure how they're used, look them up. The exception to all of these is the prefix "self," which is always hyphenated. Keep in mind, the prefixes anti, multi, non, post, pre, and re are almost always one word: anti co counter hyper inter mis multi non out over post pre re sub super ultra un Compound Words These are sometimes difficult. If in doubt, check your dictionary for the correct usage. The following are examples of the most commonly misused compound words in our documents. This is by no means a complete list. • hyphenated or two words, never one word: Unit Modifier 22 Standard Usage Section 4 - General Use Areas Desktop Reference • Document Writing Guide on-line on line start-up start up warm-up warm up stand-alone stand alone turn-on turn on own-ship own ship on-board on board follow-up follow up one or two words, never hyphenated: twofold colocate(d) backup checkoff checkout setup handoff standby lineup standoff oncoming outgoing back up check off check out set up hand off stand by line up stand off en route work up workup postflight lockup buildup database lock up build up Standard Hyphen Usage Other uses of hyphens (For technical writing, per the GPO Style Manual): • Use a hyphen when joining two or more words serving as a single adjective before a noun. 110-volt line 30-foot depth signal-to-noise ratio • For two or more words that name one subject: light-year man-hour man-weeks man-years watt-hour • When spelling out numbers twenty-one through ninety-nine. • To reduce confusion and ambiguity: a 1-kg component the 20-mile range • Do not use hyphens in Mark and Mod designations; i.e., Mk 4, Mod 3. • If in doubt about hyphenating a word, don't. Section 4 - General Use Areas 23 Document Writing Guide Desktop Reference Terms of Measurement For technical writing, per the GPO Style Manual and other technical writing guides, Terms of measurement are always expressed in figures. The following terms and forms will be used when writing our documents: Compass Directions Compass directions are abbreviated as: N. NE. E. SW. 10oN.25oW. (no spaces) NW.byN.1/4W. (no spaces) S. NNW. W. ESE. Latitude and Longitude Latitude and longitude followed by figures are shown as: lat. 52o33'05"N. long. 13o21'10"E. (no spaces in figures) Temperature Temperature is shown in figures, using the degree symbol: °F °C 212 °F (space between number and °F) 100 °C (space between number and °C) When showing a range of temperatures use; e.g., 45 to 65 °F, not 45° to 65° F. Spaces Insert a space between a numeral and any associated unit symbol. If the number and unit modify another word or term, insert a hyphen. 3 minutes 20 mm 3-minute delay 7 feet 120 V 7-foot span Percent Percent should be spelled out in text (i.e., two percent). Use the percent symbol (%) when showing percent in tables and figures (i.e., 2%). Abbreviated Terms of Measurement Below are abbreviations of the terms of measurement we use most in our documents. The singular and plural forms for these are the same; don't add an "s" to make it plural: Bd dB dBu ft G g GHz 24 baud decibel decibel unit foot giga (prefix, 1 billion) gram gigahertz kg kHz kW kWh m MHz mHz mi kilogram kilohertz kilowatt kilowatt-hour meter megahertz millihertz mile sec V VA yd yr second volt volt-ampere yard year Section 4 - General Use Areas Desktop Reference hr Hz in. k Document Writing Guide hour hertz inch thousand min mm ms nm minute millimeter millisecond nautical mile • In text, don't abbreviate ranges or altitudes expressed in thousands of feet (e.g., 15,000 feet). When showing distance in thousands of feet, the abbreviation to use is “k ft;” (space between k and ft) i.e., 25k ft; not 25K FT, 25KFT, 25 KFT, 25kft, 25 kft. • Limit abbreviations such as hr, min, sec, ft, in., m, mi, yd, k ft, and yr to tables, figures, matrices, etc., where space is limited. Spell them out in the text. Numbers • Numbers under 10 are spelled out except for time and measurement, or when used with related numbers of 10 or greater. o "A team of four UDT swimmers completed the 1-nm course in 1.5 hours." o "Of the 14 swimmers assigned to perform the mission, 8 were UDT swimmers." • Numbers must be spelled out if they begin a sentence or heading. If you don't wish to do this, rephrase the sentence or heading to avoid beginning with a number. • A spelled out number is not repeated in figures in our documents, e.g., nine (9) missiles were launched. • Numbers less than 100 preceding a compound modifier containing a figure are spelled out. two 3/4-inch boards but, 120 8-inch boards twelve 6-inch guns • Use tenths of hours when reporting results compared to a threshold that is in hours. For example, "The demonstrated MTBOMF was 1.7 hours (criterion: ≤2.0 hours), based on ...." Don't say, "The demonstrated MTBOMF was 1 hour 45 minutes ...." Punctuation Standardized marks are used to separate groups of words in sentences, clauses, and phrases in order to clarify their meaning. See the following punctuation marks, together with examples of their use: Comma • Use commas to separate items in a series. Don't place a comma before the first item or after the last item in a series. But, place a comma followed by “and” before the last item in the series (e.g., “nuts, bolts, and screws.” • Use a comma to separate two or more adjectives preceding a noun. • Use a comma before and, but, or, nor, for, and yet when they join independent clauses. • Parenthetical expressions are set off by commas. The following expressions are commonly used parenthetically: I believe (think, know, hope, etc.), I am sure, on the contrary, on the other hand, after all, by the way, incidentally, in fact, indeed, naturally, of course, in my opinion, for example, however, nevertheless. Section 4 - General Use Areas 25 Document Writing Guide Desktop Reference Semicolon • Use a semicolon between independent clauses not joined by and, but, or, nor, for, yet. (A semicolon is used only when the ideas in the two clauses are so closely related that a period would make too distinct a break.) • Use a semicolon between a series of independent clauses joined by words such as, for example, for instance, that is, besides, accordingly, moreover, nevertheless, furthermore, otherwise, therefore, however, consequently, instead, hence. • Use a semicolon between items in a series if the items contain commas. "The following are members of the new committee: Jan Bates, president of the Student Council; Alan Drew, president of the Senior Class; and Helen Berger, vice-president of the Honor Society." Colon • Use a colon before a list of items, especially after expressions like "as follows" and "the following." • Use a colon before a long, formal statement or quotation. • Use a colon between independent clauses when the second clause explains or restates the idea in the first. Quotation Mark We try to avoid using quotation marks in our documents, except for detailed comments to a TEMP. When using quotation marks combined with other forms of punctuation, use these rules: • Commas and periods are always placed inside the closing quotation marks. • Semicolons and colons are always placed outside the closing quotation marks. • Question marks and exclamation points are placed inside the closing quotation marks if the quotation is a question or an exclamation; otherwise, they are placed outside. Apostrophe • Use to show possession by adding the apostrophe and an s to a singular noun. • Use to show possession by adding only the apostrophe after the s in a plural noun. • The words minute, hour, day, week, month, year, etc., when used as possessive adjectives, require an apostrophe. • Do not use an apostrophe when showing plurals of acronyms or abbreviations (COIs, not COI's). Table and Figure Titles Table titles (size 10, bold font) are centered in the top cell of the table: Table 1. 26 Quantitative Test Results Section 4 - General Use Areas Desktop Reference Document Writing Guide Figure titles (size 10, bold font) are centered below the figure: Figure 1. New Space Vehicle Classification Markings (Ref: SECNAVINST 5510.36, Department of the Navy (DON) Information Security Program (ISP) Regulation and the COMOPTEVFOR Security Manager) Overall Classification • • The overall (highest) classification of the entire document must appear at the top and bottom center on each page of the document, except for appendix B of the OPTEVFOR test plan, which, because of the differing data and survey sheets, is marked according to each page’s content. See below. o We use size 16 bold font, all caps, for classification in the headers and footers of classified documents. o Appendix B in OPTEVFOR test plans uses the “FOR OFFICIAL USE ONLY” markings on unclassified survey sheets. In this appendix, you may also need to use the marking “THIS PAGE IS UNCLASSIFIED, BUT XXXXXXX WHEN FILLED IN” on either data or survey sheets. For marking references, use a classification mark [(U) ((C), (S) if the title is classified)] only when using the full title of a reference. o System Threat Assessment Report (STAR)/Office of Naval Intelligence (ONI) Threat Assessment (TA) 12345, Chevrolet Avalanche Converted Mobile Rocket Launcher of 11 Jul 02 (U) Title and Portion Markings (Paragraph and Subparagraph) • The appropriate abbreviated classification markings are placed following the paragraph title and a subparagraph number (this is called a “portion”). These markings are (TS) for Top Secret, (S) for Secret, (S-NF) for Secret NOFORN, (C) for Confidential, and (U) for Unclassified. • Do not apply page, title, or portion classification markings to documents with no classified content (i.e., a completely unclassified document is not marked UNCLASSIFIED); it is not marked in any way. In a classified document, every paragraph and subparagraph must con- Section 4 - General Use Areas 27 Document Writing Guide Desktop Reference tain the appropriate marking. The below example shows the numbering scheme for documents other than OPTEVFOR OT&E framework documents and evaluation reports. 101. THIS EXAMPLE IS A TITLE MARKING (U) (the classification marking follows a standalone title. Stand-alone titles can also occur at any subparagraph level). a. (U) This example is portion marking and is explanatory text following the title (the classification marking precedes the text in this case). (1) (C) Portion marking of classified text. (2) (U) Xxxxx xxx xxxx xxxxxxxx xxxxxxx b. (U) Xxxx Xxxx • OPTEVFOR OT&E framework documents and evaluation reports use a different numbering scheme. Here are the classification markings for these styles: 1. This Example is a Title Marking (U) (the classification marking follows a stand-alone title; normally a (U) unless the title itself is classified.) 1.1 (*) For subparagraphs (portions) with no headings, the paragraph number itself gets no classification marking. The text below the number is marked according to its content. Tables and Figures • For tables and figures the classification is marked in full, not abbreviated, form and appears beneath the table title and above the figure title. The classification of the title only -- not the table or figure content -- will appear in abbreviated form preceding the title, and signifies if the words in the actual title are classified or not. Table 1. (U) Program Schedule CLASSIFICATION • CLASSIFICATION Figure 1. (U) My New Computer For more detailed information on other security aspects, see SECNAVINST 5510.36, Department of the Navy (DON) Information Security Program (ISP) Regulation. Problem Areas of Word Usage We find some words are being used when, in fact, a similar word is actually the one we want. The following examples are the most common: • 28 Accept and Except. Accept is a verb, and means "to receive." Except, when used as a verb, means "to leave out"; as a preposition it means "excluding." Section 4 - General Use Areas Desktop Reference Document Writing Guide • Affect and Effect. Affect, usually a verb, means "to impress" or "to influence." Effect, when used as a verb, means "to accomplish, to bring about"; as a noun it means, "the result of some action." • And also. This is often redundant • Assure, Ensure, and Insure. Do not use these words interchangeably. If you mean "make sure" or "be sure," use ensure. Reserve insure for references to insurance, and assure for cases where you wish to convince, affirm, or guarantee. • Basically, essentially, totally. These words seldom add anything useful to a sentence. • Credible and Creditable. Credible means "believe." Creditable means "praiseworthy." • Data. Data is the plural form of the Latin datum. In our documents we say "data are/were," not "data is/was." • Imply and Infer. Imply means "to suggest something." Infer means "to interpret" something. • Or and Nor. Use "or" with "either"; use "nor" with "neither." • Ability or Capability. Ability is used when referring to a person; capability is used when referring to a machine. • e.g. and i.e. e.g. (from exempli gratia) means "for example," while i.e. (from id est) means "that is" or "in other words." • Compose, Comprise, and Consist. Although "composed of" and "consists of" have similar meanings, do not use both in one document. Comprise is frequently misused as "comprised of." A radio system, for example, consists of (or is composed of) a transmitterreceiver, a control, and an antenna. But: The radio system comprises the transmitterreceiver, control, and antenna. Since comprise is somewhat tricky to use, and even when used correctly will look "wrong" to many readers, stick to consist or compose. • On account of. Use because instead. Military Rank Abbreviations We deal daily with all branches of the military. It's professional and common courtesy to use the appropriate and correct rank abbreviation when addressing a fellow officer. Note the following: Navy & Coast G. Marine Corps Air Force Army ADM VADM RADM RDML CAPT CDR LCDR LT LTJG ENS CWO5 CWO4 CWO3 CWO2 WO Gen LtGen MajGen BGen Col LtCol Maj Capt 1stLt 2ndLt CWO5 CWO4 CWO3 CWO2 WO Gen Lt Gen Maj Gen Brig Gen Col Lt Col Maj Capt 1st Lt 2nd Lt GEN LTG MG BG COL LTC MAJ CPT 1LT 2LT CW5 CW4 CW3 CW2 WO1 Section 4 - General Use Areas 29 Document Writing Guide Desktop Reference BLANK PAGE 30 Section 4 - General Use Areas Desktop Reference Document Writing Guide SECTION 5 - - USING DOCUMENT TEMPLATE STYLES OPTEVFOR uses heading and paragraph styles for evaluation report and OT&E framework document writing. The templates are in the OT&E Reference Library on the command’s LAN and MIS/IFS. These are built by creating various heading styles in different font sizes and colors to control the paragraph hierarchy and maintain consistency. When opening the OT&E framework document or report templates, it’s necessary to open them as a “.dot” file instead of the normal Word “.doc” file. This works best by opening Word first, click on the “Open” folder on the formatting bar and then follow the path to the template you want. If you get your template by using My Computer or Windows Explorer, the template will open as “Document 1.doc”……not as a template (.dot) with the correct name. The templates for the OT&E framework document and evaluation report contain the same styles. Of course, the sections, paragraph titles, and appendices are different. In between the paragraph headings and numbers, the blank spaces or existing text are already set as “Normal” or “Body Text.” You can replace the existing text (provided it’s just an example and not boilerplate) or you can place your cursor in the blank area and begin typing. Report Cover The report cover is actually a table containing seven cells of information: • Command seal • Title of project and phase of testing • “To” line, with SSIC and serial number of the document • Date • Graphic of the test item • Distribution statement and derivative classification information (if classified) • Command name and city Title Block The title is a text form field. To insert the title of your program, double click in the title field. The style is already set to the required size and color. In the Default text field, type in your program title as it appears on your TEMP. Click OK. Section 5 - Using Document Template Styles 31 Document Writing Guide Desktop Reference In the next line, double click on the field that spells out the phase. This is a drop-down menu containing the selections Initial Operational Test and Evaluation, Operational Evaluation, and Follow-on Operational Test and Evaluation. To add additional items to any drop-down list, click your cursor in the Drop-down item box and type in what you need. Click on the Add button and it will appear in the list with the other selections. Select (single click) the one you need. To the right of the Items in drop-down list box, there are up and down arrows. Click on the up arrow until your selection is at the top of the list. Click Ok. Look down at the left-hand corner of the dialog box and you’ll see a button labeled Add Help Text… Click on the button and you’ll see directions for using the drop-down menu. Report Phase/SSIC/Serial Number This cell contains the report phase, is addressed to the CNO, and shows the SSIC and report serial number. The report phase is also a drop-down menu, operated in the same manner as described above. The form fields for the SSIC and serial number are set to list numbers. 32 Section 5 - Using Document Template Styles Desktop Reference Document Writing Guide Double click the form field. When the dialog box opens, you’ll see the Default number block. Replace the “Xs” with the numbers that apply to your d Double click the form field. When the dialog box opens, you’ll see the Default number block. Replace the “Xs” with the numbers that apply to your document ocument. Date Double click the date form field. In the Default date block, replace the default date with the current date in the same format of dd/month/year . Graphic You must have a graphic of your system/equipment. The program office(s) should be able to furnish one to you. The size of the graphic must fit in the allocated space of the cell. If it’s any larger, it will push the lower cells of the cover onto a second page. If necessary, ask the graphics shop to resize your picture so it fits. Distribution Statement/Derivative Classification The distribution statement is standard for all documents containing OT&E information. However, SECRET/NOFORN documents have a slight variation of the one most of us are used to. Instead of ‘Distribution limited to U.S. Government agencies only;….” it reads, “Distribution limited to DoD components only;….” The derivative classification is, of course, inserted only on classified documents. NOTE: In the “Derived from” line, you must list all sources of classification, not just say “Various.” The program office must furnish all classification guide publication numbers (and all other sources that apply) upon your request. The standard entry for the “Declassify on” line is “X3.” Our Command Name and City This entry requires no change. Report Commander’s Letter The letter should be kept to five pages or less. It is set up using paragraph heading styles. There is no need to change them. If additional headings are needed obtain approval through the front office. The form fields within each paragraph are either the default style or drop-down menus. Report Enclosure The enclosure is the meat of the evaluation report and can be quite extensive…or, quite short. It all depends on your program. Section 5 - Using Document Template Styles 33 Document Writing Guide Desktop Reference Enclosure Cover Page The cover page is a partial copy of the overall report cover, containing only the title and phase of the report, and the proper distribution and downgrading (if classified) statements. Title The title form fields, like the report cover, are the default text type. To insert the title of your program, double click in the title field. The style is already set to the required size and color. In the “Default text” field, type in your program title as it appears on your report cove page. Click “Ok.” (Follow the graphic instructions on page 29 for title blocks.) Phase Designation Block This form field is a drop-down menu containing the selections Initial Operational Test and Evaluation, Operational Evaluation, and Follow-on Operational Test and Evaluation. Select (single click) the one you need. To the right of the “Items in drop-down list” box, there are up and down arrows. Click on the up arrow until your selection is at the top of the list. Click “Ok.” Look down at the left-hand corner of the dialog box and you’ll see a button labeled “Add Help Text…” Click on the button and you’ll see directions for using the drop-down menu. (Follow the graphic instructions on pages 30 and 31 for phase designation blocks.) OT-XX Final Report Block This is also a drop-down menu. Double click the field. In the Items in drop-down list box, you will have phases listed from OT-1 through OT-IIID and OT-A1 through OT-E2. See the directions in the paragraph above for guidance in drop-down menus. If you need to add a phase that isn’t listed in the menu, you can easily do that. Double click on the field. The upper left box is the Drop-down item box, with Add and Remove buttons below it. Place your cursor in the D rop-down item box and type the phase you need (e.g., OT-B2) and click on the Add button. Follow the directions, above, for using the up and down arrow keys to place your selection in the form field. Distribution Statement/Derivative Classification The distribution statement is standard for all documents containing OT&E information. However, SECRET/NOFORN documents have a slight variation of the one most of us are used to. 34 Section 5 - Using Document Template Styles Desktop Reference Document Writing Guide Instead of ‘Distribution limited to U.S. Government agencies only;….” it reads, “Distribution limited to DoD components only;….” The derivative classification is, of course, inserted only on classified documents. NOTE: In the “Derived from” line, you must list all sources of classification, not just say “Various.” The program office must furnish all classification guide publication numbers (and all other sources that apply) upon your request. The standard entry for the “Declassify on” line is “X3.” Contents The contents section for evaluation reports and OT&E framework documents is already set up into three separate fields; the paragraphed contents, the tables, and the figures. Each performs its own task. Evaluation Reports Paragraphed Contents. This is set up to show heading 1 (section headings) and heading 2 (paragraph headings) styles from sections 1 — 3. Sections 4 and 5, and appendices A — D will list only the heading 1 style. All page numbers are automatically shown on the right. You don’t need to do anything to this section other than update it after you have your report finished. To update, right click anywhere in the field. A dialog box opens with seven active selections. The only one you need is the Update Field selection. Click on that and you get a dialog box with two selections: Update page numbers only and Update entire table. Select the one you want and click Ok. Updating this field will do nothing to the Table and Figures fields. Section 5 - Using Document Template Styles 35 Document Writing Guide Desktop Reference Tables. This field is set up to list all of the tables in the enclosure, provided you used the “Table Heading 1” style. Update in the same way as above. Figures. This field is set up to list all of the figures in the enclosure, provided you used the “Figure Heading 1” style. Update in the same way as above. Updating all Fields • To update all fields in a document, click Edit>Select All, then press F9. Click the radio button for Update entire table. Now click Ok on your update dialog box. All contents fields will update, along with any cross-referencing or indexing that you have done along the way. OT&E Framework Documents Paragraphed Contents. This is set up to show heading 1 (section headings) and heading 2 (paragraph headings) styles from sections 1 — 4 and appendices B and C. Section 5 and appendices A and D — F will list only the heading 1 style. Tables and Figures. These fields are the same as those in the evaluation reports. Contents updates in OT&E framework documents are the same as for evaluation reports. Inserting Heading Styles Macro (not yet incorporated into our formats, but will be soon) As you write your report or OT&E framework document, there are choices for inserting paragraph numbers. The first is a macro built to insert the paragraph level you need. This is for advanced users of MS Word. Included in this macro (a toolbar named COTF Tools that will be on your screen) is a selection to Kill Auto Formatting. Click on this selection! The other selections are: 36 Section 5 - Using Document Template Styles Desktop Reference • • • • • • • • • • • • • Document Writing Guide Insert Figure Title Insert Table Title Paragraph Title Level 1: X Paragraph Title Level 2: XX Paragraph Title Level 3: XXX Paragraph Title Level 4: XXXX Paragraph Title Level 5: XXXXX Appendix Title Section Title Section Number in Footer Appendix Number in Footer Kill Auto Formatting Insert Cross-Referencing The above features are straightforward. Place your cursor where you want to insert a title that you need and click your selection. The appropriate style will be inserted at that point. It’s great for numbering subparagraphs. The only one that really requires some advanced knowledge is the Insert Cross-Referencing feature (see Cross-Referencing in Section 6). Manual If you don’t want to use the macros, you can select the styles manually. First of all, though, you must not allow the macros to load when you open the template. When opening, you will get a box that has three buttons: Disable Macros; Enable Macros; and More Info. Click on Disable Macros. To manually insert styles after opening, put your cursor at your insertion point. On the Formatting toolbar you will see a style box that normally says “Normal,” will have your font type, and the size. Click on the down arrow to the right of the style box. The styles used for the template will be shown. Section 5 - Using Document Template Styles 37 Document Writing Guide Desktop Reference What can be confusing about this is that not everything in the style box is actually a style. Both Word versions 2000 and XP show all formatting used in the document, no matter what it is...even something as minor as the italics used just above. So, don’t confuse the formatting with a style used for headings, paragraph numbering, headers, or footers. The standard styles incorporated in our templates are: • Heading styles 1 - 5 (section, paragraph, appendix) • Table heading 1 • Figure heading 1 • COTF distribution statement • COTF derivative classification • Body text • Contents sections Click on the style you need. This will configure your line. Begin typing, whether it’s a title, a paragraph number, or plain text. 38 Section 5 - Using Document Template Styles Desktop Reference Document Writing Guide SECTION 6 - - A FEW MICROSOFT WORD TIPS Cross-Referencing Automatic Cross-Referencing is a Word capability that enables you to insert references to other sections of your report, OT&E framework document, or test plan (e.g.; see page 6 paragraph 14.2.1), which will track whatever you are referencing automatically as the document changes size. Automatic cross-reference’s key feature is that it lets you click on the reference and you will be jumped to that point. To go back to the point where you clicked on the reference, you will have to open the Web tool bar. Click on View on the Menu bar, click on Toolbars ►, then click on Web. Use the blue arrows on the Web tool bar to jump back. The example reference markings, above, are highlighted with a gray background; you will see it this way in your document on screen – Word’s way of indicating an automatic cross-reference, but they will print normally. The final report and OT&E framework document templates enable automatic cross-references on paragraphs, sections, appendices, figures, and tables. The latter two require a little care when using. One great use of cross-referencing is in reports by linking your deficiencies in your results to your recommendations in section 4. All cross-referencing begins as shown here. . To use crossreferences, you must use paragraph numbers; i.e., Numbered item. Click Insert, click References, click Crossreference. Section 6 - A Few Microsoft Word Tips 39 Document Writing Guide Desktop Reference Cross-Referencing a Paragraph In the For which number item section, Click on the numbered item you need. In the Insert reference to menu, select Paragraph Number (no context). In the Reference type menu, Click on Numbered item. Cross-referencing a page number To cross-reference recommendations in section 4 to the reported-on deficiencies in section 3, place your cursor at the insertion point of the page number of the recommendation you are going to link to and open the Cross-reference tool as shown on the previous page: 40 Section 6 - A Few Microsoft Word Tips Desktop Reference Open the Reference type: block, and select Heading Document Writing Guide Open the Insert reference to: block, and select Page number Now go to the For which heading: block and scroll down to the appropriate paragraph heading and click on it. Click on Insert. Notice the grayed page number that appeared in the example. That is the link to your deficiency. Updating cross-references uses the same procedure as shown on page 35 of this guide. Updating all Fields is also described. Section 6 - A Few Microsoft Word Tips 41 Document Writing Guide Desktop Reference Page and Section Breaks Be careful with these! Word’s breaks can confuse you terribly, and are one of the biggest problems we run into when trying to set headers, footers, and page numbers correctly. What we want to use in our documents are the standard hard Page Break, and the Next Page section break. These are designed to actually break a page so you can start another. The Continuous section break we find quite frequently...as the culprit that is keeping your headers and footers from functioning properly. This section break is not designed to actually break a page, and therein lies the problem. Page Break Use this break within a single section (i.e., contents, section 1, section 2, etc.) instead of a next page section break when your text ends on an odd page and you need a blank (even) page to finish. The easy way to add the break is Ctrl>Enter on your keyboard. From the top of the new (blank) page, count down 24 returns, center the cursor, and type BLANK PAGE. Next Page Use this break for beginning each new section, including landscaped pages, not each page. REMEMBER - - each new section (i.e., beginning section 1 of the report enclosure, must start on an odd numbered page. Continuous Page Break This break should be used for transitioning from portrait view to landscaped view and back again in the same section (i.e., section 3 of your report). Don’t use it to go from one section to the next (i.e., section 1 to section 2). Headers and Footers Headers For OPTEVFOR, headers are used for page classifications and page numbers (OT&E framework documents, test plans, and reports) and for various information in appendix B of our test plans. Headers normally stay the same throughout the evaluation report, OT&E framework documents, and test plan enclosures. The difference is in the test plan appendix B, because of data and survey sheets. Where normally we have the highest overall classification (for classified documents) on every page of a document, appendix B is marked according to each page. This is because of the nature of our survey sheets and the necessity of collecting subjective information. For these, we must take into consideration the Freedom of Information Act (FOIA) so the information isn’t released as factual. Most of the time, we will see two different headers in appendix B: 42 Section 6 - A Few Microsoft Word Tips Desktop Reference Document Writing Guide FOR OFFICIAL USE ONLY NOT RELEASABLE OUTSIDE OF COMOPTEVFOR and THIS PAGE IS UNCLASSIFIED, BUT XXXXXXXXXX WHEN FILLED IN Either of the above can be used on classified or unclassified test plans and OT&E framework documents. When a page becomes classified after being filled in, it is taken out of the realm of FOIA. The FOUO marking on the unclassified pages also removes it from FOIA scrutiny. Of course, if a page (most likely a data sheet) is classified, you must put the correct classification in the header. When using headers, the “Same as Previous” button on your header and footer toolbar needs to be on so the page numbers will continue to automatically number consecutively from section to section. However, don’t have it on when going from the contents section to section 1, as the contents section is numbered differently. Footers Footers in evaluation reports, OT&E framework documents, and test plans identify the document as a framework, test plan, or report, identify the section, and contain the overall highest classification of the document. NOTE: When adding “next page” or “continuous” page breaks, the “Same as Previous” function in your footers automatically turns on, connecting all previous footers together. To correct this, you must go from section to section, place your cursor in the footer, and click the “Same as Previous” button to turn off the function. Now, go back to each section and change the numbers at the lower right to the correct number. You may have to change both the first and second pages of each section to correct odd and even pages throughout the remainder of the section. Section 6 - A Few Microsoft Word Tips 43 Document Writing Guide Desktop Reference Document and Page Classification COMOPTEVFOR policy is to put the overall highest classification of the entire document on every page (except appendix B of the test plan or appropriate appendix of the OT&E framework document). Classification of the documents is centered in the header and footer, using size 16 bold font, all caps. See Classification Markings for full information on all classification matters. Page Numbering Page numbers in OPTEVFOR test plans, OT&E framework documents, and evaluation reports are in italics, flush right in the headers. The enclosures are numbered consecutively throughout the remainder of the document, beginning with enclosure (1), contents page (page i) and section 1 (page 1). Everything is already in place in the templates, so as you add information, things should go smoothly. But, we’re talking about Word here, aren’t we? There will be times when your numbering just won’t work right. If it happens to you, here’s one way to try to correct it without starting all over. However, keep in mind that there are many things that could make it not number correctly. • Make sure that in the headers from section to section the “Same as Previous” function is turned on. If it is, and the numbering still doesn’t flow, highlight the page number, click on Insert on the menu bar, and click on Page Numbers. Click on Format 44 Make sure that under Page numbering the Start at: radio button is selected. Now, in the box, type in the page number you want your particular page to begin on. Click OK on each box until they are closed. Section 6 - A Few Microsoft Word Tips Desktop Reference Document Writing Guide Your page numbering should resume where you wanted it to. If not, and you can’t get it to work, call the Staff Editor at ext. 3044. There could be a problem with page and section breaks working against each other. The possible solutions are too many to demonstrate in this guide. Show/Hide Button Everyone is most likely familiar with this control. It shows all of your formatting; line spacing, returns, headings, and mistakes. Some people like have the function on all of the time, others like to have it off. It’s personal preference. To see your formatting, click on the paragraph symbol on the standard toolbar. Copying and Pasting Text We all end up copying and pasting text from one document to another; especially when putting together test plans, OT&E framework documents, and reports. Ever wonder why everything went “bonkers” with your headers and footers or section formatting, or text changing from Courier New to Times New Roman when you pasted that information from the contractor’s document? It’s because the “outside” document contained different formatting than ours and it was carried over. Remember that little paragraph symbol discussed above? That’s the culprit. Look above and you’ll notice that the paragraph symbol is at the end of each paragraph. That symbol contains all of the formatting for the paragraph. When you copy text, you usually copy the symbol, too. When you paste into your document, you paste the “offending” formatting. Here’s how to avoid the problem: Select all of the text in a paragraph...except any heading style and paragraph symbol at the end (see next page). Copy the text, then paste it into the document you’re working on. Section 6 - A Few Microsoft Word Tips 45 Document Writing Guide Desktop Reference Don’t select the headings. Don’t select the paragraph symbol. Widow and Orphan Control A widow is a single, usually short, last line of a paragraph separated from its related text and appearing at the top of a page. An orphan is a single line of text separated from its related text and appearing at the bottom of a page. Neither one is allowed in technical writing. At least two lines of text are required at the top and bottom of pages. To automatically control this, Word has a Widow and Orphan control. This function is normally turned on by default. If you’re in doubt, on your standard toolbar click on Format>Paragraph>Line and Page Breaks>Widow/Orphan control. Make sure that the check box for Widow/Orphan Control marked. Then click on OK. (See next page.) 46 Section 6 - A Few Microsoft Word Tips Desktop Reference Document Writing Guide This should be the only function here you need to have checked. If this function for some reason fails to work, then you will need to use the Enter button on your keyboard to space down and move the single line to the top of the next page, or use a hard page break (Ctrl+Enter) at the beginning of the line. Your last option for correcting this is rewriting your paragraph so you don’t have the widow/orphan problem. Track Changes There are three ways to go into the track changes mode. One is to double click on the TRK on the status bar at the bottom your screen. The REC, TRK, EXT, and OVR on the status bar are normally “grayed out.” If you don’t have a status bar showing (it shows the page numbers, section numbers, etc.), click on Tools>Options. The Options box will open. Section 6 - A Few Microsoft Word Tips 47 Document Writing Guide Desktop Reference Click on the View tab. Under Show you will see several check boxes. Make sure the Status bar box is checked. Click on OK. A second way is turn on track changes is by, again, going through the Tools menu. Click on Tools>Track Changes. The last way to turn on the function is on the keyboard. Hold down Ctrl+Shift+E. Now, how do you want to view changes that are being made to your document? If you don’t like he balloon style (all changes and comments showing at the right margin), you can have your changes in colors within the text. Click on Tools>Options (see above). Click on the Track Changes tab. 48 Section 6 - A Few Microsoft Word Tips Desktop Reference Document Writing Guide To turn off the balloon style, uncheck the top box under Balloons. Now you can choose other options for viewing changes, under Track Changes Options. Problems with Track Changes Track Changes mode causes two relatively minor problems with the documents. Viewing and Printing The text “shrinks” (using the balloon style), allowing the balloons containing the changes and comments to appear at the right margin. However, just clicking on TRK on the status bar won’t let you go back to your normal view; you will end up printing what you see on the screen. Shrunken text and “balloons” containing the changes and comments at the right margin. To go back to your normal view, click on the View menu. Click on Markup Clicking on Markup will turn off all comments and changes and return you to a normal view. Now you can print. Section 6 - A Few Microsoft Word Tips 49 Document Writing Guide Desktop Reference Going Smooth Watch out for this one! BEFORE you print your smooth document and route it for signature, go back and click on the View>Markup view, as shown above. You’ve most likely left all of your changes and comments in the document. Go to View>Toolbars>Reviewing to turn on your Reviewing tool bar. On the toolbar, click on the down arrow for accepting changes. Click on Accept All Changes in Document. Move to the right one box and click on the arrow for Reject Change/Delete Comment and click on Delete All Comments in Document. The reason we do this is because we routinely distribute our finished documents by e-mail. Imagine yourself as a program manager looking at the file you received from OPTEVFOR with all of the formatting and change balloons showing at the right margin. Better yet, you’re reading the caustic comments someone wrote during the document review process. Now, imagine yourself in CNO’s office looking at the e-mailed report you just received! These documents go 50 Section 6 - A Few Microsoft Word Tips Desktop Reference Document Writing Guide out of this command every day. We are professionals. BE SAFE! Always accept all changes and delete comments as part of preparing the smooth document. Excessive Formatting Occasionally, you might find that in trying to format your document you have applied too much formatting to the entire thing or to a portion. You can erase the formatting with just one key stroke combination, which is much simpler than deleting the text and starting all over again, or trying to undo formatting one item at time. To do this you use a simple and universal undoformatting command — Word's equivalent of the text-formatting eraser — Reset Character. The shortcut key is Ctrl+Spacebar. If you have accidentally created an expanse of ugly, overly formatted text, select it as a block and press Ctrl+Spacebar. Formatting is stripped from the selected text immediately. However, this won’t work with stand-alone applied heading styles, only styles and formatted text within a paragraph. One other drawback; whatever font style your document is in (Arial, Times New Roman, Courier New, etc.), using ctrl+spacebar will automatically reset your selected text to the default font. Unless you are already using the default font style, you will have to select (highlight) the applicable section and set your text to the font style you want. Section 6 - A Few Microsoft Word Tips 51 Document Writing Guide Desktop Reference BLANK PAGE 52 Section 6 - A Few Microsoft Word Tips Desktop Reference Document Writing Guide SECTION 7 - - UNDERSTANDING EDITORIAL MARKINGS Anyone writing for COMOPTEVFOR and sending their documents forward for review will see these marks all over their pages. These are standard throughout the writing industry. The editors continuously get requests from document-producers to “please explain what you mean by these.” The following must be viewed using the Page Layout view. • Insert period Caret , Insert comma ‘ Insert apostrophe ≡ or capitalize General indicator used to mark the position of error armed forces ≡ or or lower case or # insert space Armed Forces ≡ armed forces Armed Forces ElecTRONICS Electronics ElecTRONICS Electronics # Now is the time Now is the time durming during insert new line delete will ∧ insertion point stet leave as is move to right move to left when ∧he stet there goes John when will he there goes John classified material requires proper classified material requires proper classified material requires proper classified material requires proper Section 7 - Understanding Editorial Markings 53 Document Writing Guide Desktop Reference invert (transpose) missoin mission close up I IAW delete & close up I&AW AW IAW sp sp spell out AFS AWK awkward Wording used in the sentence or paragraph is confusing or unclear. Used to draw the author’s attention. No changes made by editor. ¶ paragraph Start a new paragraph with the sentence beginning at this point. center horizontally Center the material in brackets in the center of the page horizontally. center vertically Center the material in brackets in the center of the page vertically. ? question Indicates that the material is incomplete, unclear or for some other reason was not understood by the editor. Used to draw the author’s attention. — attention mark Used in right margin of page to draw attention to editing mark(s) in the sentence. #∏ add return Used in text to show where a blank line (space) is needed between paragraphs. # insert space Used in text to show where a space is needed between words or after a period, comma, etc. 54 Armed Forces Staff (AFS) Section 7 - Understanding Editorial Markings

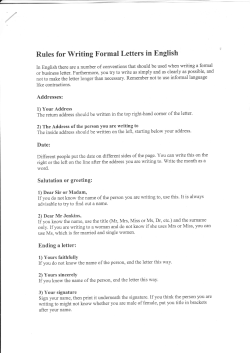
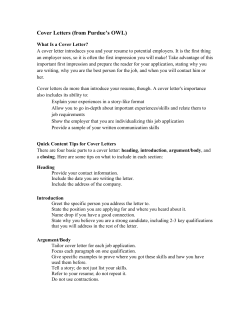


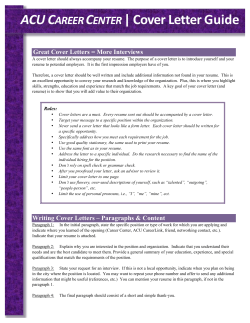


© Copyright 2026