
QA1S6ADP Q-AnS Base Unit Conversion Adapter QA1S6ADP User's Manual
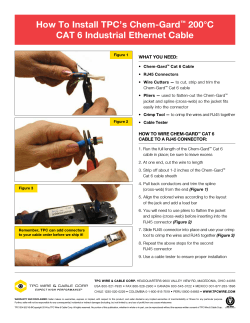
QA1S6ADP Q-AnS Base Unit
Conversion Adapter
User's Manual
QA1S6ADP
Thank you for purchasing the Mitsubishi MELSEC-AnS series programmable controllers.
Before using this product, please read this manual and relevant manuals carefully to handle the
product correctly.
MODEL
QA1S6ADP-U-JE
MODEL CODE 13J228
IB(NA)-0800538-A(1404)MEE
2014 MITSUBISHI ELECTRIC CORPORATION
CONDITIONS OF USE FOR THE PRODUCT
(1) Mitsubishi programmable controller ("the PRODUCT") shall be used in conditions;
i) where any problem, fault or failure occurring in the PRODUCT, if any, shall not lead to
any major or serious accident; and
ii) where the backup and fail-safe function are systematically or automatically provided
outside of the PRODUCT for the case of any problem, fault or failure occurring in the
PRODUCT.
(2) The PRODUCT has been designed and manufactured for the purpose of being used in
general industries.
MITSUBISHI SHALL HAVE NO RESPONSIBILITY OR LIABILITY (INCLUDING, BUT NOT
LIMITED TO ANY AND ALL RESPONSIBILITY OR LIABILITY BASED ON CONTRACT,
WARRANTY, TORT, PRODUCT LIABILITY) FOR ANY INJURY OR DEATH TO PERSONS
OR LOSS OR DAMAGE TO PROPERTY CAUSED BY the PRODUCT THAT ARE
OPERATED OR USED IN APPLICATION NOT INTENDED OR EXCLUDED BY
INSTRUCTIONS, PRECAUTIONS, OR WARNING CONTAINED IN MITSUBISHI'S USER,
INSTRUCTION AND/OR SAFETY MANUALS, TECHNICAL BULLETINS AND
GUIDELINES FOR the PRODUCT.
("Prohibited Application")
Prohibited Applications include, but not limited to, the use of the PRODUCT in;
Nuclear Power Plants and any other power plants operated by Power companies, and/or
any other cases in which the public could be affected if any problem or fault occurs in the
PRODUCT.
Railway companies or Public service purposes, and/or any other cases in which
establishment of a special quality assurance system is required by the Purchaser or End
User.
Aircraft or Aerospace, Medical applications, Train equipment, transport equipment such
as Elevator and Escalator, Incineration and Fuel devices, Vehicles, Manned
transportation, Equipment for Recreation and Amusement, and Safety devices, handling
of Nuclear or Hazardous Materials or Chemicals, Mining and Drilling, and/or other
applications where there is a significant risk of injury to the public or property.
Notwithstanding the above, restrictions Mitsubishi may in its sole discretion, authorize use
of the PRODUCT in one or more of the Prohibited Applications, provided that the usage of
the PRODUCT is limited only for the specific applications agreed to by Mitsubishi and
provided further that no special quality assurance or fail-safe, redundant or other safety
features which exceed the general specifications of the PRODUCTs are required. For
details, please contact the Mitsubishi representative in your region.
2
CONTENTS
CONDITIONS OF USE FOR THE PRODUCT . . . . . . . . . . . . . . . . . . . . . . . . . . . . . . . . . . . . . 2
TERMS . . . . . . . . . . . . . . . . . . . . . . . . . . . . . . . . . . . . . . . . . . . . . . . . . . . . . . . . . . . . . . . . . . . 4
1 OVERVIEW
5
1.1
1.2
1.3
1.4
5
5
6
6
About This Manual . . . . . . . . . . . . . . . . . . . . . . . . . . . . . . . . . . . . . . . . . . . . . . . . . . . . .
QA1S6ADP . . . . . . . . . . . . . . . . . . . . . . . . . . . . . . . . . . . . . . . . . . . . . . . . . . . . . . . . . . .
Packing List . . . . . . . . . . . . . . . . . . . . . . . . . . . . . . . . . . . . . . . . . . . . . . . . . . . . . . . . . . .
Related Product (Sold Separately) . . . . . . . . . . . . . . . . . . . . . . . . . . . . . . . . . . . . . . . . .
2 SYSTEM CONFIGURATION
7
2.1
2.2
2.3
7
7
8
8
8
System Configuration Example . . . . . . . . . . . . . . . . . . . . . . . . . . . . . . . . . . . . . . . . . . . .
Restrictions . . . . . . . . . . . . . . . . . . . . . . . . . . . . . . . . . . . . . . . . . . . . . . . . . . . . . . . . . . .
Configuration Devices . . . . . . . . . . . . . . . . . . . . . . . . . . . . . . . . . . . . . . . . . . . . . . . . . . .
Applicable base units . . . . . . . . . . . . . . . . . . . . . . . . . . . . . . . . . . . . . . . . . . . . . . . . . . .
Mountable modules . . . . . . . . . . . . . . . . . . . . . . . . . . . . . . . . . . . . . . . . . . . . . . . . . . . . .
3 SPECIFICATIONS
3.1
3.2
10
General Specifications . . . . . . . . . . . . . . . . . . . . . . . . . . . . . . . . . . . . . . . . . . . . . . . . . 10
Performance Specifications . . . . . . . . . . . . . . . . . . . . . . . . . . . . . . . . . . . . . . . . . . . . . . 11
4 PART NAMES
12
5 MOUNTING AND INSTALLATION
13
5.1
13
13
13
15
16
16
16
17
17
5.2
Mounting/Removing the QA1S6ADP . . . . . . . . . . . . . . . . . . . . . . . . . . . . . . . . . . . . . .
Precautions . . . . . . . . . . . . . . . . . . . . . . . . . . . . . . . . . . . . . . . . . . . . . . . . . . . . . . . . . .
Mounting procedure . . . . . . . . . . . . . . . . . . . . . . . . . . . . . . . . . . . . . . . . . . . . . . . . . . .
Removing procedure . . . . . . . . . . . . . . . . . . . . . . . . . . . . . . . . . . . . . . . . . . . . . . . . . . .
Connecting/Disconnecting Extension Cables . . . . . . . . . . . . . . . . . . . . . . . . . . . . . . . .
Precautions . . . . . . . . . . . . . . . . . . . . . . . . . . . . . . . . . . . . . . . . . . . . . . . . . . . . . . . . . .
Extension cable specifications . . . . . . . . . . . . . . . . . . . . . . . . . . . . . . . . . . . . . . . . . . .
Connecting procedure . . . . . . . . . . . . . . . . . . . . . . . . . . . . . . . . . . . . . . . . . . . . . . . . . .
Disconnecting procedure . . . . . . . . . . . . . . . . . . . . . . . . . . . . . . . . . . . . . . . . . . . . . . . .
6 PRECAUTIONS FOR USING THE QA1S6ADP
6.1
6.2
6.3
18
Current Consumption of the QA1S6ADP . . . . . . . . . . . . . . . . . . . . . . . . . . . . . . . . . . . 18
Voltage Drops Across the QA1S6ADP and Extension Cable . . . . . . . . . . . . . . . . . . . . 19
Precautions When Powering on the System . . . . . . . . . . . . . . . . . . . . . . . . . . . . . . . . . 20
7 EXTERNAL DIMENSIONS
21
REVISIONS . . . . . . . . . . . . . . . . . . . . . . . . . . . . . . . . . . . . . . . . . . . . . . . . . . . . . . . . . . . . . . . 22
WARRANTY . . . . . . . . . . . . . . . . . . . . . . . . . . . . . . . . . . . . . . . . . . . . . . . . . . . . . . . . . . . . . . 24
3
TERMS
Unless otherwise specified, this manual uses the following terms.
Term
Description
A1S5B
A generic term for the A1S52B, A1S55B, and A1S58B extension base
units (type requiring no power supply module) where AnS series I/O
modules and special function modules can be mounted
A1S6B
A generic term for the A1S65B and A1S68B extension base units (type
requiring power supply module) where AnS series I/O modules and
special function modules can be mounted
QA1S6ADP
The abbreviation for the QA1S6ADP Q-AnS base unit conversion adapter
QA1S6ADP+A1S5B/A1S6B
The abbreviation for the AnS series extension base unit with the
QA1S6ADP mounted
4
1
1.1
OVERVIEW
About This Manual
This manual describes the specifications, configuration devices, part names, and mounting and
installation methods of the QA1S6ADP Q-AnS base unit conversion adapter. For contents that
are not described in this manual, such as safety precautions and EMC and Low Voltage
Directives, refer to the Safety Guidelines. For the error codes of the CPU module, refer to the
QCPU User’s Manual (Hardware Design, Maintenance and Inspection).
Pour les contenus qui ne sont pas décrites dans ce manuel, tels que les mesures de sécurité et
EMC et directives basse tension, reportez-vous aux Safety Guidelines (directive de sécurité).
Pour les codes d'erreur du module de CPU, reportez-vous au "QCPU User's Manual (Hardware
Design, Maintenance and Inspection)" (le Manuel de l'utilisateur QCPU (conception du matériel,
maintenance et inspection)).
1.2
QA1S6ADP
The QA1S6ADP is an adapter to connect an AnS series extension base unit to a Q series base
unit.
A1S3B
Q3B
Replace the AnS series
main base unit and mounted
modules with those of the
Q series.
A1S6B
A1S6B
Mount the QA1S6ADP
to the extension base unit.
QA1S6ADP
• The QA1S6ADP is a CE-marked product. To comply with the EMC Directive, the
extension base units and modules used in combination with the QA1S6ADP must
be CE-compliant as well.
• Do not install the control lines or communication cables together with the main
circuit lines or power cables. Keep a distance of 100mm or more between them.
Failure to do so may result in malfunction due to noise.
5
1.3
Packing List
The following items are included in the package of this product.
Item
Quantity
Adapter (QA1S6ADP)
1
Special metal fixture A
1
Special metal fixture B
1
Adapter mounting screw (M36)
3
Special metal fixture mounting screw (M525)
2
Special metal fixture mounting screw (M528)
2
Plain washer (M5)
3
Fixing screw cover
2
This manual
1
1.4
Related Product (Sold Separately)
The following item (sold separately) is required to use the QA1S6ADP.
Item
Model
Remarks
Q series extension cable
QC05B
This cable is required to connect the AnS series extension
base unit with the QA1S6ADP mounted to the Q series
main base unit.
QC06B
QC12B
QC30B
QC50B
QC100B
6
2
2.1
SYSTEM CONFIGURATION
System Configuration Example
The following system can be configured using the QA1S6ADP.
Power supply
module
CPU module
0 1 2 3 4 5 6 7
Main base unit
(Q3B)
A1S68B
AnS series extension base unit with the
QA1S6ADP
(QA1S6ADP+A1S5B/A1S6B)
9 10 11 12 13 14 15
Power supply
module
8
Q38B
QA1S6ADP
Q series extension cable
2.2
Restrictions
This section describes the restrictions when the QA1S6ADP is used.
Applicable CPU modules
The following CPU modules support the connection with the QA1S6ADP+A1S5B/A1S6B.
• High Performance model QCPU
• Universal model QCPU with a serial number (first five digits) of "13102" or later
Base unit connection
• The QA1S6ADP+A1S5B/A1S6B can be connected to the main base unit only.
• When the QA1S6ADP+A1S5B/A1S6B is used, the number of extension base units is
limited to one.
Software
• The number of slots of the QA1S6ADP+A1S5B/A1S6B is always displayed as eight in GX
Works2 or GX Developer, regardless of the actual number of slots of the extension base unit
where the QA1S6ADP is mounted.
• Batch assign I/O numbers to the modules by the series, in order of "Q series AnS series" or
"AnS series Q series". If not, an error (SP.UNITLAY ERR) occurs. Assign I/O numbers so
that they do not overlap.
Restricted functions
The QA1S6ADP+A1S5B/A1S6B cannot be connected to a MELSECNET/H remote I/O
station.
The QA1S6ADP+A1S5B/A1S6B cannot be bus-connected with GOT.
7
2.3
Configuration Devices
Applicable base units
The following table lists the extension base units where the QA1S6ADP can be mounted.
Name
Model
Remarks
Extension base unit (type requiring
no power supply module)
A1S52B, A1S55B, A1S58B
Extension base unit (type requiring
power supply module)
A1S65B, A1S68B
Mountable modules
The following table lists the modules mountable on the QA1S6ADP+A1S5B/A1S6B.
Name
Model
Remarks
Power supply module
A1S61PN, A1S62PN, A1S63P
AC input module
A1SX10, A1SX10EU, A1SX20, A1SX20EU
AC/DC input module
A1SX30
DC input module
A1SX40, A1SX40-S1, A1SX40-S2, A1SX41, A1SX41-S1,
A1SX41-S2, A1SX42, A1SX42-S1, A1SX42-S2, A1SX71,
A1SX80, A1SX80-S1, A1SX80-S2, A1SX81, A1SX81-S2,
A1SX82-S1
Dynamic input module
A1S42X
Relay output module
A1SY10, A1SY10EU, A1SY14EU, A1SY18A, A1SY18AEU
Triac output module
A1SY22, A1SY28A
Transistor output module
A1SY40, A1SY40P, A1SY41, A1SY41P, A1SY42, A1SY42P,
A1SY50, A1SY60, A1SY60E, A1SY68A, A1SY71, A1SY80,
A1SY81, A1SY82
Dynamic output module
A1S42Y
I/O combined module
A1SH42, A1SH42-S1, A1SX48Y58, A1SX48Y18
High-speed counter module
A1SD61, A1SD62, A1SD62E, A1SD62D, A1SD62D-S1
*1
A/D converter module
A1S64AD, A1S68AD
D/A converter module
A1S62DA, A1S68DAI, A1S68DAV
Analog input/output module
A1S63ADA, A1S66ADA
Temperature input module
A1S62RD3N, A1S62RD4N, A1S68TD
Temperature control module
A1S62TCRTBW-S2, A1S62TCRT-S2, A1S62TCTTBW-S2,
A1S62TCTT-S2, A1S64TCRTBW-S1, A1S64TCRT-S1,
A1S64TCTRT, A1S64TCTRTBW, A1S64TCTTBW-S1,
A1S64TCTT-S1
Pulse catch module
A1SP60
Analog timer module
A1ST60
Interrupt module
A1SI61
*3
Positioning module
A1SD70
A1SD75M1, A1SD75M2, A1SD75M3, A1SD75P1-S3,
A1SD75P2-S3, A1SD75P3-S3
*1
MELSECNET/MINI-S3 master
module
A1SJ71PT32-S3
*1
Computer link module
A1SJ71UC24-R4
*2*3
8
Name
Model
Remarks
Intelligent communication module
A1SD51S
*3
MELSECNET, MELSECNET/B
local station data link module
A1SJ71AP23Q, A1SJ71AR23Q, A1SJ71AT23BQ
Paging interface module
A1SD21-S1
*3
Position detection module
A1S62LS
PC fault detection module
A1SS91
Memory card interface module
A1SD59J-S2
ID interface module
A1SD35ID1, A1SD35ID2
*3
MELSECNET-I/O LINK master
module
A1SJ51T64
B/NET interface module
A1SJ71B62-S3
JEMANET (OPCN-1) interface
module
A1SJ71J92-S3
*3
S-LINK master module
A1SJ71SL92N
AS-i master module
A1SJ71AS92
Blank cover
A1SG60
Dummy module
A1SG62
*1 The dedicated instructions used in the QnA series and A series programs cannot be used in the QCPU.
Replace them with the FROM/TO instructions.
*2 Only the multidrop link function can be used. (The computer link function (dedicated protocol, nonprocedural
protocol) can no longer be used.)
*3 The number of mountable modules is limited.
Name
Model
Number of mountable modules
Computer link module
A1SJ71UC24-R4
6 maximum
Intelligent communication module
A1SD51S
Paging interface module
A1SD21-S1
ID interface module
A1SD35ID1, A1SD35ID2
JEMANET (OPCN-1) interface module
A1SJ71J92-S3
Interrupt module
A1SI61
1*4
*4 Only one of the following modules can be used in the system: QI60 (mounted on the Q3B, Q5B, or
Q6B), A1SI61, AI61, or AI61-S1.
9
3
3.1
SPECIFICATIONS
General Specifications
This section describes the general specifications of the QA1S6ADP.
Item
Specifications
Operating
ambient
temperature
Température
ambiante de
fonctionnement
0 to 55
0 à 55
Storage ambient
temperature
-20 to 75
Operating
ambient humidity
10 to 90%RH, non-condensing
Storage ambient
humidity
10 to 90%RH, non-condensing
Vibration
resistance
Compliant with
JIS B 3502 and
IEC 61131-2
Under
intermittent
vibration
Under
continuous
vibration
Frequency
Constant
acceleration
10 to 57Hz
57 to 150Hz 9.8m/
10 to 57Hz
57 to 150Hz 4.9m/
Half
amplitude
Sweep count
0.075mm
10 times each
in X, Y, and Z
directions
0.035mm
Shock resistance
Compliant with JIS B 3502 and IEC 61131-2 (147m/, 3 times each in X, Y, and Z directions)
Operating
atmosphere
No corrosive gases
Operating
altitude*1
0 to 2000m
Installation
location
Inside a control panel
Overvoltage
category*2
or less
Pollution
degree *3
2 or less
Equipment class
Class
*1 Do not use or store the programmable controller under pressure higher than the atmospheric pressure of
altitude 0m. Doing so may cause malfunction. When using the programmable controller under pressure,
please consult your local Mitsubishi Electric representative.
*2 This indicates the section of the power supply to which the equipment is assumed to be connected between
the public electrical power distribution network and the machinery within premises. Category applies to
equipment for which electrical power is supplied from fixed facilities. The surge voltage withstand level for up
to the rated voltage of 300V is 2500V.
*3 This index indicates the degree to which conductive material is generated in terms of the environment in which
the equipment is used. Pollution level 2 is when only non-conductive pollution occurs. A temporary
conductivity caused by condensing must be expected occasionally.
10
3.2
Performance Specifications
This section describes the performance specifications of the QA1S6ADP.
Item
Specifications
Internal current consumption (5VDC)
150mA
External dimensions
H
130mm
W
62mm
D
78.5mm
Weight
0.27kg
Tightening torque range of adapter mounting screw (M3)
0.36 to 0.48Nm
Tightening torque range of special metal fixture mounting screw (M5)
1.59 to 2.16Nm
11
4
PART NAMES
This chapter describes the part names of the QA1S6ADP.
(3)
(1)
(2)
(3)
(3)
(4)
No. Name
Application
(1)
Extension cable connector
A connector for sending/receiving signals to/from the main base unit or
another extension base unit. An extension cable is connected here.
(2)
Connector for extension
base unit
A connector to be connected to the extension cable connector of the
extension base unit
(3)
Adapter mounting screw
(M3)
A screw for mounting the adapter on the extension base unit
(4)
Ground cable guide hole
A guide hole for placing the ground cable connected to the FG terminal of the
extension base unit (This hole is used only when the adapter is mounted on
the A1S5B.)
12
5
MOUNTING AND INSTALLATION
5.1
Mounting/Removing the QA1S6ADP
Precautions
• Ground the FG terminal of the programmable controller with a ground resistance of 100 or
less.
• When the QA1S6ADP is mounted on the A1S5B, the ground cable connected to the FG
terminal of the A1S5B must be the one with its core wire size 2 or greater and its outside
diameter 4.5mm or smaller.
• Tighten the screws within the following specified torque ranges.
Screw
Tightening torque range
Adapter mounting screw (M3)
0.36 to 0.48Nm
Special metal fixture mounting screw (M5)
1.59 to 2.16Nm
Mounting procedure
Mount the QA1S6ADP on the extension base unit, following the procedure below.
1. Disconnect the AnS series extension cable from the extension base unit.
2. Remove the base cover from the extension base unit.
3. Disconnect the ground cable from the FG terminal of the A1S5B (when the A1S5B is
used).
4.
Mount the special metal fixture in accordance with the installation conditions of the
extension base unit.
• Directly installed in the control panel
Special metal
Special metal fixture
Mount the special metal fixture A as
fixture A
mounting screw
shown on the left.
(M5×28)
Extension
base unit
13
Special metal
Special metal fixture
fixture A
mounting screw (M5×25)
Special metal
fixture mounting
screw (M5×28)
Special metal
fixture B
• Installed using a DIN rail
Mount the special metal fixture A, special
metal fixture B, and ground cable as
shown on the left.
Plain washer
(M5)
Extension
base unit
Ground cable
FG terminal
Plain washer (M5)
Special metal
fixture A
Special metal fixture
mounting screw
(M5×25)
Vibrationproofing
bracket
(A1S-PLT-D)
Plain washer (M5)
14
Extension
base unit
FG terminal
Ground cable
• Installed using a DIN rail in a frequent
vibration environment
Mount the special metal fixture A,
vibration-proofing bracket (A1S-PLT-D)
(sold separately), and ground cable as
shown on the left.
5.
6.
Connect the ground cable to the FG terminal of the A1S5B (when the A1S5B is used).
Mount the QA1S6ADP.
• Insert the connector of the QA1S6ADP
QA1S6ADP
to the extension cable connector (IN
Adapter mounting
side) of the extension base unit, and fix
screw (M3×6)
the adapter with the adapter mounting
screws (three locations).
• Pull out the ground cable connected to
the FG terminal of the A1S5B through
the guide hole (when the A1S5B is
used).
Ground
cable
guide hole
Extension
cable
connector (IN)
Special metal fixture A
Extension base unit
7.
8.
Use the Q series extension cable and connect the QA1S6ADP to the main base unit.
Mount the provided fixing screw covers to the fixing screws of the extension cable
connector.
Mount the covers marked "1" to the upper
Fixing screw
screws, and those marked "2" to the lower
cover
Connector fixing screw
screws as shown on the left.
for an extension cable
Extension
cable
Removing procedure
Reverse the mounting procedure to remove the QA1S6ADP from the extension base unit.
15
5.2
Connecting/Disconnecting Extension Cables
Precautions
• When laying extension cables, maintain the minimum bending radius of 55mm or more.
Failure to do so may cause malfunction due to characteristic deterioration or cable
disconnection.
• Keep the overall cable distance of extension cables within 13.2m.
• Do not install extension cables together with the main circuit (high voltage and large current)
lines.
• When connecting or disconnecting extension cables, do not hold the ferrite cores installed at
both ends of each cable. Hold the connector part of the cable.
Extension
base unit
Connector
Ferrite core
Extension
cable
Holding the ferrite core may cause the cable disconnection inside the connector. Besides, keep
the ferrite core in the correct position. If the ferrite core position is shifted, the characteristic will
change.
Extension cable specifications
The following table lists the extension cables that can be connected to the QA1S6ADP.
Item
Model
QC05B
QC06B
QC12B
QC30B
QC50B
QC100B
Length
0.45m
0.6m
1.2m
3.0m
5.0m
10.0m
Resistance value
0.044
0.051
0.082
0.172
0.273
0.530
Weight
0.15kg
0.16kg
0.22kg
0.40kg
0.60kg
1.11kg
16
Connecting procedure
1.
Remove the seal over the extension cable connector of the QA1S6ADP.
Extension
base unit
QA1S6ADP
Sticker
2.
Hold the connector part of the cable, and insert it to the connector of the QA1S6ADP.
Extension base unit
QA1S6ADP
Connector
Extension cable
3.
Fix the cable with the fixing screws (tightening torque: 0.20Nm).
Extension base unit
Flathead screwdriver
QA1S6ADP
Fixing screw
Disconnecting procedure
To disconnect the extension cable, loosen and remove the fixing screws, and then disconnect
the cable holding the connector part.
17
6
PRECAUTIONS FOR USING THE QA1S6ADP
6.1
Current Consumption of the QA1S6ADP
Voltage (5VDC) is supplied to the QA1S6ADP from the power supply module on the main base
unit. Select the power supply module considering the current consumption of the QA1S6ADP.
The current consumption of the power supply module on the main base unit will be as follows.
Calculation formula
Current consumption of the module(s) on the main base unit + Current consumption of the module(s) on the
A1S5B + Current consumption of the QA1S6ADP
Calculation example
The current consumption calculation example is shown below.
• When the A1S5B is used
Main base unit
Power
supply
module
IA
I0
Extension base unit (A1S5B)
I1
• When the A1S6B is used
Main base unit
Power
supply
module
IA
I0
Extension base unit (A1S6B)
Symbol
Power
supply
module
I1
Description
I
Rated current of the power supply module on the main base unit
I0
Current consumption of the module(s) mounted on the main base unit
I1
Current consumption of the module(s) mounted on the extension base unit
(In the system where the A1S6B is used, the current consumption of the module(s) mounted
on the extension base unit is supplied from the power supply module on the extension base unit.)
IA
Current consumption of the QA1S6ADP
In the systems above, the QA1S6ADP can be used when the following condition is satisfied.
Calculation formula
I>I0+I1+IA
18
6.2
Voltage Drops Across the QA1S6ADP and Extension Cable
Voltage (5VDC) is supplied to the QA1S6ADP from the power supply module on the main base
unit. Voltage drops occur across the QA1S6ADP and extension cable due to their resistance. If
the specified voltage (4.75VDC or higher) is not supplied to the QA1S6ADP+A1S5B/
A1S6B, incorrect input or output may be generated.
Since the output voltage of the power supply module on the main base unit is set to 4.90VDC
(minimum), check that the sum of the voltage drops is 0.15V (4.9V-4.75V=0.15V) or lower.
Calculation example
The voltage drop calculation example is shown below.
• When the A1S5B is used
Main base unit
Power
supply
module
R1
I1+IA
V
IA
I0
Extension base unit (A1S5B)
I1
• When the A1S6B is used
Main base unit
Power
supply
module
V
R1
IA
IA
I0
Extension base unit (A1S6B)
Item
Power
supply
module
I1
Extension cable
Resistance value
Adapter
QC05B
QC06B
QC12B
QC30B
QC50B
QC100B
QA1S6ADP
0.044
0.051
0.082
0.172
0.273
0.530
0.0158
Symbol
Description
V
Sum of the voltage drops
R1
Resistance value of the extension cable between the main base unit and the extension base unit
RA
Resistance value of the QA1S6ADP
I1
Current consumption of the module(s) mounted on the extension base unit
(In the system where the A1S6B is used, the current consumption of the module(s) mounted on
the extension base unit is supplied from the power supply module on the extension base unit.)
IA
Current consumption of the QA1S6ADP
In the systems above, the sum of the voltage drops will be as follows.
Extension base unit used
Voltage drops across the QA1S6ADP and extension cable
A1S5B
V=(R1+RA)(I1+IA)
A1S6B
V=(R1+RA)IA
Check that the condition (0.15>V) is satisfied.
19
To connect the QA1S6ADP+A1S5B, it is recommended to use the shortest
extension cable possible so that the voltage drop is minimized.
6.3
Precautions When Powering on the System
Supply power to the system where the QA1S6ADP is used in either of the following way.
• Simultaneously turn on the power supply modules on the main base unit and extension base
unit.
• Turn on the power supply module on the main base unit first, and then turn on the power
supply module on the extension base unit.
20
7
EXTERNAL DIMENSIONS
The external dimensions of the QA1S6ADP are shown below.
78.5
130
62
(Unit: mm)
When an extension cable is connected
Power supply
module
130
Extension
cable
93.6
128
(Unit: mm)
21
REVISIONS
*The manual number is given on the bottom left of the front cover.
Print date
*Manual number
Revision
April 2014
IB(NA)-0800538-A
First edition
This manual confers no industrial property rights or any rights of any other kind, nor does it confer any patent
licenses. Mitsubishi Electric Corporation cannot be held responsible for any problems involving industrial property
rights which may occur as a result of using the contents noted in this manual.
2014 MITSUBISHI ELECTRIC CORPORATION
22
WARRANTY
Mitsubishi will not be held liable for damage caused by factors found not to be the cause of Mitsubishi;
machine damage or lost profits caused by faults in the Mitsubishi products; damage, secondary damage,
accident compensation caused by special factors unpredictable by Mitsubishi; damages to products
other than Mitsubishi products; and to other duties.
Country/Region Sales office/Tel
Country/Region Sales office/Tel
USA
Mitsubishi Electric Automation lnc.
500 Corporate Woods Parkway, Vernon
Hills, IL 60061, USA
Tel : +1-847-478-2100
South Africa
CBI-Electric.
Private Bag 2016, ZA-1600 Isando,
South Africa
Tel : +27-11-977-0770
Brazil
MELCO-TEC Representacao Comercial
e Assessoria Tecnica Ltda.
Av. Paulista, 1439, cj74, Bela Vista,
Sao Paulo CEP: 01311-200-SP Brazil
Tel : +55-11-3146-2200
China
Mitsubishi Electric Automation (China) Ltd.
No.1386 Hongqiao Road, Mitsubishi
Electric Automation Center, Changning
District, Shanghai, China
Tel : +86-21-2322-3030
Germany
Mitsubishi Electric Europe B.V. German
Branch
Gothaer Strasse 8, D-40880 Ratingen,
Germany
Tel : +49-2102-486-0
Taiwan
Setsuyo Enterprise Co., Ltd.
6F., No.105, Wugong 3rd Road, Wugu
District, New Taipei City 24889, Taiwan,
R.O.C.
Tel : +886-2-2299-2499
UK
Mitsubishi Electric Europe B.V. UK Branch
Travellers Lane, Hatfield, Hertfordshire,
AL10 8XB, UK.
Tel : +44-1707-27-6100
Korea
Italy
Mitsubishi Electric Europe B.V. Italian
Branch
Viale Colleoni 7-20864 Agrate Brianza
(Milano), Italy
Tel : +39-039-60531
Mitsubishi Electric Automation
Korea Co., Ltd.
3F, 1480-6, Gayang-Dong, Gangseo-Gu,
Seoul, 157-200, Korea
Tel : +82-2-3660-9530
Singapore
Mitsubishi Electric Europe B.V. Spanish
Branch
Carretera de Rubi 76-80.AC.420, E-08190
Sant Cugat del Valles (Barcelona), Spain
Tel : +34-93-565-3131
Mitsubishi Electric Asia Pte, Ltd. Industrial
Division
307, Alexandra Road, Mitsubishi Electric
Building, Singapore, 159943
Tel : +65-6470-2308
Thailand
Mitsubishi Electric Automation (Thailand)
Co., Ltd.
Bang-Chan Industrial Estate No.111
Soi Serithai 54,
T.Kannayao, A.Kannayao, Bangkok
10230 Thailand
Tel : +66-2906-3238
Indonesia
P. T. Autoteknindo Sumber Makmur
Muara Karang Selatan, Block A / Utara
No.1 Kav. No. 11,
Kawasan Industri Pergudangan,
Jakarta-Utara 14440, P.O, Box 5045,
Indonesia
Tel : +62-21-663-0833
India
Mitsubishi Electric India Pvt. Ltd.
2nd Floor, Tower A & B, Cyber Greens,
DLF Cyber City, DLF Phase-III,
Gurgaon-122002 Haryana, India
Tel : +91-124-463-0300
Australia
Mitsubishi Electric Australia Pty. Ltd.
348 Victoria Road PO BOX11,
Rydalmere, N.S.W 2116, Australia
Tel : +61-2-9684-7777
Spain
France
Mitsubishi Electric Europe B.V. French
Branch
25, Boulevard des Bouvets, F-92741
Nanterre Cedex, France
Tel : +33-1-5568-5568
Czech Republic Mitsubishi Electric Europe B.V.-o.s.Czech
office
Avenir Business Park, Radicka 751/113e,
158 00 Praha5, Czech Republic
Tel : +420-251-551-470
Poland
Mitsubishi Electric Europe B.V. Polish
Branch
ul. Krakowska 50, 32-083 Balice, Poland
Tel : +48-12-630-47-00
Russia
Mitsubishi Electric Europe B.V. Russian
Branch St.Petersburg office
Piskarevsky pr. 2, bld 2, lit "Sch", BC
"Benua", office 720; 195027,
St. Petersburg, Russia
Tel : +7-812-633-3497
HEAD OFFICE : TOKYO BUILDING, 2-7-3 MARUNOUCHI, CHIYODA-KU, TOKYO 100-8310, JAPAN
NAGOYA WORKS : 1-14, YADA-MINAMI 5-CHOME, HIGASHI-KU, NAGOYA, JAPAN
When exported from Japan, this manual does not require application to the Ministry
of Economy, Trade and Industry for service transaction permission.
Specifications subject to change without notice.


© Copyright 2026