
Outlook 2010 Training Suzanne Via IS Dept
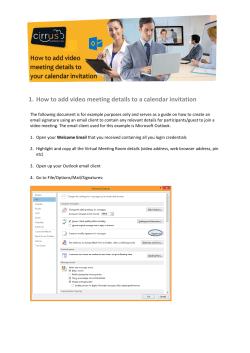
Outlook 2010 Training Last update 18 Nov 2012 Suzanne Via IS Dept SIGN INTO OUTLOOK 2010 CLIENT OUTLOOK CLIENT: Start-All Programs-Microsoft OfficeMicrosoft Outlook Or click on the Shortcut on Desktop Put in your e-mail address – Sign into Sandhills.edu Put in Password OUTLOOK CLIENT on the desktop SIGN-ON ON DESKTOP RIBBON’S: HOME SEND/RECEIVE FOLDER VIEW FILE Info Open Options VIEW RIBBON Sort mail by date, from to, etc… Navigation, reading, to do and people panels SENDING OPTIONS Put semi-colon or press enter after each email entry in a category i.e. to: CC: or BC: [email protected];@sandhills.edu NOTE: The migration of mailboxes did not include frequent contacts so those will accumulate again after you start sending Ribbons: SENDING E-MAIL RETRACT/RECALL AN EMAIL 1. Find the message you wish to retract in the Sent Items folder. 2. Double-click the message to open it. 3. Click the "Actions" button. It is located in the Move section of the ribbon. This displays a menu of options. 4. Select "Recall This Message." Outlook opens the Recall This Message dialog box. 5. Select the "Delete unread copies of this message" option or the "Delete unread copies and replace with a new message" option, then click "OK.“ SIGNATURE OUTLOOK FILE- OPTIONS- MAIL- SIGNATURE Personalize your sent e-mail with Personal Stationary File-Options-Mail-Signature-Personal Stationary tab OUTLOOK QUICK ACCESS TOOLBAR Outlook - Pictures not Downloaded ARCHIVING ONE OF 3 WAYS TO ACCESS 1. Ribbons Toolbar –Folder-Auto-Archive settings 2. File-Options-Advanced-Auto Archive settings-ALL FOLDERS 3. ARCHIVE LOCATION Archive Outlook Data File (.pst) locations The location of the archive Outlook Data File (.pst) varies depending on the version of Microsoft Windows that is running on your computer when the archive is created. New archives created with Microsoft Outlook 2010 are saved in the following locations: Windows 7 drive:\Users\user\Documents\Outlook Files\archive.pst Windows XP drive:\Documents and Settings\user \Local Settings\Application Data\Microsoft\Outlook\archive.pst OPEN OLD ARCHIVES RULES: VACATION/AUTO REPLY RULES Click the File tab, and then the Info tab in the menu. Click Automatic Replies (out of office). RULES: Move to Folder Click HOME ribbon-Rules-New Rule OR File-Info-Rules and Alerts From/Subject/or sent to Send to folder SCHEDULE A MEETING A meeting is an appointment that includes other people and can include resources such as conference rooms. Responses to your meeting requests appear in your Inbox. On the Home tab, in the New group, click New Meeting or In Calendar Keyboard shortcut To create a new meeting request, press CTRL+SHIFT+Q. CALENDAR Located in the To Do panel Double click on calendar OR choose Calendar bottom left of clients Can add other calendars-ie gmail – holiday-SCC calendar and show team meetings Delegate Access (Proxy Access) Office 365 allows you to grant proxy permission for others to access your e-mail and calendar if you choose. Turn on Delegate Access FILE –INFO-ACCOUNT SETTINGS- DELEGATE ACCESS Click Add. Type the name of the person whom you want to designate as your delegate, or search for and then click the name in the search results list. Click Add, and then click OK. In the Delegate Permissions dialog box, you can accept the default permission settings or select custom access levels for Exchange folders. If a delegate needs permission to work only with meeting requests and responses, the default permission settings, including Delegate receives copies of meeting-related messages sent to me, are sufficient. You can leave the Inbox permission setting at None. Meeting requests and responses will go directly to the delegate's Inbox. Proxy Access Access a Department / Scheduling Account Department or scheduling accounts, sometimes referred to as “non-person accounts,” are accounts used for purposes such as coordinating groups and departments or for scheduling rooms and spaces. Often access to these accounts is shared with several members of an organization. You can report issues with or request a new departmental or scheduling account through this online form. When the account is available, account managers can manage access and users can access the accounts with these provided directions. http://office.microsoft.com/en-us/outlookhelp/allow-someone-else-to-manage-your-mailand-calendar-HA010355554.aspx SHARE A FOLDER Right Click on folder, Left Click Properties; Click permissions- ADD-Search for user in Global Address Book-Give permissions You can give the person a message message: This folder was shared to you by $ownerName$ [$ownerAddr$] Access Shared Access Select File>Account Settings>Change>More Settings>Advanced>Add… Search for the Owner using the dialog to add the mailbox containing shared content. If the Owner shared a standard system folder, an alternate means to access the information may be: Select File>Open->Other User’s Folder… Search for the owner using the dialog to add the mailbox containing shared folder. SHARE & ADD ACCESS SHARED ADDRESS BOOKS To Share Click on Contacts and right click on Calendar and left click on Share-Add whomever you would like to give access To Add Share: File>Account Settings>Change>|More Settings>Advanced>Add… Search for the Owner using the dialog to add the mailbox containing this content. An alternate means to access the information may be: Select File->Open->Other User’s Folders> Click on Contacts Search for the Owner using the dialog to add the folders. SHARE & ADD ACCESS SHARED RESOURCES/CALENDARS To Share Click on Calendar and right click on Calendar and left click on Share-Add whomever you would like to give access To Add Share: Select File>Account Settings>Change>|More Settings>Advanced>Add… Search for the Owner using the dialog to add the mailbox containing this content. An alternate means to access the information may be: Select File->Open->Other User’s Folder>Calender Search for the Owner using the dialog to add the folders. MULTI-USER CALENDAR Insert an Image into Outlook Click Insert. To insert an image found on a web site: Start with a message using HTML formatting. Open the web page containing the desired picture. Drag and drop the image from the web page in your browser to the desired location in your email message. Click Allow if Internet Explorer asks you whether to allow web content to be copied. Alternatively, click on the image with the right mouse button and select Copy from the context menu, then press Ctrl-V with the cursor at the point where you want to insert the image in your Outlook message. Set Up Mail for Mac OS 10.6 Snow Leopard or 10.7 Lion for Your E-Mail Account If you're running Mac OS 10.6 Snow Leopard or Mac OS 10.7 Lion, you can use the Mail program included with those releases to connect to your e-mail account. The Mail program will try to set up your account automatically. This requires fewer steps than using IMAP or POP. Additionally, when you use Mac OS 10.6 Snow Leopard or Mac OS 10.7 Lion, you can use features that aren't available to users who connect through IMAP or POP, including iCal and Address Book. These programs help you manage your calendar and address book. Set Up Mail for Mac OS 10.6 Snow Leopard or Mac OS 10.7 Lion access to your e-mail account Open Mail, and then do one of the following: If you've never set up any e-mail accounts using Mail, the Welcome to Mail page will appear. Go to step 2. If you've already created e-mail accounts using Mail, on the Mail menu, click Preferences. On the Accounts tab, click the plus sign (+) at the bottom of the navigation pane to open the Add Account window. In the Welcome to Mail or Add Account window: In the Full Name box, enter the name you want to display to people you send e-mail to. In the Email Address box, enter your primary e-mail address. In the Password box, enter the password for your e-mail account, and then click Continue. The Mail program will use the information you entered in the previous step to try to set up your e-mail account automatically. If the Mail program was able to set up your account automatically, in the Account Summary dialog box, under Also set up, select the additional options you want to set up for the account. If you want to use the Address Book program that's included in Mac OS 10.6 Snow Leopard, select Address Book contacts. If you want to use the iCal calendar program that's included in Mac OS 10.6 Snow Leopard, select iCal calendars. After you've selected the options you want, Click Create. If the Mail program wasn't able to set up your account automatically, wait a few minutes or hours, and then repeat these steps.


© Copyright 2026