
Calendar: Basic Features Scheduling, invitations, attachments, and printing Your calendar view
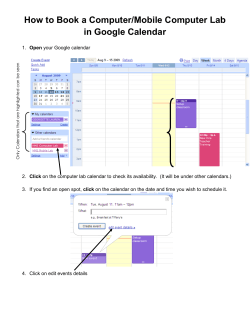
Calendar: Basic Features
Scheduling, invitations, attachments, and printing
Your calendar view
Sign in to Google Calendar at http://email.ucsc.edu with your CruzID and Blue password. You'll see your
calendar weekly view. Here’s an example:
To change your calendar view, click the tabs in the upper-right corner of the view.
Schedule a meeting
You can schedule a meeting by clicking the Create button or by clicking anywhere on your calendar.
1. Open Google Calendar.
2. Do either of the following:
Option 1: In the upper-left of your calendar, click Create to open the event details page.
Option 2: Or, click a spot on your calendar to create a 1-hour event. Click and drag to create an event of
more than 1 hour. Then type the event title in the box. Here’s an example:
Click Create Event to immediately publish the event, or click Edit event to add more details to the event.
3. Enter details, such as recurrence, guests, an agenda, and a reminder.
4. Click Save.
Edit event details later
If you've already scheduled and published your meeting, you can edit its details by clicking the title of the meeting
on your calendar.
Note: Once you've finished entering meeting details, click Save at the top of the event details page.
Invite guests
1. Go to the event details page of your meeting.
2. In the Add: Guests section on the right side of the page, enter the first few letters of a guest's full name
and if that person is already in your email contacts list, the name will auto-fill. If the person isn’t in your
email contacts list, you will need to type in the full UCSC email address, e.g., [email protected].
3. Select the guest to add him or her to your Guests list.
4. Continue adding your guests’ email addresses one by one.
Inviting Multiple People to a Meeting
● To invite multiple people to a meeting you can type each of their email addresses in the guest
field or create a group in your email contacts. Once a group is created, you just type in the
name of the group in the guest field and all the people in that group will be invited to your
meeting. To learn how to create a group in your email contacts go to:
http://its.ucsc.edu/google/calendar-faqs.html
● If you copy and paste a guest list from another source (for example, a document), make sure you
separate each address with a comma (semicolons are not supported).
5. Optionally, select options in the Guests can section to allow or prevent guests from changing event
details, inviting more people to your event, or viewing who else was invited.
6. If desired, fill in the rest of the fields on the page.
7. Click Save.
Google Calendar asks you whether you want to send invitations to the guests. Your guests can respond
to the meeting invitation and leave comments.
Tip: If you want to check the availability of guests before creating the event, use the Find a time tab. You
can see how your proposed event time (in the blue box) works for each guest.
If necessary, use the date and time options at the top of the tab to change the time for your meeting. Or,
simply drag the blue box to a time available to all guests.
Book a room or other resource for your meeting
1. Go to the event details page of your meeting.
2. In the Add: section, click Rooms, etc.
3. Do either of the following:
Option 1: Start typing any part of the room or other resource's name in the box. A list of matching
resources appears in the list.
For example, in the following screenshot, when you start typing ca, two rooms populate: Acadia and
Bryce Canyon.
Option 2: Browse the list to find the room or other resource you want to book.
4. Check if the resource is available during the time of your meeting.
- Available
- Not available
5. To book an available resource, click Add (to the left of the resource name). If there aren’t any available
resources, try changing the time or day of your event. To easily find a time that works for all guests and
resources, click the Find a time tab.
6. After you’ve entered all event details, remember to click the Save button.
Make a meeting private
To keep meeting details private, you can select the Private radio button in the Privacy section of the
event details page. Only the meeting participants and people with manage sharing access to the
calendar can see event details when the event is set to Private.
*Important: A guest invited to your private meeting can change the meeting from Private to Public on
his or her calendar, which opens up the meeting details on that person’s calendar only.
Set a reminder for your meeting
1. Open your meeting.
2. Under Reminders, choose the type of reminder you want (pop-up or email message) and when you want
to receive it.
3. To add more reminders, click Add a reminder.
4. Remember to click the Save button.
Set up a recurring (repeating) meeting
1. Go to the event details page.
2. Check the box to the left of Repeat.
3. In the Repeat pop-up, select an option from the Repeats drop-down.
4. Depending on your selection from the Repeats drop-down, further define how the meeting recurs,
including specifying start and end dates (if applicable).
5. Finish creating your meeting as usual.
6. Remember to click the Save button.
Attach a file to a meeting invitation
First, make sure the Event attachments Calendar lab is enabled.
1. Select Settings from the gear menu, and go to the Labs tab.
2. Select Enable next to Event attachments.
3. Click Save.
To add an attachment:
1. Open your meeting.
2. In the Attachment section, click Add attachment.
a. You can add an attachment that is already located in your Google Docs (Google Drive) OR you
can upload a file from your desktop.
3. If your file is already located in Google Docs, check the box next to one or more Google Docs files, and
click Select.
4. If your file is NOT in Google Docs, click Upload and Choose files to upload option to browse files on
your desktop computer.
5. Review your attachments. Here’s an event with both an attached Google Doc and a Microsoft Word
document that was uploaded to Google Docs:
6. After you’ve entered all event details, remember to click the Save button.
Note: Alternatively, you can add an attachment using either of these methods:
●
Send the attachment in a separate email message to guests.
Print your calendar
1. Make sure only the calendars you want to print are highlighted in your list under My Calendars. If not,
simply click the calendars to select or deselect them.
2. At the top of the calendar view, select the time frame you want to print; for example, select Day or Week.
3. Click the More option located upper right of your calendar and select Print. In the Calendar Print
Preview window, you can select a font size, page orientation, and other options.
4. Select the options you want, and then click Print.


© Copyright 2026