
How to Set Up a Gmail Account: Step-by-Step Guide
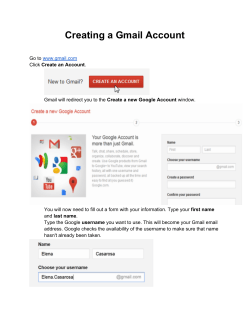
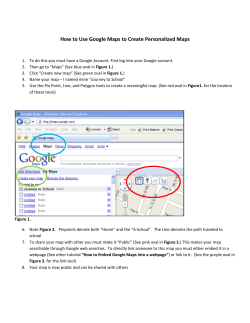
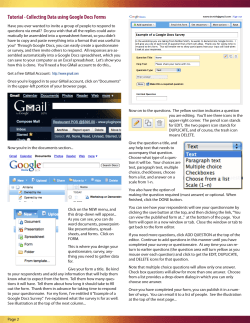
Set up an email
account with Gmail
*This guide was last updated 18 April 2011. Please note that
the real system and process may differ from this guide.
1. Get started
Use your keyboard to type http://www.google.co.uk into
the address bar and press the enter key.
Now you’ll see the ‘Google’ home page which gives you
access to Google email as well as Google internet search
and access to other Google services.
You need to click on ‘Googlemail’ at the top of the screen,
between ‘Shopping’ and ‘more’.
‘Googlemail’ is also known as ‘Gmail’, and you’ll see the
‘Welcome to Gmail’ page. This gives a few details of their
service and allows those who already have a Gmail account
to sign in and get their messages.
When you are setting up, you need to click on ‘Create an
account’.
2. Create an account
The ‘Create a Google account’ page opens. This will be the
account you use to access Gmail email later. There are
several boxes to fill in on this screen, but just take your
time and do them one at a time.
To enter text, first point your cursor at the box you want to
complete. The cursor looks like this:
Click your left mouse button once and then use the
keyboard to type in your details. If you make a mistake
press the backspace key. It looks like this:
3. Name
To enter your name, point the cursor at the correct box,
click your left mouse button once and use the keyboard to
type your name.
4. Login name
Next you’ll need to decide on an account name. This will
be the name you use to access Gmail email when you
come back, so you will want to choose something you can
remember. It is also going to be your email address, which
will be seen by people you send messages to - so think
carefully about what you want this to be.
Most people start by trying their own name, so type this
into the box, without spaces, and click the box that says
‘check availability’ to see if you can use it, or if someone
else with the same name has got there first!
In this example Graham has not been lucky. His name has
already gone. But Google has suggested some options
based on the name he asked for.
You can select one of these or try a different option. Think
about using full stops or numbers to make something that
means something to you and is recognisable to others.
In our example Graham adds his middle initials, and a full
stop before his family name.
3. Passwords
Now we come to the password section. Your password
needs to be something you will remember but others can’t
guess. You will need to use your password every time you
log into your email account.
You can make your password harder for others to guess by
using numbers, symbols or a mix of CAPITAL and small
letters.
So while someone may know Graham has a pet named
Beatrice, if he makes his password be@Tr1ce that would
be more difficult for someone to guess.
As you can see Google rates this password as very strong.
Take a moment to think of a password and how you can
make it more secure while still memorable, then type it
into both boxes on screen.
4. Additional questions
There are now 2 boxes on screen that we need to consider.
They are labelled ‘Stay signed in’ and ‘Enable Web History’,
If you leave ‘Stay signed in’ ticked Google will try to
remember you on the computer you’re using now. If you
are on a computer you share with others, for example in a
library, it is therefore very important that you make sure
this box is not ticked.
With ‘Enable Web History’ ticked, Google will keep track of
what you link to and view so that they can provide you
with more relevant information. If you don’t want Google
tracking what you do on the internet, make sure the tick is
removed from this box too.
To untick a box, move your cursor to point at the box and
click your left mouse button once.
You now need to move down the screen for the last few
questions, using the down arrow.
These questions are here so that if you have any problems
using Gmail in the future, Google can make sure it is you
they are helping.
First choose the question you want them to ask if you‘re
having trouble with your account or trouble remembering
your password.
Select a question from the drop down list. To do this point
your cursor at the box that looks like this :
and click your left mouse button once. Then move your
mouse to select your preferred question and click again.
To enter your answer , move your cursor to point at the
box below the question, and use the keyboard to type the
answer.
Make sure this is an answer you are sure of and check your
spelling as it will need to match exactly if you need help
from Google.
If you already have another email address you can enter it
here and if you have problems Google will send help
instructions to that address. If you don’t have another
email address don’t worry, just leave this field empty.
5. Location
Because Google operate all over the world they ask for
your location so that they operate in accordance with local
laws. Select the correct option from the drop down list. To
do this point your cursor in the boxes that look like this :
and click your left mouse button once. Then move your
cursor to highlight your country and click again.
6. Word verification
Also in this section is a word verification. Google use this to
prove you are a human rather than a computer. A word
verification is also sometimes called a CAPTCHA code.
Move your cursor over the box, click your left mouse
button once and use your keyboard to type the letters that
you see in the image in the box provided. If you can’t
recognise the letters you can listen to them by clicking on
the blue wheelchair symbol.
7. Mobile verification
At this point Google may ask you to further verify that you
are a human by asking for a mobile phone number that
they can send a message to. (If you do not see the page
below on your computer screen then skip straight to step 8
in this guide.)
Move your cursor over the ‘Mobile phone number’ box,
click your left mouse button once and then use the
keyboard to type your phone number into the box.
Google will send a text message to your mobile phone. The
text message will contain a code which may be a mixture
of numbers and letters.
When you receive this code, just move your cursor over
the box that says ‘Enter your code’, then click the left
mouse button once and use the keyboard to type the code.
Now move your cursor over the ‘Verify’ button and click
the left mouse button once.
8. Terms of service
Finally to get a Gmail email account you must accept the
Google Terms of Service. It is a good idea to have a read of
these so that you understand what you are agreeing to!
There are also links to Google’s Program and Privacy
policies if you want more information.
Once you have read the terms and conditions you’re all
ready to go. Move your cursor to point at the “I accept”
button and click your left mouse button once.
9. Final steps
Congratulations, you’ve just got a Gmail email account!
You will be taken to a new screen like the one below which
confirms that you have an account. Move your cursor to
point at the
button.
You will now be taken to your Gmail account where you
will have new messages to welcome you to Gmail.


© Copyright 2026