
Carbon Copy Cloner Documentation: English Getting started with CCC
Carbon Copy Cloner Documentation: English
Getting started with CCC
System Requirements, Installing, Updating, and Uninstalling CCC
CCC License, Registration, and Trial FAQs
Trouble Applying Your Registration Information?
Establishing an initial backup
Preparing your backup disk for a backup of Mac OS X
Restoring data from your backup
What's new in CCC
Features of CCC specific to Lion and greater
Release History
Carbon Copy Cloner's Transition to a Commercial Product: Frequently Asked
Questions
Credits
Example backup scenarios
I want to clone my entire hard drive to a new hard drive or a new machine
I want to backup my important data to another Macintosh on my network
I want to backup multiple machines or hard drives to the same hard drive
I want my backup task to run automatically on a scheduled basis
Backing up to/from network volumes and other non-HFS volumes
I want to back up my whole Mac to a Time Capsule or other network volume
I want to defragment my hard drive
Backup and archiving settings
Excluding files and folders from a backup task
Protecting data that is already on your destination volume
Managing previous versions of your files
Automated maintenance of CCC archives
Advanced Settings
Some files and folders are automatically excluded from a backup task
The Block-Level Copy
Scheduling Backup Tasks
Scheduling a task and basic settings
Performing actions Before and After the backup task
Deferring and skipping scheduled tasks
Frequently asked questions about scheduled tasks
Email and Growl notifications
Backing Up to Disk Images or Other Macs on Your Network
Backing up to a disk image
Restoring from a disk image
Using Carbon Copy Cloner to backup to another Macintosh on your network
Restoring from a backup on a remote machine
Managing backups of multiple computers to one "backup server"
A caveat for backing up to a remote Macintosh that has no user logged in
Frequently Asked Questions and Troubleshooting
How long should the clone or backup take?
Can CCC back up my BootCamp (Windows) partition?
"The disk usage on the destination doesn't match the source -- did CCC miss some
files?"
Will CCC clone Apple's "Recovery HD" partition?
Some applications behave differently or ask for the serial number on the cloned
volume. Did CCC miss something?"
"A block-level copy cannot proceed due to media errors"
Getting more information about what is happening during the backup
Can I run a backup while I'm using my computer? If I have open files, will they be
backed up?
What makes a volume bootable?
Can I back up one computer and use the clone to restore another computer?
Computer-specific preference files -- caveats to migrating to a new computer
Cloning a Time Machine backup
Antivirus software may interfere with a backup
"CCC found multiple volumes with the same Universally Unique Identifier"
I have a clone created by another application. Will CCC recognize that data, or will
it want to recopy everything?
Finder or App Store finds other versions of applications on the backup volume
Advice from the experts
The Cloning Coach: Expert advice for common error conditions
The Disk Center
Help! My clone won't boot!
Backing up large files, mounted disk images, and FileVault home directories
Performance Suggestions
A closer look at how CCC determines the "bootability" of a destination volume
How frequent should my backups be?
Getting started with CCC
System Requirements, Installing, Updating, and Uninstalling CCC
CCC License, Registration, and Trial FAQs
Trouble Applying Your Registration Information?
Establishing an initial backup
Preparing your backup disk for a backup of Mac OS X
Restoring data from your backup
What's new in CCC
Features of CCC specific to Lion and greater
Release History
Carbon Copy Cloner's Transition to a Commercial Product: Frequently Asked Questions
Credits
System Requirements, Installing, Updating, and Uninstalling
CCC
System Requirements
Mac OS 10.6 Snow Leopard
Mac OS 10.7 Lion
Mac OS 10.8 Mountain Lion
Mac OS 10.9 Mavericks
An older version of CCC is still available for users running Tiger and Leopard.
Supported configurations
HFS+ formatted partition or hard drive is required for a bootable backup of OS X
AFP and SMB network file systems
Backup of user data is supported on non-HFS+ filesystems
CCC will not clone to or from an unformatted or unmounted device — the source and destination must have a
filesystem recognized by OS X and visible in the Finder
Hard drives in Firewire, eSATA, Thunderbolt and USB enclosures *
CCC will not backup directly to optical media (e.g. CD-ROM or DVD-ROM)
CCC is supported only on machines that officially support Mac OS X Snow Leopard (or higher)
A minimum screen resolution of 1024x768 is required
* Not all hard drive enclosures are capable of booting OS X. Check with the manufacturer of your hard drive
enclosure to verify that booting from the enclosure is explicitly supported. See the Preparing a hard drive for use
with Carbon Copy Cloner and Help! My clone won't boot sections of the CCC documentation for more information
on disk formatting, partitioning, and general bootability concerns. These restrictions apply to the ability of the
device to boot a Mac, any of these devices are suitable for general backup.
Installing Carbon Copy Cloner
When you first download CCC, you may be prompted to copy it to your hard drive, and you can put it wherever you want.
The disk image distribution offers a link to your /Applications directory for convenience, many people copy it there. If you
used Safari to download CCC, and you have it configured to open "safe" attachments, it's possible that CCC was
automatically "installed" into your Downloads folder. If you're still having trouble finding it, you can use Spotlight to find it.
We recommend that you install CCC on your startup volume if you intend to create scheduled tasks.
Checking for updates to CCC
Carbon Copy Cloner includes a software update feature that periodically checks bombich.com for updates to CCC. To
check for application updates, launch Carbon Copy Cloner and choose "Update CCC..." from the Carbon Copy Cloner
menu. By default, CCC will automatically check for updates once a day. To change this preference, choose "week,"
"month," or "Never" from the popup menu indicating how frequently to check for updates. If you would like to check for
updates manually, click the button labeled "Check for updates now". If a new version of CCC is available, a window will
appear indicating new features, problems resolved, etc. If your version is current, you will receive a message indicating
that you are up to date.
You also can choose to be informed of beta updates. Occasionally, beta updates are provided to field test updated
version of CCC to confirm that code changes have resolved a particular problem. In general, beta updates are only issued
when a user has discovered a problem that the software developer cannot reproduce. Therefore, you should only apply
beta updates when instructed to do so by Bombich Software.
Installing an update when you have scheduled tasks
When a software update is available and you choose to download and install it, you will be prompted to temporarily
unload any scheduled tasks. Because scheduled tasks run as the system administrator user, you will be prompted to
authenticate to unload these scheduled tasks. When the download and installation is complete, CCC will be relaunched
and will prompt you to authenticate once again to reload your scheduled tasks.
Manually installing updated versions of Carbon Copy Cloner
If you decide to manually install a newer version of CCC, note that the Finder will not allow you to directly replace the
original version of CCC when scheduled tasks are enabled. Use the following procedure to update manually:
1. Move the older version of CCC to the Trash (don't try to empty the Trash!).
2. Now copy the newer version of CCC into place.
3. Launch the new version of CCC and authenticate when prompted to re-save the scheduled tasks.
4. Once the scheduled tasks have been re-saved, you can empty the Trash.
The operation can't be completed be the item "Growl" is in use
If you skip step 1 in the list above and try to replace CCC directly when scheduled tasks are running (idle, or actively
backing up), Finder will issue this error message. The Growl framework that is included with CCC happens to be the first
item that is in use that Finder tries to replace, so that's the item that is called out in the error. This has nothing to do with
Growl specifically, though, it simply indicates that the scheduled task helper application is currently running.
Unfortunately at this point, the Finder has already corrupted the older version of CCC so you can't launch it to perform a
proper update. Simply move the older version of CCC to the Trash before trying to copy the new version of CCC into
place.
Uninstalling CCC
If you haven't scheduled any tasks, you can simply drag the CCC application to the trash.
If you have scheduled tasks, you should first launch CCC and remove all of your scheduled tasks before moving CCC to
the trash. To remove scheduled tasks, choose "Scheduled Tasks..." from the Carbon Copy Cloner menu, then select
each task and press the delete key. Once all tasks have been removed, you may quit CCC and place it in the Trash.
If you deleted or moved CCC without unloading the scheduled tasks, the operating system will repeatedly attempt and
fail to launch CCC. To resolve this, you can either reinstall CCC and follow the procedure above to delete scheduled
tasks, or you can do the following:
1. In the Finder, navigate to /Library/LaunchDaemons (i.e. starting at the root level of your hard drive, not your home
directory)
2. Find any files whose names start with "com.bombich.ccc.scheduledtask" and move them to the Trash. You will be
prompted to authenticate to allow this change.
3. Reboot your computer
4. You may empty the trash upon reboot
For full transparency, here is a list of all files associated with CCC. It is not necessary to remove all of these files, but if
you like to keep a clean house, you can do so by removing the following:
/Library/LaunchDaemons/com.bombich*
/Library/PrivilegedHelperTools/com.bombich.ccc
/Library/Logs/CCC.*
/Users/username/Library/Preferences/com.bombich.ccc.plist
/Users/username/Library/Application Support/com.bombich.ccc/CCC.keychain
/Users/username/Library/Caches/com.bombich.ccc/
/Users/username/Library/LaunchAgents/com.bombich.ccc-user-agent.plist
Note: On Mac OS X Lion and later, you can get to the Library folder in your home directory by holding down the Option
key and selecting "Library" from the Finder's Go menu.
License
View the End User License Agreement for CCC
CCC License, Registration, and Trial FAQs
Thanks for trying Carbon Copy Cloner! You can try the complete feature set of CCC for 30 days before purchasing
it. Use that time to explore CCC's automated, incremental backup functionality, make a bootable backup, move
your digital life to a new hard drive and get peace of mind.
When you are satisfied with CCC's feature set and performance, you can purchase a license for CCC at our online store.
When you purchase CCC, we will send your registration information via email with a link that will instantly apply the
registration information to CCC.
Frequently Asked Questions about CCC Licensing and
Registration
1. Where can I find out about CCC's transition to a commercial product?
2. How can I get help finding my registration code and getting CCC registered?
3. When I click on the button to apply my registration settings, my browser says that it can't open this weird-looking
URL.
4. Can I use one license of CCC on multiple Macs in my household?
5. If I pay for CCC now, will I have to pay for future updates?
6. Why isn't CCC on the Mac App Store?
7. Why do I have to provide my address when purchasing CCC?
Where can I find out about CCC's transition to a commercial product?
Carbon Copy Cloner's Transition to a Commercial Product: Frequently Asked Questions has information about how CCC
is no longer "donationware", how previous donors can receive a free license to CCC 3.5, and older versions of CCC.
How can I get help finding my registration code and getting CCC registered?
Trouble Applying Your Registration Information? contains information about retrieving registration information and
applying the registration settings contained in your registration email.
When I click on the button to apply my registration settings, my browser says that it
can't open this weird-looking URL.
If you click on the "Click Here to Register CCC" button in the email that you received from us and you get a message
similar to "Safari can't open com.bombich.ccc.lic://blah-blah-blah because OS X doesn't recognize Internet addresses
starting with com.bombich.ccc.lic", that means that CCC hasn't yet been registered as the application that handles those
URLs. Typically CCC is registered as that URL handler when you launch CCC, so be sure that you have downloaded
CCC and opened it on the Mac where you're trying to apply the registration settings. If you have already opened CCC
(3.5 or later) and you're still getting this message, try entering the registration values manually, or contact us for
assistance.
Can I use one license of CCC on multiple Macs in my household?
Yes, the CCC License allows you to install and use Carbon Copy Cloner on any computer that you own or control for
personal, noncommercial use. If you're using CCC commercially or institutionally, check out our Corporate and Education
Licensing options.
To apply the registration settings to another Mac, drag the "Click Here to Register CCC" button or link from your
purchase confirmation email to your Desktop. When you drag the link to your Desktop, a bookmark file will appear on the
Desktop. Transfer this file to your other Macs and double-click it to apply the CCC registration settings there.
If I pay for CCC now, will I have to pay for future updates?
Updates (e.g. bug fixes, 3.5.1, 3.5.2, etc.) are always free to registered users. Upgrades (e.g. version 4.0, 5.0, etc.) that
include new features and functionality, support for features specific to newer operating systems, etc. will be handled like
most commercial software: current users will be offered a lower upgrade price but the previous version will continue to
work if you decline to purchase the upgrade.
Why isn't CCC on the Mac App Store?
We would love to add the Mac App Store as a distribution channel for CCC, but there are certain classes of applications
that do not meet the policy requirements imposed by Apple. Unless Apple changes these policies, you will never see a
utility that can make a bootable backup of OS X on the Mac App Store. You can send Apple some feedback about this
policy, but judging from the absence of the Mac App Store from Apple's Feedback page, and Apple's pertinacious
position on this matter, we don't anticipate a change in this policy.
Why do I have to provide my address when purchasing CCC?
FastSpring, our payment processing service, requires this information for fraud prevention (for both Credit Card and
PayPal-funded orders). They use this information, and a number of other metrics, to help prevent fraudulent orders.
Bombich Software will never share this information with other companies or individuals. This information is only used to
process your order.
Bombich Software Privacy Policy
Trouble Applying Your Registration Information?
Your registration code is tied to the name and email provided when the license was purchased. If your email or name are
entered incorrectly (capitalization matters!), the license will show as invalid.
To ensure that the license information is applied correctly, just open your license email and click on the "Click Here to
Register CCC" button to automatically apply the settings (if prompted, select CCC as the application to use when
opening the link).
Frequently Asked Questions
1. How do I retrieve my registration information? I paid for CCC in the past, but now I'm trying to use CCC under
another user account.
2. What if I can't retrieve my registration information?
3. When I click on the button to apply my registration settings, my browser says that it can't open this weird-looking
URL.
4. How do I register CCC in one click?
5. How do I manually enter a CCC registration code?
6. I'm still having trouble. How do I get someone to help me?
How do I retrieve my registration information? I paid for CCC in the past, but now I'm
trying to use CCC under another user account.
If you see a prompt to purchase CCC or banners during a backup and you have paid for CCC in the past, you can
retrieve your registration information at our website. Simply provide the email address that you used when you paid for
CCC, and we'll send your registration information via email. A button in the email will instantly register CCC (no
copying/pasting of registration codes is required).
What if I can't retrieve my registration information?
There are several reasons that this might happen, e.g. you don't have access to the email account you used when you
originally paid for CCC or you don't remember which email you used. If you can't automatically retrieve your registration
information, we need to verify your previous donation. Please submit a request for registration assistance and we'll work
it out as quickly as possible.
When I click on the button to apply my registration settings, my browser says that it
can't open this weird-looking URL.
If you click on the "Click Here to Register CCC" button in the email that you received from us and you get a message
similar to "Safari can't open com.bombich.ccc.lic://blah-blah-blah because OS X doesn't recognize Internet addresses
starting with com.bombich.ccc.lic", that means that CCC hasn't yet been registered as the application that handles those
URLs. Typically CCC is registered as that URL handler when you launch CCC, so be sure that you have downloaded
CCC and opened it on the Mac where you're trying to apply the registration settings. If you have already opened CCC
(3.5 or later) and you're still getting this message, try entering the registration values manually, or contact us for
assistance.
How do I register CCC in one click?
View step-by-step one-click registration directions, complete with pictures.
How do I manually enter a CCC registration code?
View step-by-step manual registration directions, complete with pictures.
I'm still having trouble. How do I get someone to help me with my registration?
We're here to help. Just contact us via this Registration Assistance form, and we will help you sort it out as quickly as
possible.
Establishing an initial backup
One of the most common uses of CCC is to establish a bootable backup of an OS X startup disk, or to migrate from a
smaller disk to a larger disk. The steps below will guide you through this common scenario. For more scenarios, see the
"Example backup scenarios" section of the documentation.
1. Attach your backup volume to your Macintosh. See the "Choosing a backup volume" section below for additional
advice on this subject.
2. If the new disk is not initialized, format it using the Disk Utility application. See the Formatting and partitioning a
hard drive section of the documentation for step-by-step instructions.
3. Launch Carbon Copy Cloner
4. Choose your startup disk in the Source menu
5. Choose your new volume in the Destination menu
6. Click the Clone button
CCC's defaults settings are optimized for this scenario, so no custom settings are necessary.
Next steps
Verify your backup: Take some time to verify your backup when the task has completed.
Swap hardware: If you are migrating data to a larger hard drive, you can physically swap the two hard drives when
the task has completed.
Update your backup volume: If you would like to update your backup volume in the future, repeat the cloning task
in CCC using the exact same settings — CCC will copy only the items that have changed since the last backup
task.
Automate your backup: CCC can keep your backup volume up to date without your intervention. Click on the
"Schedule this task..." button to configure CCC to automatically update your backup volume on a scheduled basis,
when the source or destination volume is reattached to your Mac, or manually when you feel like getting it updated.
Choosing a backup volume
The goal of backing up your data is to protect yourself from hardware malfunction and accidental or malicious deletions.
To effectively protect your data from both of these scenarios, it is best to back up to media that is not physically located
inside your Macintosh (e.g. to an external Firewire or USB hard drive, or to another Macintosh), but at minimum to
another physical hard drive (e.g. not to another partition on the same hard drive). Additionally, you should choose media
that allows you to boot your Macintosh from the backup. A bootable backup gives you not only a really easy way to verify
the fidelity of your backup, but it also allows you to instantly regain productivity should catastrophe strike. Rather than
spending your morning restoring your OS and data, simply boot from your backup and carry on with your business.
For general performance considerations, please see our in-depth analysis of the factors that will affect how long it takes
to back up your data. Before you purchase a hard drive for backup, consider the following options:
Internal or external?
If you have a Mac with room for additional internal hard drives, you can use that space for your backup hard drive. I prefer
external hard drive enclosures for portability reasons — I can easily swap a pair of external hard drives between office
and home to have an inexpensive offsite backup solution. This also gives me the opportunity to easily leverage that hard
drive to back up multiple Macs.
USB, Firewire, or eSATA?
Many hard drive enclosures have Firewire, USB, or both interfaces for connecting the hard drive to your computer. Either
of these interfaces will work fine for backing up and safeguarding your data, however, PowerPC Macs cannot boot from
USB-attached hard drive enclosures. While Intel-based Macs can boot from either, I generally recommend using Firewire
for performance reasons. Backups over Firewire are always faster than backups over USB. eSATA is a newer connectivity
option that is very fast, though not quite as flexible as Firewire or USB and is not typically bootable.
Where should I buy it?
Hard drive enclosures are not all built the same, some are not even capable of booting a Macintosh. I prefer to work with
vendors that cater to the Macintosh market because I can get assurance that they have tested their products with Apple
hardware and OS X. There is a lengthy thread in the public discussions on the subject of "What hard drive enclosures
have you had success or failure with?" that is worth a read.
We do not recommend purchasing a hard drive enclosure from Western Digital if you require a bootable backup.
Many Western Digital hard drive enclosures cannot boot your Macintosh, and the SmartWare firmware will guarantee that
the enclosure will not boot your Mac. Western Digital hard drives are fine, the enclosures should be avoided until their
SmartWare offers the capability of booting Macs.
How big should the backup volume be?
The backup volume should be at least as large as the amount of data that you want to copy to it. If you're planning to
make regular backups to this volume, a good rule of thumb is that the backup volume should be at least 50% larger than
the amount of data that you're initially backing up to it. This allows for a modest amount of data growth and room for
temporary archiving of modified and deleted files. If you want to create a backup volume as small as necessary, see this
discussion for a more detailed look at determining the size of the backup volume.
PLEASE NOTE: We strongly recommend that you find the means to dedicate a volume to the task of backing up
your irreplaceable data. If you have data on your backup volume that exists nowhere else, it is not backed up!
Whenever you target a volume for use with Carbon Copy Cloner, there is a risk that some files will be removed for one
legitimate reason or another. CCC offers options and warnings to protect your data from loss, but nothing can protect
your data from a misuse of CCC or a misunderstanding of the functionality that it provides.
Verifying your backup
When you have completed your initial backup, you should verify that it will be ready to come to your aid should disaster
strike. Follow these steps to verify your backup:
1. Launch the System Preferences application
2. Open the Startup Disk preference pane
3. Select your backup volume as the startup disk and click the "Restart" button
4. When your Mac has finished restarting, choose "About this Mac..." from the Apple menu and verify that you are
booted from the backup volume
5. Launch a few applications and verify that your data is intact. If you are interested in getting a more in-depth
verification of the integrity of your backup, see the "Calculate a checksum for every compared file" section of the
documentation.
6. Reset your startup disk in the Startup Disk preference pane to your original startup disk, then restart your computer
Related documentation:
Help! My clone won't boot!
A closer look at how CCC determines the "bootability" of a destination volume
Don't install older versions of OS X
Some Western Digital hard drive enclosures cannot boot a Macintosh
The first boot from the backup is slower, and some applications open automatically
The first time you boot your Mac from the backup volume, the startup process may seem a little bit slower than usual.
This is perfectly normal due to the additional background disk activity that is occurring. In particular, Spotlight will be very
busy regenerating its index, a process that involves reading nearly every file on the new volume. When this disk activity
has settled down, performance will be back to normal.
Also, starting with Mac OS X Lion, the "Resume" feature will cause some applications to open automatically when you
start your Mac from the backup volume. The applications that open will be those that were open when your backup task
was running, and that often includes CCC. The next time you restart from the backup (or restored) volume, only the
applications that were open when you chose to restart will be launched on startup.
"Where is System Events?" messages appears on first boot
There are a handful of applications that will cause this message to appear on a freshly cloned volume — any application
that loads on startup and makes a call to AppleScript can cause this. This isn't a bug or an indication of a problem, it's
just a matter of the LaunchServices system agent being a tad slow at rebuilding its cache of application to file-type
associations. If you click the Cancel button, the message will go away, and you shouldn't see it again the next time you
boot from your backup.
Preparing your backup disk for a backup of Mac OS X
OS X is installed on an HFS+ filesystem. The HFS+ filesystem defines many types of metadata that describe non-data
attributes of your files. Creation date, access control lists, permissions and ownership, Finder flags, and extended
attributes are among the various metadata types defined in the HFS+ standard. To adequately back up an installation of
OS X, CCC will indicate that your backup volume should be locally-attached, HFS+ formatted volume.
CCC can only back up system files to an HFS+ formatted volume. If you are not backing up an installation of OS X,
for example if you are only backing up your user data, an HFS+ formatted destination volume is recommended,
but not required.
When you purchase a new hard drive, or if you have a hard drive that you use with a Windows computer, that hard drive
is often pre-formatted as FAT32. While the hard drive's volume may mount just fine in the Finder, and you are able to
access files on the volume, CCC may report "configuration concerns" when you specify this volume as a destination
because some filesystem metadata would not be transferred. Most notably, you'll lose ownership and permission
metadata as well as any Access Control List settings. These types of metadata are very important for maintaining the
security of your data and your Mac's operating system.
Additionally, Macintoshes can only boot from hard drives partitioned the GUID Partition Table (GPT) scheme. The hard
drive icons that you see in the Finder are volumes. The partition scheme of a hard drive describes how volumes are
physically defined on the hard disk. Every hard drive has exactly one partition scheme and at least one volume. When you
"partition" a hard drive, you simply create multiple volumes on that hard drive (see the bottom of this article for more
details on this).
Follow these steps to format your hard drive as an HFS+ volume:
1. Launch Disk Utility
2. Click on the hard drive device in the list on the left (the volumes have names that you see in the Finder, like
"Macintosh HD" whereas the hard drive device has a name that includes the size of the hard drive and a vendor
name or serial number, like "111.8 GB ST9129876A")
3. Click on the Partition tab
4. Choose "1 Partition" from the "Volume Scheme" popup menu (or more if desired).
5. Click on the "Options" button at the bottom of the partitions table and choose GUID Partition Table, then click the
"OK" button:
6. Provide a name for your volume that will allow you to easily identify it as a backup volume.
7. Specify "Mac OS Extended (Journaled)" as the volume format.
8. Click on the "Apply" button
Your new hard drive is now ready to go!
"My disk is already formatted HFS+, why am I getting this warning?"
If your disk is not partitioned using the scheme recommended and supported by Apple, CCC will indicate a warning when
you start the backup task such as:
You may have difficulty booting from this destination volume, the underlying disk is not partitioned with a
partitioning scheme that Apple recommends for Intel Macs.
How your destination volume is formatted is not actually relevant to this warning. The problem is not a matter of how your
destination volume is formatted, rather it is a matter of how the disk is partitioned. The following graphic explains the
relationship between a disk and a volume:
Every disk has exactly one partition scheme. A disk can be partitioned as "Apple Partition Map" (APM), "GUID Partition
Table" (GPT), "Master Boot Record" (MBR), or the Fdisk partition scheme. PowerPC Macs could only boot from a disk
that is partitioned with the APM partitioning scheme. Intel Macs can boot from a disk that is partitioned with either the
APM or GPT partitioning scheme. Note, however, that Apple only supports booting an Intel Mac from a disk partitioned
with the GPT partitioning scheme. Because Apple no longer supports the APM partitioning scheme, CCC will warn
you if your destination disk is not partitioned with the GPT partitioning scheme. As the warning indicates, you may
have difficulty booting from the destination volume, but it may work just fine. We expect that Intel Macs will eventually
drop support for booting from APM-partitioned disks.
Here's what you need to do about the warning
If you haven't copied any data to the destination disk, then take the time to repartition your disk using the GPT
partitioning scheme (see above) so you have a sanctioned, bootable backup volume. If you cannot repartition the disk
because you already have a considerable amount of data on the disk, proceed with the backup task, but confirm whether
it can actually boot your Mac. If it can, you're all set and you shouldn't be bothered by the warning again. If you cannot,
you will have to back up the other data on your destination disk and repartition the disk using the GPT partitioning
scheme to get a bootable backup.
Restoring data from your backup
Because CCC backups are non-proprietary copies of your original volume, you can navigate the contents of your CCC
backup volume in the Finder and find your files exactly where you would find them on the original source volume. If you
need to restore a single file, you can copy it directly from your backup volume in the Finder. CCC is not required to gain
access to your data. If you have a larger restore need, though, CCC is ready to help make the restore process as easy as
it was to back up in the first place.
Restoring non-system files
The restore process is virtually identical to the backup process. The notable differences are that you will probably be
restoring a smaller subset of files than what you backed up, and that you may want to indicate that files newer on the
original volume shouldn't be overwritten by potentially older versions on your backup. CCC offers a preset to make
restoring files safe and easy.
1. Launch CCC
2. Select your backup volume from the source menu
3. Select your original source volume from the destination menu
4. Deselect any items from the list of items to be copied that you do not want to be restored
5. Choose "Preserve newer files, don't delete anything" from the preconfigured settings popup menu
6. Click the Clone button
With the "Preserve newer files, don't delete anything" preset, CCC will not overwrite a file that is newer on the original
volume than the one that exists on the backup volume. Any items that are replaced will be archived as a safety
precaution. Additionally, CCC will only restore the items that are missing from the original volume.
Note: If you choose your startup disk as the destination volume, CCC will impose a protective filter on system files and
folders. It wouldn't be a good idea to overwrite or delete system files on the OS that you're booted from, so this isn't
something that CCC will allow. If you need to restore system items or items in the Applications folder, refer to the
following restore solution.
Restoring an entire volume (including system files)
To restore an entire volume that includes an installation of OS X, for example your boot volume after a disk failure, you
will need to boot from an external Firewire or USB hard drive. Ideally, you will simply boot from the hard drive that you
backed up to using CCC:
1. Attach your CCC backup disk to your Mac
2. Open the Startup Disk preference pane in the System Preferences application
3. Choose your backup volume as the startup disk, then click on the Restart button
4. If you are unable to boot from your original hard drive, hold down the Option key as you start up your Mac. Your
backup disk should appear as a startup disk option in the startup disk selector screen.
5. If you are replacing your original startup disk with a new hard drive, be sure to initialize that hard drive so it's ready
to host an installation of OS X: Formatting and partitioning a hard drive
6. Launch CCC
7. Select your backup volume from the source menu
8. Select your original source volume from the destination menu
9. Choose "Temporarily archive modified and deleted items" from the preconfigured settings popup menu.
10. Click the Clone button
When the restore process has completed, reset your startup disk in the System Preferences application and restart your
Mac.
Restoring from a folder
If you chose a folder as your destination when you originally backed up your data, CCC can restore that data to the
original location using the following steps:
1. Select "Choose a folder..." from CCC's Source menu and locate the folder that you had previously specified as your
backup destination
2. Select your original source volume from the destination menu. If you had specified a folder in the source menu when
you originally backed up your data, select "Choose a folder..." from CCC's Destination menu and locate that same
folder.
3. Choose "Temporarily archive modified and deleted items" from the preconfigured settings popup menu.
4. Click the Clone button
"I have a full-volume backup in a folder or a disk image, but I don't have
a bootable backup. How can I restore everything?"
CCC makes bootable backups specifically to avoid this kind of situation. When you have a bootable backup, you simply
boot from that, then restore everything to a replacement disk or the original disk. One step, minimal time, couldn't be
easier. Occasionally people get into this sticky situation though — I have a backup of everything in a disk image or in a
folder on the backup volume, there's a clean installation of OS X on my replacement disk, now how do I get everything
back to the way that it was before?
The first thing that you need to do is make a boot volume that is not the volume you want to restore to. Once you
have done that, you can boot from that volume and then do a complete restore of your backup to the replacement disk.
There are several options for how and where you create this other bootable volume. For example, you could install OS X
onto a thumb drive, or you could use CCC to clone your clean installation of OS X to a thumb drive. You could also create
a new partition on your replacement disk and clone the fresh installation of OS X to that. The steps below attempt to
make very few assumptions about the resources you'll have in this scenario: a) You have a fresh installation of OS X on a
hard drive and b) you have your backup in a folder or disk image on some other disk. Given those assumptions, here is
how we recommend that you proceed:
Create a new partition on your replacement disk
1. Open the Disk Utility application and click on the disk icon that represents your internal hard drive. Don't click on
the "Macintosh HD" icon, click on the one above that.
2. Click on the Partition tab.
3. Click on the "+" button.
4. Set the size of the new partition to 15GB and name it something like "Rescue".
5. Click the "Apply" button.
This video describes the same procedure (albeit in a slightly different context).
Clone your fresh installation of OS X to the Rescue volume
1. Open the Carbon Copy Cloner application.
2. Choose your current startup disk as the source.
3. Choose the Rescue volume as the destination.
4. If you aren't working from a fresh installation of OS X, take a moment to exclude third-party applications from the
list of items to be copied, as well as any large items in your home folder (e.g. /Users/yourname/Music).
5. Click the Clone button.
6.
Boot from the Rescue volume and restore your data to the replacement disk
1. Open the Startup Disk Preference Pane, set the Rescue volume as the startup disk, then click on the Restart button.
2. Once restarted from the Rescue volume, attach the backup volume to your Mac and open the Carbon Copy Cloner
application.
3. If your data is backed up in a folder, choose "Choose a folder..." from the Source menu and select that folder as the
source. Otherwise, choose "Restore from a disk image..." and locate your backup disk image.
4. Choose your "Macintosh HD" volume as the destination.
5. Choose "Temporarily archive modified and deleted items" from the settings menu.
6. Click the Clone button.
Reboot from your restored volume and clean up
1. Open the Startup Disk Preference Pane, set the restored volume as the startup disk, then click on the Restart
button.
2. Open the Disk Utility application and click on the disk icon that represents your internal hard drive.
3. Click on the Partition tab.
4. Click on the Rescue volume, then click on the "-" button to delete that volume.
5. Click the Apply button.
Finally, make a new backup to the root of a locally-attached hard drive so you'll have a bootable backup from here
forward.
What's new in CCC
Changes in CCC 3.5
The most notable modification in CCC 3.5 is its qualification on Mountain Lion and Mavericks. Most features and the user
interface remain the same for this update, there have only been a few minor changes with regards to cloning the
Recovery HD volume in CCC's Disk Center. See the Release Notes for a complete list of modifications.
Features of CCC specific to Lion and greater
Clone Apple's Recovery HD
Carbon Copy Cloner offers full support for cloning the Apple-proprietary "Recovery HD" volume. More detail on this
feature is offered in the Cloning Apple's Recovery HD partition section of the documentation.
Release History
v. 3.5.4, November 27, 2013
Addressed an issue in which CCC would occasionally report errors such as "Could not find xattr #1" or "Missing
abbreviated xattr", most commonly when archiving items in the Google Chrome application support directory.
CCC now removes its temporary private mountpoint folders used to mount and inspect Recovery HD volumes.
Leaving these "stale" mountpoints in place was occasionally exposing a bug in the Finder in which it would
report an error -43, "Some items could not be found" when trying to move items to the Trash. Relaunching
Finder works around the bug, but cleaning up the stale mountpoints will avoid it.
Fixed an issue in which a scheduled task configured to run weekly, on "no days of the week" could be reenabled without specifying a day to run the task.
The "Backup everything" filter was showing up twice for non-English localizations.
Disabling "Documents and Data" syncing in the iCloud Preference Pane causes your ~/Library/Mobile
Documents folder to be renamed to Mobile Documents.12345678 (the number varies). The iCloud Preference
Pane reports that the items in this folder will be deleted. In fact, the items are not deleted, though they are
rendered unreadable as long as the "Documents and Data" setting remains disabled. The unreadable documents
in this folder generate unnecessary errors in CCC backup tasks, so the contents of this folder will now be
excluded by default. This exclusion only applies when the "Documents and Data" syncing is disabled.
CCC handles memory more efficiently now when numerous errors are encountered.
Added special handling for the "SANDS" filesystem from Tiger Engineering.
In some situations, the OS was sleeping before CCC finished sending an email notification. When this occurred,
CCC was occasionally unable to complete sending the email when the system awoke (e.g. because the network
wasn't yet available). CCC will now retain its idle sleep assertion long enough to complete sending the email
notification.
CCC is now more conservative about starting a scheduled task if the system might be entering a sleep state. If
the lid of your laptop is closed, for example, and your scheduled task is configured to wake the system to run the
task, the system may forcibly go back to sleep between 10-30 seconds after waking. Previously, CCC might
have been able to start a task in that window of time. This version avoids starting a task in those situations to
avoid Dark Wake cycles (periods of sleep and wake in which network and disk connectivity are constantly in
flux).
NFS volumes in which the root user is mapped to the root user (vs. root mapped to nobody) are no longer
unmounted at the end of a scheduled task involving the NFS volume.
v. 3.5.3, October 22, 2013
This update is fully qualified on Snow Leopard, Lion, Mountain Lion, and now Mavericks.
CCC now offers volume-specific advice about how to enable full disk encryption. Enabling encryption on an OS
X backup volume, for example, involves several steps that must be executed in the correct order. If full disk
encryption is not supported on a particular volume, CCC indicates exactly why not. We have also added
answers to some frequently asked questions about full disk encryption to our documentation.
There is an odd edge case in OS X in which you can mount a network volume using a short user name, such as
"johnny", but the remote host will place the long name in the filesystem URL that is returned, e.g. "Johnny
Appleseed". Previously, this difference would cause CCC to believe that the network volume was mounted with
other credentials altogether, and CCC would refuse to use the network volume under the assumption that
permissions issues would ensue. This update addresses that issue, CCC will now immediately evaluate the
filesystem URL of the network volume that is returned in reponse to its mount request and update its own
internal reference to the user account as appropriate.
Fixed an issue in which CCC may refuse to allow the user to schedule a backup task to a disk image that resides
on a FUSE volume.
Fixed an issue in which a scheduled task could load in a hung state if the task configuration file was corrupted.
Some Drobo devices have a problem storing extended attributes larger than 1KB. Rather than reporting that the
Drobo device is unable to accommodate the extended attribute, these devices report that the destination volume
is full, even when there is adequate space available. This update catches this edge case and reports it in a more
meaningful way.
CCC will now explicitly refuse to create a Recovery HD partition if it can positively identify the selected volume
as a Drobo device. Drobo's proprietary data moving techniques do not play well with dynamic partition changes,
and Drobo specifically does not support the modification of partitioning outside of the Drobo Dashboard.
Fixed a Mavericks-specific display anomaly in the list of items to be copied.
Addressed an issue in which the OS rarely, but occasionally, does not send an "application finished launching"
notification to the scheduled task helper tool, causing task initialization to fail.
Addressed an issue in which the OS rarely, but occasionally, does not send a distributed notification that a task
has finished, resulting in the task appearing to hang at the end despite the fact that it had actually finished.
If you have employed the option to "Silently skip if the source or destination is missing", CCC will no longer
proceed with that backup task if the missing volume reappears before the next scheduled run time. The task will
instead run on its normal schedule.
The "LOGIN" SMTP authentication mechanism for Apple's iCloud SMTP service recently started to return invalid
challenge responses to SMTP clients, causing some CCC email notifications to fail (for users that use iCloud
SMTP accounts with CCC). This version of CCC works around this problem by preferring the "PLAIN"
authentication mechanism instead.
Google recently made a change to its Gmail SMTP service that introduced a problem with sending email
notifications to multiple recipients. This update resolves that problem.
v. 3.5.2, December 19, 2012
Note for users backing up to a Remote Macintosh: Starting with this update, the system requirements for the remote
Macintosh are now the same as those for the Mac running CCC. Backing up to a PowerPC Macintosh via the "Remote
Macintosh" option in CCC's Destination menu will no longer work.
Added support for sending notifications to Mountain Lion's Notification Center. Growl support will continue to be
supported for Snow Leopard and Lion, but in Mountain Lion, CCC will only send notifications to the built-in
Notification Center. We understand that Growl offers functionality beyond Apple's Notification center, but the
time required to maintain support for Growl and protecting CCC from problems specific to Growl has become
too much of a burden to continue its support when there is a capable alternative offered by the operating
system.
Scheduled tasks configured to run when the source or destination is reattached now have an optional reminder
interval. If your source or destination volume hasn't been attached in a given length of time (7 days by default),
CCC will run the task and prompt you to attach the volume.
When selecting a folder as the source or destination, CCC now displays a "bread crumb"-style indicator of the
path to the folder to make it more clear where exactly the source and destination folders are located.
CCC will now warn you if your USB-attached source or destination volume is "slow", e.g. attached in a manner
that results in the interface speed being negotiated to 1.5MB/s or less.
Task names are now sorted in a case insensitive manner in the Scheduled Tasks window.
Improved CCC's handling of MacFUSE filesystems that do not explicitly allow access to the root user.
Made some improvements to how CCC prevents sleep during a backup task.
Improved handling of mounting network volumes with guest privileges.
CCC now offers a simple mechanism for updating the password for the credentials used to mount a network
volume in a scheduled task (e.g. if the password was specified incorrectly when the task was created or has
subsequently been changed).
There is now only one menu item for creating a Mac OS X Installer in CCC's Source menu. Selecting this item
will automatically select the Mountain Lion installer, if present, the Lion installer if present (if the ML installer is
not present), or give the user the opportunity to manually select a Mac OS X installer application. The user can
also hold down the Option key while choosing this menu item to manually select a Mac OS X Installer
application.
When CCC's Cloning Coach reports that the destination's Recovery HD needs to be updated, updating that
Recovery HD is now much more automated.
CCC now works around problems cloning a Recovery HD volume that are caused by PGP and Paragon "flavors"
of the GUID Partition scheme.
Fixed some issues handling file ownership when the source or destination filesystem is nfs, ppfs, osxfusefs, or
fuse4x.
Made a few adjustments that should cause CCC to behave better while logged in as the root user. We don't
recommend logging in as the root user, nor do we spend a lot of time testing this configuration, but it should
work better now.
Made some improvements to how a logout event is handled. During logout, the WindowServer is torn down.
Depending on the timing of that and when a CCC scheduled task manages to exit, it's possible for the
scheduled task to make requests to the now-absent WindowServer which can lead to an exception. That
exception can place CCC into an indeterminate state for a prolonged period of time. Now if a backup task is
running and you log out, CCC will abort the backup task and exit more quickly. If an exception occurs, a
secondary termination mechanism will reliably terminate the scheduled task, allowing it to properly reload and
reconnect to the new WindowServer process.
Some email servers require SSL but do not support STARTTLS, which is the IANA-approved standard for
negotiating SSL-protected connections to SMTP servers (http://tools.ietf.org/html/rfc3207). This update
accommodates these servers by pre-negotiating an SSL connection when using port 465.
Made some minor user interface adjustments to accommodate the behavior of encrypting Fusion volumes.
Fixed the errant presentation of a configuration concern when the destination volume's Recovery HD OS version
is not a perfect match to the OS version on the source. It is appropriate, for example, for the source volume's OS
to be 10.8.2, but the Recovery HD volume's OS to be 10.8 (because Apple does not update the Recovery HD
during ordinary OS updates).
Fixed a schedule calculation issue for monthly tasks in which some months could be skipped.
Fixed an issue in which some folders in the list of items to be copied could not be opened.
Addressed a couple issues where CCC would hang while trying to retrieve information from an unresponsive
volume.
Filenames that use more than 255 bytes (e.g. less than 255 characters, but with non-ASCII, multibyte characters)
are now preserved properly.
Fixed an issue in which applying the Mac OS X 10.8.2 Supplemental update would cause CCC scheduled tasks
to report that "Mac OS X is not responding to CCC's request to perform a privileged task".
Fixed an issue in which CCC was unable to copy files to the destination if the root folder of the source was
locked.
v. 3.5.1, August 3, 2012
Fixed an issue in which CCC was unable to save scheduled tasks after being updated.
Resolved a permissions issue related to accessing some files on source when the destination was a network
volume.
Made some minor UI adjustments in the Documentation window.
Fixed an intermittent exception at the end of a scheduled task that would result in the "Task finished" window
disappearing early and failure of email notifications.
Fixed an exception that would cause a hang during the creation of a Recovery HD volume.
Non-admin users will no longer be prompted to authenticate when launching CCC on Lion or Mountain Lion.
This authentication was leveraged to collect information about the Recovery HD volumes attached to your Mac,
but CCC was unable to give that indication prior to the authentication dialog being presented. To avoid
unnecessary concern, we chose to not collect that information when a user is logged in to a non-admin account.
When LateNite Software's "Clusters" software makes changes to .DS_Store files on the source volume, those
changes can lead to errors during the backup. These errors are now suppressed.
v. 3.5, July 20, 2012
CCC is no longer donationware
If you have not "donated" to Bombich Software in the past, this version of CCC will impose a 30-day trial. In order to
grow our support and development team, we have made the transition to a commercial product. This will allow us to to
continue offering frequent updates to our software, including new features. This will also enable our stellar customer
support to remain that way. Transitioning from donationware to a commercial offering underscores our commitment to
deliver the best Mac OS X cloning and backup utility on the market. More information about this transition is available in
the "CCC License, Registration, Trial, Banners, etc." section of the documentation.
This version of CCC requires Mac OS X Snow Leopard, Lion, or Mountain Lion, and is fully qualified on each of
those OSes. We will continue to provide user support and bug fixes for Tiger and Leopard users on CCC 3.4.x
for a while longer.
Recovery HD support has been overhauled to better support the concept of "one Recovery HD partition per
volume", rather than one per disk. If you have multiple backup volumes with different OSes (e.g. Lion and
Mountain Lion), CCC can associate a Recovery HD with each one and apply the appropriate OS to each
Recovery HD partition.
CCC is now signed with an Apple Developer Certificate for GateKeeper compliance.
Most of the binaries in the CCC bundle are now 32/64-bit Intel-only binaries.
Fixed an issue that appeared in 10.7.4, specific to Macs running Lion with a 64-bit kernel, in which the /Volumes
folder on the destination volume would be locked rather than hidden. This resulted in external volumes being
unmountable when booted from the backup volume.
Performance of deleting scheduled tasks is much improved.
CCC previously encountered some performance problems when saving very large numbers of scheduled tasks
(e.g. 29). These problems should now be resolved. This is most applicable when updating CCC, or when CCC
has been moved and all tasks must be re-saved at the same time.
Updated graphics for High Resolution support on the new MacBook Pro (Retina).
v. 3.4.6, July 20, 2012
Scheduled tasks that are configured to run "When the source or destination is reattached" and that have a
remote Macintosh as the source/destination will now properly run when the local destination/source volume is
reattached.
Fixed a crashing issue that affected scheduled tasks for Tiger users in cases where CCC was unable to derive a
proper Time Zone value from the system.
Fixed an issue that would lead to a hang during the "Authenticating" phase at the beginning of a backup task.
.DS_Store files are now excluded when backing up to SMB network shares. Some SMB filesystems will actually
refuse files by this name, and this often generates unnecessary error messages during an otherwise uneventful
backup task.
Scheduled tasks no longer cancel wakeorpoweron events when exiting. This resolved an issue in which some
Macs would effectively clear these canceled events from the PowerManagement queue, and subsequently not
start up the Mac when the scheduled task was configured to do so.
Scheduled tasks configured to run manually that are run when the source or destination is unavailable will now
proceed to run if a missing volume is reattached.
Fixed an issue in which scheduled tasks would be rescheduled at the wrong time when the time zone
abbreviation was ambiguous (e.g. EST is used in the United States and Australia).
If a block-level clone cannot proceed because the source volume is too severely fragmented, CCC now offers
proper guidance for proceeding with a file-level copy.
The capacity of new sparseimage or sparsebundle disk images will now be limited to 2X the capacity of the
source volume in cases where the underlying destination volume is excessively large. In cases where the
destination volume is 16TB, for example, the underlying disk image creation tool would fail to create a disk
image with this capacity and would offer a very poor, generic error code.
v. 3.4.5, April 24, 2012
Fixed a minor timing issue that would prevent CCC from finishing the submission of an email notification when a
scheduled task was configured to sleep or shut down the Mac.
Fixed an issue in which non-ASCII characters would be improperly displayed during the backup task (this was only
a cosmetic problem).
Fixed an issue in which CCC would occasionally not retain the user's last choice in the preset configurations menu.
Growl notifications should be a bit more consistent on Lion.
In anticipation of Mountain Lion's requirement that I use Apple's code signing certificate to sign my application, this
version of CCC will migrate entries in the CCC private keychain to a new keychain. I have leveraged codesigning in
CCC for almost 5 years and recently started to rely on it to have access to keychain entries without annoying the
end user for permission to do so. Switching code signing certificates at this point invalidates the keychain item
access control lists that I previously applied, forcing me to migrate the keychain or face losing access to those
keychain items. When you launch this new version of CCC, you'll see a progress panel that indicates that CCC is
migrating the keychain. This should be fast and eventless. If you see a dialog from the system asking you to grant
CCC access to a keychain item, however, it is imperative that you click on "Allow" to give CCC access to those
keychain items.
In earlier versions of CCC, when an encrypted disk image's passphrase keychain entry was updated by the
scheduled task helper application, access to that keychain item would be limited to only the scheduled task helper
application. Subsequent ad hoc attempts to back up to the encrypted disk image (e.g. in CCC's main window)
would result in a request to grant CCC access to the keychain item. This update fixes that access limitation.
Fixed a bug in which CCC would not properly set the modification date on files copied to SMB shares hosted by
some versions of Windows. This would result in CCC wanting to recopy every file to the destination on subsequent
backups.
Reverted to the pre-3.4.4 behavior of automatically running a scheduled task upon wake if the task missed a
scheduled run time during sleep. If you would prefer that CCC automatically skip tasks missed during sleep, drop
me a line on the Help Desk, there is a hidden setting that will accommodate this preference.
In previous versions, CCC might report that a source or destination folder on a network volume does not exist,
when it plainly does. CCC now appropriately handles the permissions limitation that led to this errant message.
Fixed an issue in which extended attributes may be recopied to some non-HFS destinations every time a backup
task runs.
Fixed a couple issues that could result in a crash.
Fixed an issue in which CCC would hang on launch if there is a corrupted scheduled task configuration file present.
Now that corruption is detected and these files are removed.
Fixed an issue in which the "Reschedule all future events for this time of day" setting did not work for tasks
configured to run weekly or monthly.
Fixed an issue in which weekly and monthly tasks scheduled with a start date prior to the Daylight Saving Time
switch and a start time within the "lost hour" would run multiple times a day.
Scheduled tasks can now mount the underlying network volume for a source volume that is a disk image.
Fixed an anomaly with progress indication in which the progress indicator would jump wildly if the user ran a task
with exclusions, then another task without exclusions.
Scheduled tasks will now reschedule themselves when the system time zone is changed. If a task was scheduled
for 2PM Eastern time and you change the time zone to Pacific time, the task should run at 2PM Pacific time. This
functionality is only partially available to Tiger users. Tiger doesn't offer "time zone changed" notifications, so the
currently-scheduled task will only be rescheduled upon wake, or when the task is reloaded.
Some of the postflight cleanup tasks that are required for making a clone of Mac OS X bootable were getting
skipped when minor transfer errors occurred. These tasks will now run regardless of minor transfer errors, so the
destination volume should be bootable even when minor errors occur (assuming there aren't any other hardware
compatibility problems).
A Japanese localization is included once again. A big thanks to Koichi MATSUMOTO for putting that together for
this release!
v. 3.4.4, February 7, 2012
Made several changes to the preset configurations. Both the wording and some of the settings have been changed
in response to user feedback and typical usage scenarios.
New feature: CCC now provides support for archiving and cloning the Lion Recovery HD partition. Choose "Disk
Center" from CCC's Window menu to find this functionality.
New feature: Scheduled tasks can now be configured to wake or boot the system when the task is scheduled to
run.
New feature: For users with a Lion Installer application in /Applications, CCC's Source menu now includes a handy
"Create a Lion Installer..." choice that will clone the Lion Installation disk image onto a physical volume.
Window positioning of the scheduled task helper application is now retained on a per-task basis, so you can move
these windows around on your screen and multiple tasks won't be stacked on top of each other.
CCC will now mention the lack of a Recovery HD partition in the Cloning Coach prior to running the initial backup
task.
The table of scheduled tasks in the Scheduler window are now sorted alphabetically by default.
Fixed a scheduler issue in which tasks scheduled to run on the first (any weekday) of the current month would be
scheduled to run in the following month.
Fixed an issue in which CCC was not "remembering" the last preset that had been selected upon relaunching CCC.
Fixed an issue with the German localization related to the application of a particular setting in custom presets.
Fixed an issue in which a scheduled task had trouble mounting a disk image when uncommon permissions
conditions were present (such as when a system is bound to an Active Directory directory service).
The "This volume will be bootable" message is back, though with a caveat that I have to insist upon from a support
perspective. Many external hard drive enclosures still manage to screw up the boot process, and it's impossible for
me to determine if that is going to happen for any particular user from within CCC.
When backing up to a subfolder, CCC now overlays an icon of the underlying volume on the folder icon in the task
status panel.
Scheduled tasks that specify a network volume as the destination are now aborted when CCC receives a sleep
notification.
Growl notifications should now work properly on Lion with Growl 1.3.
Email notifications now include the sender's full name.
Fixed a couple minor bugs associated with email notifications.
Fixed an issue in which the scheduled task window would be unresponsive while CCC waited for a response from
an email server.
Added support for sending email to servers that use a self-signed certificate. This support is disabled by default,
see the documentation for details on enabling this functionality.
Resolved a problem in which an errant filter would protect items in folders that were to be deleted, resulting in CCC
reporting that it couldn't replace a particular folder or application.
Fixed a minor 5-second shutdown hang associated with CCC scheduled tasks.
Numerous tweaks to the advice that CCC offers for various error conditions.
Fixed some Lion-specific problems with the mounting of sparsebundle disk image files that are hosted on a network
volume.
If you're running an ad hoc task in CCC (e.g. click "Clone" in the main window), CCC will ask before deleting
anything from the _CCC Archives folder. To avoid problems that would affect automation, this warning is not
provided for scheduled tasks.
CCC is more proactive about dealing with the 4GB file size limitation of FAT32 volumes. Files larger than 4GB will
now be excluded by default, and you'll get a warning of this exclusion before running the task.
Fixed a hang that would occur at the end of a scheduled task while CCC tried to unmount the destination volume
(network volumes only, Lion only).
Made some cosmetic changes concerning ZFS support.
Mail account settings on Lion are now properly imported and populated into the email notifications tab of the
scheduled tasks window.
The path to a disk image file is now properly provided as the fourth argument to postflight scripts.
Fixed a 30 second hang that would occur while saving changes to scheduled tasks on Tiger. For every OS, though,
saving scheduled tasks should be considerably faster.
v. 3.4.3, September 29, 2011
Addressed a regression in which the body of email notifications sent by CCC would be cut off by some email
servers.
CCC now prevents a user from choosing a non-writable folder as the destination when the underlying volume is a
network volume or another type of volume mounted in "userland".
Fixed an issue in which CCC would report an error and skip the contents of a folder that had an unreadable
extended attribute.
Made some tweaks to the advice that CCC offers in various error conditions.
Fixed a bug that would cause CCC to crash when sending a test email notification.
Fixed an issue in which the automatic unmounting of a disk image at the end of a backup task could cause a
scheduled task to errantly report that "The backup task was aborted because the destination volume disappeared".
Fixed an issue in which a CCC scheduled task would report that "The destination volume is not available" in cases
where the backup task specified a folder or disk image on the destination, and the destination volume had
reappeared at an incremented mountpoint (e.g. /Volumes/Volume Name 1).
The presence of a network volume is determined more reliably during a scheduled task's pre-flight sanity checks.
Fixed an issue in which a scheduled task was unable to mount a disk image file on a network sharepoint when read
access to the file was restricted to the file owner.
Fixed an issue in which items copied from a volume that doesn't support ownership would be owned by the root
user rather than the user that created the backup task.
Fixed an issue in which CCC would fail to create a sparsebundle disk image on a network volume while running a
scheduled task.
CCC now enforces the exclusion of system items when backing up to a non-HFS+ formatted volume.
Fixed an issue in which the exclusion of a file whose name included a return character would cause a CCC backup
task to fail with an "Invalid filter" error.
CCC now makes a note in the CCC.log file of the largest file encountered during the backup. This value can be used
to determine a minimum amount of free space that should be maintained on the backup volume.
Fixed an issue affecting Tiger users in which a network volume could not be automatically mounted before running
a scheduled backup task.
Fixed an issue affecting Lion users in which an attempt to mount a network volume would result in a -6600 error
code.
Fixed an issue in which setting extended attributes would fail on some filesystems for files whose names begin with
an underscore.
Added support for the UF_TRACKED fileflag that was added in Lion. This also now fixes an issue in which the
setting of that fileflag would cause errors on filesystems that don't support it.
Fixed an issue in which a backup task would fail if the source or destination volume on a remote Macintosh did not
support Access Control Lists.
Implemented a workaround for a Finder bug affecting Leopard users in which a mounted disk image volume would
not disappear from the sidebar when the volume was ejected by CCC.
Addressed an issue in which CCC would continue copying files after a scheduled task was inadvertently terminated
due to rescheduling of the task by the user.
Fixed an issue in which CCC would incorrectly report that a network volume would not have enough capacity to
accommodate the source volume.
Fixed an issue in which a system service would prevent a scheduled task from unmounting the destination volume.
The task performed by this system service (kextd) is now handled explicitly by CCC.
CCC now unmounts a disk image destination volume when errors occur during the backup task.
Fixed an issue in which tasks scheduled to run hourly would be scheduled several hours into the future if the
computer was slept and awoken after midnight.
v. 3.4.2, August 4, 2011
Fixed an issue in which scheduled tasks with a remote Macintosh specified as the source would not run properly if
the scheduled task had been upgraded from an earlier version of CCC
Fixed an issue in which a task scheduled to run when the source or destination was reconnected would not fire
unless the disk was physically detached from the Mac
Fixed an issue that would interfere with the execution of scheduled tasks configured to back up to a network
volume
Fixed an issue in which some network filesystems would not appear in the source and destination menus, or would
cause a crash when selected
Fixed an issue in which the Cloning Coach would appear frozen on screen
The email recipients field should now be editable on Tiger systems
Several general tweaks to user interface behavior
Fixed an issue in which a restored volume wouldn't be bootable if the volume had been restored while booted from
a different version of Mac OS X than what was being restored.
CCC now avoids setting file flags and permissions on files that are not owned by the user account that was used to
mount a network filesystem.
Fixed an issue in which CCC would report that it was unable to enable ACLs on the destination volume when
specifying a folder as the destination.
Fixed an issue in which CCC would not display the list of currently-configured scheduled tasks in the Scheduler
window.
Added undo and redo support to the "Ask a question about CCC" form in CCC's Help window.
Fixed an issue in which the "Send test email" button would be unclickable if the Scheduler window was resized
vertically.
Fixed an issue in which a scheduled task would not run, rather it would only display the background "Defer/Skip"
window. This issue was associated with a "-[__NSCFBoolean objectForKey:]: unrecognized selector sent to
instance" error in the CCC log file.
Fixed an issue in which CCC would report an error enabling ACLs when the source was a remote Macintosh. The
error would subsequently cause the backup task to fail.
Growl notifications should now work with scheduled tasks.
/.DocumentRevisions-V100 is now excluded by default. A note on this exclusion has also been added to the
appropriate section of the documentation.
CCC now deletes the per-task archive folder at the end of the backup task if that folder is empty. The _CCC
Archives folder will also be deleted if it is subsequently empty.
Archive folders were occasionally created with restrictive access that would prevent the user from accessing their
contents. These folders will now be more reliably created with the user set as the owner.
Fixed a bug in which an improperly unmounted volume would cause scheduled tasks to fail. Suspending a Parallels
VM, for example, could trigger this behavior (Parallels unmounts the "C" drive but does not remove the mountpoint
folder).
Fixed an issue affecting Leopard users in which CCC would hang when the user clicked the Stop button.
Fixed an issue in which Growl notifications would not be accepted by the Growl helper when sent from a CCC
scheduled task.
The "Maintain a backup (Archive modified and deleted items)" preset no longer calls for archive pruning. Archive
pruning must be requested explicitly by the user.
Fixed an issue in which CCC would report permissions problems while accessing some files on network filesystems.
Made a couple tweaks to the sending of email notifications that should make it work better with some email servers.
v. 3.4.1, July 21, 2011
Resolved some problems related to saving scheduled tasks
Fixed a configuration issue that would cause disk image creation to fail for Leopard users
Fixed an issue in which the source and destination menus may not be populated on Tiger systems
v. 3.4, July 20, 2011
New features:
Added support for backing up to and from non-HFS+ volumes. Specifically, you can back up the contents of FAT32
and NTFS volumes, as well as the contents of a network-attached volume (e.g. AFP, SMB). CCC will preserve as
much filesystem metadata as possible, and will warn when incompatibilities exist between the source and
destination filesystems. Please note that clones of NTFS volumes will not be bootable.
CCC now permits specifying the startup disk as a destination volume. Users are no longer required to boot from the
backup volume to restore non-system files.
CCC now has a "Disk Center" window that offers information about how your volumes are partitioned and
formatted, as well as performance statistics. If one of your hard drives encounters latency or media read/write
issues, CCC will indicate these errors.
CCC's Disk Center offers access to Lion's new "Full Disk Encryption" feature. You can use CCC to enable and
disable the encryption of your backup volume(s), and see the progress of any conversion processes.
The new "Error Center" delivers expert advice directly to the user about any errors that were encountered during the
backup task. When CCC discovers filesystem corruption and media failures, the errors are now explained in
layman's terms, with simple advice on how to resolve the errors. A convenient "Reveal in Finder" or "Launch Disk
Utility" button gets you on your way to resolving complex problems.
Added support for Growl notifications. CCC will send notifications to Growl when a backup task begins, ends
successfully, and ends with errors.
CCC now provides email notifications when a backup ends successfully and when it ends with errors.
CCC now offers the ability to sleep, restart, and shutdown your Mac at the end of a scheduled task.
Added support for saving a task configuration that only runs manually
CCC now leverages Keychain services to store passwords for encrypted disk images and network filesystems,
allowing CCC to automatically mount an encrypted disk image or network volume during a scheduled task. Please
note that the creation of encrypted disk images is limited to users running Leopard and higher.
CCC makes a diligent effort to mount the underlying volume(s) to the source and destination before a scheduled
task executes. If your source and/or destination disk is unmounted, but attached to your Mac (and powered on, of
course), CCC will attempt to mount those volumes.
CCC now supports the creation of sparse bundle disk image files for users running Leopard and higher.
You can now specify AES-128 or AES-256 encryption for encrypted disk images.
During scheduled tasks, CCC offers the capability to unmount the destination volume or set it as the startup disk
after the task completes.
CCC now allows you to manage the treatment of deleted and modified items on the destination volume separately.
Items that have been deleted from the source since a previous backup task can now be archived, moved to the
Trash, deleted immediately, or left alone. Items that have been modified since the last backup task can be archived,
moved to the Trash, or overwritten.
CCC offers an option to not overwrite files on the destination if they are newer than the file on the source.
Previously, files on the destination would be overwritten if the size or modification date differed, even if the file on
the destination was newer. The previous behavior is still the default, as the primary scope of CCC is to make your
destination volume look like the source volume (e.g. a backup).
CCC can now automatically prune the contents of your archived files prior to a backup task. Pruning can be
specified to limit the size of the archived content, remove items older than a certain age, or to provide a certain
amount of free space on the destination volume before proceeding. Pruning only affects the contents of the "_CCC
Archives" folder at the root level of the destination.
CCC now offers a checksum-based comparison method for determining if a file should be updated on the
destination. By default, CCC uses only file size and modification date to determine if a file should be updated on the
destination. A periodic checksum analysis can find any previously-backed up files that have become corrupted on
the backup volume (e.g. "bit rot").
CCC can now impose a bandwidth limit on data transfer to/from a remote Macintosh.
CCC offers an option to run the deletion pass prior to the file copying pass. In cases where space on the destination
volume is tight, this will allow CCC to more consistently complete the backup task.
Issues Resolved
CCC is now a bit more permissive in allowing scheduled tasks that target a disk image on the startup disk.
Fixed a problem introduced in 3.3.7 in which CCC would under-report the amount of data copied if the backup task
included a file larger than 4GB.
Fixed a bug in which the scheduled task helper application would crash at the end of the backup task under a
unique set of circumstances.
Improved error management related to block-level copies.
CCC will now reformat the destination volume after a failed or aborted block-level copy, rather than leaving the
cleanup task to the user.
Resolved an issue in which file ownership might get mapped to different numerical IDs when backing up to a remote
Macintosh that has similarly-named user accounts.
Fixed an issue in which CCC would report that it was unable to delete a non-empty folder
CCC will now properly format a new disk image as Case Sensitive HFS+ if the source volume has that format.
CCC will now warn of potential conflicts if the target volume is not formatted as Case Sensitive HFS+ and the
source volume is.
Fixed a bug in which the clone status panel would not be removed from the screen if the application was hidden.
Significant improvements to backup performance to/from a remote Macintosh.
Fixed a performance issue in which CCC would hang upon launch if a damaged hard drive was attached.
Carbon Copy Cloner's Transition to a Commercial Product:
Frequently Asked Questions
Is CCC 3.5 "donationware"?
No, CCC is no longer donationware. In order to grow our support and development team, we have made the transition to
a commercial product. This will allow us to to continue offering frequent updates to our software, including new features.
This will also enable our stellar customer support to remain that way. Transitioning from donationware to a commercial
offering underscores our commitment to deliver the best OS X cloning and backup utility on the market.
Do you still accept donations?
No. We have phased out the donation model and all software license purchases need to be completed through our online
store.
Can I continue using the older version that is "donationware"?
Yes, absolutely. If you are currently using CCC and have not donated in the past, you are welcome to continue using any
version up to and including 3.4.7 as long as you like without purchasing a license. Note, however, that previous versions
of CCC are not qualified against Mountain Lion and we are no longer developing older versions of CCC. In addition, we
offer limited support on a case-by-case basis. Choose "Update CCC..." from the Carbon Copy Cloner menu to see
options for disabling the CCC software update checks.
You can download previous versions of CCC on our Downloads page.
If I donated for CCC in the past, will I have to purchase the new version?
No. To express our appreciation to all of the people who have sent a verifiable donation to Bombich Software prior to
July 24, 2012, we will grant a registration code for CCC 3.5. If you are a previous donor and see a message about a 30day trial, you can retrieve your registration code here.
If I pay for CCC now, will I have to pay for future updates?
Updates (e.g. bug fixes, 3.5.1, 3.5.2, etc.) are always free to registered users. Upgrades (e.g. version 4.0, 5.0, etc.) that
include new features and functionality, support for newer operating systems, etc. will be handled like most commercial
software: current users will be offered a lower upgrade price but the previous version will continue to work if you decline
to purchase the update.
Can I use one license of CCC on multiple Macs in my household?
Yes, the CCC License allows you to install and use Carbon Copy Cloner on any computer that you own or control for
personal, noncommercial use. If you're using CCC commercially or institutionally, check out our Corporate and Education
Licensing options.
Credits
Localizations
I would like to thank the following people for their generous help in translating CCC into other languages:
German: Martin Kowalewski
Italian: Francesco Magariello
Dutch: Alexander Henket
French: Bertrand POURCEL
Japanese: Koichi MATSUMOTO
Opensource Credits
vsdbutil
Carbon Copy Cloner contains portions of source code available under the Apple Public Source License. That code may
be downloaded by clicking the links below.
vsdbutil_main.c (View my modifications: vsdbutil.h and vsdbutil.c)
View the APSL 2.0 license
rsync
Carbon Copy Cloner also includes, independently in binary form, rsync version 3.0.6. rsync is made available under the
GNU General Public License. Per the license requirements, the source code and my modifications may be downloaded
via the links provided below. This modified software is provided at no cost and with no warranty, also per the GNU GPL.
Download the complete rsync 3.0.6 project
Download the rsync 3.0.6 patches
Download the diff file (diff between 3.0.6 + [crtimes.diff, fileflags.diff, log-checksum.diff, and backup-dir-dels.diff]
and my modifications)
View the GNU GPL
Carbon Copy Cloner is not a derivative work of rsync. Rsync is called in binary form only.
Sparkle
Carbon Copy Cloner includes the Sparkle framework for handling software updates. Sparkle is Copyright (c) 2006 Andy
Matuschak and licensed under the following terms:
Permission is hereby granted, free of charge, to any person obtaining a copy of this software and associated
documentation files (the "Software"), to deal in the Software without restriction, including without limitation the rights to
use, copy, modify, merge, publish, distribute, sublicense, and/or sell copies of the Software, and to permit persons to
whom the Software is furnished to do so, subject to the following conditions:
The above copyright notice and this permission notice shall be included in all copies or substantial portions of the
Software.
THE SOFTWARE IS PROVIDED "AS IS", WITHOUT WARRANTY OF ANY KIND, EXPRESS OR IMPLIED, INCLUDING BUT
NOT LIMITED TO THE WARRANTIES OF MERCHANTABILITY, FITNESS FOR A PARTICULAR PURPOSE AND
NONINFRINGEMENT. IN NO EVENT SHALL THE AUTHORS OR COPYRIGHT HOLDERS BE LIABLE FOR ANY CLAIM,
DAMAGES OR OTHER LIABILITY, WHETHER IN AN ACTION OF CONTRACT, TORT OR OTHERWISE, ARISING FROM,
OUT OF OR IN CONNECTION WITH THE SOFTWARE OR THE USE OR OTHER DEALINGS IN THE SOFTWARE.
View the complete license for Sparkle, including external attributions
skpsmtpmessage
The SimpleSMTP framework included with CCC is a derivative work of the skpsmtpmessage project. skpsmtpmessage is
licensed under the MIT license:
The MIT License (MIT)
Copyright (c) 2008 Skorpiostech, Inc. All rights reserved.
Permission is hereby granted, free of charge, to any person obtaining a copy of this software and associated
documentation files (the "Software"), to deal in the Software without restriction, including without limitation the rights to
use, copy, modify, merge, publish, distribute, sublicense, and/or sell copies of the Software, and to permit persons to
whom the Software is furnished to do so, subject to the following conditions:
The above copyright notice and this permission notice shall be included in all copies or substantial portions of the
Software.
THE SOFTWARE IS PROVIDED "AS IS", WITHOUT WARRANTY OF ANY KIND, EXPRESS OR IMPLIED, INCLUDING BUT
NOT LIMITED TO THE WARRANTIES OF MERCHANTABILITY, FITNESS FOR A PARTICULAR PURPOSE AND
NONINFRINGEMENT. IN NO EVENT SHALL THE AUTHORS OR COPYRIGHT HOLDERS BE LIABLE FOR ANY CLAIM,
DAMAGES OR OTHER LIABILITY, WHETHER IN AN ACTION OF CONTRACT, TORT OR OTHERWISE, ARISING FROM,
OUT OF OR IN CONNECTION WITH THE SOFTWARE OR THE USE OR OTHER DEALINGS IN THE SOFTWARE.
Example backup scenarios
I want to clone my entire hard drive to a new hard drive or a new machine
I want to backup my important data to another Macintosh on my network
I want to backup multiple machines or hard drives to the same hard drive
I want my backup task to run automatically on a scheduled basis
Backing up to/from network volumes and other non-HFS volumes
I want to back up my whole Mac to a Time Capsule or other network volume
I want to defragment my hard drive
I want to clone my entire hard drive to a new hard drive or a
new machine
There are many different reasons to make an exact clone of your hard drive. Suppose your laptop is damaged and you
must send it in for repair. In the meantime, you not only have to borrow another computer for the duration of the repair,
you also don't have your data, applications and work environment exactly as they were on your machine. This lack of
organization can be very frustrating and inhibit your productivity. When you get your machine back from repair, you have
to deal with locating any modified documents on your loaner computer and copying them to your original computer. Also,
Apple recommends that you backup your data before sending in a machine for repairs because they are not responsible
for lost data.
In this situation, it would be ideal to simply copy off the entire contents of your hard drive to an external hard drive — to
create a "bootable clone" of your production machine. You can then boot a loaner machine from this bootable clone and
work from it as if working from your original machine (note this caveat on computer-specific preference files).
When you need a complete, simple backup of your entire hard drive:
1. Launch Carbon Copy Cloner
2. Choose the volume that you want to clone from the Source menu
3. Choose a properly-formatted volume from the Destination menu
4. Select "Temporarily archive modified and deleted items" from the preconfigured settings menu
5. Click the Clone button
If you want to update your cloned volume in the future, simply re-run CCC with the same settings and CCC will update
the backup volume with only the items that have changed since your last backup.
Use Setup Assistant or Migration Assistant to move data from an older
Mac to a new Mac
Another scenario in which it would be desirable to do a full-volume clone is when you have purchased a new Mac and
you would like to move everything from your old Mac to your new Mac. When you get a new computer from Apple,
though, it has a specific version of OS X installed on it, and further, a specific "build" number. Your new Macintosh
cannot boot from the older version and build of OS X that is installed on your older Mac, so simply cloning your old Mac
onto your new Mac won't work. Due to this limitation, we recommend that you use the Setup Assistant application (runs
on your Mac's very first boot) or the Migration Assistant application to migrate content from your old Mac to a new
Macintosh. You can migrate either directly from the hard drive installed in your old Mac or from a backup of your old Mac
(e.g. if your old Mac's hard drive had died). Once you have migrated your user accounts and applications using Setup
Assistant or Migration Assistant, you can continue to use Carbon Copy Cloner to back up your Mac to the same backup
volume that you were using for the old Mac.
Apple Kbase #HT2186: Don't install older versions of Mac OS than what comes with your computer
Apple Kbase #HT2681: What's a "computer-specific OS X release"?
Apple Kbase #HT3322: Mac OS X 10.6: How to use Migration Assistant to transfer files from another Mac
"I bought a previously-owned Mac that's newer than my old Mac, but
not brand-new. Can I use CCC to clone my older Mac to this Mac?"
If several OS X updates have been posted since the newer Mac originally rolled off the production line, then you will
probably have success cloning your older Mac to the newer Mac. When migrating your old Mac to your newer Mac, be
sure that your old Mac has been updated to at least one later release than what initially came on the newer Mac. For
example, if your new Mac came with 10.7.4, update your old Mac to 10.7.5 before migrating. Determining whether this
type of clone will work for you is really easy — simply boot the newer Mac from your older Mac or from a backup of your
older Mac:
1. If both your old Mac and your newer Mac have Firewire ports, boot your older Mac into Target Disk Mode by
holding down the "T" key on startup, then attach your old Mac to your new Mac with a Firewire cable. If not, attach
a backup of your old Mac (or your old Mac's hard drive in an external hard drive enclosure) to your new Mac with a
Firewire or USB cable.
2. On the newer Mac, open the Startup Disk preference pane in the System Preferences application and set the old
Mac's volume as the startup disk, then click the Restart button.
If the newer Mac booted from your old Mac's installation of OS X, launch CCC then clone the older Mac's disk to the
newer Mac's internal hard drive. If the newer Mac could not boot from your older Mac's installation of OS X, use the
Migration Assistant to transfer your user data and applications instead.
Apple Kbase #HT1159: OS X versions (builds) included with Intel-based Macs
Apple Kbase #HT2191: Mac OS: Versions, builds included with PowerPC Macs (since 1998)
I want to backup my important data to another Macintosh on
my network
Storing your backup on a locally attached hard drive certainly offers speed and space benefits, but if you'd like to store
the backups for one or several machines in a central location, or even offsite, then being able to directly backup to
another Macintosh on your network is paramount.
Carbon Copy Cloner 3 offers the option of securely copying your selected data to another Macintosh on your network (or
anywhere on the Internet for that matter). After a brief setup procedure to establish trust between your machine and the
target machine, simply indicate the IP address or hostname of the Mac to which you have access and CCC will take care
of the rest.
When you want to copy a selection of data from your hard drive to or from a remote Macintosh, choose the "Remote
Macintosh..." option from the Destination menu.
I want to backup multiple machines or hard drives to the
same hard drive
Backing up multiple volumes or multiple Macs to a single hard drive can be a messy proposition. If you back up each
source volume to the same destination volume without some pre-planning, data from each source volume will be merged
in a heap on the backup volume. Additionally, your tasks will archive or delete each other's backed up content. Carbon
Copy Cloner can solve this problem! We lay out a few different scenarios and solutions below.
"I want a bootable backup for each computer on the same hard drive"
Creating a bootable backup requires that you provide a dedicated backup volume for each Mac that you want to back
up. If you want to maintain each bootable backup on the same hard drive, you simply create a partition for each
computer that you want to back up using the Disk Utility application.
"I want to back up my startup disk and a data volume to the same
backup disk"
If you prefer not to partition your backup volume as described above, you can back up your startup disk directly to the
backup volume for a bootable backup, and your data volume to a subfolder on the backup volume. Combined with the
"Protect root-level items on the target" feature, the two backups will coexist peacefully.
1. Configure CCC to back up your startup disk to the backup volume. Choose your startup disk from the Source menu
and choose the backup volume from the Destination menu.
2. Select "Temporarily archive modified and deleted items" from the preconfigured settings menu.
3. Click the "Schedule this task..." button and schedule as desired.
4. In the Finder, create a folder at the root level of the destination volume. This is the folder where you will be backing
up your data volume, so name it something applicable to that.
5. Now configure CCC to back up your data volume to the new folder that you created. Choose your data volume from
CCC's Source menu.
6. Choose "Choose a folder..." from the Destination menu and select the folder that you created on the destination
volume.
7. Select "Temporarily archive modified and deleted items" from the preconfigured settings menu.
8. Click the "Schedule this task..." button and schedule as desired.
The "Protect root-level items on the target" setting will prevent the first task from erasing the content that you're backing
up to a subfolder on that same destination volume.
"My backup volume isn't formatted as HFS+ because I also use it to
back up my PC"
There are a couple options for backing up to a volume that isn't formatted as HFS+. If you're only backing up user data —
files that reside in your home folder, for example, then you can back up directly to the backup volume. Non-HFS+
volumes often don't support all of the filesystem metadata that is associated with files on an HFS+ formatted volume, but
that's generally OK if you aren't backing up system files or files that belong to another user account on your computer.
If you are backing up system files to a non-HFS+ formatted volume, you can back up to a disk image. A disk image is a
single file residing on your hard drive that contains the entire contents of another hard drive (except for the free space).
When you want to access the contents of that filesystem, you double-click on the disk image to mount the disk image as
if it were an external drive attached to the machine. Carbon Copy Cloner leverages disk images to provide you the
flexibility of storing several complete backups on a single shared external hard drive. To back up to a disk image:
1. Choose your source volume from the Source menu.
2. Select "New disk image..." from the Destination menu.
3. Unless you're making an archival backup of your data, choose the option to create a read/write "sparse bundle disk
image" file
4. Specify the location where you want to save the disk image file.
5. When you click the Clone button, CCC will create a disk image on the backup volume, back up the specified data,
then unmount the disk image when the task is complete.
Note: While disk images themselves are not bootable, you can mount them and restore their content to a physical hard
drive to produce a bootable, exact replica of the original.
I want my backup task to run automatically on a scheduled
basis
It takes a person of strong resolution to manually back up data frequently enough to prevent a catastrophic loss. For the
rest of us, there's task scheduling. Carbon Copy Cloner offers hourly, daily, weekly, and monthly scheduling. If your
workstyle is too hectic for scheduling, you can also create a task that is intended to be run manually, or schedule a task
to run whenever your backup hard drive is attached to your computer.
To schedule a backup task, first configure CCC as if you were going to run a backup task immediately. Instead of clicking
on the Clone button, click on the "Schedule this task..." button. In the Scheduler window that appears, provide a name
for the scheduled task and indicate when you want the task to run.
Backing up to/from network volumes and other non-HFS
volumes
In addition to backing up to volumes formatted with the OS X standard "HFS+" format, CCC can back up user data to
network volumes (e.g. AFP and SMB via OS X and Windows File Sharing) and to other non-HFS+ formatted volumes
such as FAT32. Non-HFS+ formatted volumes are presented in CCC's Source and Destination menus in the same
manner as HFS+ formatted volumes, so there are no special steps required for backing up to or from these filesystems.
However, these filesystems offer limited support for HFS+ filesystem features, so special consideration must be given
when backing up to these volumes. In general, you can reasonably expect to back up user data — files that belong to
your user account — to and from non-HFS+ formatted volumes. Specific considerations are noted below.
Instructions for gaining access to network filesystems is available in the OS X Help Center. If your network volume does
not appear in CCC's Source or Destination menu, consult the documentation that came with the storage device you are
trying to access, or choose "Mac Help" from the Finder's Help menu and search for "connecting to servers".
CCC will only back up system files to locally-attached HFS+ filesystems
OS X can only be installed on an HFS+ formatted volume. This requirement is also carried to a backup volume. When
system files are copied to non-HFS+ filesystems, important metadata are invariably lost, resulting in files that cannot be
restored to their original functionality. In short, you cannot restore a functional installation of OS X from a backup stored
on a non-HFS+ volume. To prevent any misunderstandings about this limitation, CCC will exclude system files from a
backup task if the destination is not a locally-attached, HFS+ formatted volume.
Note that the "locally-attached" caveat is an important distinction. Even if your destination volume is HFS+
formatted, if it is attached to an Airport Base Station (for example), then you're accessing the volume via file sharing. If
you open the Get Info panel for the volume, you will see that the volume format is "AppleShare", not HFS+. It is not
possible to update an OS backup on a network volume. If you would like to maintain a backup of OS X on a network
volume, you can back up to a disk image on the network volume. See the related documentation below for additional
information on this backup strategy.
Ownership and permissions concerns
Network filesystems pose some interesting challenges in regards to preserving ownership and permissions. When you
connect to another computer that is hosting a shared volume, you usually authenticate by providing a username and
password. The account whose credentials you provide is an account on that other computer, and it is this account's
privileges that determine what access you have to files and folders on the shared volume. Additionally, any files that are
copied to the shared volume will be owned by that user account, regardless of the ownership of those files on the source
volume. This is not a behavior specific to CCC, it is simply the nature of network filesystems.
An example will be very helpful in understanding the implications of this behavior. Suppose Sally would like to back up
some Movies from her Mac's home folder to another Mac shared by Bob and Joe. On Sally's Mac, there is a user
account named "sally". On Bob and Joe's Mac, File Sharing has been enabled in the Sharing Preference Pane, and there
are two user accounts, "joe" and "bob". Bob has attached an external hard drive named "Backup" to his Mac that he and
Joe have been using for backup, and he has created a folder named "Sally's Movies" on this volume to which Sally will
copy files. Sally does the following to connect to Bob and Joe's Mac:
1. In the Finder, open a new window, then click on "Bob and Joe's Mac" in the Shared section of the sidebar.
2. Click on the "Connect as..." button
3. In the authentication dialog, provide Bob's username and password, then click on the Connect button
4. Choose the "Backup" volume from the list of shared volumes.
The Backup volume now appears on Sally's Desktop, and in CCC's Destination menu in the Network Volumes section.
Next, Sally chooses "Choose a folder..." from CCC's Source menu and locates the folder of movies that she would like to
copy to Bob and Joe's Mac. She then chooses "Choose a folder..." from the Destination menu and locates the "Sally's
Movies" folder on the Backup network volume. She clicks the Clone button and the Movies are backed up.
Later that day, Joe is using his computer and he notices that he can see some of the movies in the "Sally's Movies"
folder, but some of the subfolders have a universal "No access" badge and he cannot view those folders' contents. This
occurred for two reasons:
1. Sally mounted the network volume using Bob's credentials, so the files and folders created when she copied her
files to the Backup volume are now owned by Bob's user account.
2. Some of the folders on Sally's computer limited access to "other" users.
As a result, the folders on the Backup volume are owned by Bob and some of them limit access to other users (Joe in this
case). Joe asks Sally about this and she decides to try copying some of the movies to one of Joe's folders on the backup
volume. When she chooses "Choose a folder..." from CCC's Destination menu, however, she sees the same universal
"No Access" badge on Joe's folder. Sally can't copy files to this folder (nor can CCC) because the Backup volume was
mounted using Bob's credentials, and Joe's backup folder on the backup volume happened to be inaccessible to Bob.
Sally unmounts the backup volume and reconnects to it using Joe's credentials, and she is then able to copy files to
Joe's private folder.
"What can I do when there are permissions or ownership issues that prevent CCC
from copying items to/from or updating items on a network volume?"
First, it is important to keep in mind that no application can modify the ownership of a file or folder on a network share.
Ownership changes must be applied on the computer or device that is hosting the network sharepoint. Additionally,
permissions changes can only be made to files and folders owned by the user whose credentials were used to mount the
network volume. For this reason, it is generally easier to apply both ownership and permissions changes on the computer
or device hosting the network volume.
If the computer hosting the sharepoint is a Mac, you can modify ownership and permissions in the Get Info panel for that
folder:
1. In the Finder, click on the folder whose permissions or ownership you would like to change.
2. Choose "Get Info" from the File menu.
3. In the "Sharing & Permissions" section at the bottom, click on the lock icon to make the permissions editable.
4. To change permissions, choose "Read & Write" from the popup menu next to the owner of the file or folder.
5. If the owner of the item is not the user account that you use to connect to this Macintosh, click on the "+" button
6. In the window that appears, select the user account that you use to connect to this Macintosh, then click the Select
button.
7. Set the access privileges to "Read & Write".
8. Click on the Gear menu and choose to apply the change to enclosed items.
9. Try your backup task again.
If the computer or device that is hosting the sharepoint is not a Macintosh, consult that device's documentation to learn
how to change permissions and ownership of files and folders.
Alternative #1: If you have mounted the network volume with Guest privileges, unmount and remount the network
volume using the credentials of an account on the machine or device hosting the network volume.
Alternative #2: You can create a new folder on the shared volume and specify that folder as the destination in CCC by
choosing "Choose a folder..." from the Destination menu.
Alternative #3: You can have CCC create a disk image on the network volume rather than copying files directly to a
folder. When CCC creates a disk image on the destination, the disk image is formatted as HFS+ and attached locally, so
CCC can preserve the permissions and ownership of the files that you are copying to it.
Limitations of non-HFS+ filesystems
When you choose a non-HFS+ formatted volume as a destination, CCC's Cloning Coach will proactively warn you of any
compatibility issues between the source and destination volumes. You can view the Cloning Coach's warnings by clicking
on the yellow caution button next to the "Customize these settings" button in CCC's main window. If you have selected a
source and destination volume, and the caution button is not present, then there are no configuration concerns.
Support for third-party filesystems
CCC offers limited support for third-party filesystems, such as those provided by MacFUSE. Due to the large number of
filesystems that can be provided by MacFUSE, CCC provides generic support for these "userland" filesystems rather
than specific support. CCC takes a "best effort" approach by determining the capabilities of the source and destination
filesystems, warns of potential incompatibilities, then presents only unexpected error conditions that arise during a
backup.
Writable NTFS filesystems
We have seen several reports of problems copying large amounts of data (e.g. > 4GB) to writable NTFS filesystems. In
most cases, the underlying software that vends the filesystem (e.g. Tuxera, Paragon, and others) crashes and the volume
is rendered "mute". While it may be possible to complete a backup to these filesystems in chunks (e.g. 4GB at a time), we
recommend using a more reliable, writable filesystem if you encounter these problems.
Backing up a Boot Camp installation of Windows
CCC can back up the contents of the Boot Camp volume, but it cannot make an installation of Windows bootable. If your
goal is to back up your user data on the Boot Camp volume, CCC will meet your needs. If you're looking to migrate your
Boot Camp volume to a new hard drive, you might consider an alternative solution such as WinClone, or one of the
commercial virtualization solutions that offer a migration strategy from Boot Camp.
Backing up the contents of an NTFS volume
The NTFS filesystem supports "named streams", a feature that is comparable to extended attributes on HFS+ and many
other filesystems. Unlike extended attributes, however, there is no limit to the amount of data that can be stuffed into
NTFS named streams (aside from standard file size limitations). Extended attributes on OS X have a 4KB size limit. As a
result, any attempts to copy a named stream larger than 4KB to a non-NTFS filesystem will fail. CCC will copy the
standard file data just fine, but will not copy named streams larger than 4KB. CCC's Cloning Coach will warn of this kind
of incompatibility, and any errors related to this limitation will be logged to the CCC log file, however these errors will not
be raised to your attention.
This limitation applies when copying files between volumes on Windows as well, so application developers tend to use
named streams only for data that can be regenerated (e.g. thumbnail icons, summary or statistical information), not for
storage of irreplaceable user data. We encourage you, however, to examine CCC's log file (choose "CCC Log" from
CCC's Window menu) after backing up an NTFS volume to see if any files are implicated, and whether their named
streams may have important data.
Resource limitations encountered while backing up resource forks
to/from AFP volumes
We have received sporadic reports of a problem that can occur while copying files to or from some Apple File Protocol
sharepoints (e.g. a volume shared from another Macintosh using the "File Sharing" feature of the Sharing preference
pane). When the problem occurs, the server erroneously maintains open references to hundreds of resource forks.
Eventually the file sharing service encounters a system-imposed resource limitation and is unable to continue sharing files
until it closes the open resource fork files. Misleading errors are subsequently returned to CCC, reported as
"Input/output" errors or "Bad file descriptor" errors. CCC will report that "An error occurred while CCC was getting or
setting information about this item on the source/destination".
This problem is due to a bug in the AppleFileServer application, and affects several different implementations of the
AppleFileServer (e.g. on OS X as well as on some other NAS devices). We have identified a few solutions/workarounds to
try when encountering this problem:
Unmount the sharepoint, then restart the Macintosh or Network Attached Storage device that is hosting the AFP
sharepoint. Reconnect to the sharepoint and try the backup task again.
Connect to the sharepoint using SMB instead of AFP. Choose "Connect to server" from the Finder's Go menu, then
specify "smb://servername.local/sharepoint " to connect to the server using SMB rather than AFP.
Reduce the number of files/folders in your backup set, e.g. split your backup task into multiple tasks.
"After a time zone shift, CCC recopied every file!"
HFS+, NTFS, and other modern filesystems store the modification date of files based on the Coordinated Universal Time
(UTC -- comparable to GMT). FAT filesystems, on the other hand, store file modification dates based on the local time
zone setting of your computer. Generally this difference isn't a problem, but there is a drawback if you copy files between
FAT volumes and NTFS or HFS+ volumes. During time zone shifts and the Daylight Saving Time/Summer Time shift, the
modification dates of files on FAT32 volumes will appear to have shifted. As a result, CCC will see these files as out of
date and will recopy each file. Unfortunately CCC cannot remediate this shortcoming of the FAT filesystem, so if you have
to copy files to or from a FAT volume, we recommend that the corresponding source or destination volume is also FAT
formatted.
Microsoft MSDN Library: File Times
I want to back up my whole Mac to a Time Capsule or other
network volume
Time Capsule and other network storage appliances are becoming very popular for providing shared "personal cloud"
storage. Naturally, this storage looks very appealing as a backup destination. The thought of backing up all of your stuff
without having to plug in a cable is very alluring. Indeed, this storage is well suited for the sharing of media files, but there
are some logistical and practical hurdles to backing up large amounts of data, as well as backing up OS X system data to
these devices. There are also some logistical hurdles to restoring a full system backup from a network volume. Below we
explain how to back up OS X system files to a network volume, then we describe some of the limitations and
performance expectations of this solution.
Note on bootability: You cannot boot your Macintosh from a Time Capsule backup. If you require a bootable backup,
you must use an external hard drive enclosure attached directly to your Mac to create a bootable backup.
Backing up OS X to a network volume
As described in this section of the documentation, CCC will only back up system files to or from locally-attached HFS+
filesystems. To meet this requirement, you can ask CCC to create a disk image on your destination network volume. A
disk image is a single file that contains the contents of another hard drive. When you double-click on a disk image file, the
disk image's volume is mounted locally, as if it were an external drive attached directly to your Mac. To back up to a disk
image with CCC:
1. Choose your source volume from the Source menu.
2. Select "New disk image..." from the Destination menu.
3. Unless you're making an archival backup of your data, choose the option to create a read/write "sparse bundle disk
image" file. If that option is unavailable, choose the option to create a sparseimage file instead.
4. Specify the location where you want to save the disk image file. You will find your network volume in the sidebar of
the "New disk image" save dialog*.
5. When you click the Clone button, CCC will create a disk image on the backup volume, back up the specified data,
then unmount the disk image when the task is complete.
* Instructions for gaining access to network volumes is available in the OS X Help Center. If your network volume does
not appear in CCC's Source or Destination menu, consult the documentation that came with the storage device you are
trying to access, or choose "Mac Help" from the Finder's Help menu and search for "connecting to servers".
Performance expectations when backing up to a network volume
"Convenient" and "fast" often go hand-in-hand, but not when it comes to backing up to a network volume. There are
several factors that can greatly reduce the performance of your backup, and this backup strategy involves several of
them.
Backing up data over a wireless connection will be considerably slower than backing up over an ethernet
connection. 802.11n networks support approximately 300 Mb/s of rated (theoretical) bandwidth under the best
conditions, but they usually operate at much lower speeds (130 Mbps and below, which is comparable to 16 MB/s).
Bandwidth drops considerably as you get further from the base station, and the file sharing protocol overhead will reduce
your achievable bandwidth yet more. So practically speaking, you're lucky to get 8 MB/s over a wireless connection while
sitting right next to the base station.
We performed a simple bandwidth test to a fourth generation Airport Extreme Base Station (802.11n) to demonstrate the
performance decline. We copied a 100MB file to an external hard drive attached to the base station via USB in three
scenarios: 1. An ethernet connection to the base station, 2. Sitting a few feet from the base station, and 3. Sitting across
the house from the base station (~35 feet, no line of sight to the base station). The results were 6.5s (15.5 MB/s), 18.7s
(5.3 MB/s), and 256s (0.39 MB/s) for the three scenarios, respectively. So, before you try to back up over a wireless
network, consider running a simple test in the Finder to see just how fast your connection is. If it takes more than a
minute to copy a 100MB file, your connection is too slow to be practical for backup purposes.
Backing up to a disk image on a network volume is faster than backing up to a folder on the network volume. We
explain and illustrate this performance difference in "How long should the clone or backup take?" section of the
documentation. The instructions provided above explain how to back up to a disk image, so as long as you follow those
directions, you'll get the best performance possible.
The performance of the initial backup can be improved by attaching the storage directly to your Mac. If you're
planning to attach an external disk to your wireless network router (e.g. base station, Time Capsule, etc.), consider
attaching that storage directly to your Mac for the initial backup. Be sure to back up to a disk image on this storage (as
described in the instructions above). After the initial backup has finished, you can then attach the external hard drive to
your base station and specify the disk image as your destination in CCC by choosing "Choose disk image..." from CCC's
Destination menu.
Restoring a full system from a disk image backup
Especially with the introduction of Lion, there are some logistical challenges to restoring a full system from a disk image
backup. In particular, you must have some other installation of OS X that you can boot from in order to perform the
restore — you can NOT boot from your disk image backup on the Time Capsule. Before you have to rely on your backup
in a catastrophe, prepare yourself for this logistical challenge. Learn more about this in the "Restoring from a disk image"
section of the documentation.
I want to defragment my hard drive
A welcome side-effect of cloning one volume to another is that the files on the resulting volume are largely defragmented.
While fragmentation is not as significant of an issue as it used to be (e.g. in the Mac OS 9 days), people that have begun
to fill the last 10-15% of their boot volume may see some performance benefit from defragmentation. If you find yourself
in this situation, this is also a really good time to consider migrating to a larger hard drive altogether.
Defragmentation is a natural result of backing up your data to an empty backup volume. Simply prepare your backup
volume for use with Carbon Copy Cloner, then use CCC to clone your source volume to your destination volume. Note
that a block-level clone would actually preserve fragmentation, so don't choose a block copy if you're looking to
defragment your source volume.
"Clone, wipe, restore" — think twice before you wipe that original
volume
It may be really tempting to do the following:
1. Clone your boot volume — the one with your lifetime of irreplaceable data — to another hard drive
2. Boot your Mac from that cloned volume
3. Use Disk Utility to wipe the original volume
4. Restore the cloned volume to the original volume
Very quickly you'll be booted back up from your boot volume and you'll have a backup to boot, right? In most cases, this
would work out great for you, and you'd be fine. There are two really good reasons, however, to stop after the second
step and take a breather:
1. As soon as you erase the original volume, you're down to one copy of your data — you have no backup. The
restore task will stress both the source and target disks with massive reads and writes. If either disk were on the
verge of failure, this level of stress could push it over.
2. You really should take the time to verify your backup. I trust CCC with my data, but do I trust that I asked it to copy
the right items? Did my source volume have a filesystem problem that went unnoticed?
The Best Practice for defragmenting your hard drive
1. Establish a backup regimen to a primary backup volume. Test your backups regularly.
2. Quit open applications and use CCC to update your backup one last time.
3. Use CCC to clone your hard drive to some physical volume other than your primary backup.
4. Boot from the cloned volume.
5. Use Disk Utility to reformat your original volume.
6. Use CCC to restore your cloned volume back to the original volume.
7. Boot from the original volume.
Performance upon first boot from a cloned volume will always be slightly slower than normal as Spotlight reindexes your
data. When the system has "settled down", you will be able to evaluate whether the defragmentation has offered any
performance benefit.
Backup and archiving settings
Excluding files and folders from a backup task
Protecting data that is already on your destination volume
Managing previous versions of your files
Automated maintenance of CCC archives
Advanced Settings
Some files and folders are automatically excluded from a backup task
The Block-Level Copy
Excluding files and folders from a backup task
CCC conveniently lists the contents of your source volume when you select it in the Source menu. Next to each item in
this list of "Items to be copied", there is a checkbox that, when unchecked, indicates that an item should not be copied to
your destination volume (unchecked items will also turn red to indicate that they are excluded). Each folder in this table
has a disclosure triangle, just like in the Finder. Click on the disclosure triangle to reveal the contents of a folder, then you
can continue deselecting items to be copied, if desired. CCC will not allow you to navigate beyond the folders for which
you have permission to view. Additionally, if you deselect an item that is required for OS X to boot, CCC will note this as a
"Configuration concern" when you click the Clone button. Your destination volume will be bootable as long as it meets
the requirements for OS X and you select to copy all required system files.
The popup menu next to the Source menu (the one with a gear icon) is a contextual filters menu. That menu is enabled
when you have selected a local volume or disk image in the source menu. Filters allow you to specify which items on your
source should not be copied to the destination. A filter is updated automatically for you when you uncheck items in the
"Items to be copied" table. More advanced filtering options are available as well, including the ability to exclude items
based on file type and the ability to specify your own rsync-compatible rules.
Creating filters
Creating your own filters is a breeze. Simply choose a source volume in the Source popup menu, then start deselecting
items that you do not want to copy. As you deselect items, the default filter for that volume is updated with your
selections. To view and edit the filters that you have created, click on the "gear" popup menu next to the Source Disk
popup menu. [If this button is disabled, select a source volume from the Source popup menu.]
In the Filter Settings window, you see a list of filters on the left and the contents of those filters on the right. Every time
you choose a volume from the Source popup menu, a filter is created for you with a name in the form of "Macintosh HD
(Default)". As you deselect items to be copied, those items are added to the filter. When you quit CCC, the filters are
saved and available the next time you launch CCC. Whenever you choose a volume in the Source popup menu in the
future, the settings from the default filter for that volume will be applied.
Customizing filters
Typically you will not need to manually configure your filters. If you would like to maintain more than one filter for a
particular volume, or if you would like to apply more advanced settings such as file type filters, then you do so in the Filter
Settings window. To create a new filter, click the "+" button and provide a name for the filter. To remove a filter, select the
filter in the Filters table and click on the "-" button. If you delete a default filter for a volume, that filter will be recreated the
next time you select that volume in the Source popup menu.
To delete items from a filter, select the item(s) from the "Items you have excluded..." table on the right and click the "-"
button or press the delete key.
Advanced filter options
If the files you want to exclude are scattered across your filesystem, it may be tedious to manually exclude each of them.
To address this, CCC implements file type filters. File type filters allow you to specify a file extension (e.g. "dmg", "doc",
"mp3", etc.) of a file type that you would like to exclude. Suppose you want to exclude disk images from being backed
up, for example, simply add "dmg" to the File types filter table and any file with that extension will be excluded.
For the truly adventurous, CCC permits the definition of custom rules. These custom rules follow the syntax defined in the
"INCLUDE/EXCLUDE PATTERN RULES" section of the rsync man page. Using the rules in the screenshot above as an
example:
- Library/Caches
- /private/var/log
- /Library/Logs
The "No logs or cache" filter will exclude any item that contains "Library/Caches" *anywhere* in the path (for example,
~/Library/Caches in every users home directory as well as in /Library/Caches). Items in the /private/var/log folder at the
root of the volume will be excluded as well as items in /Library/Logs (but not, for example, in /Users/mike/Library/Logs).
Note that in the case of /private/var/log, you must indicate the real path of the folder to be excluded. Indicating the
/var/log symbolic link, for example, would not be sufficient to exclude the contents of this folder.
You can learn more about custom rules by reading the "EXCLUDE PATTERNS" section of the rsync man page.
Note: Filters specified in the "Advanced options" section of the Filter Settings window will not be reflected in the "Items to
be copied" table in the main window.
Items automatically ignored
Carbon Copy Cloner excludes some items from the backup task by default. A complete list of exclusions along with an
explanation for the exclusion is available in this section of the documentation.
The CCC temporary archive folder, "_CCC Archives" is excluded by a global filter. See the Managing previous versions of
your files section of the documentation to learn how to restore items from that folder.
Additionally, CCC will exclude and protect system folders if you select the startup disk as the destination (these items will
be grayed out in the "Items to be copied" table). If you would like to restore a specific item, such as the contents of
/Library/Application Support, this protection can be avoided by choosing a specific folder at the source and destination
via the "Choose a folder" options in the Source and Destination menus. With great power comes great responsibility —
take care to avoid overwriting your system files.
CCC includes everything by default, items must be explicitly excluded
When you deselect an item from the list of items to be copied, CCC adds this item to a list of excluded items. By default,
though, everything on your source volume or folder will be included in the backup task. This was a design choice that we
specifically chose after long discussions with beta testers. We decided that we couldn't reliably predict what the end user
might want to do with new files and folders added since a backup task was created, so we took the conservative option
of assuming that anything new should be backed up. Consider the following scenario to understand the implications of
this design choice:
You instruct CCC to back up the contents of a "Fruits" folder to a "Fruits" folder on the destination volume on a regular
basis. When you created the backup task, the source folder contained:
Apples
Grapes
Lemons
Oranges
Pears
Suppose you only want non-citrus fruits backed up, though, so you exclude Lemons and Oranges from the backup task.
After running the backup task, there are three items in the Fruits folder on the destination: Apples, Grapes, and Pears.
At some time in the future, you add "Watermelons", "Peaches", and "Pineapple" to the Fruits folder on the source
volume. Because these items are not explicitly excluded, and because CCC only excludes items from the backup task
that are explicitly excluded, these new items will appear in the Fruits folder on your destination volume the next time your
scheduled task runs.
Forcing CCC to exclude everything by default and include specific items
Using custom filter rules as documented above, you can configure CCC to back up only specific items within a folder and
to exclude anything else by default. The following rules would configure CCC to back up only the Apples, Grapes, and
Pears folders and exclude everything else by default, including new items added to the source folder:
+
+
+
-
/Apples/
/Grapes/
/Pears/
/*
The last rule explicitly excludes everything, so only the items explicitly included will be backed up.
Note: The effects of custom rules are not reflected in the list of items to be copied. When applying rules like this, it is best
to not make changes to the list of items to be copied to avoid confusion about what will and will not be excluded from the
backup task. Both sets of exclusions will apply, though custom rules (includes and excludes) take precedence over
exclusions defined in the list of items to be copied.
Protecting data that is already on your destination volume
CCC offers several options for handling files and folders that reside exclusively on your backup volume. By default, CCC
will archive files and folders that exist exclusively on the destination. In a typical dedicated-backup-volume scenario,
these items would likely be files that had been previously backed up, but then deleted from the source volume. You can
customize this behavior by clicking the "Customize these settings" button.
Files and folders that are only present on the destination should be...
Moved to a temporary archive folder
CCC will create a folder named "_CCC Archives" at the root level of your destination volume if it does not already exist
(e.g. from a previous backup). CCC will then move any files and folders that are unique to your destination volume into a
time-stamped folder within this _CCC Archives folder. The folder hierarchy of your data will be preserved within this
folder, so your files and folders should be easy to find. This option is ideal if you are concerned about accidentally
deleting a file from your source volume and having that deletion propagated to your backup volume via an automated
backup task. In general, this option is an excellent safety net to prevent accidental loss of data on your backup volume.
Moved to the Trash
This option is identical to the "Moved to the archives folder" option, except that the "_CCC Archives" folder will be
created in the Trash rather than at the root level of your destination volume. This option may be preferable to the former if
you want the safety net of deleted file archiving, but want the convenience of simply emptying the Trash to quickly
recover space on your backup volume.
Deleted immediately
This option will not protect items that are unique to your destination. CCC will immediately delete any file or folder that
exists on the backup volume and not on the source volume (at the same path). The only exception to this is with the
"Protect root-level items on the destination" option, which is explained in more detail below.
Left untouched
This is the most conservative method for handling files and folders that are unique to your destination volume — CCC will
not delete or move any items that are unique to the destination. Items that were deleted from the source since previous
backups will be left to accumulate on the backup volume. While this option will provide the highest level of protection for
data that is unique to your destination volume, it may make a future restore process more time consuming and
cumbersome due to the additional cruft in the backup. This option is also not recommended for a backup of a OS X
installation because the "cruft" may interfere with the operation of the OS.
"Protect root-level items on the destination"
If you have files and folders on your destination volume that you would like to be left alone, yet you want to keep your
backup "clean", use the "Protect root-level items on the destination" option. For example, suppose you have these items
on your source volume:
Applications Library System Tax Records (This year) Users
And you have these items on the destination volume:
Documents Older Tax Records Photos 1976-2001 Tax Records (This year)
With the standard archiving behavior, the Documents, Photos 1976-2001, and Older Tax Records folders would be
moved to the _CCC Archives folder, and the Tax Records (This year) folder would be updated to exactly match the Tax
Records (This year) folder on the source. The latter is likely desirable, but perhaps you'd like to keep the other items in
place at the root level of your destination volume. By adding the "Protect root-level items on the destination" option, the
Documents, Older Tax Records and Photos 1976-2001 folders are left untouched because they are unique to the root of
the destination volume. The Tax Records (This year) folder, however, is still updated to match the Tax Records (This year)
folder on the source.
Other ways to protect the data on your backup volume
If you would rather that CCC did not move or delete files that are unique to your backup volume (e.g. files that are not
part of the source data set), there are a couple other ways to protect that data.
Add a new partition to the hard drive
You can use Disk Utility to resize existing volumes (those volumes must be formatted with a filesystem that supports
resizing, such as HFS+) and to add new partitions. These actions can be done non-destructively, that is, without erasing
the files and folders on any existing volumes.
Watch a video that demonstrates how to add a partition to your backup disk
Back up to a disk image
If you simply cannot reformat or repartition your backup hard drive, you can use CCC to back up your data to a disk
image. This subject is covered in the " Backing up to a disk image" section of the documentation.
Back up to a folder
You can use CCC to back up your data to a subfolder on the destination volume. When backing up to a subfolder on the
destination volume, CCC's copying and deleting considerations are made entirely within the scope of that subfolder —
content outside of that subfolder is not considered or affected by the backup task. To back up to a folder, select "Choose
a folder..." from CCC's Destination menu.
General thoughts on keeping "other" data on your backup volume
We strongly recommend that you find the means to dedicate a volume to the task of backing up your
irreplaceable data. If you have data on your backup volume that exists nowhere else, it is not backed up! Whenever you
target a volume for use with Carbon Copy Cloner, there is a risk that some files will be removed for one legitimate reason
or another. CCC offers options and warnings to protect your data from loss, but nothing can protect your data from a
misuse of CCC or a misunderstanding of the functionality that it provides.
Managing previous versions of your files
CCC offers three options for handling files that have been modified since a previous backup. By default, CCC will archive
modified files to a folder named "_CCC Archives" at the root level of your destination. You can customize this behavior by
clicking the "Customize these settings" button in CCC's main window.
Files that have been modified since the last backup should be...
Moved to a temporary archive folder
CCC will create a folder named "_CCC Archives" at the root level of your destination volume if it does not already exist
(e.g. from a previous backup). CCC will then move any files that a) exist at the same path on the source and destination
and b) are different in size or modification date into a time-stamped folder within this _CCC Archives folder. The folder
hierarchy of your data will be preserved within this folder, so your files should be easy to find. The up-to-date version of
the file will take the place of the previous version on the destination volume.
Moved to the Trash
This option is identical to the "Moved to the archives folder" option, except that the "_CCC Archives" folder will be
created in the Trash rather than at the root level of your destination volume. This option may be preferable to the former if
you want the option to access previous versions of your files, but want the convenience of simply emptying the Trash to
quickly recover space on your destination volume.
Overwritten
This option disables archiving of modified items, though CCC will still perform an "atomic" transfer of these items to
maintain the integrity of your backup and to mitigate risk. In an atomic transfer, CCC will first copy the replacement file to
the proper folder on the destination, using a temporary filename. When the file has been successfully transferred and
verified, the older version of the file will be deleted and the updated version will be properly renamed. This kind of transfer
prevents a scenario in which an intact file on the destination could be replaced by a corrupted version from the source.
Don't modify files that are newer on the destination
By default, if a file exists at the same path on the source and destination, CCC will transfer the file if it is different in size
or modification date. For a standard backup task, it is typically your goal to make everything on the destination look like
the corresponding items on the source, regardless of which items are newer. In some cases, however, such as a restore
task, you may prefer to transfer a file to the destination only if it is newer than the file that already exists there. This option
is enabled when using the "Preserve newer items, don't delete anything" preset.
Frequently asked questions about CCC archiving
"How do I restore files from the _CCC Archives folder?"
CCC's temporary archives folder ("_CCC Archives") is excluded from CCC's list of "Items to be copied" by default
because it contains older versions of modified files, and files that were deleted from the source volume. Typically when
you restore data from your backup volume, you will want to avoid restoring the items in this folder, choosing instead to
restore the most recent backup of your files.
If there is something that you would like to restore from the CCC temporary archives folder, a drag and drop restore in the
Finder is usually the easiest way to do so. If you would like to restore many items, or merge them into an existing folder,
choose "Choose a folder..." from CCC's Source menu and choose the folder from which you would like to restore. If you
choose the _CCC Archives folder as the source, note that the full path to your archived files will be preserved, e.g. _CCC
Archives/2012-01-10 (January 10) 14-11-18/Users/fred/Documents/some file.pdf. In most cases, you will want to choose
a subfolder within the archives folder as your source. Likewise, choose "Choose a folder..." from CCC's Destination menu
and select the specific folder that you want to restore items into.
"Why can't I open some files in the _CCC Archives folder?"
When CCC evaluates the items on your destination and determines whether they should be archived or left in place, it
does so on a file-by-file basis. This poses a challenge for bundle files — files that are actually a folder of files, but
presented by the Finder as a single file. As a result, bundle files (e.g. applications, some types of libraries, some custom
file types) may appear in an incomplete form within the CCC archive folder.
Unless all of the components within a bundle file are modified, only the items that have been updated will be present.
Incomplete bundle files are generally not useful on their own, but their contents can be. For example, if you accidentally
deleted a photo from your iPhoto library, you would be able to recover that lost photo from the archived iPhoto library
bundle. To reveal the content of an incomplete bundle file in a CCC Archives folder, right-click (or Control+click) on the
item and choose "Show package contents" from the contextual menu.
"Can I restore a previous version of the OS using one of the archives in the _CCC
Archives folder?"
While it is possible to recover an older, complete version of a bundle file from the CCC Archives and complete backup
(e.g. by overlaying the incomplete archived bundle file on top of the current backup of the bundle file), this is generally too
tedious of a task to be practical for application and OS restores. CCC's archiving feature is not intended to provide a
method for rolling back software updates, OS restores should always be done from the complete backup at the root level
of your destination. If you would like to make "snaphot" backups of your OS, choose "Choose a folder..." from CCC's
Destination menu and choose a folder on the destination volume for the purpose of a one-time backup.
"I deleted files from my startup disk to make more room, but now it's hard to find
some of those files on my backup volume"
This generally isn't a concern for ordinary "flat" file types, but it it can be a concern for certain applications that store lots
of files in a single, monolithic-appearing container file. Some applications offer highly customized interfaces to access a
specific file type. iPhoto, for example, allows you to manage tens of thousands of photo files. These files are all stored in
a proprietary bundle file in your home folder, but because photos are so easy to organize within iPhoto, many people
don't consider how those files are organized on the hard drive. Usually you really don't have to either. That is, of course,
until you can no longer use iPhoto to access your photo files, and that's exactly what happens when you delete files from
your iPhoto library, abandoning them to the archives folder on your backup volume.
If you have a habit of periodically deleting photos, music, or movies from iPhoto, iTunes, Aperture, or any other
application that uses a proprietary bundle file format so that you can "free up some space on your startup disk", consider
how those files will be organized on the destination. Specifically, keep in mind that you use a very elaborate application to
access these files on the source volume, but you will only have the Finder to access these files on the backup volume.
CCC can't reorganize your deleted files in a way that's logical to you, it can only place them at the same path in the _CCC
Archives folder as they were on the source volume. For files buried in a bundle file on the source (as is the case for
iPhoto, Aperture, for example), this means that the files will be buried in bundle files in various time-stamped archive
folders on the destination. These files will also be subject to deletion if you configure CCC to periodically prune the
contents of the Archives. In short, simply archiving deleted files from applications such as these isn't going to be the best
way to store these items long-term if your goal is ultimately to keep them.
When you want to free up some space on your startup disk, consider this approach instead, using iPhoto as an example:
1. Create a new folder at the root level of your backup volume, named something like "Archived Photos 2011".
2. In iPhoto, delete all of the photos that you want to remove from your source volume. When you delete these items,
they are placed in the iPhoto Trash.
3. Click on the iPhoto Trash in the iPhoto sidebar and select all of the photos in that folder.
4. Drag all of the selected photos from the iPhoto Trash to the archive folder on the backup volume.
5. Once the photos are safely copied to and neatly organized on the backup volume (and ideally, after you have made
a second backup of these precious files on some other volume), go ahead and empty the iPhoto Trash via the
iPhoto menu.
Not all applications have this kind of internal Trash folder, so be sure to see how it works for other applications before
applying these exact steps. The general idea, though, is that you should deliberately archive the items that you're
removing from your source volume in a way that makes sense to you rather than passively allowing CCC to archive them
in a manner that makes sense to the computer.
Automated maintenance of CCC archives
Carbon Copy Cloner will save previous versions of modified files, as well as files deleted since previous backup tasks to
an archive folder at the root of the destination. If left unmanaged, this archive folder would eventually consume all free
space on your destination volume. To prevent that from happening, CCC offers three different ways of managing the
contents of the archives folder. You can customize this behavior by clicking on the "Customize these settings" button in
CCC's main window (choose a source and destination if you don't see that button).
Archive pruning occurs at the beginning of a backup task, so CCC will never delete an item that was archived in the
current backup task. Additionally, pruning is always limited to the contents of the _CCC Archives folder that is either at
the root of the destination, or in the Trash. CCC's pruner won't delete the current versions of files on your destination.
Lastly, archive pruning works at a macro level. If any portion of an archive pushes past the limit that you have imposed,
the entire archive (e.g. the time-stamped folder) will be pruned.
Automatically prune archived content before copying files
Keep the size of the archive below [xx] (MB/GB)
Starting with the most recent archive, CCC will determine the amount of disk space that each archive consumes. When
the cumulative total exceeds the limit that you have imposed, CCC will prune the remaining, older archives. If the newest
archive is larger than the limit that you have specified, that archive will be pruned in entirety.
Maintain this much free space [xx] (MB/GB)
If your destination volume has less free space than the limit that you have specified, CCC will prune the oldest archive.
CCC will continue to prune the oldest archive until the requested amount of free space has been achieved. Note that if
the archives cumulatively consume less space than the limit requested and the destination volume is full, CCC will prune
all of the archives.
Prune archives older than [xx] days
CCC will prune archives that were created more than "xx" days ago.
Do not perform automatic pruning
CCC will not automatically prune the contents of the "_CCC Archives" folder at the root of the destination. Archived files
may eventually consume all of the free space on the selected destination, so you should periodically delete older archive
folders to maintain enough free space for future backups. You may delete the contents of the archives folder without
harm to the rest of your backup set.
"CCC is pruning my archives, but the disk is still pretty full at the end of
the backup task"
The purpose of CCC's archive pruning is to make space for additional backups. CCC also avoids pruning items that were
very recently archived — after all, it wouldn't make sense to archive an item on the destination, them immediately delete
it. To accommodate both of these goals, CCC prunes its archives before the backup task runs. Pruning the archives
immediately before copying files gives a greater level of assurance that the requested amount of free space (for example)
will be available for the current backup. Be sure to consider this detail when specifying your archive pruning settings. If
you want to retain additional space on your backup volume beyond what is required for your CCC backups, specify more
liberal limits (e.g. 50GB of free space rather than 15GB).
"Can I use the _CCC Archives folder for long-term archiving of specific
items?"
Not if you configure CCC to automatically prune archive contents. CCC doesn't consider whether items in the _CCC
Archives folder were placed there by CCC or another application, everything is considered safe to delete when the time is
right. If you would like to maintain a permanent archive of items on your backup volume, outside of your CCC backup, we
recommend that you create a specific folder for this task at the root level of your backup volume, then use CCC's option
to "Protect root-level items on the destination" to protect that folder.
We also recommend that you maintain a backup of your archived data on another volume! If you don't have a backup of
your long-term archived items, you're going to lose them forever if your backup disk fails. If you don't have another hard
drive to back up to, consider archiving this content to DVDs as a secondary backup.
"I manually moved the _CCC Archives folder to the Trash, but now I get
a -8003 error when trying to empty the Trash"
When CCC backs up your startup disk, it runs with the privileges required to access system files that are not normally
accessible to your account. Naturally, some of these files will be updated on the source, and subsequently archived on
the destination. When you place these items in the Trash (by placing the _CCC Archives folder in the Trash), and
subsequently try to empty the Trash, the Finder typically requests that you authenticate to remove these files. Sometimes
the Finder is having a bad day, though, and it simply reports the enlightening "-8003" error when you try to empty the
Trash. This error isn't defined or documented anywhere, but through trial and error, we have figured out that it simply
means "I can't cope with your request to empty the Trash".
There are two solutions to this problem. The first is to simply allow CCC to manage the "pruning" of the _CCC Archives
folder. CCC will use elevated privileges to remove inaccessible items and won't have any trouble with them. The second
solution is to use this simple Shredder application. Simply drop an item on it (e.g. the entire _CCC Archives folder in the
Trash), and Shredder will remove the problematic file or folder.
Advanced Settings
Settings in the Advanced Settings panel are helpful in specific situations, but not generally recommended for routine use.
Some of these settings involve more risk, so please use them with caution, and don't hesitate to ask questions at the
CCC Help Desk if the explanations below are insufficient for your particular scenario.
The Advanced settings panel is accessible through the customizable settings window. Click the "Customize these
settings" button in CCC's main window, then click on the "Advanced Settings" button at the bottom of that window to
reveal the Advanced Settings panel.
Run the deletion pass on the destination before copying new files
When specifying the option to "Delete immediately" items that are unique to your destination, CCC typically deletes these
items as it encounters them. CCC iterates through the folders on your source alphabetically, so some files are often
copied to the destination before all of the files that will be deleted have been deleted from the destination. If your
destination volume has very little free space, CCC may not be able to complete a backup to that volume. This option will
cause CCC to run a deletion pass through the entire destination before copying files. Use of this option will make your
backup task take longer.
Replace a folder on the destination if the source item is not a folder
If you haven't granted CCC permission to delete or archive modified items or items that are unique to the destination,
then you may encounter this error message after applying a software update to your source volume. Without permission
to delete or archive items from your destination volume (as necessary), CCC will not replace a folder with an item of a
different type.
For example, suppose you have all of your music in /Users/yourname/Music on your startup disk. You keep this volume
backed up regularly to another volume. One day, you decide that you would like to free up some space on your startup
disk. Realizing that your Music folder is already on your backup volume, you simply delete the Music folder from your
startup disk and replace it with an Alias to the folder on your backup volume. You can access the folder just as you had in
the past, it appears almost as if the content is still on your startup disk. Hooray, free money! But it isn't, it has been
deleted and replaced with a file. When you next run your CCC backup task, what should CCC do with this alias file and
this folder of Music on the backup volume?
If you have chosen one of the options to archive items that are unique to the destination (which the Music folder now is),
CCC will move the Music folder to the _CCC Archives folder. When you realize that your music isn't accessible where it
usually is, you can easily address this misconfiguration. If you have chosen the option to "Leave untouched" the items
that are unique to the destination, and you have not indicated that CCC should archive modified items on the destination,
however, CCC makes the conservative choice that protects the data on the backup volume — it refuses to delete the
Music folder and replace it with a file, and instead reports an error. This option changes that behavior by suppressing the
error, deleting the folder, and replacing it with an item of a different type (e.g. a plain file or a symbolic link).
Calculate a checksum for every compared file
CCC normally uses file size and modification date to determine whether a file should be copied. With this option, CCC will
calculate an MD5 checksum of every file on the source and every corresponding file on the destination. CCC then uses
these MD5 checksums to determine if a file should be copied. This option will increase your backup time, but it will
expose any corrupted files within your backup set on the source and destination. This is a reliable method of verifying
that the files that have been copied to your destination volume actually match the contents of the files on the source
volume.
Media failures occur on nearly every hard drive at some point in the hard drive's life. These errors affect your data
randomly, and go undetected until an attempt is made to read data from the failed sector of media. If a file has not been
modified since a previous (successful) backup, CCC will not ordinarily attempt to read every byte of that file's content. As
a result, it is possible for a corrupted file to go unnoticed on your source or destination volume. Obviously this is a
concern if the file is important, and one day you actually need to recover the contents of that file.
Frequent use of the checksum calculation option may be a burden upon your productivity. We do recommend, though,
that you add this option to a weekly or monthly backup regimen to verify the integrity of your backup.
Note: CCC will never replace a valid file on your destination with an unreadable, corrupt file from the source. If CCC
cannot read a file on your source volume, any existing backup of that file will remain intact on your backup volume and
CCC will report an error, advising you to replace the source file with the intact backup version.
Using the checksum option to verify your backup
CCC's checksum option verifies the integrity of the files on your destination volume before files are copied, it is not a
verification of files that have just been written. In general, the checksum of a file immediately after it is written to disk is of
questionable value. Most disks have a write cache, and file data goes to the cache before it is written to actual media. If
you write a file and then immediately ask to read it back, as much as x amount of data (where x = the size of the cache) is
going to come from the volatile cache. If any of the file's data comes from the write cache, then the checksum doesn't
reflect the status of the data on the permanent media, and that really defeats the purpose of checksumming the file in the
first place.
If you want to verify the integrity of the files on your destination, a subsequent backup with CCC's Checksumming option
is the best way to do that. If a file's modification data and size match those of the source file, but the checksum differs,
CCC will make a note of that occurrence in the CCC.log file, e.g.:
07/12 10:00:22 File size and modification date match, but checksums were different: "/Volumes/Backup/Docum
Remove files on the destination that I have excluded from the backup
When you exclude an item from your backup task, CCC will not only avoid that item on your source, but it will also
exclude that item from consideration for deletion and archiving on the destination. Suppose, for example, that you have a
full-volume backup of your startup disk. One day, though, you decide that you really only want a backup of the OS on
that volume (perhaps you have another disk for your home directory backup), so you exclude /Users from the backup
task and choose the option to "Delete immediately" files and folders that are unique to the destination. After running the
backup task, you wonder, "Why is /Users still on the destination?" /Users isn't unique to the destination, it also exists on
the source volume — this is why CCC did not delete that item from the destination. If you were expecting CCC to delete
items that you have explicitly excluded from the backup task, this option will provide that functionality.
This option is not applicable if you have selected "Leave untouched" for items unique to the destination. This setting also
will not override explicit protections placed on the _CCC Archives folder, so it can be safely used with the archiving
option as a safety net. Also note that this option and the "Protect root-level items on the destination" work on mutually
exclusive sets of files and folders — this option will only affect the items that you have deselected in the list of items to be
copied, or excluded via a custom filter, it does not affect items that are unique to the root of the destination. Finally, note
that this option is disabled if your destination volume is the startup disk. Use this option with care.
Some files and folders are automatically excluded from a
backup task
Carbon Copy Cloner maintains a list of certain files and folders that are automatically excluded from a file-level backup
task. The contents of this list were determined based on Apple recommendations and years of experience. The following
is a list of the items that are excluded along with an explanation of why they are excluded. This list is not (yet)
configurable.
Legend:
Items prefixed with a "/" indicate that they will only be ignored if located at the root of the volume.
Items postfixed with a "/*" indicate that only the contents of those folders are ignored, the folders themselves will be
copied.
Items postfixed with a "*" indicate that the filename will be matched up to the asterisk.
Filesystem implementation details
.HFS+ Private Directory Data*
/.journal
/.journal_info_block
.AppleDouble
/lost+found
These items only show up if you're running an older OS than what formatted the source disk. These items should never,
ever be manipulated by third-party programs.
Volume-specific preferences
.metadata_never_index
/.com.apple.timemachine.donotpresent
.VolumeIcon.icns
/TheVolumeSettingsFolder
Saved Application State
These items record volume-specific preferences, e.g. for Spotlight, Time Machine, and a custom icon for the volume.
Feedback on the exclusion of these items is welcome. Because they are volume-specific preferences, the exclusion of
these items from a day-to-day backup seems most appropriate.
The last item is a folder in each user home folder on Lion that stores application state information. Excluding this folder
prevents the applications that were open during the backup task from opening when you boot from the backup. This
seems appropriate considering that Apple intends the feature to be used to open the applications that were in use when
you log out, restart or shutdown, not at an arbitrary point during the backup task.
Apple-proprietary data stores
.DocumentRevisions-V100
.Spotlight-V100
/.fseventsd
/.hotfiles.btree
These items are Apple-proprietary data stores that get regenerated when absent. Attempting to copy these data stores
without unmounting the source and destination is not only futile, it will likely corrupt them (and their respective apps will
reject them and recreate them).
The DocumentRevisions data store is used by the Versions feature in Lion. The Versions database stored in this folder
contains references to the inode of each file that is under version control. File inodes are volume-specific, so this dataset
will have no relevance on a cloned volume.
Volume-specific cache files
/private/var/db/dyld/dyld_*
/System/Library/Caches/com.apple.bootstamps/*
/System/Library/Caches/com.apple.corestorage/*
/System/Library/Caches/com.apple.kext.caches/*
Copying these caches to a new volume will render that volume unbootable. The caches must be regenerated on the new
volume as the on-disk location of system files and applications will have changed.
NetBoot local data store
/.com.apple.NetBootX
In the unlikely event that your Macintosh is booted from a Network device, OS X will store local modifications to the
filesystem in this folder. These local modifications are not stored in a restorable format, therefore should not be backed
up. In general, you should not attempt to back up a NetBooted Mac.
Dynamically-generated devices
/Volumes/*
/dev/*
/automount
/Network
/.vol/*
/net
These items represent special types of folders on OS X. These should not be backed up, they are dynamically created
every time you start the machine.
Large datastores that are erased on startup
/private/var/folders/*
/private/var/vm/*
/private/tmp/*
/cores
OS X stores virtual memory files and your hibernation image (i.e. the contents of RAM are written to disk prior to sleeping)
and temporary items in these folders. Depending on how you use OS X and your hardware configuration, this could be
more than 50GB of data, and all of it changes from one hour to the next. Having this data for a full-disk restore does you
absolutely no good -- it makes the backup and restore processes take longer and the files get deleted the next time you
boot OS X.
Trash
.Trash
.Trashes
Moving an item to the trash is typically considered to be an indication that you are no longer interested in retaining that
item. If you use the trash for semi-permanent storage, please consider using CCC's option to archive modified and
deleted items to retain a backup of items that are moved to the trash. If you feel strongly that CCC should not exclude the
contents of the Trash by default, your feedback is welcome.
Time Machine backup
/Backups.backupdb
/.MobileBackups
This folder stores a Time Machine backup. Complete details about the exclusion of a Time Machine backup by Carbon
Copy Cloner, including information about how CCC can clone a Time Machine backup, is available in this section of the
documentation.
Special files
/private/tmp/kacta.txt
/private/tmp/kactd.txt
/PGPWDE01
/PGPWDE02
/.bzvol
/Library/Application Support/Comodo/AntiVirus/Quarantine
Files included in this section are application-specific files that have demonstrated unique behavior. The kacta and kactd
files, for example, are created by antivirus software and placed into a special type of sandbox that makes them
unreadable by any application other than the antivirus software.
The Block-Level Copy
If enabled in CCC's preferences, CCC will indicate if the source and destination volume selections qualify for a block-level
copy. During a block-level copy, CCC unmounts the source and destination volumes, reformats the destination volume to
match the source, then CCC proceeds to copy blocks of data from the source to the destination. Once all of the blocks
from the source have been transferred, CCC then reads all of the blocks that were written to the destination and
calculates a checksum. This checksum is compared against a checksum of the source volume. If the checksums match,
the destination volume is then expanded to reach the extent of the partition (so if you cloned a 1TB drive to a 2TB drive,
the destination volume would be 2TB when you're finished).
While each method produces functionally the same result, an initial backup will take less time with a block-level copy
than a file-level copy. Because a block-level copy transfers the blocks of data in order, in perfect sequence, the heads of
the hard drive are not tasked with the intensive seeking operations that are required for a file-level copy.
Requirements for a block-level copy
To take advantage of a block-level copy for a volume-to-volume clone, the following criteria must be met:
1. The source and destination must both be actual volumes (i.e. not a subfolder on a volume).
2. The source and destination must both be locally-attached, HFS+ formatted volumes.
3. CCC must be able to unmount both volumes — there cannot be any open files on either volume and you cannot be
booted from either volume. Do not actually unmount the volumes prior to the clone.
4. The destination volume must be at least as large as the source volume*, plus two blocks (usually 8KB). In some
cases you can use Disk Utility to shrink the source volume to meet this requirement.
When these criteria are met, CCC will activate the "Block copy" button adjacent to the Destination popup menu. You can
click on this button to explicitly require a block-level copy. If these criteria are not met, the "Block copy" button will
remain disabled, and a tooltip indicating why the criteria are not met will be displayed when you hover your mouse over
the "Block copy" button.
* In some cases, cloning to a smaller volume is actually possible. If you click on the padlock button and authenticate, then
reselect the destination volume, CCC can perform a more in-depth analysis of how data is arranged on the source and
determine whether the smaller destination volume can accommodate a block copy of the source.
While a block-level clone is rarely required to insure the fidelity of your backup, some people find comfort in the fact that,
block-for-block, the resulting destination is precisely like the original (this is simply impossible with a file-level clone).
Don't lose sleep, though, if meeting the requirements for a block-level clone is untenable for your particular backup or
cloning situation. The file-level backup engine in CCC has been tuned and honed to bring the best performance and
fidelity possible among OS X backup utilities.
To benefit from a block-level copy for a volume-to-disk image clone, the following criteria must be met (and note that you
cannot boot OS X from a disk image):
1. The source volume cannot be the startup disk that you are currently booted from.
2. The source volume must be an actual volume (i.e. not a subfolder on a volume).
3. The source volume must be a locally-attached, HFS+ formatted volume.
4. CCC must be able to unmount the source volume. Do not actually unmount the source volume prior to the
clone.
5. The underlying destination volume must have enough capacity to accommodate the amount of space used on the
source volume.
Cloning volumes larger than 2TB
CCC uses the OS X system service "Apple Software Restore" to perform block-level copies. On versions of OS X prior to
Lion, Apple Software Restore may be unable to complete a block-level copy of a volume larger than 2TB. This failure can
occur without reporting an error, and despite a successful verification. If you are running an OS older than Lion, CCC will
not permit a block-level copy of a volume that is larger than 2TB.
Aborting a block-level clone
If you click on the "Stop" button while CCC is in the middle of a block-level clone, CCC will immediately abort the
copying procedure and remount the source volume. If the destination volume is invalid, CCC will reformat the destination.
Due to the nature of a block-level copy, the destination volume's filesystem directory will not match the actual files on its
filesystem unless the entire block-level copy procedure completes.
If you abort a block-level clone during the Verification phase, the destination volume may appear intact and function just
fine, but will not show the true capacity of the destination volume. For more technical details on the phases of a blocklevel copy, see this discussion in the Public Discussion section of the Bombich Software Help Desk.
Frequently Asked Questions about the block-level copy
Is a block-level copy better than a file-level copy?
A block-level copy is faster for an initial backup. If your destination volume already has a lot of the source volume's
content (i.e. from a previous backup), a file-level update will actually be faster than a block-level copy. As far as the end
result is concerned, the two methods are equal. Both methods can produce a bootable backup of OS X.
Does the block-copy method copy unallocated blocks? Are deleted files copied?
Some unallocated blocks will be transferred, but it is not a goal of CCC to copy all unallocated blocks. CCC will copy up
to the "high tide" mark on the source volume, that is, to the last block that contains actual file data. If the source volume's
free space is fragmented, then some unallocated blocks will definitely get transferred. Any unallocated blocks past the
high-tide mark, though, will not be transferred. If you're hoping to recover deleted files from your source volume, we
recommend that you attempt this from the original source volume, not the cloned volume.
Can the block-level copy be used for a forensics-level backup of a volume?
No, the block-level copy is not an appropriate tool for a forensics copy of the disk. Most importantly, CCC doesn't make
any effort to prevent the mounting of the source volume, nor does it impose read-only requirements when the source is
mounted, so you cannot be sure that changes were not made to the source volume after evidence collection.
If there are filesystem problems or corrupted files on the source, will these be
propagated to the destination?
Not only will these problems be propagated to the destination, it is also unlikely that a block-level copy will complete
successfully if there are corrupted files (i.e. bad sectors) on the source volume. If you suspect problems with your source
volume, use CCC's file-level copy. If/when errors are encountered, CCC will note the affected files and move on, copying
the files that are intact. The Cloning Coach will then appear at the end of the task to offer advice on addressing the
problems with your source.
Scheduling Backup Tasks
Scheduling a task and basic settings
Performing actions Before and After the backup task
Deferring and skipping scheduled tasks
Frequently asked questions about scheduled tasks
Email and Growl notifications
Scheduling a task and basic settings
Carbon Copy Cloner offers hourly, daily, weekly, and monthly scheduling. If your workstyle is too hectic for scheduling,
you can also schedule a task to run whenever your backup hard drive is attached to your computer, or you can configure
a task to run only when you click on the "Run" button. To schedule a backup task:
1. Configure CCC as if you were going to run a backup task immediately.
2. Instead of clicking on the Clone button, click on the "Schedule this task..." button.
3. In the Scheduler window that appears, provide a name for the scheduled task (double-click "Untitled")
4. Indicate when you want the task to run.
5. Click the Save button
Scheduling a task
To schedule a task, choose the desired repetition interval from the popup menu next to "Run this task:". If you would
rather have the backup task run only when the source or destination volume is reattached to your computer, choose
"When source or destination is reconnected". If you simply want to save your backup task settings so you can re-run the
task manually at a later date, choose "Manually when I click Run".
Next choose how many (hours, days, weeks, or months) you would like to skip between backup events ("Repeat every:").
Finally, indicate the time of day at which you would like the event to start. When scheduling a task to run on a weekly
basis, you may also indicate what days of the week on which your task should run. At the bottom of the scheduler
window, CCC will indicate how frequently the task will run and when it is next scheduled to run.
By default, scheduled tasks will not run when the system is sleeping. If a scheduled run time is missed during sleep, CCC
will run the task when the system wakes. [See this discussion if you prefer to simply skip tasks missed during sleep]
If you want a task to wake or turn on your Mac at the scheduled interval, check the box to "Wake/power up the system
for this task". When this setting is applied, CCC will schedule your Mac to wake or turn on at the scheduled run time. If
your Mac is a laptop, note that CCC will not be able to wake the system if the lid is closed. The only exception to this rule
is when the laptop is connected to a display that remains turned on (it's OK for the display to sleep). The laptop must
receive an active signal from the display or it will immediately go back to sleep after the scheduled wake time.
Note: Do not attempt to modify the schedule of a task that is currently running. If you need to modify the schedule of a
running task, stop the task first.
Settings
The Settings tab in the scheduler window offers control over some of the behavior of the scheduled task helper
application.
Use strict volume identification for the destination volume
By default, CCC uses the name and Universally Unique Identifier (UUID) of your source and destination to positively
identify those volumes. By verifying both of these identifiers, there is less risk in, for example, backing up to a volume that
has the same name as your usual destination but is not actually the destination.
While beneficial, this behavior can sometimes have the wrong result. For example, if you rotate between a pair of external
hard drives, CCC will not backup to both of them even though they have the same name (e.g. "Offsite Backup"). CCC will
instead claim that the UUID of one of the volumes does not match that of the originally chosen destination.
To accommodate a "rotating pair of backup volumes" solution, you can uncheck this option to indicate that CCC should
only use the volume name to identify the destination volume. When deselecting this option, be vigilant that you do not
rename your destination volume and that you never attach a volume to your Mac that is named the same as your
destination volume.
This option is automatically disabled when the destination volume does not have a UUID. Network volumes and some
third-party filesystems, for example, do not have volume UUIDs.
Display a progress window during the backup task
By default, CCC will show a task window that indicates progress, data copied, time elapsed, etc. To suppress that
window, uncheck this setting. This setting does not affect the presentation of task errors. In the event that an error
occurs, the scheduled task will present this window and report the error.
Display a "Task finished" window when finished
When a scheduled task has completed, CCC normally leaves the task's window on screen with a dialog indicating result
of the task. This option allows you to disable the presentation of that dialog when the task finishes successfully. If errors
occur during the backup task, though, CCC will always present that error regardless of this setting.
Silently skip this task if the source or destination is unavailable
CCC makes a diligent effort to mount any local or network-attached volumes involved in your backup task. If a local disk
is attached, but unmounted, for example, CCC will mount that volume before the task begins. If your source or
destination is a disk image on a network volume, for example, CCC will mount both the network volume and the disk
image before beginning the task. If the source or destination is not available, though, and CCC cannot mount it, CCC will
display a dialog indicating that the volume is missing and will wait for you to attach that volume. You can click "Skip" or
"Defer" to skip the task or run it at a later time, or attach the implicated volume to run the task immediately.
If this dialog is undesirable, you can use this option to suppress it. Do note, however, that unless you have email
notifications enabled, you will receive no further indication that your task is not running.
Description of this task
The Description setting indicates the description of your backup task. CCC populates this description with the one
provided in the main interface, along with a summary of the settings you provided when you created the task, but you
may modify this description to suit your needs.
Managing and monitoring scheduled tasks
Scheduled task settings may be modified at any time*. You can also temporarily disable a scheduled task by unchecking
the box next to its name in the "Scheduled Tasks" list. To delete a task altogether, simply select the task in the
"Scheduled Tasks" list and click the "-" button or press the delete key. If the task is running when you save modified
settings or delete the task, the scheduled task will be terminated by the system scheduling service, so avoid changing a
task's settings while it is running its backup.
If you would like to run a scheduled task immediately, select the task in the "Scheduled Tasks" list and click on the Run
button.
* Can I modify the source/destination/cloning options specified in the
scheduled task?
The configurations available in the Scheduler window can be configured at any time. You cannot, however, modify the
task configuration (e.g. the source and destination volumes specified, cloning options, selected items to be copied, etc.)
— yet. If you would like to make changes to the task configuration, delete the current scheduled task, then create a new
task with different settings applied in the main window of CCC. Modification of scheduled task configuration is planned
for a future release of CCC.
"When I recreate the scheduled task, do I have to start from scratch?"
No, CCC offers two features that allow you to quickly reconfigure the main window with the settings of a previouslycreated backup task. First, CCC retains the settings that you last applied in the main window. Simply rechoose your
source and destination volumes and the task settings that you had previously applied will be reapplied. CCC also allows
you to store custom settings in a preset. Choose "Use custom settings..." from the preconfigured settings menu (the
popup button under the Destination menu) to create custom presets.
Second, CCC retains the list of files and folders that you have chosen to exclude on a per-volume basis. When you
uncheck an item from the list of items to be copied, that setting is stored in a CCC "filter", and these filters are maintained
on a per-volume basis. The next time you choose the same source volume, CCC will reapply the filter that you had last
configured for that volume. Additionally, you can create multiple filters and apply them to any particular volume. Suppose
you have two separate data sets on the same volume, for example, and you have two separate scheduled tasks for these
data sets:
1. Choose your source volume from the Source menu.
2. Click on the Gear menu next to the Source menu and choose "Edit Filters..."
3. On the left side of the window, click the "+" button to create a new filter.
4. Double-click on the Untitled filter name and provide a meaningful title for your custom filter
5. Close the Filters window, then choose your new filter from the Gear menu.
Now when you make changes to the list of items to be copied, the changes are recorded in your custom filter. You can
switch between filters to very quickly change the set of files and folders that will be copied. As a result, recreating a
scheduled task should be as easy as:
1. Choose your source and destination from the Source and Destination menus.
2. Click on the Gear menu next to the Source menu to select a custom filter (if necessary)
3. Click the "Schedule this task" button.
4. Schedule the new task as desired
Performing actions Before and After the backup task
Often when you have a backup task that runs on a scheduled basis, there are associated tasks that you would like to run
before or after files are actually copied. CCC offers the option to run shell scripts before and after a backup task,
unmount or set the destination as the startup disk, and power management options such as sleep, reboot, and shutdown.
Mounting the source or destination volume before a backup task begins
Without any additional configuration, CCC will attempt to mount your source and destination volumes before a scheduled
backup task begins. This applies to many different volume types — ordinary volumes on locally-attached hard drives,
disk images, network volumes, and encrypted volumes (Lion only). If your source or destination volume is on a disk that is
physically attached to your Mac (e.g. via Firewire or USB), but it is not mounted, CCC can "see" that device and will
attempt to mount it. If your source or destination is a network volume, CCC will obtain the credentials that you use to
mount that device when you create the scheduled task, and will use those credentials to mount the volume before the
task begins.
This also applies for nested volumes. For example, suppose you are backing up to a disk image on a network volume.
CCC will first attempt to mount the network volume, then it will attempt to mount the disk image. Likewise, suppose you
have a task configured to back up the contents of a folder on an encrypted volume. CCC will unlock and mount the
encrypted volume before the backup task begins.
CCC's attempts to mount the source and destination volumes occur automatically before any other tasks, including
preflight shell scripts (described below), therefore it is not necessary to implement a shell script to pre-mount the source
or destination.
Destination volume options
If you would like CCC to unmount your destination volume at the end of the backup task, choose "Unmount the
destination volume" from the Destination volume management menu. If your destination is a folder, the text will be
"Unmount the underlying volume". If the destination is a disk image, CCC always unmounts the disk image volume, so
this setting refers to the underlying physical volume upon which the disk image resides.
CCC will not forcefully unmount the destination volume. If an application has open files on the destination volume, CCC's
attempt to unmount the volume will fail. CCC doesn't issue an error dialog for this condition, though it will make a note of
it in the CCC.log file.
If you would like to set the destination volume as the startup disk, for example to automate the regular testing of your
backup volume, choose "Set as the startup disk" from the Destination volume management menu.
Destination volume management options are only applied when your backup task ends successfully. If errors are
reported, the destination volume will not be unmounted or set as the startup disk.
Power management options
If you choose one of the options from the Power management menu, CCC will sleep, reboot, or shut down your Mac
when the backup task finishes successfully. The reboot and shutdown options are not forceful. If you have a document
open with unsaved modifications, for example, the application would prompt you to save the document. If save dialog is
not attended to, the shutdown or reboot request will time out.
Power management options are only applied when your backup task ends successfully.
Running shell scripts before and after the backup task
If there is functionality that you need that does not exist within CCC, pre and post clone shell scripts may be the solution
for you. For example, suppose you want to back up your Open Directory Master with CCC at regular intervals, but you
know that a simple file-level copy may not properly back up an open database. The following pre-clone shell script will
archive your OD master to a disk image for later restoration via Server Admin. It also dumps copies of Server Admin
configurations* as well as your MySQL databases. In the event that your standard backup of the database doesn't open,
you can later restore it from the dump.
#!/bin/sh
PATH="$PATH:/Applications/Server.app/Contents/ServerRoot/usr/bin"
PATH="$PATH:/Applications/Server.app/Contents/ServerRoot/usr/sbin"
PATH="$PATH:/Applications/Server.app/Contents/ServerRoot/usr/libexec"
export PATH
# Path to recovery directory (permissions should be 700 -- read-only root or admin)
recover="/etc/recover"
ts=`date ''+%F''`
echo "Removing manual archives older than two weeks"
find $recover/ -mindepth 1 -mtime +14 -exec rm '{}' \;
# mysqldump the databases
dbs="some_database another_database mysql"
for db in $dbs; do
echo "Dumping $db"
mysqldump --user=root --password='s3kr!t' $db > $recover/${db}_${ts}.dump
gzip $recover/${db}_${ts}.dump
done
# If you ever need to restore from a database dump, you would run:
# gunzip $recover/database_name_(timestamp).dump.gz
# mysql -u root -p database_name < $recover/database_name.dump
# grab the server configuration plists (only specify services that are enabled,
# use "serveradmin list" for a list of services)
echo "Generating serveradmin configuration plists"
services="afp dhcp dns ipfilter nat network swupdate vpn web"
for service in $services; do
serveradmin -x settings $service > $recover/serverconfig/$service.plist
sleep 1
done
# Backup Open Directory
day=`date ''+%u''`
od_backup=$recover/od_backup
echo "dirserv:backupArchiveParams:archivePassword = s3kr!t" > $od_backup
echo "dirserv:backupArchiveParams:archivePath = $recover/od_$ts" >> $od_backup
echo "dirserv:command = backupArchive" >> $od_backup
serveradmin command < $od_backup
* Server Admin configuration plists are valuable as documentation of your settings, but they may not be importable to
Server Admin directly.
Pre-clone shell scripts run after CCC has performed "sanity" checks (e.g. are the source and destination volumes
present, is connectivity to a remote Macintosh established) but before any other tasks (e.g. mounting a destination disk
image, copying files). Post-clone shell scripts run after all other tasks have completed, successfully or not. CCC passes
several parameters to shell scripts. For example, the following shell script:
#!/bin/sh
echo
echo
echo
echo
echo
echo
"Running $0"
`date`
"Source: $1"
"Destination: $2"
"Exit status: $3" # Applicable only to post-clone scripts
"Disk image file: $4" # Applicable only to post-clone scripts
Would produce the following output (typically in /Library/Logs/CCC.log, though you can redirect as desired):
Running /etc/postaction.sh
Wed Aug 14 21:55:28 CDT 2007
Source: /Volumes/Home
Destination: /Volumes/Offsite Backup
Exit status: 0
Disk image file:
If your task specifies a disk image destination, the destination parameter for a pre-flight script will be the path to the disk
image. For a post-clone script, the Destination parameter is the path to the mounted disk image volume, and that volume
will probably not be mounted if the task finished successfully (it is provided in case CCC is unable to unmount the disk
image and you want to post-process this scenario).
Output from your pre- and post-clone shell scripts will be logged in /Library/Logs/CCC.log. CCC may drop the last output
from your script, however, because output handling is handled asynchronously to avoid impacting performance of the
backup task. To force all output to be logged, you can add "sleep 1" at the last line of your script, or send all output to
stderr instead.
Also, if your pre-clone script exits with a non-zero exit status, it will cause CCC to abort the backup operation if you have
selected that option. This can be used to your advantage if you want to apply preconditions to your backup operation.
The post-clone script will run whether the backup task exits successfully or not. If your script should behave differently
depending on the result of the task, you can test whether the third parameter is zero (an exit status of "0" means the task
ended successfully). For example:
#!/bin/sh
source="$1"
dest="$2"
exitStatus=$3
if [ "$exitStatus" = "0" ]; then
# foo
else
# bar
fi
Note: Shell scripts must have a ".sh" suffix, or they will be rejected by CCC. Also, you cannot specify an AppleScript,
CCC currently only supports running shell scripts.
Example pre and postflight shell scripts
To use any of these example scripts, download the script and place it somewhere on your startup disk. By default, CCC
looks in your home folder at Library/Application Support/com.bombich.ccc. To get to that folder in the Finder, hold down
the Option key and choose "Library" from the Finder's Go menu.
parallels_pause.sh
This is a preflight script that you can use to pause all currently-running Parallels VM containers. This script will also retain
state information that can be read by the corresponding parallels_start.sh postflight script to resume these VMs after the
backup task has completed.
parallels_start.sh
This postflight script will resume any Parallels VM containers that were suspended by the parallels_pause.sh preflight
script.
play_sound.sh
If you want to play a unique sound, use this script. You can plug in the path to any audio file of your liking or try one of
the examples included.
eject_destination.sh
CCC's option to automatically unmount the destination volume is a volume-level task, not a device task. If you want to
eject the destination device, use the attached postflight script instead. Note that ejecting the destination device will
unmount all volumes on the device. Also note that this example script adds a 60-second delay to accommodate OS X's
desire to automatically regenerate various cache files. This delay can be adjusted if necessary by editing the script.
timelimits.sh
This preflight script will abort the backup task if the task is running outside of your specified time limits. Use this script,
for example, to indicate that a task should run only on weekdays and only between 9AM and 5PM. If the task tries to run
at a time outside this time window (e.g. you have a task configured to run every hour), the task will abort and will run at
the next scheduled run time.
Deferring and skipping scheduled tasks
Occasionally, a scheduled task will run at the most inconvenient time. Perhaps you are under deadline and don't have the
patience for the hard drive performance hit of a system-wide backup. Or perhaps you are just about to pack up and hit
the road. If you ever find the need to cancel a scheduled task at a particular time, CCC gives you two options for
maintaining your backup regimen: 1) skip this particular scheduled run time or 2) defer this scheduled task to a specific
time in the future.
When you skip a task, CCC will run the backup at the next scheduled interval. Deferring gives you more flexibility.
Suppose that all you need are another twenty minutes to finish a project. Click defer and wind the clock forward twenty
minutes — CCC will run the task again at the specified time. Or suppose you realize that you forgot to bring your backup
drive to work with you today and you have a scheduled task that runs every other hour. Rather than getting reminded of
this four times, simply defer the backup to tomorrow.
Additionally, CCC offers you the option of permanently rescheduling a backup task. If, after a week or so, you realize that
the originally scheduled time is really just too inconvenient, you can modify the start time in the defer panel by checking
the box to "Reschedule all future events for this time of day". For more significant modifications to your backup
scheduled, launch CCC and choose "Scheduled Tasks" from the Carbon Copy Cloner menu to edit your task.
Frequently asked questions about scheduled tasks
Does CCC have to be running for a scheduled task to run?
No. Once you have scheduled a backup task, you can quit CCC because a "helper" application will be running quietly in
the background, waiting to start your task. Scheduled tasks also load automatically when you restart your computer, so
you don't have to launch CCC again unless you want to change how your task is scheduled.
What happens if no one is logged in when the scheduled task runs?
The scheduled task will run whether someone is logged in to the machine or not. If no one is logged in to the machine,
CCC will run in the background without a user interface. CCC logs information to /Library/Logs/CCC.log, you can use
that log file to monitor CCC progress (e.g. logged in remotely via SSH).
How is system sleep handled?
If you enable the option to "Wake/power up the system for this task", CCC will wake or turn on your computer when your
scheduled task should run. Without that setting, if a backup task is scheduled to run while your computer is sleeping,
CCC will run that task immediately upon wake (CCC waits 20 seconds to allow your machine to establish network
connectivity and spin up hard drives).
If your Mac is a laptop, note that CCC will not be able to wake the system if the lid is closed. The only exception to this
rule is when the laptop is connected to a display that remains turned on (it's OK for the display to sleep). The laptop must
receive an active signal from the display or it will immediately go back to sleep after the scheduled wake time.
Will CCC run when the computer is turned off?
Nothing runs when your computer is turned off. Starting in CCC 3.4.4, however, you can configure CCC to turn your
computer on at the time that the task is configured to run. With or without that setting, however, CCC will automatically
run a scheduled task shortly after your computer starts up if it has missed a scheduled task interval. So, for example,
suppose you have a scheduled task configured to run at 9PM, but you turn off your computer at 8PM. When you turn on
your computer in the morning, CCC will run that scheduled task because the 9PM interval was missed. If it is
inconvenient to run the task upon startup, you can click the Stop button to stop the task, then click the Skip button to
skip the missed interval. CCC will then resume a normal schedule for that particular task.
What if the backup drive is not available when the scheduled task runs?
If your backup hard drive is unavailable when the task is scheduled to occur, CCC will report an error that the volume is
not available and ask you to skip or defer the task. If you choose to skip the task, CCC will immediately run the backup
when you reattach your hard drive. If you do not attach the hard drive to your computer before the next scheduled run
time, CCC will prompt you again that the destination volume is missing.
Can I stop a backup task before it finishes?
Yes, you can stop the backup task at any time. The next time you run the backup task, CCC will copy only the files that
have changed or were missed since the last backup task.
How do scheduled tasks "work"
Carbon Copy Cloner Scheduled tasks are managed by launchd. Each scheduled task exists in the form of a property list
file stored in /Library/LaunchDaemons. When these LaunchDaemons are loaded, an instance of "ccc_helper.app" is
launched and configured with the scheduled task settings. While the Scheduler interface in CCC should be the primary
means of configuring scheduled tasks, you can effectively deschedule a scheduled task by removing its configuration
plist and rebooting your Macintosh.
Why can't I minimize the scheduled task application window?
The scheduled task helper application, ccc_helper, runs with elevated privileges as the System Administrator (root) user.
This allows scheduled tasks to run when no one is logged in to the system, and also allows the tasks to load consistently
when your computer is started. That the application runs as a different user than the one you log in as, though, causes its
window to be treated differently from other applications' windows. Most notably, the application cannot be minimized to
the Dock. If it could be minimized, it would be minimized to the System Administrator's instance of the Dock, which
would not be visible to you.
Starting in CCC 3.4.4, there is an option to "Display a progress window during the backup task". This setting is enabled
by default, but you can uncheck this option to hide the scheduled task helper application's window. You will find this
setting in the "Settings" tab of the Scheduled Tasks window.
Can I modify the source/destination/cloning options specified in the
scheduled task?
The configurations available in the Scheduler window can be configured at any time. You cannot, however, modify the
task configuration (e.g. the source and destination volumes specified, cloning options, selected items to be copied, etc.)
— yet. If you would like to make changes to the task configuration, delete the current scheduled task, then create a new
task with different settings applied in the main window of CCC. Modification of scheduled task configuration is planned
for a future release of CCC.
Email and Growl notifications
CCC can provide several types of task status notifications. Ad hoc and scheduled tasks send notifications via Growl, a
popular system-wide notification handler. You can also configured scheduled tasks to send email notifications when the
task completes.
Growl notifications
CCC does not install or configure Growl on your Mac. Visit the Growl website to learn more about what Growl is and how
it works, and how to download and install it on your Mac. If you have Growl installed and enabled on your Mac, CCC will
deliver notifications when a backup task begins, when it ends successfully, and when a task ends with an error. How
these notifications are handled and presented to you is configurable in the Growl preference pane in the System
Preferences application.
Growl, Mountain Lion, and Notification Center
Starting with CCC 3.5.2, CCC will no longer send Growl notifications on Mountain Lion. CCC will, however, send
notifications via Mountain Lion's Notification Center. The reasoning behind this decision, along with a method that will
continue to provide Growl notifications for CCC scheduled tasks, is indicated in this discussion on our Help Desk.
Email notifications
To configure CCC for sending email notifications:
1. Choose the circumstance under which you would like CCC to send email notifications: either when the backup
finishes, or only when the backup ends with an error.
2. If you have SMTP accounts configured in Mail, some of these accounts will appear in the accounts menu. You can
choose one of these accounts and provide your password when prompted. CCC stores email account credentials in
a private keychain. Only CCC can open this keychain to retrieve the password.
3. If you don't have an SMTP account configured in OS X's Mail application, or if the SMTP service that you want to
use is not listed automatically by CCC, choose "Other..." from the accounts menu and provide your SMTP account
information.
4. Specify recipients for the email notification. If you would like to notify more than one email address, separate those
addresses with commas.
5. Click on the "Send test email" button to test the configuration.
Specifying an iCloud account
You may notice that your iCloud account is conspicuously missing from the Accounts popup menu in CCC's Scheduled
tasks window. CCC retrieves the account information that is stored in Mail's preferences. While the iCloud SMTP server
appears as an option in the Accounts tab of Mail's preferences, those server settings are not actually stored in Mail's
preferences, so those settings can't be auto-populated for you in CCC's Accounts popup menu.
You can specify that information manually, though, just choose "Other..." from the bottom of the Accounts popup menu.
The iCloud SMTP server information is documented in this Apple Kbase article.
Sending email via a server that uses a self-signed security certificate
Self-signed security certificates are typically limited to test environments, though it isn't uncommon to see them in use on
servers that serve a very small number of users. When an email server uses a self-signed security certificate, and you
attempt to make a secure connection to the server, your email client will usually issue a warning indicating that the
server's identity can't be verified, "Are you sure you want to connect to this server?" CCC's email notifications are sent
on your behalf, in a manner that doesn't permit asking you to permit the connection, so self-signed certificates generally
prevent CCC from sending email notifications at the end of a scheduled task.
There are three potential solutions for working with servers that use self-signed security certificates:
1. Trust all self-signed security certificates (don't validate server identity)
2. Don't use SSL to connect to the server
3. Configure Keychain services to trust just your server's self-signed SSL certificate
The first option is acceptable if the user can make the choice and use the setting with a very refined scope. The second
option will allow the email to be sent, though the contents of the email will be sent in the clear. The third option is the
most preferable solution, though it can only be applied for a logged-in user (i.e. CCC uses the System Administrator,
"root" account, whose Keychain services settings would be difficult to configure).
Our official recommendation is to configure your email server with a security certificate signed by commercial certification
authority. For cases where that is not practical, and SSL is required, CCC 3.4.4 introduced an option to "Trust self-signed
root certificates when sending email notifications". To leverage this setting, follow these steps:
1. Hold down the Option key and choose "Show experimental options..." from CCC's Help menu
2. Check the box to "Trust self-signed root certificates when sending email notifications"
This setting will now be applied to any new scheduled tasks that you create, when you configure those tasks to send
email notifications. If you already have a task configured to send email notifications, you must reselect your email account
from the email accounts popup menu to have the setting applied:
1. Open CCC's Scheduled tasks window by choosing "Scheduled tasks..." from the Carbon Copy Cloner menu
2. Click on your scheduled task, then click on the Notifications tab
3. Reselect your email account from the email accounts popup menu
4. Click the Save button
5. Click the "Run" button to run your task manually.
For the purpose of testing the root certificate trust setting, running the task manually will be a more effective test of the
email notification than clicking the "Send test email" button.
Backing Up to Disk Images or Other Macs on Your
Network
Backing up to a disk image
Restoring from a disk image
Using Carbon Copy Cloner to backup to another Macintosh on your network
Restoring from a backup on a remote machine
Managing backups of multiple computers to one "backup server"
A caveat for backing up to a remote Macintosh that has no user logged in
Backing up to a disk image
Sometimes backing up your data to a single external hard drive is just too messy and difficult to organize. Suppose, for
example, that you have three computers in your household, and everyone backs up to the same external hard drive.
Where do you put each person's backup? The single hard drive can't maintain multiple operating systems, OS X does not
support that. You could split the drive into three partitions, but that isn't very flexible at all. You could clone each person's
drive to a folder on the drive, but that's a little difficult to restore from.
A good solution in a scenario such as this is to use disk images as the medium of your backup. A disk image is a single
file residing on your hard drive that contains the entire contents of another hard drive (except for the free space). When
you want to access the contents of that filesystem, you double-click on the disk image to mount the disk image as if it
were an external drive attached to the machine. Carbon Copy Cloner 3 leverages disk images to provide you the flexibility
of storing several complete, bootable* backups on a single shared external hard drive. (* Disk images themselves are not
bootable, but you can mount them and restore their content to a physical hard drive to produce a bootable, exact replica
of the original).
To back up to a new disk image:
1. Choose your source volume from the Source menu
2. Choose "New disk image..." from the Destination menu.
3. Provide a name and choose a location to save your disk image.
4. If you plan to back up to this disk image again in the future, set the image format to one of the read/write formats. If
you want a read-only disk image for archival purposes, set the image format to one of the read-only formats.
To back up to an existing disk image, select "Choose disk image..." from the Destination menu and locate your disk
image.
Read/write "sparse" disk images
A sparse disk image is a type of read/write disk image that grows as you copy files to it. In general, sparse disk images
only consume as much space as the files they contain consume on disk, making this an ideal format for storing backups.
Read/write "sparsebundle" disk images
A sparse bundle disk image is similar to a sparseimage insofar as it grows as you add data to it, but it retains its data in
many smaller files inside of a bundle rather than inside a single file. A sparse bundle may be desirable if the underlying
filesystem upon which you save the disk image has a file size limitation (such as FAT32).
Sparseimage and sparsebundle disk images will automatically grow, but they will not
automatically shrink
Sparseimages and sparsebundle disk images grow as you add data to them. They do not, however, automatically shrink
when files are deleted from them. As a result, the amount of disk space that the disk image file consumes will not
necessarily reflect the amount of data that they consume.To reclaim disk space that is occupied by the free space on
your sparsebundle disk image, drop the disk image file onto this application: Compact Sparse disk images. Be sure to
unmount the disk image volume if it is already mounted. Also, note that the compacting process can take a while (e.g. an
hour for a 100GB disk image on a locally-attached volume).
Read-only disk images
Read-only disk images cannot be modified without invalidating the built-in checksum, therefore they are a good container
for storing archived material. Whether to choose read-only versus read-only compressed comes down to time and space.
If your destination is tight on space and you have a bit of extra time, you can compress the disk image. Compression
rates vary on the content of your source, but you can typically expect to reduce the size of your disk image by about half
when using compression. There is a subtle behavior that you should take note of when considering this option as a
space-saving measure: CCC will first create a read/write disk image, copy the selected items to it, then convert the disk
image to read-only compressed. In this case, you will actually need twice the space on your destination as the items to
be copied consume on the source. When using a block-level copy, this limitation does not apply, CCC will create a readonly compressed disk image in one step.
Encrypting disk images
If any of the data that you are backing up is sensitive, and if your backup device may be in an insecure location,
encrypted disk images can improve the security of your backup. CCC offers 128 bit and 256 bit AES encryption to
encrypt disk images. To create an encrypted disk image, select one of the encryption levels from the Encryption menu.
After you click on the OK button, you will be prompted to specify a passphrase for the new disk image, and CCC will give
you an opportunity to save the passphrase in your own keychain. CCC will also store the passphrase in a private
keychain so the disk image can be mounted automatically during scheduled tasks.
Note: If you create a read-only, encrypted disk image, the intermediate disk image that CCC creates is NOT encrypted.
This intermediate disk image file is deleted once the final, read-only, encrypted disk image has been created, but it is not
shredded. Take this into consideration when choosing your destination media. If the destination may be placed in an
insecure location, use Disk Utility to securely erase free space on the underlying destination volume after you have
created your encrypted disk image archive.
Scheduling a backup task whose destination is a disk image on the
startup disk
If you specify a disk image that resides on your startup disk as the destination to a scheduled task, CCC will impose
some more conservative requirements on this task. To proceed with this configuration, one of the following requirements
must be met:
The disk image won't grow, e.g. it is a .dmg file, not a sparseimage or sparsebundle disk image
The amount of free space on the startup disk is at least 1GB larger than the amount of consumed space on the
source volume.
These requirements avoid a scenario in which the startup disk runs out of free space, causing instability on OS X.
"CCC refused to mount the sparsebundle disk image because doing so
would put its contents at risk of data loss"
CCC will refuse to mount a sparse bundle disk image if the underlying filesystem that the disk image file resides upon
does not support the F_FULLFSYNC file control. Here's a little background to understand why:
When your computer writes a file out to the hard drive, the data usually goes to a "write buffer" — a small portion of RAM
that is installed on the circuit board of the hard drive. By accumulating smaller write operations onto this RAM chip, the
hard drive can increase overall write performance by writing large blocks of cached data to the physical media all at once.
While this write buffer improves performance, it also carries a risk. If the power fails or the disk's connection to the
computer is suddenly broken between the time that data was written to the buffer and when the buffer is flushed to the
disk, your filesystem will have an inconsistency. Filesystem journaling typically mitigates this risk, however it doesn't offer
enough protection for Apple's sparsebundle disk image type, a new kind of disk image introduced in Mac OS 10.5.
In Mac OS 10.5, Apple implemented the F_FULLFSYNC file control for network servers and clients. The F_FULLFSYNC
file control is a command that is sent to the hard drive after some (or all) write operations that tells the disk to immediately
flush its cache to permanent storage. To provide better protection for data on sparsebundle disk images, Apple disabled
support on Mac OS 10.6 for using sparsebundle disk images that reside on filesystems that do not support the
F_FULLFSYNC file control. CCC extends and improves this protection by refusing to mount a sparsebundle disk image if
that disk image resides on a filesystem that does not support the F_FULLFSYNC file control, regardless of the current OS
that you are running.
You are likely to encounter this error condition if your sparse bundle disk image is hosted on a pre-Mac OS 10.5
Macintosh or various Network Attached Storage (NAS) devices. When you encounter this error, copy the sparsebundle
disk image to another network sharepoint, or ask CCC to create a new sparse disk image file (sparse disk images are not
the same as sparsebundle disk images).
"CCC is unable to proceed with the backup task because the
underlying destination volume was mounted by another user"
When a scheduled task running on OS X Lion is backing up to a sparsebundle disk image hosted on a network volume,
this message will appear if the network volume was already mounted by a user other than the System Administrator. To
avoid this problem, unmount the network volume, then run the backup task again. Note that CCC will automatically
mount the network volume when the task is scheduled to run, so it is not necessary to keep the network volume mounted
or to mount the network volume prior to the backup task's scheduled run time.
Restoring from a disk image
Manually restoring individual files and folders
You can access the contents of a disk image the same way that you access other volumes and external hard drives on
OS X. Double-click on the disk image file to mount its filesystem, then navigate the filesystem in the Finder to access
individual files and folders. If you have the permission to access the files that you would like to restore, simply drag those
items to the volume that you would like to restore them to.
Restoring individual items or an entire disk image to another hard drive
using CCC
While you cannot boot OS X from a disk image directly, you can restore the disk image to a volume. When you use CCC
to restore the disk image to a volume, the resulting restored volume will be bootable (assuming that you had initially
backed up a bootable system). To restore files or an entire filesystem from a disk image:
1. Launch CCC
2. Select "Restore from disk image" from the Source menu and locate your backup disk image. CCC will mount the
disk image for you.
3. Choose a volume from the Destination menu. You may choose the startup disk as a destination, but CCC will not
permit you to restore system files to the currently-running OS.
4. Select "Preserve newer files, don't delete anything" from the preconfigured settings menu.
5. Deselect any items from the list of items to be copied that you do not want to restore.
6. Click the Clone button.
Restoring system files to your startup disk
If you want to restore system files to your startup disk, you must start up your Macintosh from an installation of OS X on
another hard drive, such as a bootable backup created by CCC. Once you have booted your Mac from another volume,
follow the steps from the previous section, but choose the "Temporarily archive modified and deleted items" preset
instead.
Restoring system files to your startup disk when you don't have a
bootable backup
If you do not have an installation of OS X on another hard drive, you can boot your Mac from your OS X Installer DVD
(Snow Leopard) or from Apple's Internet Recovery server (Lion+ — see below) and use Disk Utility to restore the entire
disk image.
1. Reboot your computer from the OS X Installer DVD or hold down Command+R on startup to boot from the Apple
Internet Recovery server
2. After the Installer application loads, choose "Disk Utility" from the Utilities menu
3. From the File menu, choose "Open Disk Image..." and locate the disk image that you would like to restore
4. In the list in the pane on the left, click on the mounted disk image's volume
5. Click on the "Restore" tab on the right side of the window
6. Drag the mounted disk image to the Source field. If the Source field does not accept the dragged volume, right-click
on the disk image's mounted volume and choose "Set as source" from the contextual menu.
7. Drag the hard drive that you would like to restore to into the "Destination" field
8. Check the box to erase the destination (if present), then click on the Restore button.
After you have restored your disk image, do the following to create a Recovery HD volume (Lion+, this video
demonstrates the process):
1. Click on the hard drive device in the list on the left (the volumes have names that you see in the Finder, like
"Macintosh HD" whereas the hard drive device has a name that includes the size of the hard drive and a vendor
name or serial number, like "111.8 GB ST9129876A")
2. Click on the Partition tab
3. Click the "+" button to add a new volume
4. Manually set the size to 650MB (or 1GB, if that is the smallest you can specify)
5. Set the name of the new volume to "Recovery HD"
6. Click the Apply button
7. Restart your Mac from your newly restored volume, then use CCC to restore the Recovery HD volume from the
archive on your startup disk.
Using Migration Assistant to migrate data from a disk image
If you have a clean installation of OS X and simply want to restore your user data from a full-system backup on a disk
image, you can use Migration Assistant for this task. Simply mount the disk image, then open Migration Assistant and
proceed as directed, using the mounted disk image as the source. Note that Migration Assistant will only accept a disk
image that has a full system backup, it will not accept a disk image that has only user data.
Migration Assistant and Mavericks
On Mavericks, Migration Assistant will ask that you close all applications, and it will then log you out before presenting
migration options. This poses a problem for migrating data from a disk image because the disk image will be unmounted
when you are logged out, and Migration Assistant doesn't offer any interface to choose a disk image. To work around this
problem, you can use our Mount disk image for Migration Assistant application. Simply drag the disk image containing
your full system backup onto the application and it will guide you through a fairly simple procedure that will make the disk
image available to Migration Assistant after a short delay.
Using Carbon Copy Cloner to backup to another Macintosh
on your network
Carbon Copy Cloner offers the option of securely copying your selected data to another Macintosh on your network (or
anywhere on the Internet for that matter) via the "Remote Macintosh..." options in the Source and Destination menus.
After a brief setup procedure to establish trust between your machine and the destination machine, simply indicate the IP
address or hostname of the machine to which you have access and CCC will take care of the rest.
Note: Backing up to a remote Macintosh is not the same as backing up to a network filesystem. If you don't require a
bootable backup and you are only backing up files for which you are the owner, it will be easier to enable file sharing on
the remote machine and back up directly to the mounted sharepoint.
To successfully set up CCC to back up to a remote Macintosh, you must:
1. Confirm that the remote Macintosh meets the system requirements for CCC
2. Enable Remote Login on the remote Macintosh
3. Determine the Unix path to the folder on that machine that you would like to back up to
4. Install an "Authentication Credentials" package on your local machine (CCC will place this package on your
Desktop)
5. Transfer that same "Authentication Credentials" package to your remote Macintosh and install it there
6. Verify that the system time on each Macintosh is reasonably in sync with the other
7. Confirm that the backup device on the remote Macintosh is ready and mounted (CCC does not currently perform
this verification).
8. Manually disable the "Ignore ownership on this volume" setting in the destination volume's Get Info window in the
Finder.
9. Verify that any firewalls between the two Macs are permitting "secure shell" traffic over port 22.
Configuring CCC to back up to a remote Macintosh is an advanced configuration scenario. If you are unsure of any of
these settings, please seek advice at the Bombich Software Help Desk before proceeding.
Enabling Remote Login on the remote Macintosh
To enable Remote Login on your remote Macintosh:
1. Log in to that machine as an admin user
2. Launch the System Preferences application.
3. Open the Sharing Preference Pane
4. Check the box next to "Remote Login".
5. Be sure to allow access to "All users", or explicitly add the "Administrators" group to the list of restricted
users and groups.
Determining the "Remote Macintosh hostname or IP address"
To determine the value to enter into this field:
1. Log in to the remote Macintosh as an admin user
2. Launch the System Preferences application
3. Open the Sharing Preference Pane
4. Click on the Remote Login service in the list of services
5. In the settings area on the right, you will see a message to the effect of "To log in to this computer remotely, type
"ssh [email protected]" at a shell command prompt." The text after the "@" symbol is the
hostname or IP address that you will provide in the "Remote Macintosh hostname or IP address" text field.
Determining the "Path to backup directory"
To produce a backup that your source Macintosh can boot from, we recommend that you dedicate a volume to the
backup task. The backup volume can be an internal or external volume, though an external volume will be most
convenient in a disaster recovery scenario. Be sure to prepare the volume for use with CCC per the instructions in the
article titled Preparing a hard drive for use with Carbon Copy Cloner. When you have identified a volume to use on the
remote Macintosh for backup, do the following to determine the value to enter in the "Path to backup directory" text field:
1. Log in to the remote Macintosh as an admin user
2. Launch the Disk Utility application
3. Click on the backup volume in the list of devices on the left side of the window
4. Locate the "Mount point" value at the bottom of the window — this is the value that you will enter into the "Path to
backup directory" field in CCC's Remote Macintosh dialog window on the source machine. The format of this value
is typically "/Volumes/Backup Disk".
If you do not intend to create a bootable backup, you may also create a folder on the remote Macintosh that can be used
for the backup task:
1. Log in to the remote Macintosh as an admin user
2. Create a folder in your desired location
3. In the Finder, click on the destination folder that you created
4. From the Finder's "File" menu, choose "Get Info"
5. In the "General" section of the Get Info panel, the "Where" attribute indicates where that folder is located. The path
to your backup directory will consist of that location, plus "/", plus the name of your destination directory. For
example, I just created a folder named "Backups" in the /Users/Shared directory on my remote Macintosh. The Get
Info panel indicates that it is located at "/Users/Shared", therefore the path to my backup directory is
"/Users/Shared/Backups".
Bandwidth management options
CCC offers two options that can help you address bandwidth concerns. The option to "Compress data passed over the
network" can greatly reduce your backup time and total bandwidth used. The time savings depends on just how slow the
connection is between the two Macs. If you have a connection that is slower than 10MB/s, compression will make the
transfer faster. If your bandwidth is better than that, compression will actually slow down your transfer. CCC will not
compress certain file types that are already compressed, such as graphics files, movies, and compressed archives.
CCC also offers a bandwidth limitation option. If your ISP requires that your transfers stay below a certain rate, you can
specify that rate here. Note that CCC errs on the conservative side with this rate, so the average transfer rate may be
slightly lower than the limitation that you specify.
The "Authentication Credentials" package installer
Before you can back up to a remote Macintosh, you must first set up "public key authentication" (PKA) between the
Macintosh that you're running Carbon Copy Cloner on and the Macintosh that you'd like to back up to. With PKA, you
don't need to provide a username/password to access the remote machine. Instead, CCC uses pre-shared, 128-bit key
pairs to identify the source and destination machines.
To create the Authentication Credentials installer package:
1. Choose "Remote Macintosh..." from the Source or Destination menu
2. Click on the button to "Create Authentication Credentials package"
When you click on the button to create an Authentication Credentials package, CCC will generate this key pair, create a
package installer, then install the package onto your local Macintosh. When this procedure is complete, transfer the
package to your remote Macintosh and install it there as well by double-clicking on the package. If you use FTP or a nonHFS+ formatted volume to transfer the package to the remote Mac, right-click on the Authentication Credentials package
and choose the option to compress the package first. FTP and non-HFS+ formatted volumes will strip important
information from the Authentication Credentials package and render it unusable on the Remote Mac.
Note that you are NOT required to enable the root account on either machine. This is avoided by using public key
authentication instead of password-based authentication.
Remote machine requirements
At this time, CCC requires the use of the root account (though it does not have to be enabled) on both the source and
destination machines. To successfully back up to a remote machine, you must have administrative privileges on both
machines. This may be improved upon in a future release.
CCC also requires that the remote machine be running Mac OS 10.6.8 or later.
Additional pointers for advanced users
Carbon Copy Cloner's public key-based authentication is designed to work with no additional configuration of the
services required for backing up over a network connection. CCC uses rsync over an ssh tunnel (port 22 by default) to
perform the backup. If you do make modifications to the sshd configuration, consider how that may affect your backup.
For example, CCC requires use of the root account over ssh. If you set the "PermitRootLogin" key in the sshd_config file
to "no", you will not be able to use CCC to or from that machine. It's an important distinction to note that the root
account does not have to be *enabled*, but sshd must permit the use of the root account. The "PubkeyAuthentication"
key can also not be set to no, Public Key Authentication is required for CCC to authenticate to the remote Mac.
Troubleshooting connectivity problems to a remote Macintosh
Problems connecting to a remote Macintosh generally are caused by configuration problems with the Remote Login
service on the remote Macintosh. Try the following if you are having trouble making a backup to a remote Mac:
1. Verify that the Remote Login service is enabled in the Sharing preference pane on the Remote Macintosh
2. Verify that access to the Remote Login service is allowed for "All users"
3. Confirm that you have created an "Authentication Credentials Installer Package" on the local Mac, then transferred
it to the remote Mac and installed it there
4. Verify that your firewall and the remote Mac's firewall permits traffic on port 22. If you have an application firewall in
place (e.g. Little Snitch), verify that access is granted to "Carbon Copy Cloner" and "ccchelper".
5. If your local Mac and remote Mac are not on the same network (e.g. you're connecting across a VPN or through a
router and over the Internet), confirm that a connection can be established between the two Macs. How you do this
will vary from one scenario to the next, but you can generally verify connectivity by typing "ssh [email protected]"
into the Terminal application (replace 192.168.1.1 with the hostname or IP address of your remote Mac). If you see a
request for a password, then connectivity is established. If not, your network configuration isn't permitting the traffic
or the hostname that you're connecting to is invalid or unavailable.
VPN and port forwarding configuration is outside of the scope of support for CCC, though our support staff will make
every effort to identify whether problems occur within that configuration or within the service configuration on your remote
Mac. If you have worked through the troubleshooting steps above and are still having trouble backing up to a remote
Macintosh, please choose "Report a problem" from CCC's Help menu and submit a support request.
After submitting the support request, there's one more thing you can do to collect some information about the
connectivity problem between the two Macs:
1. Copy Remote Authentication Debugger to both Macs
2. Open the Remote Authentication Debugger application on the remote Mac (this will temporarily place the Remote
Login service on the remote Mac into debugging mode)
3. Open the Remote Authentication Debugger application on the local Mac and enter the remote host information for
the Remote Mac when prompted
4. The Remote Authentication Debugger application will attempt to connect to the remote Mac using the CCC
authentication keys. The debug information will then be collected into reports on the Desktop of both Macs. Please
attach those two reports to the automatic email reply that you received when you submitted a support request to
our Help Desk.
A note about access privileges to backed up data
While logged in to your remote Macintosh, you may not have permission to view the contents of your backup in the
Finder. Your access to the files will be based on the unique id that is associated with the user account that you're logged
in to on the remote Macintosh and the one associated with the account(s) on the other Mac(s) that you're backing up. The
first administrator account always gets a uid of "501", and subsequent accounts are assigned incrementally higher uids -502, 503, etc. For security and privacy purposes, OS X restricts access to the contents of user home directories to the
owners of those home directories, and these restrictions are preserved when your data is backed up to a remote
Macintosh.
To learn what user id is associated with your account:
1. Open System Preferences and click on the User Accounts preference pane
2. Click on the lock and authenticate
3. Control+click on your account in the accounts table and choose "Advanced options"
You will see your User ID in the panel that appears.
This may be annoying from the perspective of trying to access those files on your remote Macintosh, but it is important
for CCC to preserve the ownership and permissions information when backing up your data. If/when you want to do a
restore, you could do either of the following:
a) Attach the external drive directly to the machine that you want to restore files to — the accounts on those systems will
be able to access their backed up files
b) Do a restore directly within CCC from the original source Macintosh
If you must have read access to some of this data (e.g. the original Mac is gone, the user account changed, etc.), you can
change the ownership of the home folder and its contents in the Finder:
1. Choose "Get Info" from Finder's File menu
2. In the "Sharing and Permissions" section at the bottom, click on the lock icon to make the permissions editable
3. Click on the "+" button
4. In the window that appears, select your account, then click the Select button
5. Set the access privileges to "Read & Write"
6. Click on the Gear menu and choose to apply the change to enclosed items
Restoring from a backup on a remote machine
The restore procedure is nearly identical to the backup procedure:
1. Launch CCC
2. Select "Remote Macintosh..." from the Source menu*. In most cases, the Remote Settings dialog will be populated
with the same information that you used to back up originally.
3. Select a destination volume
4. Select "Preserve newer files, don't delete anything" from the preconfigured settings menu
5. Click the Clone button
* Note that the list of items to be copied will remain blank, CCC won't know the contents of the remote folder until the
copying task has begun. If you need to limit what files are restored, you can specify a custom filter in the Filters window
(via the Gear menu).
Managing backups of multiple computers to one "backup
server"
Carbon Copy Cloner can be used to back up several Macs to one particular Mac on your network. This can be a good
method of reducing the number of hard drives that you use for backup, and can also help you consolidate your data,
making offsite backup easier. The following illustrates an example scenario.
Suppose you have a Mac mini on your home network (media server, file server, backup server, etc.) with two hard drives
attached to it, "Backup" and "Offsite Backup." The "Backup" hard drive is a staging hard drive — it has a folder at the
root level for each computer that you back up. When you initially set up the backup task on one system, you'll choose
"Remote Macintosh" from CCC's Destination menu and configure the remote Macintosh information as:
IP address: 10.0.1.11
Path: /Volumes/Backup/John's iMac
Replace the IP address with that of your Mac mini. Repeat the procedure for each Mac, each backing up to its respective
folders. Each of these machines is scheduled to back up to the "Backup" volume on a nightly basis, and the backup
server is then configured to clone "Backup" to "Offsite backup" once a night (or very early in the morning) after all the
other tasks have completed.
The "Offsite" part of the setup involves a pair of disks, each named "Offsite Backup". You'll keep one of these at home
attached to your Mini, and the other can go to work, your fireproof safe, your neighbor's house &mdsah; anywhere that
gives it a little bit of physical proximity from your own home. At the beginning or end of every week, simply detach the
disk from your mini and take it to work with you, then take the other disk home and reattach it to your Mini. CCC will sync
up all of the changes from the Backup disk to the Offsite Backup disk the next morning.
There are advantages and disadvantages to backing up to a folder on a remote volume (e.g. "Backup"). The main
advantage is that you don't have to make a guess at how much space to allocate to partitions for each of the computers
that you back up. There's one partition, and when space is tight you simply erase some of the archive folders or buy a
larger hard drive.
You can't, however, boot from that hard drive because all the OSes are in sub folders. As an alternative, you could
instead partition the "Backup" hard drive and configure each machine to back up directly to one of the partitions, e.g.:
IP address: 10.0.1.11
Path: /Volumes/John's Backup <-- root of the "John's Backup" partition
That partition will be bootable if you back up your entire hard drive to it (e.g. both the OS and your user data) and if the
disk is properly partitioned. The bonus to this method is that you can get back to productivity very quickly should you
have some sort of disk failure.
A caveat for backing up to a remote Macintosh that has no
user logged in
For "improved detachability", OS X will unmount any non-internal volumes that are attached to the system when you log
out. So, for example, if you log out of your computer while a USB or Firewire hard drive enclosure is attached, you can
detach those hard drive enclosures from the system without having to manually unmount them first. This is a good thing
— it would be annoying if you had to log back in to your system just to eject a drive. The downside of this, though, is that
if you have a scheduled backup task that runs when no user is logged in, the destination volume may be unavailable. For
a local backup, CCC will attempt to manually mount the destination volume. When the destination of your backup task is
a remote Macintosh, though, CCC will not be able to mount that volume prior to backing up.
If you anticipate backing up to a remote Macintosh that may be sitting at the loginwindow, you can change the behavior
of OS X to not unmount detachable volumes. To change this behavior, run this command in the Terminal application on
the remote machine:
sudo defaults write /Library/Preferences/SystemConfiguration/autodiskmount
AutomountDisksWithoutUserLogin -bool YES
Note for Snow Leopard users: This workaround does not work on Snow Leopard 10.6.0 to 10.6.3. If you require this
functionality, please apply the 10.6.4 update (or the latest available) for the best experience.
Frequently Asked Questions and Troubleshooting
How long should the clone or backup take?
Can CCC back up my BootCamp (Windows) partition?
"The disk usage on the destination doesn't match the source -- did CCC miss some files?"
Will CCC clone Apple's "Recovery HD" partition?
Some applications behave differently or ask for the serial number on the cloned volume. Did CCC miss something?"
"A block-level copy cannot proceed due to media errors"
Getting more information about what is happening during the backup
Can I run a backup while I'm using my computer? If I have open files, will they be backed up?
What makes a volume bootable?
Can I back up one computer and use the clone to restore another computer?
Computer-specific preference files -- caveats to migrating to a new computer
Cloning a Time Machine backup
Antivirus software may interfere with a backup
"CCC found multiple volumes with the same Universally Unique Identifier"
I have a clone created by another application. Will CCC recognize that data, or will it want to recopy everything?
Finder or App Store finds other versions of applications on the backup volume
How long should the clone or backup take?
The speed at which Carbon Copy Cloner transfers data from one volume to another depends on numerous factors such
as:
The interface through which those hard drives are connected to the computer
The speed of the source and destination hard drives (RPMs, seek time)
The method used to transfer data from one volume to another (file-level copy, block-level copy, backup to a disk
image)
The chipset in an external hard drive enclosure
Fragmentation of data and how close the source volume is to full capacity
The size distribution of files on the source volume
The health of the source and destination hard drives
The quality of cables that connect the source and destination volumes to your computer
The architecture and speed of the computer's processor(s) and any CPU or disk-based activity that the backup task
must compete with
Below we will discuss how these factors affect performance, and what you may (or may not) be able to do to improve the
speed of your backup.
Hardware interface performance (USB, Firewire, SATA)
When shopping for an external hard drive enclosure, you have a choice between USB, Firewire (400 and 800), and eSATA
interfaces. When given the choice, we recommend purchasing a hard drive enclosure that supports multiple
interfaces, but at least Firewire 400 and ideally Firewire 800. The results of several (non-scientific) benchmark runs are
provided in the table below, illustrating that Firewire offers better performance for your backup.
Bandwidth achieved during a block-level clone
Destination
Source
USB
Firewire
400
Firewire
800
Internal
SATA
USB
11.5 MB/s
24.5 MB/s
25.0 MB/s
22.5 MB/s
Firewire
400
23.0 MB/s
20.0 MB/s
26.0 MB/s
40.0 MB/s
Firewire
800
23.0 MB/s
24.5 MB/s
43.5 MB/s
48.0 MB/s
23.5 MB/s
33.0 MB/s
67.0 MB/s
46.0 MB/s
Internal
SATA
Table 1: Results from several benchmark runs using Carbon Copy Cloner 3.3.4 on a PowerMac G5 (Dual 1.8GHz, 1.25GB
RAM) running Mac OS X Leopard, 10.5.8. Each test involved a block-level copy between two identical Hitachi Deskstar
750GB, 3.5-inch 7200RPM SATA hard drives. A block-level copy was chosen to reduce as many variables as possible,
especially file size distribution, hard drive seek time, and OS/CPU performance factors. The resulting values should be very
close to what the interfaces in question were actually capable of. Two external hard drive enclosures were used for the tests:
a MacAlly G-S350SUA and a NewerTech Voyager Q. The source and destination volumes were swapped between the
enclosures in several of the tests and it was determined that there was no substantive performance difference between the
two enclosures. SATA = the internal SATA slots in the PowerMac. The achieved bandwidth is an approximate (+/- 0.50MB/s)
average determined using samples of disk activity reported by the Activity Monitor application.
The speed of the source and destination hard drives
Traditional hard disk drives (HDD) have platters that spin at very high speeds — 4200, 5400, 7200, 10,000 and even
15,000 RPM. Most laptop systems typically have a 2.5-inch drive that spins at 5400RPM while desktop systems typically
have a 3.5-inch drive that spins at 7200RPM. The faster a hard drive's platters spin, the faster data can be read from and
written to them. While the 2.5-inch "mobile" external hard drive enclosures are very convenient and portable, you'll see
faster backup times to a larger 3.5-inch hard drive enclosure.
Solid-State Drives (SSD) store data on solid-state memory rather than magnetic rotating platters. SSDs are less
susceptible to physical shock, quieter, and have lower access time and latency. Due to the lower latency and faster seek
times of SSDs, you will see considerably higher performance when backing up to a volume that resides on an SSD hard
drive. SSD hard drives are still quite a bit more expensive than HDD-based hard drives, so we don't recommend running
out to buy one to be used only for backup purposes.
The method used to transfer data from one volume to another
Backing up data usually consists of copying files directly from one hard drive to another. While this is certainly the most
common and often the most appropriate method of backing up data, it isn't the only choice. Carbon Copy Cloner offers
several different methods of backing up data: file-level copies from one hard drive to another, block-level copies, where
blocks of data are copied from one hard drive to another, disk image backups to a locally-attached or network shared
disk, and backing up directly to a disk attached to a remote Macintosh. Each of these backup methods has strengths and
different applicabilities, and each has different performance characteristics.
The following figure compares the performance of a file-level backup to that of the other backup methods.
Time to completion
A
B
C
D
E
F
G
H
Minutes
A: Locally-attached destination (block copy, no verification)
B: Locally-attached destination
C: Disk image on a locally-attached destination
D: Disk attached to another Mac mini (via "Remote Macintosh" in CCC's Destination menu)
E: AFP volume hosted by Mac mini
F: Disk image on AFP volume hosted by Mac mini
G: AFP volume hosted by Airport Extreme Base Station
H: Disk image on AFP volume hosted by Airport Extreme Base Station
Figure 1: Results from several benchmark runs using Carbon Copy Cloner 3.4.4 on a Mac mini (2.3 GHz Intel Core i5, 2GB
RAM) running Mac OS X Lion, 10.7.2. The source volume in each case was the stock 500GB SATA internal hard drive with a
21.12 GB data set that included OS X system files and a typical user's data set (308k files, 533K extended attributes, 1.7GB
total of extended attributes). To remove any effect of the underlying hard drive's performance, the destination volume (or
underlying destination volume) was always the same Hitachi Deskstar 750GB SATA hard drive attached directly to the
applicable device using the fastest interface available to the device. Each disk image was a new sparse bundle disk image
created by CCC prior to the backup. 1: The remote Macintosh was a Mac Mini, 2.4GHz Intel Core 2 Duo, 4GB RAM running
Mac OS X 10.6.8 Server. The two machines resided on the same gigabit ethernet network. 2: The network shared filesystem
was hosted via AFP on the aforementioned Mac mini and across the same network. The Airport Extreme Base Station was a
4th generation Airport Extreme 802.11n. The wireless capabilities of this device were not examined, it was accessed
exclusively over the same gigabit ethernet network as the other tests.
Block-level cloning
As illustrated by the results in Figure 1, block-level cloning with CCC is considerably faster than file-level copying
methods. To understand the difference in how a hard drive behaves during a block-level vs. file-level copy, consider this
analogy. Suppose you're at the grocery store and you're picking up groceries for the week. In the first scenario, you have
a list that is organized by aisle so you can cruise up and down each aisle only once, ending at the checkout. In the
second scenario, your list is organized alphabetically, so you end up making frequent visits to the same aisles multiple
times. In the end, you get all the groceries that you need, but the first scenario is clearly faster. When your hard drive's
reading and writing heads move from one aisle to the adjacent aisle, they copy the data much more efficiently than if they
are darting all over the disk getting the files in alphabetical order. Block-level copies tend to complete the backup in 50%
to 75% of the time that an equivalent file-level backup takes.
While block-level clones of an entire volume are quite a bit faster than an equivalent file-level copy, they do have some
disadvantages in certain scenarios. For example, if the destination volume already has a considerable amount of data on
it from a previous backup, a file-level backup will copy only the items that are different on the source and destination.
This subsequent file-level backup will often be much faster than re-cloning the entire volume. Block-level clones also
require that the source and destination volumes both be unmounted for the duration of the clone. While this typically is
not a hardship, it automatically excludes your startup disk. It is generally not worth putting the time and effort into
procuring a third volume from which to boot while cloning your startup disk. Unless you are transferring hundreds of
gigabytes from one volume to an empty, new, and larger volume, we recommend file-level copies for backing up your
startup disk.
Lastly, please keep in mind that block-level clones and file-level backups offer the same level of fidelity for your data. Do
not seek a block-level clone for comfort at the cost of time or convenience.
Backing up to a remote Macintosh
CCC offers a feature to back up directly to another Macintosh via the "Remote Macintosh..." item in the Destination
menu. With this backup method, CCC copies your data over a secure network connection directly to a hard drive
connected to another Mac. As demonstrated by the benchmarks in Figure 1, backing up to a remote Macintosh over a
gigabit network connection rivals the performance of backing up to a locally-attached hard drive. The performance gain is
even more marked when leveraging CCC's "Compress data passed over the network" option with a slower network
connection. In one test we were able to achieve data rates of 5.4MB/s over a connection with a theoretical max of
1.25MB/s. "Your mileage may vary", achievable compression depends on the nature of the data that you're backing up,
but this functionality is especially ideal for setting up automated offsite backups.
Backing up to network storage: Disk image containers vs. a folder directly on the
network sharepoint
Disk images are handy filesystem containers. Rather than having the entire contents of a filesystem exposed in a folder or
at the root-level of a hard drive, everything is stored in a single file. This allows you not only to store a backup of your
Mac on a non-Apple formatted disk without losing important filesystem metadata like ownership and permissions, it also
allows you to store your backup on a network shared filesystem (e.g. a disk attached to an Airport base station, another
Mac's disk accessed via AFP, a PC accessed via SMB). You can back up to a new or existing disk image in CCC by
choosing the appropriate menu item from the Destination menu.
Figure 1 illustrates the most important benefit of backing up to a disk image when the destination is a network shared
volume: performance. It's difficult, or impossible, to determine how a network appliance will perform based on its
specifications. Vendors of network appliances rarely report CPU specifications, choosing instead to report performance in
terms of bandwidth achieved. The actual bandwidth that you achieve, however, will be based on the number of files
you're copying, the file size distribution, and the number and size of extended attributes in the source data set. Copying a
single, large file to a network volume will achieve the maximum potential bandwidth, while copying lots of small files will
take ages.
Network appliances are well suited to the task of serving media to multiple workstations, but they aren't necessarily great
backup appliances. Media files are generally large and the required data rate for streaming media is relatively low.
Consider a 1-hour, 1GB HD movie file. Streaming 1GB over the course of an hour requires only 0.27MB/s. That's easy,
even over a weak wireless network! If you want to back up 100GB in an hour, and that 100GB is comprised of a million
smaller files, that's when you need some more muscle behind the file server, or you need to buffer the smaller writes
locally by using a disk image. The Airport Base Station folder-to-folder backup exemplifies this problem. Copying the
21GB data set to a hard drive attached to another Mac mini via File Sharing took an hour. When that same destination
disk was attached to the AEBS, the same backup task took 9 hours. Backing up that same 21GB of data to a disk image
on the same disk took only 28 minutes. That's an 18X performance difference!
Conclusions and recommendations
1. There is no performance advantage to backing up to a disk image when the destination volume is a locallyattached, HFS+ formatted volume.
If your destination volume is a locally-attached, HFS+ volume, we recommend backing up directly to a folder on this
volume.
2. Backing up to a disk image on a network volume offers a significant performance advantage.
If you are backing up to a network volume, we strongly recommend that you back up to a disk image on that
network volume. To make this easier and more transparent, CCC offers a preference to automatically create a disk
image on network volumes. Choose "Preferences..." from the Carbon Copy Cloner menu to access this setting.
3. Backing up directly to a remote Macintosh offers a modest performance advantage over backing up to a
disk image on the same disk accessed via file sharing.
Backing up directly to a remote Macintosh can also yield a bootable backup. If this is not required, however, or if
the setup required for backing up to a remote Macintosh is too daunting, we recommend backing up to a disk
image on the other Macintosh accessed via File Sharing.
4. Performance of network storage appliances varies wildly. Caveat emptor.
Network file sharing is a CPU-intensive task, so targeting an actual Mac or PC hosting the network sharepoint will
likely offer a significant performance advantage over cheaper network appliances.
Other factors that affect performance
More files = more seeking = longer backup times
Anything that increases the amount of seeking that your hard drive must do will have a noticeable impact on your backup
performance. A source volume with a high level of fragmentation, for example, will require a lot more seeking than a
volume with little fragmentation. The size distribution and total number of files will also affect the amount of seeking
required. For every file that is copied, the heads of the drive must first seek to the filesystem directory at the beginning of
the volume to determine where on disk the file resides, then seek out to that section of the platter to retrieve the file's
data. In general, the more files that you copy, the longer your backup time. Suppose, for example, that you have 10GB of
data to backup: transferring one hundred 100MB files will copy much faster than 100,000 100KB files. Putting this to the
test using the same gear as in Table 1, it took about 7 minutes to copy the 100 files whereas copying the 100,000 files
took nearly 12 minutes. To carry on the grocery store analogy from earlier, you can imagine that it would take a lot longer
to get all the rice that you needed if you had to purchase it by the kernel vs. by the bag.
Hard drive health can affect throughput and reliability
The health of the source and destination hard drives will also have an effect on your backup performance if their health is
poor. SMART status monitoring is one method of tracking drive health, though it only reports "fail" and "prefail"
conditions, it won't report on pre-threshold conditions that will start to degrade your backup performance (such as the
number of sectors that have failed). To track your hard drives' performance over time, you can periodically copy some
large files to your disks while monitoring disk activity in the Activity Monitor application to determine if their performance
characteristics have begun to change.
You get what you pay for — purchase quality cables and enclosures from reputable
dealers
The quality of the cables that connect the source and/or destination volumes to your computer, as well as the quality of
external hard drive enclosures will not generally have a direct effect on performance, but bad cables and poorly
architected enclosures can cause erratic behavior during various stages of the backup. During some of the benchmarking
tests performed for this article, for example, we encountered a USB cable that consistently caused the "Erasing the
destination" stage of a block-level copy to hang. It caused the same behavior in Disk Utility, and the behavior was
resolved by replacing the cable.
We've also seen cases where a particular hard drive enclosure works fantastically over one interface but fails at random
locations during backups over another interface. While "one good interface" is technically sufficient, we recommend
warranty replacement of enclosures that are defective on any interface.
Finally, some enclosures claim support for daisy chaining, but don't necessarily perform well in scenarios that involve
high-bandwidth data transfer between any two interfaces. This is purely anecdotal, but something to consider if you're
experiencing erratic behavior while daisy chaining devices off an external hard drive enclosure.
Competition can inhibit performance — try disabling bandwidth-hungry services like
Spotlight on the destination volume
Lastly, the architecture and speed of the computer's processor(s) can have an effect on backup performance, but usually
only if the computer is particularly slow, busy with other tasks, or if the source and destination volumes are capable of
very high-bandwidth transfers (e.g. hardware RAID). Considering other reasons not to back up your data while you are
heavily using the system, we recommend that you schedule your backup tasks to occur when you are not actively using
your computer.
Spotlight indexing is one particular process that CCC typically must compete with for disk bandwidth. As you copy new
data to your destination volume, for example, Spotlight wants to read those "new" files so it can index their contents.
Having a Spotlight index of your backup volume may be unnecessary as you probably want to search for files only on
your source volume. The Performance suggestions section of the documentation explains how to disable Spotlight
indexing for your destination volume.
Can CCC back up my BootCamp (Windows) partition?
CCC can back up the contents of the Boot Camp partition, but it cannot make a bootable clone of the partition. If your
goal is to back up your user data on the Boot Camp partition, CCC will meet your needs. If you're looking to migrate your
Boot Camp partition to a new hard drive, you might consider an alternative solution such as WinClone, or one of the
commercial virtualization solutions that offer a migration strategy from Boot Camp. CCC is not designed to
accommodate backing up or restoring Windows system files or applications.
"Will CCC clone both my OS X and Windows partition at the same
time?"
No, CCC will copy only one volume at a time, and CCC will not modify the partitioning of the destination disk. You should
apply your custom partitioning prior to restoring anything to your new disk.
"I'm migrating to a larger disk, will CCC work for my Windows volume?"
No, CCC will not create a bootable backup of your Windows volume. Creating a bootable backup of OS X is mostly trivial.
For Windows, there are numerous tweaks that have to be made — you must update the boot sector of the root target
device to point to the correct start sector of NTFS volume, the boot.ini may need to be updated with the slice number of
the partition, you have to restore the MBR, you must synchronize the GPT and MBR partition tables. Windows Vista+ has
yet more requirements.
"Will CCC copy my Parallels/VMWare virtual machine containers?"
Yes! These are just ordinary files as far as CCC is concerned, CCC can copy these just fine. Note that these files can be
quite large, so occasionally problems are encountered when these files are in use or when the destination volume does
not have sufficient space to accommodate the updated copy of the VM container file. These two sections of the
documentation address these matters:
Can I run a backup while I'm using my computer? If I have open files, will they be backed up?
"My destination has exactly enough space to accommodate the data on the source, why can't CCC complete the backup
task?"
Example pre and postflight shell scripts (e.g. how to automatically suspend Parallels)
"The disk usage on the destination doesn't match the
source -- did CCC miss some files?"
CCC doesn't copy virtual memory or the Trash
There are a couple legitimate explanations for a mismatch between the capacities reported in Disk Utility. First, some
system files and folders are excluded from a backup task either because they are regenerated every time your machine
reboots, or they are not appropriate to back up or because they won't work properly on another hard drive or computer.
The largest and most notable excluded item is the /private/var/vm/sleepimage file. The sleepimage file contains the live
state of your Mac's RAM, so it will be as large as the amount of RAM that you have installed. Considering that the amount
of RAM pre-installed is only increasing, and that this file changes constantly and gets recreated on startup, CCC excludes
this file from your backup task.
CCC also excludes the contents of the Trash, so you may want to empty the Trash, then compare again the source and
destination. An exhaustive list of the items that CCC excludes is included in the CCC Help section labeled "Some files
and folders are automatically excluded from a backup task".
If your source volume is the startup disk, the Size of Trash and VM application will quickly tell you exactly how much data
is in these folders that CCC is excluding. In most cases, this explains all of the discrepancy that users notice during an
initial backup task.
The sum of all your files may never match the disk usage value reported
by Disk Utility
While the exclusion of these items explains much of the disk capacity discrepancy you may discover in Disk Utility, it
does not explain it all. A user suggested the following scenario after cloning his entire source to his destination drive:
Boot drive - 39.67 GB used
Backup drive - 38.55 GB used
Should I be concerned there's more than a GB missing? Could this be a swap file or something? Is there an
easy way to isolate what files are not on both?
One GB seems like a lot, but it's not surprising, not for 40GB used (the discrepancy increases with the amount of data on
your boot volume). Discrepancies like this are not uncommon when you're booted from the source or (subsequently) the
destination.
The issue is that Disk Utility (and Finder Get Info for the volume) is misleading. The value that Disk Utility reports is indeed
the amount of space consumed on your hard drive, however, it is not the amount of space consumed on the drive by all
the files and folders that you can see. And I'm not referring to the other files as simply "invisible", these other files and
directories that make up the rest of the space you're "missing" are simply not presented to the operating system. These
items are filesystem implementation details, and it isn't possible to copy them directly with file-level copying tools.
Does this mean you're losing data? Absolutely not. It's pretty easy to prove it to yourself too, just boot from your cloned
volume and take a look at the capacity reports in Disk Utility. Here's an example we performed on a test machine:
** Booted from the original source volume
Source: 5,258,776,576 bytes
Clone: 5,025,562,624 bytes
**Booted from the clone volume
Source: 4,996,599,808 bytes
Clone: 5,250,097,152 bytes
Disk Utility can't really be used as a good measure of success for your clone. That's not to say that what it reports is
wrong, it simply isn't telling the whole story.
"Right, OK, but how can I tell that all of my data was actually copied?"
The numbers reported by Disk Utility and Finder for total disk usage on the source and destination are essentially
irrelevant if they can't be meaningfully compared. What can be compared, however, is a basic enumeration of the files
and folders on your source and destination volumes. The Volume Disk Usage Details tool can help you collect this kind of
thorough enumeration. When this tool has completed collecting this enumeration for your source and destination
volumes, you can compare the reports to find any discrepancies. You can use this tool to enumerate individual folders as
well if you need to get more granular details about a discrepancy in a particular folder. Note: This utility has not been
tested for use on network volumes. It can do no harm, but you may encounter permissions errors with items on network
volumes, or it may simply report inaccurate values for those volumes. We recommend using this tool only on locallyattached volumes or mounted disk images.
If you find a discrepancy that you cannot explain, or that appears to be errant, please let us know and we'll help you get
to the bottom of it.
Will CCC clone Apple's "Recovery HD" partition?
Carbon Copy Cloner offers complete support for archiving, cloning, and recreating Apple's Recovery HD partition. See
the "Cloning Apple's Recovery HD partition" section of CCC's Disk Center documentation for more details.
Some applications behave differently or ask for the serial
number on the cloned volume. Did CCC miss something?"
Some applications won't work when transferred to a new disk or when run on a different Mac. This has nothing to do with
whether or how CCC backs up your data, it comes down to the serialization requirements imposed by the software
vendor (e.g. their anti-piracy strategy). Some applications will work just fine, some will simply require that you re-enter
your serial number, while other applications will require a reinstallation from the original install media or online reactivation
via the vendor's website. CCC cannot (technically or legally) subvert activation requirements imposed by other software
vendors.
Also note that some applications consider the presence or absence of peripherals as well as other hardware
characteristics during the installation process. If these conditions are different when running the application on a new
hard drive or Macintosh, you may encounter problems. We have seen these types of problems with some high-end audio
software packages in the past, particularly with the installation or configuration of various plugins.
We recommend that you always retain a copy of your applications' installation disks and serial numbers in case the
applications have special serialization or installation requirements.
Non-registration-related, application-specific oddities
In addition to application registration issues that occur when running your apps on a new volume, there are occasionally
other oddities that you may encounter when booting from your cloned volume. The following is a list of potentially
unexpected behavior that has been reported to us that a) appears to be a consequence of running an application from a
different volume or on a different Macintosh and b) does not appear to be or cannot be accommodated/resolved in the
backup/cloning process:
Dropbox may ask you to reconfigure your account settings
A dialog may appear asking you to locate the "System Events" application (this one appears to be a one-time deal,
dismiss the dialog and you shouldn't see it again)
Time Machine may no longer recognize your original source volume because the UUID has changed (potential
solution)
"Google Drive" must be disconnected, then reconnected to your account. Details here
Lion or later: Finder preferences may not be respected (e.g. whether to show disks on the Desktop, the contents of
the "All my files" item may be empty)
Photoshop may require that you reset the Scratch Disk preference potential solution
Finder may not resolve aliases to files on a backup volume if those aliases were created on Snow Leopard or later.
Finder will give you the opportunity to "readdress" these aliases when you try to open them.
Network settings may not be respected on another Macintosh. If you have an extensive VPN configuration that you
want to preserve, we recommend that you export those settings to a file before you lose access to the original Mac.
References to third-party solutions/workarounds are provided as information only. We have not tested these solutions
and we cannot endorse them.
"A block-level copy cannot proceed due to media errors"
When Carbon Copy Cloner performs a block-level clone of your source volume to your destination volume, it proceeds in
two stages: the cloning stage and the verification stage. Before it begins, both the source and destination are unmounted
to prevent any external modifications to each filesystem. During the cloning stage, blocks are read from the source
volume and written to the destination volume. While blocks are read from the source volume, a checksum of those blocks
is calculated. In the verification stage, the blocks that were written to the destination are now read back and another
checksum is calculated. The destination volume's checksum is then compared to the source volume's checksum. If these
two values do not match, CCC will display an error message that "A block-level copy cannot proceed due to media
errors".
Verification errors are occasionally the result of errors in hard drive drivers, defective hard drives, or defective cables,
hard drive enclosures, etc. Resolving these hardware problems may allow your backup task to continue through to
completion without error. Typically, though, verification errors are a result of the failure of one or more sectors of media
on the source or destination volume.
What can I do to "fix" this problem?
The challenge in resolving this problem is determining what files are sitting on bad media. Because a block-level copy
doesn't copy individual files, it doesn't know what file is associated with the block that it failed to read. Instead of
repeating the backup task with the same settings, we recommend that you try the cloning task with a file-level clone
instead. During the file-level backup, the exact files affected will be exposed and all the intact files will be backed up fine.
Getting more information about what is happening during
the backup
Carbon Copy Cloner logs its activity to a file located at /Library/Logs/CCC.log. You can use this log to verify the
productivity of your scheduled tasks. To view CCC's log file, choose "CCC Log" from the Window menu. Beta versions of
CCC will produce more output than non-beta versions. Additionally, you can manually enable debug logging by choosing
"Enable Debug Output" from the Help menu.
Debugging output is only useful to the developer, so don't enable debug logging unless instructed to do so for support
purposes. CCC imposes a size limit of 512KB on the log file. When this limit is reached, the log is rolled over.
Comment on the "Data copied" figure reported in the CCC.log
This value indicates the data written that was actually consumed as disk space. For example, suppose you have a plain
text file that contains nothing more than "I really love cheese". That file that occupies a single 4Kb block (4,096 bytes) on
the disk, but it only consumes 20 bytes of the block. The "Data copied" figure represents the accumulation of those 20
byte values. This figure will *not* correspond to the value of disk usage indicated in Disk Utility (not even close in most
cases), Disk Utility reports the number of blocks occupied multiplied by the size of the block.
Note that the " Total data in file set" figure is also not necessarily representative of all the disk usage on your source
volume. This figure does not include unmodified extended attributes — to determine the size of extended attributes, CCC
would have to read each one. Reading each extended attribute regardless of whether it was modified would consume
unnecessary CPU cycles and would make the backup task take much longer than necessary. This is especially notable
when making a backup of an OS X system volume, because 3-5GB of disk space is consumed by compressed data
stored in extended attributes.
Can I run a backup while I'm using my computer? If I have
open files, will they be backed up?
Yes and no, it really depends. Performance will be affected during the clone (especially the first one) as CCC reads the
entire source volume and writes to the destination volume. If your work is "disk bound" -- that is your applications are
reading or writing to either the source or destination, then you'll notice a performance hit. If you're just reading email or
writing a Pages document, then you probably won't notice the performance hit.
Affecting the accuracy of the backup task is something else that should be considered. Typically it's OK to work from the
source volume while you're copying it, with the understanding that if CCC copied a file, then you open it, make changes,
save it, then CCC completes the backup task, the modified version of your document is not backed up (this time around).
Typically that's no big deal, the modifications will get backed up the next time the backup task runs. More importantly,
though, if you're working with large files (mounted disk image, Entourage email database, VMWare/Parallels container)
during the backup operation, it is possible that those large files could be modified while CCC is backing up that file. This
won't affect the source file, but there's a good chance that the backup version of that file will be corrupt. For this reason it
is a good idea to stop using applications that may be modifying large files.
What makes a volume bootable?
Bootability comes down to a few simple rules:
1. The hard drive enclosure must support booting a Macintosh (applies to external hard drives only)
2. The computer must support booting from the interface used to attach the hard drive (e.g. USB, Firewire, eSATA)
3. The computer must support booting from the hard drive's partition format (e.g. APM vs GPT vs MBR)
4. The cloned filesystem must have all the required components of OS X
5. The cloned operating system must be properly "blessed"
When you buy a hard drive enclosure that you intend to use to boot your Mac, caveat emptor -- not all enclosures will
boot a Mac (or any machine for that matter). Be sure to check that the manufacturer or vendor supports booting a Mac
with the enclosure. You may even have to pay attention to whether they support booting your particular architecture (e.g.
PowerPC vs. Intel). Some Western Digital enclosures cannot boot a Mac. If you can't find solid proof that an enclosure
will boot your Mac, don't buy it.
The interface that is used to connect the hard drive enclosure to your Mac also has an effect on bootability. PowerPC
Macintoshes can not be booted from enclosures attached via USB. Intel-based Macs can be booted from hard drives
connected via Firewire or USB. Both platforms can boot from hard drives installed internally. Both platforms can also
boot via the eSATA interface, though bootability support varies for third-party eSATA adapters. You can ask your eSATA
adapter vendor whether the device will support booting OS X when installed in your particular Macintosh.
Once you have your new hard drive (in an enclosure or installed into your computer), you need to a) apply a partitioning
scheme to the disk and b) format one or more volumes on the disk. Even if you do not plan to "partition" the disk, that is,
slice the disk into smaller volumes, you still need to apply the correct partitioning scheme to the disk. Every disk has a
partitioning scheme, even if it only has a single volume. I go into plenty of detail on this in this section of the
documentation, so I won't rehash it here. Suffice it to say that PowerPC Macs and Intel Macs boot from different partition
schemes, and each from a different partition scheme than what the overwhelming majority of hard drives ship with.
Rules #1, #2 and #3 are external to the functionality of CCC. CCC will not apply a partition scheme to your disk, nor will it
affect or modify your partition scheme in any way*. Also, if a hard drive enclosure won't boot OS X, there's no software
solution that will resolve that problem. Once you're sure you have those rules in hand, we can look at rule #4.
* OK, there's a small caveat to this for complete transparency. When doing a block-level clone, CCC will reformat the
destination volume. As a result, it must update the partition table entry for the destination volume. Functionally, however,
CCC is having no substantive effect on the partitioning of your disk.
Rule #4 is pretty intuitive -- if you want the operating system to boot, it must be whole. If you've cleared rules #2 and #3,
CCC will tell you whether your destination will have all the necessary components to boot OS X. I should be clear that this
is not exhaustive -- CCC will verify that the following items are present on the source and will be copied in their entirety to
the destination volume:
/Library
/System
/bin
/etc
/mach_kernel
/private
/sbin
/tmp
/usr
/var
So, if you choose to exclude /Applications or /Users for example, the cloned volume would still very likely boot. How
much functionality you'd have is another story. Likewise, if the source volume's OS is not whole and, as a result, not
bootable, CCC doesn't do an extensive analysis of the OS to confirm that it will boot. The bottom line, though, is that
CCC will give a pretty good indication about whether your destination volume will have the right OS components to
actually boot.
Rule #5 is perhaps the least understood (and most technical), so I'll do my best to explain it here. When a Macintosh
boots, this happens:
1. The computer performs a Power On Self Test. When that test succeeds, you hear the characteristic Macintosh
startup chime.
2. The computer's pre-boot firmware (software that is embedded in a chip on the computer's motherboard) takes
account of the hardware that is present, builds a device tree, and determines which hardware device to boot from
(more on this in a bit). For the sake of simplicity, let's suppose a machine is configured to boot from particular
volume on a particular hard drive.
3. The firmware of the computer accesses the filesystem of that volume and determines the location of the file, or
folder containing the file, that is "blessed" to initiate the operating system.
4. That file is executed by the firmware and control of the hardware is handed over from firmware to the booter.
5. The booter executes the kernel of the operating system and pre-loads a kernel extensions cache.
6. The kernel initiates the rest of the boot process (primarily by executing launchd)
The gist of all of this is that every bootable volume must indicate the location of the system folder. The path of the folder
turns out to be irrelevant, because the HFS+ filesystem simply stores the "inode" of this particular folder. The inode is
basically like a street address for the file, it indicates where on the disc platter the folder is located. This information is
stored in the HFS+ Volume Header, but you can easily see the current state of this information using the "bless"
command in the Terminal application. For example:
bash-3.2# bless --info "/Volumes/Backup"
finderinfo[0]: 116 => Blessed System Folder is /Volumes/Backup/System/Library/CoreServices
finderinfo[1]: 546345 => Blessed System File is
/Volumes/Backup/System/Library/CoreServices/boot.efi
finderinfo[2]: 0 => Open-folder linked list empty
finderinfo[3]: 0 => No OS 9 + X blessed 9 folder
finderinfo[4]: 0 => Unused field unset
finderinfo[5]: 116 => OS X blessed folder is /Volumes/Backup/System/Library/CoreServices
The relevant information in this case is that the blessed system folder is at inode 116, and that path (for the human
reader) is /System/Library/CoreServices. PowerPC-based Macs need only this piece of information to boot. PPC Open
Firmware will find that directory, then execute the file named "BootX" within that directory. Intel-based Macs also use the
"Blessed System File" information. In this case, that is the file at inode 546345 and (again, for the human reader), that file
is located at /System/Library/CoreServices/boot.efi.
If you ever need to bless a volume manually (for example, if CCC indicated that it was unable to bless the volume), you
could run this command in the Terminal application:
sudo bless -folder "/Volumes/Backup/System/Library/CoreServices"
It is important to note that blessing a volume is different than specifying a boot device. Blessing a volume simply updates
the information in the HFS Volume Header that indicates where the blessed system folder and file are located. When you
specify a particular volume as the startup disk, on the other hand, the computer stores a reference to that volume in the
"Non volatile RAM" -- basically a small section of RAM whose contents are not lost when the machine loses power or is
shutdown. The importance of this disctinction, and all four of these rules for that matter, is that simply setting a volume as
the startup disk may not be sufficient to actually boot from that volume.
Can I back up one computer and use the clone to restore
another computer?
As long as the architectures match (e.g. intel vs. ppc), then the answer is **probably yes**. However, there are two
caveats.
1. Some of your preferences on OS X are considered "host-specific." Preferences such as these will be ignored if you
boot your cloned operating system and data from another machine. For example, the screen saver preferences are
host-specific -- if you boot another machine from your bootable clone and the screen saver kicks in, you will notice
that it has reverted to default settings. Do not fear that you have lost any data, your original preferences will be
"restored" when you boot again from your original computer. To learn exactly what preferences are host-specific,
navigate in the Finder to your home directory, then to Library/Preferences/ByHost.
2. Don't install older versions of Mac OS than what comes with your computer. When you get a brand new Mac from
Apple, it usually has a specific version of OS X installed on it, and further, a specific "build" number. If you install an
older version or build of the OS, for example by cloning your older Mac to it, then it may behave unexpectedly.
When migrating your old Mac to your new Mac, be sure that your old Mac has been updated to at least one later
release than what came on the new Mac. For example, if your new Mac came with 10.4.7, update your old Mac to
10.4.8 before migrating. If such an update is not available, use the Migration Assistant instead.
Determining whether this type of clone will work for you is really easy — simply boot the destination Mac from the source
Mac or from a backup of the source Mac:
1. If both the source Mac and the destination Mac have Firewire ports, boot the source Mac into Target Disk Mode by
holding down the "T" key on startup, then attach the source Mac to the destination Mac with a Firewire cable. If not,
attach a backup of the source Mac (or the source Mac's hard drive in an external hard drive enclosure) to the
destination Mac with a Firewire or USB cable.
2. On the destination Mac, open the Startup Disk preference pane in the System Preferences application and set the
source Mac's volume as the startup disk, then click the Restart button.
If the destination Mac booted from the source Mac's installation of OS X, launch CCC then clone the source Mac's disk
to the destination Mac's internal hard drive. If the destination Mac could not boot from the source Mac's installation of OS
X, use the Migration Assistant to transfer your user data and applications instead.
Apple Kbase #HT2186: Don't install older versions of Mac OS than what comes with your computer
Apple Kbase #HT2681: What's a "computer-specific OS X release"?
Computer-specific preference files -- caveats to migrating to
a new computer
Some application preferences on OS X are considered "host-specific." Host-specific preferences will be ignored if you
boot your cloned operating system from another Macintosh. For example, the Launchpad (Lion+) and screen saver
preferences are host-specific -- if you boot another Macintosh from your bootable clone, you will notice that Launchpad
and the screensaver are reflecting the default settings. This does not mean that CCC did not preserve your preferences
files, it simply means that these applications do not respect the preferences files while booted from another Macintosh.
Do not fear that you have lost any data, your original preferences will be "restored" when you boot again from your
original computer.
Host-specific preferences may also be ignored if you have your computer's motherboard replaced. In this case, it will be
necessary to reapply your preferences in these applications.
To learn exactly what preferences are host-specific, navigate in the Finder to your home directory, then to
Library/Preferences/ByHost.
Network settings may not be respected on another Macintosh
In addition to application-specific preference files, the network configuration of one Mac may not be accepted by another
Mac. OS X network settings are stored in /Library/Preferences/System Configuration/preferences.plist, and CCC will copy
that file unless you explicitly exclude it. Sometimes a Mac will respect the settings configuration file from another Mac,
but often there are enough differences in the networking hardware configuration that OS X decides to ignore the contents
of that file.
Cloning a Time Machine backup
Can I use Carbon Copy Cloner to clone my Time Machine backup?
For important, albeit technical reasons, Carbon Copy Cloner will avoid backing up a Time Machine backup set in a filelevel copy. It is often possible, however, to clone a Time Machine volume with CCC using a block-level copy:
1. Enable the "Block copy" button in CCC's preferences: choose "Preferences..." from the Carbon Copy Cloner menu
and check the box to "Indicate when a block-level clone is possible"
2. Choose your source and destination volumes in CCC's main window
3. Click the "Block copy" button to require a block-level copy
4. Click the Clone button
Time Machine is a highly proprietary Apple device, and the block-copy tool that CCC uses to clone it is also Apple
proprietary. Given the limited access that CCC has to the implementation details of both Time Machine and the blockcopy tool, support for cloning Time Machine volumes is "Best Effort", and we cannot offer additional support for moving a
Time Machine backup to a different volume when CCC's block copy method is unable to complete the task. If CCC
refuses to permit a block copy or reports an error while attempting to clone a Time Machine volume, we
recommend that you attempt to use Disk Utility's Restore functionality to clone the Time Machine volume instead.
Backing up Time Machine sparsebundle disk images (file-level backups)
When Time Machine is configured to back up a Macintosh to a network volume, Time Machine stores the backup in a
sparsebundle disk image. CCC has no problem copying these sparsebundle disk image files. In fact, CCC quite capably
copies only the bands within the sparsebundle that have changed, so you can add CCC to this type of setup for a second
tier backup to an offsite network share.
CCC excludes the Backups.backupdb folder at the root level of a volume by default. However, you can choose "Choose
a folder..." from CCC's Source menu and choose that folder directly to configure CCC to back up the sparsebundle disk
images. Note that the only items in a Backups.backupdb folder that CCC will copy are sparsebundle disk images. Other
folders, e.g. local Time Machine backups will be excluded. Further, CCC will only consider sparsebundle images for
deletion in a Backups.backupdb folder on the destination. Other items in this folder on the destination will be protected
from deletion.
In summary, when it comes to backing up a Time Machine backup, CCC will only back up sparsebundle disk images
during a file-level copy in which you explicitly choose the Backups.backupdb folder as the source, whereas the entire
Time Machine Backup will be copied during a block-level copy.
The technical reasons for excluding a Time Machine backup from a file-level copy
Time machine uses a feature of the HFS+ filesystem that was introduced in Leopard called "directory hard links". Like file
hard links, a directory that is hard linked to another directory is not actually a new directory, it is simply a pointer to the
previous directory. Time Machine uses these hard links to make references to entire directory trees whose contained files
have not been modified. To properly clone a Time Machine backup, these directory hard links must be preserved.
Directory hard links are proprietary to Apple. Apple discourages their casual use by third party developers because, used
incorrectly, they could create devastating looping directory structures that would render a volume useless. For this reason
and others, support for directory hard links has not been implemented in CCC's file-level synchronization engine. CCC's
block-level cloning engine, on the other hand, does preserve directory hard links, and is therefore capable of cloning a
Time Machine volume.
Cloning a Time Machine volume that has failed sectors or filesystem corruption
If your Time Machine volume has become corrupted and Time Machine refuses to use it due to this corruption, you may
turn to CCC thinking that cloning it to a new, "clean" volume will solve the problem. Unfortunately, CCC will not help you
solve these kinds of problems. When you clone a volume with a block-level copy, filesystem corruption is preserved. In
these cases, we concur with Apple's advice to start a new Time Machine backup from scratch.
Antivirus software may interfere with a backup
Some antivirus applications may prevent Carbon Copy Cloner from reading certain files, mounting or unmounting disk
image files, or, in general, degrade the performance of your backup. In some cases, antivirus applications can even affect
the modification date of files that CCC has copied, which will cause CCC to recopy those files every time as if they have
substantively changed. In another case, we have seen such software create massive cache files on the startup disk
during a backup, so much so that the startup disk became full. We recommend that you temporarily disable security
software installed on your Mac (e.g. for the duration of your backup task) if problems such as these arise.
If you experience problems copying files and note that error messages such as "Operation not permitted" are reported in
relation to the problem:
1. Determine whether the files in question are being quarantined by your antivirus software. Perform a system scan
with your antivirus software and address any issues that are reported. Please refer to the Help documentation
associated with your antivirus product for more information.
2. If the problem persists, try running your backup task with the antivirus software temporarily disabled.
If these steps do not address the issue, or if you do not have antivirus software installed, please start a discussion in the
Discussions area of the Help Desk.
"CCC copies every file, every time!"
Some anti virus applications tamper with file modification dates. After CCC has copied a file to the destination, the very
last thing that it does is to set the file's modification date to the modification date of the source file. This filesystem
activity prompts the AV software to scan the file, which is generally OK (albeit with a performance hit to the backup task).
Reading a file is not sufficient to change the file's modification date, so well-written AV applications should cause no
harm by scanning the files that CCC copies. When an AV application "touches" the file, however, or otherwise makes
changes to the file, the modification date will be updated to the current date.
CCC's default settings instruct it to copy a file whenever the size or modification date of the file is different on the source
and destination. This includes the case where the modification date of the file on the destination is newer. If you cannot
resolve the modification date tampering of your AV software, you can configure CCC to only copy files that are newer on
the source:
1. Choose your source and destination in CCC's main window
2. Click the "Customize these settings" button
3. Check the "Don't modify files that are newer on the destination" box
4. Save your settings and proceed with your backup task, or click the "Schedule this task" button to create a new
scheduled task
"CCC found multiple volumes with the same Universally
Unique Identifier"
Occasionally a circumstance arises in which CCC presents the following error message before creating or running a
scheduled backup task:
CCC found multiple volumes with the same Universally Unique Identifier that was associated with the
volume you designated as the source for this task.
CCC cannot proceed with confidence in having correctly identified the volume you originally chose when you
configured this backup task. Unmount one of the conflicting volumes and try the task again, or please choose
"Ask a question" from CCC's Help menu to get help resolving the issue.
Most modern operating systems apply a universally unique identifier to a new volume when you format that volume (e.g.
in Disk Utility). Volumes should never have the same identifier, these identifiers are called "universally unique" because
they're suppose to be unique, universally! Wikipedia notes that, for 122 bit UUIDs, there is a 50/50 chance of having a
single duplicate UUID if 600 million UUIDs were allocated to every person on Earth. The chances of two volumes having
the same UUID should, then be slim enough that the UUID can be reliably used to positively identify the source and
destination volumes.
Given these odds, it is statistically more likely that CCC's discovery of a duplicate UUID is due to a hardware or software
problem rather than to two volumes randomly having the same UUID. Therefore, CCC makes the conservative decision to
not back up to either volume if another volume with the same UUID is detected.
Unfortunately, it has come to our attention that many Iomega drives that are pre-formatted for OS X are stamped with the
same UUID at the factory (BDFE6D09-7483-3479-B37F-0BE15F9CBFBB). As a result, this situation can arise if you own
and attach two "factory fresh" Iomega hard drives to your computer.
There are two solutions to this problem:
1. Reformat one of the affected volumes in Disk Utility. A new UUID is generated every time you reformat a volume.
2. In the Settings tab in the scheduler window, you can uncheck the box that indicates CCC should use "Strict volume
identification"
To determine the identity of the two affected volumes, choose "CCC Log" from CCC's Window menu.
I have a clone created by another application. Will CCC
recognize that data, or will it want to recopy everything?
CCC always examines the files on the destination to determine if they already match those on the source. If you have a
volume that is virtually identical to your source, CCC will copy only the items that are different between the two volumes.
Scenario 1: Clone created by another cloning utility
If the software you used previously created a non-proprietary clone of your source to the destination, then CCC will copy
only the items that have changed since you created the backup. CCC doesn't care what application you used to copy the
files previously, only whether the files match based on name, path, and modification date.
Scenario 2: I replaced my hard drive with an SSD, and now I want to
use the HDD as my backup
Whether you cloned your HDD to the SSD or used Migration Assistant to get your data there, the bulk of the data on your
HDD and SSD are identical. Once again, CCC doesn't care how the data got there or what application put it there, CCC
will copy only the items that are different between the two volumes.
Scenario 3: My backup is in a folder on the destination. Why is CCC
recopying everything?
The common use of CCC is to create a bootable clone of your startup disk. To do this, CCC copies all of the stuff from
your source volume directly to the destination volume — not into a subfolder, but directly to the destination. At the end of
the task, the destination looks exactly like the source. Typically you see "Applications", "Library", "System", and "Users"
on the source volume, so that's exactly what you should see on the destination volume.
If your previous backup was placed in a folder, however, then you must instruct CCC to place your backup into that same
folder (assuming that's what you want — OS X will not work when placed in a folder on the destination). To do this,
choose "Choose a folder" from the Destination menu to select the folder that your backup should be placed into.
Finder or App Store finds other versions of applications on
the backup volume
Occasionally we receive reports of odd system behavior, such as:
When opening a document, the application on the backup volume is opened rather than the version from your
startup disk (e.g. Programs launching from the back up drive)
When trying to update an application in App Store, the update appears to fail -- the older version is always present
(e.g. Aperture not updating)
The destination volume cannot be (gracefully) unmounted because various applications or files are in use (e.g.
Cannot eject the cloned drive)
These problems consistently go away if the destination volume is ejected.
These problems are ultimately caused by problems with the LaunchServices database, which is an issue outside of the
scope of the backup process. There are two things that you can do to address the problem:
Disable Spotlight on the destination volume
Disabling Spotlight indexing on the destination volume should prevent new additions being made to the LaunchServices
database that references the destination. Open the Spotlight preference pane, click on the Privacy tab, then drag your
destination volume into the privacy tab. Check whether applications still open by default from the destination volume,
because this step may be enough to address the issue.
Reset the LaunchServices database
If applications still open from the destination volume, you can use this Reset LaunchServices Register application to reset
the LaunchServices database, then restart your Mac.
Advice from the experts
The Cloning Coach: Expert advice for common error conditions
The Disk Center
Help! My clone won't boot!
Backing up large files, mounted disk images, and FileVault home directories
Performance Suggestions
A closer look at how CCC determines the "bootability" of a destination volume
How frequent should my backups be?
The Cloning Coach: Expert advice for common error
conditions
There is no end to the number of hardware and filesystem problems that could affect your Mac's hard drives. Filesystem
and media corruption are commonplace, and now CCC delivers expert advice to you when the errors occur. The Cloning
Coach is a window that will appear at the end of a backup task if "transfer errors" occurred during that backup task.
Transfer errors are errors that affect individual files or folders and not the backup task as a whole. CCC enumerates these
errors, analyzes them for common conditions, then explains the problem in simple terms with down-to-earth advice for
fixing the problem.
Getting help for common errors
When errors occur, CCC will categorize the error and offer troubleshooting advice. For some errors, CCC will offer helpful
buttons at the bottom of the window that will for example, take you to Disk Utility or reveal a corrupted file in the Finder.
Click on each error to see what CCC recommends to resolve the error. If you're stuck or overwhelmed, or if CCC's advice
alone isn't helping you resolve the problem, click the "Help Me!" button to submit a summary of the problem to the
Bombich Software Help Desk.
Troubleshooting hardware problems
Sometimes hardware components die slow and annoyingly inconsistent deaths. At one moment, it appears that you can
copy data to the disk and use it ordinarily. In the next moment, you're getting seemingly random errors, hangs, crashes,
the destination volume "disappearing" in the middle of a backup task and other unruly behavior.
When hardware fails in this way, it's nearly impossible for the OS or CCC to pop up a dialog that says "Hey, it's time to
replace XYZ!" Instead, you have to dig a little deeper, rule out components, try replacements, etc. to isolate the faulty
component.
When CCC suggests that you might have a hardware problem, here are the steps that we recommend that you take to
isolate the problem. Repeat the backup task between each step, and stop if something has resolved the problem:
1. If the affected volume resides on an external hard drive, detach that disk from your Mac, then reattach it. Otherwise,
restart your Mac before proceeding. Unmounting and remounting a volume can solve a lot of transient filesystem
problems.
2. Run Disk Utility's "Repair disk" tool on the source and destination volumes. Filesystem problems are commonplace,
and easy to rule out. If you discover filesystem problems on your startup disk, boot from your CCC backup volume,
the Mac OS X Installation DVD, or Apple's Recovery volume to run Disk Utility so you can repair the problems.
3. If you have any other hardware devices attached to your Mac (e.g. Firewire or USB webcams, printers, iPhones —
anything other than a keyboard, mouse, and the source/destination disks), detach them. If your source or
destination volume is plugged into a USB hub, keyboard, or display, reconnect it to one of your Mac's built-in ports.
4. Replace the cable that you're using to connect the external hard drive enclosure to your Mac (if applicable). A bad
cable could cause reads or writes from/to the external hard drive to "block", which can lead to a hang. Bad cables
don't necessarily cause failures altogether, sometimes they just cause flaky behavior. I have a cable, for example,
that works fine in general, but makes it impossible for Disk Utility to reformat the disk (causing a system hang).
5. Try connecting the external hard drive enclosure to your Mac via a different interface (if applicable)
6. Try the same hard drive in a different external hard drive enclosure.
7. Reformat the hard drive in Disk Utility. Choose the "Write zeroes" security option to ferret out any media damage.
8. Replace the hard drive.
Troubleshooting "Media errors"
Read errors are typically a result of media damage — some of the "sectors" on the hard drive have failed and OS X can
no longer read data from them. Read errors can occur on the source or destination volume. When read errors occur,
the file or files that are using the bad sector must be deleted. The steps below indicate how to resolve media errors.
1. Click on the affected item in the Cloning Coach window, then click on the "Reveal in Finder" button.
2. Move the affected files and/or folders to the Trash.
3. Empty the Trash.
4. If you had to delete a folder, launch Disk Utility and use the "Repair Disk" tool to clean up any related filesystem
damage on the affected volume.
5. If you had to delete items from your source volume, locate those items on your backup volume and copy them back
to the source (if desired).
Once you have deleted the affected files, you should be able to re-run your backup task with success.
"But Disk Utility says that there is nothing wrong with the disk!"
While it is generally a good practice to run Disk Utility's "Repair volume" utility when you run into problems with your disk,
note that Disk Utility does not scan for bad sectors, it only checks the health of the filesystem. Additionally, the
SMART status that is reported in Disk Utility will report "Verified" unless the drive is in a pre-fail condition — i.e. failure is
imminent. Bad sectors will not be reported by Disk Utility.
Individual sector failures are not uncommon, and not necessarily indicative of imminent drive failure. A full-volume backup
of your hard drive is a great method for detecting media problems with sectors that are in use because it requires reading
data from each of those sectors. If you only see a handful of affected files, delete those files as described above and
continue to use the disk. If you see dozens or hundreds of these errors, however, there could be a more significant
problem at play. These kinds of problems are described in more detail below.
"The backup task is hanging, what can I do?"
Several hardware-related problems can cause CCC to hang or stall during a backup task. When CCC hangs on the same
file in repeated backup tasks, it typically suggests that the file is sitting on bad media. While CCC typically won't hang on
a single file for a very long time, it's possible for several smaller files clustered together on a bad section of media to
make it appear as if CCC is stuck. Also, if your source volume is your Mac's startup disk, OS X may become
unresponsive. This type of hang is unfortunately unavoidable when media corruption occurs on your startup disk. CCC
can help you identify the affected files, though, and lead you on your way to addressing the corrupted media problem.
While it is generally a good practice to run Disk Utility's "Repair volume" utility when you run into problems with your disk,
note that Disk Utility does not scan for bad blocks, it only checks the health of the filesystem. The easiest way to
confirm whether you have a bad file is to exclude the file (or the entire folder containing the file) from your backup task. If
your backup task is hanging on a particular file, do the following to resolve the underlying problem:
1. Wait at least five minutes. If the current file or "Data copied" figure has not changed in 5 minutes, CCC is stuck.
2. Make a note of the file or folder that CCC is currently attempting to copy.
3. Stop the backup task by clicking on the Stop button. If the Stop button does not accept your click, you can detach
the destination volume from your Mac or turn off the destination volume to break the deadlock. Turning off your
Mac should not be necessary to cancel the backup task.
4. If you have any other hardware devices attached to your Mac (e.g. Firewire or USB webcams, printers, iPhones —
anything other than a keyboard, mouse, and the source/destination disks), detach them. If your source or
destination volume is plugged into a USB hub, keyboard, or display, reconnect it to one of your Mac's built-in ports.
5. Repeat the backup task.
6. If CCC hangs on the same file, stop the backup task again.
7. In the list of items to be copied under the Source menu, navigate to the item that CCC was last trying to copy.
8. Deselect the item that CCC was last trying to copy and/or its containing folder.
9. Repeat the backup task.
CCC will rescan the source volume, but will pick up where it had left off in the previous backup task. When you have
identified the file or folder that CCC had trouble backing up (e.g. your backup runs through to completion after excluding
an item), delete or replace the affected item(s) with a known good backup, then repeat the steps above, reselecting the
affected item(s) in step 7.
Errors on read or write caused by physical drive malfunction
Occasionally input/output errors are reported when a mechanical failure is preventing OS X from reading a portion of the
hard drive. Failures such as these are sometimes characterized by unusual noises coming from the hard drive (especially
repetitive clicking noises) and slow performance of the affected hard drive. CCC may also appear to "hang" when it
encounters these kinds of errors. If you are booted from the affected hard drive, you may notice that OS X seems quite
unresponsive.
If your source or destination hard drive is experiencing physical malfunction, you may have a narrow window of
opportunity to back up the data from that disk to another hard drive. Time is precious; components could fail at any
moment rendering the drive completely unmountable. Read activity is stressful on a dying volume, especially a fullvolume backup. We recommend that you immediately back up the files that are most important to you. When you have
backed up the most important data, next try to do a full-volume backup. When all of your important files are backed up,
you may also try running a filesystem repair utility (e.g. Disk Utility's "Repair Disk" tool) if signs of imminent failure are not
present (e.g. particulary noisy drive, or loud, repetitive clicks). In any case, though, we recommend that you replace the
affected hard drive.
What if the dying drive's volume won't mount?
More often than not, you're completely out of luck. You may be able to revive a hard drive for small amounts of time by
letting the drive cool down (somewhere cool and dry, not cold) and then powering it up attached to a service workstation
(e.g. don't attempt to boot from it, you may not have enough time).
Other factors that can lead to hangs
Hardware is often the culprit when a backup task hangs, but sometimes other software can interfere with a backup task
and even cause the whole system to hang. If you are using an external hard drive enclosure that came with custom
software, try disabling or installing that software before trying your next backup task. If a firmware update is available for
your enclosure, try applying that as well to see if a problem with the enclosure has been resolved recently through a
software update.
Related discussions:
Uninstalling Seagate diagnostic utilities alleviates hangs
An error occurred while CCC was "Replacing this item on the
destination"
If you haven't granted CCC permission to delete or archive modified items or items that are unique to the destination,
then you may encounter this error message after applying a software update to your source volume. Without permission
to delete or archive items from your destination volume (as necessary), CCC will not replace a folder with an item of a
different type.
For example, suppose you have all of your music in /Users/yourname/Music on your startup disk. You keep this volume
backed up regularly to another volume. One day, you decide that you would like to free up some space on your startup
disk. Realizing that your Music folder is already on your backup volume, you simply delete the Music folder from your
startup disk and replace it with an Alias to the folder on your backup volume. You can access the folder just as you had in
the past, it appears almost as if the content is still on your startup disk. Hooray, free money! But it isn't, it has been
deleted and replaced with a file. When you next run your CCC backup task, what should CCC do with this alias file and
this folder of Music on the backup volume?
If you have chosen one of the options to archive items that are unique to the destination (which the Music folder now is),
CCC will move the Music folder to the _CCC Archives folder. When you realize that your music isn't accessible where it
usually is, you can easily address this misconfiguration. If you have chosen the option to "Leave untouched" the items
that are unique to the destination, and you have not indicated that CCC should archive modified items on the destination,
however, CCC makes the conservative choice that protects the data on the backup volume — it refuses to delete the
Music folder and replace it with a file, and instead reports an error.
There are three different ways to resolve this problem:
1: Manually delete the folders that need to be replaced
CCC offers a convenient "Reveal in Finder" button in the error dialog that you can click on to reveal each folder in the
Finder. Once revealed, simply drag the item to the Trash. The next time you run your CCC backup task, CCC will copy
the new non-folder item to that location, error free. Note, however, that this is a short-term fix. You may see this error
again if a future software update replaces a folder with a file.
2: Change CCC's conservative behavior
If you don't use Alias files or symbolic links, then you can implement a more long-term fix for this kind of problem by
using one of CCC's advanced settings. To make CCC delete a non-empty folder so that it can replace it with a file, use
the "Replace a folder on the destination if the source item is not a folder" option:
1. Choose your source and destination in CCC's main window
2. Click on the "Customize these settings" button
3. Click on the "Advanced settings" button
4. Check the box next to the "Replace a folder on the destination if the source item is not a folder" option
5. Close the Customize Settings panel
6. Click the Clone button. If a scheduled task was affected by this error, click on the "Schedule this task..." button to
create a new scheduled task to replace the older task without this setting.
3: Change your backup strategy
CCC can skillfully manage the retirement of data from your destination volume. By allowing CCC to manage files and
folders on your destination volume that have been removed from the source, you'll never see these errors again. See the
section below, "The destination volume is full," for tips on developing a better backup strategy.
"The destination volume is full"
If you have indicated that CCC should not delete items that are unique to your backup volume, then now is a good time
to reconsider that choice. It's the Wild West on your backup disk — nothing is getting deleted, cruft that you deleted long
ago on your source volume is piling up on the destination. If you ever tried to restore from that backup, weeding out the
cruft would be very time consuming.
Consider this instead:
1. If there is any data on your destination volume that you don't keep on the source volume, put it into a folder at the
root level of the destination volume. We can protect this data from CCC's management techniques.
2. If your destination is completely full, then it is too full to complete a backup and you will have to free up some space
manually. Find something on the destination volume that also exists on the source, such as the "System" folder,
and move it to the Trash. If there are any other large items on the destination that you don't need, toss that in the
Trash too.
3. Empty the Trash.
4. Choose your source and destination volumes in CCC's main window
5. Choose the "Temporarily archive modified and deleted items" preset from the preconfigured settings menu
6. Click the Clone button. If you were using a scheduled task, click on the "Schedule this task..." button to create a
new scheduled task to replace the older task (changes to settings in CCC's main window are not applied to
previously-created scheduled tasks).
7. If the volume fills up again, find more items to manually delete, or browse through the _CCC Archives folder at the
root of your destination volume to see if those items can be deleted. Be sure to empty the Trash before trying your
backup task again.
With those settings, CCC won't immediately delete anything from your backup volume. Instead, it will move deleted and
modified items to a "_CCC Archives" folder at the root of the destination. If you're concerned about losing something
accidentally from your backup volume, this Archives folder is the answer.
Now that the cruft data is moved to these special archive folders, you can either let CCC "prune" these archives by size,
age, or free space, or you can manually remove items when your destination gets full.
These sections of the documentation explain what CCC does with the cruft data on your backup volume:
Protecting data that is already on your destination volume
Managing previous versions of your files
"I'm already using the Archiving settings"
If you are already letting CCC manage your modified and deleted items, then you may need to apply a more liberal
pruning setting. The amount of free space required on your destination depends on the size of files that you normally edit
during the day. In general, you should have as much space available at the beginning of the backup task (e.g. right after
pruning is complete) as you ordinarily see copied during a backup task. So if CCC ordinarily copies 9GB of data, maybe
with a spike to 14GB every once in a while, you should configure your pruning settings to accommodate that maximum
value (e.g. leave 15GB of free space). Especially if you modify large files on a regular basis, the nominal amount of data
copied each time could be fairly high. If you use a Windows virtual container that is 80GB on a daily basis, for example,
the nominal amount of data copied during your daily backup task will be at least 80GB, so you will have to accommodate
that with your pruning settings.
Automated maintenance of CCC archives
If you make changes to your archiving settings, be sure to create a new scheduled task and delete your previouslycreated scheduled task. Changes made in the "Customize these settings" panel are not reflected in previously-created
scheduled tasks.
"My destination has exactly enough space to accommodate the data on the source,
why can't CCC complete the backup task?"
To prevent overwriting a good backup file with a corrupted file on the source, CCC uses a special file copying procedure
called an "atomic" copy. If a file has changed since the last backup, it will be copied to the destination using a temporary
filename, e.g. .filename.XXXXXX. When CCC has finished copying the file successfully, CCC deletes (or archives) the
older version on the destination, then renames the updated file to the correct filename.
Because CCC uses this special procedure, the destination volume must have, at minimum, enough free space to
accommodate all of the data that will be backed up plus enough room to accommodate a temporary copy of the largest
file on the source volume. If you frequently modify very large files, such as movies, disk images, or virtual machine
containers, you should designate a backup volume that has considerably more space than is consumed by your source
volume to avoid running out of space during a backup task.
Additionally, if you have CCC configured to immediately delete items that are unique to the destination, those deletions
occurs as the items to be deleted are encountered. CCC traverses the files and folders on your source and destination
volumes in alphabetical order, so it is possible that CCC will attempt to write new files to the destination before deleting
items that were deleted from the source.
If you have made large organizational changes on the source (e.g. renamed or moved folders, deleted and created many
items), your backup task, you may want to run a manual backup task that employs the option to "Run the deletion pass
on the destination before copying new files".
The Disk Center
Many factors can affect the performance and outcome of a backup task. One of the things that we have found particularly
helpful for identifying performance problems, for example, is to have disk activity statistics available during a backup.
CCC's Disk Center provides this kind of statistics monitoring, as well as general volume information for each locallyattached volume mounted on your Mac. Choose "Disk Center" from CCC's Window menu to view the Disk Center.
Basic volume information
The Disk Center window displays a list of locally-attached, mounted volumes in a table on the left. Click on one of these
volumes to display information such as the volume name, filesystem, capacity, and disk usage. CCC displays a level
indicator next to the disk usage figure. When disk usage exceeds 70% of the volume capacity, the level indicator will turn
yellow to indicate that you may want to consider "cleaning house". If the disk usage exceeds 90% of the volume
capacity, the level indicator will turn red. Especially on a volume that contains an installation of OS X, we recommend that
you try to maintain at least 10% of the volume as free space. When you start to consume that last 10%, fragmentation
becomes a problem and general performance of OS X begins to decline.
Drive Statistics
The Disk Center will update disk activity statistics on a one-second interval. Disk activity is collected by OS X at the
hardware interface, so data for multiple volumes residing on the same disk will be identical. The data read and write rate
can give you a good indication of how fast OS X is able to read and write data from and to your disk. You will likely notice
that these values fluctuate wildly over the course of a backup task. This is quite normal, write performance will generally
be lower when copying lots of small files and higher while copying a larger file. When lots of small files are being copied,
there is a lot of seek activity occurring on your source and destination volumes. This seeking greatly reduces the overall
throughput compared to the theoretical throughput of your disks.
If your backup task seems particularly slow, stop the task and see what the baseline disk activity is. For example, while
running a performance test, I couldn't understand the absolutely dismal performance I was seeing. In the middle of the
task I had launched Safari so I could download and test Growl on my test system, and I didn't think it would have a
measurable affect on the task. I stopped the task and noticed a persistent 1.8MB/s level of write activity on my source
volume in the Disk Center. After a brief investigation, I discovered that Safari was writing massive cache files to my home
directory. After quitting Safari, my backup performance was back to normal.
Disk error statistics
CCC will report error-related statistics when they are present. You can tell at a glance that something is wrong with this
disk:
Read and write latency is a cumulative measurement of the amount of time that the disk interface had to wait for a read or
write operation to return data (in cases where the operation ultimately succeeded). Read and write retries indicates the
number of times that the disk interface had to make multiple attempts to retrieve data (again, this value only pertains to
attempts that were ultimately successful). Read and write errors indicate the number of read or write attempts that were
simply unsuccessful. The meaning of each of these values is less important than their meaning as a whole. If you're
seeing any red data in the Disk Center, there's a good chance that your hard drive is suffering a hardware problem.
Full Disk Encryption, aka FileVault 2 (Lion or greater)
Apple introduced a new "Full Disk Encryption" feature to OS X Lion, and CCC offers some advice around enabling
encryption in the Disk Center.
Enabling encryption on a volume that contains (or will contain) an installation of OS X
If your goal is to create a bootable, encrypted backup, use the following procedure:
1. Use CCC to back up your installation of OS X to the unencrypted destination volume.
2. Use CCC's Disk Center to associate a Recovery HD with your backup volume
3. Start up your Mac from the backup volume
4. Enable FileVault encryption in the "Security & Privacy" preference pane of the System Preferences application
5. Reboot your Mac from your primary startup disk
6. Configure CCC for regular backups to your encrypted backup volume.
Enabling encryption on a volume that will not contain an installation of OS X
If your backup volume won't be a bootable backup of OS X, simply right-click on that volume in the Finder and choose
the option to encrypt the volume.
Learn more about FileVault
Can I back up an encrypted volume to a non-encrypted volume?
Yes.
If I back up an encrypted volume to a non-encrypted volume, will the copied files be
encrypted on the destination?
No, encryption occurs at a much lower level than copying files. When an application reads a file from the encrypted
source volume, OS X decrypts the file on-the-fly, so the application only ever has access to the decrypted contents of the
file. Whether your backed-up files are encrypted on the destination depends on whether encryption is enabled on the
destination volume. If you want the contents of your backup volume to be encrypted, follow the procedure outlined above
to enable encryption.
Can Carbon Copy Cloner enable encryption on my backup volume?
No. You can enable encryption in the Security & Privacy preference pane while booted from your bootable backup, or in
the Finder by right-clicking on your backup volume.
Cloning Apple's Recovery HD partition
Starting with Mac OS X Lion, the OS X Installer creates a new, hidden volume on your startup disk named "Recovery
HD". The primary purpose of the Recovery HD volume is to offer a method to reinstall OS X (Apple no longer distributes
the OS X Installer on a DVD). When performing a backup of an OS X volume, Carbon Copy Cloner automatically archives
the Recovery HD volume that is associated with the source volume to a disk image. This archive can later be restored to
another Recovery HD volume. CCC's Disk Center also offers the ability to create a new Recovery HD volume on your
destination disk.
Creating a new Recovery HD volume
Drobo devices do not support dynamic volume resizing (reference), and therefore cannot accept a Recovery HD
volume. Do NOT attempt to create a Recovery HD volume on a Drobo device.
The Recovery HD volume is approximately 650MB, so to create a new Recovery HD volume, you must choose a volume
on your disk that has at least 1GB of free space available. This documentation will refer to the chosen disk as the "donor"
disk. No data will be harmed on the donor disk, it will simply be resized so some space can be allocated for the new
Recovery HD volume. When you click the button to create a new Recovery HD volume, CCC will do the following:
1. Unmount the donor disk
2. Perform the equivalent of Disk Utility's "Verify disk" tool
3. Resize the donor volume to (size of the donor volume) - 1GB
4. Create a new volume named Recovery HD using the 1GB of borrowed space
5. Clone a suitable Recovery HD volume from another disk (such as the startup disk) or an archive of the Recovery HD
volume onto the newly-created Recovery HD volume
6. Remount the donor volume
When the task has completed, the Recovery HD volume will not be mounted on your Desktop, nor will it appear in Disk
Utility (it's a very special, very hidden volume!). You can verify the functionality of this Recovery HD volume by holding
down the Option key on startup, then selecting the Recovery HD volume as the startup disk.
Re-cloning an existing Recovery HD volume
If you choose a volume on a disk that already has a Recovery HD volume, CCC will indicate that you may "Re-clone the
Recovery HD volume on this disk". Recloning the Recovery HD volume may be helpful if the Recovery HD volume is
invalid, or its partition type is invalid (and it appears on your Desktop).
When do I need to create a Recovery HD volume?
CCC bootable backups offer similar functionality to the Recovery HD volume, so the Recovery HD volume is not strictly
required on a backup volume. Unless you have a specific reason to not create a Recovery HD, though (e.g. because it
could affect a Boot Camp partition on the same disk, you don't want to give up the 1GB, etc), we recommend that you
maintain a Recovery HD volume on your backup disk. Especially if you intend to use your destination volume in
production (e.g. you are migrating to a larger disk, or restoring to a replacement disk), or if you intend to enable
encryption on a volume on the backup disk, then you should create a Recovery HD volume on the destination disk. If you
intend to enable encryption on the destination volume, we recommend that you create the Recovery HD volume before
enabling encryption. A Recovery HD volume is not required for restoring an installation of OS X from a CCC
bootable backup.
What is the difference between archiving the Recovery HD and creating a new
Recovery HD?
During the course of an ordinary backup of a volume that contains OS X, CCC will automatically create an archive of the
Recovery HD associated with that volume. This archive is stored on the source volume, and is subsequently backed up to
the backup volume along with everything else. This archive of the Recovery HD volume can be used in the future to
create a new Recovery HD. The archive is not, however, an operational Recovery HD volume, it's just a backup file.
CCC's Disk Center offers the ability to create an operational Recovery HD volume as well. This functionality is completely
separate from creating an archive of the Recovery HD. Unlike the archiving of the source Recovery HD, creating a new
Recovery HD is not something that happens automatically, you have to ask CCC to do this in the Disk Center. When CCC
creates a new Recovery HD, it borrows space from your destination volume to create a new, hidden volume on that disk.
The resulting Recovery HD is fully operational — you can boot your Mac from it and reinstall OS X. Refer to the previous
section to determine if creating a Recovery HD is required in your situation.
Why were other volumes on my disk unmounted when I created a Recovery HD?
CCC uses a command-line version of Disk Utility to resize the donor volume. Resizing that volume requires making
changes to the partition table on the disk, and Disk Utility may choose to unmount other volumes on the disk while it
makes those changes. CCC will specifically remount the donor volume, but whether Disk Utility remounts the other
volumes is a function (or bug) of Disk Utility. You can remount these volumes manually in Disk Utility.
Can I configure CCC to not automatically archive the Recovery HD onto my source
volume?
Yes. Choose "Preferences" from the Carbon Copy Cloner menu and uncheck the box next to "Automatically create an
archive of Apple's Recovery HD volume".
Can I create a Recovery HD on an Apple "Fusion" volume?
No, not with CCC. Creating a Recovery HD requires borrowing space from a physical volume, and that is not a
modification that we recommend making to an underlying member of an Apple Core Storage logical volume. The only
Apple-supported method of creating a Fusion volume is via Disk Utility or the OS X Installer, and each of those will create
a Recovery HD volume before the Fusion volume is created. If you intend to create your own Fusion volume using one of
the various tutorials available on the Internet, and if you want that volume to have an associated Recovery HD volume, we
strongly recommend that you create a Recovery HD volume before creating the Fusion volume. You can use CCC to
create the Recovery HD volume on the slowest disk that you intend to add to the Fusion logical volume group. See the
following document for a demonstration.
Creating a Fusion volume with a Recovery HD
Help! My clone won't boot!
We're happy to help you troubleshoot your bootability problems. Before you ask for help, please try the troubleshooting
steps below. If you're having trouble with the steps or have run out of options, please let us know how far you got, or how
far your Mac gets into the boot process.
If CCC's Cloning Coach didn't report any configuration concerns for your backup volume and you are having trouble
booting from it, try the following troubleshooting steps (in order):
1. If you are using an external hard drive enclosure, confirm with the enclosure vendor whether your enclosure should
support booting your Mac. Several Western Digital enclosures, for example, cannot boot a Mac. Also, scroll to the
bottom of this page for related discussions that describe specific configurations that we've seen problems with in
the past.
2. Reboot your Mac holding down the Option key.
3. Wait about 30 seconds to see if the backup volume appears. If your backup volume appears at this step but
doesn't complete the boot process, skip to the next section below.
4. Detach, then reattach the backup volume's firewire or USB cable from/to your Mac and wait up to another 30
seconds.
5. Shut down your Mac completely, then start it up holding down the Option key, waiting another 30 seconds for the
volume to appear.
6. Repeat the steps above, but using another interface (e.g. USB if you tried Firewire, Firewire if you already tried USB)
and see if the volume appears. If you have multiple USB ports, try each port.
7. If the hard drive enclosure is bus powered, try plugging in its DC power supply before starting up your Mac. Bus
powered enclosures often take a bit longer to spin up or simply don't make themselves available that early in the
boot process.
8. Lastly, try resetting your Mac's parameter RAM. PRAM maintains settings related to starting up your Mac, and it's
possible that invalid settings are interfering with your Mac's discovery of the external enclosure. To reset your
PRAM, hold down Command+Option+P+R on startup. Hold down those keys until you hear the second startup
chime. Release all but the Option key after you hear the second startup chime.
If the volume still won't boot, it's possible that the enclosure doesn't support booting your Mac. The Golden Litmus Test
for bootability would be to install OS X directly onto the volume. If that fails to make the disk bootable, then it definitely
isn't going to happen. Please report these enclosures to us so we can assemble a list of troublesome enclosures.
The backup volume starts to boot the Mac, but is slow or never gets to the Finder
There are several visual hints that can indicate how far your backup volume is getting in the startup process:
1. Apple logo: The "booter" file was found and executed.
2. Spinning progress indicator: The OS "kernel" was executed and now has control over the startup process. The
kernel will load kernel extension caches, mount the startup disk, then execute "launchd" which kicks off all of the
other system processes.
3. Blue screen: The WindowServer has loaded, so the system is ready to start loading regular applications or the
loginwindow.
4. Loginwindow or your Desktop: The system has finished loading, and is ready for user interaction
If your backup volume showed up in the Option key startup disk selection screen, but doesn't display the Apple
logo when you choose to start from it, then your Mac is having trouble finding the "booter" file on this volume. This can
occur due to hard drive enclosure interference, due to filesystem corruption on the backup volume, or due to the volume
being improperly "blessed" (blessing a volume stores certain information about the startup files in the volume's header,
and your Mac uses that information to start the boot process).
1. If you can rule out enclosure problems, use Disk Utility to repair any filesystem problems on the backup volume
2. Run your backup task again
3. Try booting from the backup volume again
If you see the universal "No access" symbol after selecting your startup disk, this indicates that the kernel cannot
load the kernel extension cache, or that it cannot mount the startup disk. This could be due to trying to run an
incompatible operating system on your Mac, or due to an extension conflict with the enclosure you are trying to boot
from. We see this quite frequently when trying to boot from a USB 3.0 enclosure, especially on Macs that do not have
native support for USB 3.0.
If you are booting a different Mac than what the backup volume was cloned from, try installing OS X directly onto
the cloned volume while booted from the OS X Installer DVD or the Apple Recovery volume
If you're booting the same Mac from which you created the backup, try booting into Safe Boot mode (hold down the
Shift key as you start your Mac).
If your Mac never progresses past the spinning progress indicator (below the Apple logo) or hangs at the blue
screen while booting from the backup volume, there is probably a problem with some of the system files that are called
early in the startup process. The system log on the backup volume can be very useful in troubleshooting these problems.
To view the system log:
1. Boot your Mac from its usual startup disk
2. Choose "Go to folder" from the Finder's Go menu
3. Type "/Volumes/Backup volume name/var/log" (no quotes, and substitute the actual name of the volume) and click
the Go button
4. Double-click on the system.log item in this folder
Look for any error messages, indications of crashes, etc., or simply attach the system.log file to a discussion on the
Bombich Software Help Desk.
Configurations with which we have seen some problems
Some Western Digital enclosures cannot boot Macs
Hands Off! and possibly Little Snitch may prevent a cloned volume from booting
Some Macs have trouble booting from USB 3.0 enclosures
Some MacBook Pros can boot from a disk in an enclosure, but not when it is installed internally
Some MacBook Pros can boot from a disk in an enclosure, but not when it is installed internally (asks to be
reinitialized)
Cannot boot from a hard drive installed in some optical bay replacement kits
Clone on Iomega eGo disk boots only via USB, not via Firewire
Backing up large files, mounted disk images, and FileVault
home directories
FileVault protects the contents of your home directory by enclosing it in an encrypted disk image. When you log in, the
encrypted disk image is unlocked via your login and password and mounted for use as your home directory. Mounted
disk images pose an interesting problem to incremental backup utilities. By simply being mounted and accessed (e.g. via
browsing the contents), the content of a disk image, and thus the disk image file itself, is modified. If you run CCC while
logged in to a FileVault-protected account or while a read/write disk image is mounted, there is a strong chance that the
disk image will be modified while it is being backed up, resulting in a corrupted version of the disk image on your backup
volume. Also, because the contents of your FileVault-protected home directory are technically on another volume, CCC
will not back up the contents of your home directory when backing up your root filesystem (e.g. your boot drive).
For these reasons, you should either exclude your FileVault disk image file from your backup routine while logged into a
FileVault-protected account (and set up a separate routine for backing up the contents of your home directory), or you
should only run CCC while logged into an account that is not protected by FileVault. Likewise, if you have other very large
files (e.g. Parallels or VMWare container files) that are frequently modified, you should either quit the applications that
modify those files for the duration of the backup, or you should set up a separate task for backing up those files when
they are not typically in use.
"Are special steps required to back up a volume protected by Lion's FileVault 2?"
No, FileVault 2 works completely differently. Rather than placing your files into a disk image, the entire volume is
encrypted. CCC can back up to and from FileVault 2 encrypted volumes just fine without any additional steps. If you
would like to enable encryption on the backup volume, see the Full Disk Encryption (Lion only) section of the
documentation.
Performance Suggestions
Reduce the number of files considered for backup
CCC analyzes all of the files that are included in your backup set for consideration to be copied. If you have a particularly
high number of files on your source volume, you may want to put some thought into how your files are organized. For
example, if you have a large number of files that never change (perhaps some old, completed projects), you can collect
these into a folder named "Archives", back it up once, then exclude it from future backups. CCC will not delete excluded
items from your destination (unless you ask it to in the Advanced Settings panel), so as long as you keep the original on
your source volume, you will always have two copies of your archived content. Because these items are excluded from
your daily backups, CCC will not spend time or RAM enumerating through those files for changes.
Hard drive performance and interface bandwidth
Performance will be worse for smaller hard drives (e.g. physically smaller, like those in laptops), for older hard drives, and
for hard drives that are nearly full and thus more likely to be fragmented. You will also get longer copy times when you
have lots of small files vs. a volume filled with just a few very large files. Finally, you will see better performance with
faster/more efficient interfaces -- eSata is faster than Firewire, Firewire is faster than USB (FW800 and FW400 are both
faster than USB 2.0).
Spotlight Indexing
Anything that causes CCC to compete for bandwidth to your source or target volume will increase the amount of time
that it takes to back up your data. Spotlight indexing is one such process that CCC typically must compete with for disk
bandwidth. As you copy new data to your target volume, for example, Spotlight wants to read those "new" files so it can
index their contents. Having a Spotlight index of your backup volume may be unnecessary as you probably want to
search for files only on your source volume. To disable Spotlight indexing on a volume that is dedicated to backup, drag
the icon of the target volume into the "Privacy" tab of Spotlight Preference Pane in the System Preferences application. If
you do want the backup volume indexed, drag its icon out of the "Privacy" tab after the cloning and indexing will start
immediately.
Other applications and conditions that can lead to performance
problems
Over the years we have received numerous queries about poorer performance than what is expected. Careful analysis of
the system log, kernel log, and Activity Monitor will usually reveal the culprit. Here are some things that we usually look
for:
Other backup software copying simultaneously to the same volume, a different volume on the same disk, or across
the same interface as CCC's destination.
Utilities that watch filesystem activity and do things when file changes are detected. Antivirus software is a common
culprit, but we have also seen problems caused by other watcher applications, such as memeod and Western
Digital's SmartWare.
Did we mention Spotlight already?
Slow interfaces — USB hubs (including the ports on a USB keyboard or display) and even some USB cables can
reduce the bandwidth to your disk dramatically. We generally prefer Firewire over USB, but if you're forced to use
USB, be sure that your device is plugged directly into one of the USB ports on your Mac.
Using a wireless network connection to connect to a network volume. If you're seeing poor performance with a
wireless connection, compare the performance when using a wired (ethernet) connection.
Use the Console application to view the contents of the system log and the kernel log (kernel log is only present on Snow
Leopard and Lion, those messages are merged into the system log on Mountain Lion). If you're still having trouble
identifying a performance problem, we're here to help.
A closer look at how CCC determines the "bootability" of a
destination volume
CCC determines whether your destination volume will be bootable and indicates any configuration concerns in the
"Cloning Coach" window. If you see a yellow warning icon next to the "Customize these settings" button, you can click
on that icon to see these concerns. CCC will also present these concerns to you the first time that you back up to any
particular destination volume.
If CCC doesn't raise any configuration concerns, and the destination volume has an OS on it when the backup
task is completed, and barring any hardware problems that might interfere, your backup volume *should* be
bootable.
Configuration concerns that affect bootability of the destination volume
CCC looks for the following configurations to determine if a destination volume will not be bootable:
The destination volume cannot be a disk image -- you cannot boot your Macintosh from a disk image.
If the Macintosh is a PowerPC Macintosh, the destination device must be an internal volume or on a Firewire hard
drive. Intel Macintoshes can boot from either an internal volume, a Firewire hard drive, or a USB hard drive.
The files and folders required by OS X must be present on the source volume. These include: /Library, /System,
/bin, /etc, /mach_kernel, /private, /sbin, /tmp, /usr, and /var.
The files and folders that are required by OS X must be selected to be copied to the destination volume (applicable
only to the "Incremental backup of selected items" cloning method).
If the Macintosh is a PowerPC-based Macintosh, the hard drive on which the destination volume resides must be
partitioned using the APM (Apple Partition Map) partitioning scheme. Intel-based Macintoshes ship with hard drives
formatted with the GPT (GUID Partition Table) format, and will not boot a PowerPC Macintosh.
If the Macintosh is an Intel-based Macintosh, the hard drive on which the destination volume resides must be
partitioned using the Apple Partition Map or GUID Partition Table partitioning scheme (CCC will indicate, however,
that an APM-partitioned disk is not an Apple-supported configuration for Intel-based Macs). You may have difficulty
booting or running an Intel-based Macintosh from a hard drive formatted with the MBR (Master Boot Record)
partitioning scheme.
CCC will issue a warning if the operating system that you're backing up (or restoring) is older than the OS that your
machine shipped with.
CCC does not maintain an exhaustive list of hardware:shipping OS pairs. CCC also cannot determine whether the
destination will be bootable when the source or destination are remote Macintosh volumes.
Related documentation:
What makes a volume bootable?
Don't install older versions of OS X
Western Digital hard drive enclosures and bootability
Configuration concerns that affect the preservation of filesystem
metadata
CCC will note a concern if there is a compatibility mismatch between the source and destination filesystems. For
example, if you are backing up files from an HFS+ volume to a network filesystem, some of the filesystem metadata
cannot be preserved. In many cases this is acceptable and you can ignore the message. Each of the possible concerns
that CCC might raise are listed below. The "risk" associated with not preserving each type of metadata is explained
plainly, so you can decide whether the destination volume will suit your needs.
The destination doesn't support Access Control Lists
Access Control Lists specify a granular list of the privileges that users and groups have for a particular file or folder (e.g.,
read, write, get information, delete, etc.). These advanced privilege settings generally apply only to user accounts that
have been created on your Macintosh — for example, to prevent other users from deleting items from your home
directory. If you are backing up your own files to a locally-attached hard drive, or to a network file share on a trusted
computer, the Access Control List filesystem metadata is relatively unimportant. If you are backing up to or from a
network filesystem in a business or education setting, however, check with your tech support staff for additional advice
on whether this metadata must be preserved.
The destination doesn't support hard links
A hard link makes a single file appear to be located in multiple places on your hard drive. If a single file had 20 hard links
scattered across the disk, each hard link file would consume no additional space on the hard drive, and editing the
content of any one of those files would immediately affect the content of every other hard link to that file.
When you back up the contents of a volume that contains hard links, ideally you want to preserve the hard links. If the
destination filesystem doesn't support hard links, each hard linked file will be disassociated from the original file and will
become a copy on the destination. This won't result in any loss of data, but your backup set will consume more space on
the destination than on the source. Hard links are leveraged quite a bit on OS X by the operating system, though they are
generally less common among user data.
The destination doesn't support ownership
File ownership indicates which user account on your Mac has control of a file. The owner of a file can limit access to that
file from other users on the same computer. If the destination doesn't support ownership, then the owner of each file
copied to the destination will be set to the user that mounted the destination. If the destination volume is accessed
elsewhere (e.g. mounted on another Mac or even by a different user on the same Mac), then any restrictions that you
have placed on those files may not be honored. If you are backing up files and folders that are not all owned by the same
user (e.g. you), you should consider backing up to a local, HFS+ formatted volume or to a disk image instead.
Some filesystems have file size limitations
Some filesystems have restrictions on how large a file can be. FAT32, for example, limits files to 4GB or less. CCC will
proactively warn you of this limitation if you choose to back up a volume whose filesystem supports files larger than 4GB
to a filesystem that does not support files larger than 4GB. CCC will then automatically exclude files larger than 4GB from
the backup task. Files that were excluded will be reported at the end of the backup task.
If you require that files larger than 4GB are backed up, you must reformat the destination volume with a format that
supports larger files.
Related documentation:
Preparing your backup disk for a backup of OS X
The destination already has an installation of OS X. Merging a different
version of OS X into this destination may cause problems with that
installation of OS X
This message appears if you have indicated that files and folders that are only present on the destination should be left
alone. While that setting will protect any data that you have on the destination volume that is unique to that volume, it
does a disservice to the installation of OS X on your destination.
Suppose, for example, that you have a complete backup of Mac OS 10.6.7 on your backup volume. When you apply the
10.6.8 update to your source volume, many system files are updated, some new files are added, and some files may be
deleted. If you use CCC to update your backup volume, but you don't allow CCC to delete the items on the destination
that the OS update had deleted from the source, then there will be a bunch of "cruft" left over on the backup volume.
If you should ever need to boot your Mac from your backup volume, these cruft files could cause the OS to behave
unexpectedly, and they may prevent it from booting altogether.
CCC can help you perform a clean upgrade or downgrade of OS X on the destination volume by moving items that
should be deleted to an archive folder. Any files and folders that you keep only on the destination would also be moved to
the archive folder. See the "Protecting data that is already on your destination volume" section of the documentation for
more details on these settings.
Help! My clone won't boot!
See this section of CCC's documentation for troubleshooting advice if you're having trouble getting your backup volume
to start your Mac.
How frequent should my backups be?
I find hourly backups to be very intrusive. If I did decide to do hourly backups, I might choose to back up a smaller subset
of files (e.g. vs. the entire filesystem) so the backups occur very quickly. Otherwise, I'd just set the system to back up
when I'm not using the system. My production machine backs up once a day at 5:30.
Feel free to experiment with the frequency of the backup to see what works best for you. I've decided that the risk of
failure on any given day is low enough that I'd rather not have it interfere with my productivity. If an hourly backup were to
cause me a minute or two of productivity loss per run (via distraction, having to wait, or generally slowing me down), that
would start to add up quickly. Eventually it would outweigh the four hours of work I might lose if one day my drive failed
at noon.

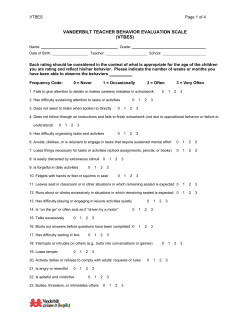


© Copyright 2026