
Google Docs: Access, create, edit, and print
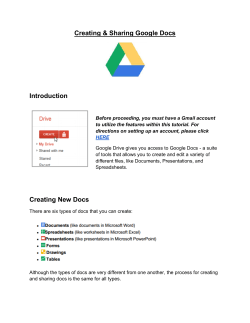
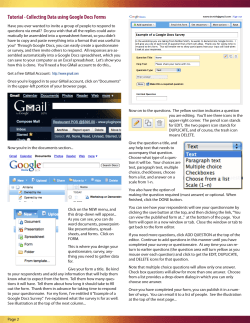
Google Docs: Access, create, edit, and print
There are several kinds of Google Docs: text documents, spreadsheets, presentations, drawings,
and forms. We’ll use a basic text document to show you how to get started with Google Docs. Most
of these steps also work for other document types, so learn these tasks and you’re on your way to
creating presentations, spreadsheets, forms, and drawings too.
Access your documents
You can access your Google Docs from any computer, anywhere in the world.
To view a list of documents you own or have access to, or to create a document:
●
Visit Google Drive at https://drive.google.com.
Google Drive is where you’ll find your Google Docs (plus other types of files). If Google Drive is not yet
enabled for you, visit https://docs.google.com.
●
Or visit from another Google Apps product
When you're using a Google Apps product (e.g. Gmail, Calendar), you'll see other Apps products listed at
the top left of the page. Click Drive to access your Google Docs:
If you don’t yet have Drive, click Documents instead.
In Google Drive (or your Docs list) you'll see all of the Google Docs you have access to, including documents,
presentations, spreadsheets, forms, and drawings. You might also see other types of files.
Create a document
From Google Drive (or your Docs list), click Create and then select Document.
4/24/2012
DN:GA-DB_103.00
An untitled document appears in your browser -- now you're ready to edit!
Rename your document
Just click on the title to rename the document (the title is “Untitled document” when you first create it).
Edit and format your document
There are many ways to edit your document with the edit toolbar.
You could stick to entering plain text, but why? Take advantage of the full range of features in Google Apps
Documents to make your documents stand out from the rest.
Here are some ideas to get you started:
Insert images
1. Click Insert > Image.
2. Choose an image from your computer or from the web (via URL). Once your image is added, you can
remove or resize it at any time.
4/24/2012
DN:GA-DB_103.00
To remove an image, select it, right-click (or click Edit), and choose Cut:
To resize an image, select it and then pull one selection handle. Use a corner handle to proportionally
resize in all dimensions:
Use a top, bottom, or side handle to resize on only one dimension:
4/24/2012
DN:GA-DB_103.00
Add a table
Tables are a great way to organize information in your document.
1. Click Table > Insert table and point at the number of rows and columns you want:
2. Then format and fill out your table:
Tip: To add color to cells (like the top row above), select the text in one or more cells, click Table >
Table properties, and then set the cell background color.
Add a link
It’s super easy to add links in Google Docs.
1. Select the text (or an image) where you want the link.
4/24/2012
DN:GA-DB_103.00
2. Click the link icon in the toolbar.
3. Type the URL and click OK. Note that you can even test the link before you add it.
Set margins, page size, orientation, and background color
To set these options, click File > Page setup.
4/24/2012
DN:GA-DB_103.00
Print
To print your document, click File > Print. A PDF version of your document will appear with these print options:
4/24/2012
DN:GA-DB_103.00
If you need more advanced options, or if system print settings override your Google Docs print settings, click
Print using system dialog.
Share and collaborate
Many people say the best thing about Google Docs is how easy it is to share them and work on them with other
people in real time. Check out Docs Sharing and Collaboration to get started!
4/24/2012
DN:GA-DB_103.00


© Copyright 2026