
HOW TO Information Sheet For
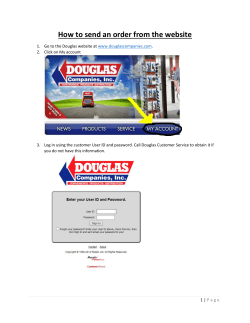
HOW TO
Information Sheet
For
Implementations
TRN-W-541
Created 11/21/05 Revised 6/05/06
Page 1 of 18
HOW TO
Information Sheet
For Implementations
Remember to use conventions:
1.
2.
3.
4.
Use the tab key to move from field to field within any input screen.
Use point and click to move multiple lines within any input screen.
When fields are highlighted, just start typing.
When performing a task (function) within an input screen:
a. First, review function buttons at the bottom of the screen for use in performing the task.
b. Next, if no button is available to perform the desired task, drop down the function menu and review
options.
c. If navigating between screens and no specific button or function in the function menu meets the desired
use, slide to Shortcuts.
d. If no Shortcut meets the desired use, use a three-letter Screen Access command.
e. The Return button is the button of last resort when navigating.
5. Retain your arrow over a button, tab, or field for a second and a popup will appear to explain the location.
6. Once you have determined the date and the doctor, double click to start appointments. To move, copy, delete, or
cancel, right-click on appointment to begin the process.
MDr Portal and MDr PracticeManager Logon
1.
At your desktop, double click on the MDr Portal PracticeManager icon.
MDrPortal.lnk
2.
At the MDr Portal page, click on the PracticeManager tab.
Click the
Practice
Manager
tab.
TRN-W-541
Created 11/21/05 Revised 6/05/06
Page 2 of 18
3.
Click OK on the digital certificate window.
4.
At the MDr PracticeManager screen, click on the Launch PracticeManager button.
Click Launch Practice Manager
button to begin loading process.
TRN-W-541
Created 11/21/05 Revised 6/05/06
Page 3 of 18
The loading process will take place and can be monitored by the percentage display and the bar across the bottom. Wait
for it to complete and it will present the Session Manager Authentication screen.
5.
Key the user-defined Username and Password and click OK. Each user in an office has an individual
username and password set up in the DST application.
Key Username,
tab once and
enter password.
Click OK.
TRN-W-541
Created 11/21/05 Revised 6/05/06
Page 4 of 18
6.
Click the system button you use to access your application system.
7.
default.
You now are on the Operator Signon screen. Enter your initials and click OK. Your client ID will appear by
TRN-W-541
Created 11/21/05 Revised 6/05/06
Page 5 of 18
To enter the Portal, click on the Enter Portal tab on the MDr Portal screen.
At the MDr Portal logon screen, enter your clinic prefix and number as the user name and as the password.
Enter Username, tab once, and
enter Password assigned
specifically for your office.
Press ENTER key or click
Login button.
TRN-W-541
Created 11/21/05 Revised 6/05/06
Page 6 of 18
To shut down PracticeManager, click Return button until returned to Main menu screen and press Exit. Click Yes in
response to “Do you wish to exit PracticeManager?” Click No if you did not wish to exit at this time.
Click X in the upper right hand corner of each of the browser windows that still remain open. You could have up to 3
browser windows open.
Reconnect or Disconnect from PracticeManager:
This feature allows you to restart PracticeManager without having to close all browser sessions. If the system is
stalled, click File menu and select “Disconnect/Reconnect” selection or press F2.
If the system stalled and you are viewing the “Processing PracticeManager” window, click “Reconnect to PM” button
to return to the sign on screen.
If PracticeManager has determined you have lost connection, click the “Reconnect to PM” button to attempt
reconnection to PracticeManager until the situation is fixed. If you get an Abend message, press F2.
Access to:
1. Patient Inquiry from Main Menu
Click on Patient Listing.
Enter search information, press enter, and select record to view. Click on REX tab at top of screen.
TRN-W-541
Created 11/21/05 Revised 6/05/06
Page 7 of 18
Add new record or make changes. When completed, initial and apply.
2. To make a change to the policy number, click on the INS Listing button on the REX screen.
In the INS Listing screen, select the insurance record with which you wish to work and click OK.
On the Insurance Main screen, click the Copy button to open the policy number field.
TRN-W-541
Created 11/21/05 Revised 6/05/06
Page 8 of 18
Once all changes have been completed, initial and apply. Remember to check the Listing screen to insure the changed
policy is listed and the original has dropped to the bottom of the list and is now inactive.
To return to the Patient Listing by Name, click on the Shortcut Menu and select Patient List by Name.
3. To access DAL appointments, you must use an open Cmd field at the top of an application screen.
Remember: the first time into DAL, the system will require you to select the doctors you will use on DAL.
4. To access Account Analysis, use the same technique as you do for accessing REX. At the Patient Listing screen,
complete the search for the record, select the record , and click on Account Analysis Tab at the top of the screen.
TRN-W-541
Created 11/21/05 Revised 6/05/06
Page 9 of 18
5. To access Charge Ticket Tracking, The Charge Ticket Tracking System is used to account for pre-assigned charge
ticket print numbers. Missing numbers are identified so that research may be done to insure that no charge data is
accidentally left out of the computer billing system. Charge Ticket Tracking is an optional system that will need to be
set up by Support.
Printing Charge Tickets. Charge tickets can be printed from Patient Registration or from the Appointment
System. A number will print on the ticket and record in List of Charge Tickets List with a status of ‘Out’ (0).
•
From any Registration Screen, key C/T in the Cmd field on the Control bar and press Enter for an on
demand ticket print.
•
Multiple charge ticket print is accommodated through the Appointment System by selecting Multiple
Charge Ticket from the Functions menu.
Keying the charge ticket number at charge entry. The charge ticket number is assigned when the ticket is
printed. The ticket number is accounted for when charges are entered in one of the following methods:
•
•
Standard Charge Entry – Key the charge ticket number in the defined field on the Charge Entry
Header screen, Case and Transaction tab.
Express Charge Entry (Multiple Charge Entry) – Key the charge ticket number in the defined field on
the Multiple Charge Entry screen, Main tab.
Once the ticket number is entered, the status of the ticket will change from Out (O) to Entered (E). When
work file is batched and processed, status will change to Posted (P). If charge ticket number entered at charge
does not match, a warning message will appear. If you decide to go ahead and process with this mismatch, a
report will produce overnight and list those numbers that did not match the patient number.
Access Charge Ticket Tracking System. The Charge Ticket Tracking System can be accessed in one of
these methods:
•
•
Select Charge Ticket Tracking from the Options menu or
Key CTT in any Cmd field and press Enter to access Charge Ticket Tracking.
Viewing the Charge Ticket Tracking List. The List of Charge Tickets screen is used for viewing all tickets.
•
The default is to view all tickets for the clinic.
•
An option is available to view tickets by Department. Select List by Department from the Functions
menu to list tickets by specified department. Enter the desired department number in the Dept field and
press Enter or click OK. To return to the default view, press Return.
•
The screen can be viewed in Display Charge Ticket or Change Charge Ticket modes by pressing
respective buttons. Note: The List by Department is available in the display only mode.
•
Sorting may be done by ticket number, status, date, or patient name. The default sort is ticket number. If
you desire to sort by another option, click on the drop down box in the Sort List By field and select sort
choice. Example: select Patient Name for sort. Key patient last name followed by all or part of the first
name. Press Enter or click OK. Note: Patient Name search is only available in the List by Clinic mode.
Viewing the Charge Tickets. Click in the Sel field and click Print Selected Ticket from the Functions menu
to print a charge ticket. To view status details, click in the Sel field and press Change or Display button as
desired.
You will be brought to the Display or Change Charge Ticket Screen. The Status may be noted as follows:
TRN-W-541
Created 11/21/05 Revised 6/05/06
Page 10 of 18
Out - Not accounted for
Returned - Back from exam room-no charges entered
Void - Manually voided (for print jams, etc.)
Lost - Not accounted for, no explanation
Confirmed - Not accounted for, explanation exists
Entered - Charges entered but not yet processed
Posted - Charges entered and processed
Changing Charge Ticket Status. In the Change mode, the ticket status can be changed. Status codes Out,
Posted, and Entered cannot be manually entered. They are maintained by the system.
•
In the Status field, click the drop down box and choose Returned, Void, Lost or Confirmed status.
•
Enter comments, as desired.
•
Press OK to accept changes.
•
Press Return button to return back to the List Charge Tickets.
Press Return button again to return to a menu.
6. Blue Cross and Blue Shield Notes:
•
BCBS Benefits Screen - now divided into benefit categories. Customers can select which category they
need information about instead of paging through pages of data.
•
BCBS Benefits Screen - Customers will notice the HIPAA messages read differently than before. The
non-local (Blue Exchange) BC policies messages in some cases are very different. HIPAA has very
strict requirements on the data we send over now. They are looking at the Group# and Tax-Id
information. In the Legacy format we could send a very broad span of data to retrieve Infosolution
messages.
•
BCBS Claim Status Screen - HIPAA uses Claim Status Codes that define exactly what is going on with
the claim. Before all you ever saw was IP (In Process).
•
BCBS Claim Status Screen - Date Range - BC is now limiting to a years worth of claim data at a time.
We will default the Date Range automatically to one year. If you need to see more, you will need to
change the date range on the screen.
•
BCBS Benefits Screen - Response Time - Customers may see some response time issues when pulling
up this screen because of the vast amount of data being returned back to us with the new HIPAA format.
Access BCBS with Screen Access Commands: I/E, I/B, or BPL
7. To shut down PracticeManager, click Return button until returned to Main menu screen and press Exit. Click Yes
in response to “Do you wish to exit PracticeManager?” Click No if you did not wish to exit at this time.
Click X in the upper right hand corner of each of the browser windows that still remain open. You could have up to 3
browser windows open.
MDr PracticeManager Properties Quick Reference
MDr PracticeManager offers the user different options for font and screen sizes, showing lines on selected screens and
auto tabbing on data entry screens to name a few. In order to choose your options, when you logon to the MDr
PracticeManager Session Manager Authentication screen, choose File, and then Properties.
TRN-W-541
Created 11/21/05 Revised 6/05/06
Page 11 of 18
Show lines: Show lines on the Account Analysis Screen.
With lines
Without lines
Show Screens Full Size: MDr PracticeManager application window will fill the display of the monitor.
Auto Tab: Automatically jumps to the next field when the current field's maximum length has been reached. This
avoids manually clicking in or tabbing to the next field.
Make Periodic Internet Traffic: Keep Alive property replaces this.
Show Patient Information (Frame Customers Only): Displays demographic information (PDI, ADI, IDI) in PLS,ALS,
ILS, and the Insurance List in Support files. Right click in PLS and select Show Patient Information. The Patient’s
Demographic Information (PDI) for the patients will be listed on the PLS screen. The display screens may be profiled
also for customized viewing.
Show Extra Insurance Information (Frame Customers Only): Adds Relationship to Insured and Group number to ILS
screen. Shows insurance address on Insurance Support Files listing screen.
Problem Determination: Reserved for IT or Inside Support use.
Redirector Connection: Reserved for IT or Inside Support use.
Keep Alive: Sets the number of seconds your terminal will stay connected to the network when no keyboard or screen
activity is detected.
TRN-W-541
Created 11/21/05 Revised 6/05/06
Page 12 of 18
Use HIPAA Security Login: This property controls role-based security for terminal and user. The property is
password protected.
Check Group Code: Adds a verification step when keying a group number and beginning date field. Requires group
and date field data be keyed again.
Switch Payment with Deductible Amount: Allows payment and deductible fields in the Insurance Payment screen to
be switched. Once the option is set, click on the OK button to switch the fields in the screen.
Verify Keeping Charge in Suspense: Allows suppression of the Multiple Payment Entry (MPE) pop-up box Do you
really want to keep the charge in suspense? If you turn this property off, you must ensure that unchecking the box in
the MPE screen is confirmed by applying that change before leaving the MPE screen. A bypassable error will appear
in the status line to alert you to your action.
Show Patient Name (Frame Customers Only): Multiple Charge Entry screen users may show the patient name as part
of their profiling process.
Real Time Totals (Charges) - This option can be turned on to display Data Entry Totals for all transactions shown on
each page of the MCE screen. Totals will be in a running balance mode. Hash totals may be displayed by right clicking
Show Totals by Service Code in the MCE screen.
Start Cursor in Patient Name for AIU: When entering the Appointment Inquiry Update (AIU) Screen, the cursor will
be positioned in the name field.
Gateway for Appointment System (Frame Customer use only): Must be checked to use the DAL screen.
Show Weekly Schedule-DAL (Frame Customer use only): When this option is set, you may view one doctor’s weekly
schedule at a time.
Use Appointment Label Printing (Frame Customer use only): Activates label printing with use of the MAL command.
Use Label Print function in the Function menu.
TRN-W-541
Created 11/21/05 Revised 6/05/06
Page 13 of 18
Format Comments for AIU: Comments will wrap when using your new line key in this screen.
Block Appointment Interval: Allows variable minute intervals at any time when blocking appointments in increments.
Show Insurance Code on DAL: The Gateway option must also be set for this to work. After the appt. is made the
primary insurance will show at the end of the appt.
Show Doctor Messages on DAL: Gateway option must be set. Doctor’s messages will show at the bottom of the screen
above the status line. The information will change as you click on different doctors and days. This also works on the
weekly schedule option.
Update Doctors Individually: Allows changes to be made for another doctor while changes are being applied on
another doctor.
Automatically Rank Insurance on REX: Allows automatic ranking of Insurance as entered in the screen. Once you
have keyed the Insurance number and tab out of the field, the rank will be filled in. You may manually key in the Rank
field to override the automatic ranking..
Turn on Helpful Hints: Displays fly-overs.
Drop Name Box Automatically (Profiled REX screen): Drop down fields such as the Patient Name can be set not to
drop down automatically. It will drop down when you tab or back tab into the field.
Show Medical Record Number on MPI (MPI users only): Will display the Medical Records Number when using the
MRL (Medical Records Listing).
Registration Encryption on PC (Interface clients only):
When a patient’s record is updated, it creates and sends an encrypted file to update the hospital’s database with the
changes.
Start Printer Automatically: ALWAYS blank.
FAL Printer: Allows 4 X 6 screen print of future appointment. Found in right click menu. Contact Customer IT
before this option is to be used.
TRN-W-541
Created 11/21/05 Revised 6/05/06
Page 14 of 18
How to Create and Work in Multiple Sessions
Change
sessions
Print
screen
Add new
session
Control bar
Rotate between
sessions
1.
After logging into PracticeManager and signing onto the client, you must exit from the news screen. Then you
see the screen below. This screen includes the main menu and the control bar.
2.
The button on the control bar allowing you to open multiple sessions is shown below. It is the first button to the
right of the printer button. Click this button.
3.
After clicking this button, a system menu appears for the new session. Choose the new session.
Add new session
4.
Next, a new sign in screen appears. After signing in using your initials and a different client number *your screen
appears as shown below. Click on the patient listing or account listing buttons to search for patients or accounts.
TRN-W-541
Created 11/21/05 Revised 6/05/06
Page 15 of 18
*Notice that the new client number appears at the bottom left hand corner of the screen.
5. After clicking on the patient listing button, you are taken to the patient listing screen. If you want to work in the
other session you have open in PracticeManager, you have to click on the rotate button. This button allows you to
move between sessions.
Rotate button
6. If you want to see how many sessions you have open, you can press the change session button.
Change session
The following screen appears. From this screen, you can access any of the sessions you have open by clicking on the
appropriate button. You can also create a new session by clicking on the ‘create new session’ button.
Please follow these procedures to correct a printer problem:
1.
Is the printer powered on and ready?
A.
Insure the printer is powered on..
B.
If power is on, insure the “Ready” or “Sel” button has been pressed.
2.
Is the printer in an alarm condition?
A.
If paper needs loaded, please insert paper and try again.
B.
If the paper seems jammed, please clear the paper jam and try again.
1.
Laser printers may require opening the top cover and removing the drum cartridge to
access the jammed paper.
2.
Dot matrix printers may require the paper to be removed and then doubled before re-inserting.
3.
If you feel you need assistance to complete either of the above, feel free to contact Customer IT.
C.
If unsure what the alarm condition might be, refer to your owner’s manual or contact Customer IT.
3.
Has the Practice Manager printer session been started?
A.
Is there a printer session button on the Task Bar?
TRN-W-541
Created 11/21/05 Revised 6/05/06
Page 16 of 18
1.
2.
If there is a printer session button on the task bar, clicking that button will open the “Printer Session”
window or bring it to the surface.
a.
A solid green activity bar and the session status of “Connected” indicate a good connection.
b.
A partially red activity bar indicates connectivity problems.
If there is no printer session button on the task bar, click twice on the “Start Printer” icon on the desktop.
You may be required to minimize all active screens to access your icons.
4.
Can the printer print a test page from the Practice Manager printer session?
A.
To print a test page from the Printer Session window, use the following steps:
1.
In the Printer Session window at the top left corner, click on “File”.
2.
Under “File” click “Print Test Page”.
3.
A small window stating a test print has been sent to the printer will appear, however, the page will not print
until the “OK” button is clicked.
B.
If the test page prints properly, Disconnect and Reconnect the printer in the Printer Session window and reset the
printer under Practice Manager, using the following steps:
1.
In the Printer Session window at the top almost center, click on “Communication”.
2.
Under “Communication” click “Disconnect”.
3.
Once more click on “Communication”.
4.
Under “Communication” this time click “Connect”.
5.
Minimize the Printer Session Window.
6.
In the first Practice Manager Medical System Menu (after selecting a system and exiting the “News”
screen) click the button for the “Options” Menu.
7.
Under the “Options” Menu select the “Reset Printer” button.
8. An additional screen will display the printers that will be reset. Click OK.
5.
Is the printer selected under the Practice Manager “Main Menu/ Options Menu/Printer Selection”?
A.
In the first Practice Manager Medical System Menu (after selecting a system and exiting the “News” screen) click
the button for the “Options” Menu.
B.
Under the “Options” Menu select the “Printer Selection” button.
1.
Insure that the printer ID is listed in the proper field.
2.
Click “Apply” if any changes have been made.
3. If changes were required, request the print job.
6.
If all the preceding steps have failed to correct your problem, please call the DST Customer IT Help Desk (Hardware Option).
TRN-W-541
Created 11/21/05 Revised 6/05/06
Page 17 of 18
Screen Access Commands
AA
AEO
AFN
ALB
ALE
ALS
Account Analysis
Account Employer/Other
Account Financial
Account List by Balance
Acct List by Employ/Other
Acct List by Name, Num
FL1
FL3
I/B
I/E
IIN
ILS
Follow-up List by Patient
Follow-up List for All Accounts
Insurance Benefits
Insurance Eligibility
Insured Information
Insurance Policy List
ALP
AMN
BIS
CAL
CAD
Acct List by Phone, SSN
Account Main
Batch Index Screen
Calendar
Case Acc/Disability/Hosp
IMN
I/R
MCE
MPE
MPI
Insurance Main
Insurance Referral
Multiple Charge Entry
Multiple Payment Entry
Master Patient Index
CDI
CEH
CIC
CIP
CIR
CLS
CPL
CRL
CRC
CSM
CNS
CMN
C/T
CTT
BPL
D/P
ERR
FSS
RCL
CEA
Collection Daily Index*
Charge Entry Header
Case Ins Coverage
Case Ins Precertification
Case Ins Referral
Case Listing
Case Ins PreCert Listing
Case Ins Referral Listing
Case Ref Covered Services
Closeout Scheduling
Collection Notes
Case Main Phone, SSN
Charge Ticket Print
Charge Ticket Tracking
BCBS Precert Listing
Demographic Print*
Multiple Error Listing
Form Selection Screen*
Retained Charge Listing*
Charge Entry Anesthesia*
OPS
PEO
PEH
PLA
PLD
PLE
PLI
PLS
PLP
PMN
P/R
P/S
RES
REX
RSM
SOS
W/F
ICM
RCR
BPL
Online Print Services
Patient Employer/Other
Payment Entry Header
Patient List by Acct/Other
Pat List by DOB, Misc
Pat List by Empl/Other
Pat List by Ins Info
Pat List by Name, Num
Pat List by phone, SSN
Patient Main
Reacquire Printer
Printer Selection
Reset Record to last update
Registration Express
Requestor Screen Menu
Sign on Screen
Transaction Entry Work File
Interface Control Menu*
Retained Charge Reversal*
BCBS Pre-Cert Listing
AAL
AAD
AMG
AIU
CAL
DAD
Appointment Related:
Alphabetic Appointment Lookup
Available Appointment by Dept
A Month-at-a-Glance
Appointment/Inquiry Update
Calendar
Daily Appointment Display
DSL
DAS
MAL
MCT
NAA
DAL
Doctor Schedule Lookup
Doctor Appointment Schedule
Multiple Appointment Listing
Multiple Charge Ticket Print
Next Available Appointment
Daily Appointment Long Display
Notes:
TRN-W-541
Created 11/21/05 Revised 6/05/06
Page 18 of 18


© Copyright 2026