
How to Pop Email to Outlook Webmail Access
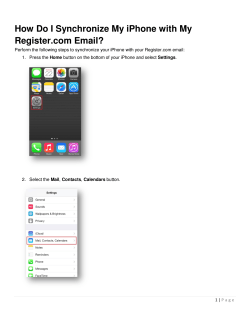
How to Pop Email to Outlook
Webmail Access
You can access your email account through the following URL: http://webmail.usalocalbiz.com. The login
is your full email address and your account password. We do have tools available to hosted domains to
create new email accounts. Some want to take advantage of software like Outlook to view their email.
For those who have email popped to Outlook, we’ve developed these instructions that cover Outlook
2007/2010 and IOS (iTouch, iPad, iPhone).
Those familiar with configuring email settings can skip the step by step instructions and use the
following information:
Account type: POP3
User Name: your email address
Password: your password
Incoming mail server settings:
Incoming mail server: smtp.usalocalbiz.com
Incoming server (POP3) Port number: 995 (Requires SSL)
If your ISP provides outgoing mail, you will probably want to use their settings. However, if needed, you
can use USALocalBiz's outgoing server by using the following settings:
Outgoing mail server (SMTP): smtp.usalocalbiz.com
Outgoing server (SMTP) requires authentification.
Outgoing server (SMTP) Port number: 465 (Using SSL encryption)
(You can also use Port number 587 and TLS encryption if you have problems.)
Log on to outgoing server using your email address, but replacing the @ with a .
For example, [email protected] would become shane.culocalbiz.com
Setting up Email to Outlook 2007
Let’s take a look at how to setup your pop mail account in Outlook 2007.
First things first – check the version of Outlook you’re currently using by going to Help > About Microsoft
Office Outlook. The screen that displays will tell you your version. We’ll begin with instructions for the
latest Office Outlook 2007 setup.
1. Open Outlook.
2. Select Tools > Account Settings.
3. Select NEW from the secondary toolbar in the display window. This will allow you to create a
new connection. You could also edit the existing pop email, if you have it setup for our old email
server. Whichever route you choose, you will need your original password to create the account.
4. Choose the first selection – Microsoft Exchange, POP3, IMAP or HTTP. We’ll use Secure POP.
5. After clicking next, do not enter information into the following screen. You will want to select
the checkbox on the lower left of the window – Manually configure server settings or additional
server types.
6. Select Internet Email – the first selection. Click Next.
7. Enter your information into the relevant field. The account type is POP. The mail server for both
outgoing and incoming is: smtp.usalocalbiz.com. The username is your full email address. The
Page - 2
password has stayed the same from the old mail server. Note: check the "Require login using
Secure Password Authentication (SPA)".
8. Click More Settings on the above screen. You can edit the existing account to return to the
above screen, if you clicked NEXT.
9. A four tabbed dialog window appears. Select the second tab titled “Outgoing Server” and tick
the checkbox then the second radio button. Please note that your User Name is your email
address with the @ replaced by a period. For example, here [email protected] has
become shane.culocalbiz.com.
Page - 3
10. Select the fourth tab titled “Advanced” and tick the “This server requires an encrypted
connection (SSL) checkbox. This automatically changes the incoming server port number from
110 to 995. Leave that change as it is.
11. Change the Outgoing server (SMTP) to 465 (use Port number 587 and TLS encryption if you have
problems) and from the drop down menu next to "Use the following type of encrypted
connection," choose SSL.
NOTE: You can also choose to leave a copy of your email messages on the server from this
Advanced tab. Tick the checkbox and select the configuration you would like.
12. Click OK when you have the configuration complete. You can begin sending and receiving email
through Outlook.
Page - 4
Setting up Email for Outlook 2010
Let’s take a look at how to setup your pop mail account in Outlook 2010.
First things first – check the version of Outlook you’re currently using by going to Help > About Microsoft
Office Outlook. The screen that displays will tell you your version. We’ll begin with instructions for the
latest Office Outlook 2007 setup.
1. Open Outlook.
2. Select File > Info.
3. Select + Add Account from the display window. This will allow you to create a new connection.
You could also edit the existing pop email, if you have it setup for our old email server.
Whichever route you choose, you will need your original password to create the account.
4. Do not enter information into the following screen. You will want to select
the checkbox on the lower left of the window – Manually configure server settings or additional
server types. Then click Next.
5. Select Internet Email – the first selection. Click Next.
6. Enter your information into the relevant field. The account type is POP. The mail server for both
outgoing and incoming is: smtp.usalocalbiz.com. The username is your full email address. The
Page - 5
password has stayed the same from the old mail server. Note: check the "Require login using
Secure Password Authentication (SPA)".
7. Click More Settings on the above screen. You can edit the existing account to return to the
above screen, if you clicked NEXT.
8. A four tabbed dialog window appears. Select the second tab titled “Outgoing Server” and tick
the checkbox then the second radio button. Please note that your User Name is your email
address with the @ replaced by a period. For example, here [email protected] has
become shane.culocalbiz.com.
Page - 6
9. Select the fourth tab titled “Advanced” and tick the “This server requires an encrypted
connection (SSL) checkbox. This automatically changes the incoming server port number from
110 to 995. Leave that change as it is.
10. Change the Outgoing server (SMTP) to 465 (use Port number 587 and TLS encryption if you
have problems) and from the drop down menu next to "Use the following type of encrypted
connection," choose SSL.
NOTE: You can also choose to leave a copy of your email messages on the server from this
Advanced tab. Tick the checkbox and select the configuration you would like.
11. Click OK when you have the configuration complete. You can begin sending and receiving email
through Outlook.
Page - 7
Setting up Email for iOS (iPhone, iPad, iTouch)
Let’s take a look at how to setup your pop mail on your iPhone, iPad or iTouch device. First pull up your
apps page.
Once on this page, simply click on
Settings
Which will open this window.
Here click on Mail, Contacts, Calendars
Once on this page, simply click on
Add Account...
Opening this window.
Here click on Other
Page - 8
Pressing Other will open this window.
Here you will click on Add Mail Account
This will open the New Account window.
Here you will enter your Name, Email address,
password and a brief description of the account.
After doing so, click the Next button above.
Press the POP button above and then scroll
down the page to show more settings.
Stop when you see the settings for
Incoming Mail Server
Enter Host Name as smtp.usalocalbiz.com
For User Name use your email address
and then enter the password associated with the
account. Then scroll down further.
Page - 9
Now to enter settings for the Outgoing
Mail server, use the same settings as before,
except substitute a period in place of the @
symbol. Shown here, [email protected] has
become shane.culocalbiz.com.
After entering this information press Save.
This will open this window. Here you should click
on the description you chose for the email
account. In this example, we'll push Culocalbiz.
You will now see the window above.
push smtp.usalocalbiz.com
In this window, slide the Use SSL slider until it
says ON. Then press the Server Port number
and change it to 465 before pressing Done.
Page - 10
You will now see the window above.
This time, push Advanced
In this window, slide the Use SSL slider until it
says ON. Then press the Server Port number
and change it to 995. Exit by pushing Culocalbiz
above. Then press Done to finish.
Page - 11
Setting up Email for MacMail
Let’s take a look at how to setup your pop mail on MacMail. First pull
up your accounts page located by going to Mail ->Preferences
Under Account Information
Set Description to
smtp.usalocalbiz.com. replace Email
address with your own and enter your
full name as you would like it to
appear.
Incoming mail server will be the same
as description and User Name and
Password should use your email
address and the login password for the
account.
Outgoing Mail Server (SMTP) should be
set to smtp.usalocalbiz.com and Use
only this server should be checked.
Under Advanced
Check all three boxes and set removal
period to After one week (or your
preferred removal period).
Set Port to 995. Check box for Use SSL
and Authentication type to Password.
Page - 12
Return to Account
Information Page
Click Outgoing Mail Server (SMTP)
and select Edit Server List. You will
see the window to the left.
If the window looks different click
the Advanced tab in the center of
the page.
Click Use custom port and set it to
465. Click Use Secure Sockets Layer
(SSL) Set Authentication to
Password and enter User Name.
Note: this is your email address, but
with the ( @ ) symbol replaced with
a period ( . ). Then enter your email
password and click OK.
And that's it!
Page - 13


© Copyright 2026