
How to link Facebook with the WuBook Booking Engine !
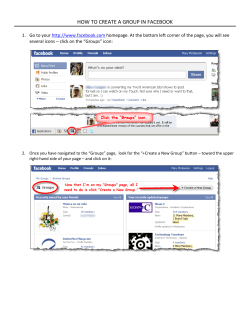
How to link Facebook with the WuBook Booking Engine ! This document explains how to obtain a direct link from within an existing Facebook page to the hotel’s booking engine page at WuBook via the WuBook Widget for Facebook. The are TWO METHODS ! After investigation, and sending a first method to WuBook for publishing, another WuBook customer (Thanks very much to Luigi !!) mentioned in WuBook’s blog that there is a much simpler way to acomplish the task than described initially. We have ammended this document and now we explain both methods . Common Task for both Methods Let’s start at WuBook : Enter your own Wubook account and on the right side links (fast links) you will find WUBOOK WIDGET. There you will find the link that is shown Once you enter that option, you can generate the Widget with the options of your preference. After selection, press the GENERATE WIDGET button : You will then find a HTML code that can be copied and pasted at a later stage. Please remember that this procedure has to be done for each hotel that you want to link in Facebook, as this widget will be related to the particular hotel ID that you selected. You will need that code for both methods that will be explained here. So far ... the work at WuBook has been done ! METHOD 1 (Simple, fast, but ....) : Enter you Facebook account. At the top, in the search area ... ... search for : „STATIC HTML“. You will obtain more than one application after your search. You can choose any of them. We will continue this guide with the application named as “Static HTML: iframe tabs“, the one marked with a star. Once you choose that application, you will obtain a screen showing something like this : You can then press the button „Add Static HTML to a Page“ And after pressing that button, you will notice the first advice. You are using a THIRD PART APPLICATION on Facebook, that is stating that this application will have access to your page’s profile information, to your photos, friend’s info, and other content that it requires to work. What this exactly means, is up to your own interpretation. The fact is that you will make use of an application, created for Facebook, by a third party provider, on which you will have no further control. You cannnot be sure of what information of your profile or other Facebook data will be exposed to that application. It is your own responsability to use this advise in a correct manner. The second method that is explained later in this document, DOES NOT make use of any third party application, and everything remains under you own control. To be some more specific in a technical way : The code that has been generated by the WuBook widget is a script that must be stored and saved somewhere, and must be executed somehow by a web server. In this case, explained in method 1, this code is stored and executed in the third party provider web server. Among others, they will in fact have access to your private hotel code provided by WuBook, because it is part of the code generated by the WuBook Widget. If you are not concerned about this fact, you can use this method that is simple, fast and immediate. All what you have to do, to finish your task, is choosing a page on which you want the tab to appear. Press the button ADD STATIC HTML: IFRAME TABS, and you will have your new tab on your Facebook Menu. Press the ‚Welcome Tab‘ and you will be able to enter the HTML content, generated by the WuBook Widget. Just copy and paste that code from WuBook into the field. After you press the SAVE botton, on the upper right corner of this application, you will see ALL SAVED You should also consider to take a look at the FAQ & Help Center section. There you will find answers to questions like : To see the final result, you must exit your Facebook Account, and look for your Hotel Site as a final customer : You will see your new tab (in this example it has not yet been renamed, and continues as Welcome Tab), and the new WuBook Widget to access the booking engine of your hotel directly from your Facebook Page. That’s all ! Fast, simple and easy, but remember, due to the use of a third party application, your private data may be exposed to others. Thanks again to Luigi for your comments in WuBook’s blog and your contribution to this tutorial. Next Method Nº 2 will acomplish the same task, but not exposing your data to any third party, and giving you total control on your information. METHOD 2 (Not as simple as method 1, but secure and you keep control on your private information) : First of all : Since few months ago, Facebook will not longer host any third party web page ! So you NEED to have your own secure (https) web server to achive this link between Facebook and WuBook. Facebook will deny the link in case that you do not use a https secure server. So within your hosting, you will have to have enabled SSL security. Open any text editor, like Notepad in Windows and paste that code generated by WuBook into a new document. Save the document into any directory of your computer with the name ‘index.html‘ This is the file that later has to be copied to you secure web hosting ! Enter your Web Hosting via any FTP program (remember it has to be a https secure server !), and create a new folder wherever you want inside the html folder of your web FTP. For example : /html/Facebook/MyHotel1 Upload the index.html file you’ve just saved on your computer to that folder in your secure web server, even if it is the only file in that folder (it should be the only file in the new created folder). Your FTP should then show something like : You can now exit your FTP program connected to your server. Just remember the full path to the index.html file. We have finished this new phase too, and now we can proceed directly to Facebook. Enter your Facebook account. What we now want to achieve is to create a new tag on your Facebook main menu on the left side of your screen , which will enable to show „BOOK NOW“ or something similar and which allow the users to book your hotel directly from your Facebook site. Once entered your Facebook account and page, go to the very bottom of your screen and look for the DEVELOPERS link : If this is the first time that you enter the Developers area, you will see a request like : Just click on Allow to continue. The following information is updated as of 22. November 2011. Facebook changes very often options and interfaces, so it might be that at a later stage the following screenshots should appear different. You can avoid the next two following steps by entering directly the following link : https://developers.facebook.com/apps but I wanted to show some additional information for those who are interested : Select the following option : You will see that you have many tutorials which you can read and follow. In our case, we need to go to PAGE TABS : There, you will see another tutorial which you can examine , but we need again to enter DEVELOPER APP, which will take us to the link that was mentioned above and that could had avoided these two steps in between : Ok ! Let‘s start creating our new Facebook tag ! At the top right corner you will find : Once you press that Button, you will have the options to specify a Name for the Tag that will be created. Don’t worry about the name or text that you are going to use, it can be edited or changed after conclusion, or whenever you want. At APP DISPLAY NAME you should enter any name you like, but I have noticed that Wubook is a ‘Facebook Trademark‘ (!!) and cannot be used. For the purpose of this example, I will use the name ‘BookARoom‘. The text that is going to be shown on your Facebook site can be edited later. Leave APP NAMESPACE empty at this stage. Agree to the Facebook Platform Policies and click on Continue. You will be asked for a security check. Enter the captcha that appears and Submit. The next page will show the data required to create the new app. At the top, you’ll see the App ID and App Secret Values. Don’t care about these values. Second, notice the ‘edit icon’ below the App Secret. This is the icon that will appear to the left of your tab’s name in your Facebook page navigation section, so make it eye catching and make the dimensions 16 x 16 pixels. If you don’t create your own icon, your tab will have a generic Facebook‐tab icon : Basic Info on the previous screenshot : APP DISPLAY NAME : Make this the same as the original value you provided. APP NAMESPACE : Any name that you want to enter for internal reasons. No spaces and no uppercases are allowed. CONTACT EMAIL : Where you want Facebook to send emails regarding your new app. You can leave the rest empty. Cloud Services Since Facebook instituted their HTTPS requirement for all applications, they started offering cloud hosting solutions for those who find setting up a hosting account and secure server too much bother, expense or both. But click the Learn More if you're interested. “Select how your app integrates with Facebook“ This is where you select the data of your https secure server, and where the index.html that we uploaded to our web hosting is located. In case of the example that we are describing in this tutorial the values should be used as follows : PAGE TAB NAME : The displayed name of the tab in the Facebook page navigation section on your facebook site. PAGE TAB URL : The unsecure URL (HTTP) of our index.html file. Use the same address as it would be a secure secure but with http:// instead of https:// In our case, as we created a Facebook folder within our html folder in our web hosting, the values should be similar as shown above. SECURE PAGE TAB URL : Same as the PAGE TAB URL but in this case including the https:// instead of http:// You need to enter these values, as shown above, not only in PAGE TAB option, but also you need to click on the APP ON FACEBOOK option to see additional options, and fill the values as shown on the screenshot above, similar to the values just enterde in the PAGE TAB option. The ‘Canvas Page‘ value is autofilled by Facebook. PLEASE TAKE CARE that the URL’s that you enter should end with a ‘/’. Add also an additional folder ‚/MyHotel1/‘ after the ‚/Facebook‘ folder if you used it for uploading the index.html to you web hosting folder. Click SAVE CHANGES and you’re done !! Once your Facebook app has been created, you will need to add it to your own Facebook site. To do that, you need to click on the VIEW APP PROFILE PAGE option that is shown on the left side of your screen : After clicking on that option, you should obtain : Select the ADD TO MY PAGE option, and select the your Facebook page to which you want to add the tab with the app that we just created. The button will then change to ADDED TO PAGE. Your new iFrame app should now appear on your Fan Page. If you don’t see it there right away, you may need to adjust your PAGE SETTINGS. From your Fan Page, click on the EDIT PAGE button in the top right corner of your page. Then click on ‚APPS‘ and find the application that you just added. Click on the ‚Edit Settings‘ and you’ll get this popup dialog : TAB : If it says ‚Available (Add)‘, click add to add it to your navigation; if it says ‚Added (remove)‘, you’re set. CUSTOM TAB NAME : You can override the default tab name by entering a new name in this filed and then click ‚Save‘. Finally click ‚Okay‘ to save your changes. GREAT !! If everything has gone fine, then you should see the WuBook booking engine widget into your own Facebook site !! And you can have your customers, friends and facebook visitors to book directly from your Facebook Site !! THAT’s ALL FOLKS !!!


© Copyright 2026