
How to create an information page (info page)
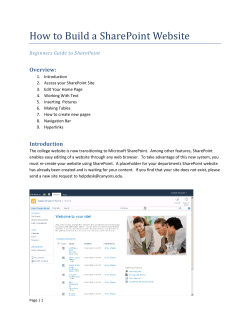
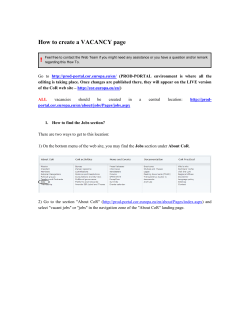
How to create an information page (info page)
!
Feel free to contact the Web Team if you might need any assistance or you have a question and/or remark
regarding this How To.
IMPORTANT! new pages must ONLY be created EN version of the site.
Go to http://prod-portal.cor.europa.eu/en/ (PROD-PORTAL environment is the back office of
the CoR website and is the place where all the editing is taking place. Once changes are
published there, they will appear on the LIVE version of the CoR web site –
http://cor.europa.eu/en/)
1. When are information pages used?
Information pages are generally used to display static content – general information. Or when no other
of page layouts (highlight, press release, interview, event,….) is applicable to the content to be put
online.
2. Where to create information pages?
Go to the section in which you wish to create a new page.
For example:
Option 1: go to section via the web address
http://prod-portal.cor.europa.eu/en/about/Pages/index.aspx
http://prod-portal.cor.europa.eu/en/activities/commissions/civex/Pages/civex.aspx
Option 2:
go to the main section (ex: About CoR),
select "Site actions" "View all site content"
In the list "Sites and workspaces", select the subsite in which you wish to create an info page.
3. Create your information page
Go to the left side of the Ribbon on top of the page, select Site Actions, then select New page.
Fill in the name of the page
Important: The name of the page is the name which will appear in the URL address. Although the
"URL Name" field is automatically generated after you leave the Name field, please follow the
CoR URL policy:
- adapt the words into lower case (NO CAPITALS)
- keep the '–' sign as space between the words
- no accents
- key words from the title (not more than 3 to 5 correctly spelled words)
- no date
Correct: conference-on-regional-policy
Wrong: Conference-on-Regional-Policy
You will then be redirected to the page itself in editing mode.
On the Ribbon under the Page tab, go to Page Layout, select the "Info Page" page layout.
*Be sure to be on the top of the page, so that you can see the entire Page Layout list. If not, then
scrolling down the list will lead till the middle of it.
*If you do not see the ribbon tabs (Browse, Page, Publish), go to site actions show ribbon.
4.
Content:
After verifying that the Page Layout is correct, you may proceed to content editing.
-
Title: title of the page
Byline: subtitle (more detailed description to complement the title) (not mandatory)
Page Image: Browse the database and select an existing image (or one you have uploaded this section is part of another "How to" Guide)
Image Caption: here you can add a small description concerning the image
Page Content: this is the field where you can type the content of this Highlight.
DO NOT copy paste your content text straight from an email or Word into the 'Page
Content' field it will break the website style.
To import your content into the webage, follow the instructions:
Copy the content from your word document
Click on the "page content" zone in your page layout
The "Editing Tools – Format Text" tab will be activated
Click on "Paste", then select "Paste plain text"
Your content text will now be copied into the webpage content zone.
ATTENTION – The formatting of the text will be lost (bold, hyperlinks, bullet points,…)
To reformat the text correctly, please use the "Editing tools" in the Sharepoint ribbon (similar to
word formatting tools). (see screenshot below)
-
bold
NEVER use italic and underline on a webpage (bad practice: italic (poor quality
readability), underline (confusion with underlined hyperlinking)
-
ALWAYS format bulleted/numbered list using the Sharepoint editing tools (DO NOT do
it manually)
DO NOT USE: Heading 1 and Heading 2 for titles or subtites (these are already
preformatted in Sharepoint for page titles (heading 2) and banner title (heading 1)
Heading 3: to be used for subtitles in the content text
Heading 4: to be used for sub-subtitles (if needed)
Read more about CoRwebsite editorial guidelines for highlights in Annex 1 of this guide.
TIP: If your feel confident to use HTML click inside the Page Content field, you may notice
that an extra tab appears on the Ribbon, called Editing Tools. There you will find on the right
part the HTML button. Select, press Edit HTML Source and the HTML Editor will open. As with
the Page Layout list, be sure to scroll on top of the page, so as to be able to see the HTML
Editor.
In the right column, you will notice a series of buttons.
- Add a Web Part: you can add any element to the page (video, news feed, list of related
events, etc.)
- Documents/Links/Media Links: Here you can add any Related information to the Highlight
(internal or external documents, internal or external links to pages, internal or external media
links)
o New link: Opens a new window to configure the settings for your new link (see
screenshot after descriptions)
o New Group: Organise links as a group – creation of new group
o Configure Styles and Layout: configuration of styles and layout of the links
o Reorder: Opens a window with the current Related links where you can change the
order of appearance.
Here you will need to change the following elements:
- Title: this is the text that would be displayed as a link
- Link URL: copy the link URL or browse through the web site to find it if it is internal (if the
link is external and/or is a document check the box: Open link in a new window)
- Style: select Bulleted Title
Before Saving and Closing your page, you will also need to set the Metadata of your page. (You can
always do that before editing the content.)
In order to Save the page without closing, press to the arrow below the Save and Close button and
select Save and Keep Editing.
4. Metadata / Page properties
You will find the metadata (or page properties) below the page content area when you are in edit
mode.
The fields that are mandatory to be filled are the following ones:
- Abstract: Enter the introductory text to the page (as short as possible, main ideas to be
summarized in the first sentence). See screenshot below. Read more about the style and
length of abstract in the CoR editorial guidelines.
- Language: write the language of your page (ie. English, French, German, etc. – you will
notice that by writing the first letters an automatic suggestion will appear and you can select
the appropriate with your cursor)
- Keywords: respectively, select from the keywords list the keywords that need to be assigned
to the page
-
Homepage: check this box if the page needs to appear on Homepage
Contact Person: you can put your name as contact person, since you have access to edit the
page
Rollup Image: this is not mandatory. The Rollup image will serve as the image that will
appear in parent pages (homepage, general landing page "News and Events", etc)
TIP: The purpose of keywords is to classify the information on the site via filters based on these
keywords (and NOT for search engines or users search purpose). Select carefully the keywords
thinking on where the information will appear on the site.
Example: Highlight which topic is of interest of the COTER commission and France – Select
keywords: COTER Commission, France it will also appear on the highlights page of both
these sections.
Before closing, make a final check to see if all mandatory property fields are properly filled in.
Go to the Page tab on the Ribbon and select Edit Properties button and press Edit Properties on
the list that appears below.
Here you can see the metadata and content of your page, as well as edit them.
> Check the Name of the page if it is line with the URL policy:
- no "spaces" but "dashes",
- lowercase characters, no capital letters
- no date
- to lowercase characters.
Moreover, if the title of your highlight is longer, you don't need to have all of it in a URL:
i.e. President Valcarcel meets with President Barroso of the European Commission to discuss latest
topics on Maritime Affairs of Southeast regions
can become
valcarcel-meets-barroso-to-discuss-maritme-affairs-of-southeast-regions.aspx
(the TITLE of the page will still remain the same)
After this change, and verification of content and metadata, press SAVE and Check in your page.
Check in button is located under Page tab next to the Edit/Save button.
Once your page is ready to be published, select Page + Submit for approval. A workflow will start
with the webteam to publish your page.
5. Page publish workflow
Once your page is submitted for approval, the webteam will approve or reject the page.
> If your page is rejected you will receive an email explaining why it is rejected and what you
should correct/modify to your page.
> If your page is approved, the webteam will:
1) Approve and publish your page
2) Replicate your page in ALL language variations of the site
> Once your page is replicated you must publish the page in ALL language variations
TIP: When the page is replicated, it remains in draft on the other language variations of the site
and is not visible to the pubic. You need to go on the page in each of the language variations to
publish it.
6. Translate the content of the page in the appropriate linguistic version of the site:
Your page in the original language has now been published in ALL language variations.
You can proceed to the replacing the content of the original language with the translation.
You know that the original version of the page has been published in the EN site and replicated to all
language variations of the site.
Page in the original version on the EN variation: http://prodportal.cor.europa.eu/en/news/highlights/Pages/erasmus-local-regional-actors-kicks-off.aspx
Go to the site in the chosen language to replace the content with a translation:
For example, GO TO the page in the Italian version of the site: http://prodportal.cor.europa.eu/it/news/highlights/Pages/erasmus-local-regional-actors-kicks-off.aspx
Site actions Edit page
Page content: Replace title + content with the translation + edit the URL of the Related information
if needed.
Make the necessary changes to page properties, in particular translate the abstract + adapt the
language to the language of the page content.
When finished:
Page Save and close Publish Submit for approval Webteam to publish/reject page
Annex 1: CoRweb editorial guidelines
(please read carefully when formatting your page content)
ANNEX 1 : CORWEB EDITORIAL GUIDELINES FOR INFO PAGES
The "info page" page layout is used mainly for static content.
Info page content: Editorial guidelines
Page layout
Article page
Title
Font: Heading 2 (preformatted by SharePoint in the title field)
Style: no capital letters (except for at the beginning and for acronyms),
no italics, no full stop at the end
Length: as short as possible
Dimensions: 150 x 150 pixels, 72 dpi
Alignment: Automatically preformatted by SharePoint
Alternative text (alt text): max 90 characters (accessibility guidelines)
− Useful information (who? what? where?), or
− Description of the picture, or
− Use of key content words
(Text alternative to a photo is useful for people with visual problems or
when the image doesn't load, the description will be visible)
Subject choice (policy themes) –operational later
Date of article/info page:
- only use the "date" field
- do not enter the date in the title or the abstract
Photo (not obligatory)
Theme (List)
Date
Paragraphs
Subtitles (2 levels)
Date in the content:
- use the following standard format: dd.mm.yyyy (e.g. 28.05.2011). This
goes for all language versions as well as the territorial pages (Europe in
my Region)
Font: normal
Style:
− no italics,
− bold for key words/phrases and or for peoples' names (e.g. COR
Members)
− list or enumeration: use bullets or numbering available in the
SharePoint text editor (do not use the keyboard!!!) no manual
formatting
Layout: spacing between paragraphs and subtitles (h3 or h4)
Style subtitle level 1: h3
Style subtitle level 2 : h4 (= subtitles under h3 subtitles)
Hyperlinks
Links to e-mail address
"Related information"
column
Web-writing guidelines
Tick the box "Open in a new window" for links external to the COR
site
Do not tick the box " Open in a new window " for internal COR links
- ALWAYS link key words/phrase to the destination they describe (see
web-writing guidelines)
(e.g. The COTER Committee will meet on….-> YES, click here ->
NO)
Do not enter e-mail addresses (do not use "mailto") Link to
"contact form"
For all documents, links or media files – use the corresponding field.
For all other useful information, it is possible to use another web part
See the document
Info page properties: METADATA
Name (of the page) =>
- By default, when creating an article, always use English
- NO accents (valid for all languages when translating names of
embedded in the URL of
pages)
the page
- Lower case letters (NO CAPITALS!)
(other than the "default")
- Key words from page content: short words and current usage
-
Date
Article photo
Image roll up (= photo that
will appear in the filtered
information)
(not more than 3 to 5 correctly spelled words)
SharePoint 2010 automatically separates each word with a
hyphen (DO NOT insert an underscore)
NO date or reference figures
Examples:
• multi-level-governance.aspx
• political-groups.aspx
• enlargement-neglect-local-regional-authorities.aspx
• e-inclusion-congress.aspx
Date of article/info page:
- only use the "date" field
- do not enter the date in the title or the abstract
Date in the content:
- use the following standard format: dd.mm.yyyy (e.g. 28.05.2011). This
goes for all language versions as well as the territorial pages (Europe in
my Region)
Dimensions: 150 x 150 pixels, 72 dpi
SharePoint 2010 operates automatic scaling (reduction) based on the
original size of the image (Thumbnail).
Abstract (required)
Language (Required)
Key words (Required)
Abstract = introduction to the article
NB: in the predefined styles of the query, only the first 250 characters of
the introduction will be visible => The first sentence of the introduction
is paramount
Editorial guidelines:
Length: Ideally max. 30 to 40 words! (250 characters with spaces). If
longer, the sentence will be chopped in the query results.
Content: as short as possible, avoid narrative style, use telegraphic
style, without links and as neutral as possible as regards time. Use a
maximum of key words from the beginning (think about search engine
results (e.g. title and 1st line of the paragraph)
Required: indicate the language used in the contents
Add key words according to the list
(Purpose: Filtering and cross-linking information on the website,
website customisation and search engine ranking)

© Copyright 2026