
Blackboard Academic Suite This chapter includes the following topics. Blackboard Academic
Blackboard Academic Suite (Release 7.2)
Instructor Manual
This chapter discusses how to navigate and enter text in the Blackboard Academic Suite.
In this chapter
This chapter includes the following topics.
T OPIC
D ESCRIPTION
Navigation
Describes how to move throughout the Blackboard Academic
Suite.
Language Packs
Explains how Language Packs are used to present information
using different languages and cultural norms.
Quick Edit
Explains how to edit a course from within the view.
Searching for
Users and
Courses
Explains how to locate records in the system.
Entering Text
Describes how to input information.
Text Box Editors
Describes how to Input information using the Text Box Editor.
Link to File
Explains how to add a link to a file.
Insert Multimedia
File
Explains how to add a multimedia file.
About Spell Check
Describes the Spell Check feature.
Using Spell Check
Explains how to use the Spell Check feature.
Math and Science
Notation Tool
Describes the Math and Science Notation Tool – WebEQ
Editor.
Adding and Editing
Equations
Explains how to add and modify equations on the Math and
Science Notation Tool.
© 2006 Blackboard Inc. Proprietary and Confidential
Page 20 of 351
Blackboard Academic Suite (Release 7.2)
Instructor Manual
NAVIGATION
Overview
Only the material in the content frame changes when moving to a new area or page. The tabs and
header frame are always available for quick access to those navigation features.
N AVIG ATION T OOL
D ESCRIPTION
Tab
Click a tab to open it.
Button
Click a button to navigate to a page
within the Blackboard Academic Suite.
Some buttons also lead to areas outside
of the Blackboard Academic Suite.
Buttons also execute functions.
Link
Click a hypertext link to access another
Web page within the Blackboard
Academic Suite. Links can also open
Web sites outside of the Blackboard
Academic Suite.
Path
Click one of the hypertext links that
appear in the navigation path to access
that page. The navigation path appears
at the top of pages to return to the
previous page that led to the current
page.
Linking to a Course
To link to a Course, copy the URL from the address bar in the Web. Links to Courses can be
posted inside or outside the Blackboard Academic Suite. Users will be prompted for authorization
before accessing the Course.
© 2006 Blackboard Inc. Proprietary and Confidential
Page 21 of 351
Blackboard Academic Suite (Release 7.2)
Instructor Manual
LANGUAGE PACKS
About Language Packs
Language Packs present the Blackboard Academic Suite using language and cultural norms
matched to different audiences. Language Pack preferences are defined at the system level, the
course or organization level, and finally at the user level.
At the system level, the Administrator defines one language pack as the system default. This is the
language pack that appears when no other language pack are specified at the course level or at
the user level.
At the course level, the Instructor can set a language pack and enforce it. Enforcing a language
pack means that all users will see that language pack. If the language pack is not enforced, and a
user has a preferred language pack associated with their account, the user’s language pack will
override the course language pack.
At the user level, individuals may select their preferred language pack .
Note: Customized names, such as changing the name of a Content
Area, are not changed with the language pack . These values stay the
same through all language packs. The default names in the system are
translated and appear differently in each language pack.
Set a Locale for a Course
Follow these steps to set a locale for a course.
1.
Click Settings from the Control Panel.
2.
Click Set Language Pack.
3.
Select a language pack from the drop-down list.
4.
Click Enforce Language Pack to always display this course in the selected language
pack .
5.
Click Submit.
If a language pack is not chosen for a course the course will display in the user’s preferred
language pack or, if the user has not set a preferred language pack , the system default language
pack .
© 2006 Blackboard Inc. Proprietary and Confidential
Page 22 of 351
Blackboard Academic Suite (Release 7.2)
Instructor Manual
Course Areas not Impacted by Language Pack Selections
For the most part, the Control Panel appears in the selected language pack of a course; it does not
appear in the language pack selected for the user. In a few spots within a course, the page will
display using the system default or the user’s preferred language pack rather than the course
language pack . The following pages will not display in the selected course language pack:
•
Control Panel > Course Information > Modify Item, Copy Item, Add Item, Remove Item
•
Control Panel > Copy Files to CS
•
Control Panel > Discussion Board > Add Forum
•
Control Panel > Announcements > Confirmation receipt.
Spell Check and Language Packs
The Spell Check tool supports American English, Great Britain English, French, and Spanish. The
Spell Check tool will not work with other language packs. If Spell Check does not recognize the
language pack it will use a supported dictionary.
© 2006 Blackboard Inc. Proprietary and Confidential
Page 23 of 351
Blackboard Academic Suite (Release 7.2)
Instructor Manual
QUICK EDIT
Overview
Quick Edit allows Instructors to make changes to content from within the course view instead of
navigating through the Control Panel to edit content. When an Instructor is viewing the course
through the Student view, they may use this shortcut to edit course content, without going through
the Control Panel. Quick Edit controls appear in the navigation bar in each Course area and any
subfolders. System Administrators may disable this feature.
NOTE: The Edit View link is displayed to users with a role of Instructor, TA,
Course Builder, or System Administrator. Due to the size of the content
editing pages, this method of editing is not recommended with an 800x600
screen resolution.
Functions
Select Edit View to open and edit the Course area or Content Item. A Display View link appears in
the top right corner of the Control Panel view of the content page. Select Display View to go back
to the course display view of the same content page. Instructors may use Edit View and Display
View to toggle back and forth between the edit view and display view of course content.
© 2006 Blackboard Inc. Proprietary and Confidential
Page 24 of 351
Blackboard Academic Suite (Release 7.2)
Instructor Manual
SEARCHING FOR USERS AND COURSES
Overview
There are several areas in the Blackboard Academic Suite where users can search for other users.
User search options
The table below details the available user search options. All options are not available in all search
boxes.
TO . . .
search for a user using last
name or Username
THEN
...
1.
Select the Search tab.
2.
Enter either a last name or a Username.
3.
Select either the Last Name or Username
option. All matching entries will be displayed.
search for a group of last
names or Usernames that
start with a particular letter
or number
1.
Select the A-Z, 0-9 tab.
2.
Click on the first letter of the last name or on
the first number of the Username. All matching
entries will be displayed.
search using a value found
in the user’s name
1.
Select the Advanced tab.
2.
Enter a value in the Containing field.
3.
The search will return all users with that value
in their Username.
4.
Click the check boxes and select values from
the drop-down list to narrow the search.
1.
Select the tab.
2.
Click List All to list all the names enrolled. All
entries will be displayed.
list all users
Course search options
The following options are available when searching for a course:
•
Search: The search parameters on this tab can be used separately or in tandem to further
narrow the list generated. To use this tab: Click the Course ID, Instructor, or
Title/Description option. Enter a value in the field. Then click the All Courses, Month, or
Day option to define the list based on when the courses where created. The search
function will create a list of courses with that value created in the time selected.
•
A-Z, 0-9: Click the letter or number that represents the first character of a Course ID. A list
of all courses with an ID that begins with that character will appear.
•
List All: Click List All to view all the courses on the system.
© 2006 Blackboard Inc. Proprietary and Confidential
Page 25 of 351
Blackboard Academic Suite (Release 7.2)
Instructor Manual
ENTERING TEXT
Overview
By default, Blackboard Academic Suite will format text to 12-point, left-justified Arial. Any other
formatting must be done with HTML tags or using the Text Box Editor.
Text boxes may appear using the Visual Text Box Editor or with the options shown below. For more
information about the Visual Text Box Editor, please see the next topic.
Text box options
The following options are available in most text entry boxes in the Blackboard Academic Suite:
F ORM AT O PTION
B EHAVIOR
Smart Text
Automatically recognizes a link entered in the text box. Smart
text recognizes the ENTER key as a paragraph tag and accepts
HTML tags as well. Smart Text will also prompt to load images
if an image source tag appears.
Web addresses entered as URLs are
converted to links. The URL must begin with "http://" and there
must be a space before the "http://" to distinguish it from the
previous word.
If an image tag, <IMG>, is entered in Smart Text,
the Blackboard Academic Suite will automatically prompt you to
upload the image.
Plain Text
Displays text as it is written in the text area. Plain text does not
render HTML code. HTML code will appear as text.
HTML
Displays text as coded by the user using Hypertext Mark-up
Language (HTML) tags.
Note: The Smart Text and Plain Text options are only available if the
Administrator has turned off the Text Box Editor or if the user does not
have a Windows Operating System and Internet Explorer Version 5.x or
a later.
It is not possible to display a file in a content item and add a Smart Text or Plain Text description.
Add the description as a separate content item and then add display the file in the next content
item.
Smart text, Plain text, or HTML may be used in the Text Box Editor. Options at the bottom of the
box allow the user to switch format at anytime.
Smart text should be used if the intent is to display the text in the exact way that it is typed in. Line
breaks, tabbing, and other keyboard formatting will be retained with Smart text.
© 2006 Blackboard Inc. Proprietary and Confidential
Page 26 of 351
Blackboard Academic Suite (Release 7.2)
Instructor Manual
Plain text strips any formatting from the text, except for line breaks. The result is completely
unformatted text. This may be useful if the user needs to do a lot of copy and pasting of the
content, or if the intent is to display code information. For example, if the user wants to show how to
write something in HTML, Plain text should be used to retain the HTML tags in the content. Plain
text does not work with MathML or the equation editor. Changing a text box that includes a
mathematical formula to Plain text will make the formula unreadable.
The HTML option should be used if the user knows HTML and opts to type HTML tags into the Text
Box Editor. The result will be content formatted by the HTML tags used.
File names
Blackboard allows the use of all characters in file names. However, the user's operating system
and browser may limit the types characters accepted. For example, some browsers do not accept
multi byte characters.
Missing image detection in the Text Box Editors
Missing Image Detection functionality is available when a user:
•
pastes HTML with a broken image into the Text Box Editor and selects the HTML option
•
pastes HTML with a broken image into the Text Box Editor selects the Smart Text option
Missing image detection functionality does not apply when a user:
•
pastes HTML with a broken image into the Text Box Editor and selects the Plain text
option
•
links to an HTML file in the Content Collection with a broken image (either via the third row
of the Visual Text Box Editor or as a URL in the Text Box Editor).
Note: Images are stored in HTML using the following syntax: <img
scr="http://image_path">. The source location should be inside double of
single quotations.
© 2006 Blackboard Inc. Proprietary and Confidential
Page 27 of 351
Blackboard Academic Suite (Release 7.2)
Instructor Manual
VISUAL TEXT BOX EDITOR
About the Visual Text Box Editor
The Visual Text Box Editor presents controls for entering and formatting text, equations, and
multimedia files. When it is enabled, it appears throughout the system as the default editor when
adding text through a text box.
If the Visual Text Box Editor does not appear, first check the list of browsers below to ensure that
the current browser is compatible. If it is, check that the Visual Text Box Editor is enabled through
Personal Settings. If the Visual Text Box Editor still does not appear, it has most likely been
disabled by the System Administrator.
Users who access the system through assistive technologies should use standard text entry
options instead of the Visual Text Box Editor. Please see the previous topic, Entering Text, for
more information.
Compatible Browsers
The Visual Text Box Editor is compatible with the following browsers on Windows Operating
Systems:
•
Microsoft Internet Explorer 6.0
•
Mozilla Firefox 1.0
•
Netscape 8.0
The Visual Text Box Editor will not work with older versions of these browsers. Instead, the
standard options for entering text will appear.
The Visual Text Box Editor is compatible with the following browsers on Macintosh Operating
Systems:
•
Safari 2.0
•
Mozilla Firefox 1.0
When run on Safari, the Visual Text Box Editor Lite Version appears. The Lite Version does not
include the button controls for several features because Safari does not yet support those rich-text
editing features. Some features that are not accessible from a button in the Lite Version may still be
activated using keyboard shortcuts. For example, the cut, copy, and paste functions may still be
used through the keyboard shortcuts. Macintosh users may also download and use the free
Mozilla Firefox 1.0 (or higher)Web Browser to use all the features of the Text Box Editor.
Firefox users must perform an extra step to enable the cut, copy, and paste functions. The first time
an attempt is made to cut, copy, or paste text in the Visual Text Box Editor, a message from Firefox
will appear explaining that the action is not allowed. A link is provided for information on how to
enable the cut, copy, and paste functions by editing a Firefox configuration file. The link currently
points to http://www.mozilla.org/editor/midasdemo/securityprefs.html. Please check with Firefox for
the most up-to-date information on using rich-text tools for cut, copy, and paste. Macintosh users
may find that this does not fully resolve the problem, particularly because Fireflox does not permit
pasting text from Microsoft Office files on Mac. To accomplish this task, paste the text into a basic
text editor, such as TextEdit or Notepad and then paste the text into the Visual Text Box Editor.
© 2006 Blackboard Inc. Proprietary and Confidential
Page 28 of 351
Blackboard Academic Suite (Release 7.2)
Instructor Manual
Visual Text Box Editor Features
The Visual Text Box Editor has three collapsible rows of buttons. The tables below define the
functions of each button and identifies if the button is available in the Lite Version that runs on the
Safari browser.
F IRST
ROW BASIC ACTIONS
B UTTON
D ESCRIPTION
L ITE V ERSION ?
Font Style
Select a style for the text. The options correspond
to standard HTML Style types.
Font size
Select the size of the text.
Font
Select the font.
Y
Bold
Make selected text bold.
Y
Italics
Make selected text italics.
Y
Underline
Underline the selected text.
Y
Strikethrough
Display text with a horizontal line through the
characters. For example, strikethrough.
Subscript
Display text on the same line but slightly above
the current text. For example, 7th.
Superscript
Display text on the same line but slightly below
the current text. For example, H20.
Align left
Align text to the left.
Y
Align Center
Align text in the center.
Y
Align Right
Align text to the right.
Y
Ordered list
Create a numbered list or add a numbered list
item.
Unordered list
Create a bulleted list or add a bullet list item.
Decrease Indent
Move text left.
Increase Indent
Move text right.
S ECOND R OW A DDITIONAL B ASIC A CTIONS
B UTTON
D ESCRIPTION
L ITE
V ERSION ?
Spell Check
Select the ABC checkmark to open Spell Check.
Y
Cut
Cut the selected items.
Copy
Copy the selected items.
© 2006 Blackboard Inc. Proprietary and Confidential
Page 29 of 351
Blackboard Academic Suite (Release 7.2)
Instructor Manual
S ECOND R OW A DDITIONAL B ASIC A CTIONS
Paste
Paste copied or cut content.
Clear Formatting
Removes formatting tags that are shown in the
Pathfinder at the bottom of the text box. Highlight
the formatting tag to delete in the Pathfinder and
then click Clear Formatting to remove. This is
useful when copying and pasting text from another
application yields discrepancies in formatting.
Undo
Select the circular arrow pointing to the left to undo
the previous action.
Y
Redo
Select the circular arrow pointing to the right to redo
the previous action.
Y
Hyperlink
Add a hyperlink. Types include: file, ftp, gopher,
http, https, mailto, news, telnet, and wais. Please
keep in mind that when creating a hyperlink, the
text that appears on the page is separate from the
information about the link. Information on where the
link points is stored in a tag that surrounds the text.
Therefore, it is possible to change the link without
changing the text that is displayed to users. Please
be careful when constructing links to ensure that
the text is consistent with where users will be taken
when they click the link.
Create Table
Add a table.
Horizontal Line
Add a line.
Background Color
Add a highlight color to the selected text.
Y
Text Color
Specify the color of the text.
Y
WebEQ Editor
Open the WebEQ Equation Editor icon (√x) to add
an equation. Equations cannot be added to a cell in
a table. Instead, create the equation outside the
table and then cut and paste the equation into the
cell.
MathML Editor
Open the MathML Equation Editor icon to add an
equation.
Preview
Preview the content as it will be seen by end users.
HTML View
Toggle to view the HTML code that is generated by
the Visual Text Box Editor. Users may also edit the
HTML in this view. Click HTML view again to toggle
back to the standard view.
© 2006 Blackboard Inc. Proprietary and Confidential
Y
Page 30 of 351
Blackboard Academic Suite (Release 7.2)
Instructor Manual
The following table includes a description of some options specific to each type of file attachment.
This row will only appear where it is possible to attach a file or link to a file in the Blackboard
Content System.
T HIRD
ROW FILE ATTACHMENT ACTIONS AND SPECIAL OPTIONS
B UTTON
D ESCRIPTION
Attach file
Add a file to the text area. The Insert Link to File
page will appear.
L ITE V ERSION ?
•
Browse: select a file from the local machine
•
Link to Content Collection: select an item
or folder from the Content Collection, if
Content System integration is allowed.
•
Specify Source URL: provide a URL where
the item is located.
•
Name of link to file: provide a descriptive
name of the content is helpful for the user.
This allows the user to read the link in
context, rather than simply read the name of
the file being linked to.
•
Launch in New Window: Select whether to
open the file in the current window or open a
new browser window to display the file.
Attach image
Add an image to the text area. The Insert Image
page appears.
Attach
MPEG/AVI
Add MPEG/AVI media content to the text area. The
Insert MPEG file page appears.
Add Quick Time
Add Apple QuickTime media to the text area. The
Insert QuickTime File page appears.
Add audio
Add an audio file, such as .mp3, .midi or .wav to the
text area. The Insert Audio File page appears.
Add
Flash/Shockwave
Add Macromedia Flash or Shockwave media to the
text area. The Insert SWF File page appears.
Attaching files in the Visual Text Box Editor
Users have the option of attaching different types of files to the Visual Text Box Editor. Do not copy
and paste a file from one text box to another; this will cause errors. More information about the
available options when adding a multimedia file can be found in the topic, Insert Multimedia File.
The table below explains which button in the Third Row of the Visual Text Box Editor is used to add
different file types.
F ILE
ATTACHMENT TYPES
Attach file
.doc, .exe, .html, .htm, .pdf, .ppt, .pps, .txt, .wpd, .xls, .zip
Attach image
.gif, .jif, .jpg, .jpeg, .tiff, .wmf
© 2006 Blackboard Inc. Proprietary and Confidential
Page 31 of 351
Blackboard Academic Suite (Release 7.2)
F ILE
Instructor Manual
ATTACHMENT TYPES
Attach MPEG/AVI
.avi, .mpg, .mpeg
Add Quick Time
.qt
Add audio
.aiff, .asf, .moov, .mov, .mp, .wav, .wma, .wmv
Add Flash/Shockwave
.swa, .swf
Keyboard shortcuts for the Visual Text Box Editor
The Visual Text Box Editor supports the keyboard shortcuts listed in the table below. Please note
that Macintosh users should use the CMD key instead of the CTRL key.
Note: If the shortcut keys that move selected items one character left,
right, up, or down are used, the object being moved will be absolutely
positioned. An absolutely positioned element is determined by pixels, so
moving it up once will move it up one pixel.
K EYBOARD S HORTCUTS
Movement
RIGHT ARROW
Move one character to the right.
LEFT ARROW
Move one character to the left.
DOWN ARROW
Move down one line.
UP ARROW
Move up one line.
CTRL+RIGHT ARROW
Move right one word.
MAC: CMD+RGT ARROW
CTRL+LEFT ARROW
Move left one word.
MAC: CMD+LFT ARROW
END
Move to the end of the line.
HOME
Move to the start of the line.
CTRL+DOWN ARROW
Move down one paragraph.
MAC: CMD+DWN ARROW
CTRL+UP ARROW
Move up one paragraph.
MAC: CMD+UP ARROW
PAGE DOWN
Move down one page.
PAGE UP
Move up one page.
CTRL+HOME
Move to the beginning of the text.
MAC: CMD+HOME
CTRL+END
Move to the end of the text.
MAC: CMD+END
© 2006 Blackboard Inc. Proprietary and Confidential
Page 32 of 351
Blackboard Academic Suite (Release 7.2)
Instructor Manual
K EYBOARD S HORTCUTS
Selection
SHIFT+RIGHT ARROW
Extend the selection one character to the right.
SHIFT+LEFT ARROW
Extend the selection one character to the left.
CTRL+SHIFT+RIGHT
ARROW
Extend the selection right one word.
MAC: CMD+SHIFT+RIGHT
ARROW
CTRL+SHIFT+LEFT ARROW
Extend the selection left one word.
MAC: CMD+SHIFT+LEFT
ARROW
SHIFT+UP ARROW
Extend the selection up one line.
SHIFT+DOWN ARROW
Extend the selection down one line.
SHIFT+END
Extend the selection to the end of the current line.
SHIFT+HOME
Extend the selection to the start of the current line.
SHIFT+PAGE DOWN
Extend the selection down one page.
SHIFT+PAGE UP
Extend the selection up one page.
CTRL+SHIFT+END
Extend the selection to the end of the document.
CTRL+SHIFT+HOME
Extend the selection to the beginning of the document.
MAC: CMD+SHIFT+HOME
CTRL+A
Select all elements in the document.
MAC: CMD+A
Editing
BACKSPACE
Delete the selection. Or, if there is no selection, delete the
character to the left of the cursor.
CTRL+BACKSPACE
Delete all of a word to the left of the cursor.
MAC: CMD+BACKSPACE
CTRL+C
Copy the selection.
MAC: CMD+C
CTRL+V
Paste cut contents or copied contents.
MAC: CMD+V
CTRL+X
Cut the selection.
MAC: CMD+X
DELETE
Delete the selection.
INSERT
Toggle between inserting and overwriting text.
CTRL+Z
Undo the most recent formatting command.
MAC: CMD+Z
CTRL+Y
Re-do the most recent undone command.
MAC: CMD+Y
© 2006 Blackboard Inc. Proprietary and Confidential
Page 33 of 351
Blackboard Academic Suite (Release 7.2)
Instructor Manual
K EYBOARD S HORTCUTS
CTRL+F
Find text.
MAC: CMD+F
SHIFT+F10
Display the context menu. This is the same as a right-click.
Formatting
CTRL+B
Toggle bold formatting.
MAC: CMD+B
CTRL+I
Toggle italic formatting.
MAC: CMD+I
CTRL+U
Toggle underlining.
MAC: CMD+U
Missing image detection in the Text Box Editors
Missing Image Detection functionality is available when a user:
•
pastes HTML with a broken image into the HTML view of the Visual Text Box Editor
Missing image detection functionality does not apply when a user:
•
pastes HTML with a broken image into the Visual Text Box Editor
•
uploads an HTML file with a broken image from the third row of the Visual Text Box Editor
•
links to an HTML file in the Content Collection with a broken image (either via the third row
of the Visual Text Box Editor or as a URL in the Text Box Editor).
Note: Images are stored in HTML using the following syntax: <img
scr="http://image_path">. The source location should be inside double of
single quotations.
Differences between Text Box Editor and Visual Text Box Editor
The Text Box Editor and Visual Text Box Editor both allow the entry of formatted text in the
Blackboard Academic Suite.
The Text Box Editor allows Plain Text, Smart Text and HTML formatting. The Visual Text Box
Editor allows users to modify content in an interface resembling a word processor, and perform
basic HTML functions without knowledge of any HTML. These features include creating tables,
bulleted lists, hyperlinks, horizontal lines, and more. Users may also format text and paragraphs,
and upload multimedia files in the Visual Text Box Editor. Both editors may include WebEQ,
MathML and SpellCheck features.
© 2006 Blackboard Inc. Proprietary and Confidential
Page 34 of 351
Blackboard Academic Suite (Release 7.2)
Instructor Manual
SELECTING DATES
Overview
Availability of the course and individual content items, including Assessments and Learning Units,
can be controlled by date. Content may only be available within a certain range, available from a
certain date until the end of the course, or available from the date created until a specified end
date.
Setting availability by date
Dates are set using drop-down lists to select the day, month, year, and in some cases, time. There
is also a calendar interface that can be used to select the date.
•
To set availability to a set range, select both a start date and an end date.
•
To set availability from the current time until a certain date, only set an end date.
•
To set availability from a date until the end of the course, only set a start date.
© 2006 Blackboard Inc. Proprietary and Confidential
Page 35 of 351
Blackboard Academic Suite (Release 7.2)
Instructor Manual
HTML TIPS
Overview
This section provides some basic HTML codes and tips for adding simple formatting to a Course.
Additional resources for learning more about HTML may be found at the end of this section.
What is HTML?
HTML is the set of codes used to format (or “mark up”) Web pages. A single piece of HTML code is
called a "tag." HTML tags are surrounded by pointed brackets ("<" and ">"). Tags usually come in
pairs.
For example the pair of HTML tags to create bold text looks like this:
<b>This text will be bold. </b>
The <b> tag means "start bold here." The end tag, </b>, means "end bold here." End tags always
include the forward slash ("/").
Paragraph formatting
In HTML, a paragraph break is used to put a single blank line between paragraphs. A hard return
inserts no blank line.
The tag can be used alone at the end of a paragraph, or as a pair. If used as a pair, the
"align=left|center|right" modifier may be included in the beginning tag to control placement.
For example, the following tag would create a right-aligned paragraph:
<P align=right>Fourscore and seven years ago, our founding father set forth upon this continent a new
nation.</P>
Text formatting
The following tags are used for basic text formatting:
Bold text tag: <B> text </B>
Italic text tag: <I> text </I>
Underlined text tag: <U> text </U>
Font format tags: <FONT> text </FONT>
(Font formats include FACE=fontstyle COLOR=fontcolor SIZE=fontsize)
The FONT tag requires at least one of the modifiers (FACE, COLOR, or SIZE).
The FACE modifier can be set to any font, but the person viewing the page must also have that font
installed on their computer. For that reason, it is best to stick to common fonts like Times New
Roman, Arial, or Courier New.
The COLOR modifier will recognize basic colors, including black, white, gray, red, blue, yellow,
© 2006 Blackboard Inc. Proprietary and Confidential
Page 36 of 351
Blackboard Academic Suite (Release 7.2)
Instructor Manual
green, purple, orange, cyan, magenta, and so forth.
The SIZE modifier does not refer to typical font point sizes. In HTML fonts can be sizes 1 through 7.
The default font size is 3.
Note: Since each user may set the default font point at which their
browser will display text, these font sizes can be relative. For example,
one user might have their browser's default font set to 10-point Times
while another has their browser's default font set to 12-point Times. The
HTML tag would create 10-point Times text on the first computer, and
12-point on the latter, since 3 is the default size.
Users may use plus or minus signs to indicate sizes relative to the default. For example, the
following HTML would create text that is two steps larger than the default font size:
<FONT size=+2>Bigger, Better, Faster!</FONT>
Creating Links with HTML
Links are created using the ‘anchor’ tag.
<A href="URL">Clickable text</A>
In the following example, the words ‘Blackboard Inc.’ will turn into a link that directs the user to the
Blackboard home page.
<A href="http://www.blackboard.com/">Blackboard Inc.</A>
Creating HTML with other tools
Course developers do not have to learn everything about HTML. They may also use Web authoring
tools to generate HTML. There are many applications that may be used for this. Some examples
are:
•
Word processors- Microsoft© Word™, Corel© WordPerfect™, Apple© AppleWorks™,
Sun© StarOffice™, and almost every other contemporary word processor contains the
ability to convert word processing documents to a Web page coded in HTML. However,
the conversion from a word processing document to an HTML Web page is often not
perfect, especially for documents with complex formatting.
•
WYSIWYG (What You See Is What You Get) Web-authoring tools- These tools
provide an environment similar to a word processor for developing Web pages and entire
©
Web sites. There are many products to choose from, including, Macromedia
©
©
©
Dreamweaver™, Adobe GoLive™, NetObjects Fusion, and Microsoft FrontPage™.
•
HTML Editors- Applications like BareBones© Software's BBEdit™ and Macromedia©
Allaire HomeSite™ provide an editing environment for HTML documents. While they are
not WYSIWYG, HTML editors usually have a "preview" mode that allows users to switch
between viewing the raw HTML codes and previewing how those codes will look in the
browser. These products help write HTML faster and easier, but they presume the user is
already knowledgeable about HTML.
© 2006 Blackboard Inc. Proprietary and Confidential
Page 37 of 351
Blackboard Academic Suite (Release 7.2)
Instructor Manual
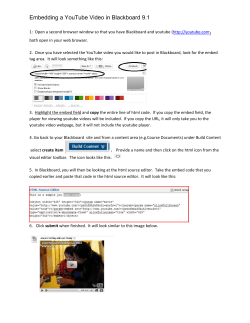
Incorporating HTML generated with other applications
Instructors may decide to incorporate HTML generated content with other applications into their
Course. There are two options for including this content:
Save the content as an HTML file and upload the HTML file itself into Blackboard Learning System.
In the Course area, next to the Special Action field, select Create a link to this file. The
Blackboard Learning System will automatically detect images in an HTML file and prompt the user
to upload the images as well.
Copy and paste the HTML code into a text box.
To copy and paste HTML code, follow the steps below:
1.
View the HTML code. Most of the tools discussed above will have a mechanism (usually
part of a View menu) to allow the user to see the ‘HTML source’.
2.
Copy all of the HTML tags between but not including the <BODY> and </BODY> tags.
The Blackboard Learning System dynamically generates the HTML above and below the
BODY tags, so this portion of the HTML source must not be copied.
3.
Paste the copied HTML into the text box.
4.
Choose the HTML text-formatting option.
5.
Submit the form.
6.
If there are <IMG> tags in the HTML, the Blackboard Learning System will automatically
detect them when the page is submitted. Users will receive a second page prompting
them to upload the appropriate images.
Troubleshooting
Blackboard recommends that users do not use the following in a Course:
•
Do not use multiple frames.
•
Do not add Web pages that contain additional navigational items, for example, buttons.
Only include links that directly point to a URL.
•
Do not add <body> tags, <html> tags, <head> tags, <form> tags, or <form element> tags.
Entering these tags will cause issues when the page is viewed.
•
Do not use inline style sheets. Inline style sheets are not supported by all browsers.
•
Do not use <applet> tags inside the text box. These tags may cause errors in the content.
Other HTML resources
There are many online resources for additional information about HTML. One that users may want
to visit is The World Wide Web Consortium located at www.w3.org.
© 2006 Blackboard Inc. Proprietary and Confidential
Page 38 of 351
Blackboard Academic Suite (Release 7.2)
Instructor Manual
LINK TO FILE
Overview
Users may include a link to a file from the Text Box editor.
Fields
The table below details the fields on the Insert Link to File page:
F IELD
D ESCRIPTION
Insert Link to File
Browse
Click Browse to locate a file.
OR Specify URL
Enter a URL to create a link to a file outside of the local system. For
example, from a central image repository, the URL may be
http://blackboard/images/picture1.jpeg.
Link to File Options
Name of Link to File
Enter the name of the link that users click to access the attached
file.
Launch in new
window
Select Yes to have the file open in a new separate window. Select
No to have the file open in the content frame.
© 2006 Blackboard Inc. Proprietary and Confidential
Page 39 of 351
Blackboard Academic Suite (Release 7.2)
Instructor Manual
INSERT MULTIMEDIA FILE
Overview
Users may add the following multimedia files when authoring content in the Text Box Editor.
•
Image.
•
MPEG or AVI. MPEG (Moving Picture Expert Groups) files are audio-visual files in a
digital compressed format. AVI (Audio Video Interleave) is Microsoft’s file format for
storing audio and video data.
•
Quicktime. QuickTime is a video and animation system that supports most formats,
including JPG and MPEG. Users with a PC will require a QuickTime driver to view
QuickTime files. Macintosh users do not require this driver.
•
Audio.
•
Flash or Shockwave. Macromedia Flash and Shockwave files support audio, animation
and video; they are also browser independent. Browsers require specific plug-ins to run
Flash and Shockwave files.
The options to control how a multimedia file displays, such as should it loop, should the controls
display, will not be available after the file has been inserted. To edit these options, use the HTML
view and edit the options directly.
Image Fields
The table below details the fields on the Insert Image page:
F IELD
D ESCRIPTION
Insert Image
Browse
Click Browse to locate a file.
OR Specify URL
Enter a URL to create a link to a file outside of the local system.
For example, from a central image repository, the URL may be
http://blackboard/images/picture1.jpeg.
Image Options
Set the Width
Enter the width of the image in pixels.
Set the Height
Enter the height of the image in pixels.
Border
Choose a border for the image. If ‘0’ is chosen there will be no
border around the image.
Alt Text
Enter text that will be used display if the image fails to load.
Alternate text is important for visually impaired users who access
the Web.
© 2006 Blackboard Inc. Proprietary and Confidential
Page 40 of 351
Blackboard Academic Suite (Release 7.2)
Instructor Manual
MPEG or AVI Fields
The table below details the fields on the Insert MPEG File page:
F IELD
D ESCRIPTION
Insert MPEG File
Browse
Click Browse to locate a file.
OR Specify URL
Enter a URL to create a link to a file outside of the local system.
For example, from a central image repository, the URL may be
http://blackboard/images/picture1.jpeg.
MPEG File Options
Set the Width
Enter the width of the video in pixels.
Set the Height
Enter the height of the video in pixels.
AutoStart
Select Yes to start playing when the page is opened. Select No to
let users start playing manually after opening the page.
Controls
Select the size of controls to appear to users. Controls must be
available if users are to start the video manually.
Quicktime Fields
The table below details the fields on the Insert QuickTime File page:
F IELD
D ESCRIPTION
Insert QuickTime File
Browse
Click Browse to locate a file.
OR Specify URL
Enter a URL to create a link to a file outside of the local system.
For example, from a central image repository, the URL may be
http://blackboard/images/picture1.jpeg.
QuickTime File Options
Set the Width
Enter the width of the video.
Set the Height
Enter the height of the video.
AutoStart
Select Yes to start playing when the page is opened. Select No to
let users start playing manually after opening the page.
Loop
Choose whether the file should repeat continuously.
Controls
Select to display controls.
© 2006 Blackboard Inc. Proprietary and Confidential
Page 41 of 351
Blackboard Academic Suite (Release 7.2)
Instructor Manual
Audio Fields
The table below details the fields on the Insert Audio File page:
F IELD
D ESCRIPTION
Insert Audio File
Browse
Click Browse to locate a file.
OR Specify URL
Enter a URL to create a link to a file outside of the local system.
For example, from a central image repository, the URL may be
http://blackboard/images/picture1.jpeg.
Audio File Options
AutoStart
Select Yes to start playing when the page is opened. Select No to
let users start playing manually after opening the page.
Loop
Choose whether the file should repeat continuously.
Controls
Select to display controls.
Flash or Shockwave Fields
The table below details the fields on the Insert SWF File page:
F IELD
D ESCRIPTION
Insert SWF File
Browse
Click Browse to locate a file.
OR Specify URL
Enter a URL to create a link to a file outside of the local system.
For example, from a central image repository, the URL may be
http://blackboard/images/picture1.jpeg.
SWF File Options
Set the Width
Enter the width of the video.
Set the Height
Enter the height of the video.
AutoStart
Select Yes to start playing when the page is opened. Select No to
let users start playing manually after opening the page.
Loop
Choose whether the file should repeat continuously.
Set Quality
Select the quality of the images that will appear to users. Please
note that the better the quality of an image the larger the file.
Larger files take longer to open.
© 2006 Blackboard Inc. Proprietary and Confidential
Page 42 of 351
Blackboard Academic Suite (Release 7.2)
Instructor Manual
ABOUT SPELL CHECK
Overview
The Spell Check feature supports a full English dictionary, a supplemental word list configured by
the System Administrator, and custom word lists that are stored as a cookie on a user’s local
machine. The spell check feature is available wherever users can enter blocks of text. It is also
available as a module with the Blackboard Community System.
Word lists
Misspelled words are determined by the following three sources:
•
Spell Check Dictionary: A full English dictionary that includes words that will not be
flagged for correction. The dictionary is also the only source for suggestions. This
dictionary cannot be modified.
•
Supplemental Word List: A list of additional terms added by the System Administrator
that do not appear in the default dictionary.
•
Personal Word List: This word list is stored as a cookie on each user’s local machine.
Words are added to this list using the Learn function. The words in the personal word list
are not flagged for correction. These words are not included as suggestions for misspelled
words.
Extensive personal word lists may slow performance of the Spell Check tool.
Personal word list and cookies
The personal word list is stored as a cookie on the user’s local machine. The cookie is not user or
installation specific. Therefore, a user’s word list will be available to them whenever they are using
Spell Check as long as they are on the same local machine. Also, if another user logs onto the
same machine, that user will have the personal word list stored on that machine applied to Spell
Check. For example, if a user creates a personal word list on a computer in the computer lab, this
word list will be available to all users who use this computer in the lab. The user may not take this
word list with them to a different computer.
© 2006 Blackboard Inc. Proprietary and Confidential
Page 43 of 351
Blackboard Academic Suite (Release 7.2)
Instructor Manual
USING SPELL CHECK
Overview
When Spell Check is launched it will review the text block and sequentially bring up any words it
does not recognize for review.
Functions
The table below details the functions available with Spell Check.
TO . . .
THEN
replace the
occurrence of a
word with a
correction or
suggestion
enter a correction in the Replace With field or select a
suggestion from the list. Click Replace to change the word in
the text to the word in the Replace With field. If the misspelled
word appears later in the text block it will be flagged again for
correction.
replace every
occurrence of a
word in the text
with a correction or
suggestion
enter a correction in the Replace With field or select a
suggestion from the list. Click Replace All to change every
occurrence of the word in the text with the word in the Replace
With field.
ignore the word
and not make a
correction
click Ignore. The word will not be changed. If the word appears
again in the text block it will be flagged for correction.
ignore every
occurrence of the
word in the text
block
click Ignore All. The word will not be changed and Spell Check
will not flag it for correction again in the text.
teach Spell Check
to recognize the
word as correct
click Learn. The word will be added to the personal word list.
Whenever Spell Check is run on the local machine the word will
be recognized and not flagged.
close the spell
check without
finishing
click Finish.
© 2006 Blackboard Inc. Proprietary and Confidential
...
Page 44 of 351
Blackboard Academic Suite (Release 7.2)
Instructor Manual
Recognized errors
Note how Spell Check handles the following circumstances:
•
Double words are recognized as errors.
•
Irregular capitalization is not recognized as an error.
•
Initial capitalization at the beginning of sentences is not checked.
•
Words in ALL CAPS are checked for spelling errors.
•
Words that contain numbers are recognized as errors.
•
A word that appears in the supplemental or personal word list must be entered as a
correction during a spell check (these words do not appear as suggestions). The Spell
Check tool must be run again to verify that the word is spelled correctly.
© 2006 Blackboard Inc. Proprietary and Confidential
Page 45 of 351
Blackboard Academic Suite (Release 7.2)
Instructor Manual
MATH AND SCIENCE NOTATION TOOL – WEBEQ EQUATION EDITOR
Overview
The Math and Science Notation Tool (WebEQ Equation Editor) is a general purpose equation
editor. The Math and Science Notation Tool enables users to use mathematical and scientific
notation. Users can add equations, edit existing equations, and move equations within the Equation
Editor. All of the Equation Editor symbols are based on MathML, a markup language for math on
the Web. MathML is a subset of XML.
Users may receive a pop-up box when launching WebEQ that asks the user to trust an applet
provided by Design Science, the maker of WebEQ. If users click Always, the pop-up will no longer
appear on that computer when launching WebEQ.
For best performance on a Windows® operating system use Internet Explorer 6.0.
For best performance on a Macintosh®:
Mac OS X v10.2 or later
Install the MRJPlug-in. http://homepage.mac.com/pcbeard/MRJPlugin/
MathML Equation Editor
The MathML Equation Editor functions in the same way at the Math and Science Notation Tool.
Instead of opening with the symbol buttons, a blank text box will appear where users can enter
XML.
Functions
The table below details how to access the Equation Editors.
TO . . .
CLICK
access the
WebEQ Equation
Editor
the Math and Science Notation Tool icon.
insert XML
the MathML Equation Editor icon.
© 2006 Blackboard Inc. Proprietary and Confidential
...
Page 46 of 351
Blackboard Academic Suite (Release 7.2)
Instructor Manual
ADDING AND EDITING EQUATIONS
Overview
Once an equation has been created it can be copied and used again or copied and modified using
the Notation Tool features.
Functions
The table below describes the functions available in the Math and Science Notation Tool.
TO . . .
THEN
...
create a name for
the equation
enter a name in the Equation Name: field. To accept the
default name do not make any changes.
create an equation
use the equation symbols available on the keyboard or in the
toolbar to create equations.
modify an existing
equation
select the equation from the Edit Equation: drop-down list.
The equation will appear in the Editor. Click Modify to save the
changes.
submit the
equation and its
name
click Add.
Tip
If an equation is more then one line or uses a large font size, the equation may be cut off when it
appears in a course. Add an empty line after the final line in the equation to prevent this error.
© 2006 Blackboard Inc. Proprietary and Confidential
Page 47 of 351
Blackboard Academic Suite (Release 7.2)
Instructor Manual
COURSE CREATION WIZARD
Overview
The Course Creation Wizard enables users to create courses through an easy workflow. The
Wizard consists of a series of pages that breaks up the numerous aspects of course creation into a
sequence of manageable pieces. Instructors can use the wizard to complete the initial setup of a
course in one easy-to–follow process.
Note: Only courses may be created through the Course Creation
Wizard. Organizations may not be created through this method.
Find this page
To open the Course Creation Wizard, select the link in the Course Creation Wizard Module on the
My Institution tab. The wizard will appear in a pop-up window.
Wizard navigation
Users may use the links at the bottom of each Wizard page to navigate within the Wizard. These
links include options for Cancel, Back, Next, and Finish. All links may not be available on all pages
within the Wizard.
Wizard Progress Tracker
The Wizard Progress Tracker appears on the left side of each page in the Wizard and represents
the entire workflow of the Course Creation Wizard. Users can view where they are in the workflow
as they build a course. There are no navigation options in the Wizard Progress Tracker.
Wizard steps
The Welcome page gives an overview of the different steps for creating a course through the
Course Creation Wizard. Users may choose to skip some of these steps.
Note: If the user skips steps in the Wizard, these options will
automatically be set to the system defaults. These settings may be
modified through the Control Panel once the course is created.
The following list includes all of the steps for creating a course:
S ECTION
D ESCRIPTION
Course Information
Enter course information, such as Course Name, Course ID,
and a description of the course.
Course Materials
Select a template, course cartridge, or an existing course to
use as the basis of the course, or create a new course.
© 2006 Blackboard Inc. Proprietary and Confidential
Page 48 of 351
Blackboard Academic Suite (Release 7.2)
Instructor Manual
S ECTION
D ESCRIPTION
Course Design
Design the buttons and text for the course
Course Menu
Add or remove options that appear on the Course Menu.
Availability and
Duration
Select which users this course will be available to.
Enrollment Options
Select how users will be enrolled the course.
© 2006 Blackboard Inc. Proprietary and Confidential
Page 49 of 351


© Copyright 2026