
How to Book Conference Rooms Using Outlook
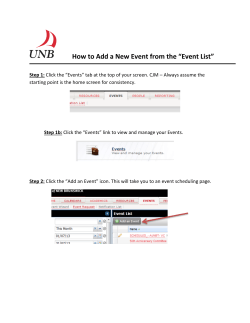
HOW TO BOOK CONFERENCE ROOMS
Using Outlook
Page 1
STEP 1
Open up your calendar section of Outlook and
click “New Appointment” or “New Meeting”
STEP 2
If you clicked “New Appointment” you will have
to click “Invite Attendees”. If you clicked “New
Meeting” skip to Step 3.
STEP
3
Click the “Rooms...” box.
Page 2
STEP 4
Search for your room by typing in “NYN” or
scrolling down.
From there you can click a particular room or
hold down shift and highlight and add multiple
rooms.
STEP 5
Your “To” field should contain your selected
conference room(s).
Page 3
STEP 6
Click “Scheduling Assistant”.
STEP 7
Check/change your desired date and time.
Page 4
STEP 8
Look in between the green and red vertical lines
to find available rooms. Blank space indicates
the room is available.
Blank space = the room is available
The green line indicates your
desired start time
The red line indicates your
desired end time
Page 5
STEP 9
Un-check all rooms except for your desired
conference room.
Desired conference room
STEP 10
Click back on “Appointment” to get to this
screen. Here you can fill out the rest of your
information.
Invite people to your meeting
Enter the Subject of your meeting
Page 6
STEP 11
Hit “Send”
CONFIRMATION
Check for a confirmation email. The room will
respond back if you have been “accepted”.
If your request has been denied or is tentative
even though it looks available, reach out to
AdminSupport@
Questions? Feel free to email
AdminSupport@


© Copyright 2026