
How to use the Address Book
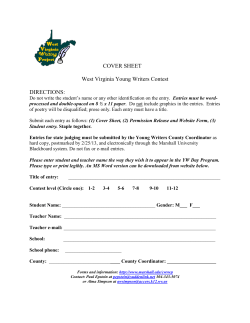
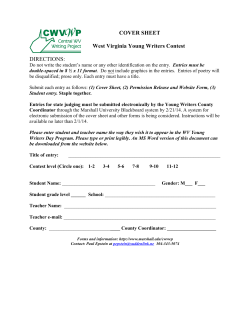
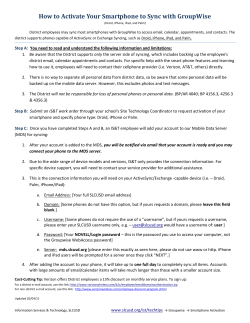
How to use the Address Book
GroupWise 7.0 WebAccess
April 10, 2006
The Address Book stores information about the users, resources and organizations. You can use
the Address Book to search for information or to add e-mail addresses to an item. The Address
Book consists of the GroupWise Address book (all SD41 GroupWise users), one or more personal
address books, the Frequent Contacts address book, and possibly shared address books.
Address Books
In the main WebAccess
window, Click the icon
Address Book.
The Address Book
window opens. Click on the
down arrow next to the
Address Books field. The
display will list the
GroupWise Address Book,
one Personal address book
(your name), one Frequent
Contacts address book and
other Shared address books.
NOTE:
GroupWise Address Book: Our school district has one system address book. This address book
includes all users who have a GroupWise Mailbox in our organization. You cannot modify this
system address book.
Personal Address Book: You can have multiple personal address books. By default, you have
one predefined address book with your name as the title. You can add e-mail address and other
information for users, resources or organizations not defined in the system address book.
Frequent Contacts Address book: Your most recently used addresses are automatically added
to this address book.
Shared Address Books: You can ONLY receive shared address books; accepted shared address
books will appear in your Address Book list.
Page 1 of 4
GW06_How to use the Address Book.doc
2006-04-10 / REV.SS
Searching for an Entry in the Address Book
(1) In the Address
Book list, select the
address book you want to
search. (2) Click the
Show Entry Filter icon.
(3) Select the Entry Type
(All, Person, Group or
Resource). Select the
number of names to
dislplay (5, 10, 15, etc.).
(4) Click the + sign to
display a second line to
constraint your search.
(5) Select from the drop
down arrows to narrow
your search. Use the
AND or OR to match
your need.
Click Search.
A list of entries that
match your search
conditions is displayed.
The example shows five
entries found with the last
name that begins with
the letter s from the
address book of John
Sample.
Options (lists) from the drop down arrow:
Tip: To display all entries,(1) select Address Book, click Search.
Note: The value fields (A) supports the * (asterisk) and ?
(question mark) wildcards. Use * to represent multiple
characters and ? to represent one character.
Select the entries
(click to check box), then
click To or CC or BC to
indicate the recipient
type.
TIP: Click the
to
remove from the
recipient type.
Click
to open a
new Compose Message
window.
Note: click
to
continue composing an
existing message.
Page 2 of 4
GW06_How to use the Address Book.doc
2006-04-10 / REV.SS
Adding Entries to a Personal Address Book.
From the main window, click
Address Book.
Click
to display the Add
Address Book Entry form.
Click Person tab if necessary.
Select the personal address book
where you want to add the entry.
Fill in all the required fields (with red
asterisks)
Fill in any other fields you want. Any
information you add displays when you
select the entry.
Click OK.
NOTE: The email address can be for
people inside or outside of SD41
organization.
Adding a Personal Address Book:
Click Address Book from main window
(1) Click Address Book Options.
A window opens displaying all the
existing address books.
(2) Click Create.
A window opens with a field to enter
the name of a new address book.
(3) Enter a name and a description of
the new address book.
Click OK to save the new address book.
Address Book Options should now
display the new personal address book.
Click Close to close the Address Book
Options window.
This should return you to the Address
Book window.
Page 3 of 4
GW06_How to use the Address Book.doc
2006-04-10 / REV.SS
Creating a Personal Group
Click Address Book in the main
window to open the address book
window.
Select the address book that contains
the entries you want to add to the
group. Build the recipient list as per the
steps outline above in ‘Searching for an
Entry in the Address Book’.
After you select the entries you want to
add to the group.
(1) Click Save Group to display the save
group dialog box.
In the Personal Address Books list,
select the personal address book where
you want to save the group.
Type a name and description
(optional) for the group, then click Save.
The new group name is now ready for
use in the address book you saved it.
TIP: Must use ONLY numbers (0-9),
letters (A-Z), dashes and underscore.
Note: Enter the new group name in the
TO field when sending out a group
message; the CC: and BC: within the
group is retained.
Editing a Personal Group:
Click Address Book from main window.
Find the group you want to edit.
Click on the group name to open the
Group dialog.
Click on the Modify button.
This returns you to the Address Book
window to make modifications to the
recipients list.
Click the Save Group button to save the
modify group with the same name.
Note: Keeping the same group name
overwrites existing group. Change the
group name if you wish to save it as a
separate group.
Page 4 of 4
GW06_How to use the Address Book.doc
2006-04-10 / REV.SS


© Copyright 2026