
UMEHLUKO Medical Service Provider User Guide
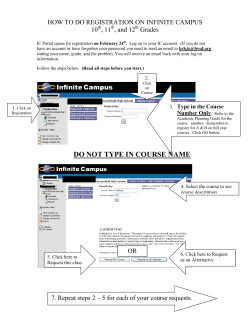
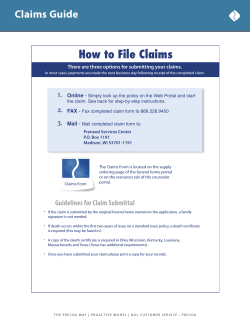
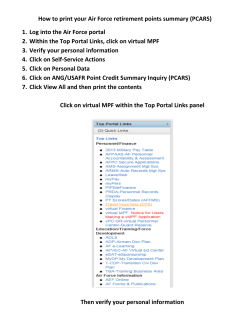
UMEHLUKO
Medical Service Provider User Guide
MSP Portal User’s Guide
Chapter 1 - Getting Started
Page 1 of 10
Chapter 1
Getting Started
In this chapter the user will be introduced to the basic concepts of the MSP Portal.
The user will learn how to log on to, navigate and log off from the system. The user will
also be introduced to the different screen elements that make up the application
window.
The chapter comprises of the following lessons:
LESSON 1A
LOGGING ON TO THE SYSTEM
LESSON 1B
NAVIGATING THE SYSTEM
LESSON 1C
LOGGING OFF FROM THE SYSTEM
LESSON 1D
LEARNING ABOUT EVENTS , PERSONS, PERSON EVENTS AND CLAIMS
LESSON 1E
DATA CAPTURING AND PROCESSING CONVENTIONS ON THE
RMA SYSTEM .
MSP Portal User’s Guide
Chapter 1 - Getting Started
Page 2 of 10
LESSON 1A
L OGGING ON TO THE SYSTEM
To log on to the system double-click on the Internet Explorer Browser icon on your desk top.
The user’s internet home page will display and the user enters the CF website adress
www.labour.gov.za and the select online claims submission.
You will then see the Online Submission Portal, where you registeror log in
MSP Portal User’s Guide
Chapter 1 - Getting Started
Page 3 of 10
Lets look at “How To Register” - This is to be done only if you do not already have an
online account, if you already do, please enter your log n details
Fill in the required information on the registration form , upon completion click submit,
thereafter and email will be sent to you containining your username and password
and authentication key
Once you receive your username and password go back to the website and fill in
you log in credentials
MSP Portal User’s Guide
Chapter 1 - Getting Started
Page 4 of 10
You will then see the page below, where you can link a practice to your profile or
select a practice that has already been linked
You can link the practice you wish to act on behalf of by entering the practice
number and then clicking ‘get organisation’ and then ‘add to profile’
MSP Portal User’s Guide
Chapter 1 - Getting Started
Page 5 of 10
You can then select the linked practice and submit a medical report, by clicking
submit medical report you will be redirected to the Umehluko log on page whe you
enter you log on details
MSP Portal User’s Guide
Chapter 1 - Getting Started
Page 6 of 10
After you log in, you will see the MSP portal home screen will then display as
indicated below.
Records in the inbox will be communications sent from CF.
Note: - To open a workflow the user is required to click on the workflow and
then click on the URL link on the next screen which would then take the user
into the case.
NOW the user can click on the URL button in the column next to the case
that needs action and it will open the workflow for further action.
In the next lesson, the user will learn to navigate around the home screen.
MSP Portal User’s Guide
Chapter 1 - Getting Started
Page 7 of 10
LESSON 1B
NAVIGATING THE SYSTEM
The user, after logging on, will be presented with the MSP Portal Applications home page. On the
top of the page are various icons indicating the individual applications. Each application’s is
described below in the boxes.
Pension’s application to manage all pensions’ matters of
injured Employees in terms of RMA member’s policies
The
Underwriting
application to
manage
compensation
insurance
policy matters
of RMA
Members
Medical
application to
manage all
medical matters of
injured Employees in
terms of RMA
member’s policies
Financial application to
manage all the payments
made to various
stakeholders in terms of the
various members’ policies.
Information Technology
application to manage all the
applications
Claims application to manage all
claims matters of injured
Employees in terms of RMA
member’s policies
The icons that are greyed out are the ones that the user cannot access. The icons
that are in bold black are the applications that the user can access and may use.
This access is usually linked to the user’s role and permission levels contained within
the system. The grey toolbar (Highlighted) at the top of the screen contains menu
options.
MSP Portal User’s Guide
Chapter 1 - Getting Started
Page 8 of 10
Each of the options is briefly described below as each item will be discussed where
applicable later in the guide.
SEARCH TAB
MSP Portal User’s Guide
Person
Allows the user to search for a person
using a variety of options
Claim
Allows the user to search for a claim
using a variety of options
Medical Invoices
Allows the user to search for a medical
invoice using a variety of options
Chapter 1 - Getting Started
Page 9 of 10
LESSON 1C
LOGGING OFF FROM THE SYSTEM
To log off from the system:
Click on Logout.
The application window closes and your current session is terminated.
MSP Portal User’s Guide
Chapter 1 - Getting Started
Page 10 of 10
LESSON 1D
LEARNING ABOUT EVENTS , PERSONS , PERSON EVENTS AND CLAIMS.
An event such as an accident or disease may have more than one affected person
associated with it. Each person involved in that event may have cover from more
than one policy and therefore more than one claim.
The system treats each event and involved person as a person event and links
invoices, medical reports, and so forth at this level, which makes it possible to
associate more than one claim with an event.
MSP Portal User’s Guide
Chapter 1 - Getting Started
Page 11 of 10
A claim is created for every product that applies to an event, for example, a person
may be covered under the Employees Policy (COIDA) for a single event.
When making payments, the invoices that are captured at person-event level are
allocated to the claims and payments made based on each claim’s specific cover
rules, for example, only pay 75% of the days-off value on COIDA.
MSP Portal User’s Guide
Chapter 1 - Getting Started
Page 12 of 10
LESSON 1E
DATA CAPTURING AND PROCESSING CONVENTIONS ON THE MEDICARE
SYSTEM.
Capturing information can be a tedious and time consuming process. The system
has been designed to capture all the information relating to an injury on duty claim
for benefits. Provision has been made to enable the user to capture certain
information quicker and thereby speeding up the entire claim processing function.
The system provides several tools to simplify and speed up this process such as drop
down lists, online calendars, check boxes and so forth.
For example, the user clicks on the drop down arrow button to the right of the Date
Captured field and the following calendar displays:
The user can then select the appropiate date and by so doing the system will
automatically enter the information into the blank field.The user can also move from
one field to another by using the TAB key when populating the fields with
information.
At this point it
A red asterisk next to a field indicates that the field is a mandatory field and
the system will not allow the user to continue unless they provide all the
necessary information. The user must complete all of the fields as accurately
and completely as possible, ensuring that all of the mandatory fields are fully
completed.
MSP Portal User’s Guide
Chapter 1 - Getting Started
Page 13 of 10
What’s next?
Now that the user has been introduced to the basic concepts of the JV Portal
system, the user is ready to learn more about capturing and/or accessing
information into/from the system.
MSP Portal User’s Guide
Chapter 1 - Getting Started
Page 14 of 10


© Copyright 2026