
IMPaLA tutorial 1. Introduction
IMPaLA tutorial
http://impala.molgen.mpg.de/
1. Introduction
IMPaLA is a web tool, developed for integrated pathway analysis of
metabolomics data alongside gene expression or protein abundance data. It
works through extending over-representation and enrichment analyses to
multiple dataypes. The methodology was first presented in Cavill, R. et al.
(2011) Consensus-Phenotype Integration of Transcriptomic and Metabolomic
Data Implies a Role for Metabolism in the Chemosensitivity of Tumour Cells.
PLoS Computational Biology, 7(3), 12.
IMPaLA was developed to provide a straightforward publicly available platform
for performing these analyses. It provides pathway over-representation and
enrichment analysis functionality with user-specified lists of genes/proteins
and/or metabolites, generally termed physical entities.
2. IMPaLA screenshots
2.1 IMPALA home screen.
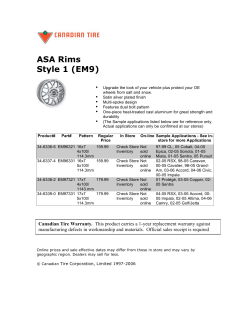
Figure 1 - Screenshot from IMPaLA with important features numbered (see next page for key)
Figure 2 – Key to figure 1.
2.2 IMPaLA output screen
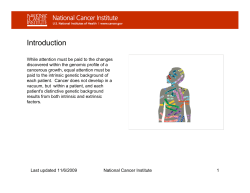
Figure 3 – IMPaLA outputs: A Full output table (using example data link figure 1, item 6) B Checking
and correcting identifier mappings when metabolite names were entered.
3. Using IMPaLA with lists of selected genes/proteins and/or
metabolites
3.1 Step-by-Step input
1. Create a list/s of genes/proteins and/or metabolites from your data.
These lists should typically contain genes with significantly altered
expression or metabolites with significantly altered concentration
2. Copy these lists into boxes 1 and 2 as shown in figure 1.
3. Select the Identifier types which you used in the lists from the dropdown boxes marked 3 in figure 1.
4. Select pathway over-representation analysis from 4 in figure 1.
5. Click the START ANALYSIS button shown as 5 in figure 1.
6. Wait for the results table to appear, this should take 10-15 seconds
depending on the input size, internet connection, and on how heavily
used the tool is at that moment.
3.2 Step-by-step Understanding the output
1. Check the mappings for your identifiers; at the top of the ouptut
screen (figure 3A), the mapping performance is shown. The color of the
text “X out of Y input gene/metabolite identifiers...” scales from green to
red according to the mapping performance (green=many of the provided
identifiers have been mapped to physical entities, i.e. genes/proteins or
metabolites, available in pathways). If you click on the text “X out of Y
input gene/metabolite identifiers”, then the popup dialog shown in figure
3B appears.
2. View and correct the mapping (Figure 3B); if incorrect mappings are
made, then you can deselect them here. If mappings are missed, or
identifiers have not been mapped due to entry errors (see “glucoze” at
the bottom of figure 3B), then you can use the link at the top of the
results page to “go back and start a new analysis” and correct your input.
The entity specificity column (color scaling from green, specific to red,
non-specific) helps you spot e.g. currency metabolites that are not
pathway-specific (such as ATP) and it might be a good idea to exclude
them. If you mouse-over the colored area, you will get information about
the number of pathways the according entity is present in.
3. Reading the results table; for each pathway found, the following
columns are in the results table:
a. Pathway name –
Pathway name; clicking on the name links to the pathway's
original source, containing a detailed pathway diagram if
supported by the source database
b. Pathway source – Name of the database in which the pathway is
found.
c. Gene columns – If genes/proteins were entered into the input
then the next 4 columns are about the results of the analysis with
just the genes/proteins.
i. Overlapping genes – Gives the number of your entered
genes which are found in that pathway.
ii.All genes – Gives the total number of genes in the
pathway, with the number found in the background list
given in brackets.
iii. Pgenes – A P-value for the pathway based only on the
genes.
iv. Qgenes – The False Discovery Rate which results from
correcting the P-values for multiple testing using the
method set out by Benjamini and Hochberg.
d. Metabolite columns – If metabolites were entered into the input
then they have an identical set of 4 columns to the genes,
showing the results of the analysis with just the metabolites.
e. Joint columns – If both genes/proteins and metabolites were
input, then joint P-values and Q-values are calculated for each
pathway. Evidence for pathway de-regulation from the provided
genes and metabolites is treated independently, thus the
according probabilities (P-values) are integrated with Fisher’s
method to obtain the joint P-value. By default the table is sorted
on these columns.
4. Sorting the table by other columns; Click any column title to sort the
table by the values in that column.
Downloading the data; Just above the results table is a “download results” link,
which downloads a .csv file (comma separated value file) that can be read by Excel
or other programs.
4. Using IMPaLA with continuous values for all
genes/proteins/metabolites
With continuous values for all the genes/proteins/metabolites, IMPaLA can perform
Wilcoxon pathway enrichment analysis. The continuous values entered could be
correlation coefficients to a phenotype of interest, fold changes of expression
between two groups, results from t-tests or any of the many other values which
emerge from analysis. The input data should contain all measured entities, with either
one or two values per entity (one value: e.g. expression difference; two values: e.g.
mean expression in two phenotypes).
Important – To get meaningful results the list of values must contain both positive
and negative values. If you are using a continuous measure that is all positive (or all
negative) then centre the data first, by subtracting the mean of each value from all
values..
Top Tip! Since you will be entering an identifier plus value for each item in you have
measured, you will have a much longer input than with the over-representation
analysis, prepare your inputs as files and use the file upload facility (figure 1, number
7) to send your data to the IMPaLA server.
To run the analysis, follow the step-by-step instructions in section 3.1 except in step 4
select “Wilcoxon pathway enrichment analysis”.
Background lists in Wilcoxon enrichment analysis
Unlike over-representation analysis, there is no need to upload a background
list for the Wilcoxon analysis because the Wilcoxon test applied here is essentially
different from the hypergeometric test..
Top Tip! When preparing data for Wilcoxon analysis, make sure each element is
only listed once. If an element features in the list repeatedly a warning message will
appear, and the mean value of all those supplied per identifier will be used.
5. Case Study
Using data freely downloaded from the NCI60 website (http://dtp.nci.nih.gov/
mtargets/download.html) with baseline transcriptomics measurements of all genes
(affymetrix U133 chip) and accompanying values for the GI50 (dose level at which
the growth of the cell line is inhibited by 50%) for doxorubicin, I performed a wilcoxon
enrichment analysis of those pathways which are enriched in cell lines which are
particularly resistant or sensitive to doxorubicin.
5.1 Step-by-Step
I combined all the data into a single excel sheet, by pasting the
doxorucin GI50 for each cell line above the column of gene expression
readings for the cell line. (see the first sheet in
preparing_doxorubicin_data_for_wilcoxon_analysis.xlsx ) and
calculated the correlation between each probeset and the doxorubicin
GI50 values.
Next I copied and pasted just the gene name identifier and the
correlation columns to a separate sheet (using the paste special
command to paste the values from the correlation calculations rather
than the formulae).
In order to summarise all the probesets which pertain to each gene
name into a single value I used a pivot table. In excel click insert> pivot
table, using the data from this second sheet as input. I then placed
“gene” in the row labels section of the pivot table, and “correlation to
doxorubicin” in the values section. By default the values will use the
sum of all correlations, but for this purpose we want the average value,
right clicking on the top of the column in the pivot table, give the
“summarise by” option in the menu, where “average” can be selected.
I then copied and pasted this data into dialog box in impala, selecting
wilcoxon analysis and gene symbols as the input type, and obtained the
results shown in “enrichment_results_doxorubicin.csv”.
6. Frequently Asked Questions
I want to do over-representation analysis – how do I make my list of
selected items?
o The list of selected items for over-representation analysis is usually
the result of a statistical test on your data. For instance those items
which show statistically significant differential expression in a t-test
between two phenotypes, or whose values are significantly
correlated with a phenotypic value of interest.
Top Tip! It might be useful to check the validity of your analysis by
making a minimum of 10-20 random lists of items, where each list is
the same length as the list you entered with your real data – check
that the pathways which come out are different each time. If you are
always getting the same pathways at the top of your analysis, then
you have some bias in your analysis. To deal with this bias, try
using summary values for each gene/protein/metabolite before
selecting the list and using background lists which contain all the
items you have measured.
Which analysis type should I use with my data?
o Which analysis type to use depends on what data you have and the
questions you want to ask, however for most biological problems
both types of analysis will be applicable. Over-representation
analysis will be much faster through the website as you will have to
upload a much smaller amount of data. However, the disadvantage
with over-representation is that once an item passes your
statistically signifcant threshold and is included in the list, it will be
treated with identical weight to all the other items in the list.
Therefore, it is important to use multiple-testing correction when
selecting your threshold, so that your list does not contain too many
false-positives.
The identifiers I have for my genes/proteins/metabolites are not in your list
of identifiers, how can I use your tool?
o IMPaLA supports all popular identifier types for genes and
metabolites, but there are many identifier types out there. There are
many free tools available for changing between different identifier
types. Bridgedb (www.bridgedb.org) and BioMart
(http://www.biomart.org), and the metabolite ID conversion module
of MSEA (http://www.msea.ca) are useful tools for doing this.
Please also let us know the identifier types which you use if they are
missing, and we may be able to add them into the next version.
I used IMPaLA a few months ago, and now with the same data I get a
slightly different answer – what’s going on?
o IMPaLA updates its pathways knowledge base every three months,
based on the latest versions of its source databases. If a source
database changes the pathway definition, then the results from the
analysis will change. Always note the version number and build
number of IMPaLA when you do the analysis, then it will be clear
when IMPaLA has changed since your last visit. Also note, we are
always working to extend the databases used by IMPaLA to
increase its pathway coverage, so with new versions, new pathways
may also appear in your analysis.
Why should I use a background list for over-representation analysis?
o A background list should contain all the elements which you have
measured, or in cases where you have only identified the
differentially expressed elements, a list of what would typically be
measurable by your technique in that sample type. Background lists
are particularly important when you have only measured a small
percentage of the elements of that type in the source databases.
For instance, if I just enter 4 amino acids; alanine, proline, glutamine
and lactate, then I get a p-value of 3.64e-08 for the Amino acid and
oligopeptide SLC transporters from Reactome. However, if all I
measured was the amino acids, then my background is much
smaller than all the metabolites in the database, so I get a much
less significant p-value of 0.293.
I have lots of scenarios which I want to test, do you provide a programming
interface to IMPaLA?
o Yes, there is a well documented programming interface available,
see the link about SOAP/WDSL access shown at number 13 in
figure 1.
How do you cope with ambiguity in metabolite names? If I enter Lactate,
will it map to R-lactate or S-lactate?
o Lactate will map to both R- and S- forms, see figure 3B. To specify
just one form of a chiral metabolite enter the name for that speficic
form. To check which entities your names have mapped to, click on
the “X out of Y input identifiers” text at the top of the results screen
(figure 3A) and you will get the dialog seen in figure 3B. If the
mappings are not what you desire, then you can use the link at the
top of the screen to return to the input screen and re-enter your
amended indentifiers.
What are the forumulas used to make the calculations?
o For over-representation analysis the formula is:
N
min(
i
pathways
K ,N
i
)
i
j
, pi
j
M
N
K
j
i
M
ki
K
Where Ni is the effective size of pathway i, M is the overall number of
genes or metabolites available to be picked, K is the number of genes
or metabolites picked and ki is the number of genes or metabolites
picked from the pathway.
For Wilcoxon analysis xj , yj denote the expression level of the j-th gene
in the pathway. The differences dj = xj –yj are calculated for each
pathway and ranked. The ranks of differences with negative signs, Rneg,
and those with positive signs, Rpos , were summed. The test statistic is
based on, R = min{R pos , Rneg}. The Z-score is defined as
where
and
respectively
I have a great pathway database – can it be included in IMPaLA?
o Let us know about it, and we will consider it for integration.
If you have further questions, do not hesitate to contact us at
[email protected] and [email protected].


© Copyright 2026