
CREATING A DIELINE 1 4 GOING PRO TUTORIALS AND PROFILES
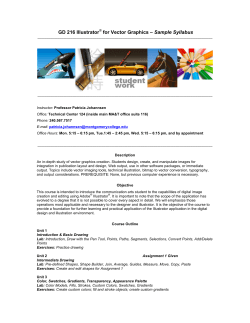
GOING PRO TUTORIALS AND PROFILES
CHAPTER 12 PRACTICAL SKILLS
CREATING A DIELINE
1
Tab
Closure
4
No Selection
New Document
Number of Artboards:
Score/Fold lines
Side
Panel
Base Panel
Spacing:
Cancel
1
7.06 mm
Columns:
Size: [Custom]
Width: 363 mm
Units
Height: 333 mm
Front Panel
Bleed:
Side
Panel
Top
0 mm
Millimeters
Color Mode: CMYK
PPI: 300
Align to Pixel Grid: No
Orientation:
Bottom
0 mm
Left
0 mm
Right
0 mm
Object
Type
Place...
Advanced
Tab Lock
Edit
New...
New from Template...
Open...
Open Recent Files
Browse in Bridge...
Close
Save
Save As...
Save a Copy...
Save as Template...
Save for Web & Devices...
Save Selected Slices...
Revert
Templates...
1
File
Select
⌘N
⌥⇧⌘N
⌘O
Effect
View
2 pt. Oval
Window
Style:
Help
Opacity
Dieline Tutorial* @ 90% (CMYK/Preview)
⌥⌘O
Share My Screen...
Device Central...
OK
Name: Dieline Tutorial
New Document Profile: [Custom]
Glue
Flap
Illustrator
Cutter/Dieline
⌘W
⌘S
⇧⌘S
⌥⌘S
⌥⇧⌘S
F12
⇧⌘P
Save for Microsoft Office...
Export...
Scripts
Document Setup...
Document Color Mode
File Info...
Back Panel
Glue
Flap
Dust
Flap
Dust
Flap
Dust
Flap
This tutorial explains the basics of dielines and how to create one
in Illustrator from a pre-existing package. For this tutorial, I used
a small gum pack. A dieline is a flattened outline of the cut and
fold lines for a package; it serves as a template. Designers often
receive dielines from their printer; however, if your client wants
a new style of package or a package structure for which the
printer does not have a template, you might need to create one
from scratch. If the client gives you a package to use, it’s pretty
easy to scan it in and create dielines over it in a program such
as Illustrator.
2
Print...
⌥⇧⌘I
⌘P
Setting up your file
Placing your artwork
Create a new file in Illustrator big enough to hold your dieline,
PMS swatches, and design notes.
For this small template, I used an 11 × 81⁄2in (28 × 21.6cm) artboard.
Gently open out your package and scan it. Place this scan on
the Original package layer and then lock that layer by clicking
on the padlock icon.
3
5
6
X:
LAYERS
ARTBOARDS
Dieline
Notes
Artwork
Original package
127.346mm
Y:
62.787 mm
W:
124.884 mm
H:
114.4 mm
YK/Preview)
Layer Options
OK
Name: Original package
Color:
Cancel
Light Blue
Template
Lock
Show
Print
Preview
Dim Images to:
50
%
4 Layers
Creating layers
Make a template layer
Drawing lines
Check measurements
Create four layers: one titled “Dieline”, one “Artwork,” one “Original
package” and one “Notes.” Your Dieline layer should be on top.
When you create the Original package layer, check the Template
option. This will allow you to always see the original packaging,
but as a light tint so that you can clearly see your dieline and
new artwork in the foreground.
Use either Shapes or the Pen tool, whichever you are most
comfortable with, to draw your guidelines. Either is fine, as long
as you are making clean, accurate lines.
When you work from a pre-existing template, you’ll need to check
your accuracy by taking measurements from your template and
comparing them to the in-progress dieline.
138
139
GOING PRO TUTORIALS AND PROFILES
CHAPTER 12 PRACTICAL SKILLS
7
STROKE
GRADIE
8
TRANSP
STROKE
Limit:
10
Base Panel
Limit:
Corner:
x
10
x
Align Stroke:
Align Stroke:
Dashed Line
Dashed Line
gap
11
TRANSP
0.5 pt
Cap:
Cap:
Corner:
dash
GRADIE
Weight:
0.5 pt
Weight:
dash
gap
dash
dash
gap
gap
dash
gap
dash
LAYERS
gap
Scale: 100
% 100
Scale: 100
%
% 100
Notes
%
Artwork
Align:
Align:
Profile:
Profile:
Uniform
ARTBOARDS
Dieline
Arrowheads:
Arrowheads:
Side
Panel
Uniform
Front Panel
Original package
4 Layers
Dust
Flap
Glue
Flap
Dust
Flap
Cut lines
Fold lines
Lock Original package layer
Cut lines are indicated with solid red lines, typically .25 or .50pt.
Folds are indicated with solid or dotted red lines.
(I use dotted lines in this tutorial.)
Once you have created your dielines, lock that layer by clicking
the padlock icon.
9
STROKE
GRADIE
12
10
TRANSP
0.5 pt
Weight:
Cap:
Corner:
Limit:
10
x
Align Stroke:
Dashed Line
dash
gap
dash
LAYERS
gap
dash
Arrowheads:
Scale: 100
% 100
Notes
%
Front Panel
Align:
Profile:
ARTBOARDS
Dieline
gap
Artwork
Uniform
Original package
4 Layers
Safe margin lines
Labels
Safe margins are shown either with guides or blue lines.
Identifying labels, such as “Front Panel,” “Glue Panel,” “Tuck Flap,”
etc., should be put on your Notes layer.
140
Creating a prototype
Once you have a basic dieline, you can
place your art on the Artwork layer. Create
a hardcopy prototype of your package by
printing out and assembling your design.
This will show you any errors in orientation,
measurement, text or art placement
and give you the opportunity to fix them.
Once your dieline is ready, send it to the
printer and ask for a proof. If you receive this
in digital rather than printed form, print and
assemble it in order to check one last time
for orientation, spelling, placement errors,
and so on. If you can’t print out your dieline
to full size, assembling a miniature version
will work as, by this point, your
measurements should be perfect.
141


© Copyright 2026