
How to create and use a Google Doc
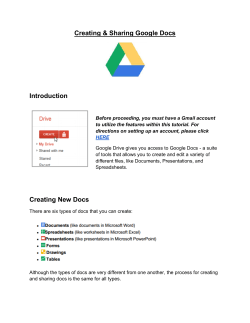
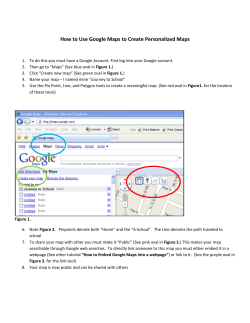
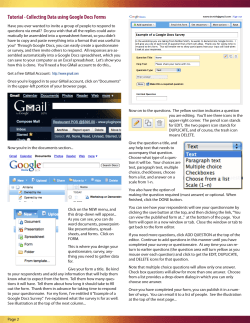
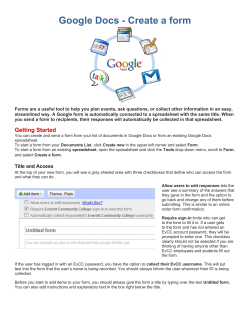
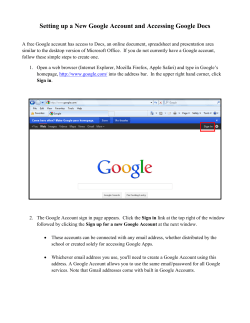
How to create and use a Google Doc
Use Google Docs to create documents that can be shared with others. Google Docs are a great
way to collaborate with others on a project. A benefit of Google Docs is that it automatically will
save to ensure that you will not lose your work if something crashes.
Google.com
In order to create a Google Doc, go to google.com. On the top task bar of the Google Search page,
select the Documents tab to access Google Docs.
How to create and use a Google Doc - 1
Opening your documents
In order to create a Google Doc, you must have gmail account. If you do not already have an
account, you can select the red "Create an Account." If you already have an account through
Google, sign in with your user name (The first part of your email before @) and your password. If
you cannot remember your password, you can have Google help you access it.
How to create and use a Google Doc - 2
Some of the Features of the Google Doc Home page:
1. Create a new Document
2. The title shows you what type of document it is so you can better organize your documents. It
also will show documents which you have been included in and make edits to.
3. Since Google Docs can be shared, you are able to see which documents are created by you or
someone who shared them with you.
4. You are able to see when the document was last updated and who it was modified by.
Creating your document
There are 6 different documents that you can create by selecting them. During this tutorial, we will
cover the first 4: Document, Presentation, Spreadsheet, and Form.
How to create and use a Google Doc - 3
Document
A Google Document is very similar to a Microsoft Word Document:
1. Change the title of your document so you can keep track of what it is
2. The menu allows you to edit your document.
3. The quick menu allows you to print, undo and redo, copy and paste, edit your text, insert
pictures and hyperlinks, add bullets and numbers, and edit the orientation of your text.
4. Add comments to the document and share it with others
How to create and use a Google Doc - 4
Presentation
When you select the Presentation button, you will be asked to select a theme for your
presentation. If you do not want to select a theme when a new presentation is opened, uncheck
the box labeled "Show for new presentations"
How to create and use a Google Doc - 5
Features of Google Presentation
1. Title-name your presentation so you can keep them organized in your documents. Star your
document if it is important. The file folder allows you to save your document in a certain collection
which can make it easier to keep organized
2. Use the different menus to edit your powerpoint.
3. The red button will allow you to add new slides. When it drops down it gives you the following
options: Title, Title and Body, Title and Two Columns, Title Only, Captions, or Blank.
4. The quick menu allows you to undo or redo, copy from the web clipboard, paste, zoom, insert
lines, shapes, text, images, or hyperlinks
5. Allows you to begin your presentation. You can start it from the current slide or with your
speaker notes.
6. By selecting the blue share button, you can share your presentation to allow other to edit it.
7. The body of your presentation is where you do the majority of your editing. What you see on the
body of the slide will be what is shown on your presentation
8. You are able to add speaker notes to your presentation like you would do in Microsoft
PowerPoint.
How to create and use a Google Doc - 6
Adding Transitions
To add a transition to your slide:
1. Select the Slide Menu
2. Select "Change transition"
3. This is where you change the transitions and their speed
4. Play your transition to make sure it is exactly what you want.
How to create and use a Google Doc - 7
Adding a Hyperlink
To add a hyperlink to your slide:
1. Select the text you want to show on your slide. (If you want the URL to show you can just copy
and paste it here as well.
2. Select what you want it to be linked to. If you are choosing a URL, select Web address. If it is an
email address, type that into the space. If it is a slide select Slide and then choose which slide
you want it to like to.
How to create and use a Google Doc - 8
Your link will appear with a line under it. The red box shows the tools which are used to edit the
text area of your slides. You can change the line size/color, the size of the text, the format of the
text, and add bullets or numbering.
How to create and use a Google Doc - 9
Slide Show Mode
When you select Start Presentation, it will make your presentation full screen. You will be able to
get out of the presentation by selecting the red X at the top of the presentation or by hitting the Esc
key on your keyboard.
How to create and use a Google Doc - 10
Spreadsheet
1. Change the title of your spreadsheet and use the menus to format your spreadsheet
2. Use the quick menu to format the text in your spreadsheet
3. Enter your data into the cells by clicking in them and begin typing.
4. Share your spreadsheet
How to create and use a Google Doc - 11
Form
The features of creating a form are:
1. You can add a new question in the form of short answer text, paragraph, multiple choice,
checkboxes, choose from a list, skid, or grid; or you can create a new section header or insert a
page break. You can also change the theme of the form by selecting the button next to: "Add Item"
2. You can share your form, email it to someone, see the responses in a table, embed the table
or save it
3. Change the title of your form and give any instructions you want to explain something that will
help those filling it out
4. Editing the question: Add a title to your question and any information they may need to answer
the question; you can select the type of question you want them to answer and then select
whether it is a required question they need to answer.
5. By selecting the next question you can edit it by clicking on the small pencil which will appear
on the right hand side
6. The URL will be provided so you personally can see the form once it is punished
How to create and use a Google Doc - 12
There are many themes you can choose from. You can go to the next page by selecting the Next
link
How to create and use a Google Doc - 13
Your finished form
When you finish your form and send it out, this is an example of what it can look like. Those you
send it to will be able to fill in the responses and select Submit
How to create and use a Google Doc - 14
Once they select submit, it will go to a spreadsheet showing the responses that have been
recorded and the time they submitted the form.
Sharing your document
When you are ready to share the document, click the blue share button that is located in the top
right corner. Under the share button will show you the other people who are viewing the
document.
How to create and use a Google Doc - 15
Sharing Settings
There are three different options to share your document:
How to create and use a Google Doc - 16
Public on the Web
When you publish it on the web, anyone can access it. If you do not want to allow anyone to edit
your document, make sure the box highlighted in red is unchecked.
How to create and use a Google Doc - 17
Anyone with the link
You can provide a link which makes it private unless they have that link.
How to create and use a Google Doc - 18
Adding people to access your private document
When you choose to keep it private and only give specific people permission to edit it, you need to
type their names in the add people section. They will receive an email telling them that you have
sent them a link to your Google Doc.
The Email
When someone sends you a file via Google Docs, this is what your email address will look like.
There are two different places for you to access the document. They are both hyperlinked for
easier access to you. When you click on the link, it will open a new tab that will take you right to the
document and provide easy access for you to read as well as edit the document.
How to create and use a Google Doc - 19


© Copyright 2026