
YouTube Videos & Your Blackboard Course
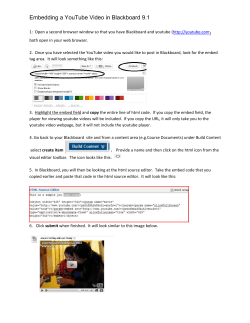
YouTube Videos & Your Blackboard Course Peru State College | Distance Education | Instructor’s Guide - YouTube Videos & Your Blackboard Course - Introduction & Reasons for Using YouTube 1 Creating a Gmail Account (Required for YouTube) 1 Creating a YouTube Account (For existing Gmail accounts) 3 Creating YouTube Videos in Blackboard (New feature!) 5 Creating YouTube Videos on the YouTube Site 10 Editing Your Video Settings 12 Info and Settings, page 12 Advanced Settings, page 13 Enhancements, page 15 Audio, page 15 Annotations, page, 16 Captions, page 17 Uploading Videos to YouTube 19 Adding Personal YouTube Videos to Your Course 22 Adding Public YouTube Videos to Your Course 25 Downloading Your Video from YouTube 28 Removing a Video from YouTube 30 Adding a Mobile Number to an Existing YouTube Account 31 Contact Us 33 Introduction Reasons for using YouTube for your course: You can create and store the video in one place. You can record videos anywhere. The video can be kept private and can be made "unsearchable." The quality of videos will be better than most alternatives. The videos will be stored on the YouTube server and won’t take “space” on your computer. Blackboard has added an integration tool. NOTE: YouTube changes their website design very regularly. However, the steps should remain similar. (Last Updated: July 11, 2013) Creating a Gmail Account (Required for YouTube) To have a YouTube Account, you need to have a Google Email Account (Gmail) If you already have a Gmail account, you may skip to the next step, ‘Creating a YouTube Account.’ If you do not have a Gmail account, you will need to follow the steps below: Go to: www.youtube.com Click on ‘Sign in,’ in the upper, right-hand corner. Click on ‘CREATE AN ACCOUNT’ in the upper, right-hand corner. Peru State College | Instructor YouTube Tutorial | Last Updated: 7/11/13 | Page 1 Fill out the information: 1. Fill in your name. #1 2. Your Google username will also be your new Gmail address. #2 3. Google suggests that you provide a mobile phone number, to assist you with making your account secure. Also, it provides verification of your identity and allows you to make longer videos. 4. Another email address will assist with securing your account as well. #3 5. Don’t forget to check the box “I agree to the…” #4 6. It is your decision to check the second box, about ads and personalization, or not. 7. After you have confirmed all the information is correct, click on ‘Next step.’ #5 #6 #7 Peru State College | Instructor YouTube Tutorial | Last Updated: 7/11/13 | Page 2 Now, you will see your Google account name and you may add a profile photo; otherwise, click on ‘Next Step.’ Your Name Once you have a Gmail account, please feel free to explore the Google “world,” by going to www.gmail.com. To continue with YouTube, click on ‘Back to YouTube.’ Also, see related tutorials about Google+, Drive, and Hangouts. Creating a YouTube Account (For existing Gmail accounts) If already have an existing Gmail account, you will need to link it to your YouTube account. If you followed the steps above and created a Gmail account through YouTube, skip to ‘Creating YouTube Videos in Blackboard.’ Go to: www.youtube.com Peru State College | Instructor YouTube Tutorial | Last Updated: 7/11/13 | Page 3 Click on ‘Sign in’ in the upper, right-hand corner. You will be taken to the YouTube, Google login page. Log in using your Gmail address and password. o Google may offer a list of their new policies. You are welcome to read them. Otherwise, click on ‘OK, got it.’ o You may also receive other pop-ups. You may close out of them. Once you have successfully linked your Gmail and YouTube accounts, you will be sent back to the YouTube home page. Peru State College | Instructor YouTube Tutorial | Last Updated: 7/11/13 | Page 4 Creating YouTube Videos in Blackboard (New Feature!) You may create YouTube videos in your course directly from the text editor. Go to the course and go to the area you wish to add a video. You may create a video as an Announcement, an Item, an Assignment, Test instructions, Grade Center feedback, or anywhere else you will find the textbox editor. Click on the “Video Everywhere” tool in the textbox editor, on the bottom, far left. The button looks like a webcam, with a red dot in the middle. A window will pop-up that will allow you to ‘Sign in to Youtube.’ Peru State College | Instructor YouTube Tutorial | Last Updated: 7/11/13 | Page 5 If you click on ‘Sign in’ you will get a pop-up to log into your Gmail account. Once you enter your credentials, YouTube will ask if you are sure that you want to give Blackboard access to your account. Click on ‘Grant access.’ You now have the option to record directly by clicking on ‘Record from webcam.’ You may see a pop-up from Adobe Flash Player, asking to have access to your camera and microphone. Peru State College | Instructor YouTube Tutorial | Last Updated: 7/11/13 | Page 6 You want to check ‘Allow’ and you may consider checking the box ‘Remember.’ Then click ‘Close.’ You should now be able to see yourself. When you get your camera situated and the background is appropriate, click on the camera icon, ‘Start recording.’ If you put a mobile number in when signing up for YouTube, you will have 120+ minutes of record time; however, if you did not enter a mobile number, you only have 15 minutes to record. At 15:30, the video will come to a stop on it’s own. (See Adding a Mobile Number to an Existing Account for more information.) You may get a pop-up message asking if Blackboard can access your webcam to upload to YouTube. Click, ‘OK.’ To stop recording, click on the ‘Stop recording’ button at the bottom of the screen. To cancel the recording without saving, click on ‘Cancel’ to the left. Peru State College | Instructor YouTube Tutorial | Last Updated: 7/11/13 | Page 7 Now you have the option to preview the video by clicking play, uploading it, or start over. If you have previewed your video and like it, click on ‘Upload.’ You can add the video as the default 480 x 360 pixels: Example: OR, you may add it as a thumbnail: Example: Peru State College | Instructor YouTube Tutorial | Last Updated: 7/11/13 | Page 8 Once you choose an option, click on ‘Insert.’ You will then want to edit your video, as videos are set to ‘Public’ by default. You can quickly access YouTube by clicking on the Video Everywhere tool again. Then, click on the ‘Browse’ tab. Click on the ‘Edit button next to the preferred video to go to YouTube for video editing. See ‘Editing Your Video Settings’ for more information. Peru State College | Instructor YouTube Tutorial | Last Updated: 7/11/13 | Page 9 Creating YouTube Videos on the YouTube Site To get started with video creation, click on the ‘Upload’ button at the top of your page. Then click on ‘Webcam capture’ in the upper, right-hand corner. The video will not automatically start recording. You may see a pop-up from Adobe Flash Player, asking to have access to your camera and microphone. Peru State College | Instructor YouTube Tutorial | Last Updated: 7/11/13 | Page 10 You want to check ‘Allow’ and you may consider checking the box ‘Remember.’ Then, click ‘Close.’ You should now be able to see yourself. When you get your camera situated and the background is appropriate, click on the camera icon, ‘Start recording.’ If you put a mobile number in when signing up for YouTube, you will have 120+ minutes of record time; however, if you did not enter a mobile number, you only have 15 minutes to record. At 15:30, the video will come to a stop on it’s own. (See ‘Adding a Mobile Number to an Existing Account’ for more information.) To stop recording, click on the ‘Stop recording’ button at the bottom of the screen. To cancel the recording without saving, click on ‘Cancel’ on the left. Now you have the option to preview the video, upload it, or ‘Start over.’ If you have previewed your video and like it, click on ‘Upload.’ Peru State College | Instructor YouTube Tutorial | Last Updated: 7/11/13 | Page 11 See ‘Editing Your Video Settings’ for more information. Editing Your Video Settings Under Info and Settings > Basic info: 1. Give the video a new title. 2. You are welcome to give a description. Otherwise, you can put the description in your Blackboard Course. 3. Delete all the tags. These are used for searching and advertising. 4. You want to change the ‘Privacy settings’ from the default ‘Public’ to ‘Unlisted.’ This will make it unsearchable, and someone would have to have the specific URL to view it. Your URL will appear once the ‘Unlisted’ option is selected. Students will not be able to view a ‘Private’ video from Blackboard. 5. You may change the category to Education, if you would like. 6. Then, click on ‘Save changes.’ #1 #4 #2 #5 #3 #6 Peru State College | Instructor YouTube Tutorial | Last Updated: 7/11/13 | Page 12 Next, click on the ‘Advanced settings’ tab. 1. Uncheck all of the boxes under ‘Comments and responses.’ 2. Leave the ‘License and rights ownership’ as default, ‘Standard YouTube License.’ 3. Use the ‘Caption certification’ drop-down to select the first option, ‘This content has never aired on television in the U.S.,’ as this should be an original video that you have created. 4. Leave the ‘Distribution options’ as checked. 5. You may add a video location and recording date, if you would like. 6. You may also choose a preference regarding 3D videos. 7. Additionally, it is your choice to show video clicks on the viewing page or not. 8. When you are done, click on ‘Save changes.’ #5 #1 #6 #2 #7 #3 #4 Peru State College | Instructor YouTube Tutorial | Last Updated: 7/11/13 | Page 13 Next, click on ‘Info and Settings’ at the top of the page. You can now pick a video thumbnail on the right-side of your video preview. This thumbnail will be what the students see before they hit play. If you do not see these, your video many not be finished uploading. You will want to come back to adjust the thumbnail, or YouTube will pick one by default. To choose another thumbnail, click on the image you prefer. Then, click ‘Save changes.’ Peru State College | Instructor YouTube Tutorial | Last Updated: 7/11/13 | Page 14 Once you feel comfortable with all of your ‘Info and Settings,’ you can explore some of your other video options. If you click on the ‘Enhancements’ tab, you can add: 1. Video filters and colors 2. Auto-fix, for adjustments to lighting and color 3. Slow motion 4. Stabilization, to “remove shaky camera motions” 5. Or, ‘Additional features’, like blurring all faces #4 #3 #2 #1 #5 If you click on the ‘Audio’ tab, you can add music. However, be aware that the added music will replace your original sound. Peru State College | Instructor YouTube Tutorial | Last Updated: 7/11/13 | Page 15 The next editing area is ‘Annotations,’ where you can add comments to your video. To do this, simply go to the portion in the video that you want to put a note and click on the ‘+ Add annotation’ drop-down. Once you add a comment or note, you can preview it by pushing play. Peru State College | Instructor YouTube Tutorial | Last Updated: 7/11/13 | Page 16 If you want to move the comment or note just drag the brackets, where you want it moved. Or, you can delete the comment or note, by clicking the trashcan button. Peru State College | Instructor YouTube Tutorial | Last Updated: 7/11/13 | Page 17 If you make changes, remember to select ‘Save’ and then the ‘Publish’ button, before leaving this page. You can also add captions or a transcript, if you would like. Once you are done with editing, click on the video title to preview the video with the changes. If you added any major enhancements, it may take a while for it to process. If you want to make additional edits, click on ‘Video Manager.’ If you are on another page and don’t see this button as an option, click on the ‘Upload’ dropdown, in the upper right-hand corner and then ‘Video Manager.’ Peru State College | Instructor YouTube Tutorial | Last Updated: 7/11/13 | Page 18 In the Video Manager, you should see any videos that you have made. Next to the video you want to edit, click ‘Edit’. Uploading Videos to YouTube You may upload videos that you own. It is illegal to upload videos that you purchased. Instructors must follow copyright laws. We only recommend the uploading option when: You are uploading a video that you captured from another recording device. Or, you are uploading your own videos, which you originally downloaded from YouTube. (See ‘Downloading Videos from YouTube’ for more info.) Start by logging into YouTube.com and clicking the ‘Upload’ button at the top of your page. Then click on ‘Select files to upload.’ A file upload box should pop-up. Search for the video you have saved. Once you have found it, click ‘Open.’ Peru State College | Instructor YouTube Tutorial | Last Updated: 7/11/13 | Page 19 Processing may take a few minutes, depending on the length and quality of your video. When the upload is complete the processing bar will disappear and you will see your file title and an ‘Upload Complete’ message. Under the ‘Info. and Privacy’ tab, edit the following information: 1. Give the video a title. 2. You may give the video a description; otherwise, you can put a description in your course. 3. Do not add ‘Tags.’ These are used for searching and for advertising. 4. Choose a ‘Video Thumbnail’ that you prefer, by clicking on it. This image will be what students see before they hit play. 5. Change the Privacy setting to ‘Unlisted’. This will make it unsearchable, and someone would have to have the specific URL to view it. Students will not be able to view a ‘Private’ video from Blackboard. 6. You may change the category to ‘Education.’ 7. Once you are done, click ‘Save.’ #5 #1 #2 #6 #3 #6 #4 Peru State College | Instructor YouTube Tutorial | Last Updated: 7/11/13 | Page 20 #7 Next, click on the ‘Advanced settings’ tab. 1. Uncheck all of the boxes under ‘Comments and responses.’ 2. Leave the ‘License and rights ownership’ as default, ‘Standard YouTube License.’ 3. Use the ‘Caption certification’ drop-down to select the first option, ‘This content has never aired on television in the U.S.,’ as this should be an original video that you have created. 4. Leave the ‘Distribution options’ as checked. 5. You may add a video location and recording date, if you would like. 6. You may also choose a preference regarding 3D videos. 7. Additionally, it is your choice to show video clicks on the viewing page or not. 8. When you are done, click on ‘Save changes.’ #5 #1 #6 #2 #7 #3 #4 Peru State College | Instructor YouTube Tutorial | Last Updated: 7/11/13 | Page 21 Next, click the link listed near the top of the page, under the video title. You should be able to preview the video, as students will view it. Adding Personal YouTube Videos to Your Blackboard Course You may add personally recorded or uploaded YouTube videos to your course directly from the text editor. Go to the course and go to the area you wish to add a video. You may add a video as an Announcement, an Item, an Assignment, Test instructions, Grade Center feedback, or anywhere else you will find the textbox editor. Click on the “Video Everywhere” tool in the textbox editor, on the bottom, far left. The button looks like a webcam, with a red dot in the middle. Peru State College | Instructor YouTube Tutorial | Last Updated: 7/11/13 | Page 22 A window will pop-up that will allow you to ‘Sign in to Youtube.’ If you click on ‘Sign in’ you will get a pop-up to log into your Gmail account. Once you enter your credentials, YouTube will ask if you are sure that you want to give Blackboard access to your account. Click on ‘Grant access.’ You now have the option to record directly or go to the ‘Browse’ tab. Peru State College | Instructor YouTube Tutorial | Last Updated: 7/11/13 | Page 23 A list of your videos should appear. Simply click on the ‘Insert’ button next to the video you prefer. You can add the video as the default 480 x 360 pixels: Example: Peru State College | Instructor YouTube Tutorial | Last Updated: 7/11/13 | Page 24 OR, you may add it as a thumbnail: Example: Once you choose an option, click on ‘Insert.’ You are welcome to add accompanying text above or below the video; however, be aware of formatting. o You may decide to just add another item above or below your video in the course. When you are done in Blackboard, click ‘Submit.’ Adding Public YouTube Videos to Your Blackboard Course You may also add public videos to your Blackboard courses, if you wish to share them with your students. Go to the course and go to the area you wish to add a video. You may add a video as an Announcement, an Item, an Assignment, Test instructions, Grade Center feedback, or anywhere else you will find the textbox editor. Peru State College | Instructor YouTube Tutorial | Last Updated: 7/11/13 | Page 25 Click on the ‘Mashups’ drop-down, for more options. From the drop-down, choose ‘YouTube Video.’ *Note: You cannot add personal videos to your course using the ‘Mashup’ method. Your videos should be set to unlisted and would not appear in a search of YouTube. Use the Video Everywhere tool outlined on page 22, ‘Adding Personal Videos to Your Blackboard Course.’ A new window will open. Use the search box to search for the video or topic you wish to include. o Be sure to use the search drop-downs to receive narrower results. o Then, click on ‘Go.’ Search results should appear. They are listed by popularity of views and ratings by viewers. Peru State College | Instructor YouTube Tutorial | Last Updated: 7/11/13 | Page 26 You may preview the videos before selecting them for your course. Be sure to watch videos in full before selecting them for your course. To choose a video, click on ‘Select.’ Peru State College | Instructor YouTube Tutorial | Last Updated: 7/11/13 | Page 27 You now have editing options. 1. You may edit the name, if you prefer to clarify for students. 2. You may change the view to a thumbnail (shown at the top of your page), a link, or an embedded video (480 x 360 pixels). 3. You may show or hide the YouTube information. 4. Then, click on ‘Submit. #1 #2 #3 #4 Downloading Your Video from YouTube Once you have created a video that you want to use multiple times, you may download it from YouTube, to save on your computer. This would ensure that you have a copy of the video, in case you accidentally delete it from YouTube. Peru State College | Instructor YouTube Tutorial | Last Updated: 7/11/13 | Page 28 Log into YouTube, click on the ‘Upload’ button’s drop-down, and click on ‘Video Manager.’ You should see any videos that you have created. Click on the down arrow next to the video you want to download. Do not click ‘Edit.’ Click ‘Download MP4’ from the drop-down. A window, or download, should pop-up asking you to open the video or save it. Choose the ‘Save File’ option or save it from your downloads. You may now watch it on your computer. Peru State College | Instructor YouTube Tutorial | Last Updated: 7/11/13 | Page 29 Removing a Video from YouTube Log into YouTube, click on the ‘Upload’ button’s drop-down, and click on ‘Video Manager.’ You should see any videos that you have created. Click on the down arrow next to the video you want to download. To remove a video and delete it from YouTube permanently, you would click the box next to the appropriate video. Then, click the down arrow next to ‘Actions.’ Peru State College | Instructor YouTube Tutorial | Last Updated: 7/11/13 | Page 30 Choose the option to ‘Delete.’ You will receive a warning that you are deleting the video permanently. This action cannot be undone. You would simply click on ‘Yes, delete’ or ‘Cancel.’ NOTE: If you delete a video from YouTube.com, it will no longer appear in your course. The course will show a black box, where the video used to be. Remember to remove the video from Blackboard as well. Adding a Mobile Number to an Existing YouTube Account If you add a mobile number to your YouTube account, you will have 120+ minutes of record time. Otherwise, you only have 15 minutes. For lengthy lectures, it would be advantageous to increase you recording time. Start by logging into YouTube.com and clicking the ‘Upload’ button at the top of your page. Under the uploading and recording options, there is the option to ‘Increase your limit.’ Peru State College | Instructor YouTube Tutorial | Last Updated: 7/11/13 | Page 31 Although it mentions uploading videos, this option will also increase your recording time. Click the link to ‘Increase your limit.’ You will then choose to receive a telephone call or Short Message Service (SMS or text message) to verify your number. Select your country. Enter your phone number, no dashes, spaces, or other characters. Then, click ‘Submit.’ Peru State College | Instructor YouTube Tutorial | Last Updated: 7/11/13 | Page 32 Check your phone for a call or text and enter the verification code you receive. Then, click ‘Verify.’ For questions or concerns, please contact: Distance Education & Online Services Peru State College PO Box 10 600 Hoyt Street Peru, NE 68421 Toll Free: (888) 258-5558 24-Hour Tech Line: (402) 819-8181 [email protected] Peru State College | Instructor YouTube Tutorial | Last Updated: 7/11/13 | Page 33


© Copyright 2026