
Land Information Ontario LIO Make-a-Map Version 2.0.0
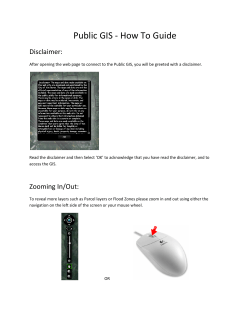
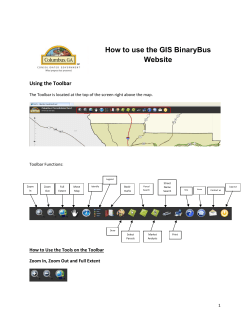
Land Information Ontario
LIO Make-a-Map
Version 2.0.0
Issued: March 2010
Version: 2.4
Issued: July 2007
1
LIO Make a Map Manual
Disclaimer
This technical documentation has been prepared by the Ministry of Natural Resources (the
“Ministry”), representing Her Majesty the Queen in right of Ontario. No warranties or
representations, express or implied, statutory or otherwise shall apply or are being made by the
Ministry with respect to the documentation, its accuracy or its completeness. In no event will the
Ministry be liable or responsible for any lost profits, loss of revenue or earnings, claims by third
parties or for any economic, indirect, special, incidental, consequential or exemplary damage
resulting from any errors, inaccuracies or omissions in this documentation; and in no event will
the Ministry’s liability for any such errors, inaccuracies or omissions on any particular claim,
proceeding or action, exceed the actual consideration paid by the claimant involved to the
Ministry for the materials to which this instructional documentation relates. Save and except for
the liability expressly provided for above, the Ministry shall have no obligation, duty or liability
whatsoever in contract, tort or otherwise, including any liability or negligence. The limitations,
exclusions and disclaimers expressed above shall apply irrespective of the nature of any cause
of action, demand or action, including but not limited to breach of contract, negligence, strict
liability, tort or any other legal theory, and shall survive any fundamental breach or breaches.
Additional Information
For more information about this document, please contact Land Information Ontario at (705)
755-1878 or [email protected].
© 2010, Queen's Printer for Ontario
Version: 2.0
Issued: March 2010
2
LIO Make a Map Manual
Table of Contents
Disclaimer....................................................................................................................................2
Introduction .................................................................................................................................4
Using Make a Map.......................................................................................................................4
Tabs and Tab Features...............................................................................................................5
About........................................................................................................................................5
Layers ......................................................................................................................................5
Legend Tab ..............................................................................................................................7
Search Tab...............................................................................................................................7
Bookmarks ............................................................................................................................12
Feature Icons.............................................................................................................................13
Other Features ..........................................................................................................................15
Map Scale ..............................................................................................................................15
Map Tool in Use.....................................................................................................................15
Map Centre ............................................................................................................................15
Tutorials: How to Make a Map .................................................................................................16
Making a Basic Map ..............................................................................................................16
Making a Map of Trails..........................................................................................................18
Measure Distance .................................................................................................................21
Marking up a Map..................................................................................................................22
Printing/Emailing a Map .......................................................................................................24
Version: 2.0
Issued: March 2010
3
LIO Make a Map Manual
Introduction
Make a Map is a free web application for making topographic maps of Ontario. It is available
from the Land Information Ontario (LIO) website:
http://www.mnr.gov.on.ca/en/Business/LIO/2ColumnSubPage/STEL02_167954.html
Data used by Make a Map is from a number of federal, provincial and local sources, and is
intended for display at scales of 1:5,000 to 1:10 Million. Make a Map uses LIO, and other Web
Map Services (WMS).
Using Make a Map
The Make a Map screen has several sections (see below):
• Tabs and Tab Features: Use to add layers, find places and save extents
• Feature Icons: Use to identify features, mark up map, print and email
• Map extent: What is visible in the window
• Map Scale and Map Tool: Shows the current scale and tool being used
• Map size: Use to increase/decrease the size of the application on your screen
Version: 2.0
Issued: March 2010
4
LIO Make a Map Manual
Tabs and Tab Features
About
Provides information about the application such as name, version number, release date and
support information.
Layers
Select the data layers that you want displayed. Layers are grouped in five folders:
Administrative Boundaries
Non-physical features such as parcel,
township, municipal, district, regional and
provincial boundaries.
Natural Features
Physical features related to water,
vegetation and land.
Constructed Features
Physical features related to human activity
such as buildings, roads, and trails.
Grids
Rectangular lines commonly displayed on
various maps
Imagery
Aerial and satellite photography from
Ontario imagery collection projects.
Important!
Layers can only be seen when the scale is within its upper and lower display threshold for that
layer, and the box beside the layer name is checked. The check box is greyed out when the
respective layer is outside its display threshold.
Layer Descriptions
Each map layer name shown in blue is described in the Data Directory. This description
typically provides the source, accuracy, frequency of update, intended purposes and contact
information. To view the description, click on the link a new window will open and display the
information.
Version: 2.0
Issued: March 2010
5
LIO Make a Map Manual
Turning layers on/off
Click folder to show or hide contents
To turn on all layers in a folder, click the following icon
To turn off all layers in the associated folder
Turn on/off a specific layer
Layer is not visible at the current map scale but will be when it meets the
criteria
Layer is not visible at the current scale. Layer is also not turned on.
Used with a feature tool. When enabled (black) feature information from this
layer can be obtained by clicking on the map. Click the icon to enable.
By default, the following layers are turned on when beginning a session:
• Province (Administrative Boundaries/Municipalities and First Nation Reserves)
• Lakes and Ponds (Natural Features/Water and Navigational Aids/Water Features)
• Rivers and Streams (Natural Features/Water and Navigational Aids/Water Features)
• Freeways (Constructed Features/Roads and Bridges/Roads by Type)
• Highways (Constructed Features/Roads and Bridges/Roads by Type)
• Arterial Roads (Constructed Features/Roads and Bridges/Roads by Type)
• Collector Roads (Constructed Features/Roads and Bridges/Roads by Type)
• Local Roads (Constructed Features/Roads and Bridges/Roads by Type)
Important
For changes in the layers tab to take effect, click the Refresh Map button.
Version: 2.0
Issued: March 2010
6
LIO Make a Map Manual
Legend Tab
This tab displays the legend for the map.
The legend only shows the layers that are
turned on in the Layers tab and are
displayed at the current display threshold.
This legend will be displayed in PDF and
email versions of the map.
Search Tab
Locate and zoom to an area of interest in the map window.
Basic and an Advanced Search; advanced provides additional options and refinement to the
geoname search as well as search by location. Both searches use the Ontario GeoName
database to find places like cities, towns, lakes and rivers A full list is provided in the Advanced:
Geoname Search section.
Basic Search
1. The Basic Search function is the
default under the search tab. Enter the
name of the feature you are looking for in
the Search box. Click the Search button.
2. Results will appear below the search
box. Click the Go button beside the
location that corresponds to the feature
you are looking for to zoom to the
specified area.
The zoom from search will put the result
at the centre of the extent.
Version: 2.0
Issued: March 2010
7
LIO Make a Map Manual
Important!
If the layer in which the searched for object is not ON it will not be visible. For instance, if
searching for place name and this layer is not on, place names will not be visible in the extent.
Advanced Search
Clicking the Advanced Search link below the
basic search box provides six Advanced Search
options.
Advanced Search: Search Address
1. Enter as much address information as
possible in the appropriate boxes (Street
Number, Street Name, City, and Postal
Code).
2. Click the Search button. Matching results
will be displayed.
3. Select the result that you are interested in
and click Zoom. The map will zoom and
centre on this point.
4. If there are no matching results, click Do
another search. Try the following to improve
results:
- check spelling
- check that it is a valid address
- include additional information
Version: 2.0
Issued: March 2010
8
LIO Make a Map Manual
Advanced Search: MNR OBM Map Sheets
The MNR OBM Map Sheets (Ministry of Natural Resources Ontario Base Mapping, Map
Sheets) option provides the functionality to center the map on the OBM tile. OBM numbers are
located in the lower left corner of MNR issued maps.
1. Enter all or part of OBM Map Sheet
Number in the Search Box and click the
Search button.
2. A drop-down menu will appear with a list of OBM numbers.
Choose the number that corresponds to what you are looking for.
Click the Search button. The map window will then zoom and
centre on the to the specified tile.
3. Restart the OBM search by clicking Do Another Search.
Advanced Search: Latitude / Longitude
1. Enter the geographic position
(Longitude & Latitude) where you wish to
centre the map. The width of the map to
be displayed must also be set.
2. Click OK. The map will zoom and
centre on the extent entered.
Important!
The longitude for Ontario is between -74°
18’ 29” and -95° 9’ 25” and latitude is
between 56° 51’ 0” and 41° 40’ 20”.
If you enter a geographic location located
outside of Ontario, the map will appear
white.
Version: 2.0
Issued: March 2010
9
LIO Make a Map Manual
Advanced Search: UTM Coordinate
1. Enter the Universal Transverse Mercator
position (Easting & Northing) where you wish
to centre the map and the UTM Zone in which
these coordinates are located. Enter the width
of the extent in kilometers.
2. Click the OK button. The map will zoom to
the extent that you entered and the following
confirmation message will be displayed on the
left-hand side of the page.
3. This message confirms that the map is
centred on the specified UTM
coordinates.
Important
If you enter a geographic location located outside of Ontario, the map will appear white.
Ontario is within UTM Zones 15 to 18. The UTM Easting must be between 320448 (in Zone 15)
and 542202 (in Zone 18) and the UTM Northing must be between 4615632 and 6300902.
Advanced Search: Geoname Search
1. Search by official Ontario place names.
Searches may be refined by using the
National Concise Code.
Version: 2.0
Issued: March 2010
10
LIO Make a Map Manual
Code
BAY
BCH
CAPE
CAVE
CHAN
CITY
CLF
CRAT
FALL
FOR
GEOG
IR
ISL
LAKE
MIL
MISC
MTN
Type
Bay
Beach
Cape
Cave
Channel
City
Cliff
Crater
Falls
Forest
Geographical Area
Indian Reserve
Island
Lake
Military Area
Miscellaneous
Mountain
Code
MUN1
MUN2
PARK
PLN
RAP
RIV
RIVF
SEA
SEAU
SHL
SPRG
TOWN
UNP
VALL
VEGL
VILG
Type
Municipal/district area - major
Municipal/district area - misc.
Conservation Area
Plain
Rapids
River
River Feature
Sea
Undersea Feature
Shoal
Spring
Town
Unincorporated Area
Valley
Low Vegetation
Village
2. Find the result in the list and click Go
3. The map will centre and zoom to the
selected location. The results list will
remain in the left panel.
Version: 2.0
Issued: March 2010
11
LIO Make a Map Manual
Advanced Search: Township
1. Enter the first few characters of the
township of interest and any additional
information (Lot, Concession, Direction).
2. Click the Search button.
3. Matching townships will be displayed in a
drop-down menu. Select the township that
corresponds to what you are looking for and
click Zoom.
Bookmarks
This feature use cookies allowing extents to be saved and viewed at a later time. To use this
feature, your browser must accept cookies.
Important!
This feature only bookmarks the extent of your map. Anything additional such as labels will not
be saved.
1. Create extent to be saved.The first
time using this feature there will be no
existing bookmarks. To save a map and
create a bookmark, click Add Current
Extent.
2. Enter a name for the bookmark, and
press the Add Bookmark button.
Version: 2.0
Issued: March 2010
12
LIO Make a Map Manual
3. The bookmark Test has been created.
Click it to return to the extent or click the
red x when it is no longer needed.
To add another Bookmark, click the Add
Current Extent and repeat the above
steps.
Feature Icons
Feature icons provide the functionality to interact with the maps. The icons are located above
the map extent. For detailed instructions on how to use these icons, see Tutorial following.
Toolbox Closed
Toolbox Open
Refresh the Map
View Province of Ontario
Return to Previous Map View
Zoom In
Zoom Out
Reposition the Map
Open Index Map
Version: 2.0
Issued: March 2010
Click to refresh the map.
Click to return the map to the default view of the entire
province. Selected layers remain checked but may not be
visible due to the change in map scale..
Click to return the map view to the previous extent. This
action will change the viewing scale. Visible layers will
change depending on their threshold. Layers that were
previously visible will remain enabled.
A. Left-click the mouse on the map, hold down and drag
diagonally to create a rectangle around the area of
interest; release. The map will zoom to the extent defined
by the largest side of the rectangle.
B. Left-Click the mouse at a single point in the centre of
the area of interest until the map zooms to the desired
extent.
Left-click the mouse at the centre of the area of interest
until the map is zoomed out to the desired extent
Sometimes called “dragging” or “panning”, used to view
other areas of the map while staying at the same scale.
Left-click, hold and drag the mouse over the map.
Show where in the province the extent is located. An
image will open in the Left panel
13
LIO Make a Map Manual
Displays information about all the active layers that have
Information – A Visible
Layers
an
(Information icon).
Click on the map at the point of interest to display
information on left side panel.
Get information on a single active layer under the layers
Information – Single Layer
icon beside the layer so that it is
tab by clicking the
enabled ( ). The icon turns black once enabled. Click on
the map of the point of interest to display information on
left side panel.
Measure Distance
If there is No Feature Found at the point selected, check
that the active layer has an enabled Information icon
and that a visible feature has been clicked on the map.
Click the map where the measurement is to begin then
continue clicking when ever there is a change in direction.
Open/Close Drawing Tools
Click to open Drawing Tool Box.
Label a point with a coloured push pin.
Label a Point
Draw a Polygon
Click
, then click the point on the map you want to
label, select the colour and assign a label. Click the Add
Pushpin button.
Polygons are areas bounded by straight sides.
To Draw a polygon: Create a straight line by clicking the
endpoints. Draw this above or below the object to be
enclosed in the area. Expand by clicking clockwise or
counter clockwise around the object of interest. When
satisfied, click OK or Clear to reset. See figure.
Draw a Line
Create a straight line by clicking the endpoints of the line.
Draw a Rectangle.
Click on the map and drag the cursor to the opposite
corner of the desired rectangle.
Erase an Object
Click on the area or line to be erased.
Erase all
Print map to PDF
Email map
Version: 2.0
Issued: March 2010
Click to remove all drawing, highlighting and pushpins
from the map.
Give the map a title. This will appear in the PDF. Choose
the Current Extent, Scale or Specific Scale and click Ok.
For more detailed explanation see the tutorials section.
Give the map a title. This will appear in the PDF. Choose
the Current Extent, Scale or Specific Scale. Include the
recipient, sender and message. Click the Send Email
button.
14
LIO Make a Map Manual
Other Features
Map Scale
The Scale feature allows the user to scale the map to a fixed
resolution centred around the current centre of the map. To
Scale the current view, enter the desired scale and click the Go button.
Map Tool in Use
The Map Tool displays the feature that is currently selected.
Map Centre
The centre of the extent in Longitude/Latitude
coordinates. This information is located in the bottom
right corner of the screen.
Version: 2.0
Issued: March 2010
15
LIO Make a Map Manual
Tutorials: How to Make a Map
Making a Basic Map
1. Zoom to area of interest by using the zoom in tool
, or search for a specific feature by its
geographic name. You can zoom in by either double clicking on where the center of the map
should be or by drawing a box around the area of interest.
2. Select the layers that will appear on the map. Layers that are greyed out are not
available at the current map scale. Zoom in further to unlock layers and turn them on/off.
Version: 2.0
Issued: March 2010
16
LIO Make a Map Manual
3. Click Refresh Map.
4. Review your Legend.
Version: 2.0
Issued: March 2010
17
LIO Make a Map Manual
Making a Map of Trails
1. Zoom to the area of interest.
2. Turn on the Trail Head and Trail layers under Constructed Features > Trails. Turn on the
information icon for Trail Head. Click Refresh Map.
Version: 2.0
Issued: March 2010
18
LIO Make a Map Manual
3. Select the Information – Single Layer tool.
4. Click on the trail head (check the legend) of interest and review the information displayed in
the right side panel.
Version: 2.0
Issued: March 2010
19
LIO Make a Map Manual
5. To highlight the trail segment, click the Highlight Associated Trails button.
6. Repeat clicking next trail head to continue highlighting the trail.
Version: 2.0
Issued: March 2010
20
LIO Make a Map Manual
Measure Distance
1. Create map.
2. Select the Measure Distance tool. Click on the map where you would like to start
measuring, continue click when the measured path needs to change direction
Version: 2.0
Issued: March 2010
21
LIO Make a Map Manual
Marking up a Map
1. Create a map that you want to mark up.
2. Click on the tool box icon.
3. Select the pushpin icon and click on the map at the location to mark.
4. To draw a polygon, select the Draw Area tool. Begin by drawing a line by clicking the start
and end points. Continue clicking in a continuous direction until an area is drawn. Click OK.
Version: 2.0
Issued: March 2010
22
LIO Make a Map Manual
Version: 2.0
Issued: March 2010
23
LIO Make a Map Manual
5. The area will be shaded.
6. To remove the object click the remove Erase Object icon and click somewhere in the
shaded area
Printing/Emailing a Map
1. Make a map that you want to share.
2. Click the Print to PDF icon.
3. Give the map a title and chose how you will display the image.
Current Extent: Prints the current extent on an 8.5x11 sheet of paper. To accommodate
this request, the scale will automatically change.
Current Scale: Prints what will fit on an 8.5x11 in sheet of paper according to the current
scale.
Specific Scale: User defines the scale of the map for printing.
4. Click Create Map
Version: 2.0
Issued: March 2010
24
LIO Make a Map Manual
5. Click the link with the title that you gave to your map. A PDF document will open from
which you can save or print the map.
6. To email a map, click the Email Map icon, give the map a title and how the image should be
displayed. Include the recipient and sender email and a message. Click the Send Email
button.
Version: 2.0
Issued: March 2010
25


© Copyright 2026