
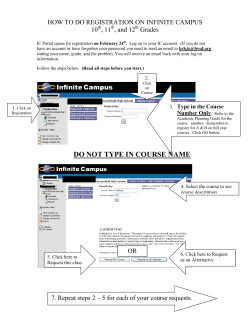
HOW TO SET UP A PORTAPORTAL.COM ONLINE BOOKMARK SITE www.portaportal.com
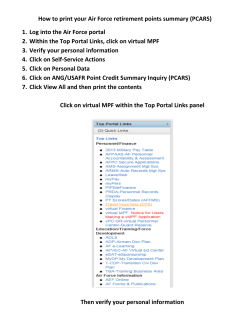
HOW TO SET UP A PORTAPORTAL.COM ONLINE BOOKMARK SITE
www.portaportal.com
Prepared by Carla Huck, January 2009
This is an example of a completed teacher portaportal:
http://guest.portaportal.com/kbongiorno
Today we are going to build our own portaportals. To get started, select “Click here to
begin” and you will be prompted to enter your name, id, password, and e-mail address.
That will bring you to this screen:
Check your e-mail inbox for the message from portaportal, confirming your id and
password. Save this! Next, click on the confirmation link, which will bring you to this
screen:
Click on preferences
in the upper right hand corner, and you will have some more
options in configuring your portaportal. I made mine printer-friendly, and I am allowing
guests to view it. Guests can never make any edits to this page. You can choose to let
them view your e-mail address or not. Send them to guest.portaportal.com and they will
need your user id to log in. Mine is cbhuck. If you click “reordering mode is on” then you
will see additional features while editing your portal which allow you to move your
categories around and alphabetize the links within. You can always go back and
change these settings at any time. Once you have made changes, click the “change
user preferences” option at the bottom of the screen.
2
Next we will start building our portal by adding categories
I typed in three category names and now I have this screen:
3
(NOTE: an ad-free portal costs $15.00/year. The large ads you see get pushed to the
bottom of the screen as you add more content to your portal, so it’s not TOO distracting;
however it would be lovely to have no ads!)
Click the
image to add a folder within this category, the
image to edit links, or
the
to add sites. I’ll add a few in Interactive Sites, then click “ADD LINKS” at the
bottom of the page:
4
You can add five at a time, save, then go back to adding more. There is no limit to the
number of links you can add. Now you see the links listed:
5
You can keep your portal open while you are surfing, and use the Q (Quick link) option
in the upper right corner to type in URL’s that you will return to later to annotate and
organize:
6
Here is a description of all the buttons in the upper right hand corner:
1
This button brings up the "QuickLink" window. Use it to add many links quickly,
or leave it open as you surf the web and add interesting websites you come
across.
2
Use this button to alphabetize your categories.
3
Clicking on this brings you to a new screen which lets you add categories. This
is the first thing you will do after creating your portal. There is no limit to the
number of categories you can have.
4
You will use the logout button when you are finished working on your portal.
This secures your site so it will be inaccessible until the password is entered
again.
5
This button brings to you the advanced functions page. Once you are
comfortable using portaportal, you have options to import bookmarks, clone
your page, test the links, export your portal, or delete it altogether.
6
This button is what brings you to the online tutorial. Use it whenever you are not
sure how to get portaportal to behave the way you want. It is very clear.
7
Clicking on this brings you to a screen which lets you remove categories. Be
careful with this command, as there is no “undo” function. All bookmarks inside
a deleted category will be lost.
8
Use this link to access your personal preferences page. It controls options
available in the presentation of your portal like color, layout, and guest settings.
New options are being added all the time too.
7


© Copyright 2026